Overview
Hightouch integrates with identity providers like Okta and Microsoft Entra ID to simplify user management and authentication.
- SAML SSO enables users to authenticate through their organization’s identity provider, supporting just-in-time (JIT) provisioning during login.
- SCIM automates user management tasks such as group assignments and deactivations based on changes in the identity provider.
Required permissions
To configure these integrations, you'll need the following:
- Admin access to your company's identity provider, which is typically managed by your IT team.
- User membership in the Organization admins group within your Hightouch organization.
Identity model and trust boundaries
- SSO is configured at the organization level in Hightouch. This means all workspaces in that organization inherit the same SAML trust and access model.
- Hightouch supports one SAML IdP trust per organization at a time. Updating IdP metadata (like issuer, certificate, or IdP SSO URL) updates that trust for the entire organization.
Configuring SAML SSO
SAML single sign-on (SSO) enables just-in-time (JIT) provisioning so that Hightouch users are automatically created upon first login. Once SSO is set up, users in your organization can navigate to the Hightouch login page and select Log in with SSO to authenticate with your identity provider.
When a user attempts to log in, Hightouch sends a SAML authentication request to your identity provider. If the identity provider validates the user’s credentials and confirms that the user is authorized to access Hightouch, the user is logged in. For first-time users, an account is automatically provisioned based on the information returned from the identity provider, such as name and email address. SSO also ensures that user attributes (like email addresses) are updated during login when changes are detected.
Configuration steps for SAML SSO may vary depending on the identity provider used. Below are detailed instructions for setting up SAML with Okta and Microsoft Entra ID (formerly known as Azure Active Directory). For other identity providers, similar configuration will apply.
For an overview of SSO and SAML concepts, refer to this introductory video.
Keep your SAML NameID stable over time, especially during IdP migrations or
tenant changes. If the NameID format or source value changes (for example,
from email to an employee ID or UUID), users may be created as duplicate
identities in Hightouch.
Okta
The first step is to create a new SAML application in Okta. You can follow this guide or the steps outlined below:
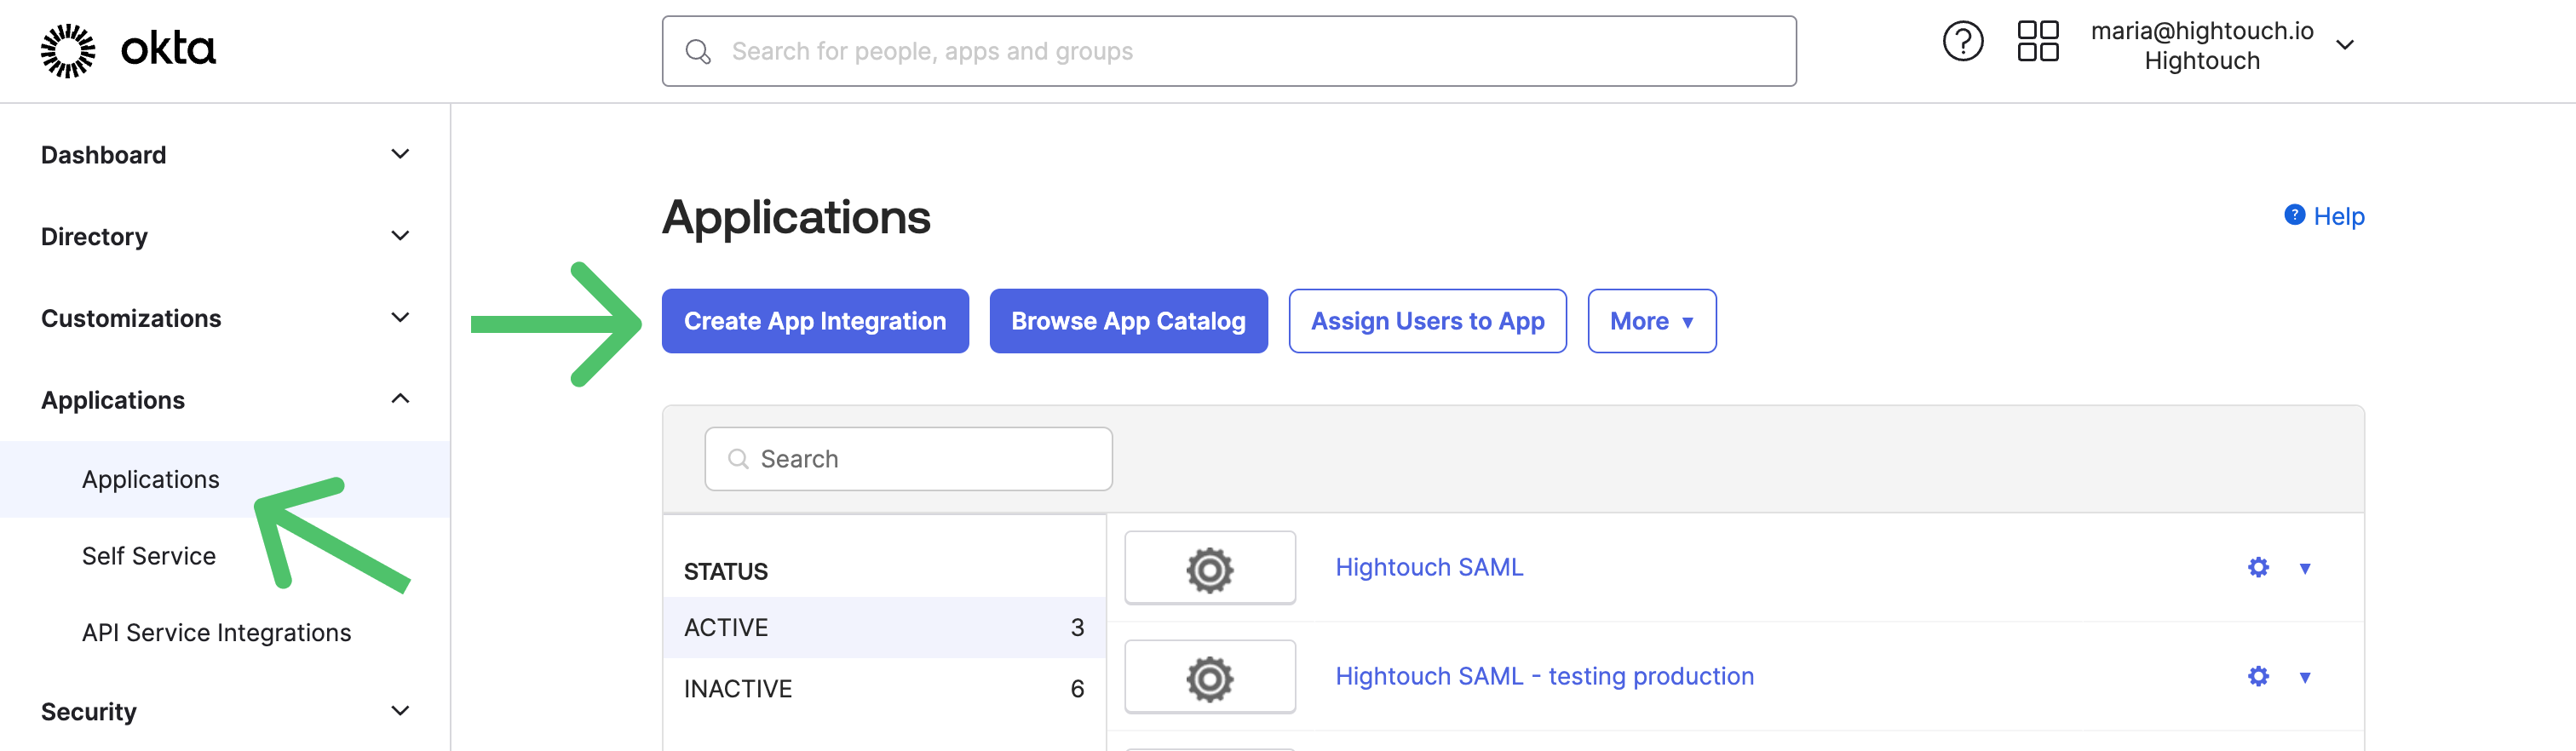
- In your Okta dashboard, navigate to Applications and select Create App Integration.
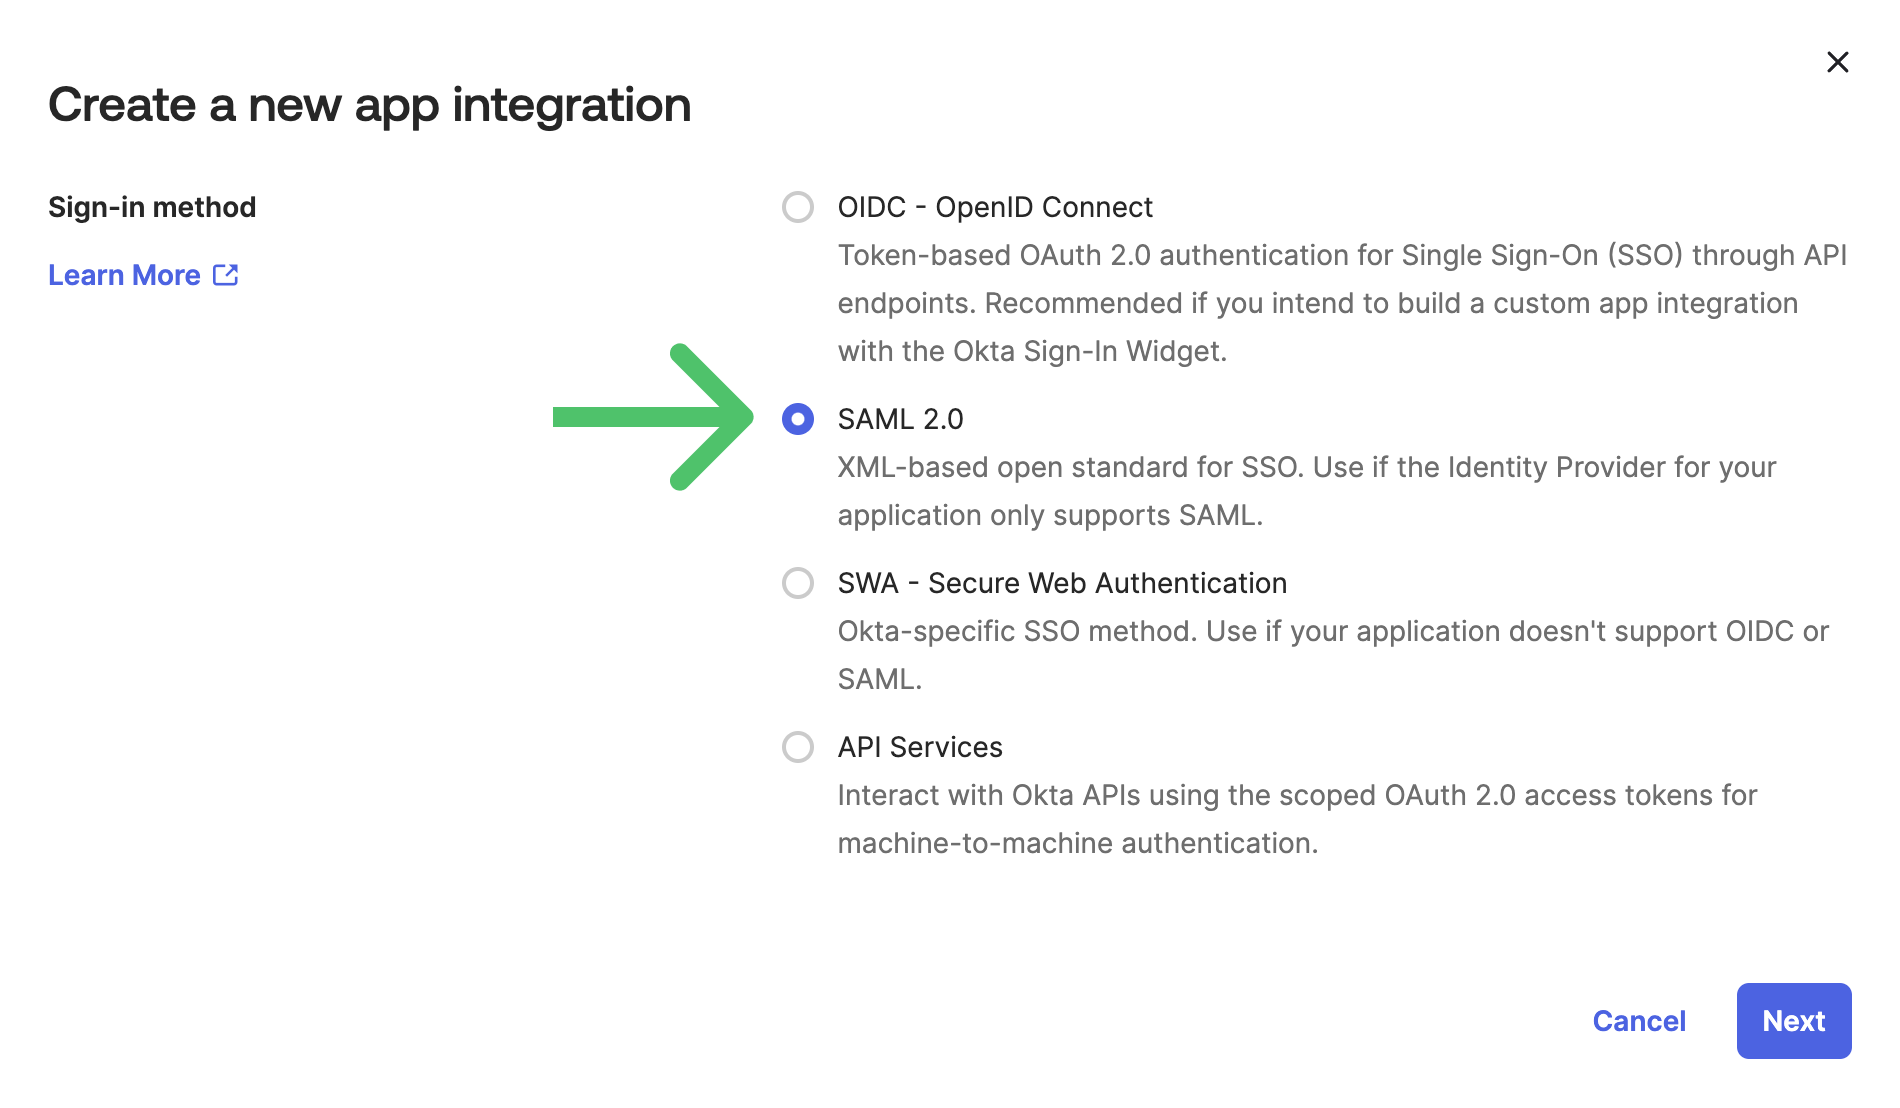
- Choose SAML 2.0 as the sign-in method and click Next.
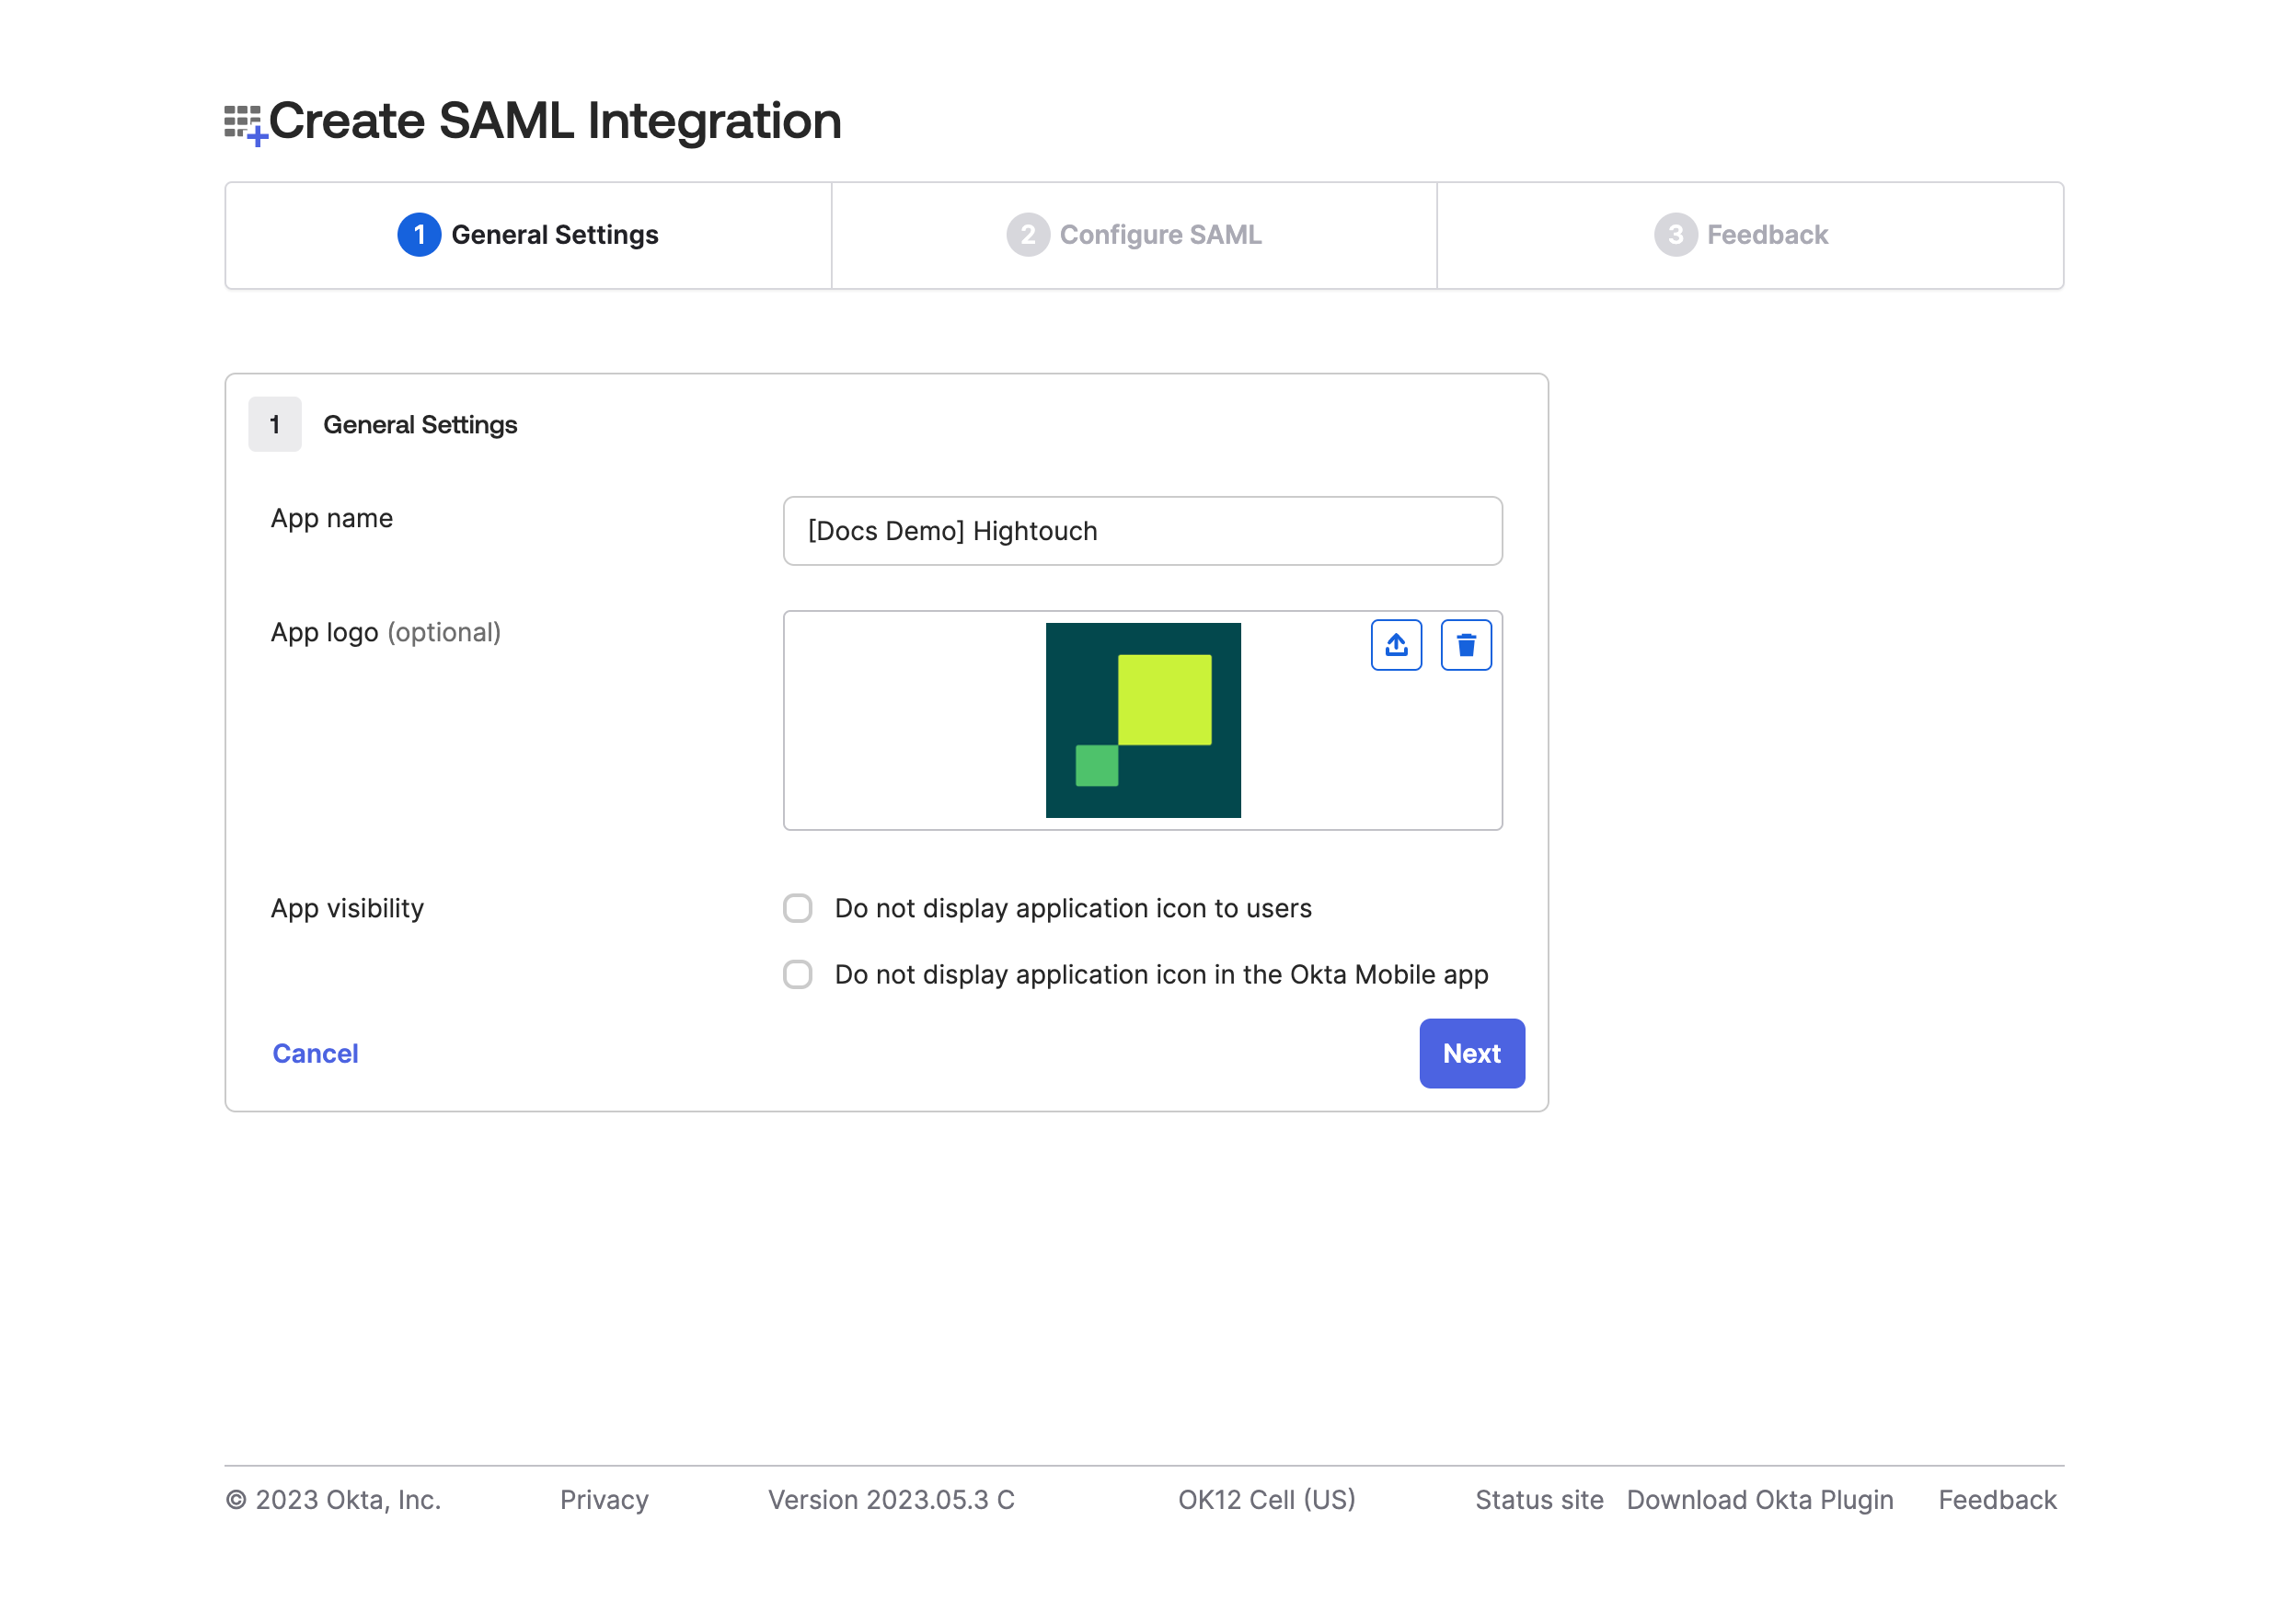
- Give the application a descriptive App Name, such as "Hightouch." You can also add the Hightouch logo if you'd like. Then, click Next.
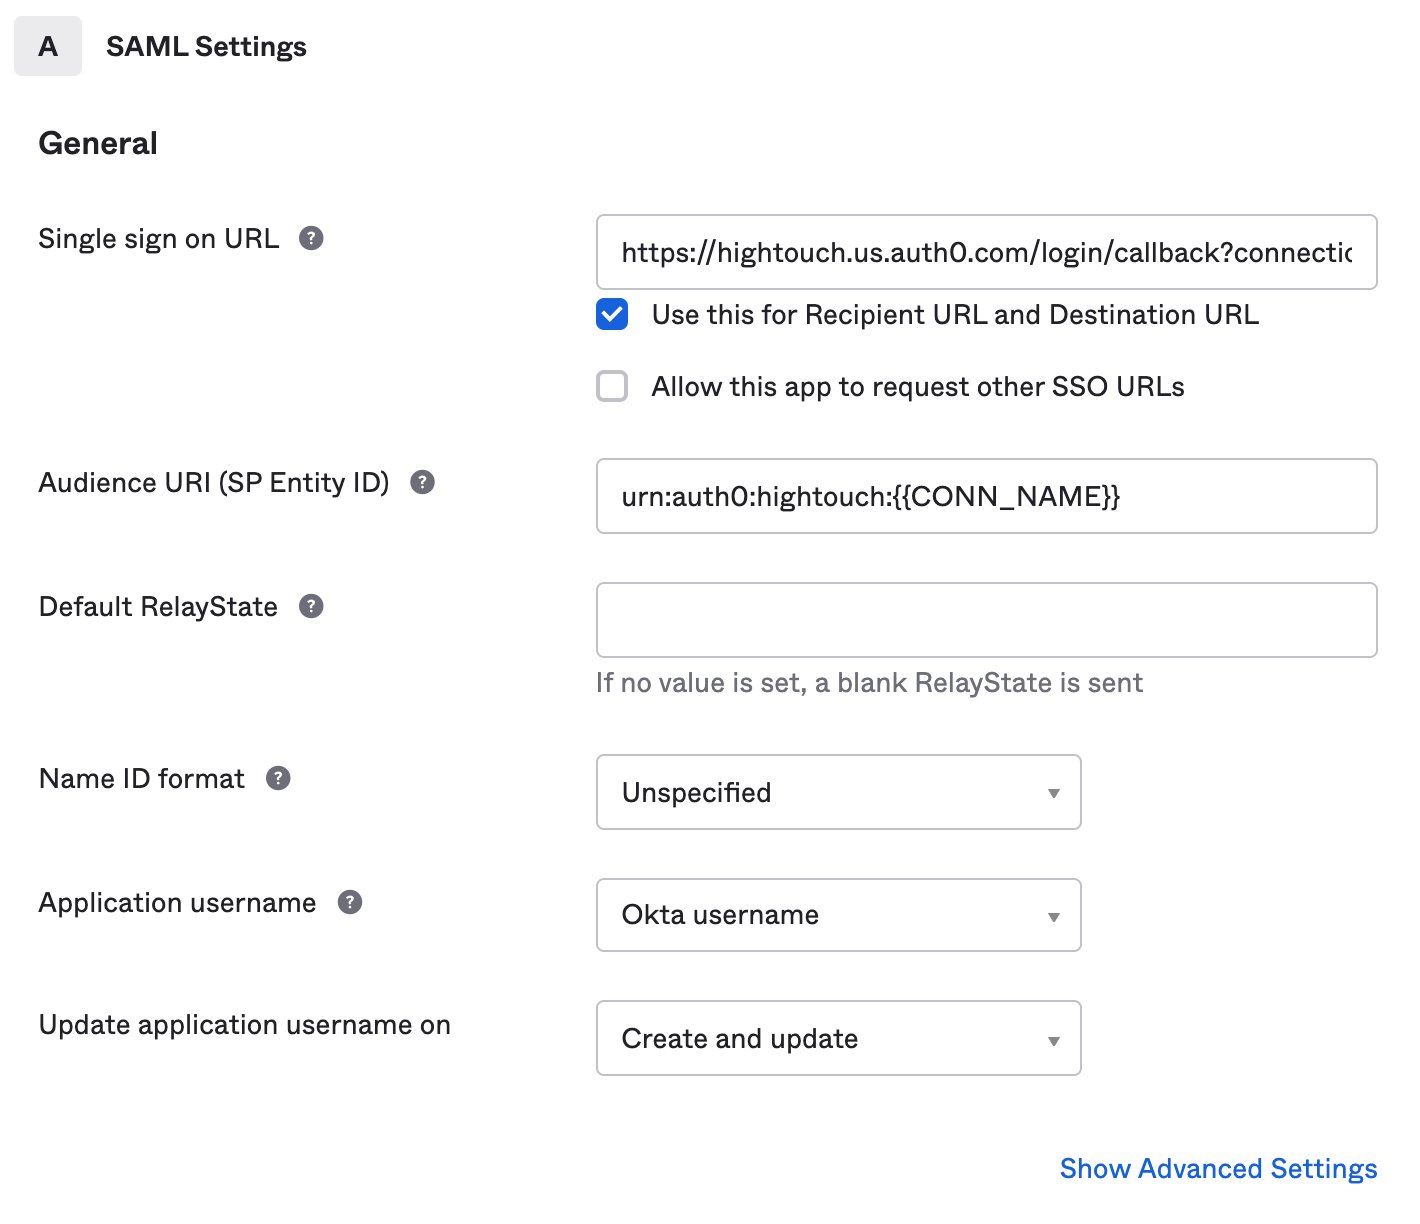
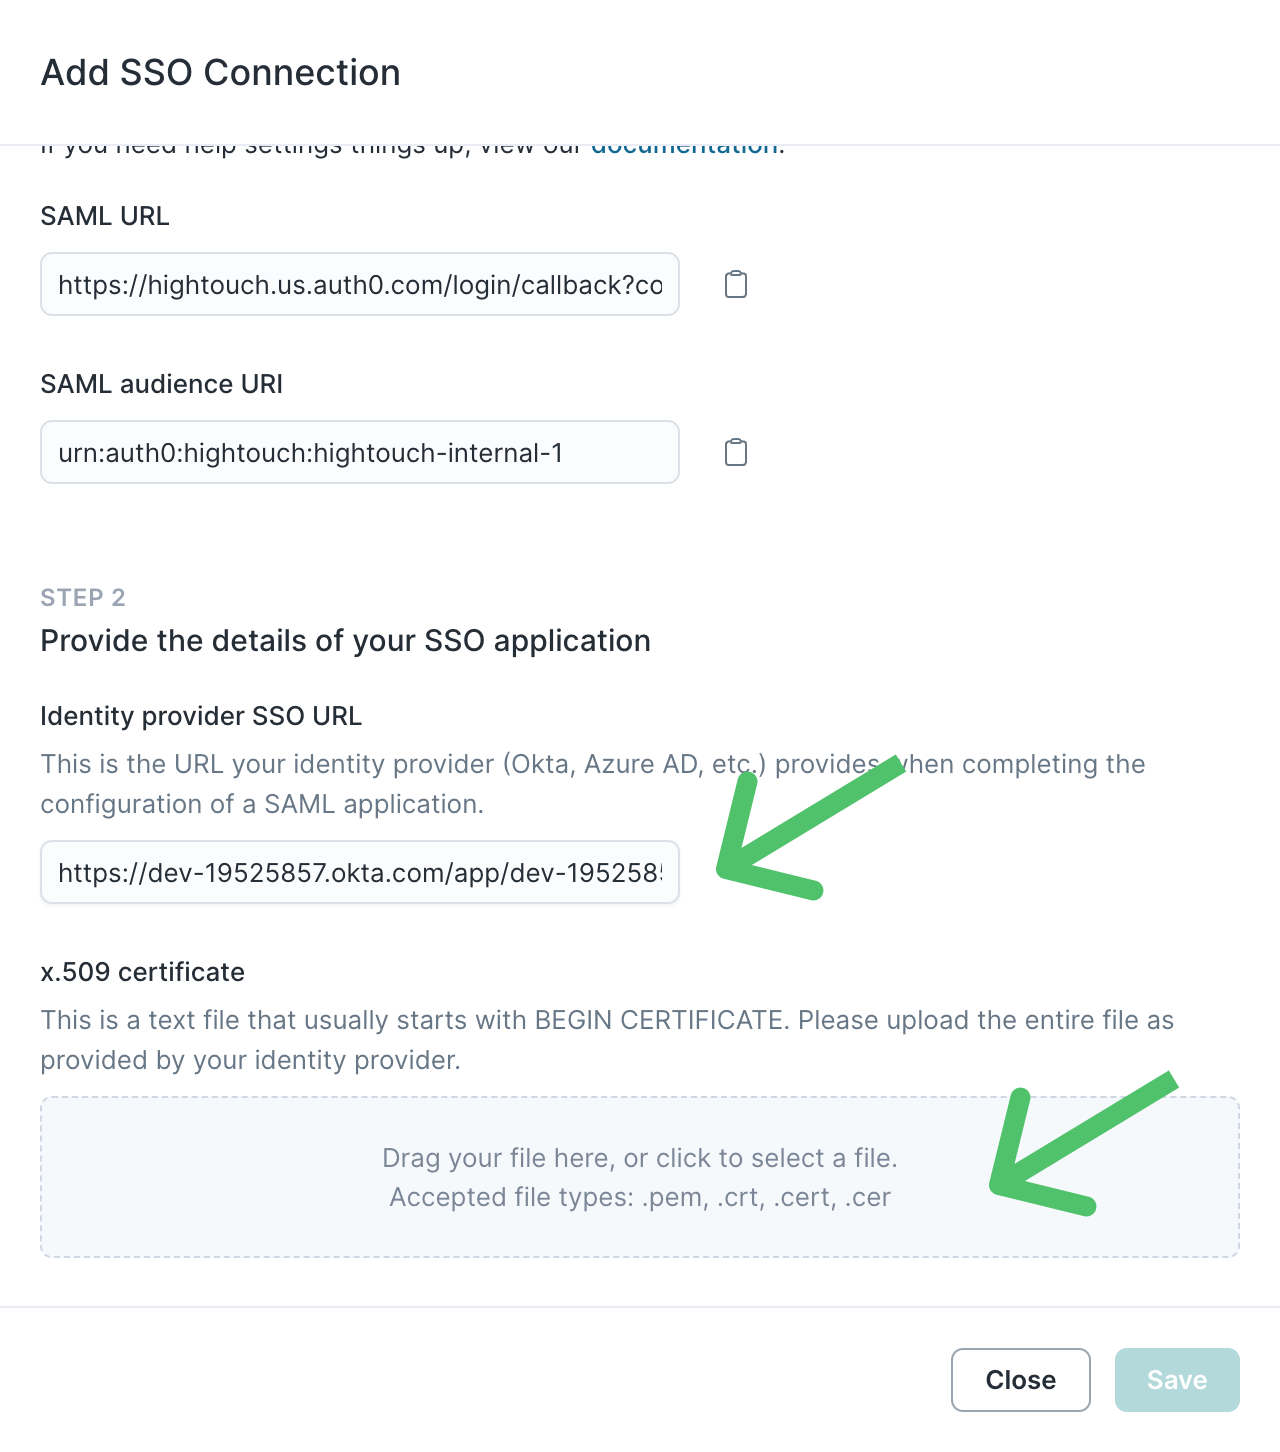
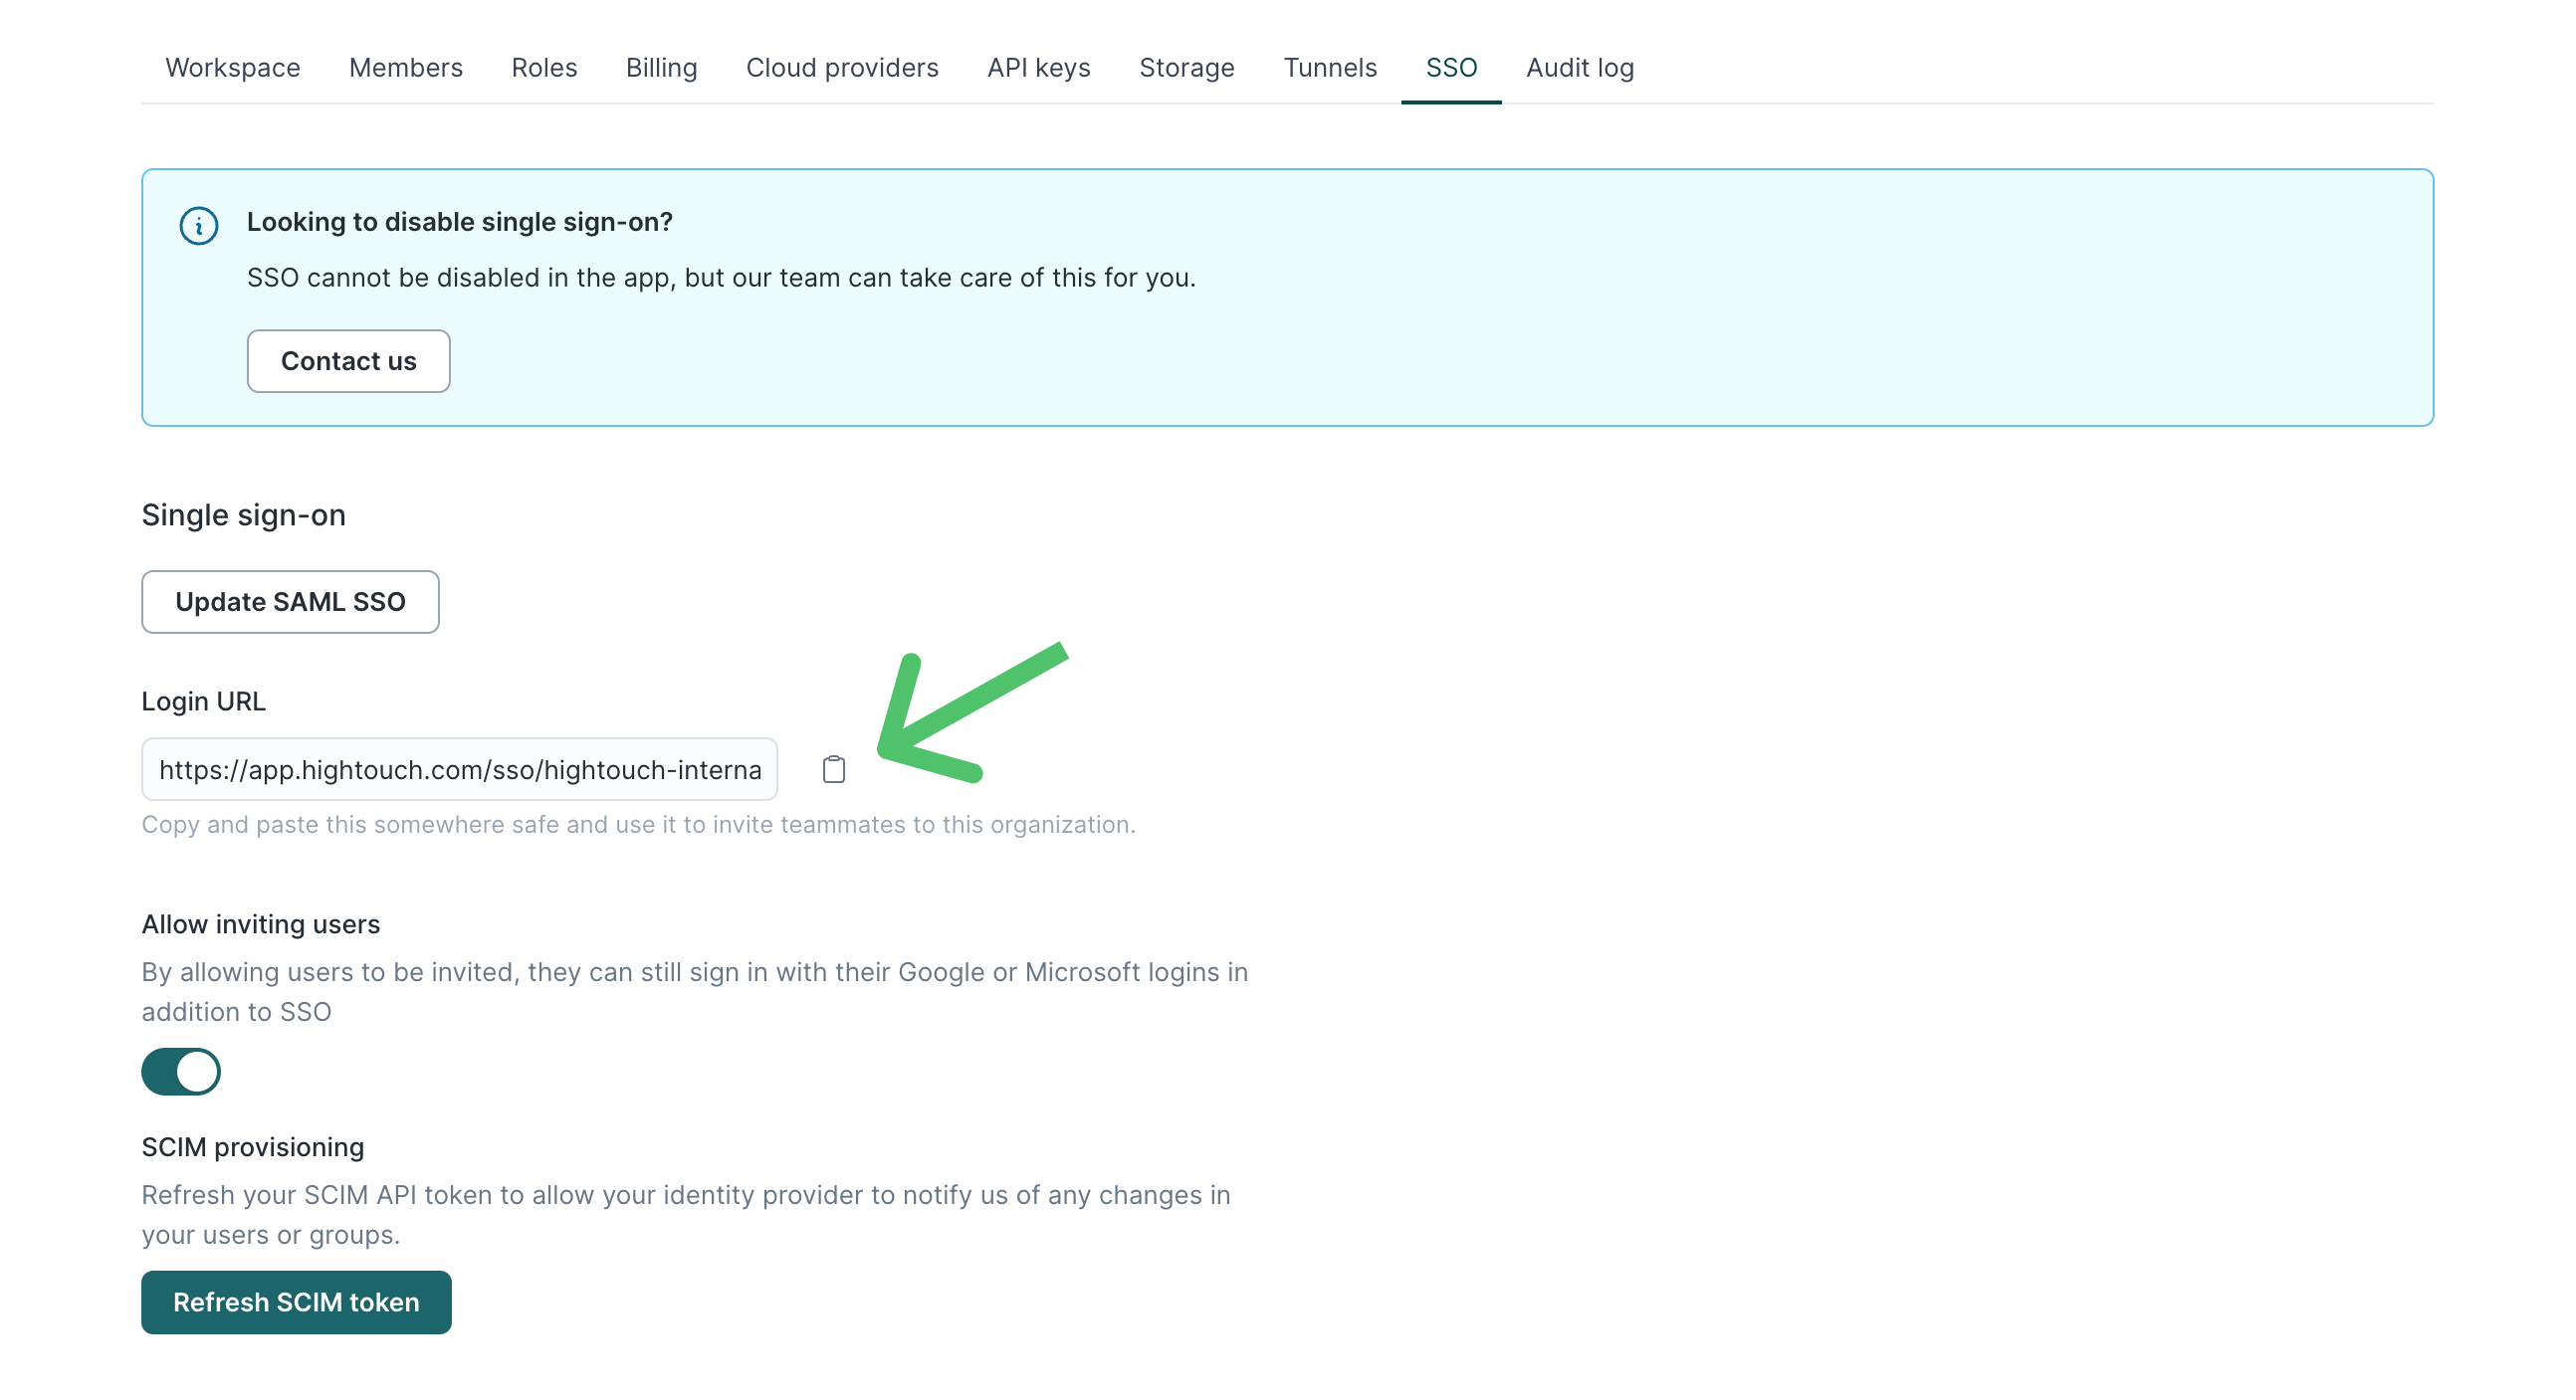
- In Hightouch, visit the Single sign-on tab on the Organization settings page. Click Configure SAML SSO to display a modal that provides the Hightouch SSO URL and Audience URI.
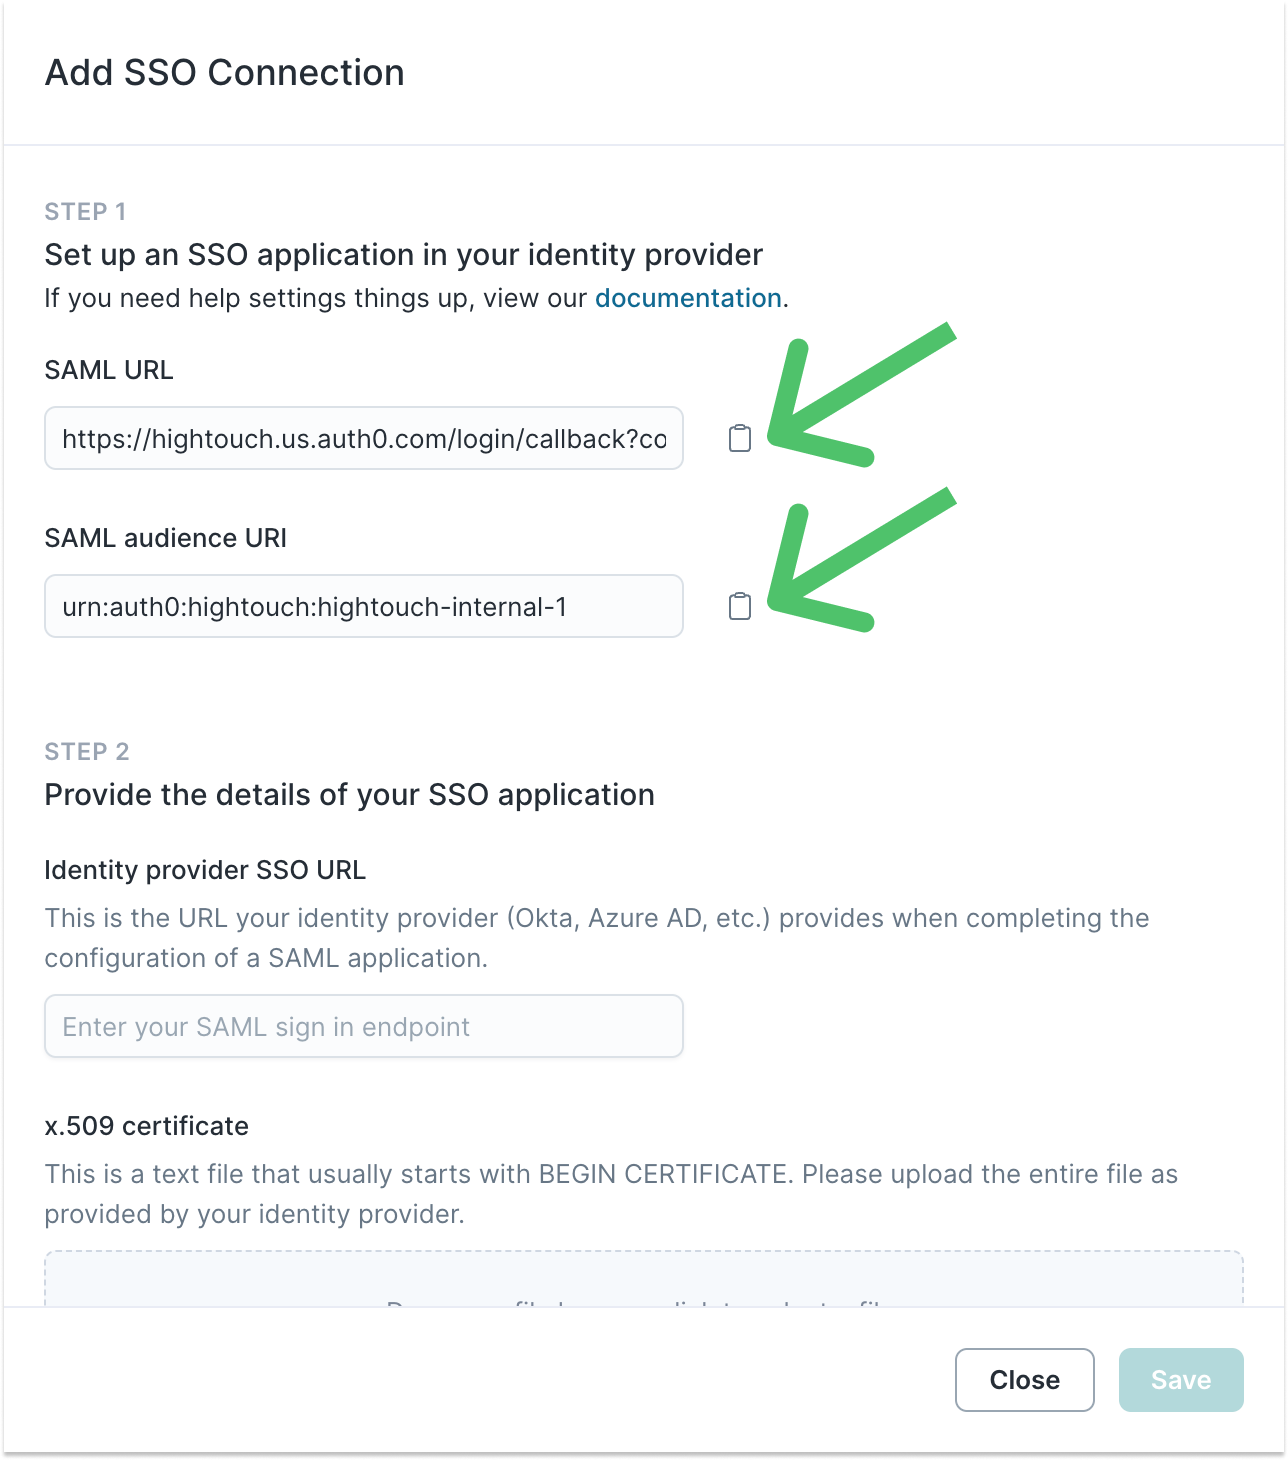
- In Okta, configure the SAML settings by entering the Hightouch SSO URL from the Hightouch modal as the Single sign on URL, and the Audience URI as the Audience URI (SP Entity ID). You can leave the remaining fields at their default settings.
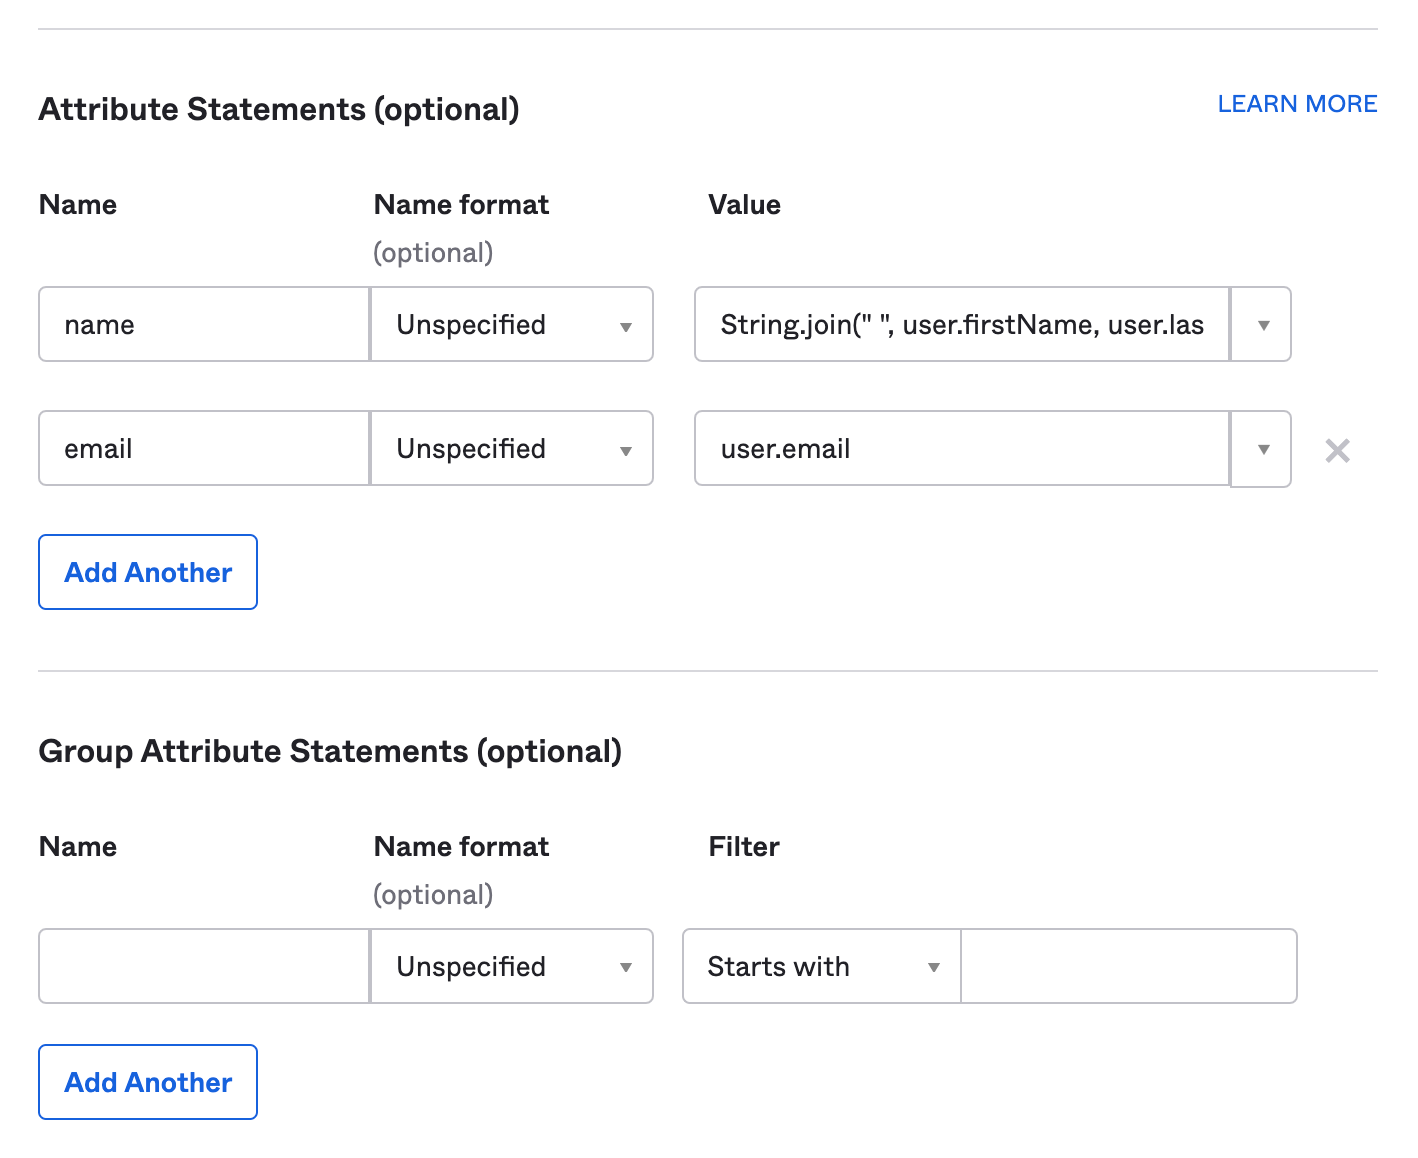
- Under Attribute Statements, map the
nameandemailattributes. For instance, you might mapnameusingString.join(" ", user.firstName, user.lastName)andemailasuser.email. Ensure that these match the properties defined in your Okta instance. You can refer to the Okta user profile properties if needed. Click Next to continue.
-
For the prompt Help Okta Support understand how you configured this application, select I'm an Okta customer adding an internal app. Click Finish.
-
Then, you’ll be taken to the application overview page in Okta. Under Metadata details, click More details, then copy the Sign on URL and download the Signing Certificate. These will be needed for Hightouch.
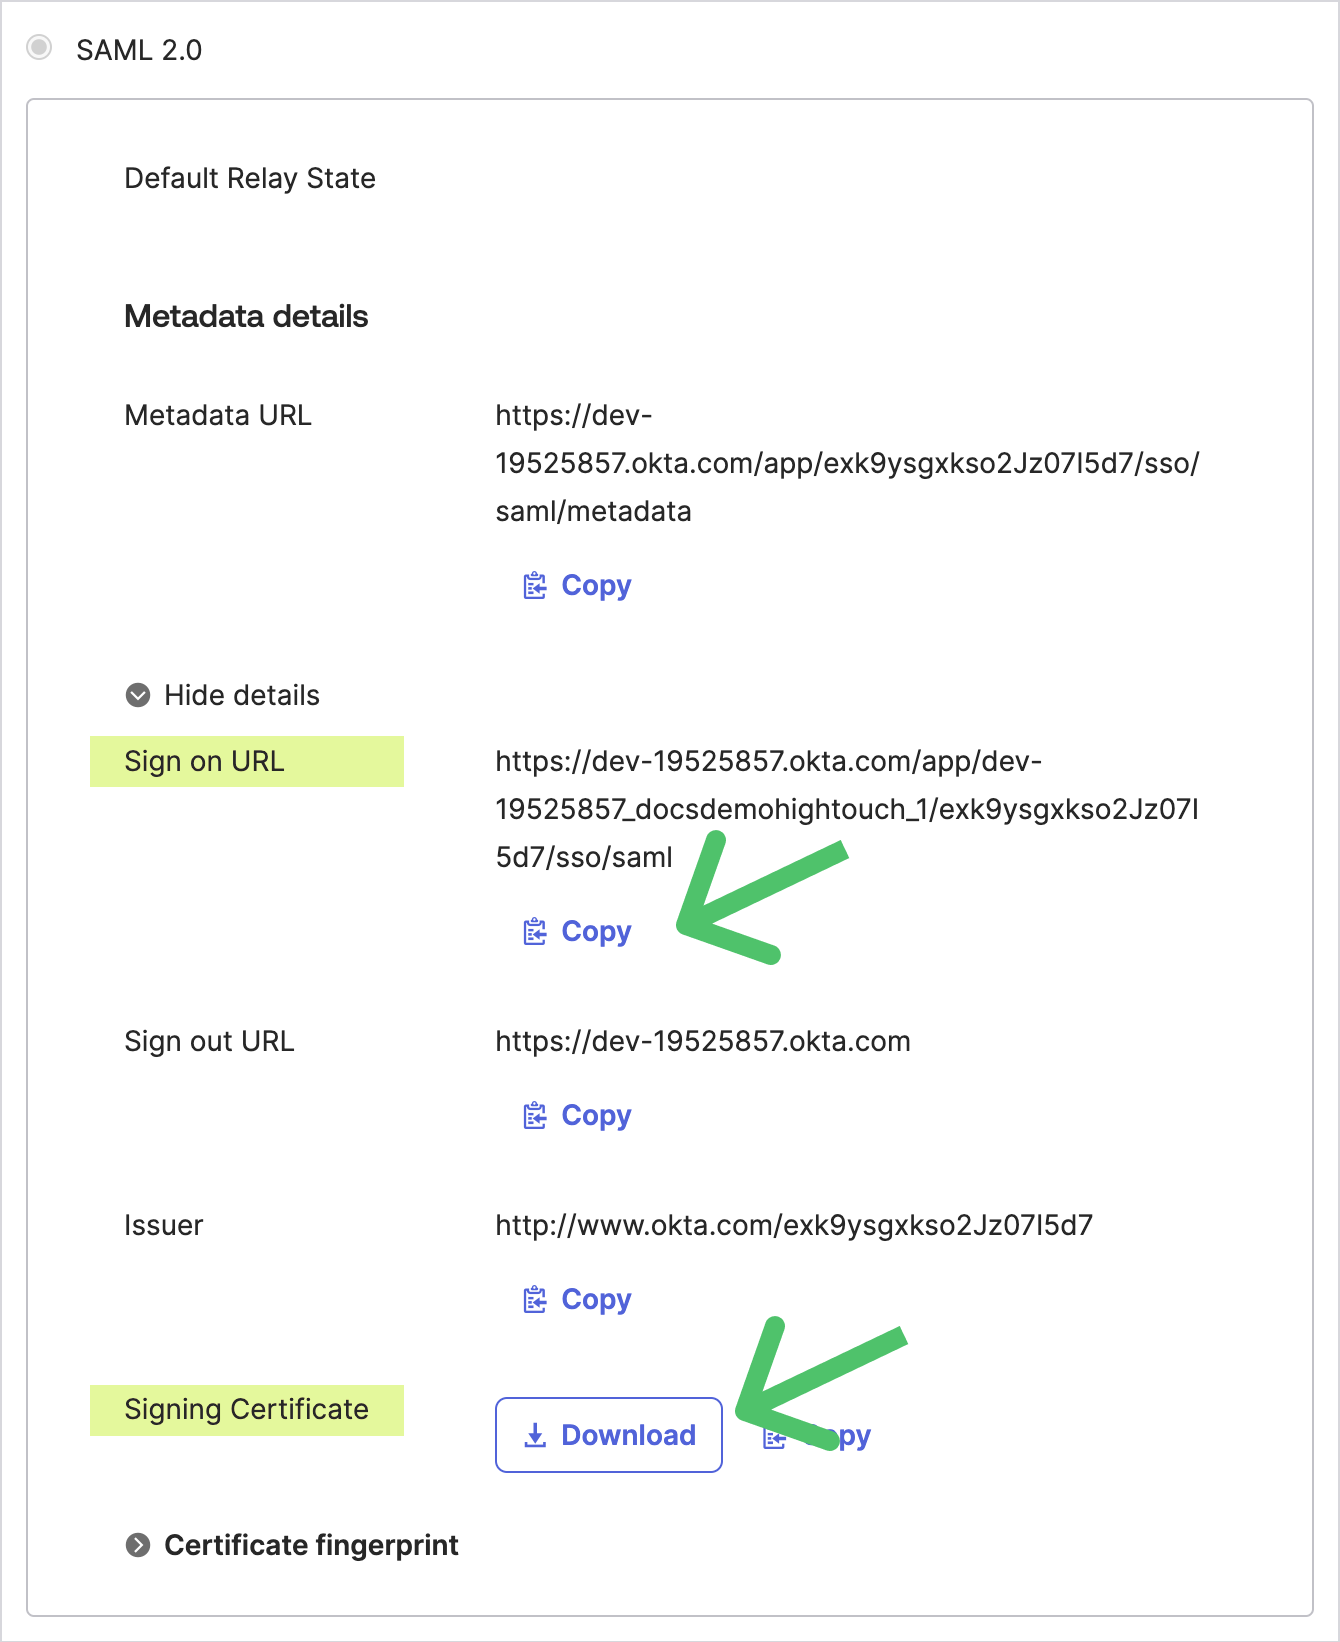
- In the Hightouch modal from step 4, paste the Identity provider SSO URL and upload the certificate. Click Save to finalize the connection.
- In Okta, go to the Assignments tab of the application you just created. Assign users or groups to grant them access to Hightouch.
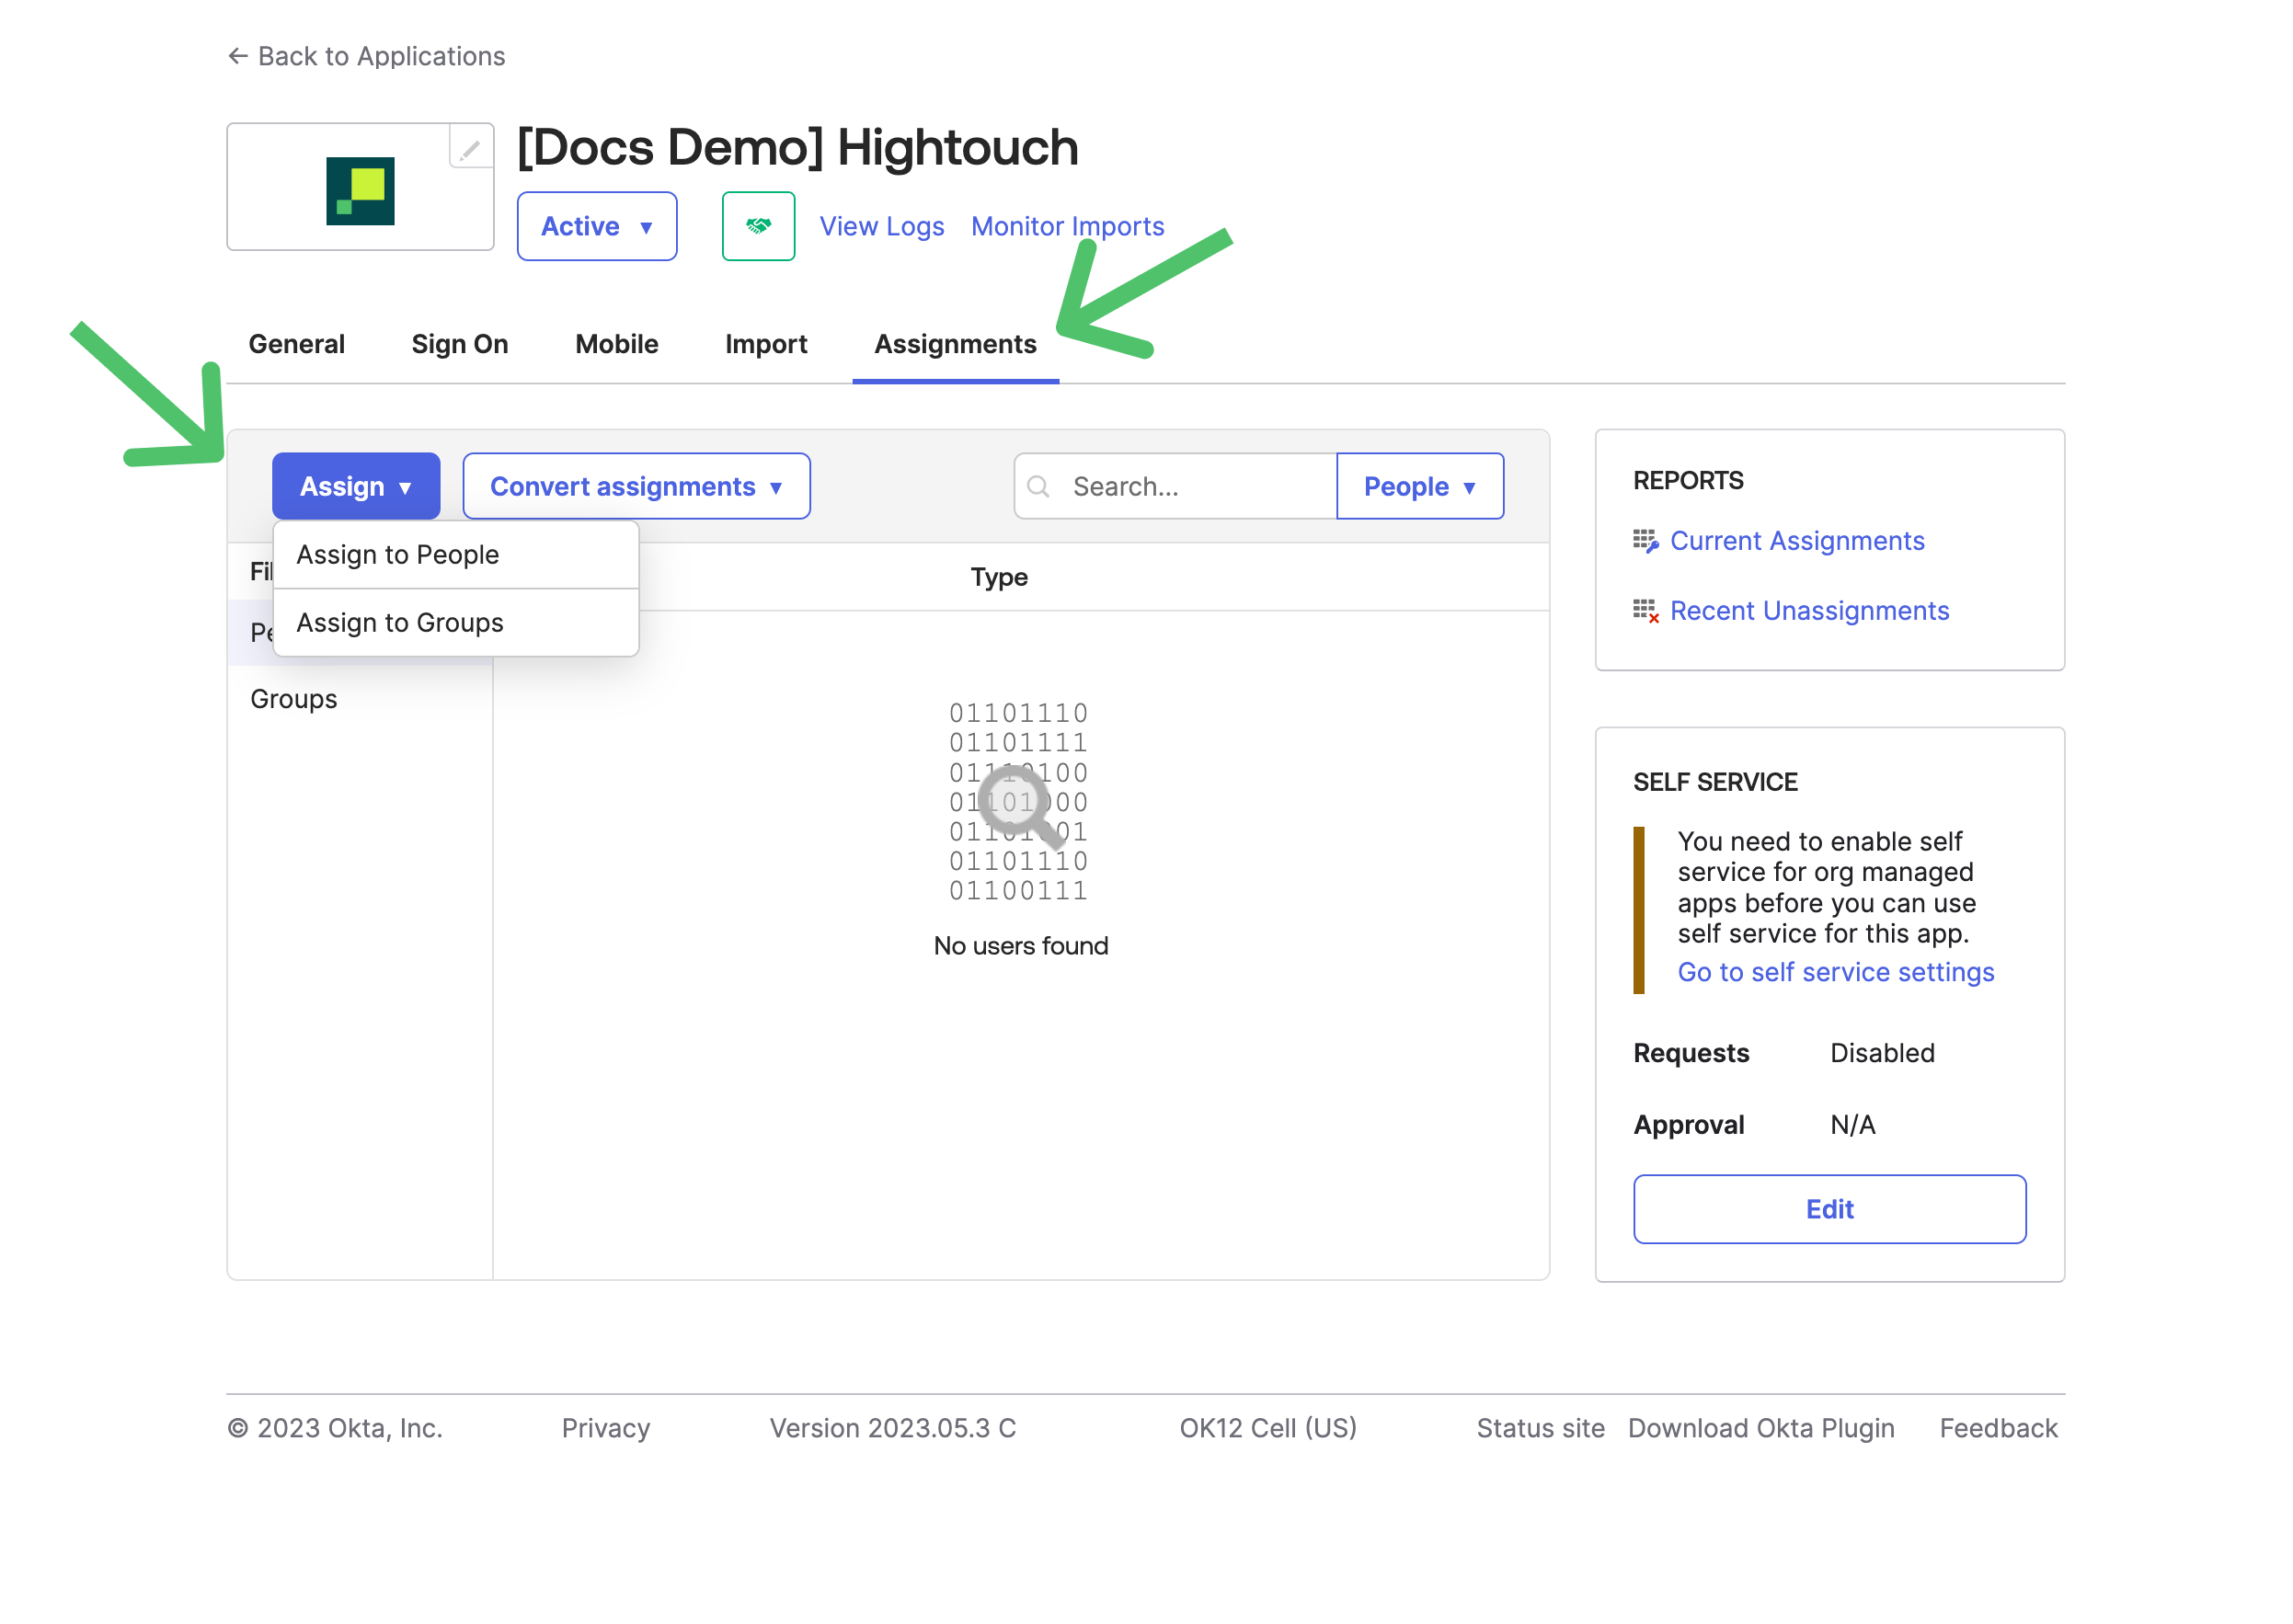
- At this point, you've completed the basic SAML SSO setup, allowing your users to log in to Hightouch through Okta. However, you'll still need to manually assign permissions for each user after they join your Hightouch organization. To streamline this process, we highly recommend setting up automatic group assignments in Okta. This ensures users have the right access to workspaces and resources as soon as they log in for the first time.
If SSO group mappings are not configured, new users won't be automatically assigned to any group, which may result in limited access until group assignments are manually set up.
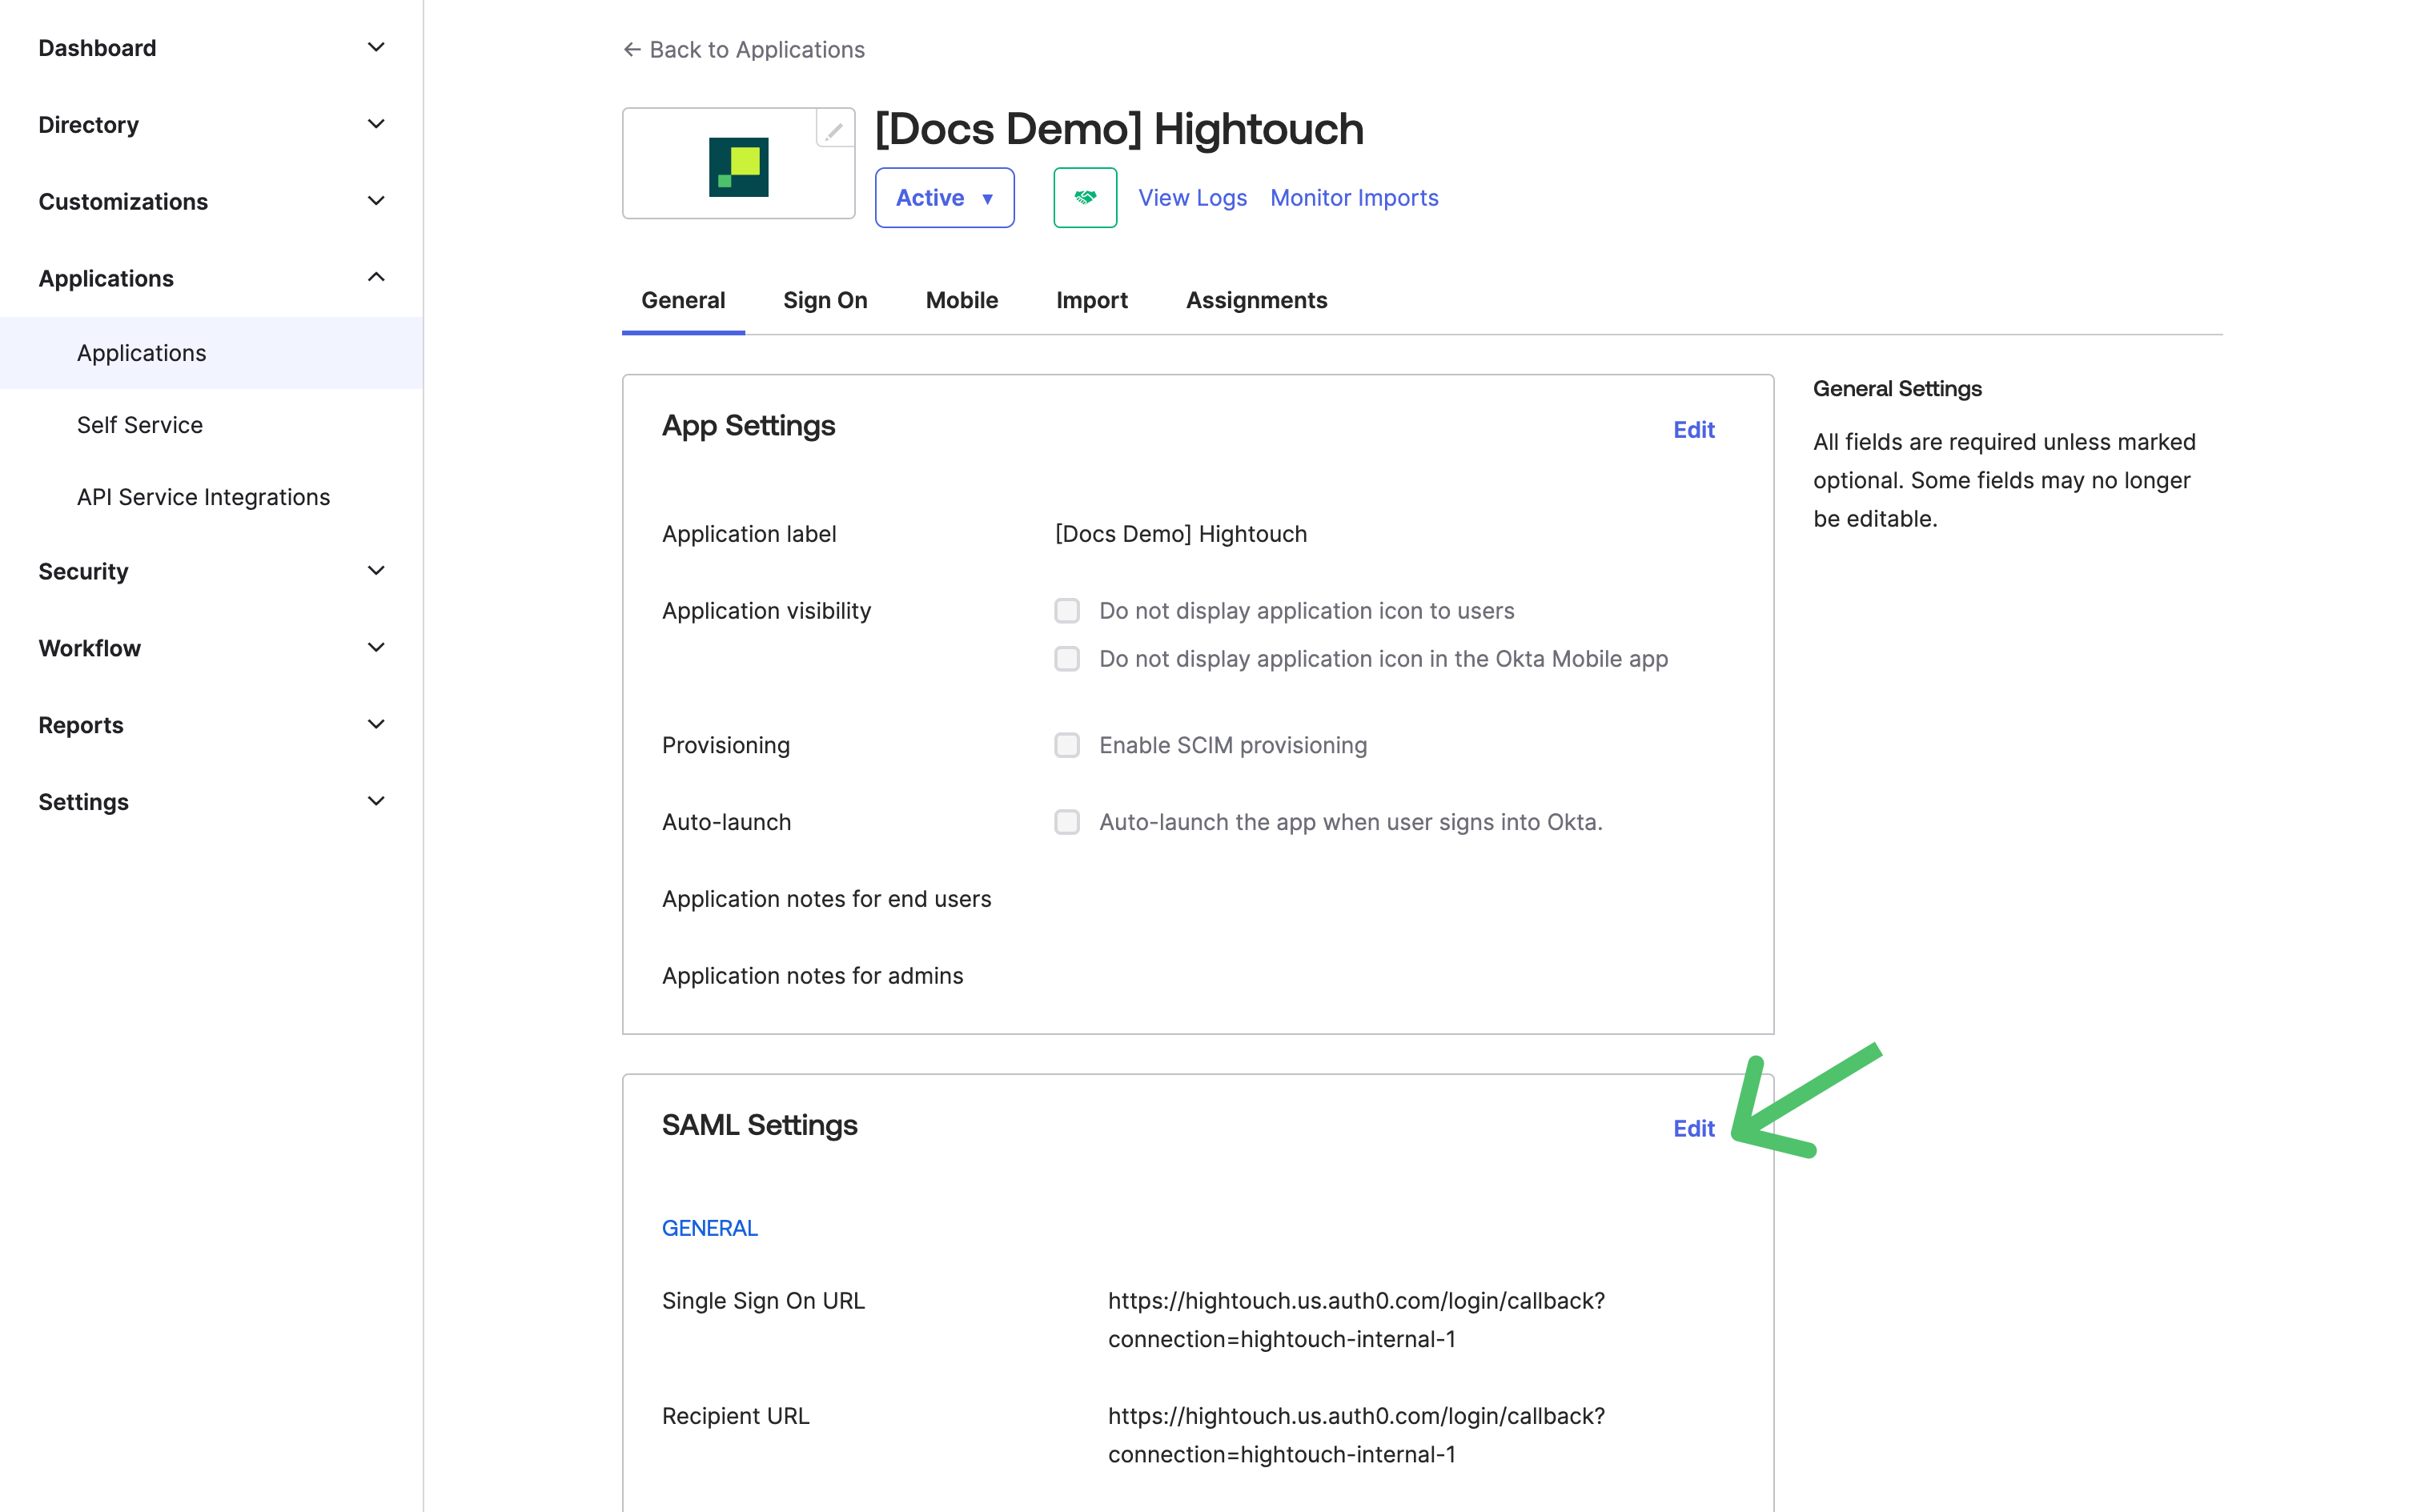
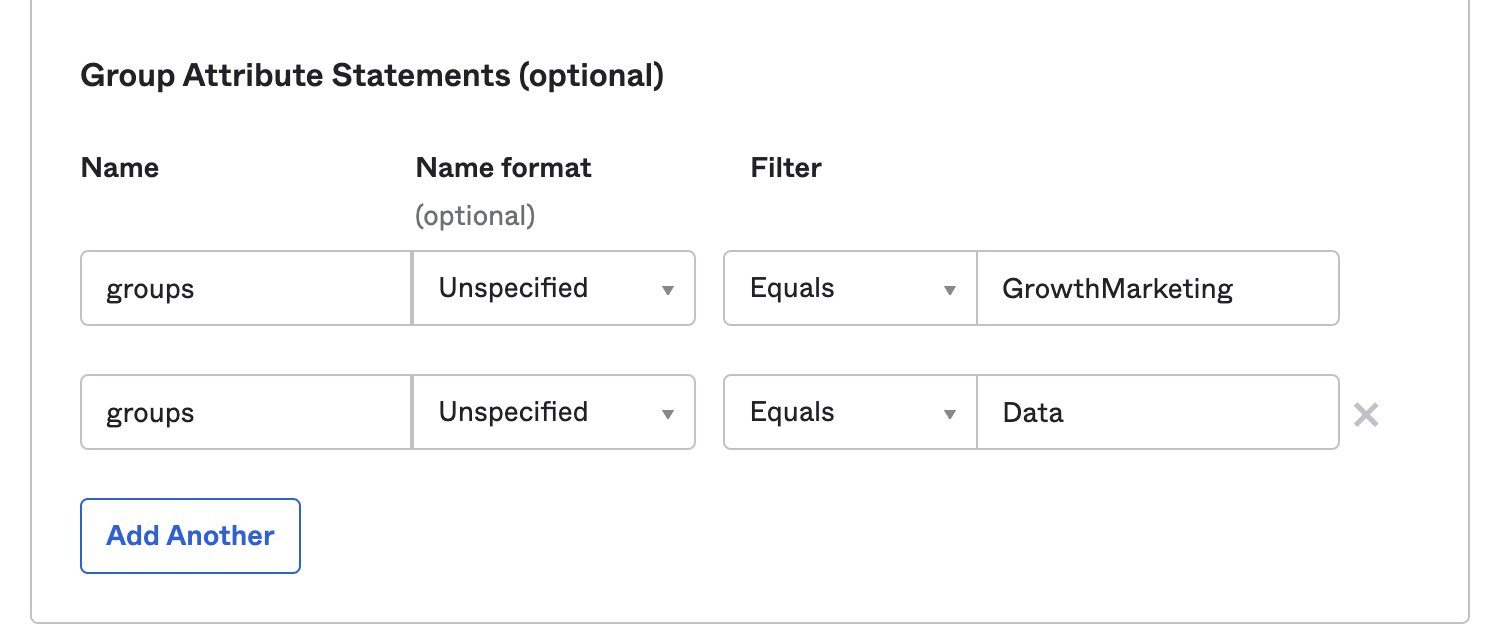
- To configure group mappings, navigate to the General tab for your Hightouch application in Okta and click the Edit button in the SAML Settings section.
- Scroll down to the Group Attribute Statements section. Set the attribute name to
groupsand apply the appropriate filter. For instance, to make all Okta groups available in Hightouch, select the Matches regex filter and enter.*.
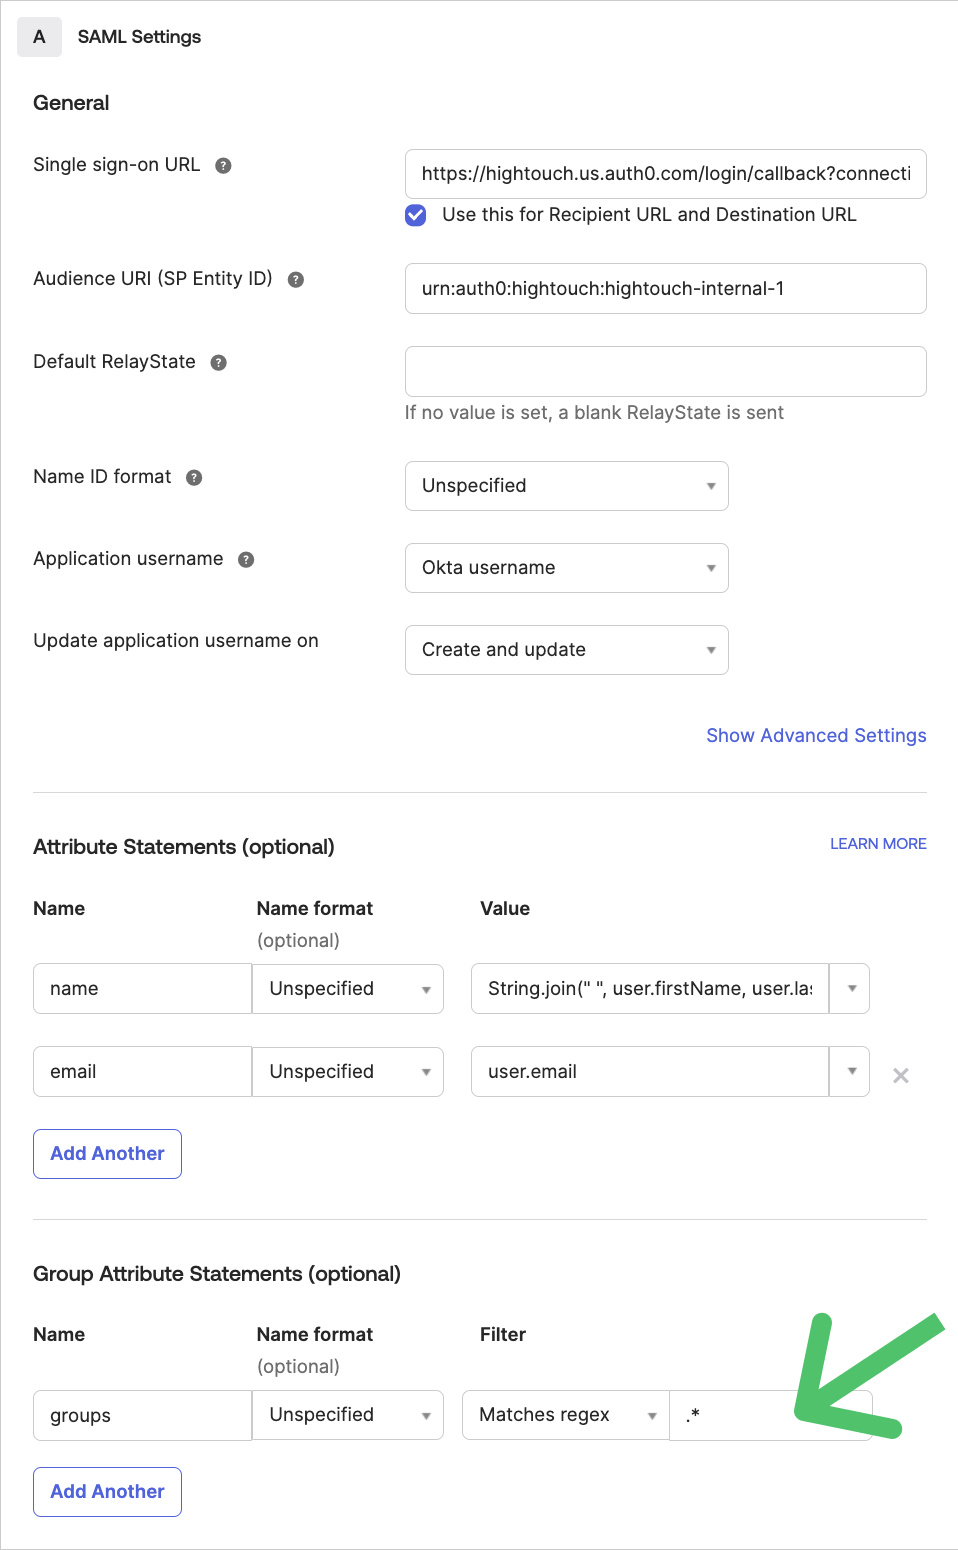
If you want to send only specific groups, you can either map them individually or use a filter like Starts with Hightouch.
-
Next, you'll want to go back to Hightouch and create mappings between the groups from your identity provider and the corresponding user groups in Hightouch. Navigate to Organization settings and click on the Single sign-on tab.
-
Scroll to the bottom section called Group mappings. In this table, each group from your identity provider can be mapped to any number of user groups in Hightouch. (Users can belong to multiple groups, and when they do, they inherit the combined access from all of their assigned groups.)
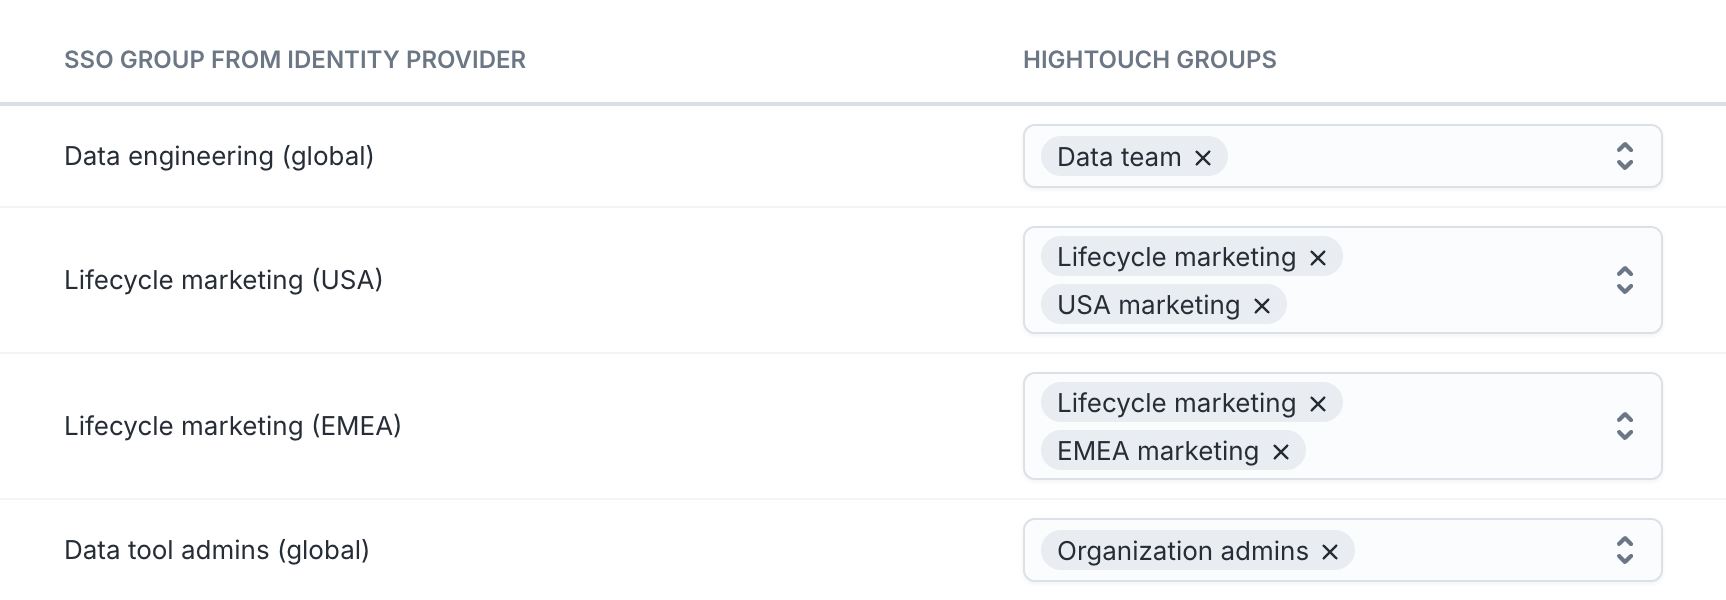
Group assignments are refreshed only when a user logs in. This means that new SSO groups will not appear for mapping until after a member belonging to that group has logged into Hightouch. If you need to synchronize users and groups without requiring login, consider enabling SCIM.
- All done! Members of your organization can access Hightouch by selecting Log in with SSO. You can also share your workspace's direct Hightouch login URL, which is available in the Single sign-on tab on the Organization settings page.
Microsoft Entra ID
- In the Microsoft Entra admin center, go to the Enterprise applications screen and select New application, then click Create your own application.
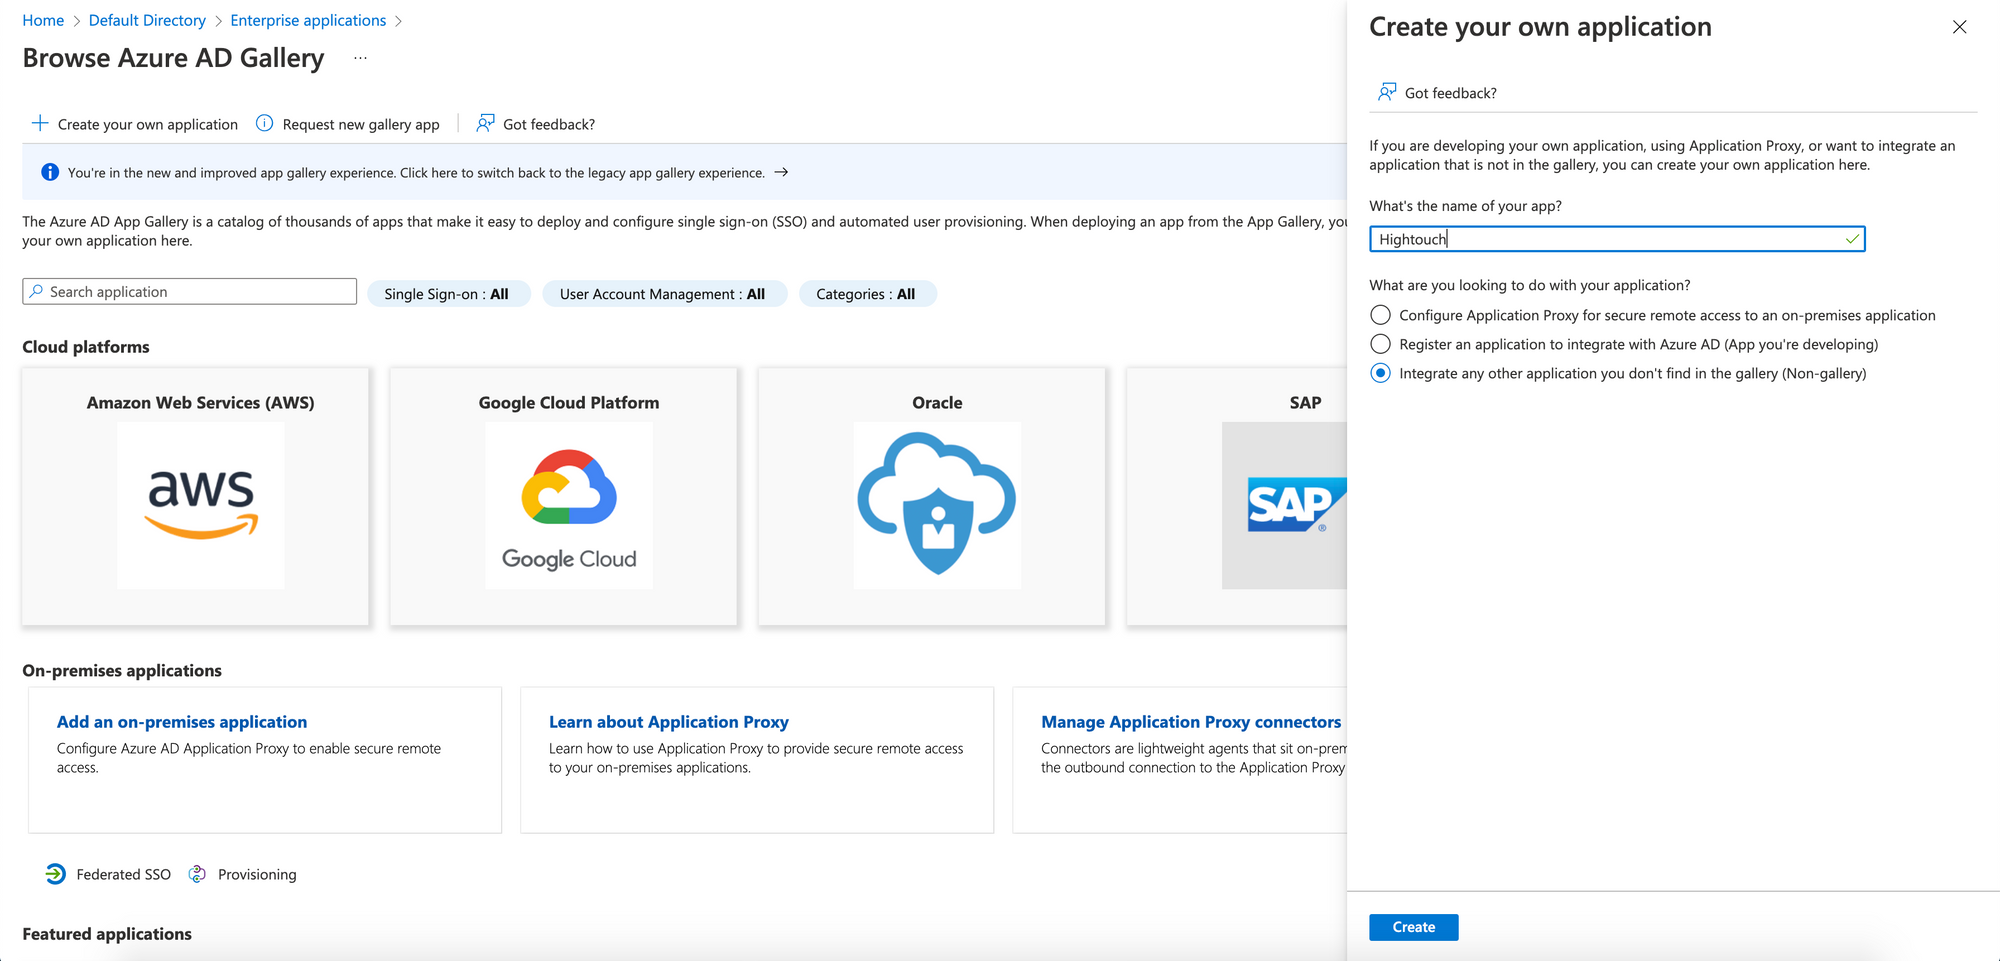
- In your newly created app, select Set up single sign on.
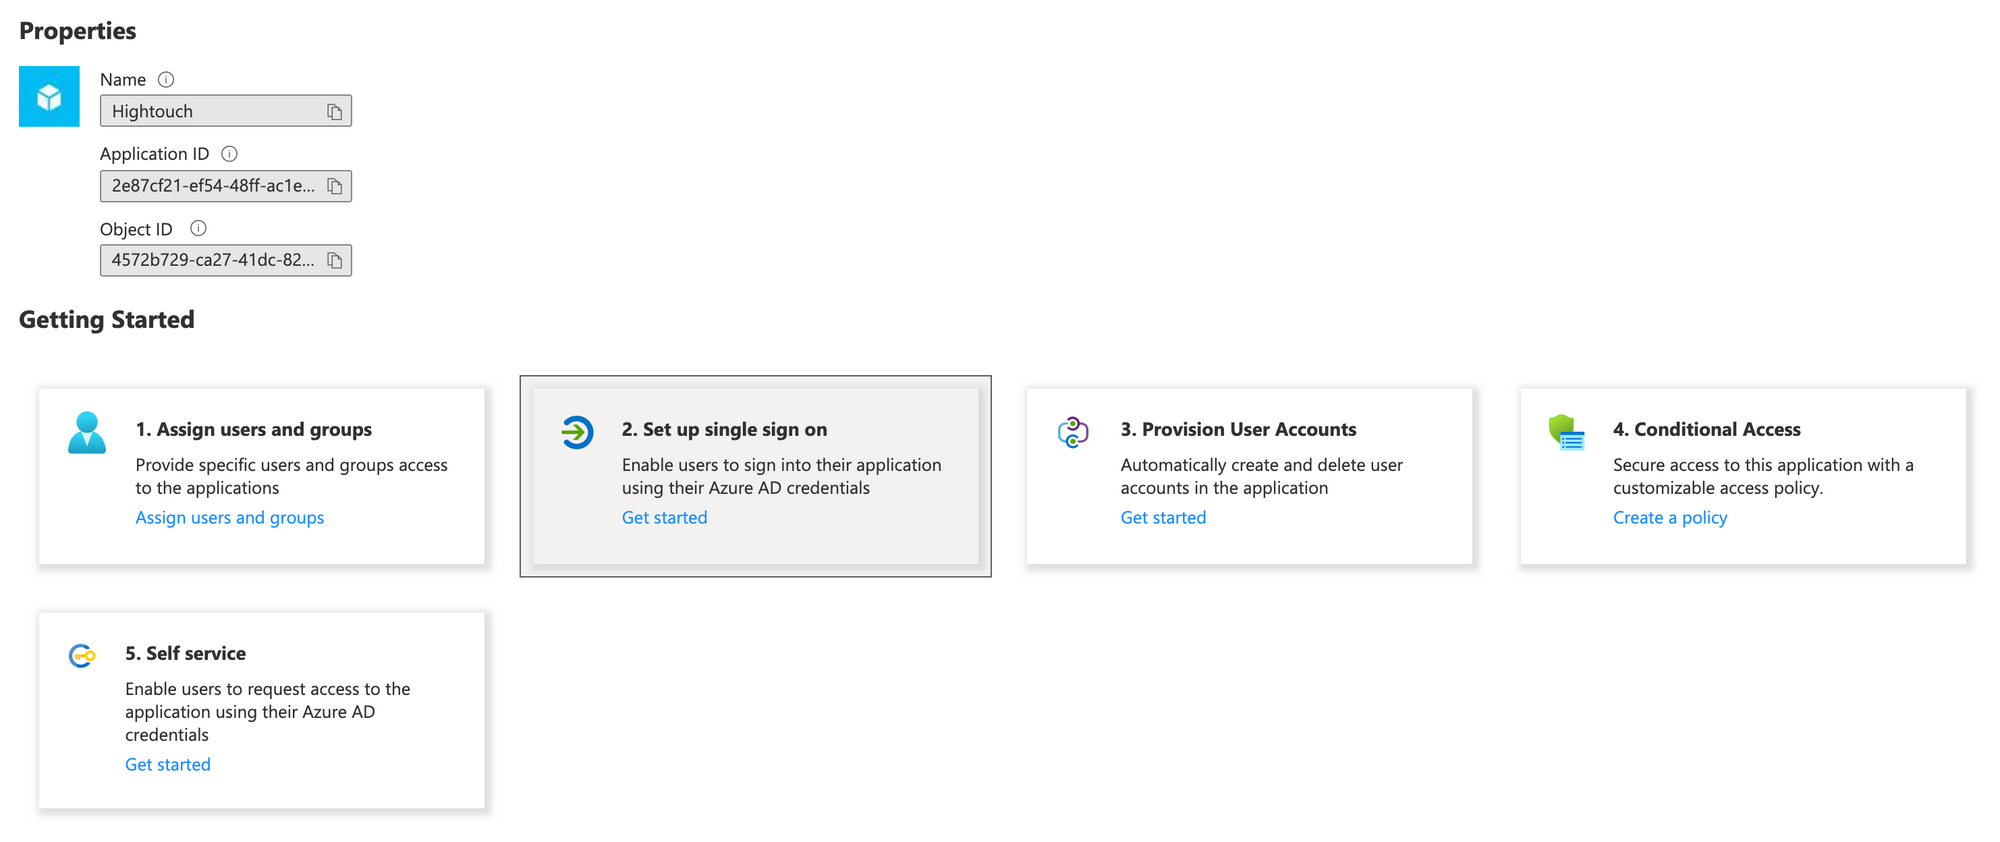
- Choose SAML as the sign-on method.

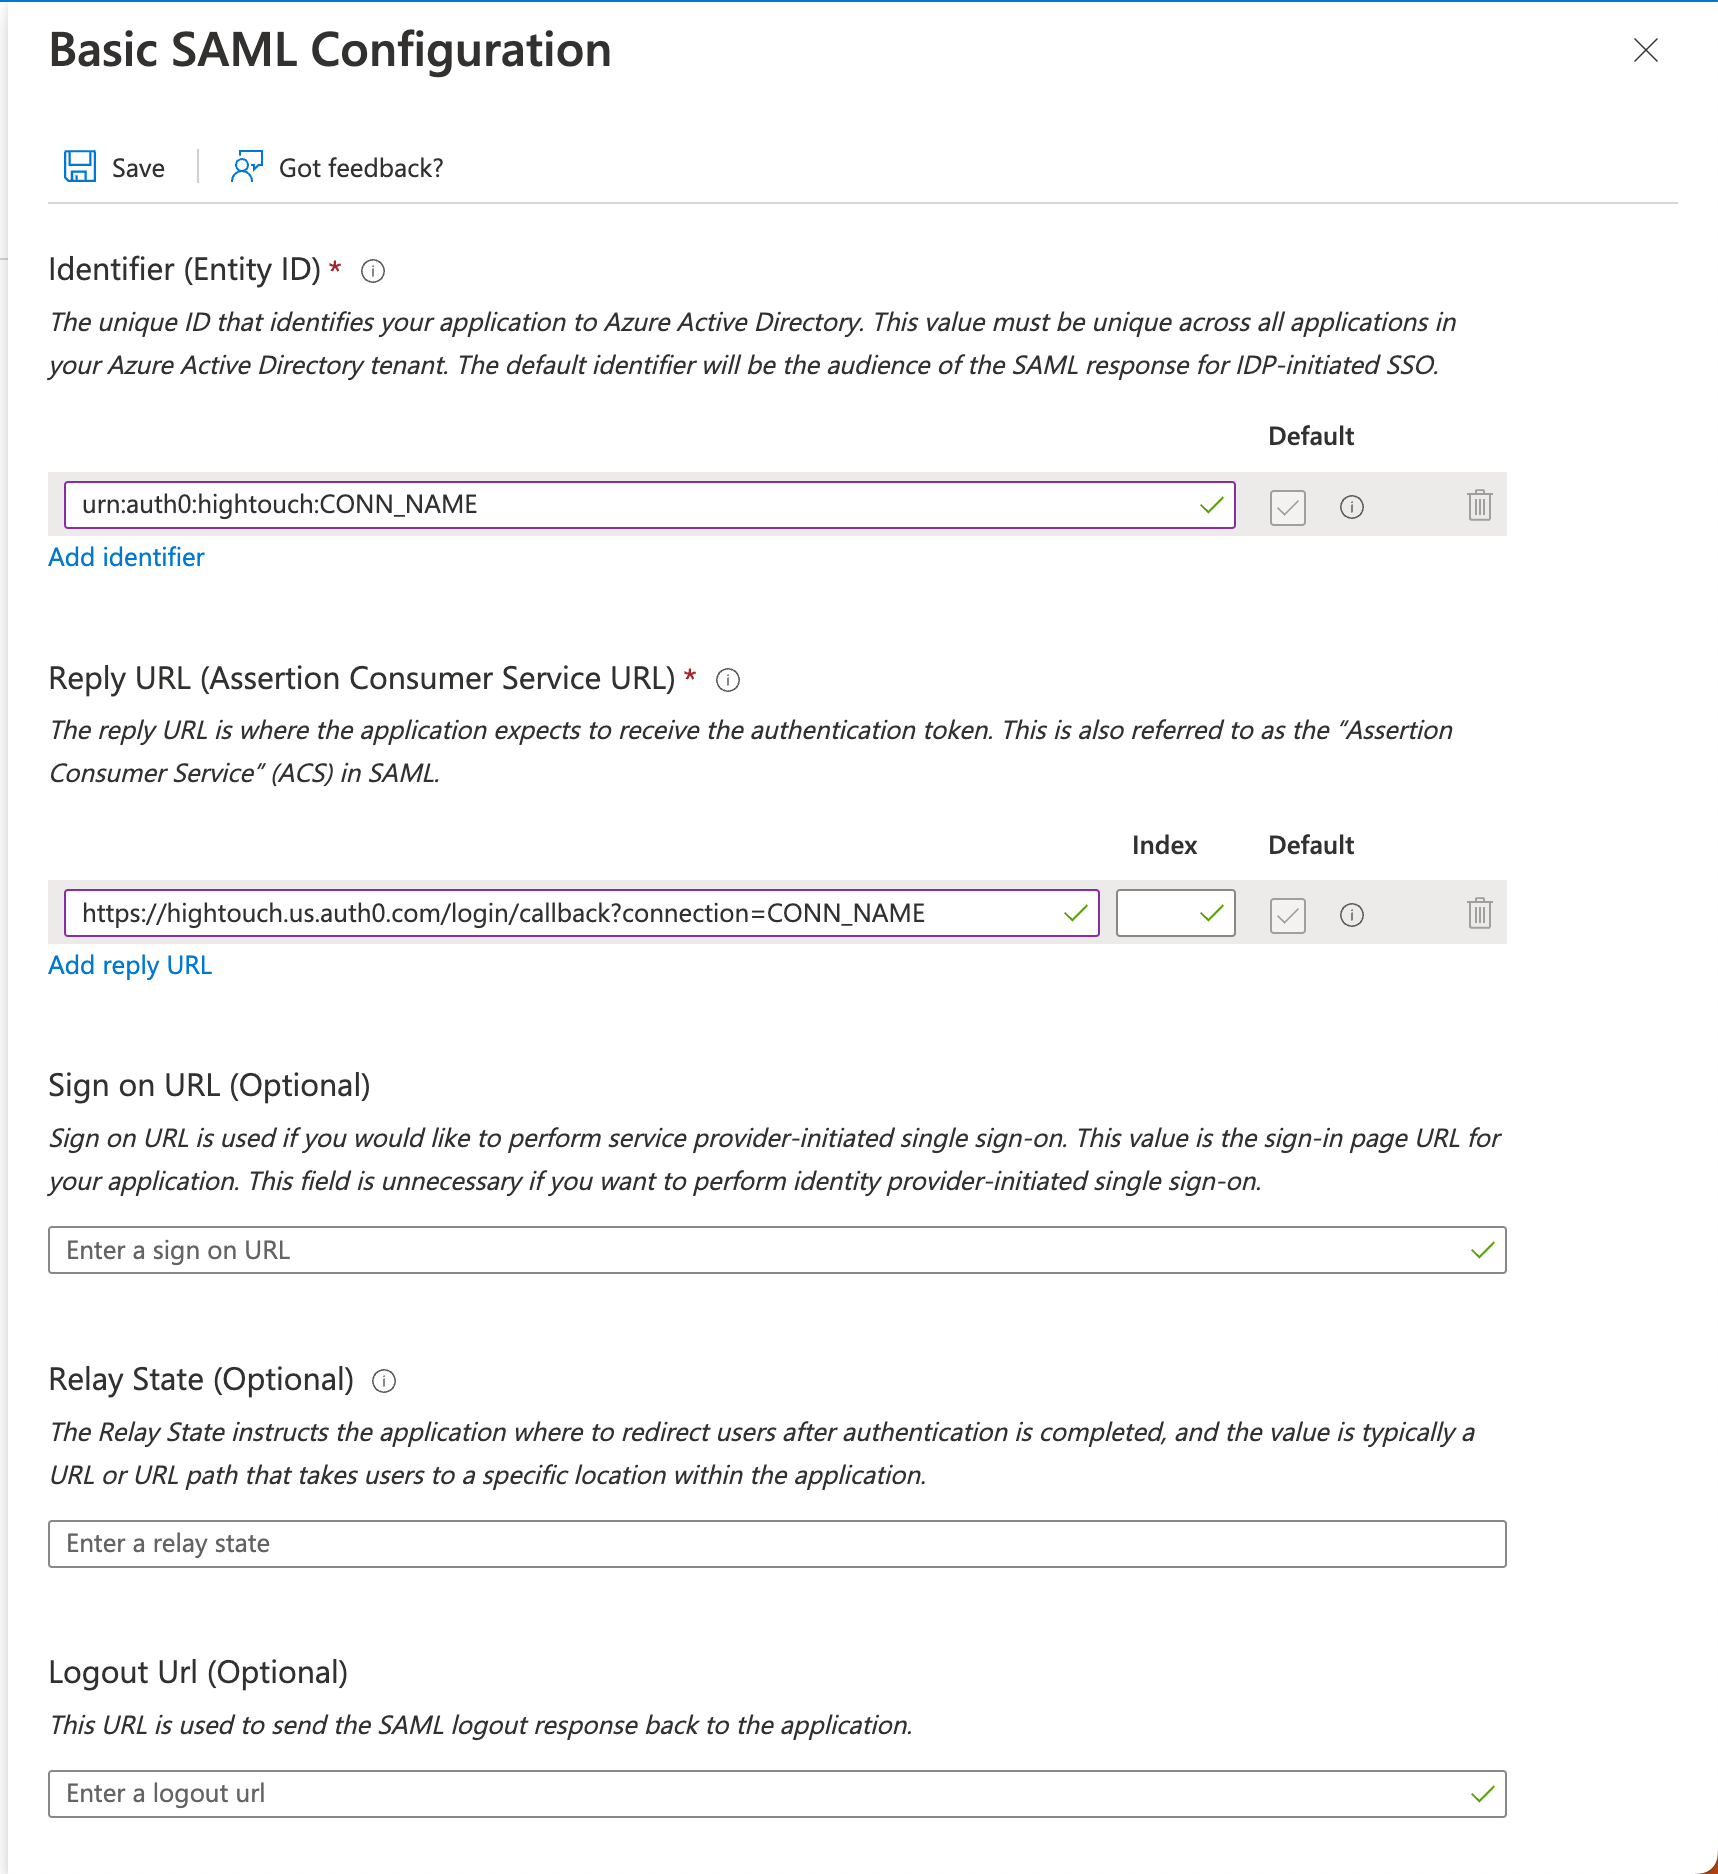
- In Hightouch, open the Single sign-on tab in the Organization settings page. Click Configure SAML SSO to display a modal with the Hightouch SSO URL and Audience URI.
- Configure the SAML settings in Microsoft Entra ID by entering the Hightouch SSO URL as the Reply URL (Assertion Consumer Service URL) and the Audience URI as the Identifier (Entity ID).
Leave the Sign on URL field empty if you plan to use IdP-initiated sign-on. Alternatively, grab the value from the Hightouch login URL field in Hightouch and enter it here.
- In Microsoft Entra ID, go to the Attributes & Claims section and add two claim mappings:
-
Name:
email
Namespace (optional):http://schemas.xmlsoap.org/ws/2005/05/identity/claims/email -
Name:
name
Namespace (optional):http://schemas.xmlsoap.org/ws/2005/05/identity/claims/name
As indicated above, the Namespace fields can be left blank.
The Unique User Identifier (Name ID) is the stable value the service provider uses to identify a user across login sessions. Set this to a unique, persistent value in Microsoft Entra (e.g.userprincipalname) to ensure consistent user recognition.
Example mapping section:
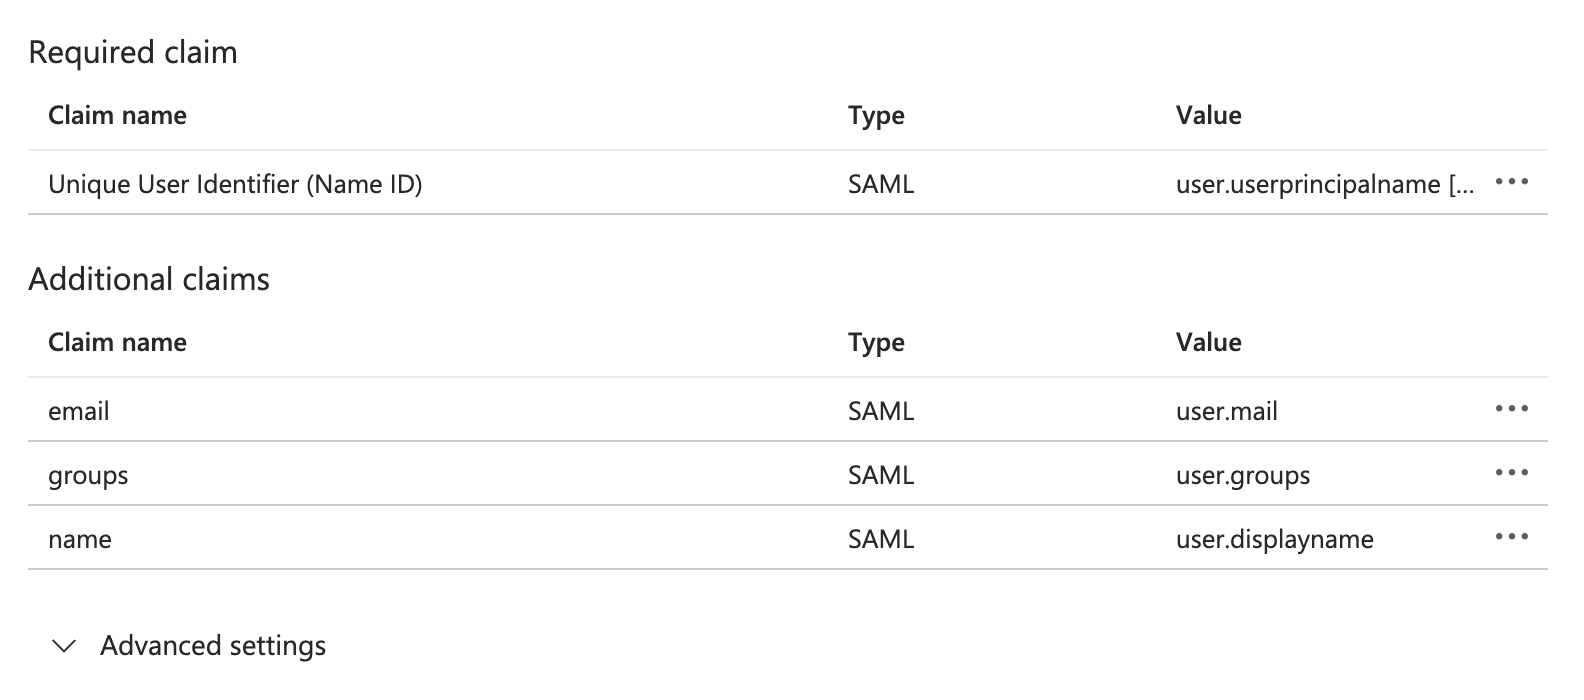
The Source attributes you choose for the name and email claims will depend on your Entra configuration; in the example above, the displayname attribute contains the user's full name, while the mail property contains their work email.
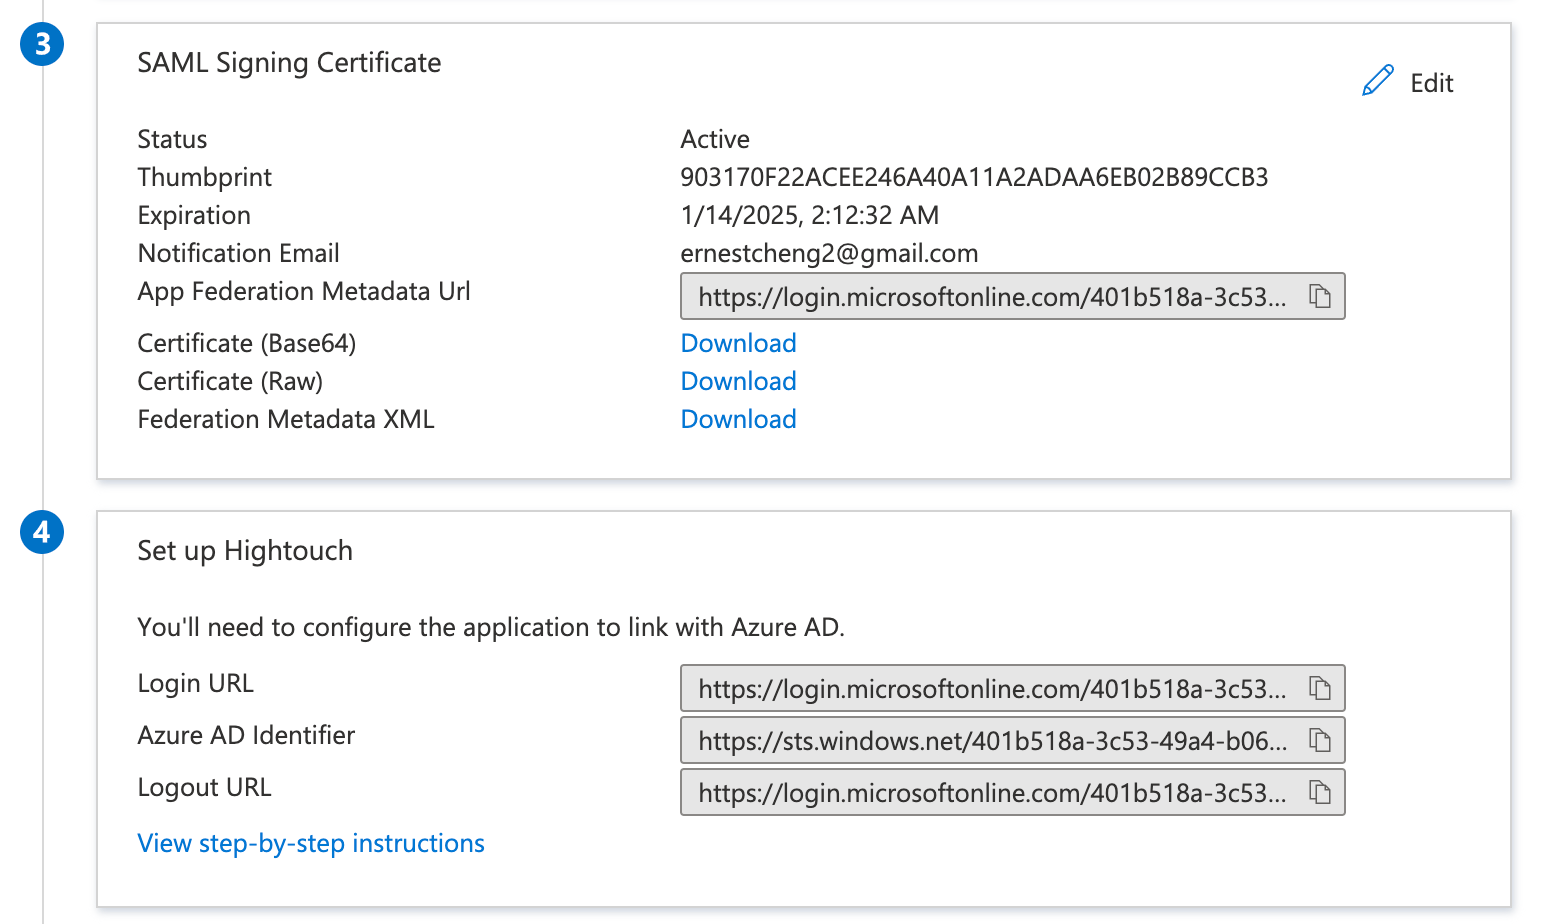
- In the Hightouch modal from step 4, enter Microsoft Entra ID's Login URL as the Identity provider SSO URL, and upload the Certificate Base64 as the x.509 certificate in Hightouch. Then, click Save.
- At this point, you've completed the basic SAML SSO setup, allowing your users to log in to Hightouch through your identity provider. However, you'll still need to manually assign permissions for each user after they join your Hightouch organization. To streamline this process, we highly recommend setting up automatic group assignments. This ensures users have the right access to workspaces and resources as soon as they log in for the first time.
If SSO group mappings are not configured, new users won't be automatically assigned to any group, which may result in limited access until group assignments are manually set up.
-
In the Microsoft Entra admin center, go to Enterprise applications and select the Hightouch application you created earlier. Navigate to Single Sign On configuration and then click on Attributes & Claims again.
-
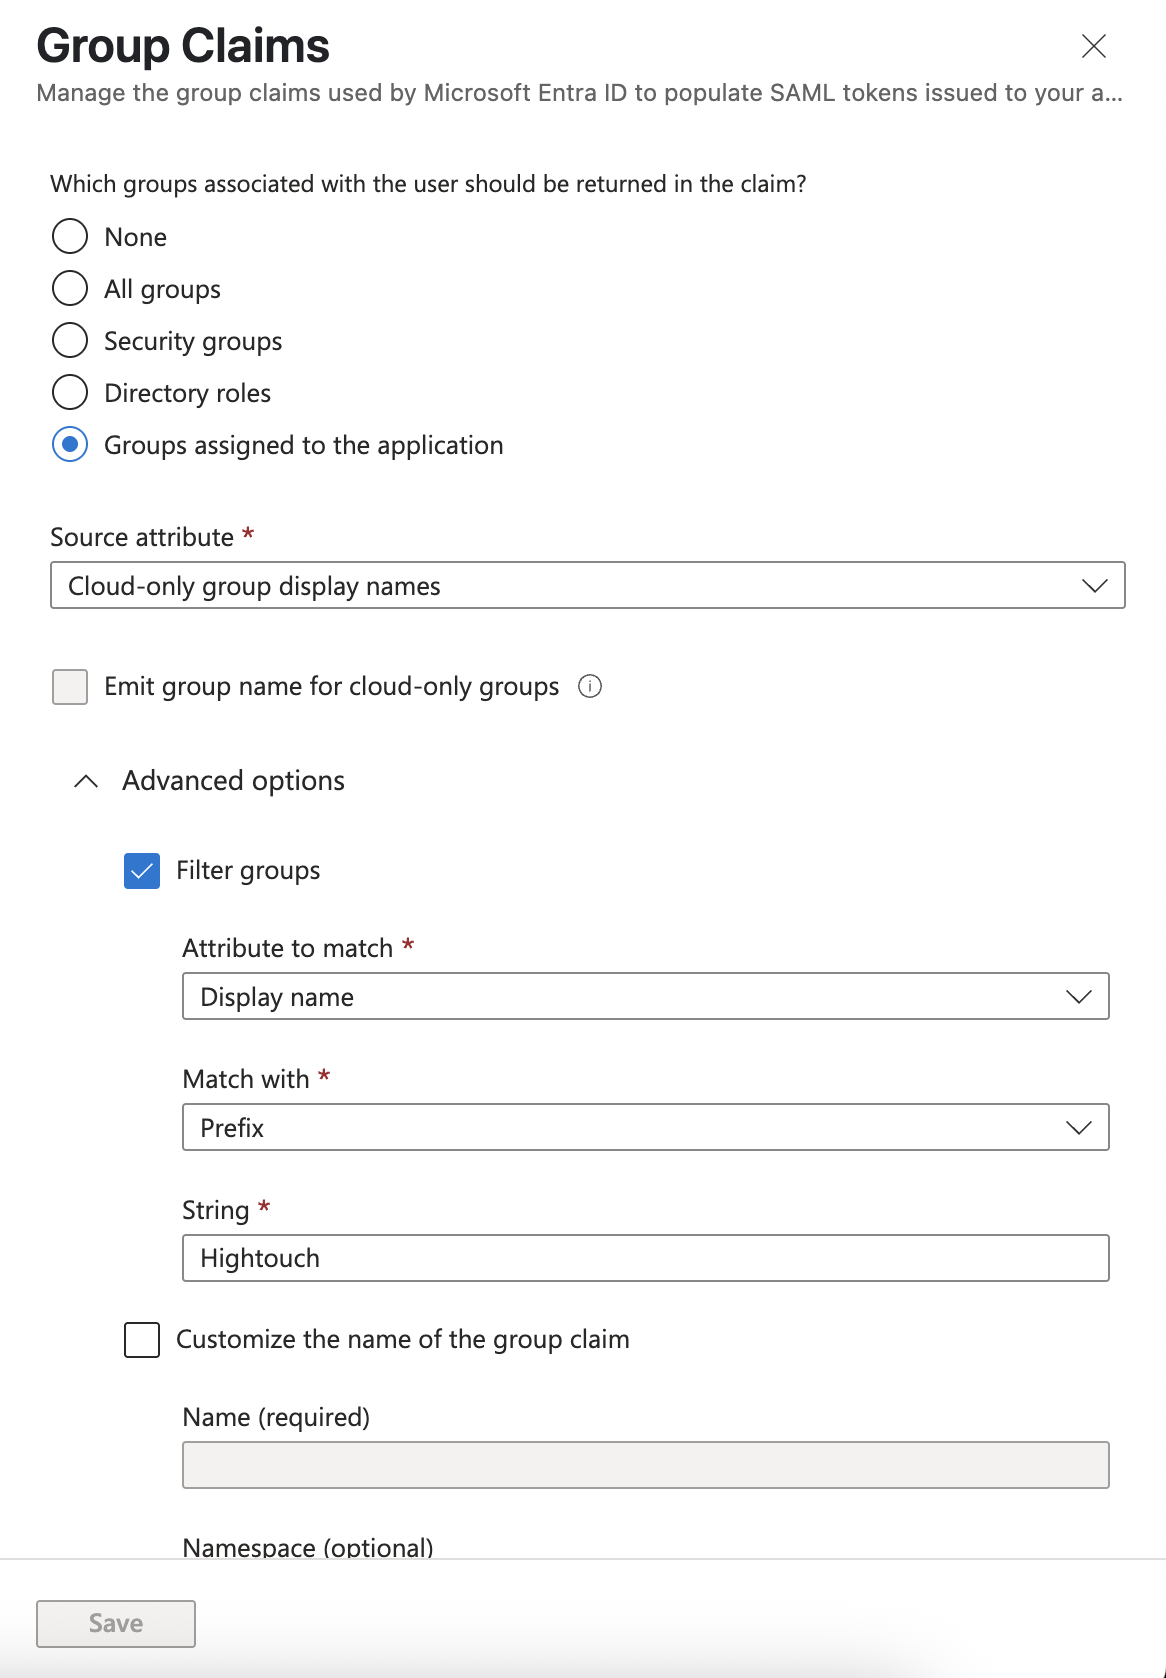
Select Add a group claim.
-
Make sure to choose
Groups assigned to the applicationwhen defining your scope. That means only groups that are both assigned to the application and include the logging-in user as a member will be included in the SAML assertion.
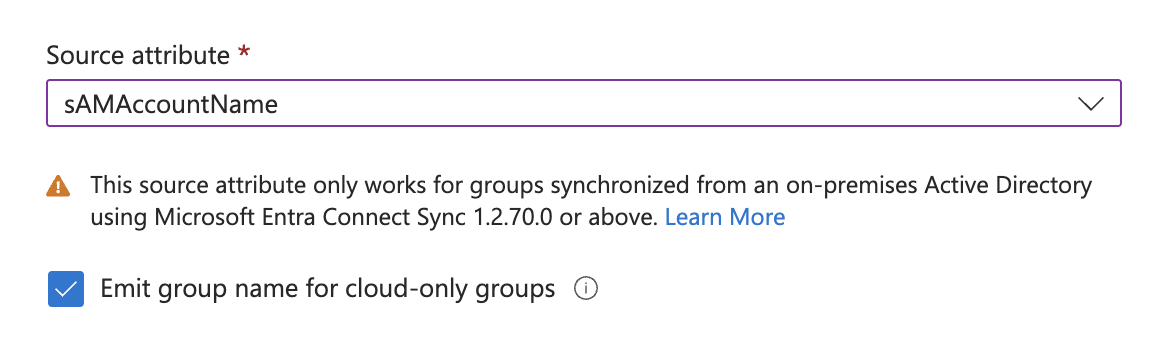
If you select a different option, you won’t be able to use Cloud-only group display names as the Source attribute - this attribute is required to sync human-readable group names to Hightouch, as described in the Entra documentation.
- Next, set
Cloud-only group display namesas the Source attribute. This will send thedisplayNamefor each group associated with both the application and the user. - Optionally, you can also configure custom settings, such as filtering for groups whose
Display namestarts with a specific prefix, e.g.Hightouch.
For setups that are on-premises only (but synced to Entra) or hybrid (using both on-premises and cloud groups), you have two options for emitting group claims:
- For on-premises groups, select an appropriate on-premises source attribute (such as
sAMAccountName). For cloud-only groups, enable theEmit group name for cloud-only groupscheckbox (see screenshot below). This configuration emits the selected on-prem group attribute for synced groups and the display name for cloud-only groups. Learn more about this setup in the Entra documentation. - You can also choose to emit the
Group IDfor both group types. In this case, Entra group object UUIDs will appear in the SSO group from identity provider section of the SSO mappings settings in Hightouch.
-
Next, you'll want to go back to Hightouch and create mappings between the groups from Microsoft Entra and the corresponding user groups in Hightouch. Navigate to Organization settings and click on the SSO mappings tab.
-
On this page, each group from your identity provider can be mapped to any number of user groups in Hightouch. (Users can belong to multiple groups, and when they do, they inherit the combined access from all of their assigned groups.)
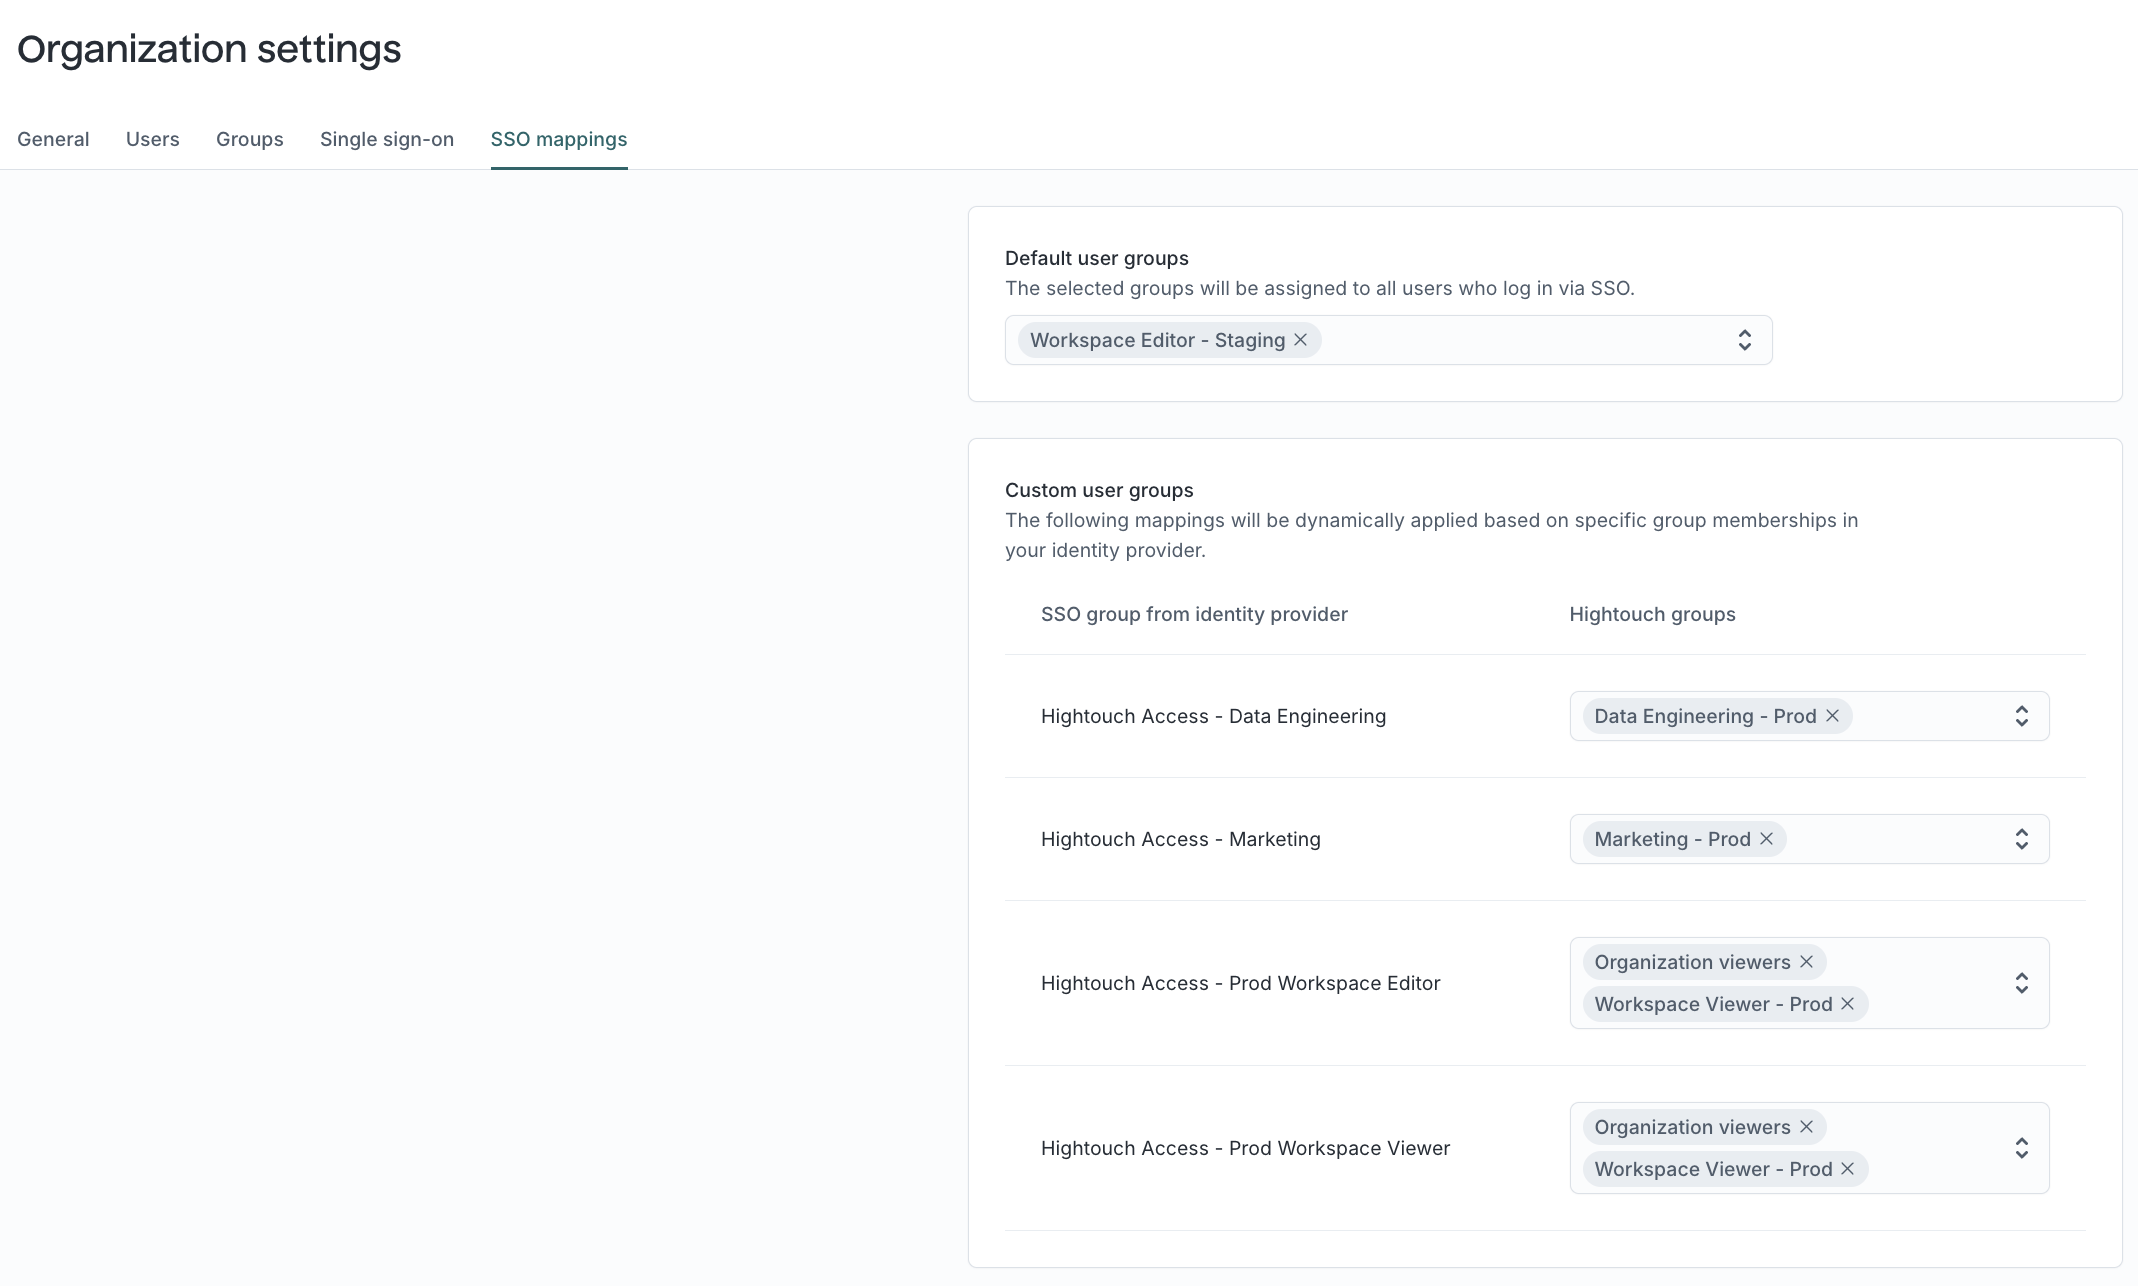
Group assignments are refreshed only when a user logs in. This means that new SSO groups will not appear for mapping until after a member belonging to that group has logged into Hightouch. If you need to synchronize users and groups without requiring login, consider enabling SCIM.
- All done! Members of your organization can access Hightouch by selecting Log in with SSO. You can also share your workspace's direct Hightouch login URL, which is available in the Single sign-on tab on the Organization settings page.
Regardless of your exact Entra configuration, make sure that your Entra SAML user and group attribute mappings are aligned with your Entra SCIM user and group attribute mappings.
Other identity providers
Hightouch supports all major identity providers, including OneLogin, Rippling, Google, Ping, and more.
The setup instructions are generally similar to those provided above for Okta. If you encounter any issues or need assistance, please don't hesitate to reach out to our support team—we're here to help!
Configuring SCIM
You must configure SAML SSO before configuring SCIM.
Unlike SAML SSO, which creates and updates user accounts only when users log in, SCIM automatically synchronizes user account changes from your identity provider to Hightouch without requiring user login. This means that adding, updating, or deactivating user accounts in your identity provider happens in the background and is immediately reflected in Hightouch.
To get started, generate a SCIM API token by following these steps:
- Visit the Organization settings page in Hightouch and navigate to the Single sign-on tab.
- Click Generate SCIM token.
- Copy the generated bearer token and click Save to activate the token.
Hightouch displays the SCIM token only once, immediately after you generate it. Once you close the modal, you won't be able to access the same token again. If you don't copy it when it's first displayed, you'll need to generate a new token by clicking Refresh SCIM token.
Okta
After generating your SCIM token, follow these steps:
- Navigate to the Hightouch application within your Okta admin panel.
- On the General tab, locate the App Settings section and click the Edit button.
- Check the box labeled Enable SCIM provisioning, then click Save.
- Move to the Provisioning tab and click Edit in the SCIM Connection section.
- Enter
https://api.hightouch.com/api/scim/v2as the SCIM connector base URL. - Enter
userNameas the Unique identifier field for users. - Under Supported provisioning actions, ensure that the following options are selected:
- Import New Users and Profile Updates
- Push New Users
- Push Profile Updates
- Push Groups
- Set the Authentication Mode to HTTP Header.
- Paste the SCIM bearer token you generated in Hightouch into the authentication field, ensuring it includes the
Bearerprefix. - Click Save to complete the configuration.
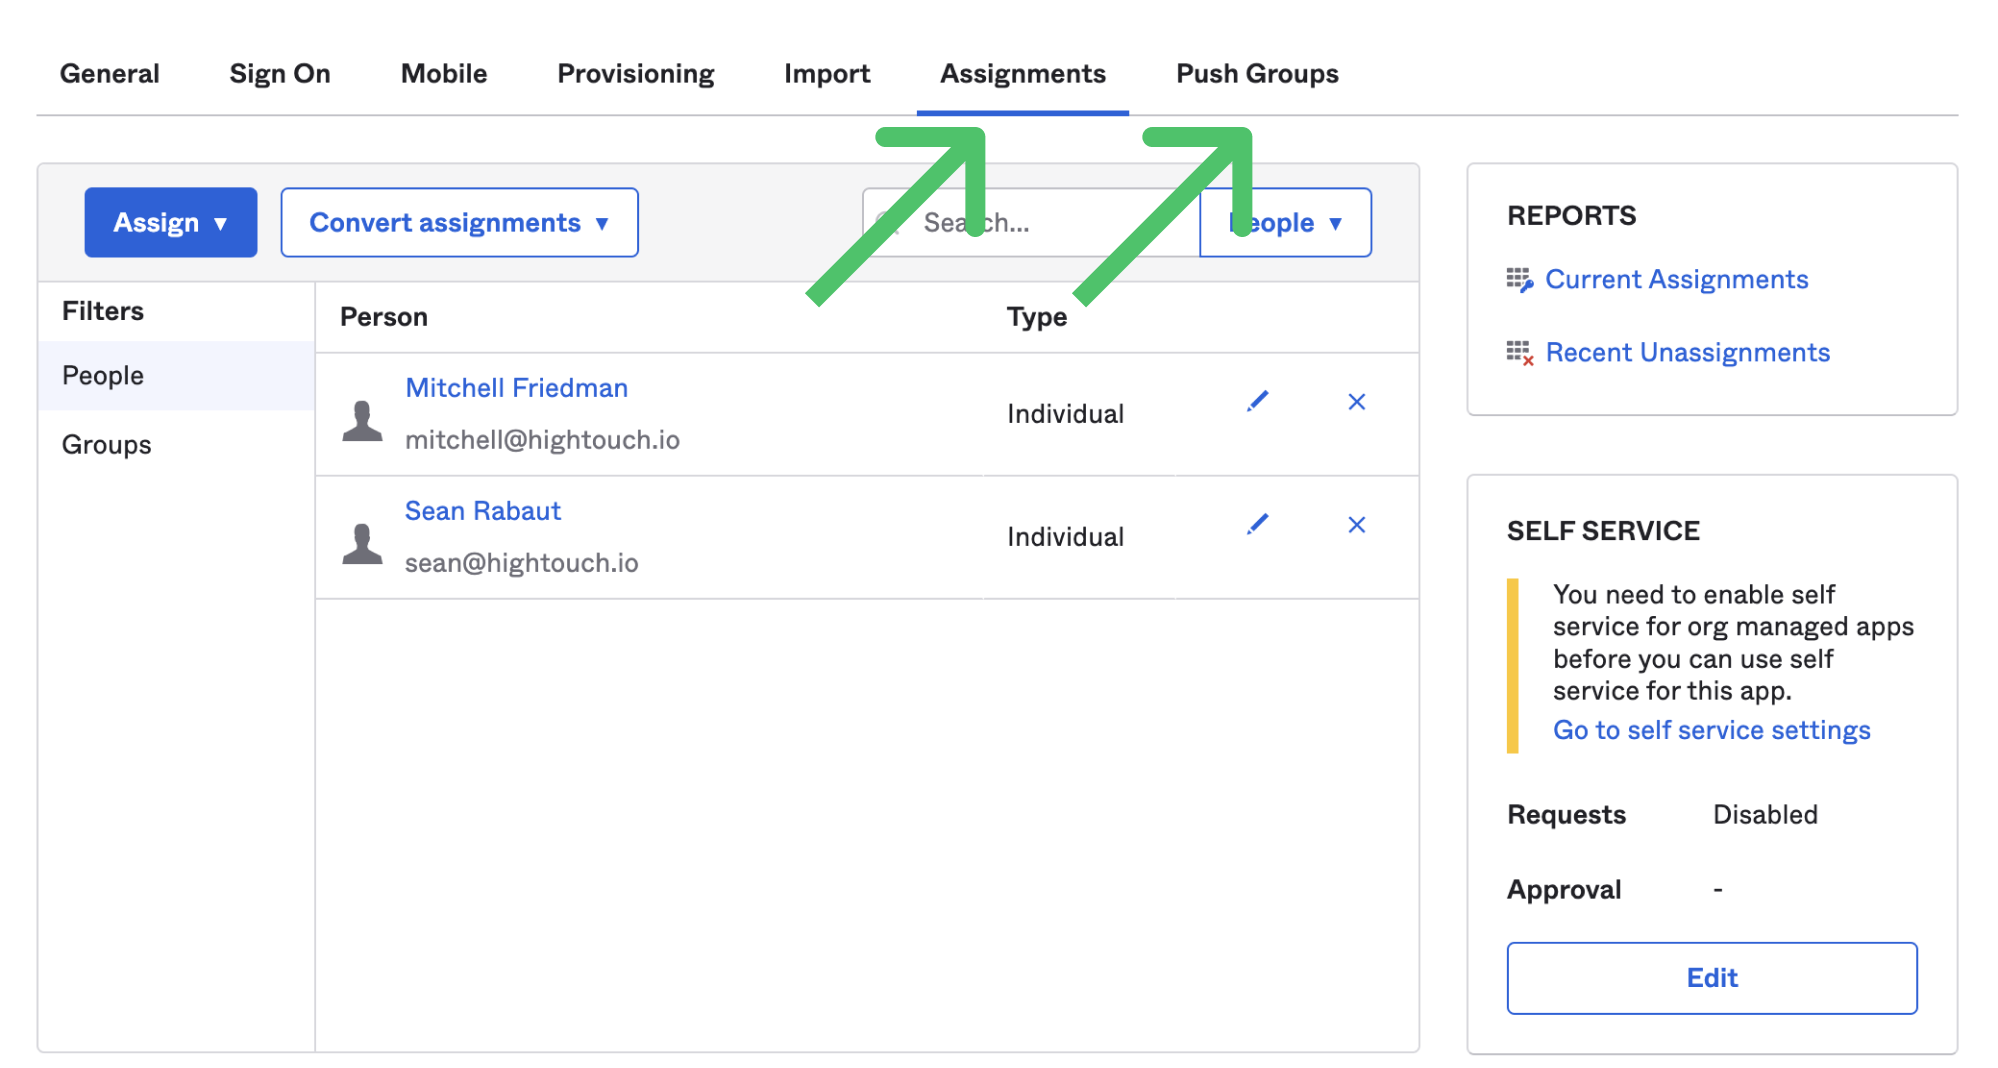
- Finally, make sure to assign the relevant users and groups to the Hightouch application. In Okta, you must do this from both the Assignments tab and the Push Groups tab.
For additional information, or if your Okta admin panel differs from the steps above, please refer to Okta's documentation on SCIM provisioning.
Microsoft Entra ID
After generating your SCIM token in Hightouch, follow these steps:
- Navigate to the SAML SSO application that you created for logging into Hightouch within the Microsoft Entra admin center.
- Click on the Provisioning tab.

- To configure SCIM for your application, click Connect your application.

- Set the Tenant URL to
https://api.hightouch.com/api/scim/v2. - Paste the SCIM bearer token you generated in Hightouch into the Secret Token field. Test the connection to ensure it's working, then click Save.
- At this point, SCIM is configured for your application, but it isn't yet enabled. It's also recommended to set up user and group assignments.
- Cick on the Provisioning tab under the Manage section. This will open a nested Provisioning section where you can configure Users and Groups attribute mappings.
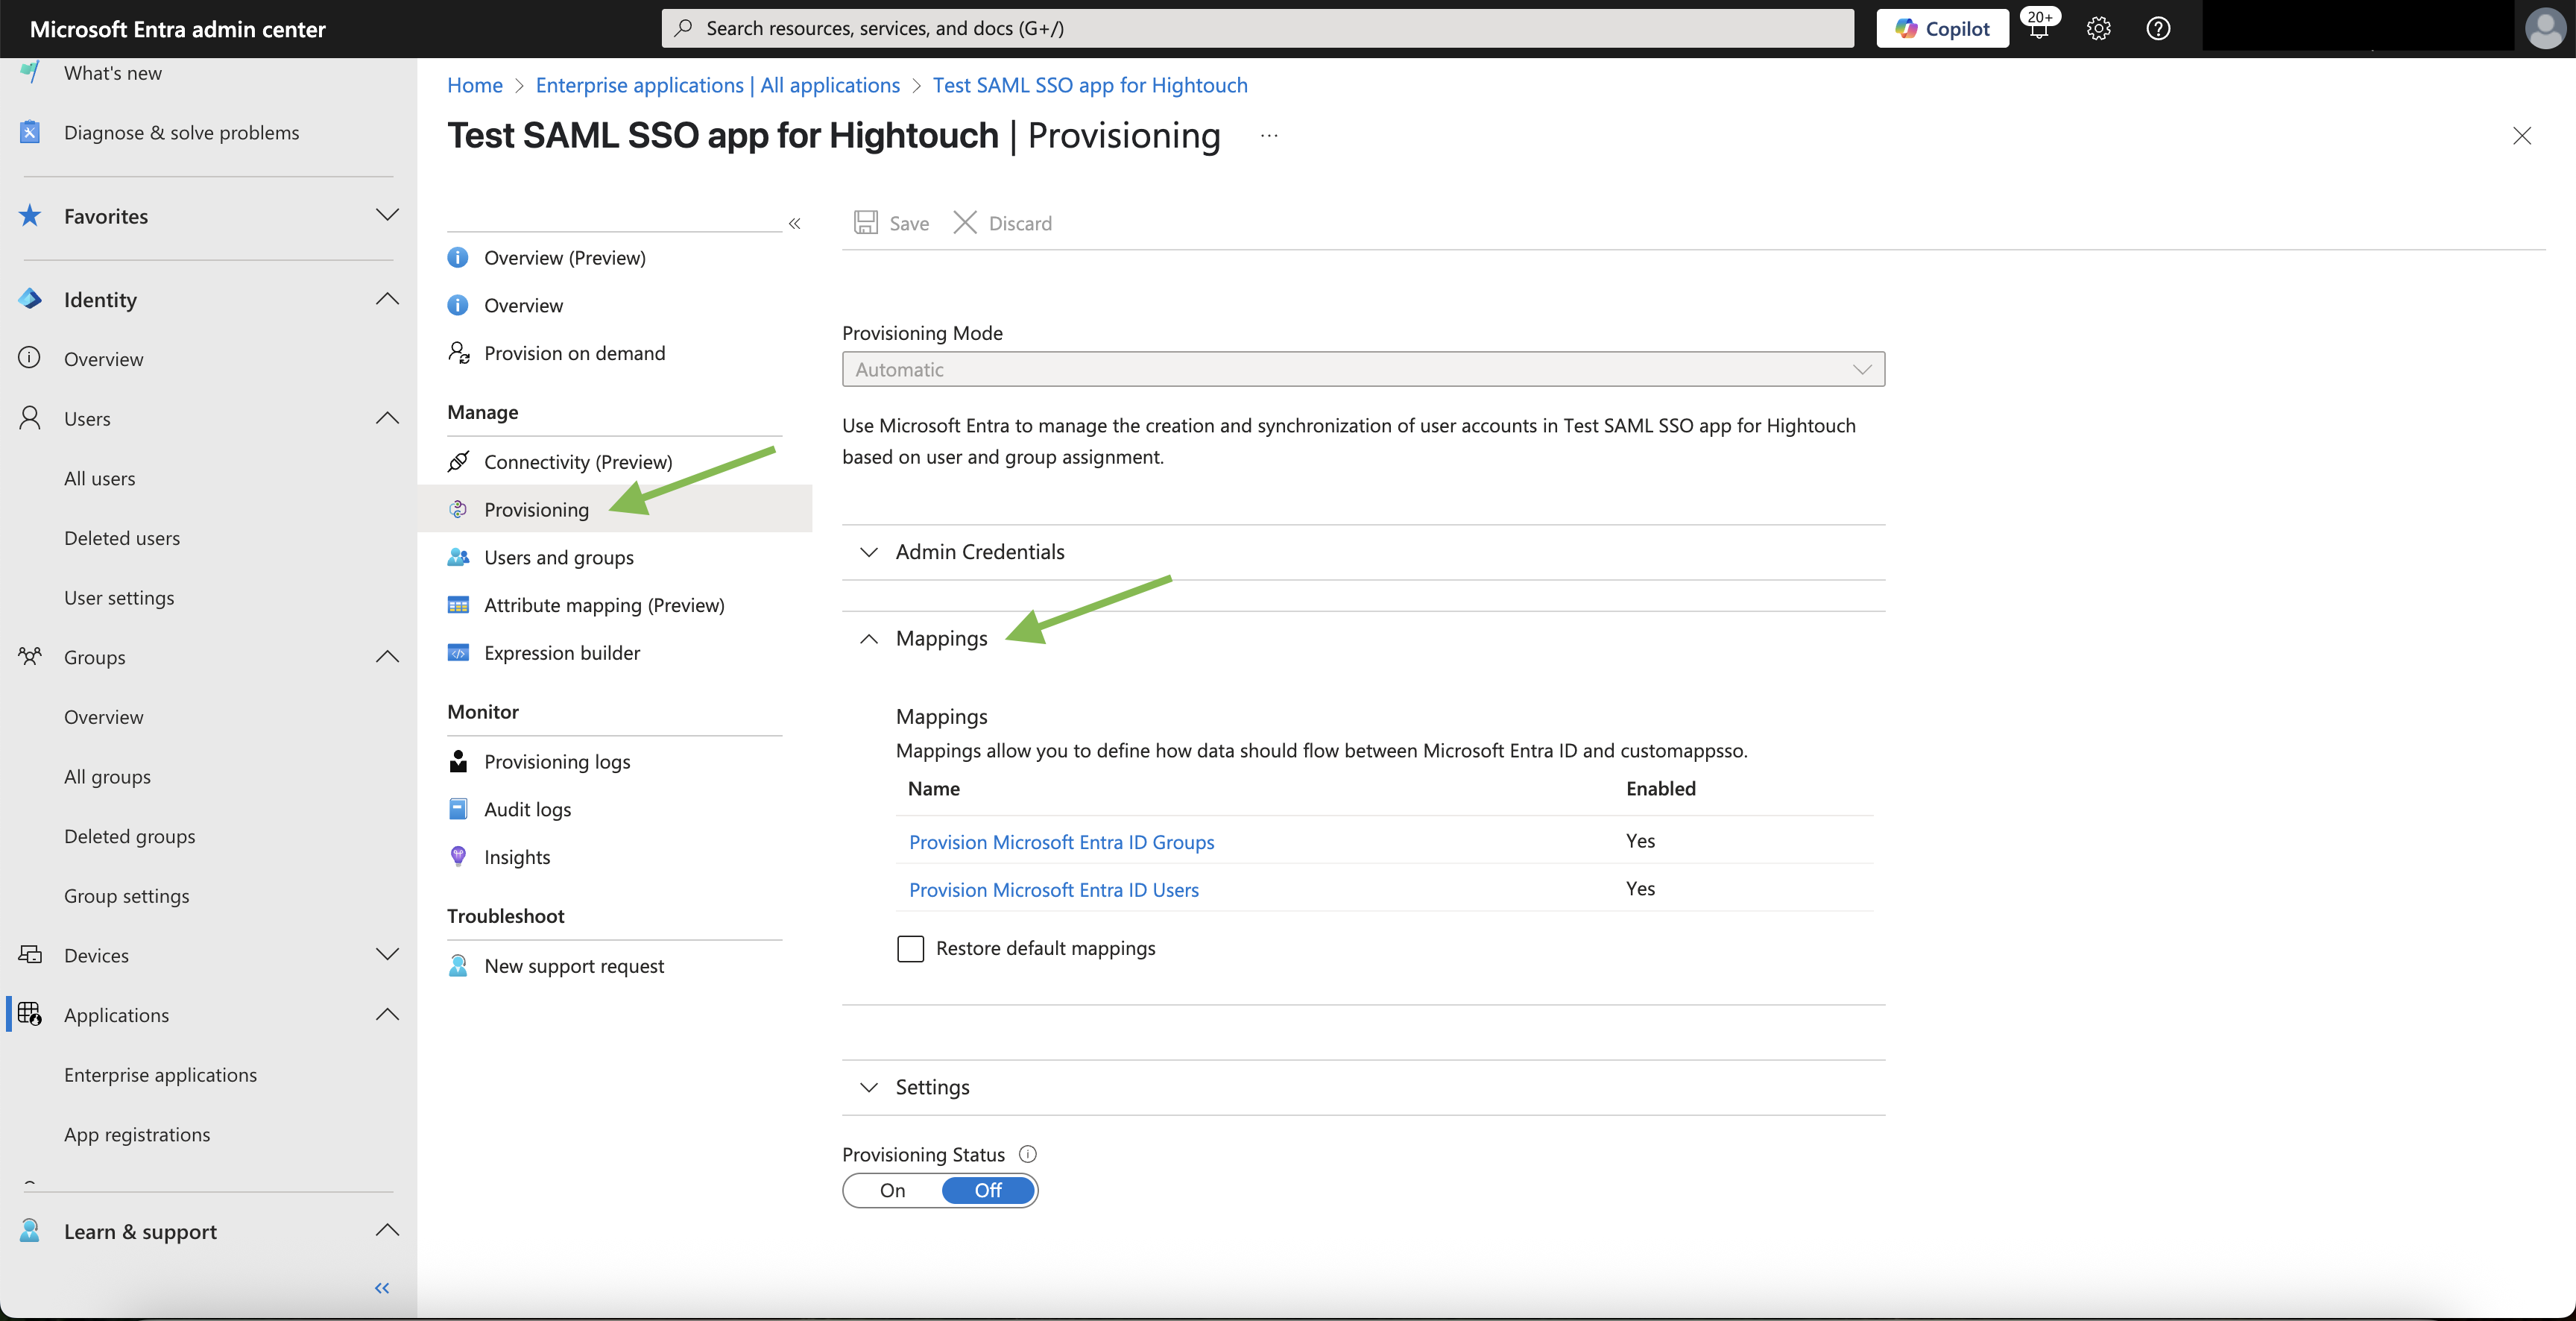
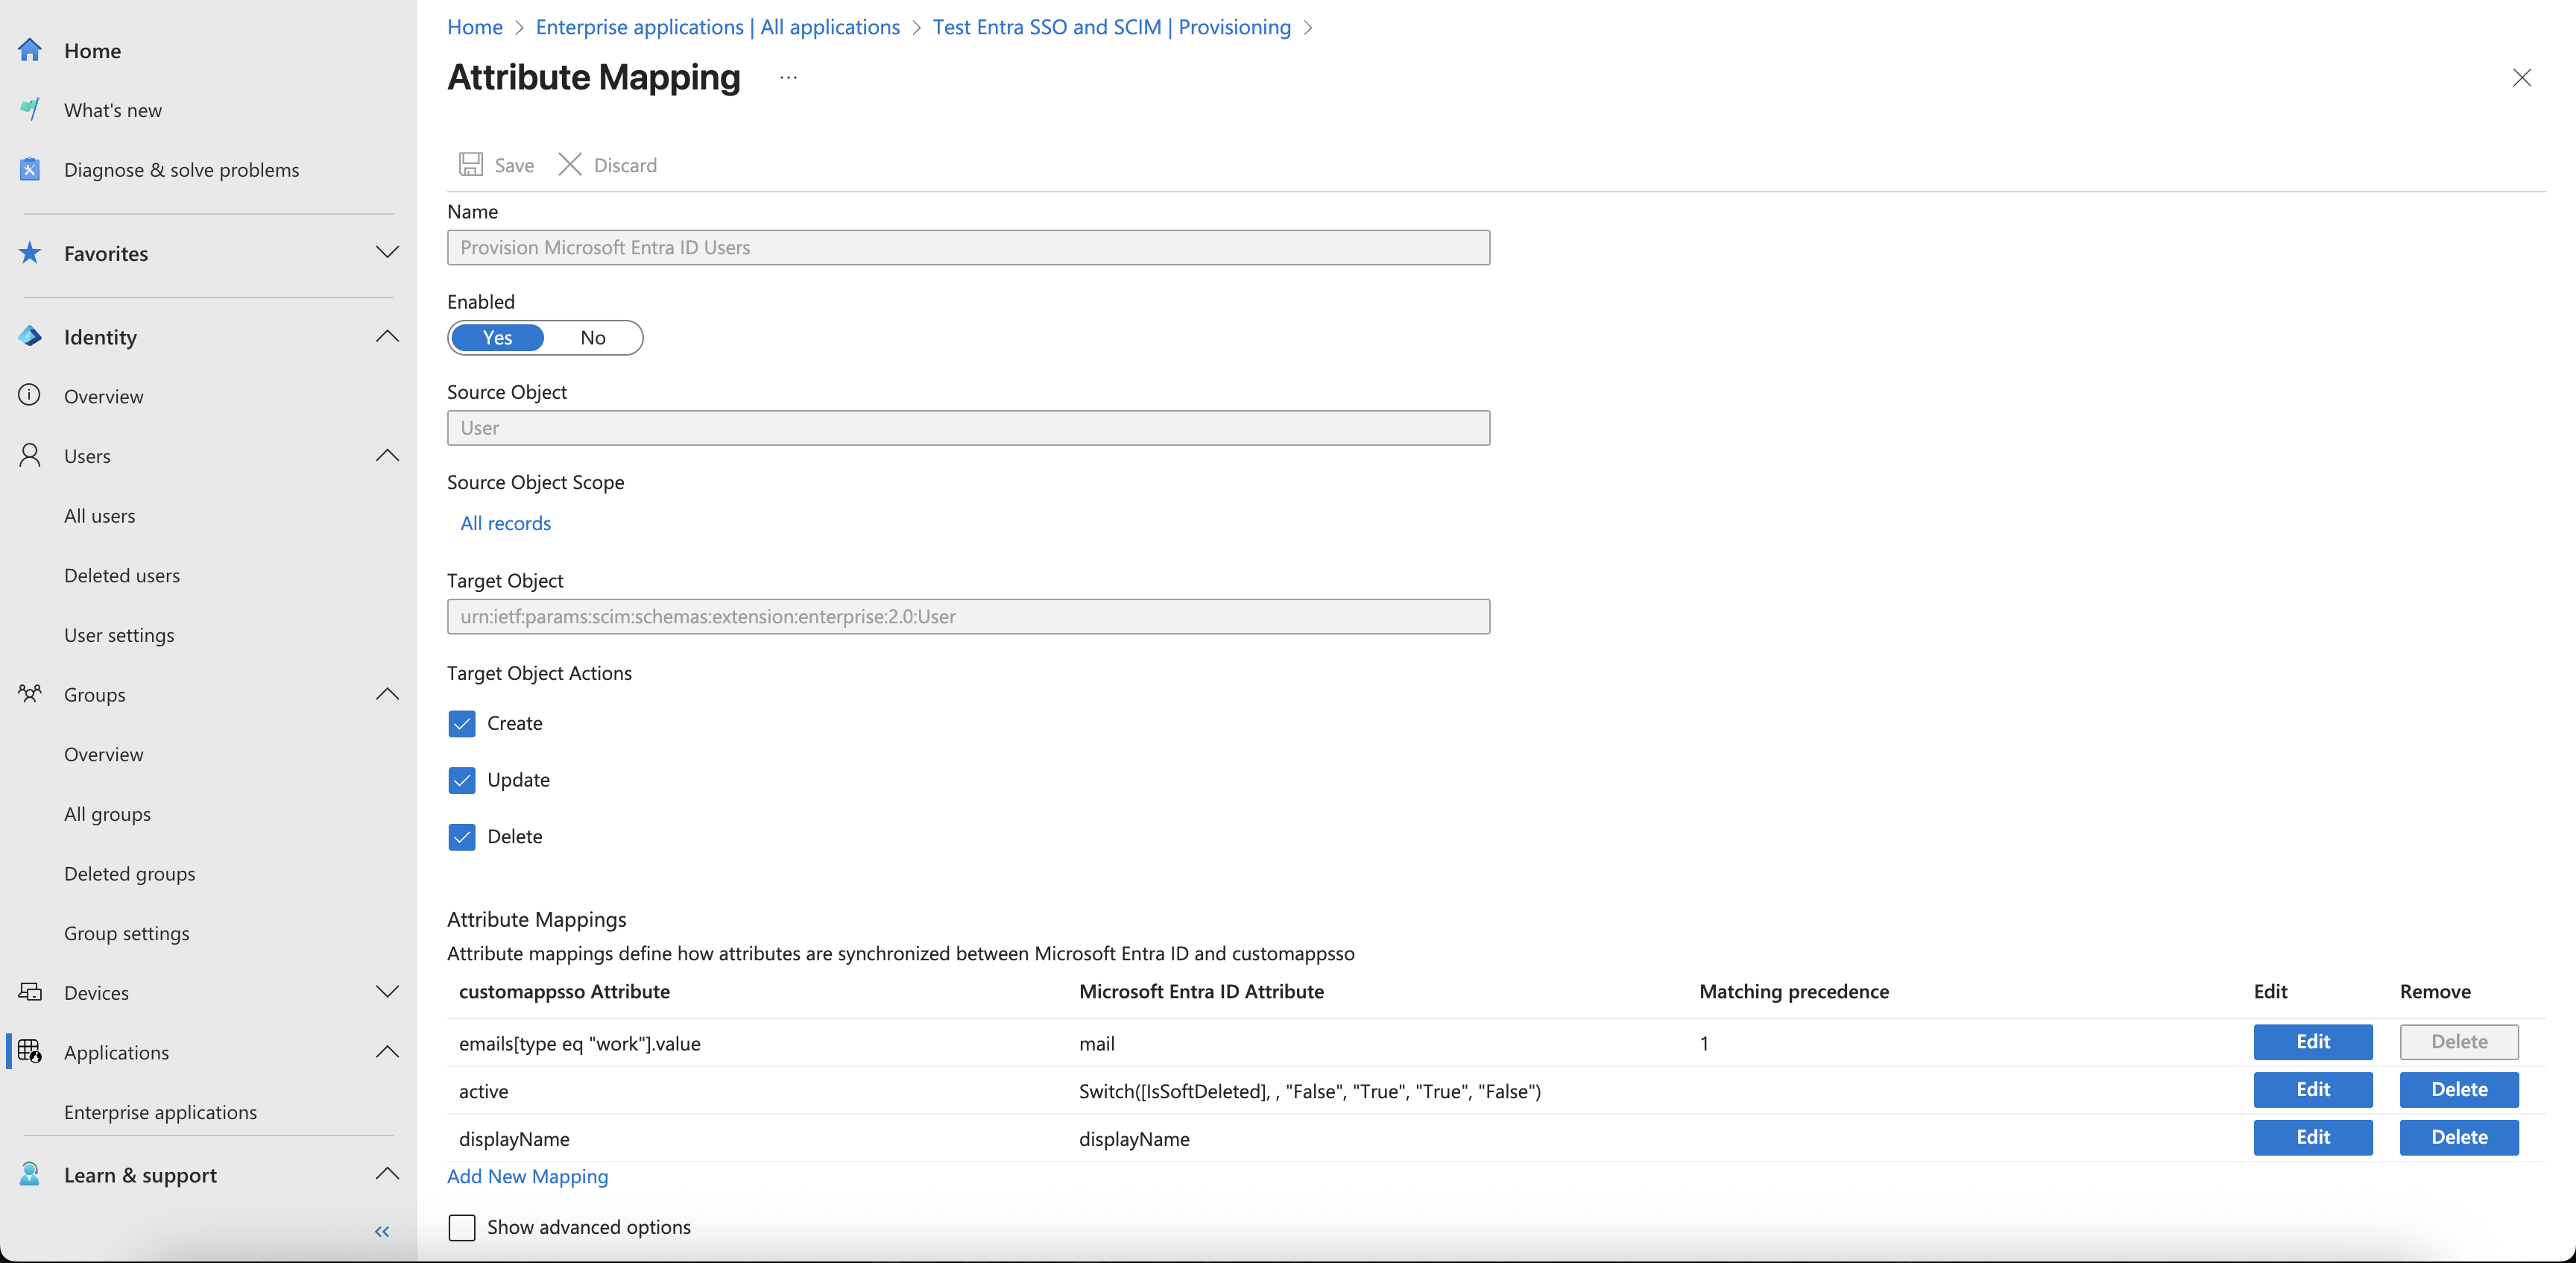
- Select Provision Microsoft Entra ID Users to configure SCIM attribute mappings for users.
- A Hightouch user object has three key properties relevant to SCIM provisioning: email, name, and active. During provisioning, these fields should receive their values from the following SCIM Target Attributes:
emails[type eq "work"].valuedisplayNameactive
While it’s technically possible to use other Target Attributes (for example, sending a value for email under userName), doing so isn't recommended. Using the Target Attributes above ensures that user provisioning behaves as expected within Hightouch.
If your Entra configuration meets the following conditions:
- Emails are stored in the
mailattribute and are unique. - Full names are stored in the
displayNameattribute. - You want to control user access by enabling or disabling accounts in Hightouch without immediately deleting them.
You should proceed with the following setup:
- First, uncheck the userName field as a required attribute in the Edit attribute list for customappsso section under Show advanced options, and save the change.
- For
emails[type eq "work"].valueas the Target attribute, usemailas the Source attribute. Set Match objects using this attribute toYesand set Matching precedence to1. - For
displayNameas the Target attribute, usedisplayNameas the Source attribute as well. - Leave
activeas the Target attribute mapped to theSwitch([IsSoftDeleted], , "False", "True", "True", "False")formula as the Source attribute. - Leave the Primary Key settings unchanged.
Example of a valid user attribute mapping configuration:
active / IsSoftDeleted behavior, and the meaning of Match objects using this attribute, Matching precedence, and Primary Key - in the official Microsoft documentation. - As mentioned earlier, the exact Source attribute configuration depends on how your Entra directory is set up. Once this setup is complete, your User Attributes Mapping section is ready!
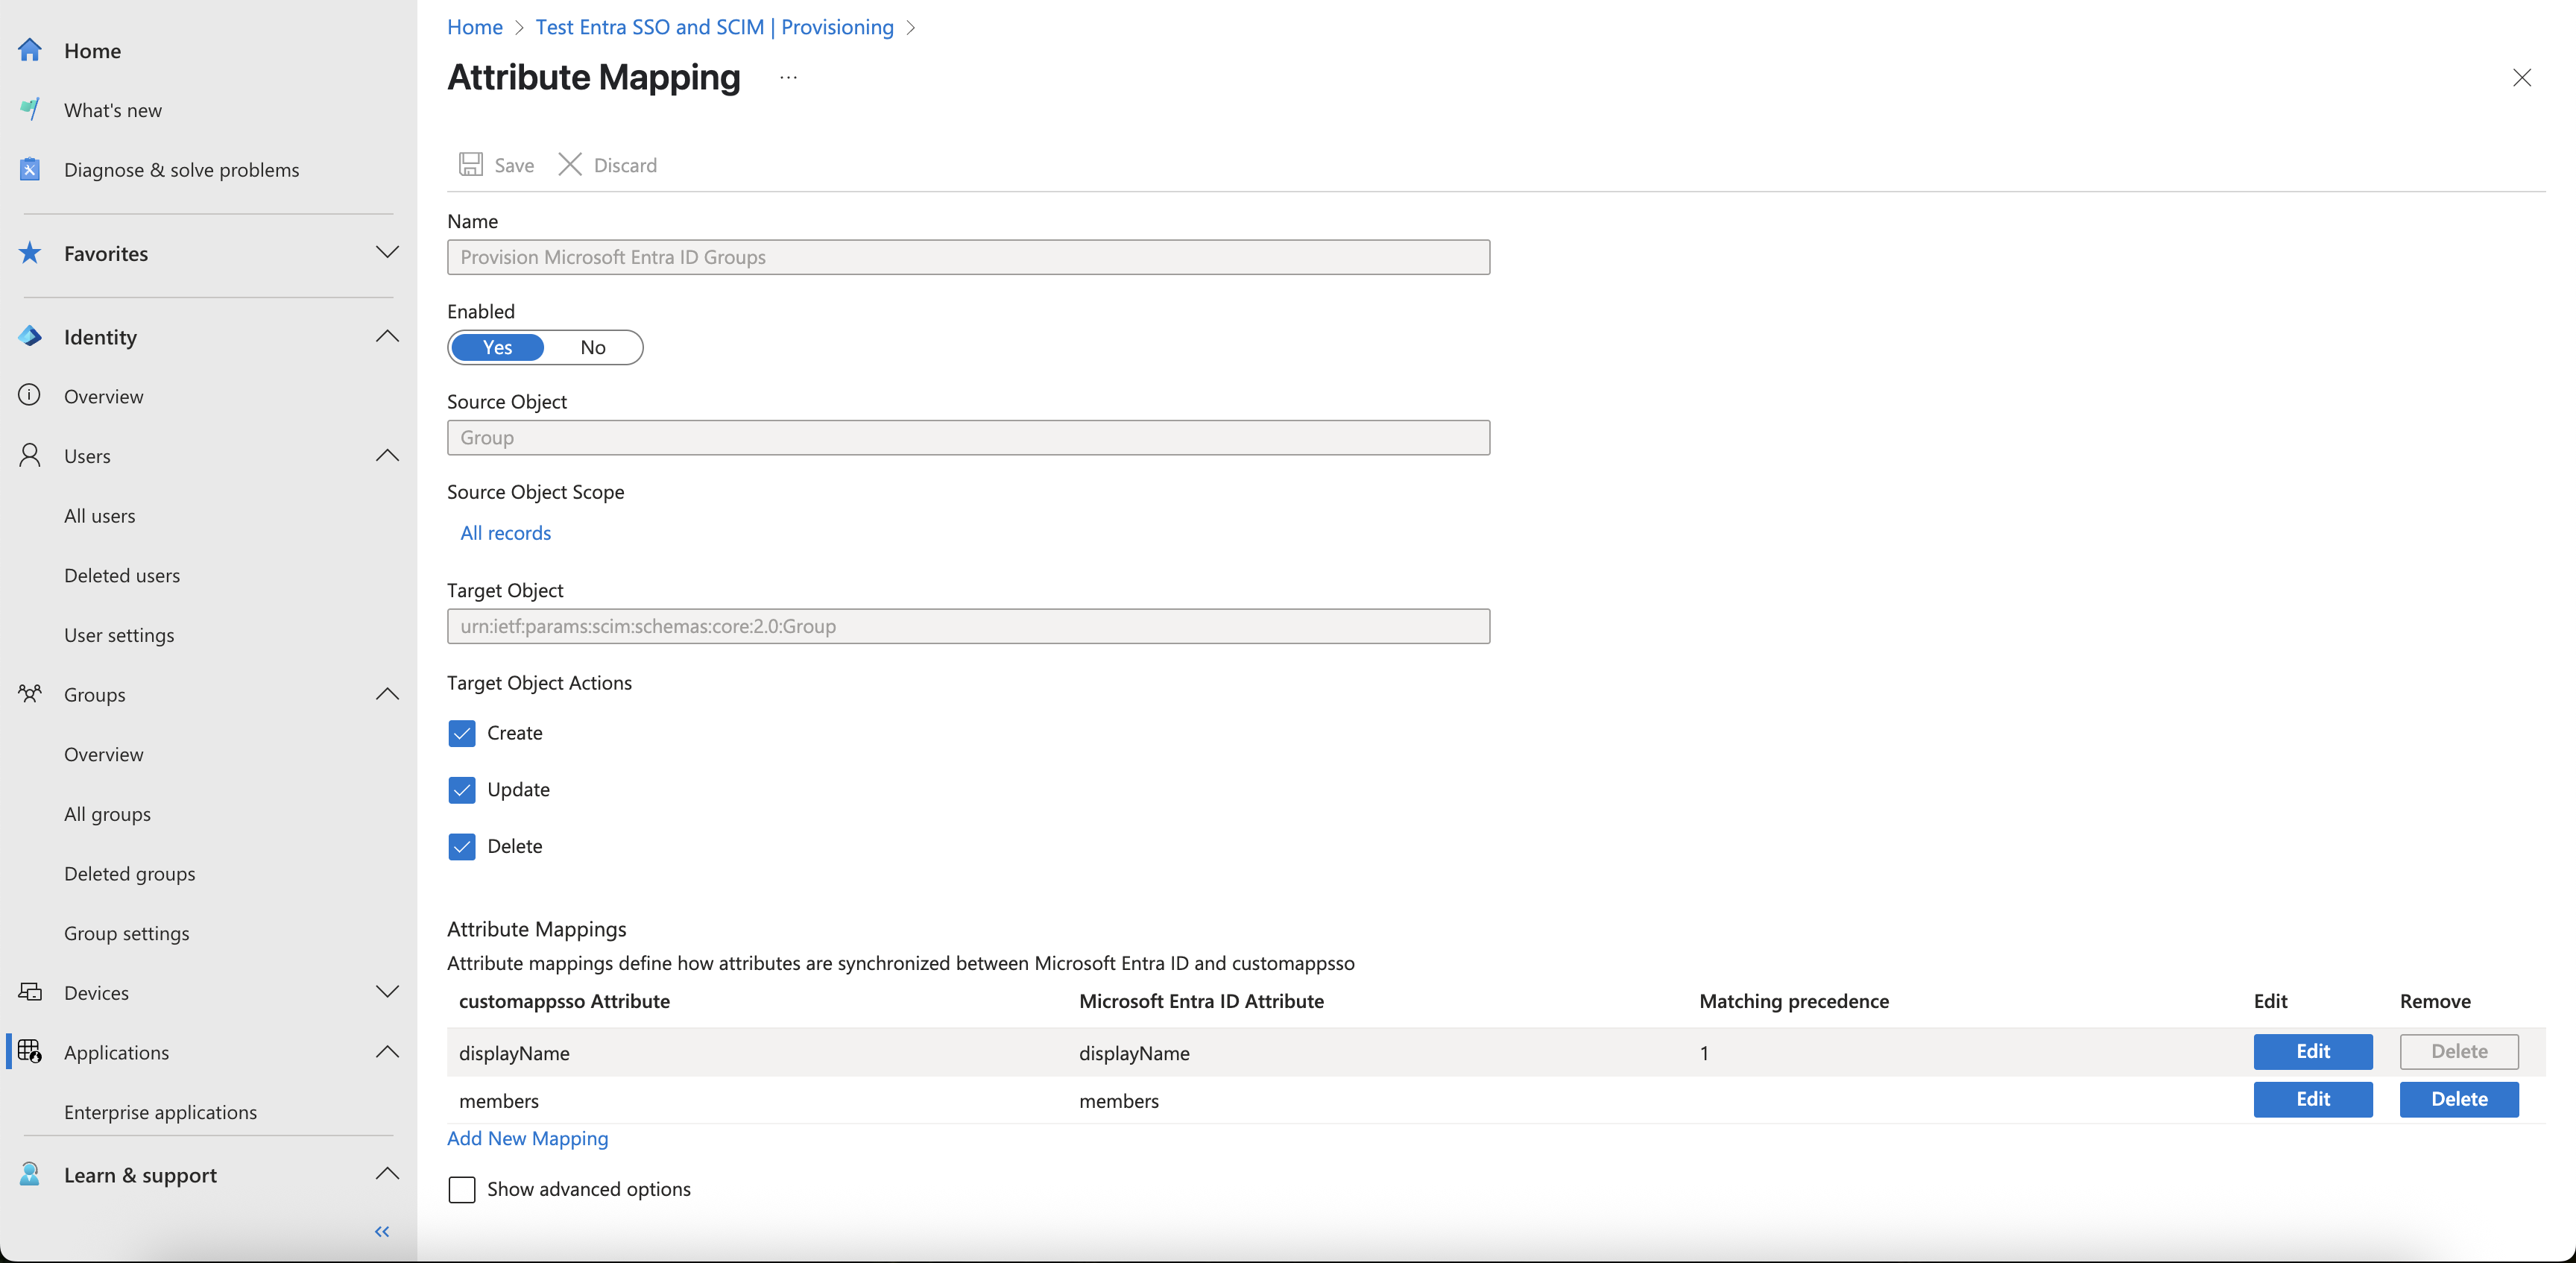
- The Group provisioning section (
Provision Microsoft Entra ID Groups) does not require any changes. The default configuration works out of the box. If you want to verify it, ensure that thedisplayNameTarget attribute is mapped to thedisplayNameSource attribute, and that Match objects using this attribute is set toYeswith a Matching precedence of1for this mapping. Additionally, themembersTarget attribute should be mapped to themembersSource attribute. Optionally, you can delete theexternalId(Target attribute) toobjectId(Source attribute) mapping.
Example of a valid group attribute mapping configuration:
As with the earlier example of the SAML group attribute configuration, this example SCIM setup is also optimized for a cloud-only Entra group environment; for an on-premises or hybrid group setup that includes both on-premises groups synced to Entra and cloud-only groups in Entra, you need to ensure that the Source attribute selected during SCIM provisioning for the displayname Target attribute fits your Entra configuration and also aligns with your SAML attribute mapping.
- When provisioning groups with members, keep in mind that users added with this process will not automatically receive the intended Hightouch group assignment, as the SSO group mapping between Entra and Hightouch cannot yet exist at provisioning time.
Let’s assume the corresponding Hightouch group already exists. In that case, to ensure the user is correctly assigned to that group in Hightouch:
- After the initial group-with-members provisioning, set up the relevant Entra → Hightouch SSO group mapping inside Hightouch.
- Then, have the user log in to Hightouch via Entra using SAML SSO. The group assignment will be applied at that time (assuming the SAML attribute mapping is correctly configured, as per our documentation).
Other identity providers
Hightouch supports all major identity providers, including OneLogin, Rippling, Google, Ping, and more.
The setup instructions are generally similar to those provided above for Okta. If you encounter any issues or need assistance, please don't hesitate to reach out to our support team—we're here to help!
Rollout, migration, and diagnostics best practices
These recommendations help reduce lockouts and access regressions during new SSO deployments, IdP migrations, and certificate rotations.
Before rollout
- Use the exact Hightouch values for SSO URL and Audience URI from the SSO modal. Even minor typos can cause login loops.
- Plan your IdP group taxonomy and mapping strategy before production rollout.
- During initial validation, keep default access minimal and temporary until group mappings are verified.
During migration or cutover
- Recreate your SAML app in the new IdP/tenant with the same Audience URI, NameID format/source, and required claim mappings.
- Update Hightouch with the new IdP SSO URL and signing certificate.
- Generate a new SCIM token and connect SCIM in the new IdP app before disabling SCIM in the old app.
- Validate with a small pilot (2-3 users), then expand to a full rollout.
Keep an admin validation path during cutovers, for example by testing in a separate browser session before organization-wide rollout.
Diagnostics
- Test in an incognito/private window to avoid cached session effects.
- Use a SAML tracer tool to inspect incoming NameID and group claims.
- If users can authenticate in your IdP but have no workspaces, verify SSO group mappings and that expected groups have been sent to Hightouch.
SSO disable/rollback is not self-serve in the app. If you need emergency SSO disablement for recovery, contact Hightouch Support.
FAQ
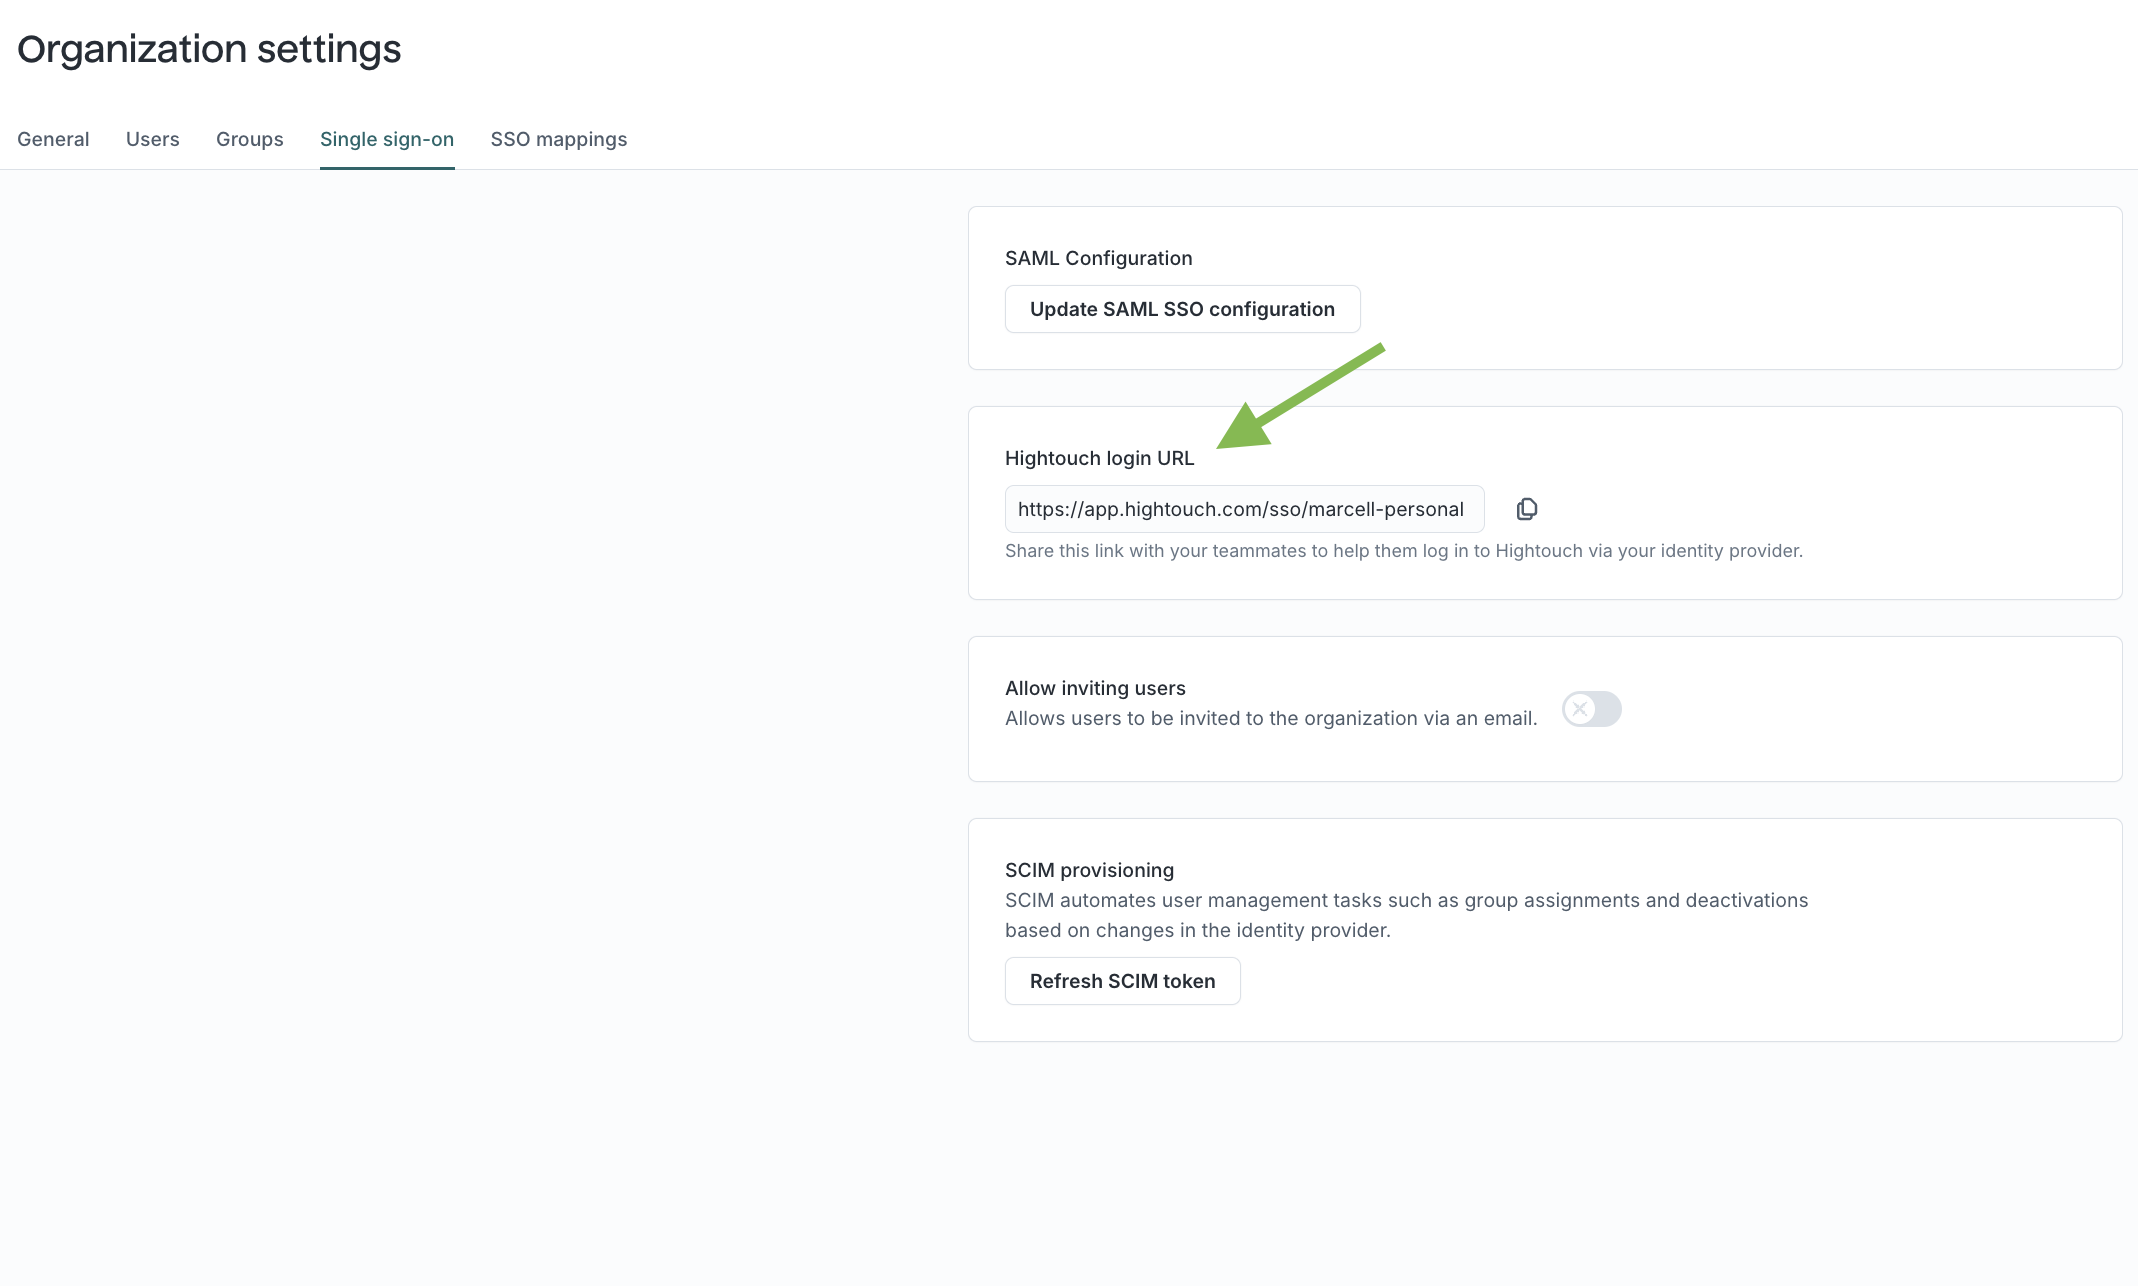
Where can I find my organization identifier to log in with SSO?
After setting up SSO, you can share your workspace's direct Hightouch login URL, which is available in the Single sign-on tab on the Organization settings page.
The organization identifier is the part that appears after /sso/.
I've enabled SSO in my workspace—how do I invite the rest of my team?
Once SSO is enabled, users no longer need a direct invitation to join your Hightouch organization. When they log in through your identity provider for the first time, Hightouch will automatically create an account for them.
How do I allow or disallow non-SSO logins?
Go to the Single sign-on tab in the Organization settings screen. Here, you'll find a toggle labeled Allow inviting users. We typically recommend disabling this when using SSO to ensure that all users in your organization are managed through your central identity provider.
However, there may be situations where you'd want to allow non-SSO logins for external users, such as contractors or consultants. In these cases, you might choose to leave the setting on.
When trying to login, I get redirected to app.hightouch.com/login.
If you see the Log in to Hightouch page instead of your Hightouch workspace after logging in with SSO, you need to make sure your IT team has appropriately set the Audience URI when configuring SAML SSO for login).
I don't see any workspaces after accepting an invitation.
There are a few possible reasons for this:
- If your workspace uses SSO, you shouldn't need to accept an invitation. Instead, use your organization's dedicated login link (shared with you directly or accessible through your identity provider). This ensures that you're logging in to the correct organization.
- If you land on the Welcome to Hightouch page, you may have accidentally created a separate Hightouch account. Keep in mind that Log in with Google and Log in with Microsoft do not connect to your company's central identity provider. To access your company's organization, be sure to select Log in with SSO.
- Confirm with your team that your account is mapped to at least one user group in Hightouch. Group assignments might be automatically inherited from your identity provider. Without being part of a user group, you won't have access to any workspaces.
When I log in to Hightouch after configuring SSO, I am shown an error on the log in page.
In your SAML configuration:
- Check that you have mapped attributes for
nameandemail. See the SSO setup instructions for more detailed steps. - Ensure you used the correct Hightouch SAML URL and audience URL provided in your dashboard.
If you made changes to the SAML app in your identity provider between uploading your self-serve SAML settings, you can try to re-generate a certification and upload the new app settings on the Hightouch SSO tab.
I see an error when logging into Hightouch after configuring SSO.
In your SAML configuration:
- Verify that the attributes for
nameandemailare correctly mapped. Refer to the SSO setup instructions for detailed guidance. - Make sure you are using the correct Hightouch SSO URL and Audience URI when configuring SAML SSO in your identity provider.
If you made changes to the SAML app in your identity provider after uploading your self-serve SAML settings, try re-generating a certificate and uploading it again.
I see a duplicate user in Hightouch after logging in for the first time with SSO.
This is expected. SSO users are treated as separate from non-SSO users, so it's possible to have two users with the same email address (but different login methods). If you no longer need the original non-SSO user, you can manually delete it. This doesn't affect workspace-owned resources like syncs, models, sources, and destinations.
However, API keys stop working when the user who created them is deleted or loses workspace access. Before deleting the original non-SSO user, check whether they created any API keys, create replacements as the new SSO user, and update any integrations that use the old keys.
I don't see any groups on the SSO tab of my dashboard.
You will only see groups and their mapped roles on your SSO tab if your identity provider has been configured to send the groups attribute. Users may need to log out and log back in for changes to take effect.
My group was updated in my organization's identity provider, but I still belong to the same group in Hightouch.
You will need to log out and log back in for changes to take effect.
Why can't I remove certain group assignments in the Hightouch app?
Group assignments inherited from your identity provider cannot be overridden. However, you can still manually add additional users beyond those assigned by your identity provider.
I see a "Matching user not found" error when adding users after enabling SCIM.
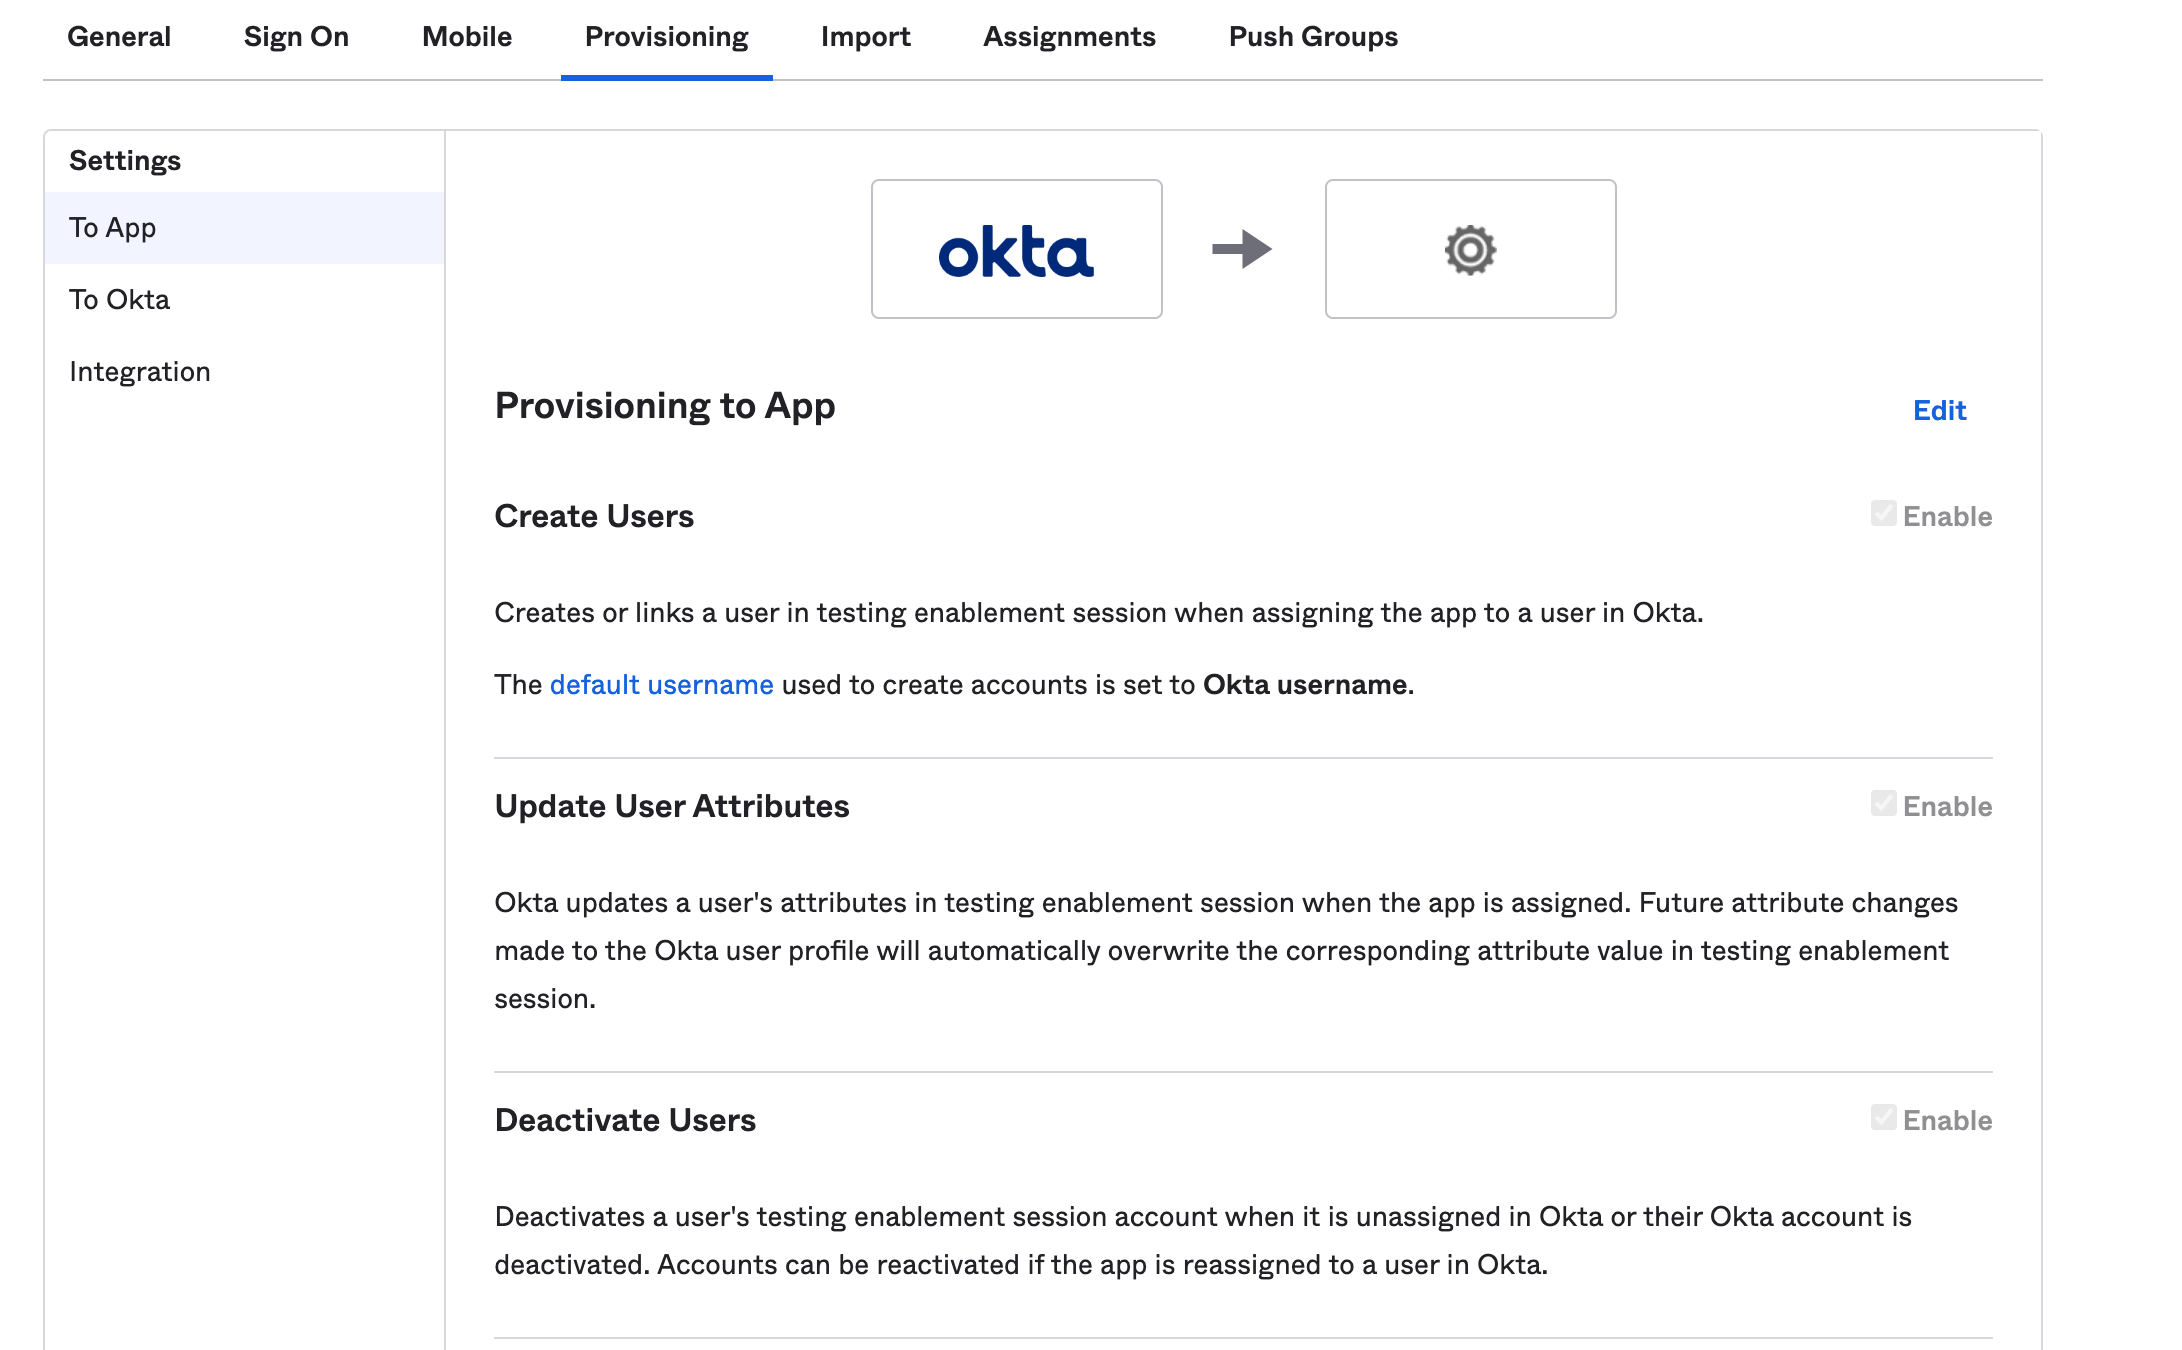
When SCIM is enabled, your identity provider needs to be configured to create users in Hightouch. For example, in Okta, you must go to the Provisioning tab and ensure your Hightouch integration app has permissions to Create Users, Update User Attributes, and Deactivate Users.
Once these settings are updated, delete any users showing the "Matching user not found" error and re-add them.