Overview
One of the key aspects of sync configuration is field mapping. Field mapping defines which columns from your model query results should appear in your destination and how. In other words, it's a way of relating model columns to destination fields or properties.
"Columns" vs. "fields" vs. "properties": Though some may use these terms interchangably, Hightouch uses the term "columns" to refer to a set of vertical data values in a source or model and "fields" or "properties" to refer to them in a destination.
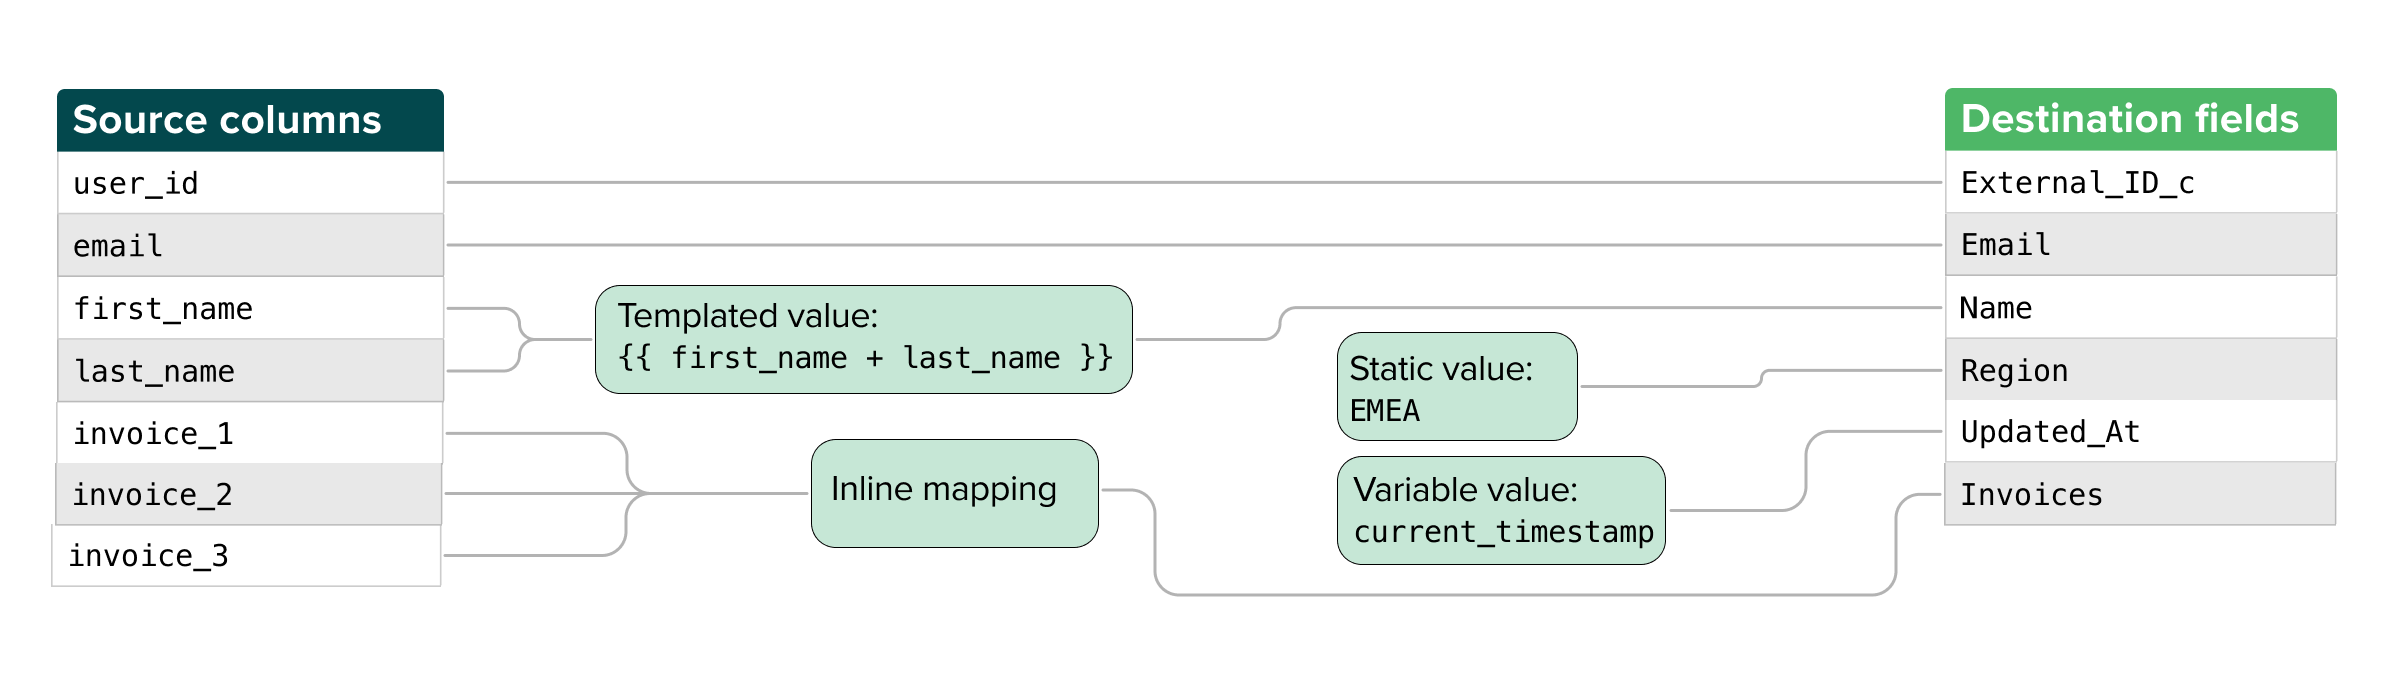
Depending on your destination, you can map your data with either the basic mapper or the advanced mapper. The basic mapper maps columns to fields in a one-to-one way. The advanced mapper gives the additional options of:
- mapping with static or constant values
- mapping with variables
- mapping with Liquid templates
- inline mapping, which lets you create nested objects and arrays from model columns
Usage
You can start with either the source or destination input fields when using either basic or advanced mapper. The Hightouch UI offers this flexibility to enable you to map data the way that makes the most sense for you.
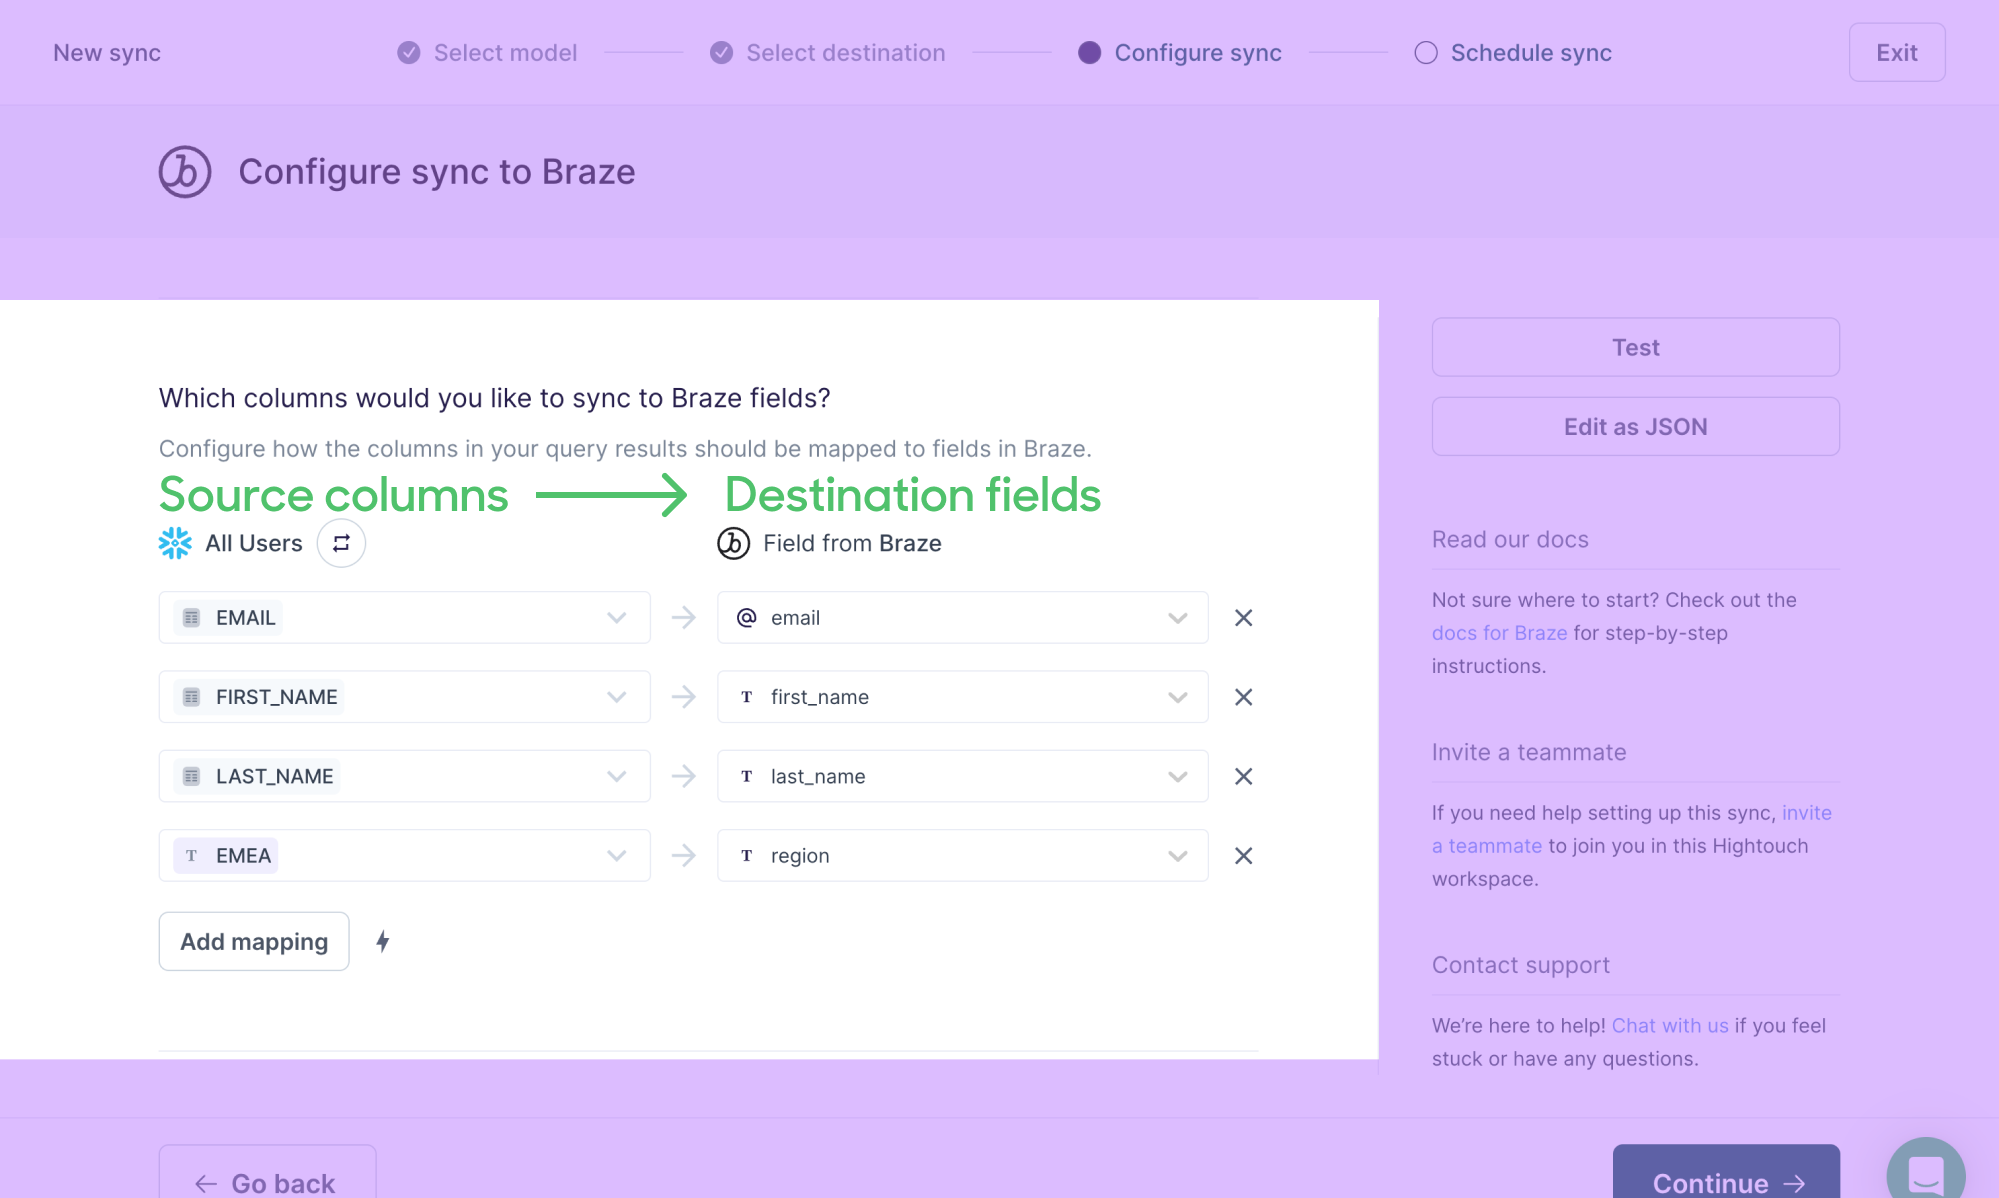
For example, you may approach mapping with an idea of all model columns you want to send to your destination. To do so, click Add mapping and select each model column in the left-hand inputs. Then select the appropriate destination fields to map them to in the corresponding right-hand dropdowns.
Conversely, you may know all the destination fields you need to sync to. Select each destination field from the dropdowns on the right and map the appropriate model columns on the left.
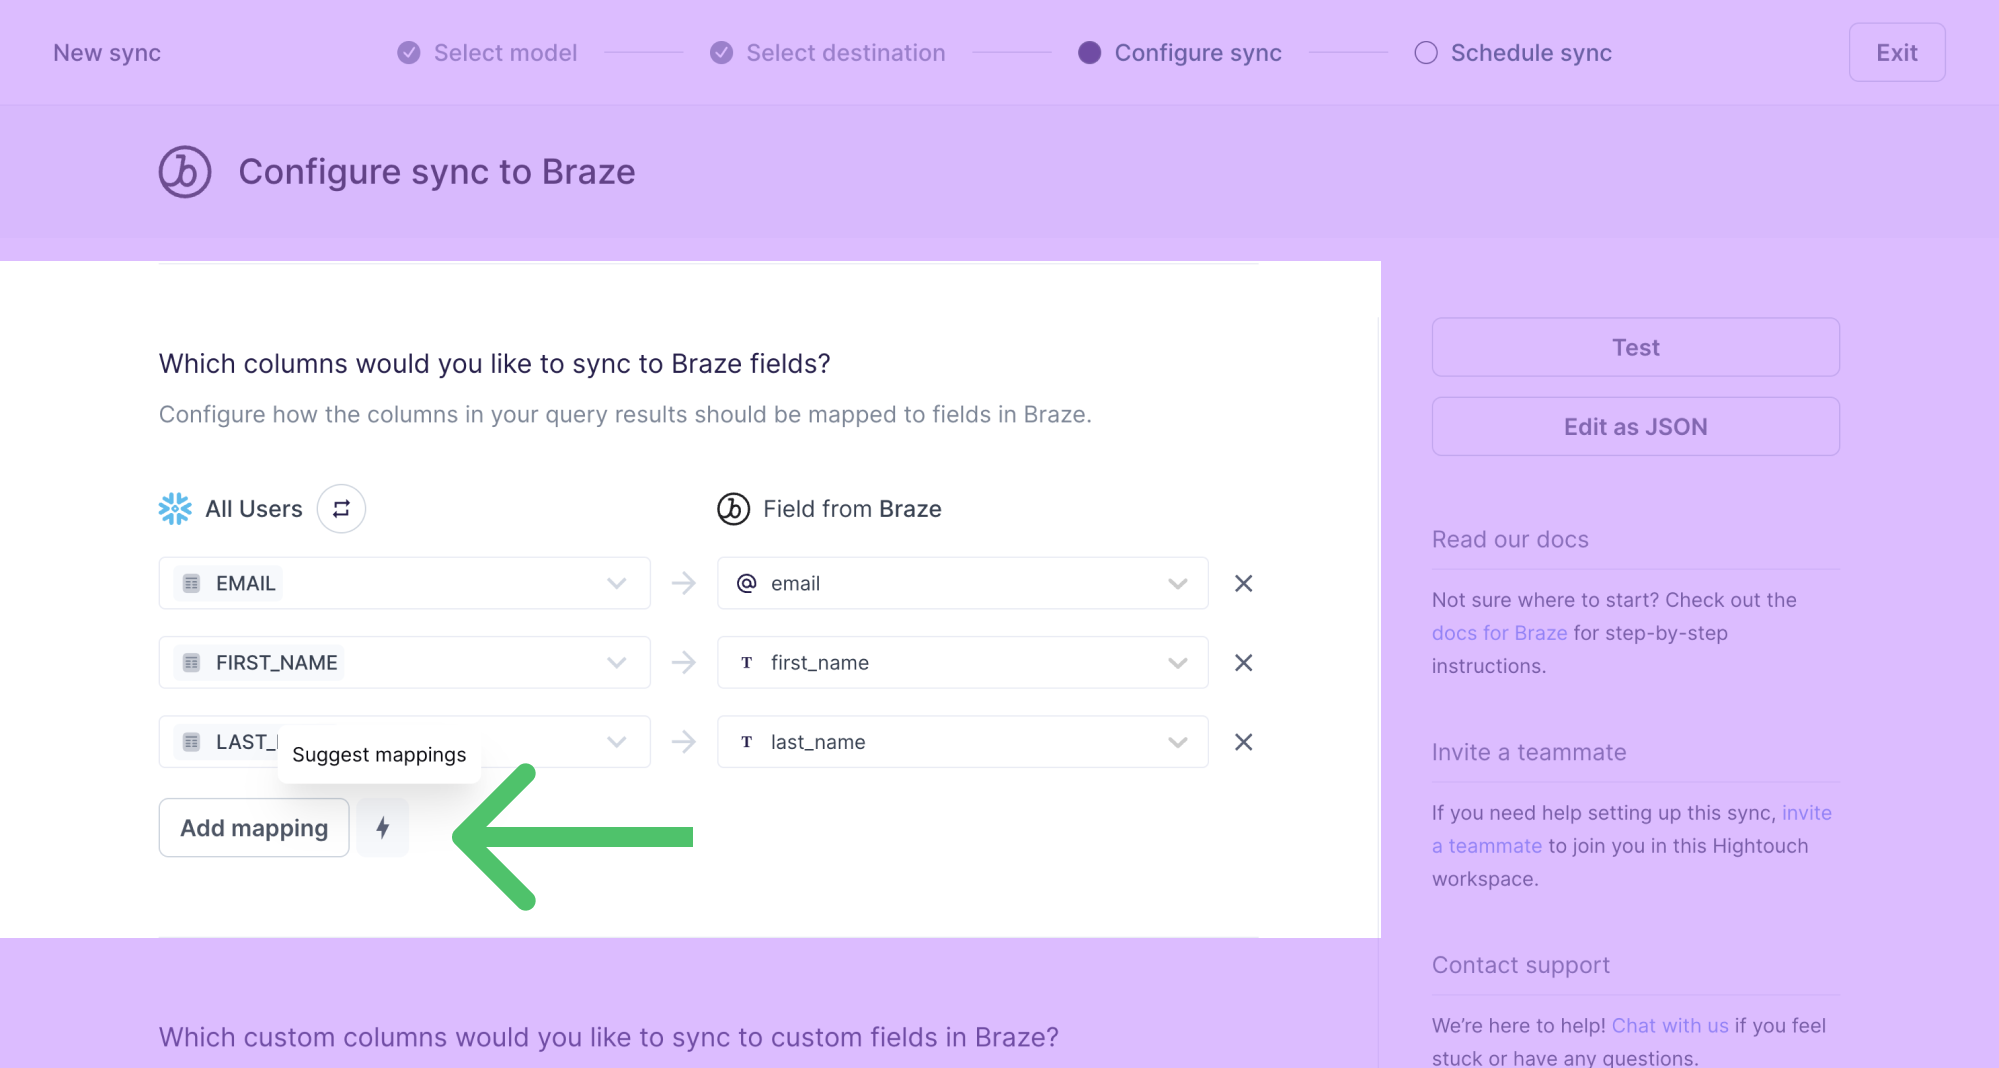
You can also select to Suggest mappings. This option proposes relevant destination fields for model columns. For example, a model column named email_address would receive a suggested destination field like Email. This autocompletion works by searching for matching and near-matching column and field names. Before saving your configuration, you should confirm that the autocompleted suggestions have made the correct selections.
Basic mapper
With the basic mapper, you tell Hightouch which columns in your source to feed into which fields in your destination. For example, you can use the basic mapper to relate model columns to destination fields like these:
| Column in your source | Field in your destination |
|---|---|
email_address | Email |
first_name | FirstName |
last_name | LastName |
account_id | AccountId |
Advanced mapper
For destinations with the advanced mapper, you can create mappings that include:
- a column value
- a static value
- a sync-based variable value
- values using the Liquid templating language
- nested objects and arrays using the inline mapper
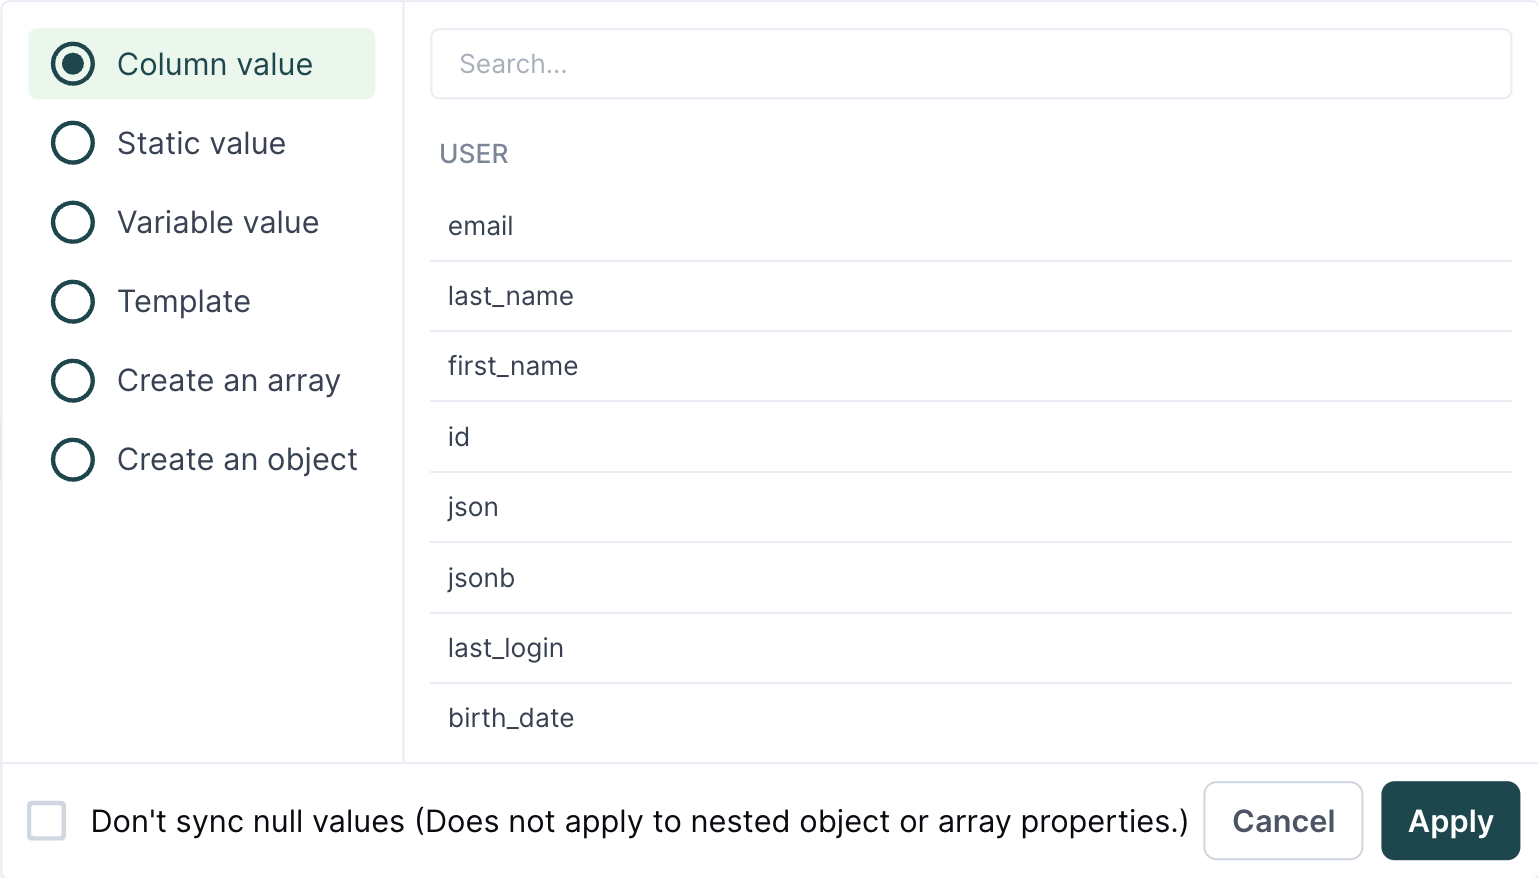
You can open the advanced mapper by clicking the source field you want to map. If you click a source field and the advanced mapper doesn't appear, it isn't supported. Please if you have a use case requiring the advanced mapper on a destination that doesn't support it.
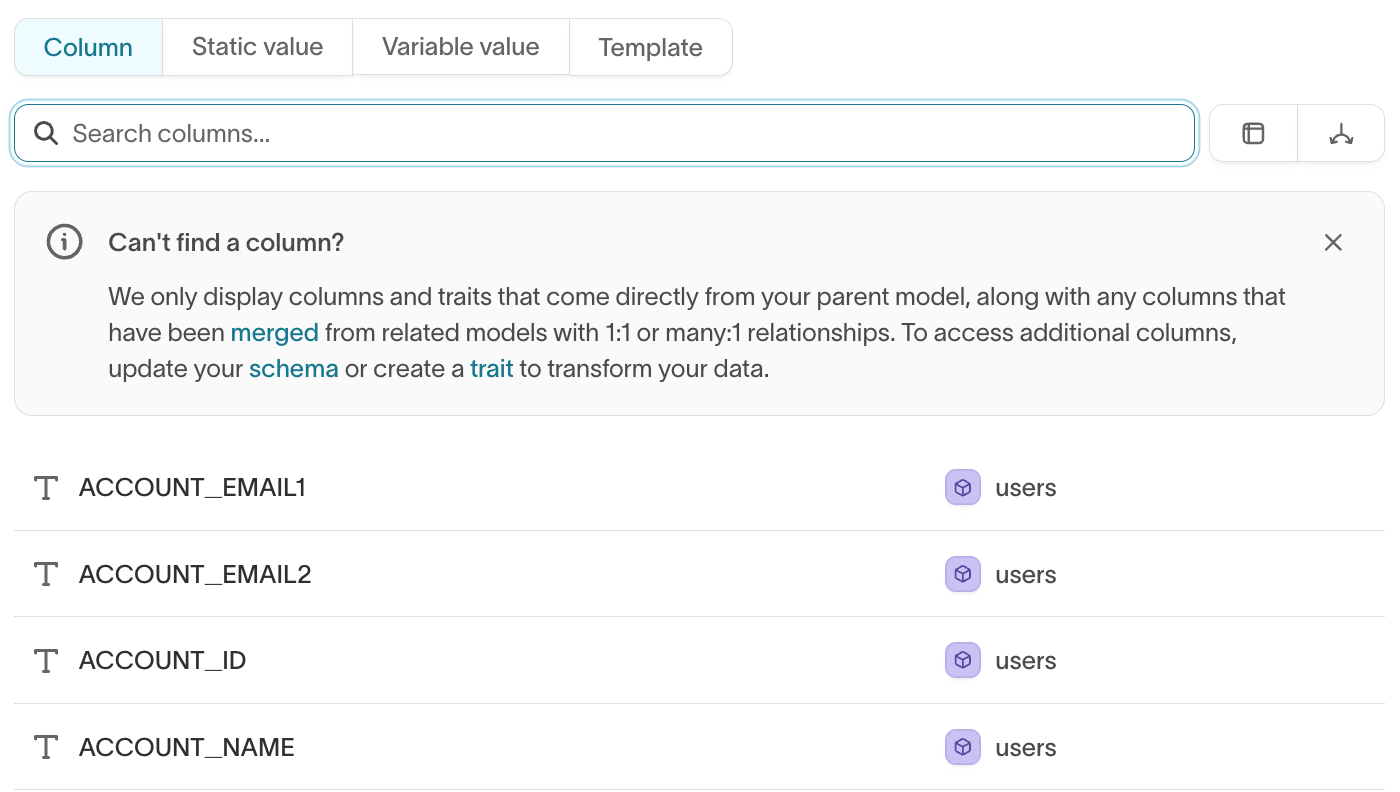
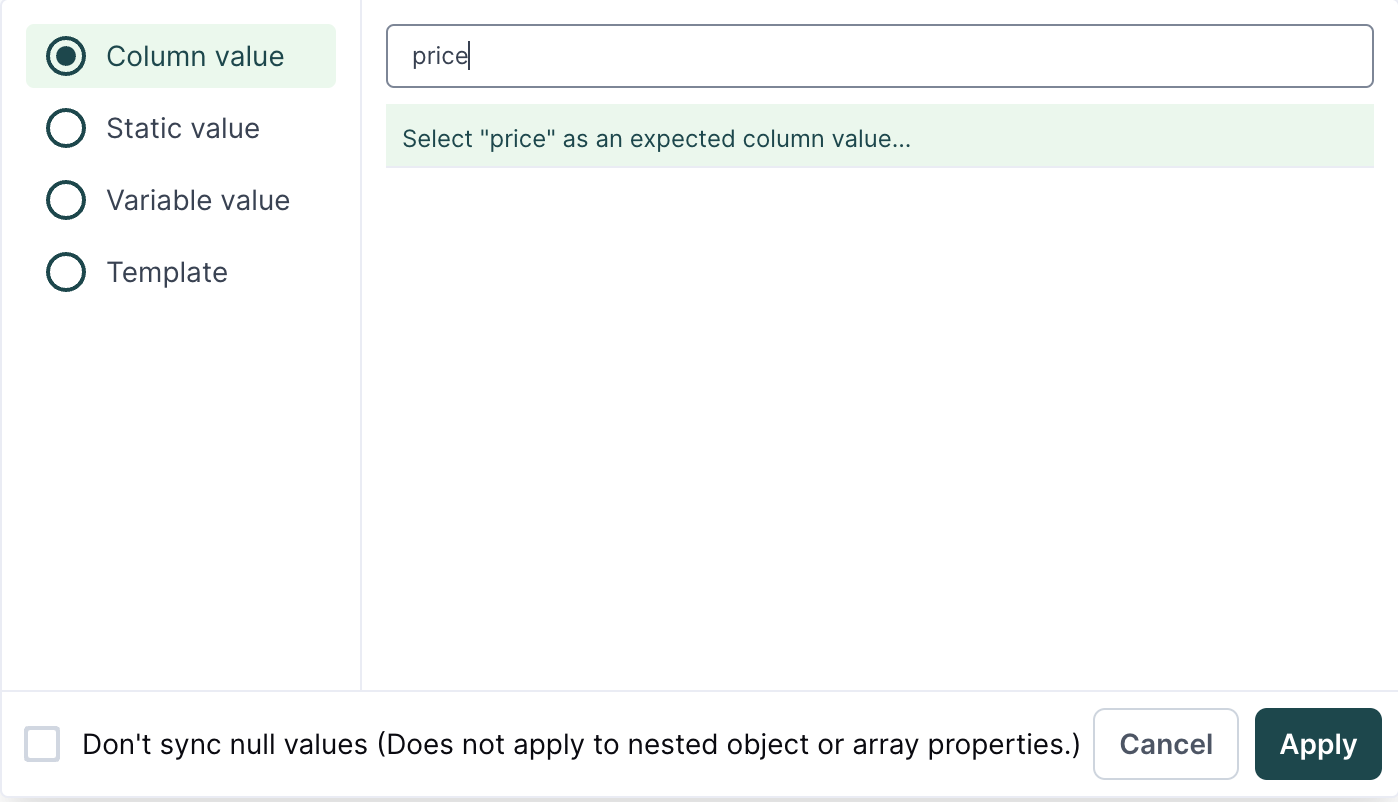
Column values
Mapping column values is similar to the basic mapper's functionality. You can search for and select the model column name you want to map to a destination field.
Don't sync null values
By default, Hightouch syncs any null values found in your model query results to your destination. You can select to sync nothing instead of null values by enabling Don't sync null values.

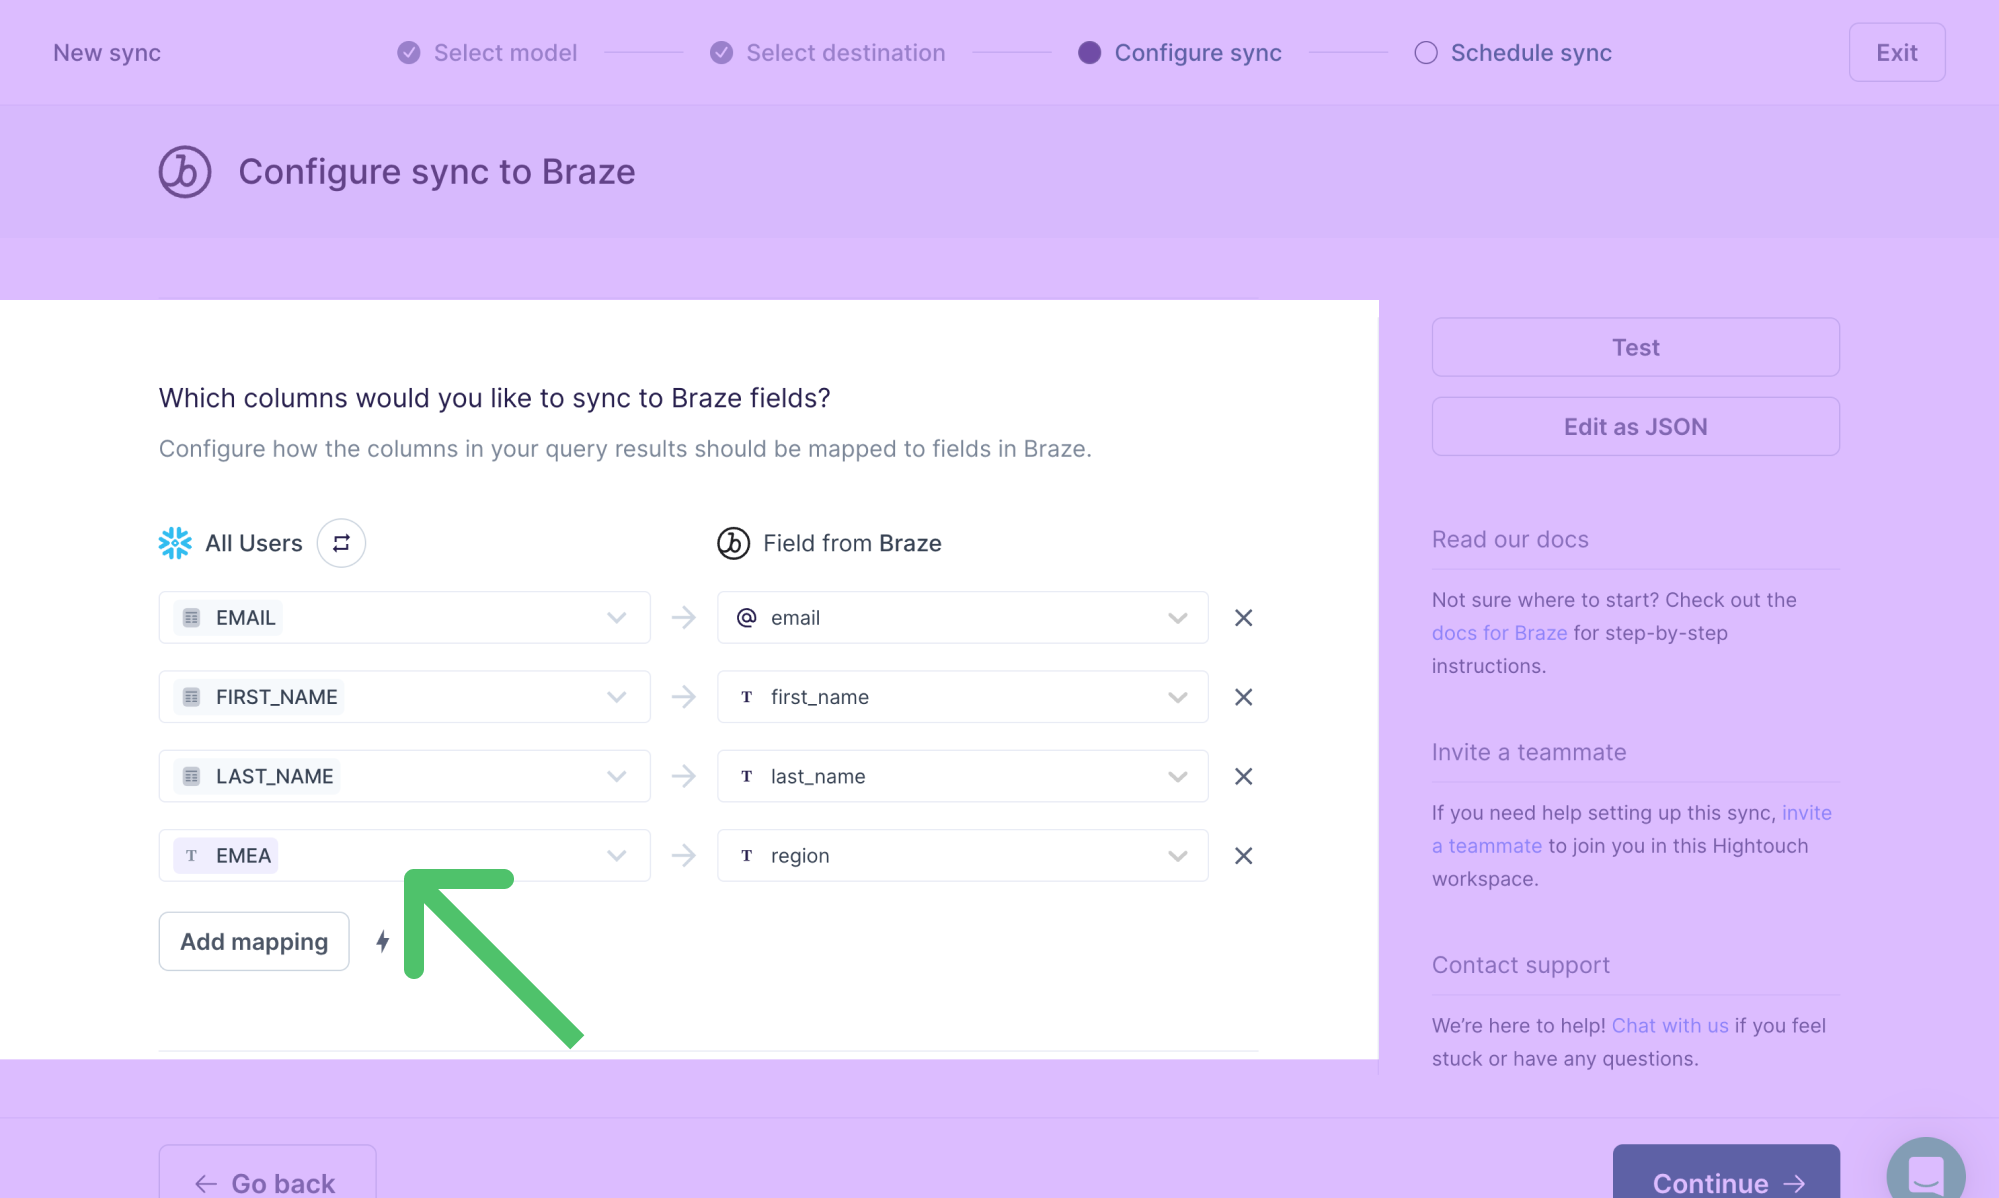
Static values
With static mapping, you can specify a constant value to use for each field value. For example, suppose you want to map the string value EMEA for every record's region field value in a destination. You can do this with static mapping:
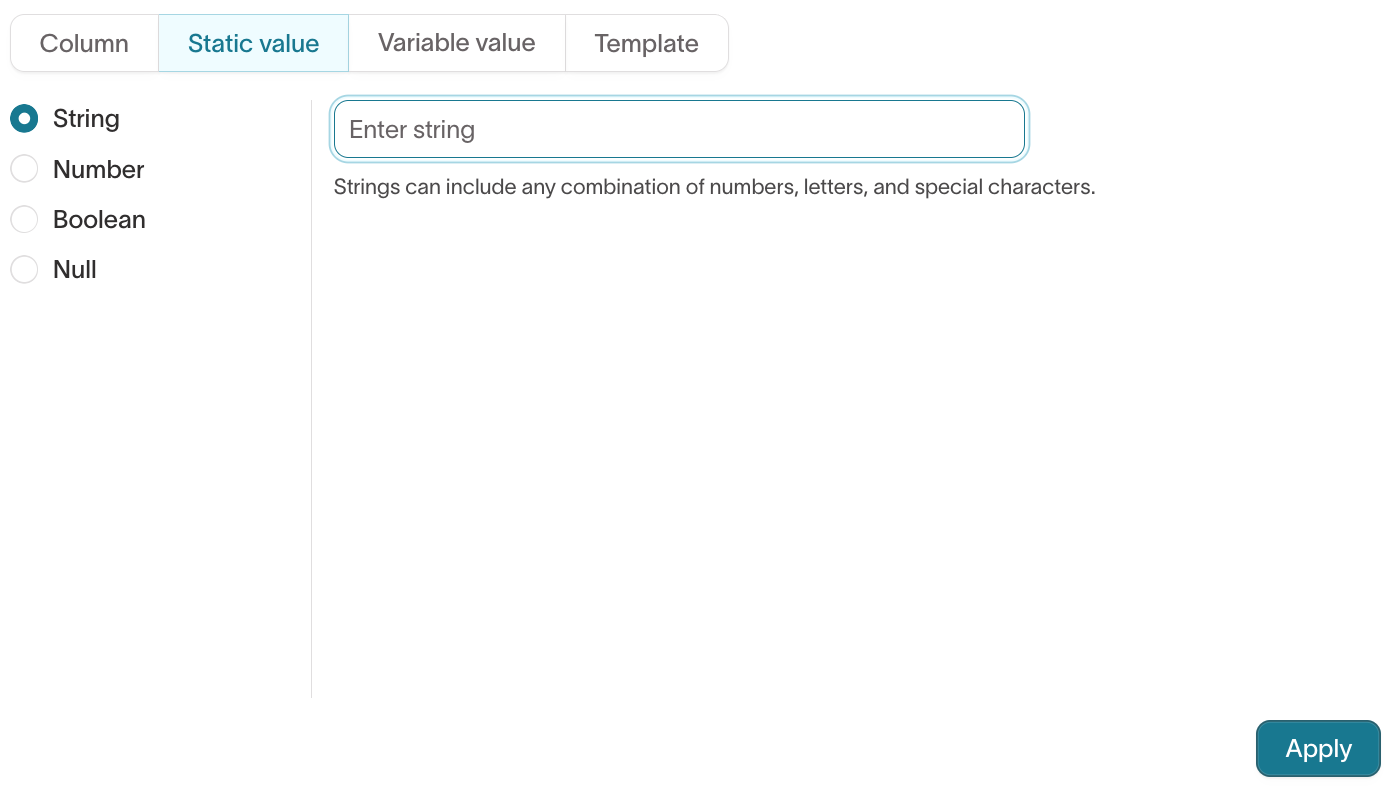
- Open the advanced mapper by clicking on a model column.
- Select Static value and the value's data type: String, Number, Boolean, or Null.
- Enter the desired value in the field provided.
- Click Apply.
- In the field input to the right of the static value, select the destination field name to which you want to map the static value.
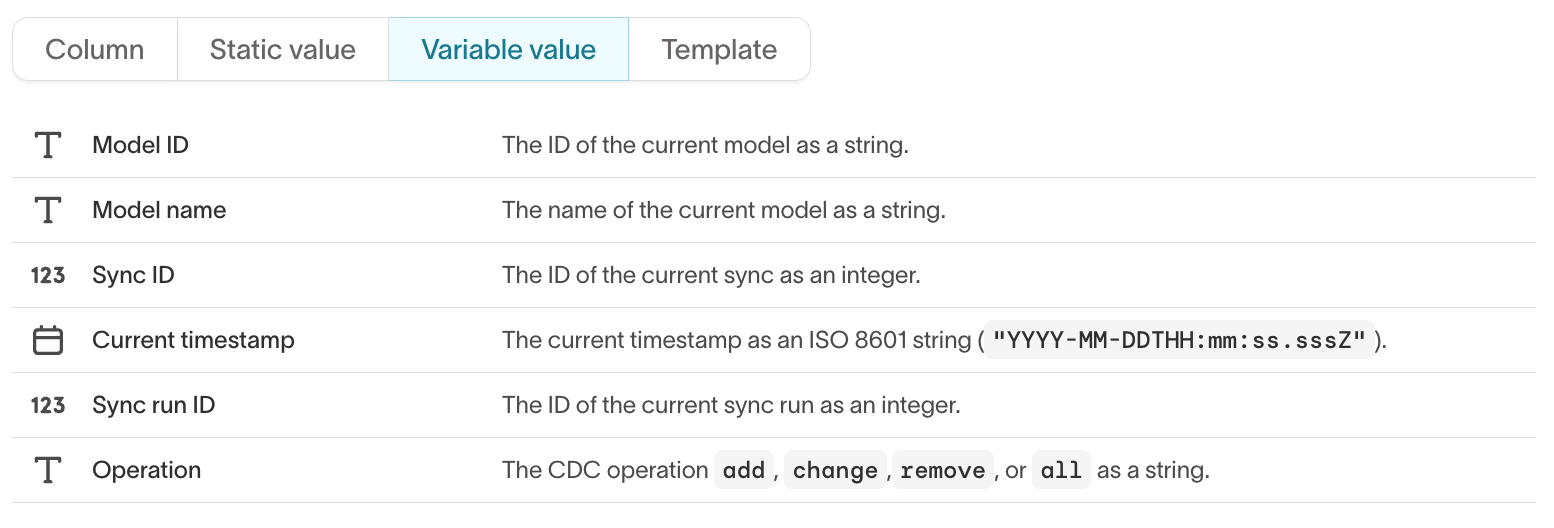
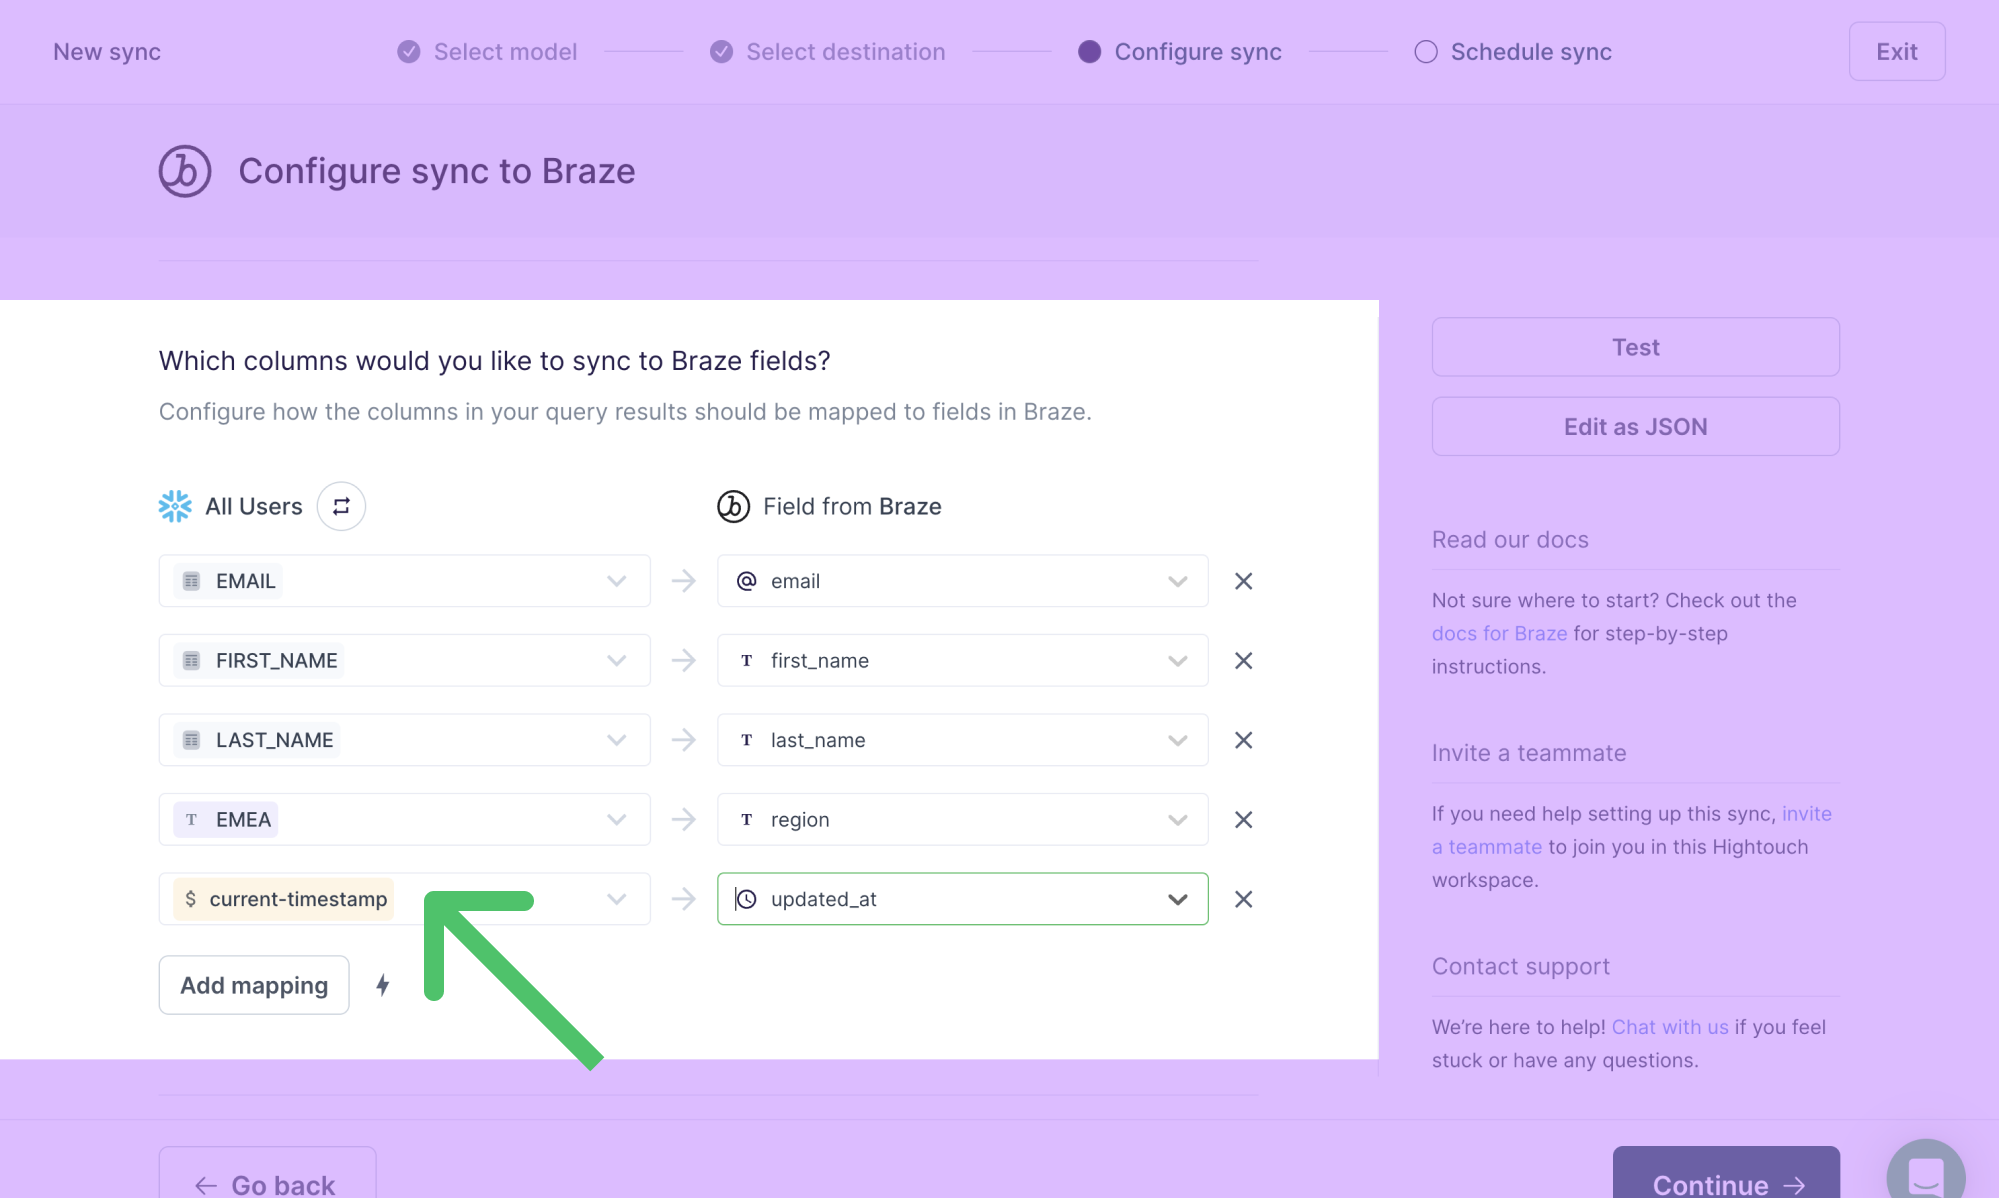
Variable values
With variable mapping, you can send sync metadata to a destination field. The available metadata variables are:
model-id(string)model-name(string)current-timestamp(date/time)sync-id(string)sync-run-id(string)operation(string)
For example, you may want to send a sync's timestamp to an updated_at field in a destination.
- Open the advanced mapper by clicking on a model column.
- Select Variable value and the desired metadata, for example, current-timestamp.
- Click Apply.
- In the field input to the right of the variable value, select the destination field name to which you want to map the variable value.
With this example mapping, Hightouch sends ISO time/date value (YYYY-MM-DD) into every record's updated_at field:
Template mapping
The template mapper is convenient when your destination requires data in a specific format, and you want to avoid baking this specificity into your model. For example:
- Webflow requires slugs not to have any special characters. You can use the template mapper's
regex_replacefunction to remove them. - You want to validate email addresses before sending them to Mailchimp or another email service provider.
- You want to enable lead routing in your destination using Liquid conditionals without touching your central dbt model.
To create nested objects or arrays, you need to use the inline mapper.
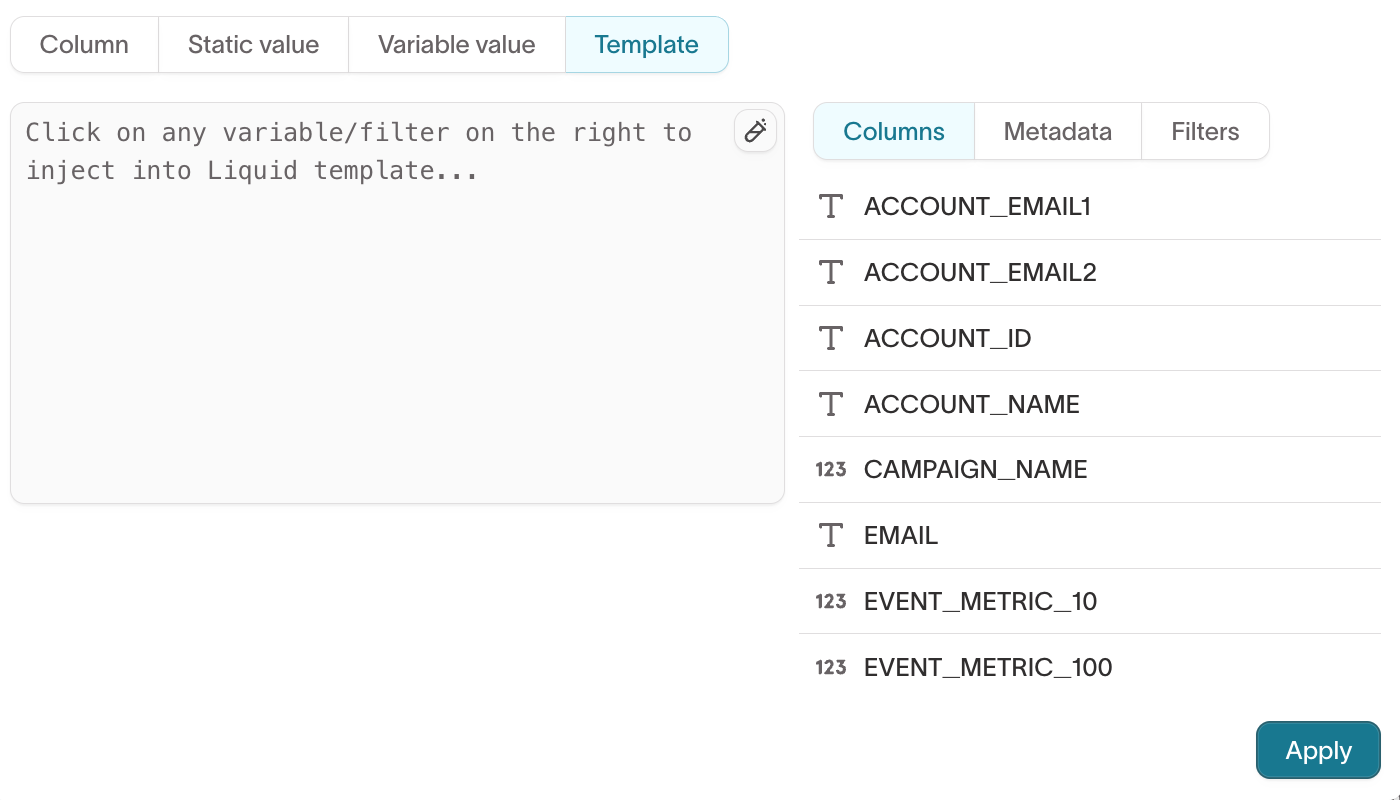
The template mapper uses the Liquid templating language to create complex mappings.
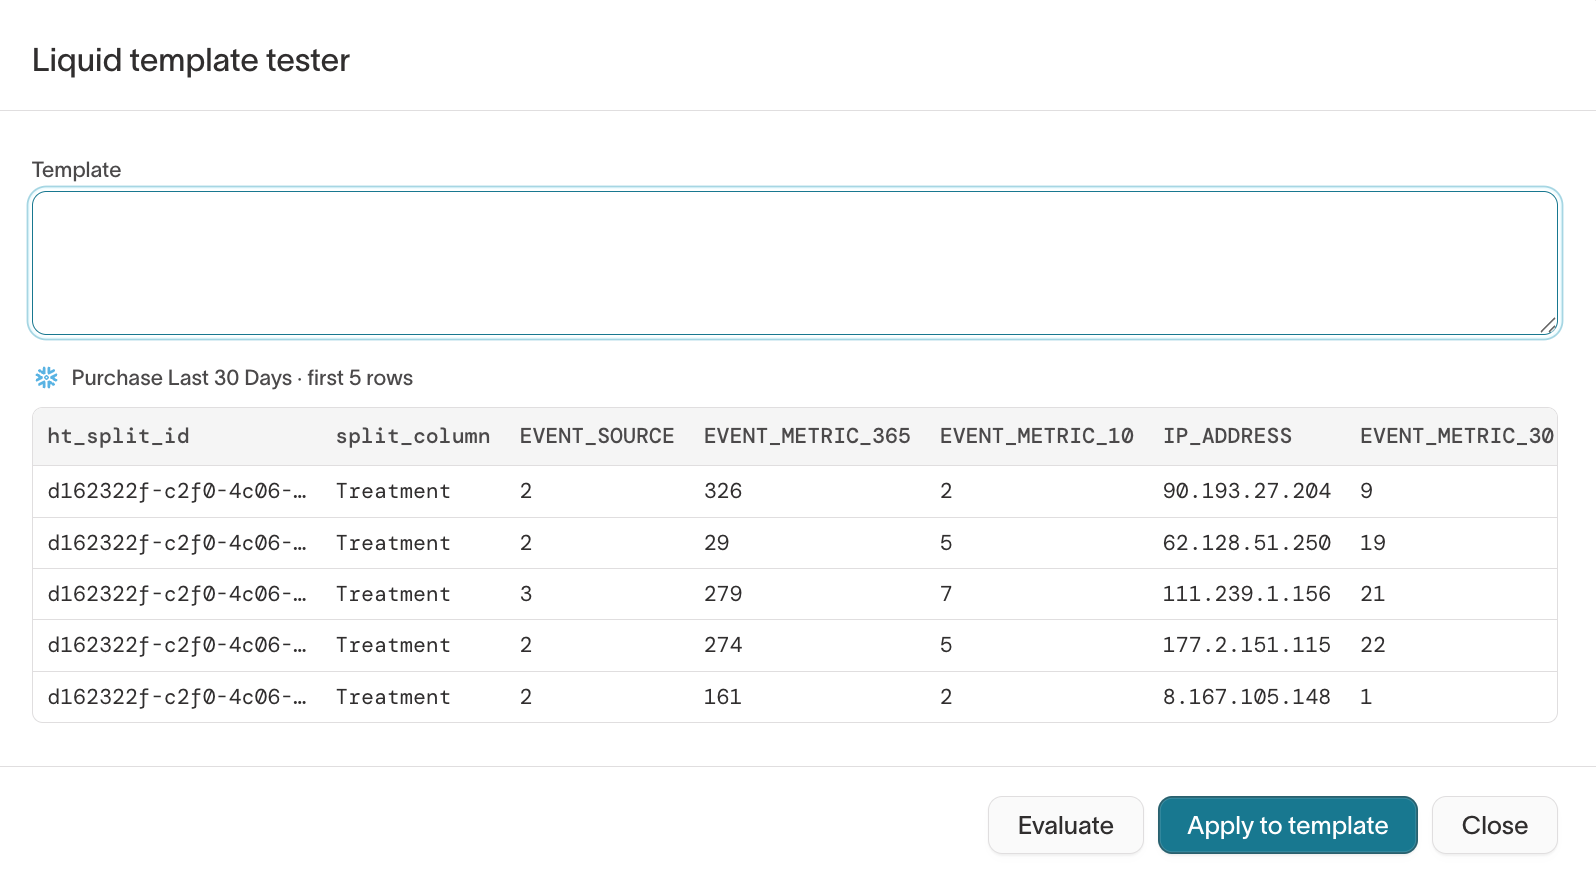
Test Liquid templates
Use the Liquid template tester to preview how your Liquid expression evaluates against real rows from your model before saving the mapping. The tester runs your template against up to five sample rows and shows the rendered output for each, so you can catch formatting issues, missing values, or logic errors without triggering a sync.
To open the tester, click the Test template icon in the top-right corner of the template editor. The tester evaluates your expression, displays the output for each sample row, and indicates whether the template parsed successfully. You can edit the template directly in the tester and apply it when you're satisfied.
- Open the advanced mapper by clicking on a model column.
- Select Template, then select a Variable and Function. The function's code automatically appears in the editor window.
- Click Apply.
- In the field input to the right of the templated value, select the destination field name to which you want to map the templated value.
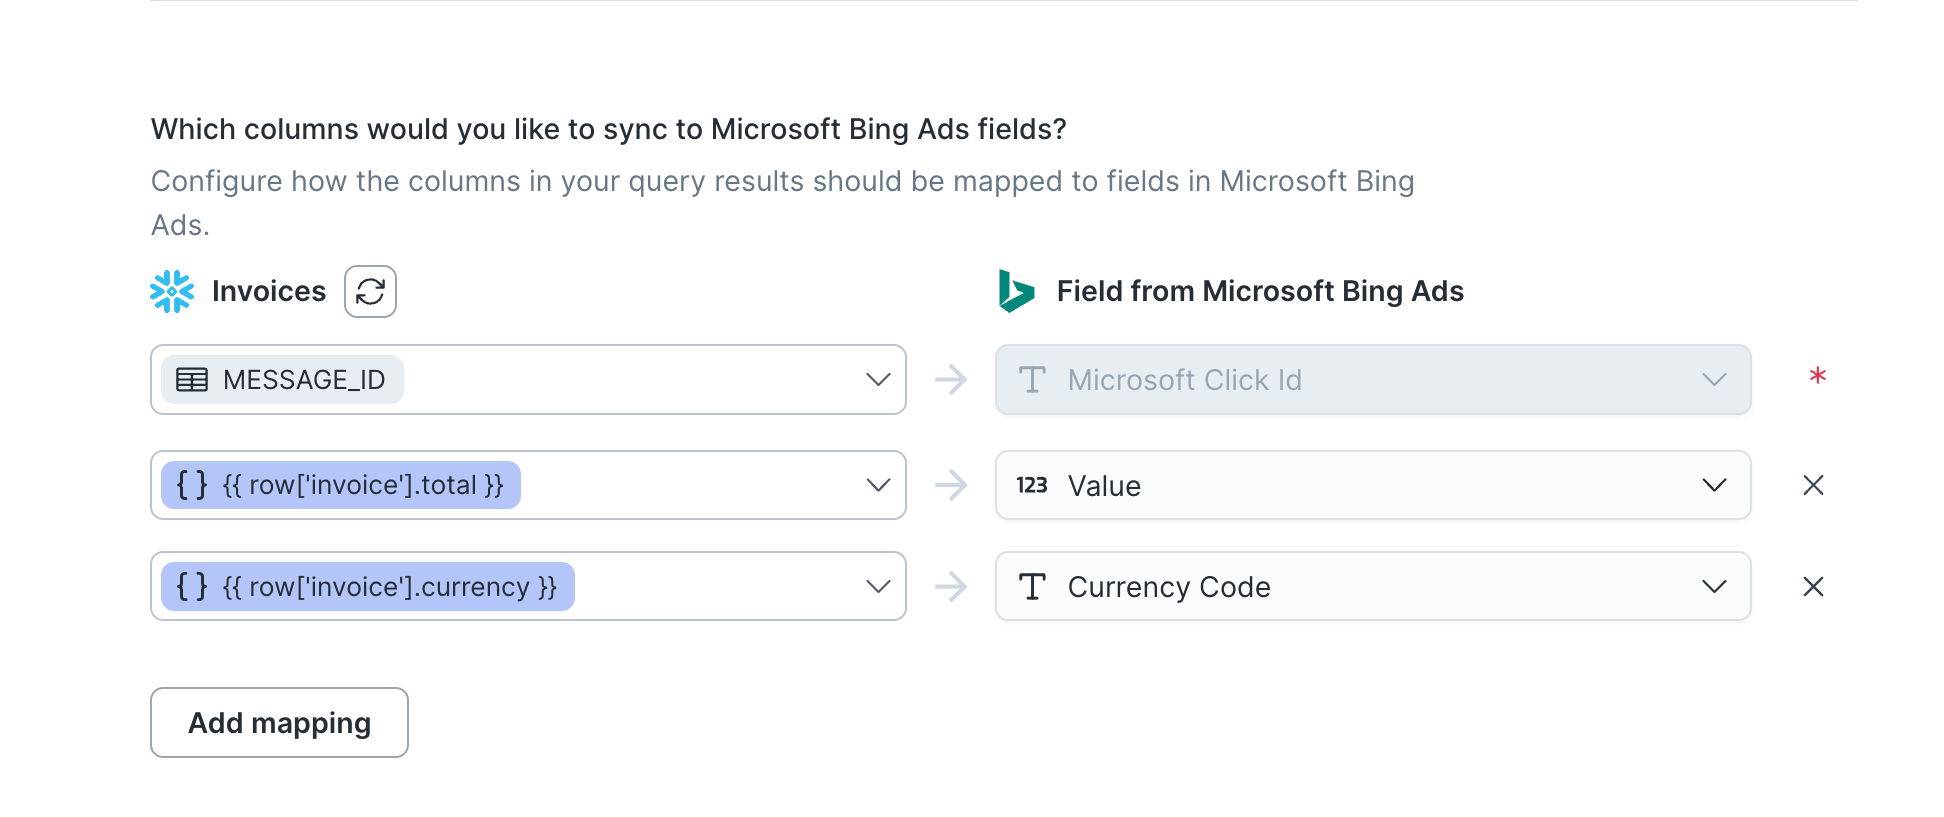
In the example screenshot, the template uses the function {{ row['last_name'] | includes: "Stark" }} to check checks if a row's last_name column includes the string "Stark". If it does, the row is processed. If it doesn't, the row is rejected.
Beyond using row values, accessible by {{ row['column_name'] }}, you can also access any of the variable values present in the advanced mapper. Switch to the Metadata tab in the template editor to see available context variables like Model ID, Sync ID, and Operation.
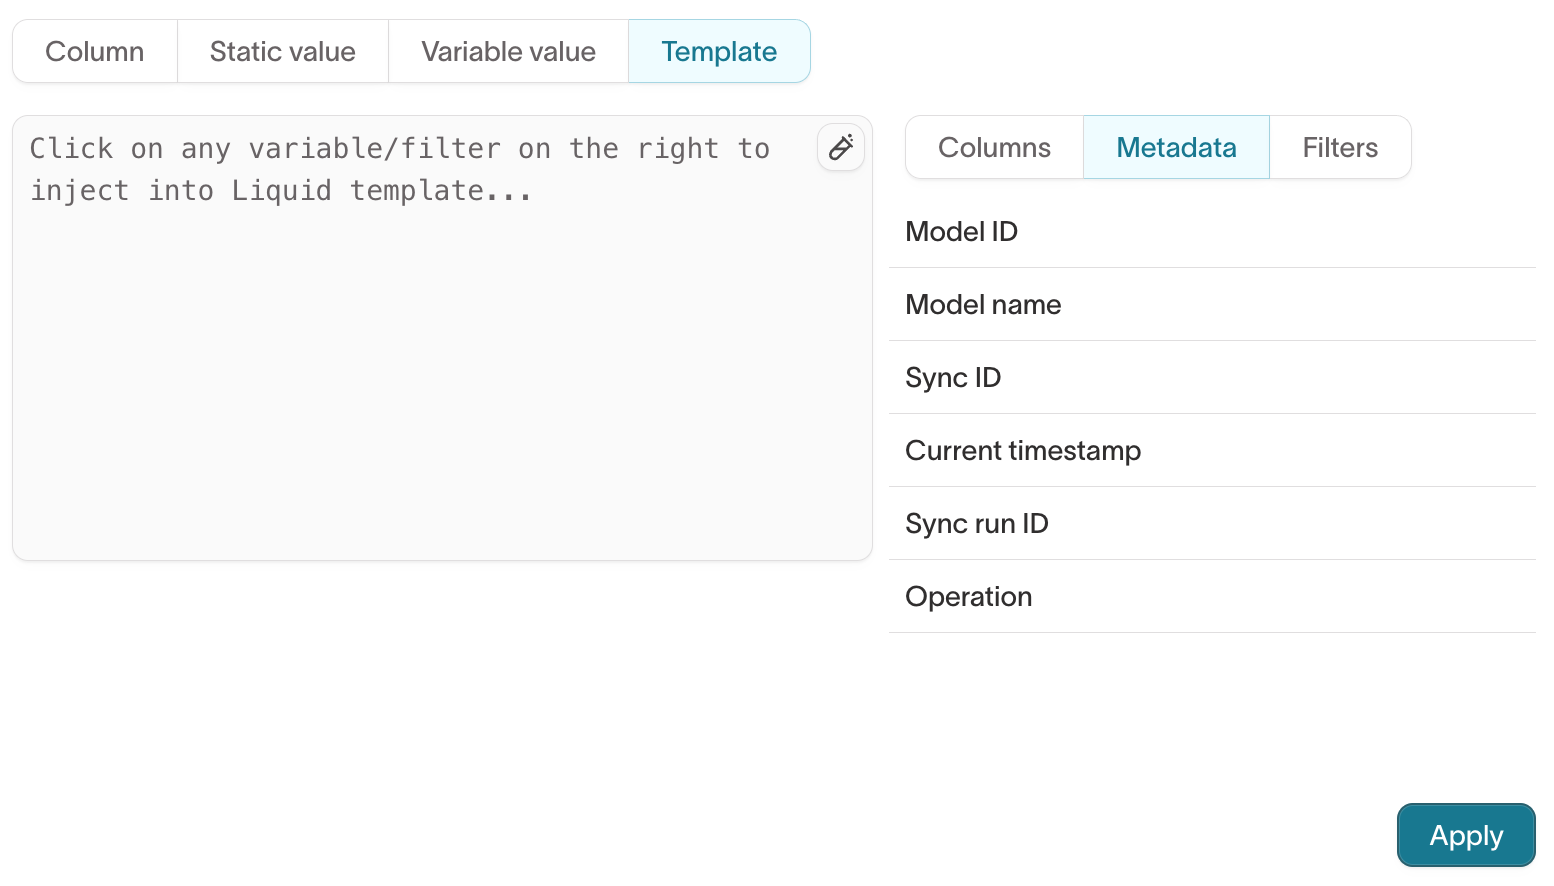
These variable values are available on the context object.
For example, you could you use {{ row['id'] | concat: context['sync_run_id'] }} to concatenate a row's ID with the current sync run's ID.
The Filters tab lists all available Liquid functions, including built-in Liquid filters and Hightouch-specific functions. Click any filter name to inject it into your template.
The template mapper supports all Liquid native features and also includes Liquid-inspired functions. To learn more about the Liquid templating language, skip to the Liquid reference section in this doc or check out the Liquid reference documentation.
Inline mapping
The inline mapper is only available for certain destinations and is currently in beta. Please if you'd like to be considered for early access.
When syncing data to a marketing automation or enterprise resource planning (ERP) tool, you may need to nest related entities. For example, you may have nested items in an invoice or nested entities for a user: associated devices, shipping address, pets, etc. The inline mappers allows you to create these nested objects and arrays from your model query results without altering your model definition.
Each destination has its own formatting expectations for these nested entities. For example, in Stripe, an invoice object supports an items field that expects an array of items.
The inline mapper lets you model your data once and format it during sync configuration rather creating a separate model for each destination requiring nested objects or arrays.
Create an object
The object inline mapper allows you to construct objects and map them to destination fields usings columns from your model. This section walks through constructing an object for the shipping field in Stripe's customer object.

- In the destination field input on the right, select the field name to which you want to map an object, for example, Shipping Address.
- The model column input on the left autopopulates to Object mode if the selected field is of type
object. If the type of the field is not provided, open the advanced mapper by clicking on the source input field and select Create an object.
- Select the relevant destination fields you want to map values to and map the nested fields as needed.
Given the previous example row and the mappings shown in the screenshot above, Hightouch would sync the following payload:
{
"email": "doe@test.com",
"shipping": {
"address": {
"city": "San Francisco",
"state": "California",
"postal_code": "94105"
},
"name": "John Doe",
"phone": "123-456-7890"
}
}
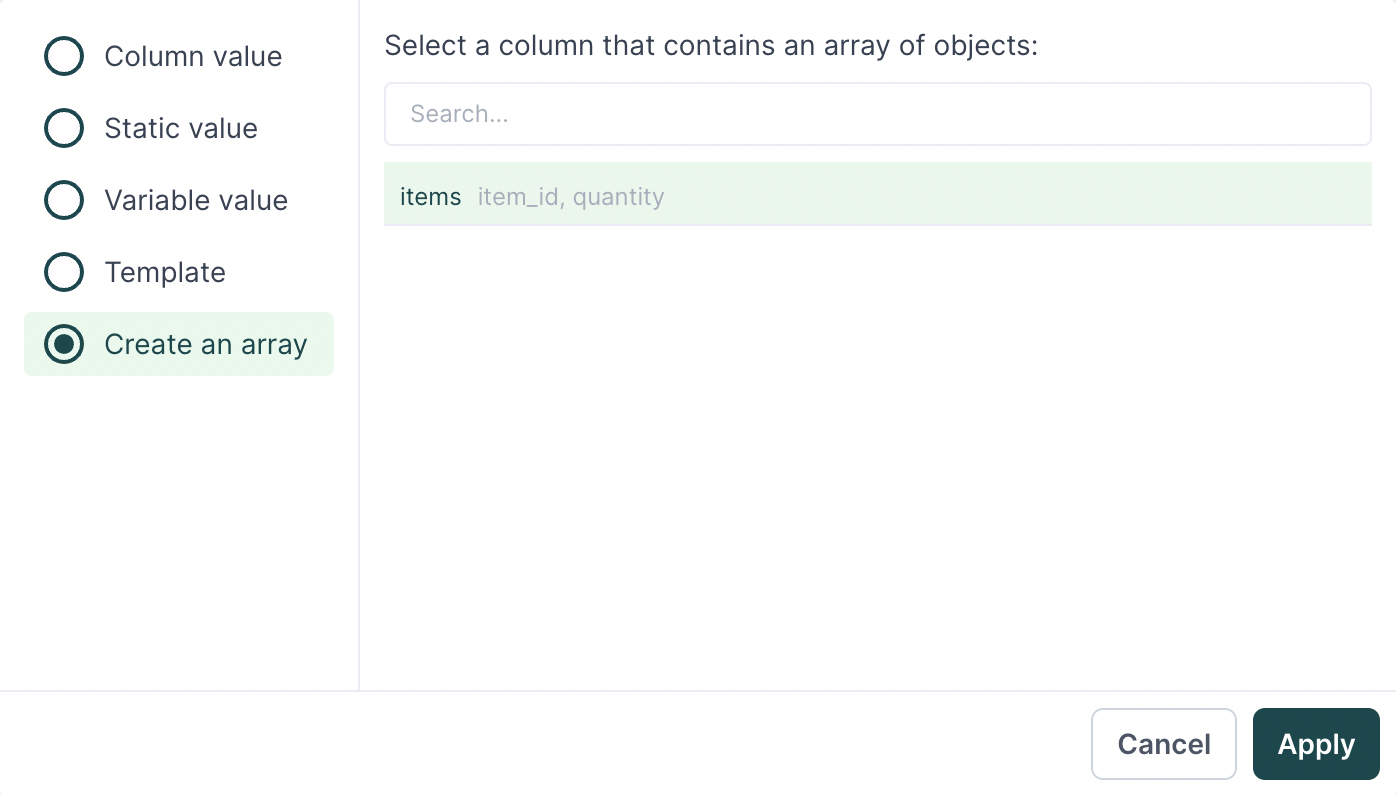
Create an array
The array inline mapper allows you to construct an array of objects and map them to destination fields using a model column that contains an array of objects. This section walks through constructing a line items array for Stripe's quote object. You would use the same steps for any other object arrays you want to create.
Required data format
To use the inline mapper to create an array of objects, the query results from your model need to have a certain format. Specifically, they should appear as an array of objects, like the example items field in the entity relationship diagram (ERD) above.
[
  {
    "item_id": "542",
    "quantity": 50
  },
    {
    "item_id": "631",
    "quantity": 20
  }
]
If you don't already have a data field formatted like this, you can define your model using a SQL query that constructs an array of objects from other fields.
For example, imagine you have a line_items data table where each row represents an invoice item. The columns are:
invoice_idfor the ID of the invoice the item belongs tocustomer_idfor the ID of the customer who purchased the itemamountfor the cost of itemdescriptionfor a short description of the item
For example:
| invoice_id | customer_id | amount | description |
|---|---|---|---|
| in_1 | cust_abcd | 55 | Waffle Maker |
| in_1 | cust_abcd | 7 | Dog Chew Toy |
| in_2 | cust_efgh | 12 | HDMI Cable |
| in_3 | cust_abcd | 45 | Humidifier Filters |
| in_3 | cust_abcd | 109 | Electric Kettle |
| in_3 | cust_abcd | 15 | Wall Calendar |
| in_4 | cust_ijkl | 25 | Mediterranean Cookbook |
| in_4 | cust_ijkl | 10 | AAA Batteries |
You want to sync an array of items for each invoice for each customer. For example, for customer_abcd from the preceding table, they would have two separate invoice objects, each with their own items array, one for the invoice with ID in_1 and one for the in_3 invoice:
[
  {
    "invoice_id": "in_1"
    "customer_id": "cust_abcd",
    "items": [
      {
        "description": "Waffle Maker",
        "amount": 55,
      },
      {
        "description": "Dog Chew Toy",
        "amount": 7,
      }
    ]
  },
  {
    "invoice_id": "in_3"
    "customer_id": "cust_abcd",
    "items": [
      {
        "description": "Humidifier Filters",
        "amount": 45,
      },
      {
        "description": "Electric Kettle",
        "amount": 109,
      },
      {
        "description": "Wall Calendar",
        "amount": 15,
      }
    ]
  }
]
To make these fields available in the inline mapper to construct an items array, you would need to include SQL like this in your model definition:
select
  inv.customer_id,
  inv.invoice_id,
  array_agg(object_construct(it.*)) as items
from
  line_items inv
  join items it on it.invoice_id = invoice._id
group by
  1,
  2
This query selects the customer_id and invoice_id as well as all properties—in this case just description and amount—on each item and then aggregates them into an array of objects. The group by statement groups them based on the customer_id and invoice_id so that each aggregated array is for one invoice for one customer. Without the inline mapper, you would need to write more complex SQL manually constructing each item attribute as part of the item object.
Map fields
Once your model query results have an array of objects to pull data from, you can use the inline mapper to configure as many syncs as you need to sync these items.
- In the Field Mapping section of your sync configuration, in the destination field input on the right, select the field name to which you want to map an array, for example, Line items.
- The model column input on the left autopopulates to Array mode if the selected field is of type
array. If the type of the field is not provided, open the advanced mapper by clicking on the source input field and select Create an array. - You will be prompted to pick a column that contains an array of objects. Select your desired column from the list of compatible columns. If no columns appear, ensure your model query results conform to the required data format.
- Select the relevant destination fields you want to map values to and map the nested fields as needed.
The columns available under the array inline mapper are properties of the previously selected column.
Hightouch uses the first 100 rows from your query to extract the available properties at each index of the array. To add additional properties that may be missing, type into the input field and select the custom option or press Enter.
Hightouch only processes properties if the mapped object property at the index of the array exists.
For example, if <Your Column>[0].price exists and <Your Column>[1].price doesn't exist, items[0].price will be mapped and items[1].price won't be mapped. Hightouch syncs null values if you don't choose to ignore them.
For each row in your query, the array created using the inline mapper matches the length of the array in your column.
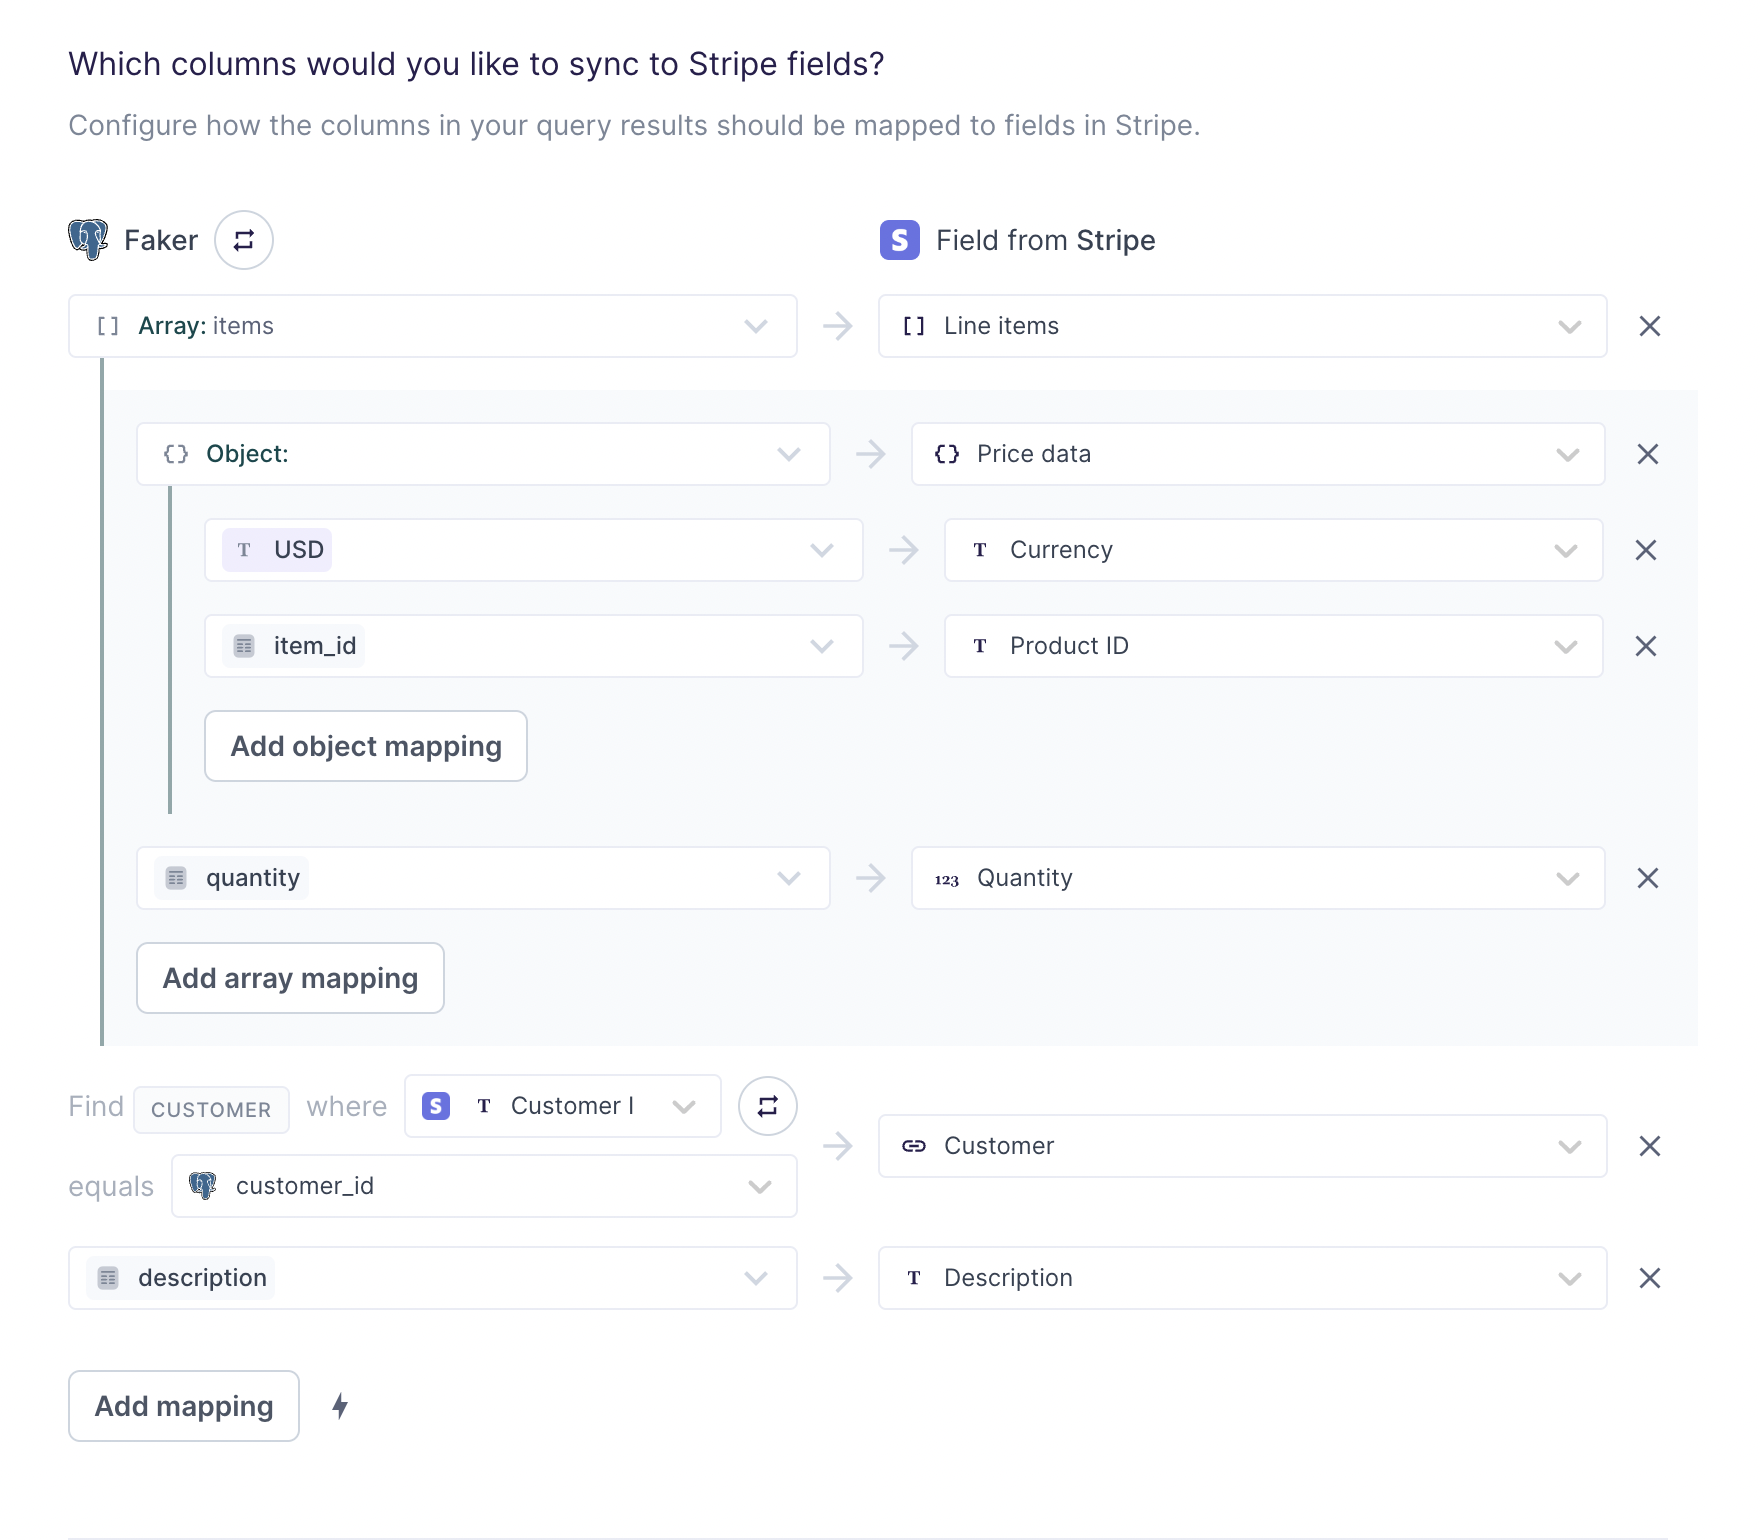
Given the previous example row and the mappings shown in the screenshot above, Hightouch would sync the following payload:
{
  "line_items": [
    {
      "price_data": {
        "currency": "USD",
        "product": "542"
      },
      "quantity": 50
    },
    {
      "price_data": {
        "currency": "USD",
        "product": "631"
      },
      "quantity": 20
    }
  ],
  "customer": 231,
  "description": "Two items"
}
Nesting depth
You may need to sync arrays or objects with more deeply nested objects. For example, you may need to sync a Shipping Address object with this format:
{
    "name": "Jane Doe",
    "address": {
      "address_line_1": "123 High Street",
      "address_line_2": "",
      "city": "San Francisco",
      "state": "California",
      "postal_code": "94105",
      "country": "USA"
    },
    "phone_number": "4151234567"
}
The "address" key expects a further nested object. Hightouch supports nesting up to two levels deep. You can do this by selecting Create an object or Create an array while already using the inline mapper.

Liquid reference
This reference goes over the following:
- Basic liquid formatting rules in the advanced mapper
- Available liquid variables and functions
- Extended use cases
For more detailed information, refer to the Liquid reference documentation.
Liquid template format
Variables follow this format:
{{ row['company'] }}
The double handlebars enclose a Liquid snippet that generates an output. The column name, company in the preceding example, should be in single quotes inside the square brackets.
Hightouch also provides these alternative syntaxes:
{{ row.company }}
{{ company }}
These shorter alternatives can be useful when templating messages, such as when syncing to Slack, Mattermost, Microsoft Teams, or to the SMTP Email destination.
Make sure to use the {{ row['first name'] }} syntax if your model column name contains spaces.
Functions follow this format:
{{ row['last_name'] | includes : 'Stark' }}
A single pipe (|) comes after the variable and before the name of the function and any necessary parameters. See the Liquid Reference or Liquid Cheatsheet for a complete list of available functions.
Liquid variables in the advanced mapper
You can use metadata variables in your liquid templates, such as a model's name, all model column names, and the timestamp of a sync's last run.
$ <column_name>
$ Model Name
$ Timestamp
You can view all available variables in the Variables column in the template editor.

Liquid-inspired functions in the advanced mapper
Hightouch provides these non-native functions for you to use out of the box:
| Function | Syntax | Description |
|---|---|---|
base64_decode | row['email']|b64_decode | Base64 decode input |
base64_encode | row['email']|b64_encode | Base64 encode input |
cast | row['phone']|cast:'string' | Cast input to specified type. Allowable types are 'string', 'number', 'boolean' |
includes | row['last_name']|includes:'Stark' | Check input for a substring. Row will be rejected if substring isn't found |
json_construct | | json_construct: 'city', row['city'], 'state', row['state_province'] | Construct JSON object from key/value arguments |
MD5 | row['email']| md5 | Hash input using MD5 algorithm |
null_if_empty | row['email']| null_if_empty | Replace empty strings with null |
parse | row['first_name']|parse | Parse a JSON-formatted string to a JSON object |
push | row['first_name']|push : '<new array item>' | Append an item to an array |
regex_replace | row['last_name']|regex_replace: '<[a-zA-Z]>', '<replacement>' | Search and replace substrings of input using RegEx |
regex_test | row['last_name']|regex_test: '<[a-zA-Z]>' | Check input for a RegEx match. Row will be rejected if no match is found using RegEx |
sha256 | row['email']|sha256 | Hash input using SHA-256 |
sha512 | row['email']|sha512 | Hash input using SHA-512 |
to_date | row['dob']|to_date | Parse input and return a Date object (ISO 8601 format) |
to_unix | row['date_sent']|to_unix | Convert input to Unix time |
validate_email | row['email']|validate_email | Reject emails that aren't RFC 2822 compliant email addresses |
Liquid function chaining
You can use more than one Liquid function in a template by chaining them. For example, you may want to put a string variable into camel case before hashing it. To chain functions, separate them with a single pipe (|):
Examples:
{{ row['full_name'] | camelcase | sha256 }}
{{ row['email'] | downcase | validate_email | sha256 }}
Extended Liquid use cases
See Shopify's Liquid docs, Liquid Cheatsheet, or Liquid Reference for a complete list of available functions.
In this section, you can learn how to use Liquid to:
- set up conditional outputs
- output a
nullvalue for empty values - set a default value
- escape special characters in JSON mappings
You can also use Liquid to work with different data types:
- Numbers: use math functions (such as
absandround) or format currency amounts - Booleans: output a conditional boolean value
- Strings: use string functions (such as
capitalize,strip, andappend) or isolate parts of a string - Dates: use the date function
- Arrays: construct a static array, sync an empty array, or convert an array to a string
- Objects: convert an object to a string or isolate object properties
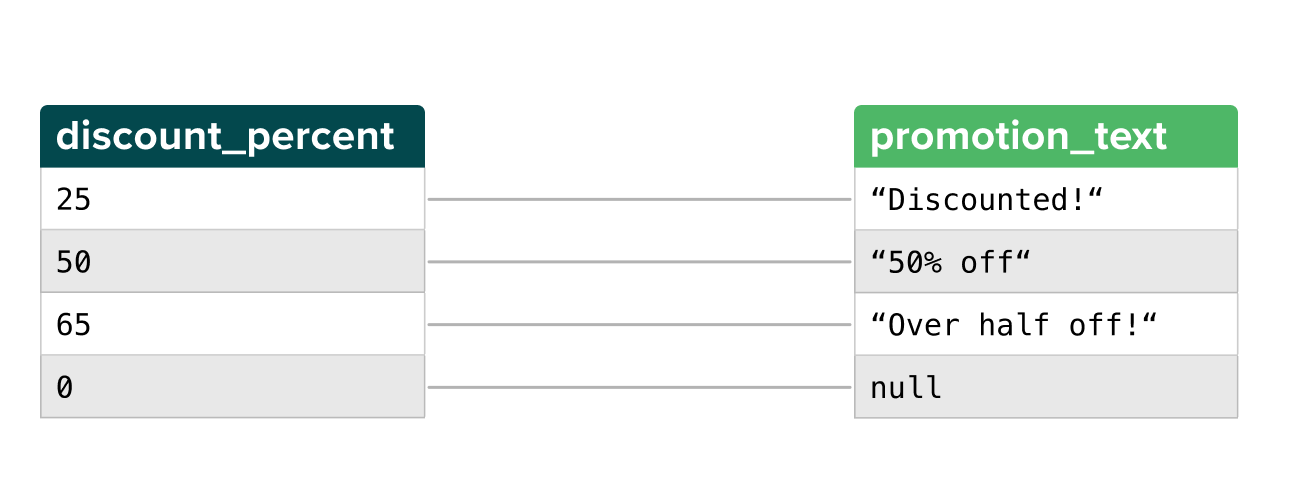
Conditional output
You can use Liquid conditionals to specify output based on input. For example, this Liquid snippet:
{%- if row['discount_percent'] >= 50 -%}
  Over half off!
{%- elsif row['discount_percent'] == 50 -%}
  50% off!
{%- elsif row['discount_percent'] > 0 -%}
  Discounted!
{%- else -%}
  null
{%- endif -%}
Outputs the following result in a destination column:
Conditional output for empty values
Conditionals are also helpful to guard against missing values.
For example, you could use the following Liquid snippet to send a null value for empty values.
This is helpful if you need to map a column that exists for some rows but not others:
{%- if row['column_name'] !=nil -%}
{{ row['column_name'] }}
{%- else -%}
{{ null }}
{%- endif -%}
Conditional boolean output
You could also use the assign function to output a conditional boolean value:
{%- if row['column_name'] == "value" -%}
{%- assign variable = true -%}
{%- else -%}
{%- assign variable = false -%}
{%- endif -%}
{{ variable }}
Default value
You can also use Liquid to set a default value, in case an input value is null, false, or empty. For example, this Liquid snippet sets the revenue field as 0 if the value is missing or null in a model's row:
{{ row['revenue'] | default: 0 }}
Be sure to change revenue to the column name you want to set default values for.
Math functions
See Liquid Math Functions for a complete list of math functions. In Hightouch, the absolute value and rounding functions are some of the most commonly used:
- Use the
absfunction to send an absolute value:
{{ row['value'] | abs }}
- Use the
roundfunction to round a value to the nearest integer or a specified number of decimals:
{{ row['value'] | round: 2 }}
Currency amounts
Hightouch doesn't support money functions.
If you would like to format currency amounts, such as prices, you can set this up manually by using the following template:
{%- assign decimals = row['price'] | split: "" | reverse | slice: 0,2 | reverse | join: "" -%}
{%- assign units = row['price'] | split: "" | reverse | slice: 3,3 | reverse | join: "" -%}
{%- assign thousands = row['price'] | split: "" | reverse | slice: 6,3 | reverse | join: "" -%}
{%- assign millions = row['price'] | split: "" | reverse | slice: 9,3 | reverse | join: "" -%}

{%- if millions != "" -%}
  ${{millions}},{{thousands}},{{units}}.{{decimals}}
{%- elsif thousands != "" -%}
  ${{thousands}},{{units}}.{{decimals}}
{%- else -%}
  ${{units}}.{{decimals}}
{%- endif -%}
To explain this expression:
split: converts the value in therow['price']model column (eithernumberorstring) to an arrayreverse: reverses the order of items in the arrayslice: isolates the items in groups of threesreverse: reverses the order of items in the groupsjoin: transforms the single groups of items back into strings
The second part is a conditional that displays the currency amount in the correct format.
If your model column contains currency amounts without decimal places, make sure to remove the decimals variable from the Liquid expression and update the slice functions accordingly.
String functions
See Liquid String Functions for a complete list of string functions.
In Hightouch, the capitalize, strip, and append functions are some of the most commonly used:
- Use the
capitalizefunction to capitalize the first letter of a string:
{{ row['title'] | capitalize }}
- Use the
stripfunction to remove all whitespace from the left and right sides of a string:
{{ row['title'] | strip }}
- Use the
appendfunction to add a file extension to a string:
{{ row['file_name'] | append: '.png' }}
Isolate parts of a string
You can use the Liquid split function to isolate a certain part of a string.
For example, suppose you have a model column that returns URLs, including query parameters.
An example value may look like this: www.example.com/?gclid-123.
You may want to send the base URL (www.example.com/) as one field and one of the query parameters as another field.
Query parameters often include click IDs, such as the gclid or fbclid that you should include on events you send to Google Ads or Meta Conversions (or Meta Offline Conversions) respectively.
For the example value www.example.com/?gclid-123, this Liquid snippet would return the base URL, www.example.com/:
{{ row['column_name'] | split: "?gclid-" | first }}
And this Liquid snippet would return the gclid value, 123:
{{ row['column_name'] | split: "?gclid-" | last }}
Date function
If your destination expects dates in a different format than your model returns them,
you can use the Liquid date function to reformat them.
For example, this Liquid snippet ensures that dates from the column are always in the DD/MM/YYYY format:
{{ row['column_name'] | date: '%d/%m/%Y' }}
And this snippet always returns dates in the MM/DD/YYYY format:
{{ row['column_name'] | date: '%m/%d/%Y' }}
You can also include other parameters to include time and timezone data, by adding %H:%M:%S and %z:
{{ row['column_name'] | date: '%s' | date: '%Y-%m-%dT%H:%M:%S%z' }}
You can use Liquid to change a timestamp's time and date values. For example, you may want to send a date one day earlier than the original. This snippet subtracts 24 hours (represented as 86,400 seconds) from the original date in the column:
{{ row['column_name'] | date: '%s' | minus: 86400 | date: '%Y-%m-%dT%H:%M:%S' }}
To add time to a date, replace minus with plus.
For more examples of how to transform dates and times, refer to this documentation.
Construct a static array
You can sync a static array value to your destination by using this Liquid snippet:
{%- assign value = '[' | append: '"value1","value2"' | append: ']' -%}
{{ value | parse }}
You can replace '"value1","value2"' with the values you wish to insert in your static array.
Sync an empty array
You can sync an empty array to your destination by using this Liquid snippet:
{{ '[]' | parse }}
If you decide to use this with Liquid conditionals or other complex syntax, make sure to use a hyphen in your tag syntax to strip whitespace.
Convert an array to a string
You can convert an array to a string by using the join function:
{{ row['items'] | join: "" }}
JSON function
You can convert an object to a JSON-formatted string by using this Liquid snippet:
{{ row['invoice'] | json }}
You can also use this function to escape special characters when creating a JSON payload.
For example, if you attempt to map this value, This is the "value" in the column in the special_characters column, it will fail:
"column_mapping" : "{{ row.special_characters }}"
To successfully sync this value, select the json function and use the example format below:
"column_mapping" : {{ row.special_characters | json }}
Isolate object properties
If your model columns contain object type values, you may want to sync only one or some of the object's properties to your destination.
You can do this in the template mapper using the dot notation.
Specifically, you can write a Liquid expression containing the model column's name and the property's name: {{ row['model_column'].property }}
You can use dot notation for field mapping and record matching, but only for destinations that support Liquid templating.
Furthermore, dot notation doesn't work when testing a row. To test your sync, trigger a sync run and take a look at the live debugger.
For example, suppose you had a model column named invoice that contains objects with this structure:
{
  "invoice_number": "INV-001",
  "issue_date": "2023-06-08",
  "due_date": "2023-06-30",
  "customer": {
    "name": "John Doe",
    "email": "johndoe@example.com",
    "address": "123 Main St, City, State, ZIP"
  },
  "items": [
    {
      "description": "Product A",
      "quantity": 2,
      "unit_price": 10.99,
      "total_price": 21.98
    },
    {
      "description": "Product B",
      "quantity": 1,
      "unit_price": 15.99,
      "total_price": 15.99
    }
  ],
  "subtotal": 37.97,
  "tax": 3.60,
  "total": 41.57,
  "currency": "GBP"
}
You may only want to map the total column to a price field in your destination.
You could do this by including the following Liquid in the template mapper:
{{ row['invoice'].total }}
You can also use this to map nested properties, for example, customer.name:
{{ row['invoice'].customer.name }}
If you want to sync multiple object properties individually, you can use these types of expressions for multiple mappings in your sync configuration.
Make sure you've set the model column's type as Object / Array in the model's Columns tab.
Otherwise, Hightouch syncs an undefined value to your destination.
Dot notation only works with model columns that contain single objects. For arrays of objects, you can use the inline mapper.
Spread JSON columns into fields
If you manage many destination fields in warehouse SQL, you can sync a JSON (object) column and have Hightouch send each of its keys as a separate destination field. This saves you from mapping hundreds of fields by hand. The keys and values come directly from the column.
For example, a lead_json column containing this object:
{ "first_name": "Mohan", "tier": "gold", "region": "EMEA" }
syncs three fields (first_name, tier, and region) to the destination, alongside any fields you map normally.
To spread a column:
- In the sync's mapping section, find Spread JSON columns into fields. This option appears on destinations that support it.
- Select Add JSON column and choose the source column that holds the JSON object.
- Save your configuration.
Regular field mappings always take precedence. If you map a field explicitly and the same field also appears in a spread column, the explicit mapping wins.
Hightouch sends each key exactly as it appears in the JSON object, so every key must match a field name the destination accepts (after any key or value transforms). For consistent results, make sure every row's JSON object uses the same set of keys.
Set precedence for multiple columns
You can spread more than one JSON column into the same destination. Hightouch applies them from top to bottom. If two columns contain the same key, the lower column wins. Drag the handle to the left of a column to change its order.
Transform spread keys and values
Because Hightouch sends keys and values verbatim, each key must match the destination's field name and each value must be in the shape the destination expects. When they don't match, apply a transform to every key or every value in the column instead of reshaping data in your model. For example, your warehouse might use snake_case keys while the destination's API field names have no underscores, or it might wrap each value in an object like { "dtype": "Integer", "value": 202624 } when the destination wants the scalar 202624.
To apply a transform:
- Select the settings icon to the right of the JSON column.
- Under Key transform or Value transform, choose a transform:
- Remove special characters — removes everything except letters and numbers. For example,
SF_ME_PRC_BASE_PRICEbecomesSFMEPRCBASEPRICE. - Custom Liquid template — rewrites the key or value with a Liquid template. Reference both sides as
{{ key }}and{{ value }}. For example,{{ key | remove: "_" | downcase }}turnsSF_ME_PRC_BASE_PRICEintosfmeprcbaseprice. Liquid output is always a string. - Extract from object — pulls a field out of an object-shaped value and preserves its type. Enter a dot-separated path. For example, the path
valueextracts the number202624from{ "dtype": "Integer", "value": 202624 }. If a row's value isn't an object or is missing the path, Hightouch rejects that row. This transform is available on the value side only.
- Remove special characters — removes everything except letters and numbers. For example,
- Save your configuration.
Each column applies at most one key transform and one value transform. Remove special characters and Custom Liquid template work on both sides; Extract from object applies to values only.
Marketo matches REST API field names without regard to case but not punctuation. Remove special characters lets a snake_case warehouse column line up with Marketo's field names without renaming columns in your model.
A transform runs for every key or value in the column on every row, so a complex Custom Liquid template over columns with many keys can slow down syncs.
Field mapping updates
If you edit the field mappings in your sync configuration, the sync engine automatically reprocesses the entire model query result set during the next sync run. Depending on the selected sync mode, Hightouch syncs the model rows detected as added or as changed by change data capture to your destination.
If the sync uses either update or upsert mode, Hightouch resyncs previously synced rows (with the updated mappings) as "changed" rows. If the sync uses insert mode, Hightouch doesn't reprocess previously synced rows. Instead, it only syncs model rows that are detected as added after the field mapping change was saved in your sync configuration.
Model column changes
Most changes to your model columns aren't automatically detected by sync configurations. Hightouch handles the changes differently depending on whether columns are added, renamed, or removed from your model definition, or if you change a column's data type.
If you add a new column to your model, Hightouch doesn't automatically add it as a field mapping to your sync configurations. This is because Hightouch doesn't know which columns you would like to sync to the destination, and which destination fields they should be mapped to. Follow the field mapping instructions to include new columns in your sync configuration.
You need to preview and save your model to have new columns appear in the Hightouch UI.
If you rename a column in your model, all syncs that had that column mapped in their configuration fail with an Unknown field name error.
The error message also contains the original name of the renamed column. To resolve this, remove or update the relevant field mappings in your sync configuration.
Changes to model column names aren't detected for All / Mirror type syncs.
If you remove a column from your model, Hightouch doesn't automatically remove it from the field mappings in the sync configuration. Make sure to remove the mapping manually.
If you change a model column's data type, the sync engine considers this update as a field mapping update and reprocesses all model rows during the next sync run.
As explained in the primary key updates section, if you update a model's primary key by selecting a different column, you need to trigger a full resync or reset change data capture (CDC) for all syncs that use that model. Otherwise, change data capture can't process your model data correctly, which can make your syncs fail.
Destination field changes
If you rename a field in your destination, you need to update the mapping to this field in your sync configuration. Select the new field name from the dropdown menu and save your changes.