| Audience | Data teams, marketers |
| Prerequisites |
|
Traits are reusable calculated values you can build on top of your existing data. Use them when you need a value that isn’t already stored as a field in your tables — like lifetime value, number of purchases, or days since last order. Once created, a trait becomes available in the audience builder so your team can use it in filters without recreating the same logic each time.

What you’ll learn
- What traits are and when to use them
- Who creates and maintains traits
- How to create a trait
- How to use traits in audience filters
- How to sync trait values to destinations
When to use a trait
Use a trait when the value you need for filtering or syncing doesn’t exist as a column on your parent model and needs to be computed from related or event data. Common examples include total spend, days since last purchase, most viewed product category, and number of support tickets.
Traits are the right choice when multiple audiences will use the same calculation — define it once and reuse it across audiences. If the logic is a core business metric your team governs centrally (like official LTV or churn score), keep it upstream in your warehouse instead and expose it as a parent model column.
For a full comparison of traits vs. other modeling options, see Choose the right model type and When to model something as a trait.
Who creates and maintains traits
Traits are typically created and maintained by data teams or schema owners, since they involve choosing the right source columns and aggregation logic. If you’re a marketer and the trait you need doesn’t exist, work with your data team to decide whether it should be added as a trait or modeled upstream.
Trait types
| Trait Type | Description | Example Usage |
|---|---|---|
| Aggregation | Calculates the sum or average of a numeric field across a related or event model. | Total amount a user has spent across all purchases (order_value) |
| Count | Counts the number of records that match optional filters. | Number of emails a user opened in the past 30 days |
| Occurrence | Returns the first, last, most frequent, or least frequent value from a column in related data. | Most frequently viewed product category or last brand interacted with |
| List | Returns an array of values or objects from related or event records, with optional sorting, slicing, and filters. | List of SKUs a user has browsed or added to cart in the past 7 days |
| SQL Aggregation | Uses SQL to calculate a value across related records. Supports advanced logic like JSON or arrays. | JSON object of purchased products with price and quantity, for use in dynamic email personalization |
| SQL Formula | Computes logic using SQL on model-level fields without joins. Ideal for string manipulation or flags. | Boolean trait for whether a user is in a loyalty program (membership_tier = 'Gold') |
Traits can be defined on any type of model, though in most use cases they are defined on the parent model.
Create a trait
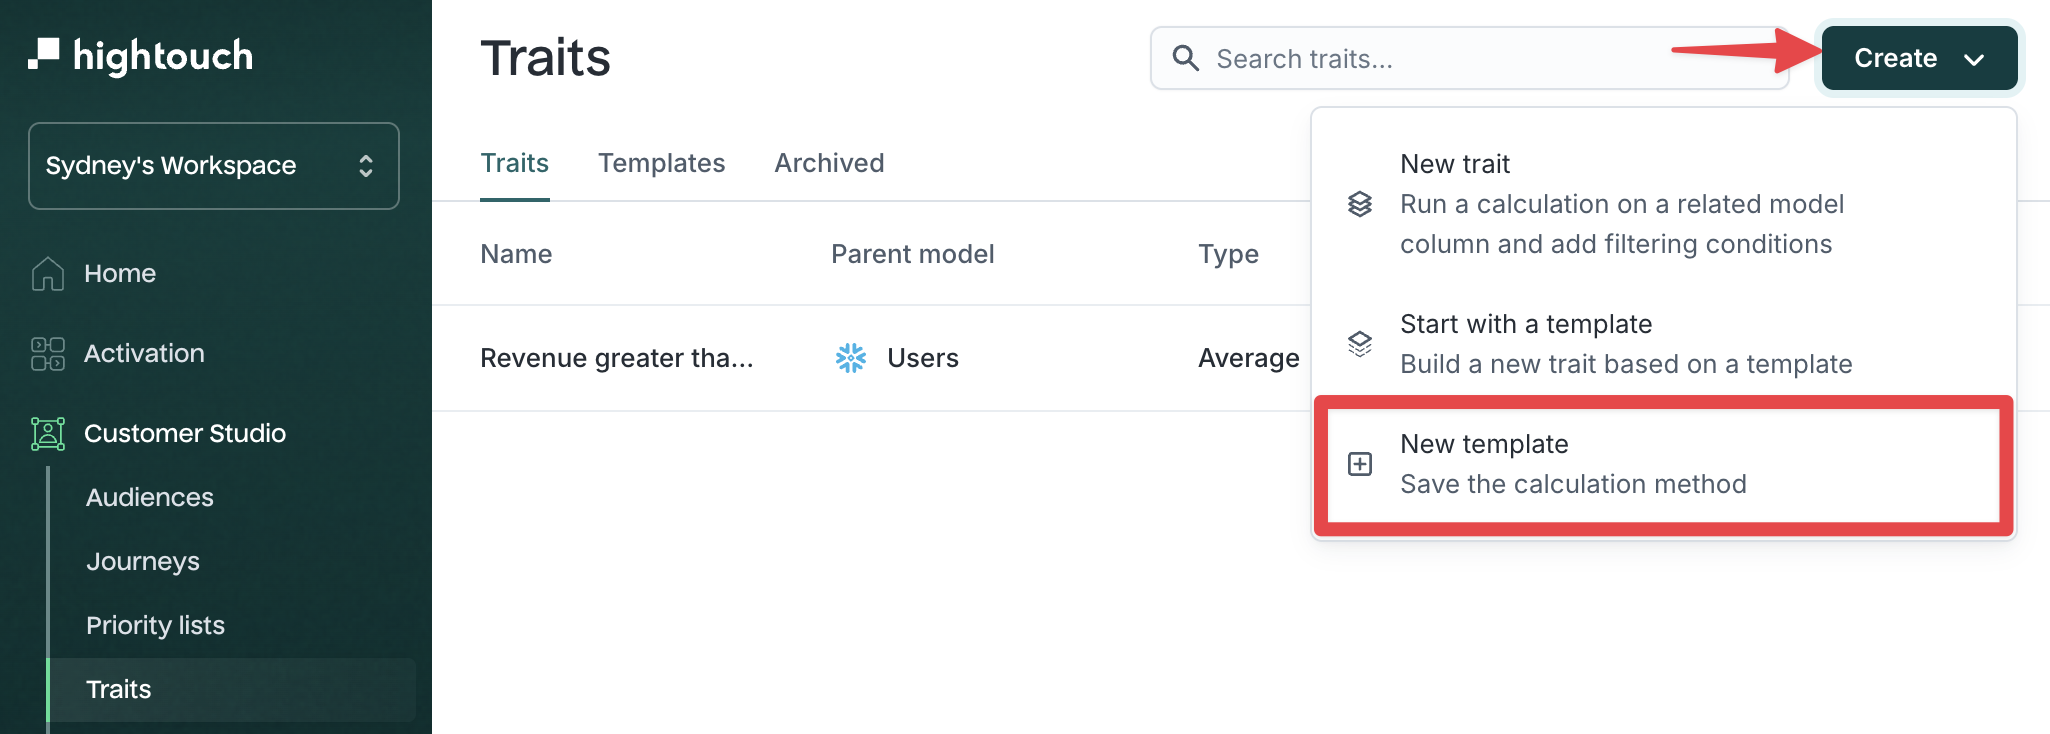
You can create a trait in one of three ways:
Option 1:
- Go to Customer Studio → Traits
- Click the Create dropdown and select New trait

Option 2: Select Start with a template to use a predefined calculation
Option 3: Create a custom trait while building an audience using the Custom traits filter group.
Configure traits
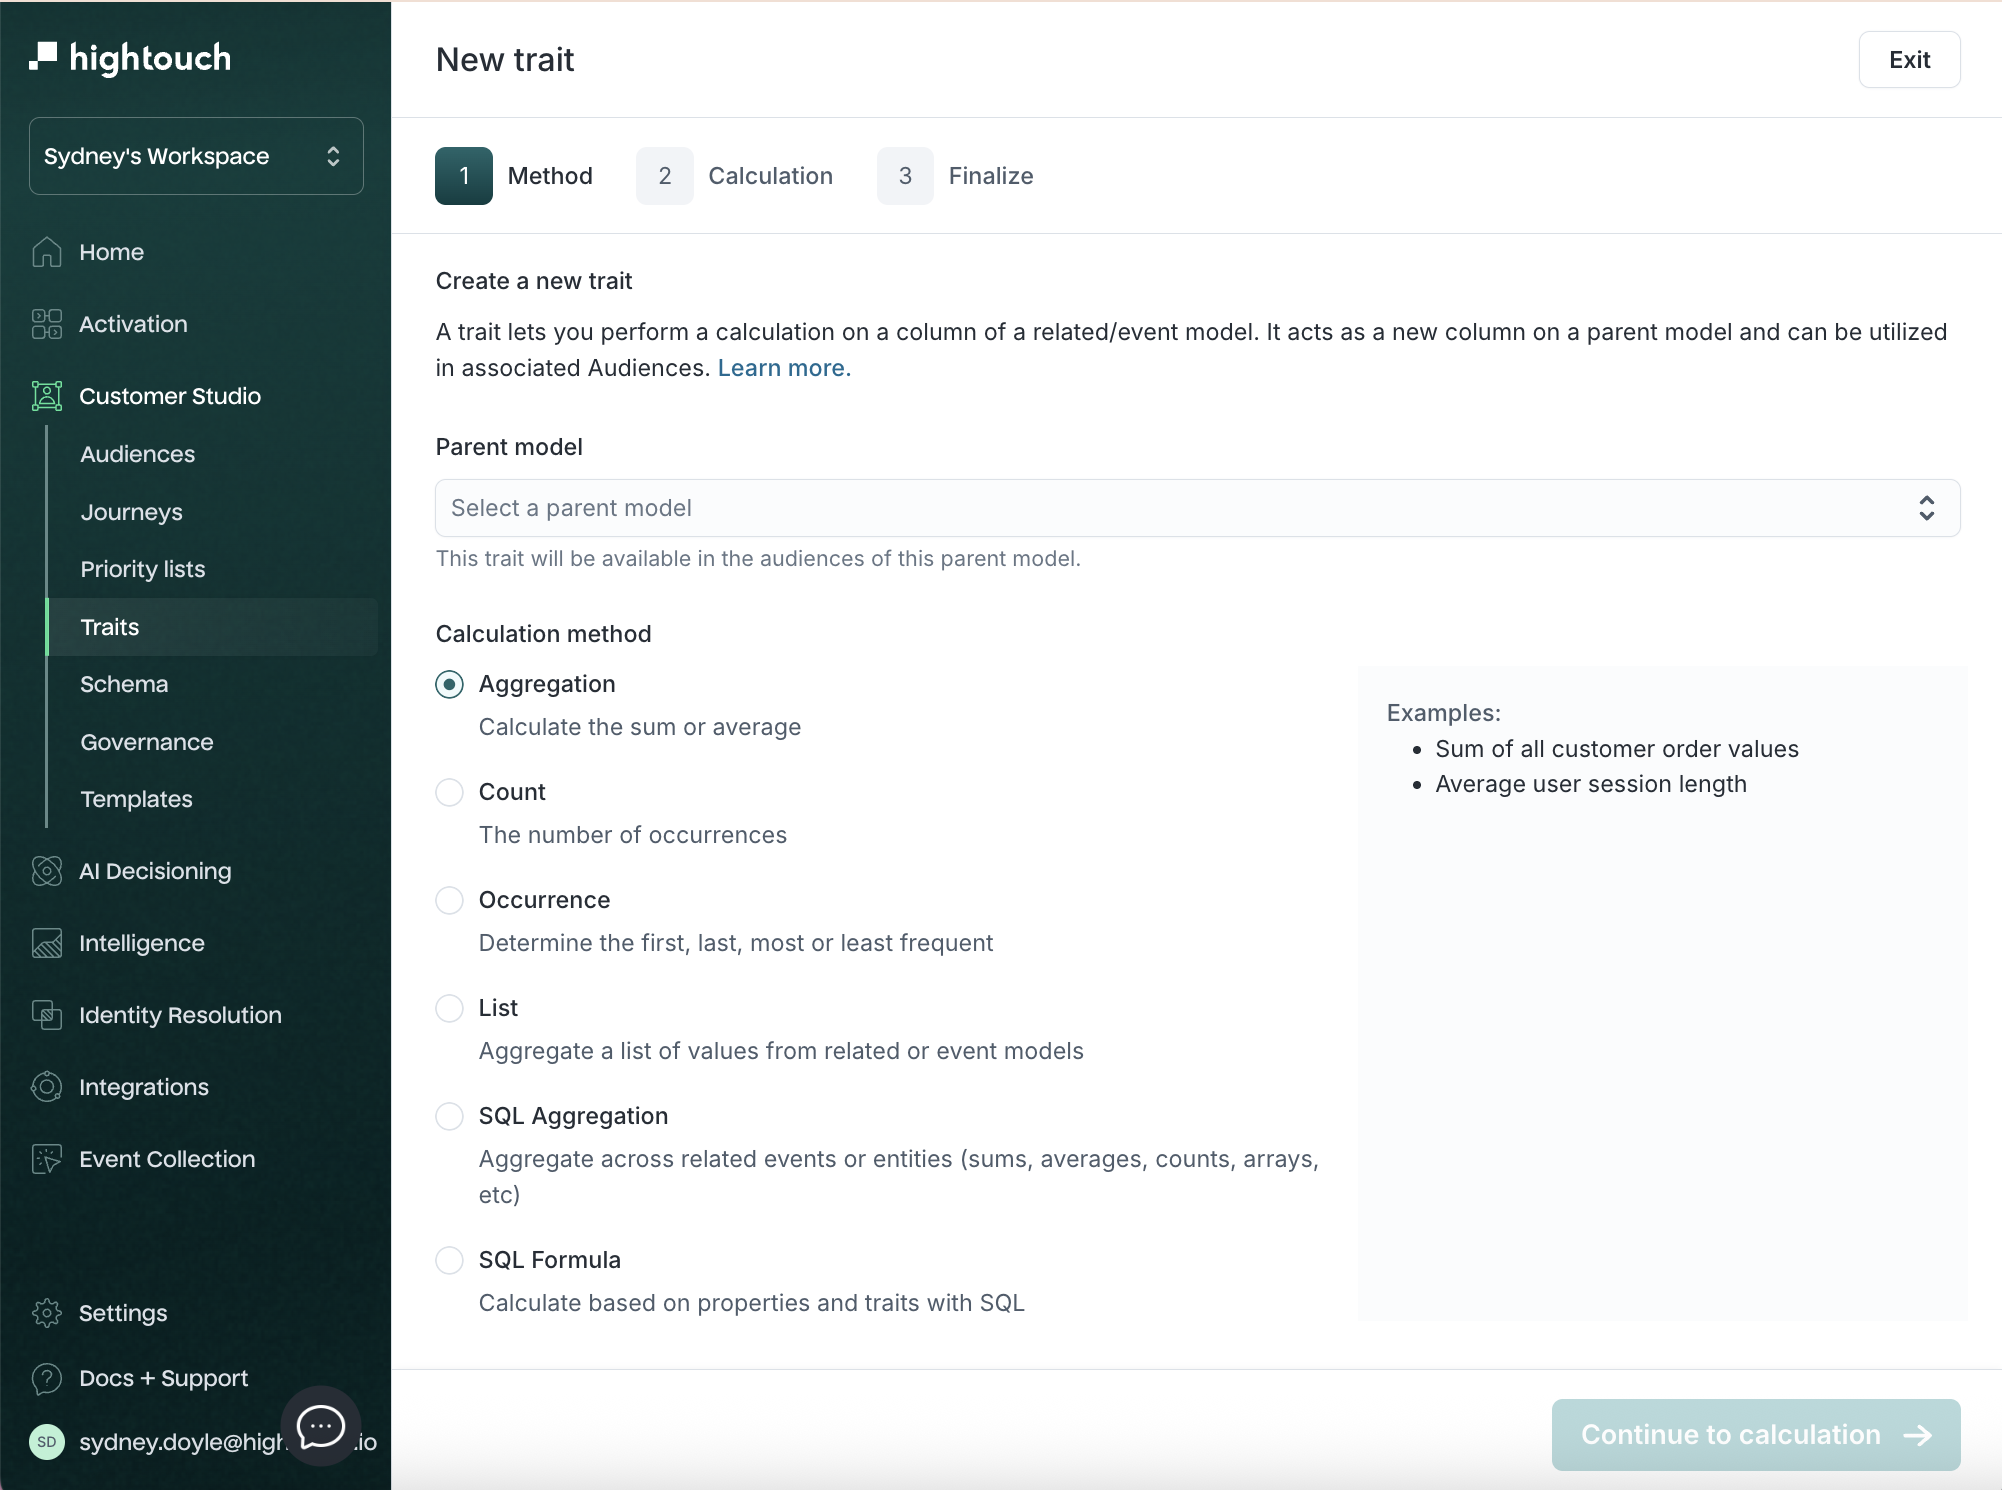
Step 1: Method
In the New trait flow, the first step is choosing the logic type.
- Select a model. Typically this will be your parent model, but you can also create traits on a related or event model.
- Select the calculation method.
Available calculation methods:
- Aggregation: Sum or average across rows
- Count: Total number of matching events
- Occurrence: First, last, most frequent, or least frequent value
- List: Return an array of values or objects
- SQL Aggregation: SQL for grouping/array logic
- SQL Formula: SQL expressions based on parent properties
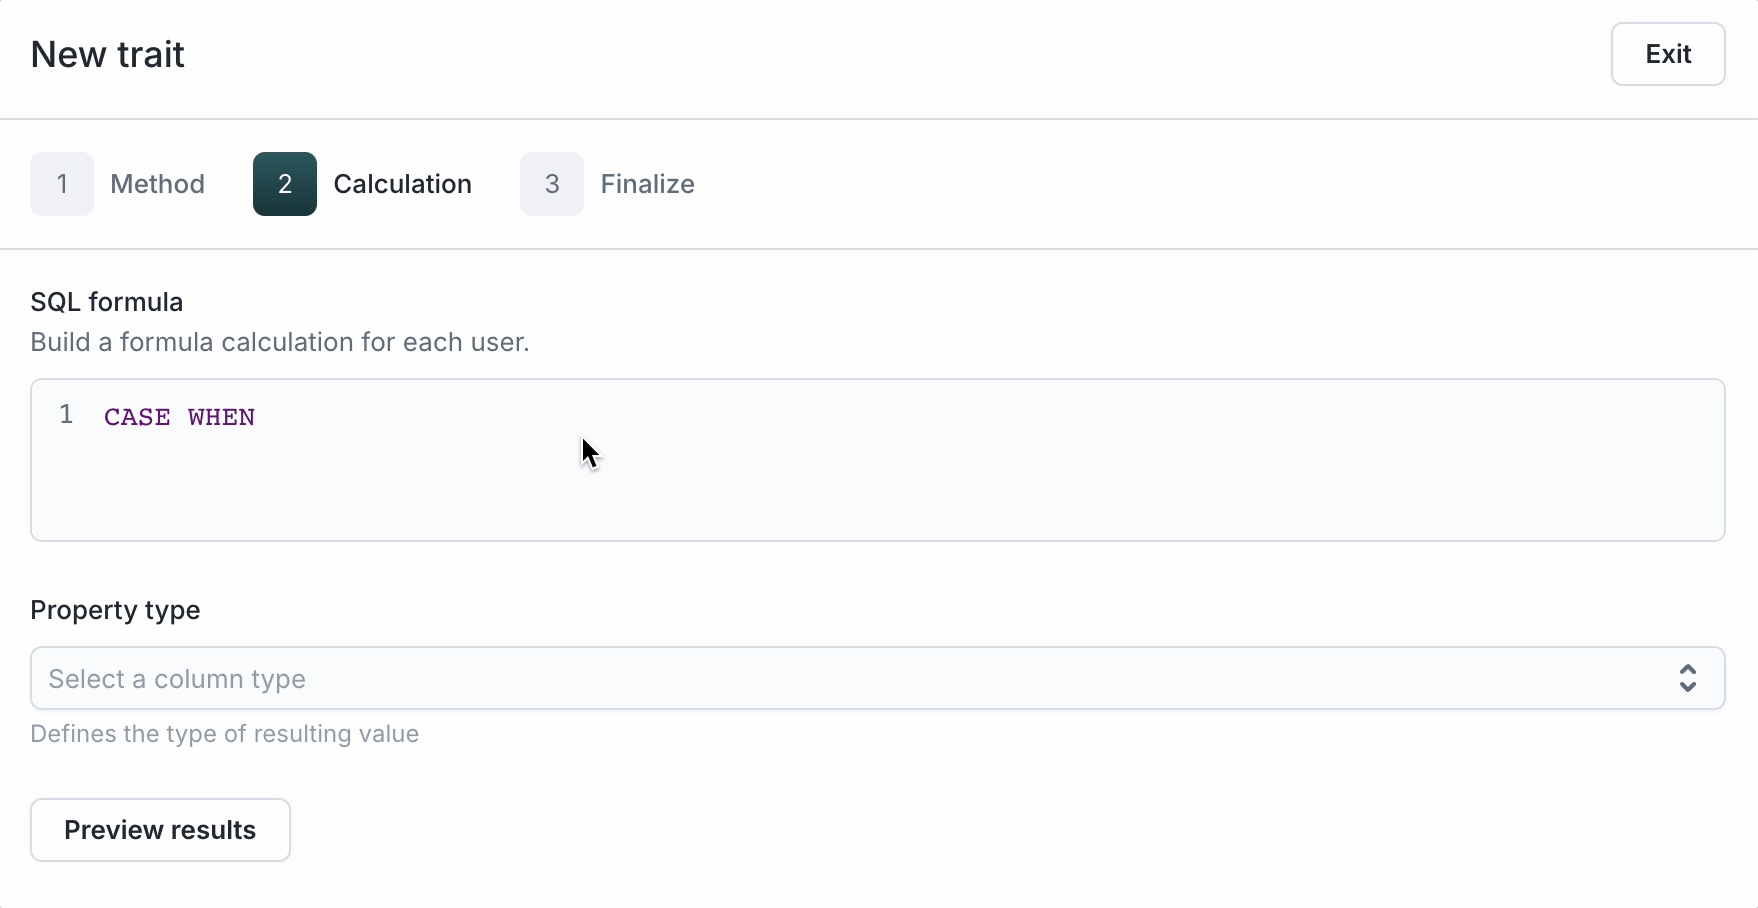
Step 2: Calculation
In Step 2, you'll configure the logic for your selected calculation method. The fields shown depend on the method you chose in Step 1 (e.g., Aggregation, Count, Occurrence, SQL, etc.).
For most methods, you’ll need to:
- Select a related or event model Choose the dataset you're calculating across (e.g., Purchases, Sessions, Page Views)
- Add optional filters Filter the input records before applying your calculation (for example, revenue greater than 500 or event_type = "checkout")
- Complete method-specific settings
Filters can include field-based logic (for example, revenue greater than 500) and are applied before aggregation.
Use the Preview results button to validate before moving to the final step.
Method specific settings
Aggregation traits (Sum, Average)
Use case: Compute the sum or average of a numeric column across related or event data.
You’ll configure:
- Related or event model (e.g.
Purchases) - Filter conditions (optional)
- Aggregation type:
SumorAverage - Column to aggregate (e.g.
REVENUE)
Count traits
Use case: Count the number of records (e.g. purchases, sessions, clicks) that meet a condition.
You’ll configure:
- Related or event model
- Optional filters
- Count by: Select a column (optional — defaults to row count)
Occurrence traits (First, Last, Most frequent)
Use case: Return the first, last, or most frequent value of a column from a related model.
You’ll configure:
- Related or event model
- Optional filters
- Occurrence type:
First / Min,Last / Max,Most frequent, orLeast frequent - Trait value: Column to return (e.g.
product_name) - Order by: Determines ordering for first/last
List traits
Contact your Customer Success team to enable returning list of objects. By default, only list of values are supported.
Use case: Return an array of values or objects for use in downstream tools (e.g. product IDs, brand names).
You can configure:
- Column to list
- Select one column (e.g.
product_id) to return a list of values - Select multiple columns to return a list of objects. The object key is the column alias; change the alias to control the output key name in the object.
- Select one column (e.g.
- Optional filters to control which rows are included
- Deduplication toggle: Check to skip duplicate values
- Order by and Sort direction
- Optional slice controls: Optionally, choose which part of the list to return (e.g. first 3)
Examples:
- Value list:
["product_1", "product_2", "product_3"] - Object list:
[{"id": "abc", "expiration": "2024-10-01"}, {"id": "xyz", "expiration": "2024-11-15"}]
For value lists, if using "Deduplication", "Order by" must match the selected column. For object lists, "Order by" and "Deduplication" cannot be used together.
SQL Aggregation traits
Use case: Build advanced calculations using SQL across related models.
You’ll configure:
- SQL expression, using
{{ column "<name>" }}syntax - Default value for null or missing results
- Property type (e.g.
String,Number,Boolean)
SQL Formula traits
Use case: Compute logic based on fields from the trait model itself using SQL. Does not join to related models.
You’ll configure:
- Formula expression (no
{{ }}syntax—just reference columns directly) - Property type
In SQL Formula traits, use direct field names (e.g. ltv, email_verified)
instead of {{ column }} syntax.
Step 3: Finalize
- Give your trait a clear name and optional description. This name will appear when filtering in the audience builder.
- Review the summary shown in plain language.
- Click Create trait to finish.
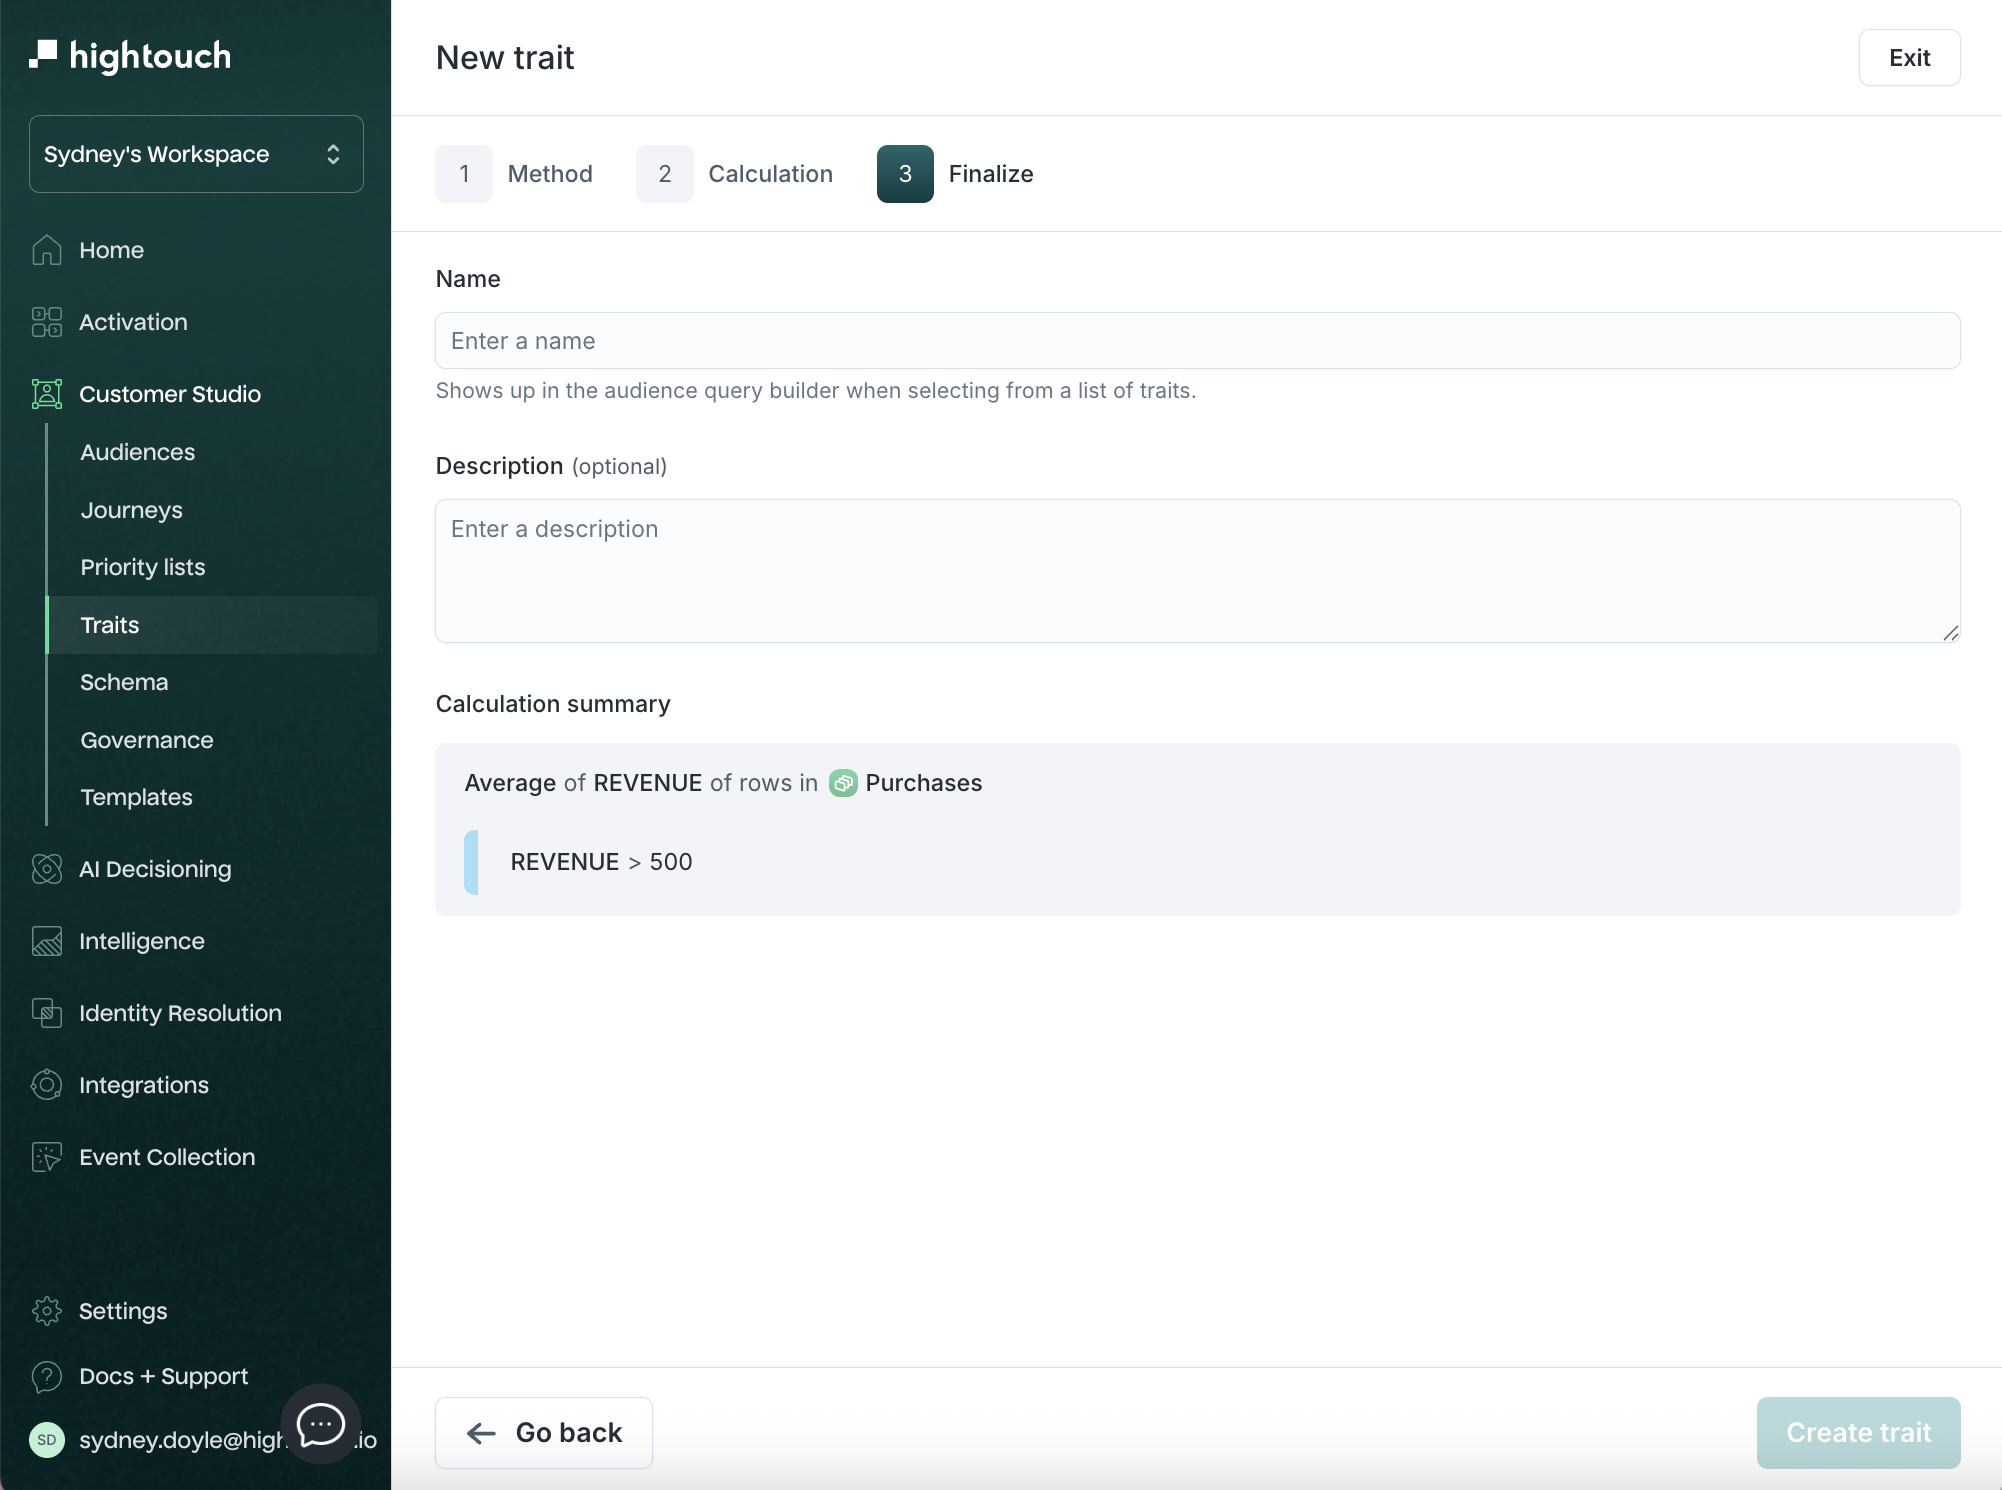
The new trait is now associated with the trait model and can be used in audiences or, if the trait model is a parent model, synced to destinations.
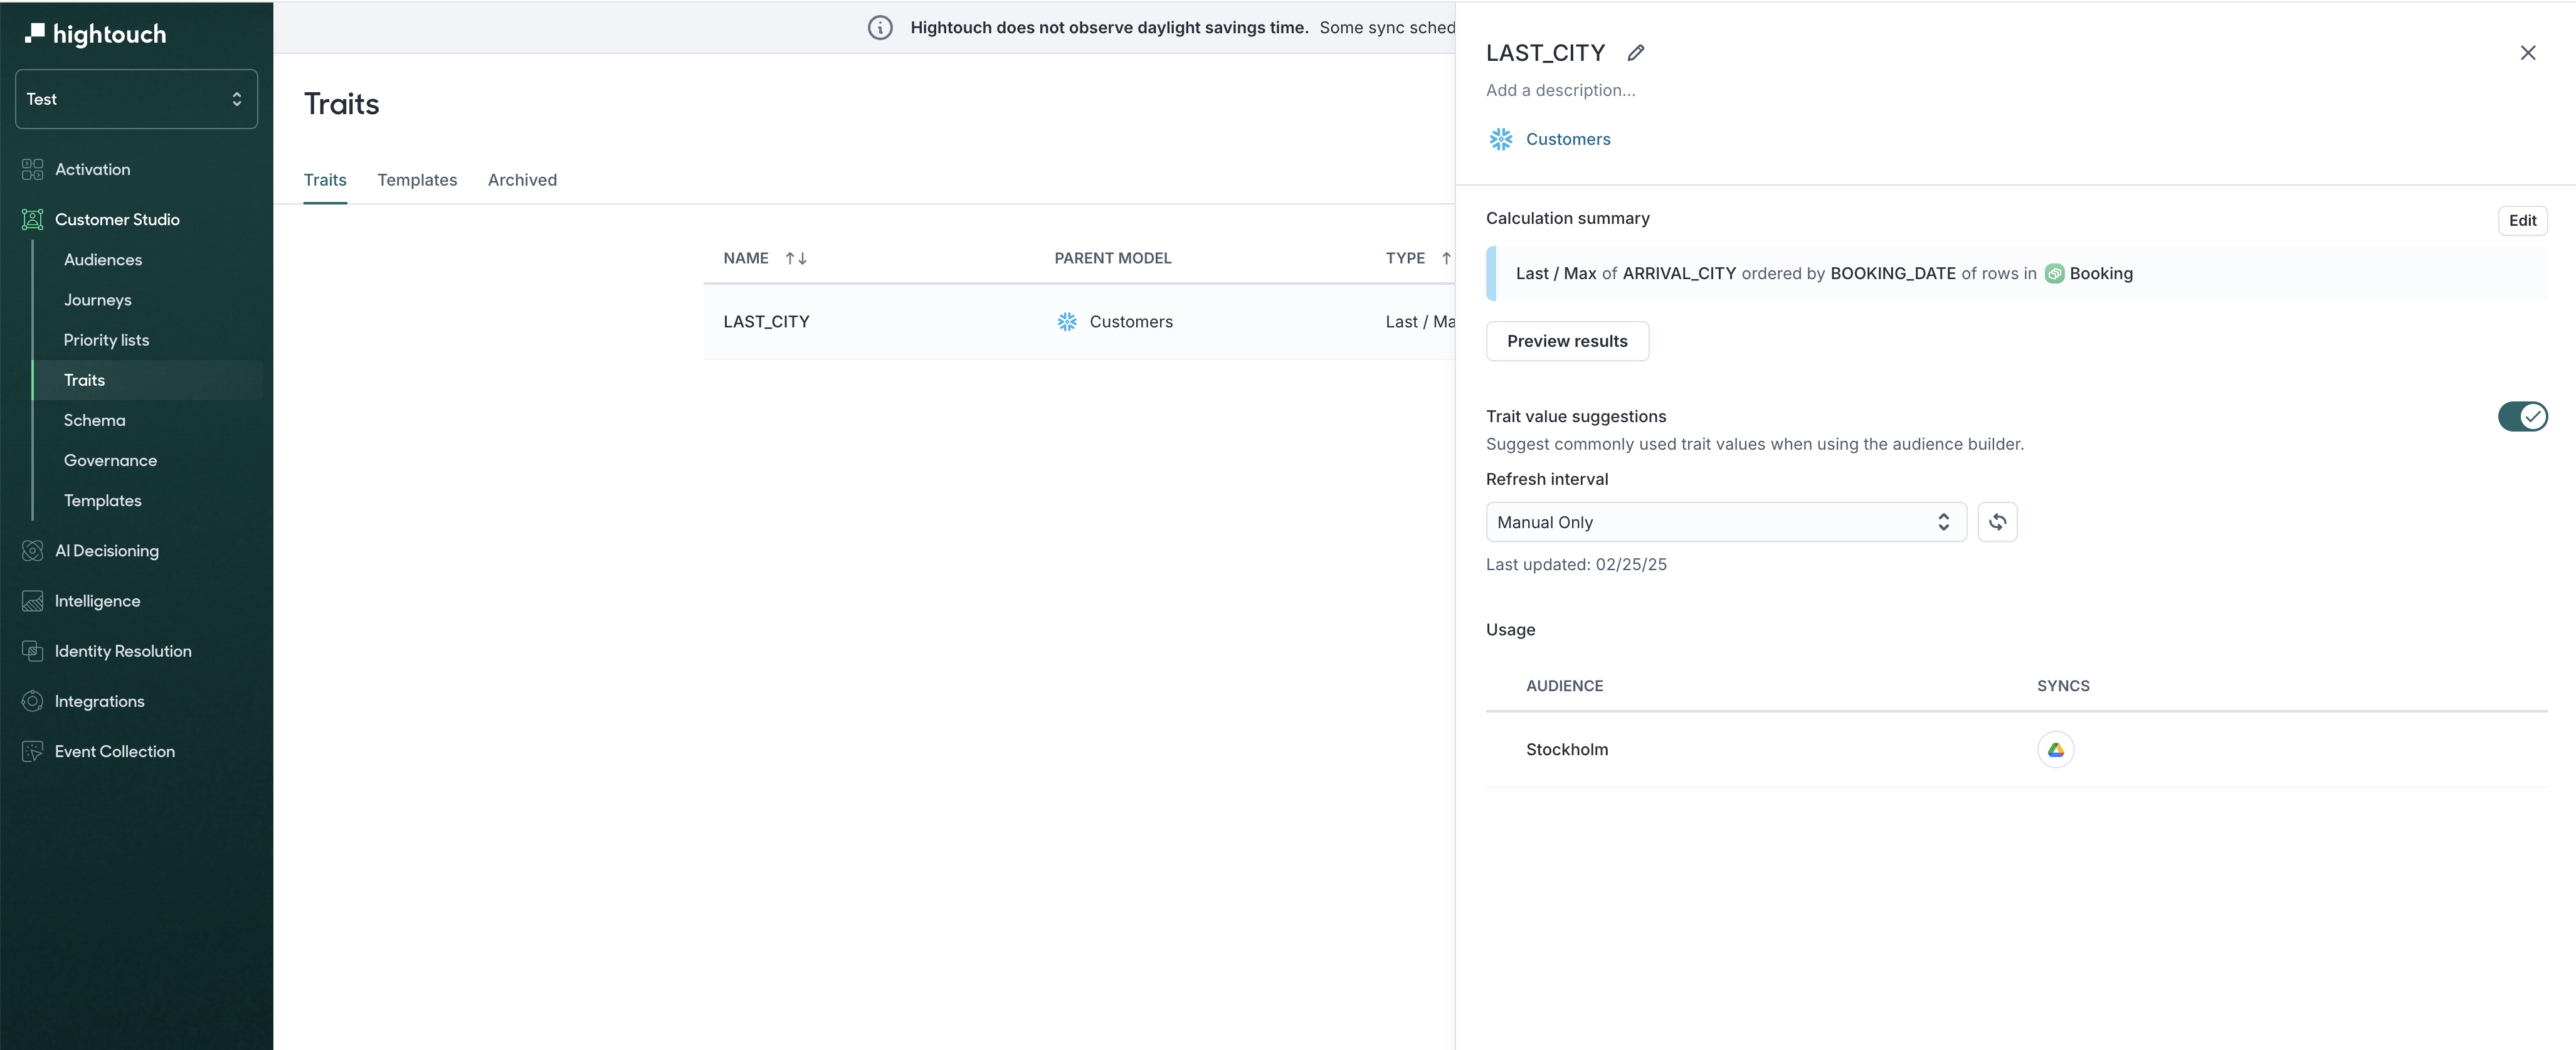
View and manage traits
After creation, traits appear in the Traits table, where you can:
- View name, the model the trait belongs to, calculation type, and the model used to calculate the trait
- Edit or archive traits

Use the tabs to switch between:
- Traits: All saved traits
- Templates: Reusable blueprints
- Archived: Deactivated traits
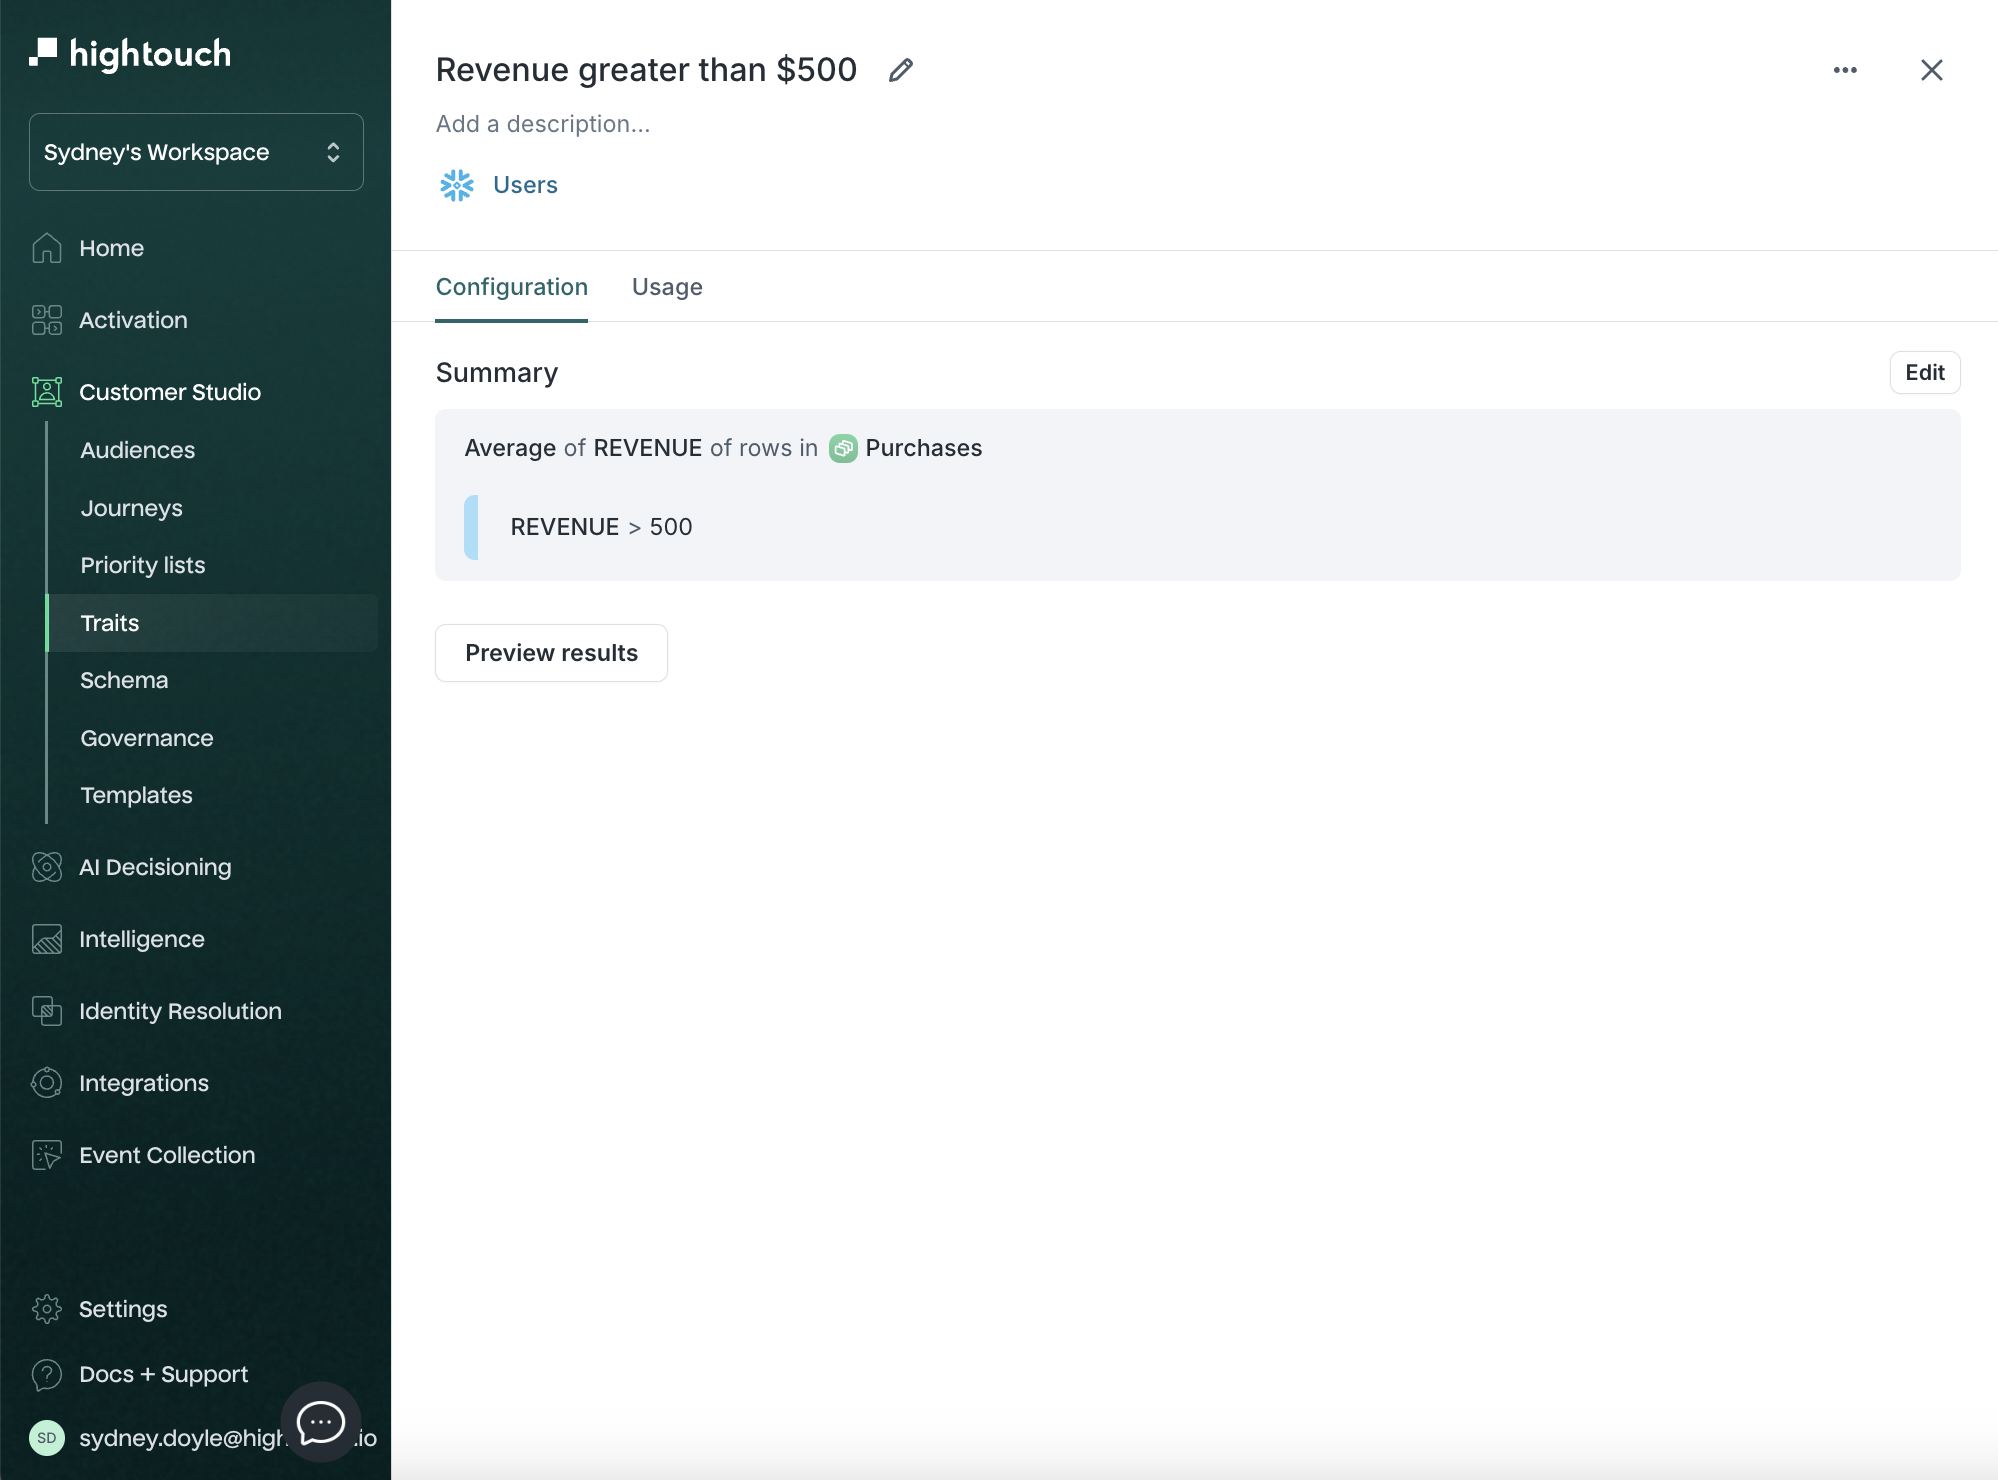
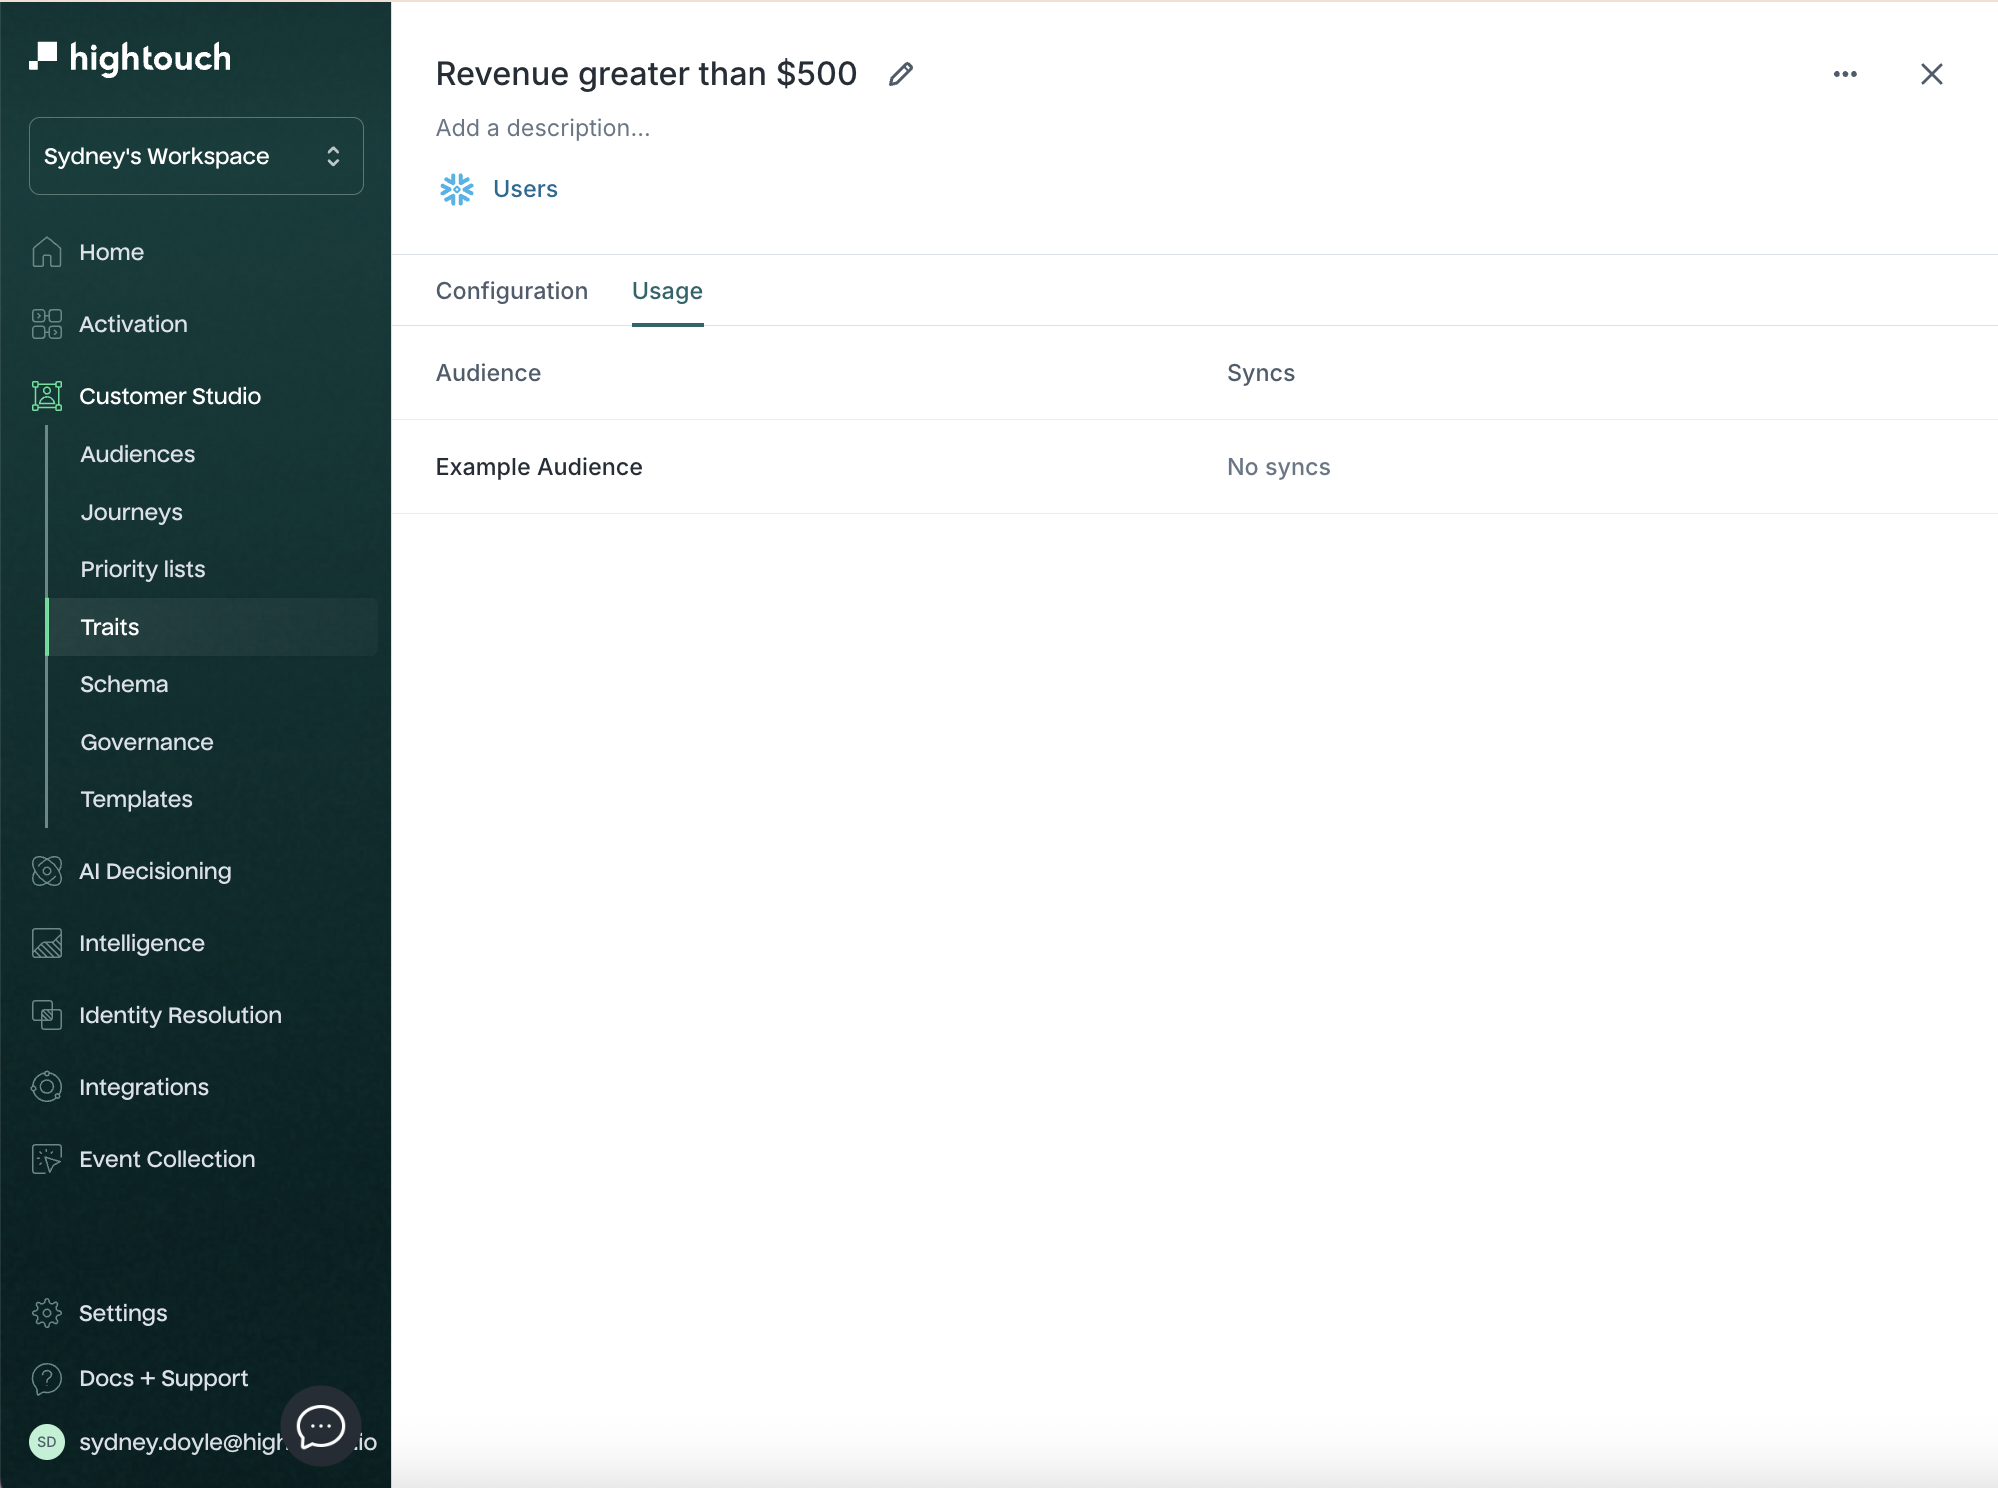
Trait configuration and usage
Click into any trait to view:
- The Configuration tab: shows logic summary and allows edits
- The Usage tab: lists audiences where this trait is used
Trait templates
Trait templates let you define reusable logic that can be used as a base for other traits. You can create templates once and generate new traits from them, saving time and ensuring consistency across teams.
Create a new template
To create a template:
- Go to Customer Studio → Traits
- Click the Create dropdown and select New template
The flow for creating a template is the same as creating a standard trait:
- Choose a trait model
- Select a calculation method
- Configure filters and logic
- Finalize the template by naming and saving it
Once saved, the template appears under the Templates tab.

Updating a trait template will also update all traits created from it—unless those
traits have overridden the base logic. For example, if you change a template’s
aggregation type from Sum to Count, any traits built directly from that template
will adopt the new Count method automatically.
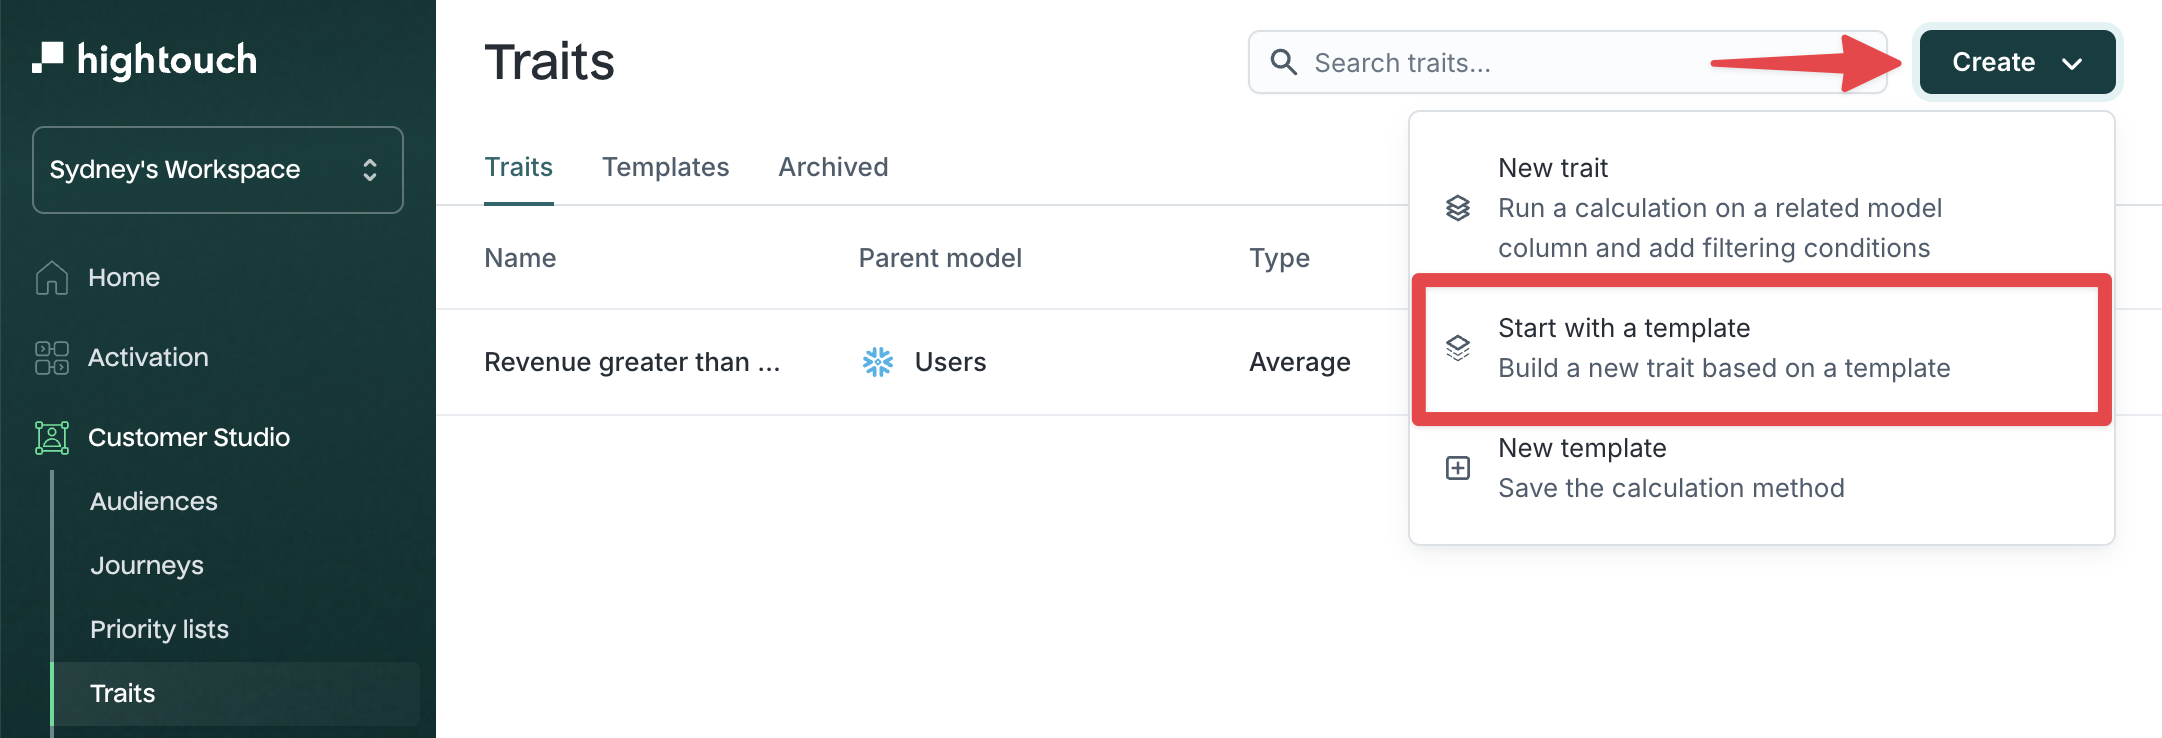
Create a trait from a template
Once you’ve created a template, you can use it to quickly generate new traits with consistent logic.
To create a trait from a template:
- Go to Customer Studio → Traits
- Click the Create dropdown and select Start with a template
- In the modal, select a template and click Choose template.
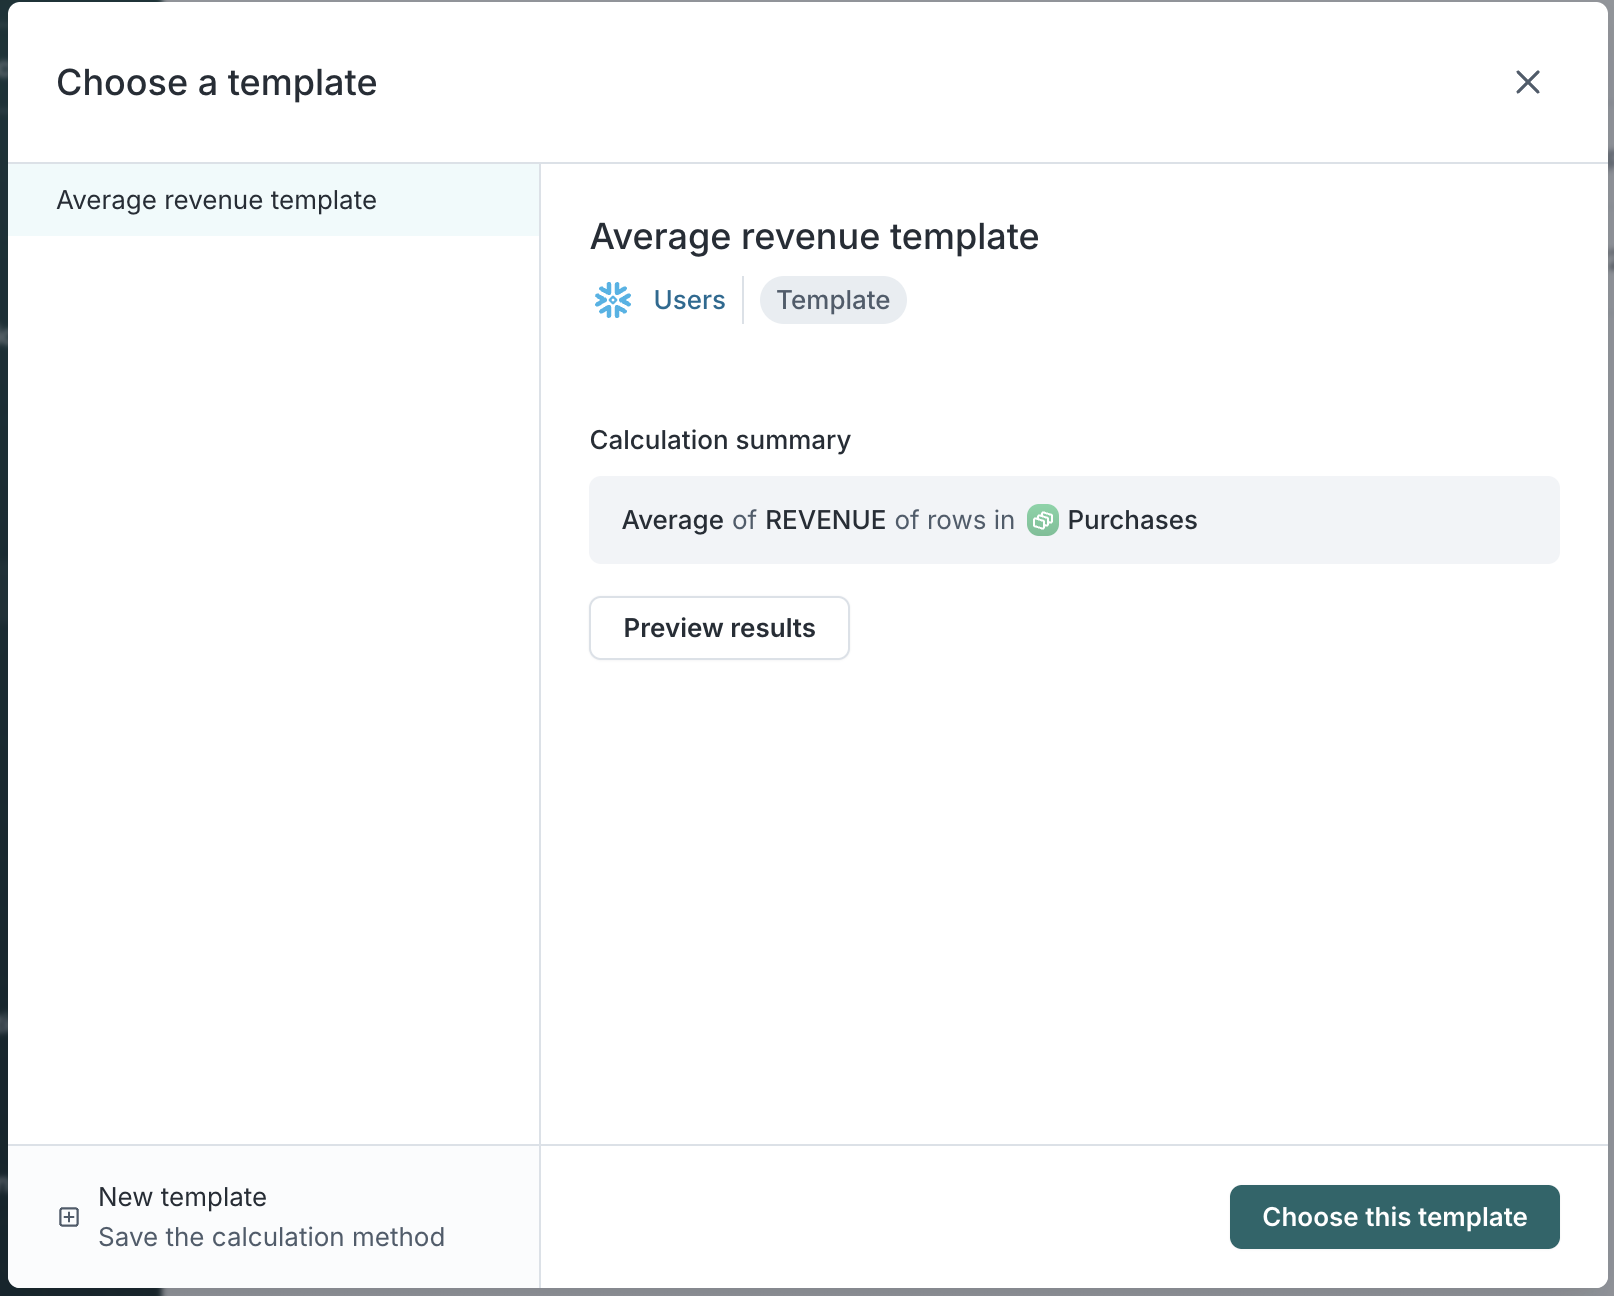
-
In the Choose a template modal, select your desired template from the list.
- You’ll see a summary of the calculation logic, including parent and related models.
- Click Preview results to validate the output.
- Click Choose this template to continue.
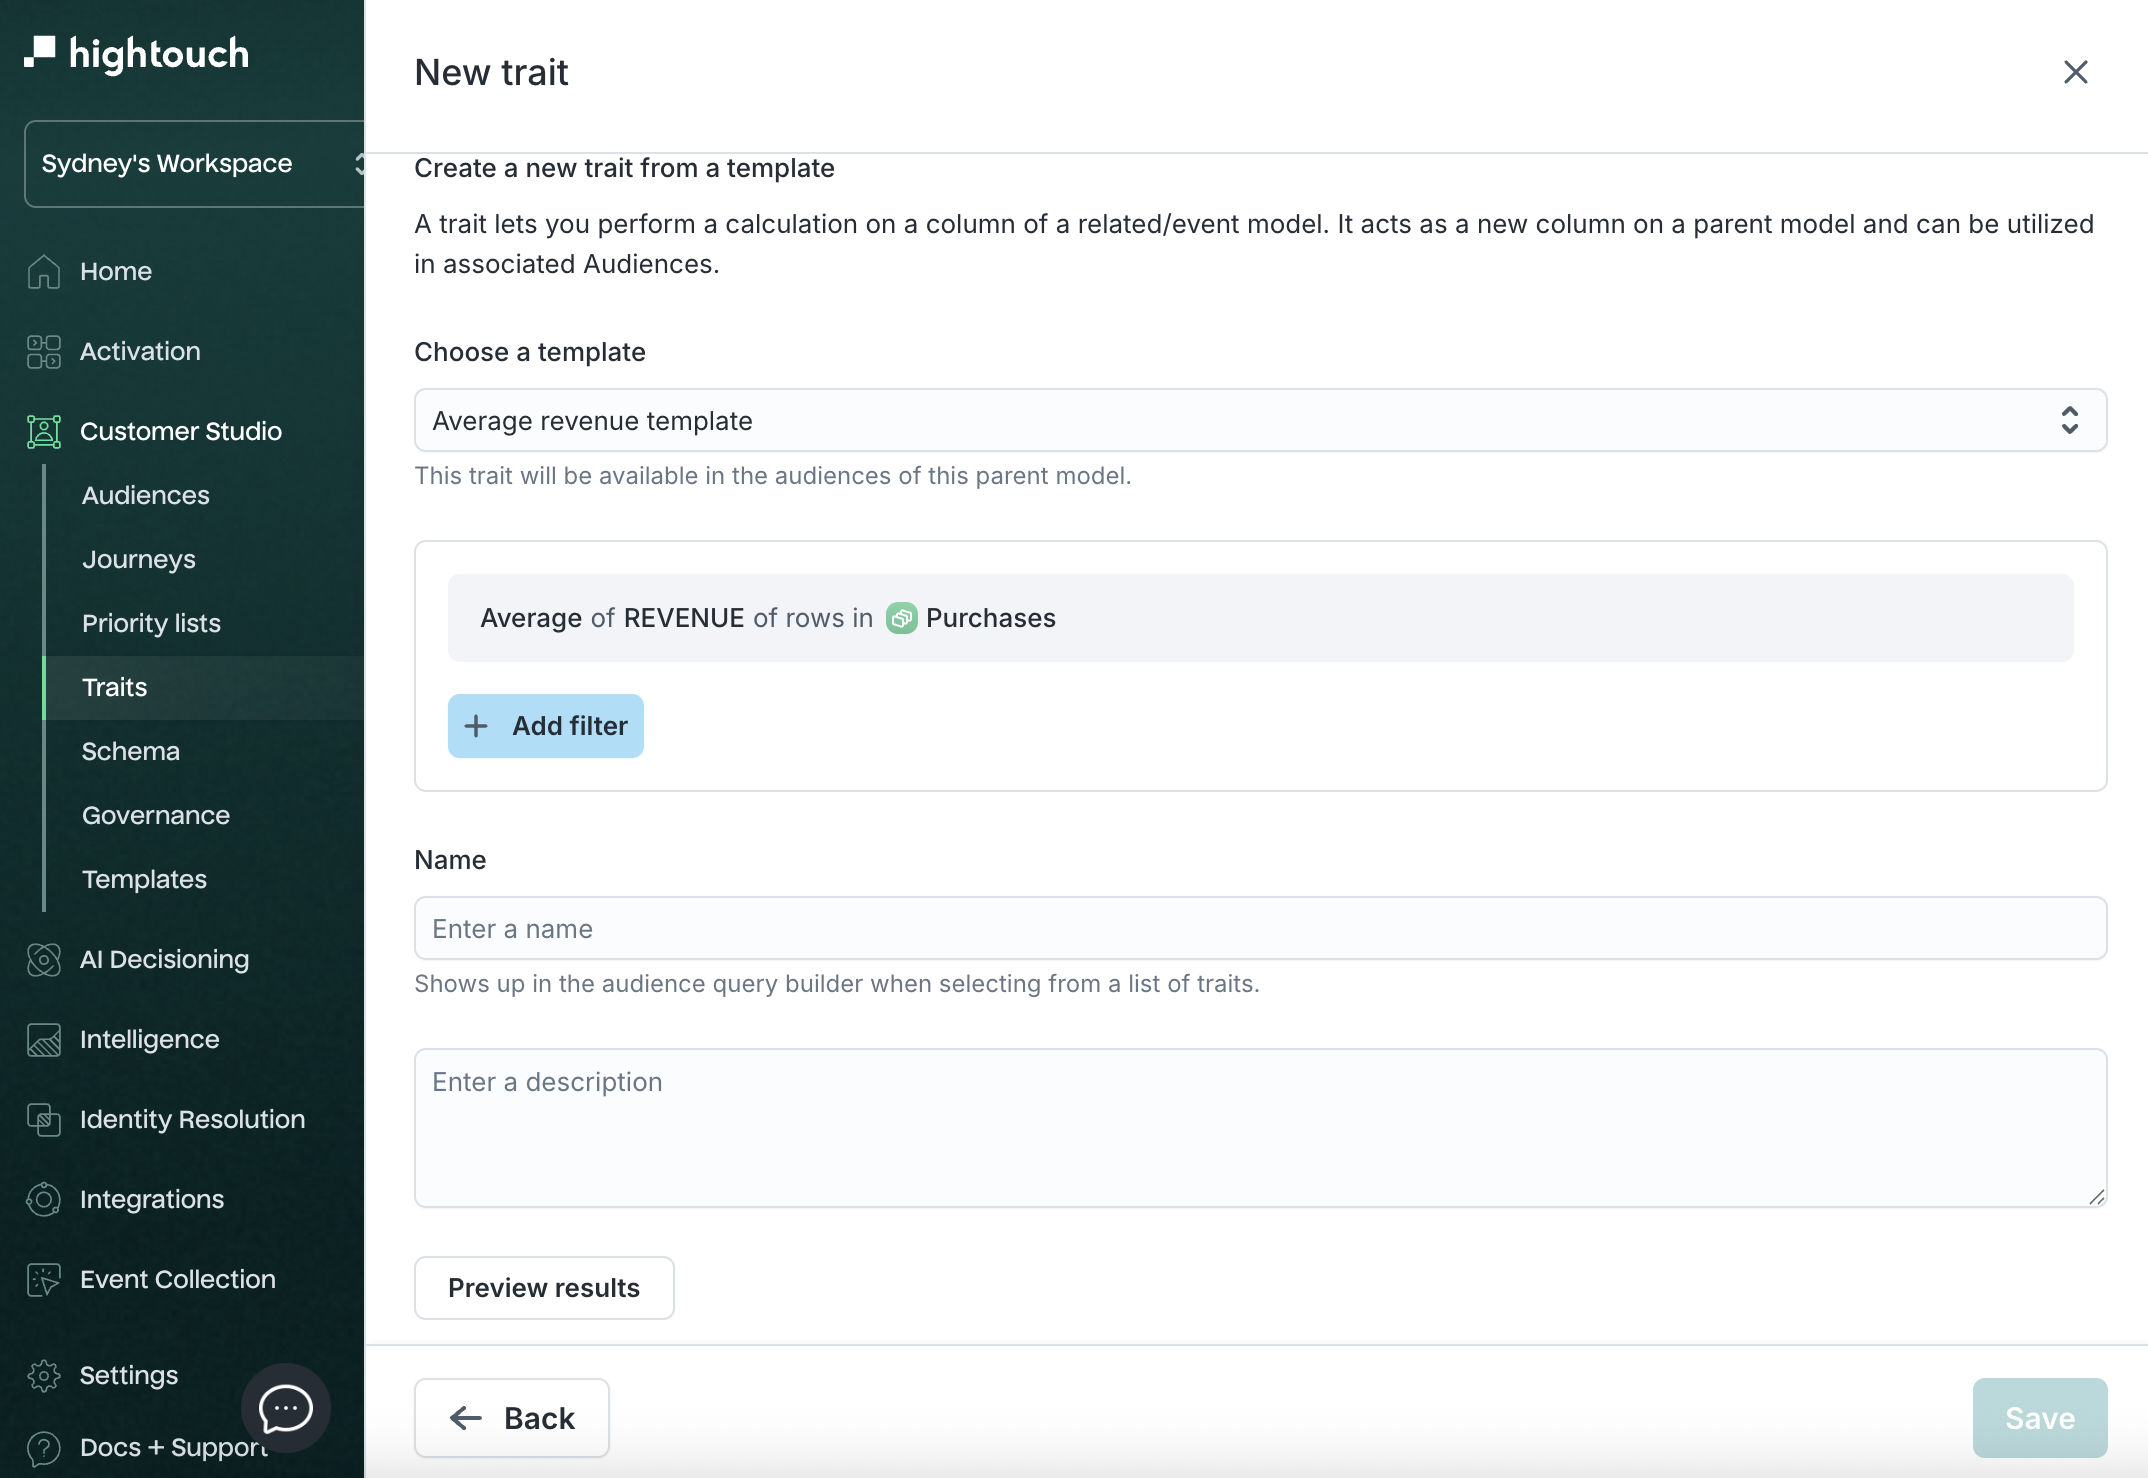
-
On the next screen, you'll see the template logic pre-populated.
- (Optional) Add additional filter conditions.
- Enter a Name and optional Description.
- Click Preview results to validate trait output.
- Click Save to finalize.
Once saved, this trait will be available in the Traits tab and can be used for audience filters and destination syncs.
Changes made to the base template will automatically update all traits created from it—unless local filters or logic were modified when the trait was saved.
Create audiences with traits
Once you've created a trait, you can use it for filtering within your audiences. Traits filters are under Traits in the filters dropdown.
There are three kinds of traits you can use in your audience filter:
- Trait templates
- Traits
- Custom traits
Use trait templates in the audience
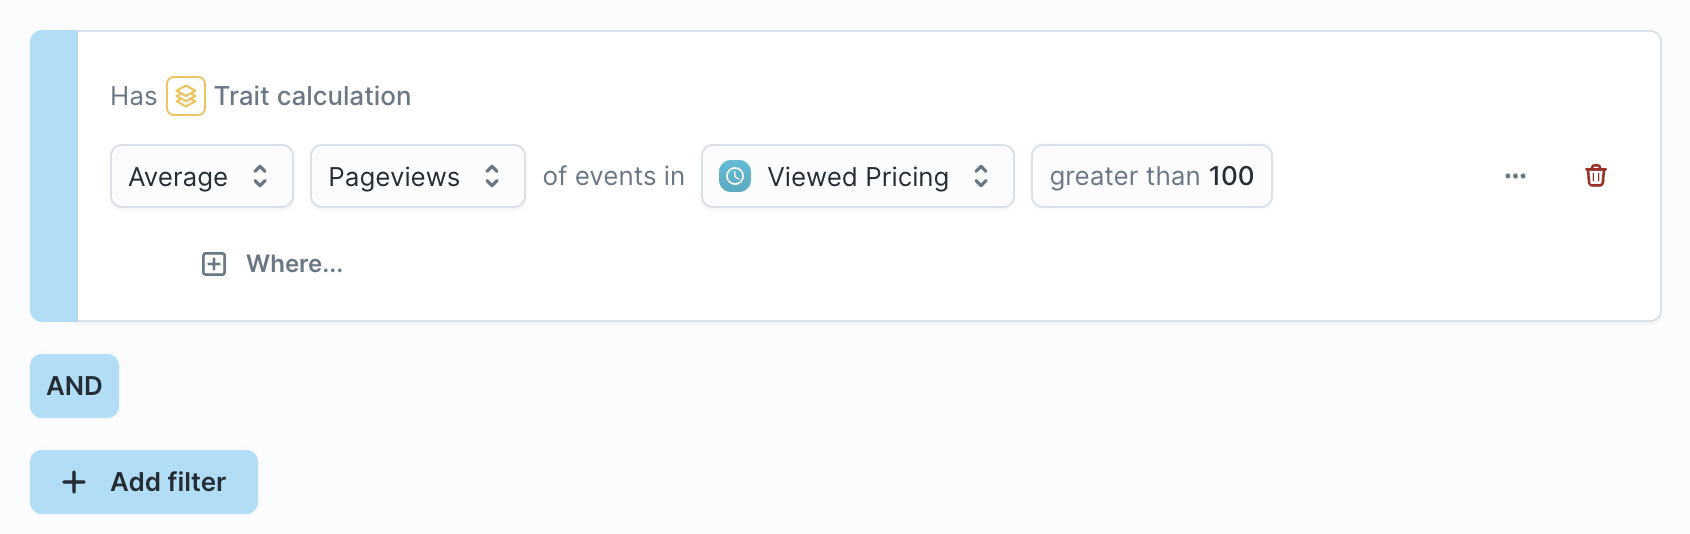
- Click Add filter
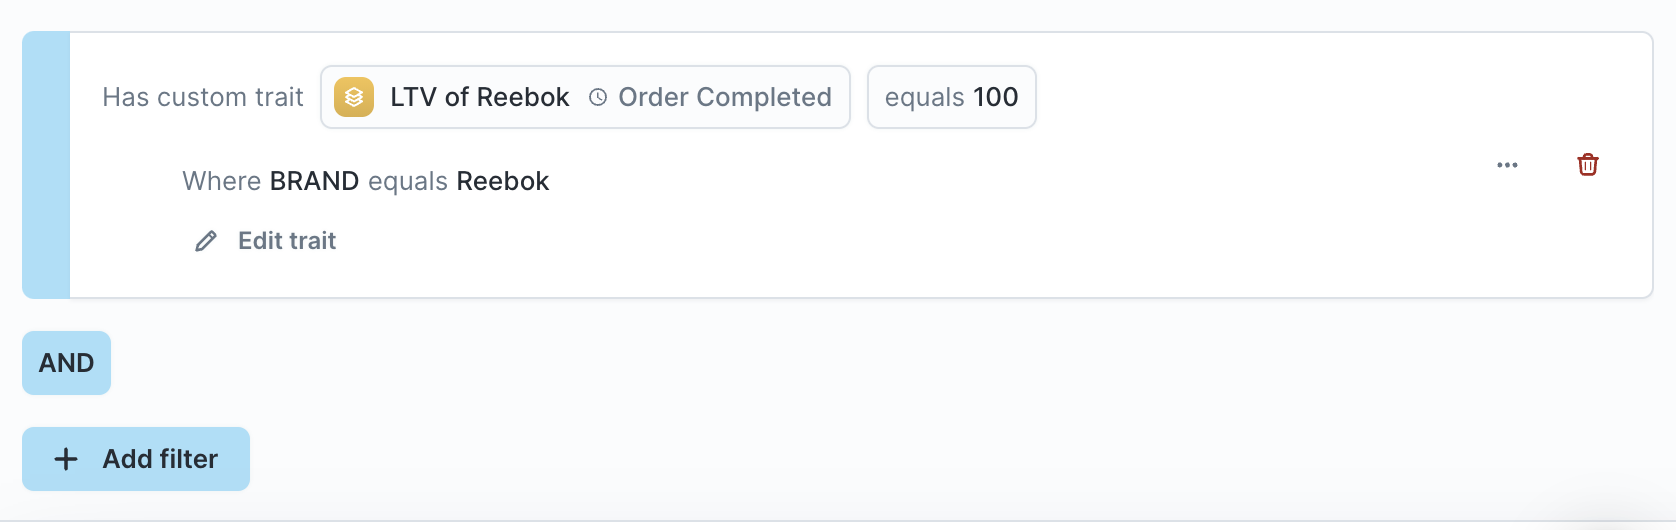
- Navigate to Traits and select a trait template. For example, if you created an LTV trait, you can use it to filter for "All users that have spent more than $100."
- [Optional] You can also add filters to apply before Hightouch calculates trait values. For example, you can restrict the LTV calculation to purchases where the
Brandwas Nike directly in the audience builder.

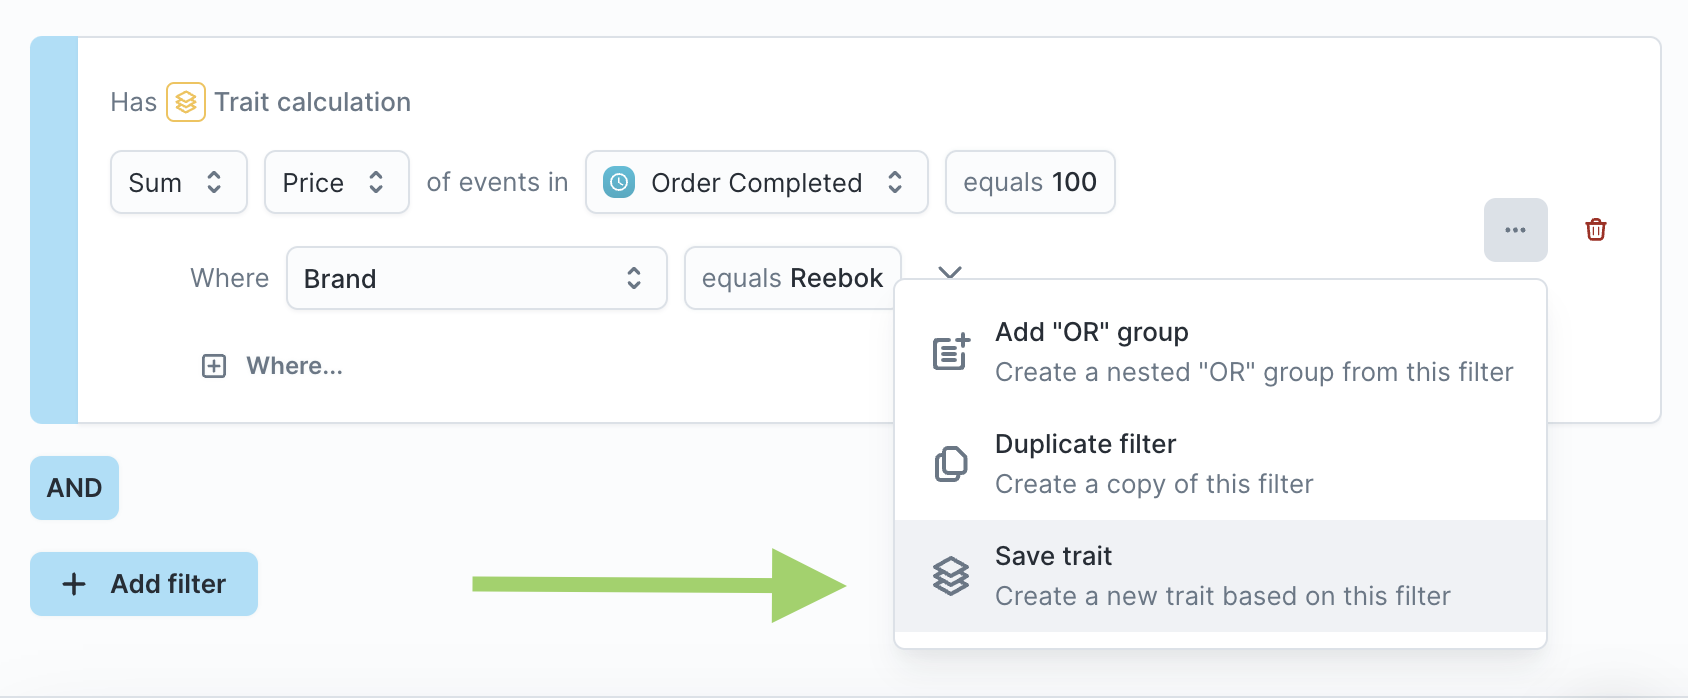
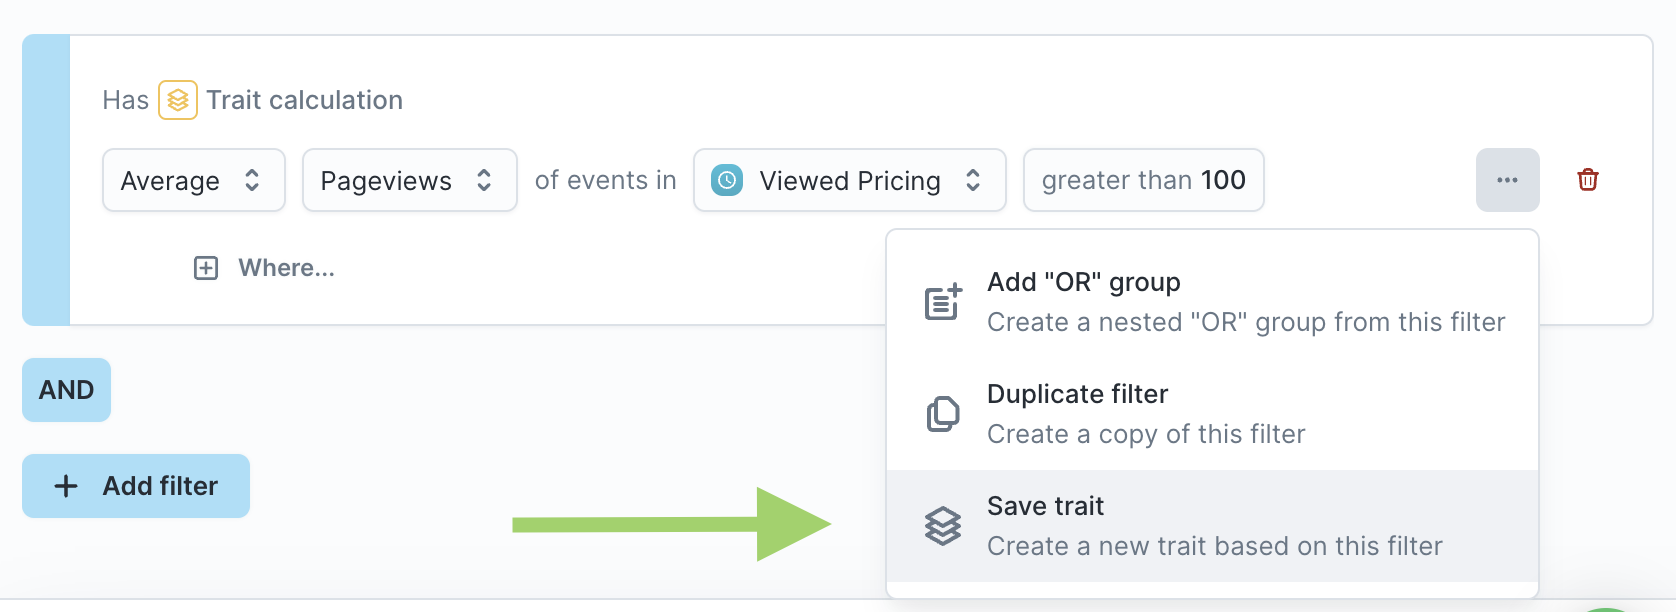
- [Optional] You can save the trait filter as a new trait enrichment. To do so, click the actions button and "Save trait enrichment"
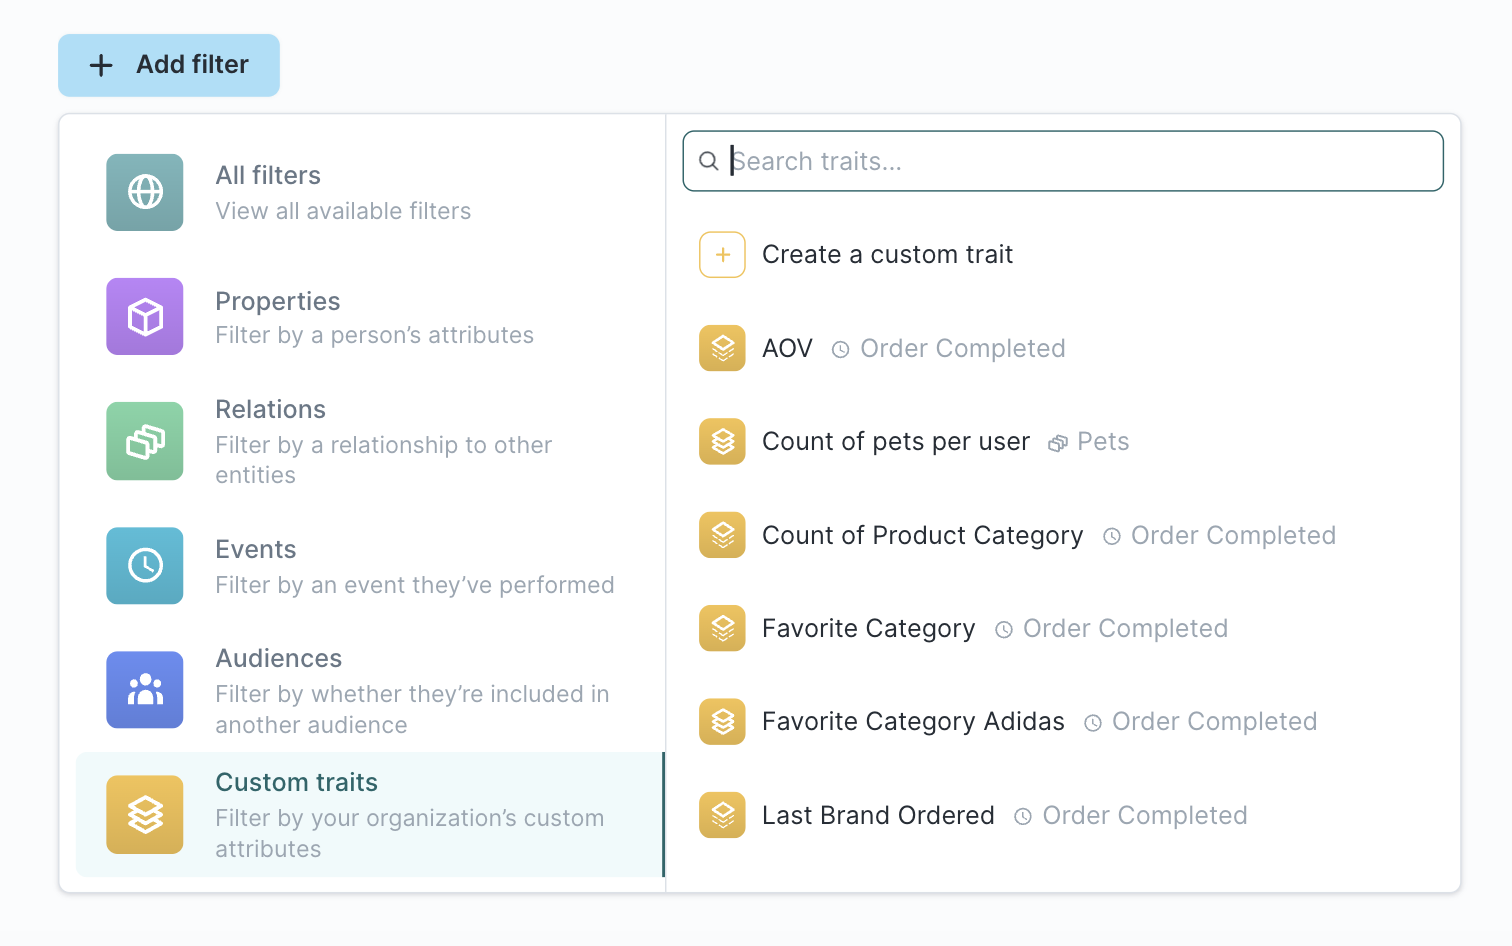
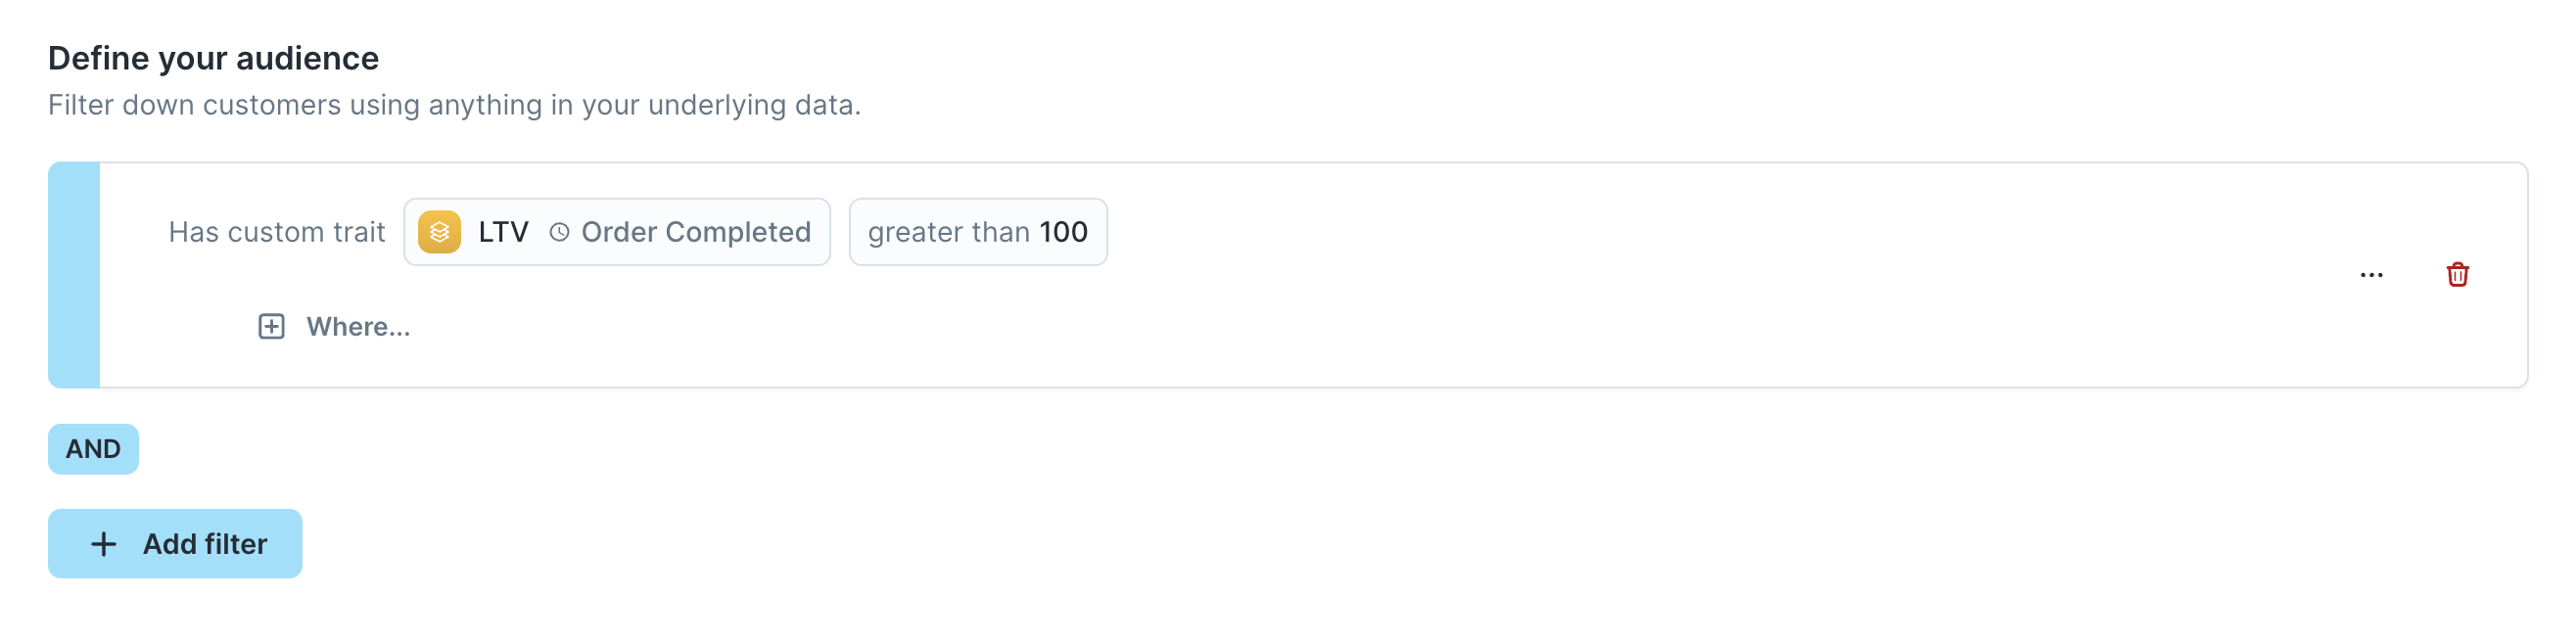
Use traits in the audience
- Click Add filter
- Navigate to Custom traits and select a trait
- [Optional] You can edit the trait configuration by clicking Edit. Updating these filters will not affect the original trait.
- [Optional] If you edit the trait and want to save it as a new trait, click the actions button and "Save trait."
Create a custom trait within the audience
Maybe you don't have a suitable trait or trait template to act as a filter. Or, maybe you just want to experiment with a trait filter without necessarily creating one for the parent model. You can create a custom trait inline within the audience query builder.
- Click Add filter
- Navigate to Custom traits and click Create a custom trait
- Select a related model
- Select the configuration for your trait
- [Optional] If you decide that this custom trait is useful enough to persist it for the entire parent model, click the actions button and "Save trait." Doing so converts it into a new trait that can be synced.
Enrich audiences with traits
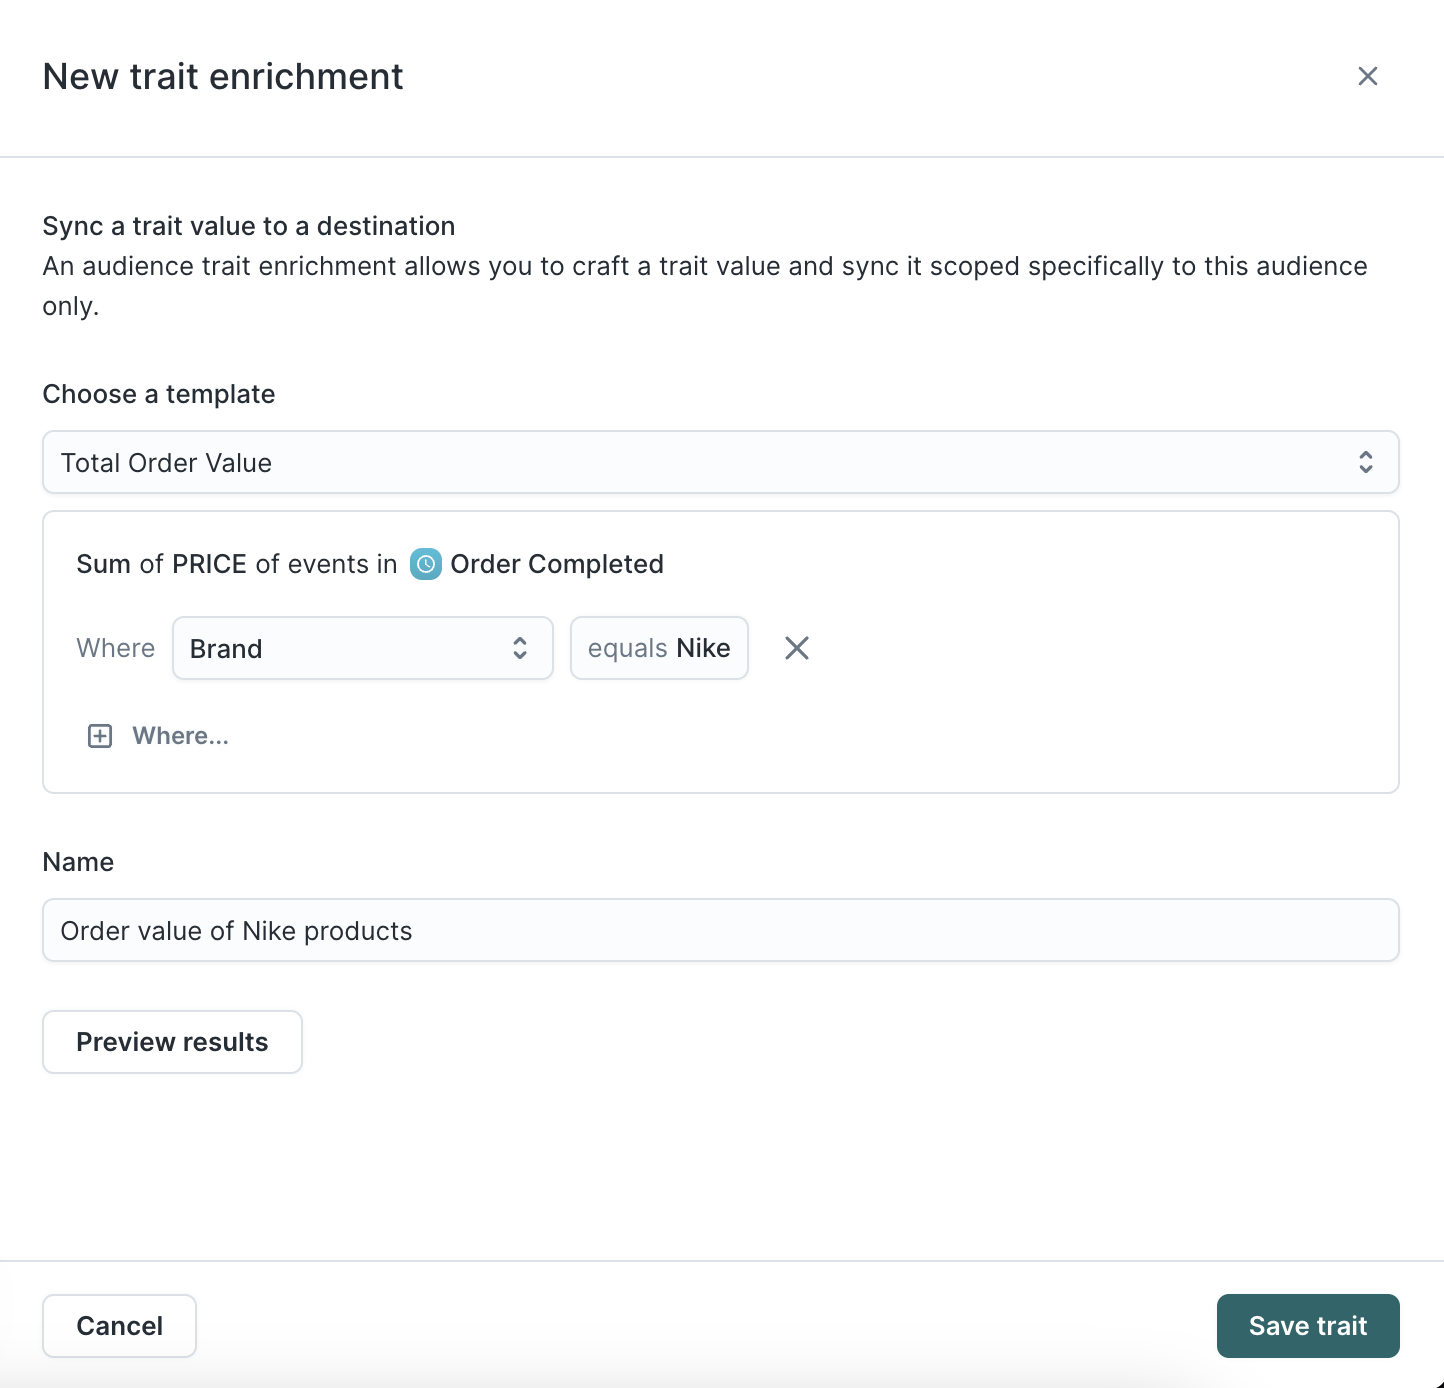
Traits defined on the parent model are automatically available for syncing to destinations. Alternatively, you can create trait enrichments which are traits that are specific to an audience.
Trait enrichments are based on a parent trait which are the trait templates you've defined on the parent model.
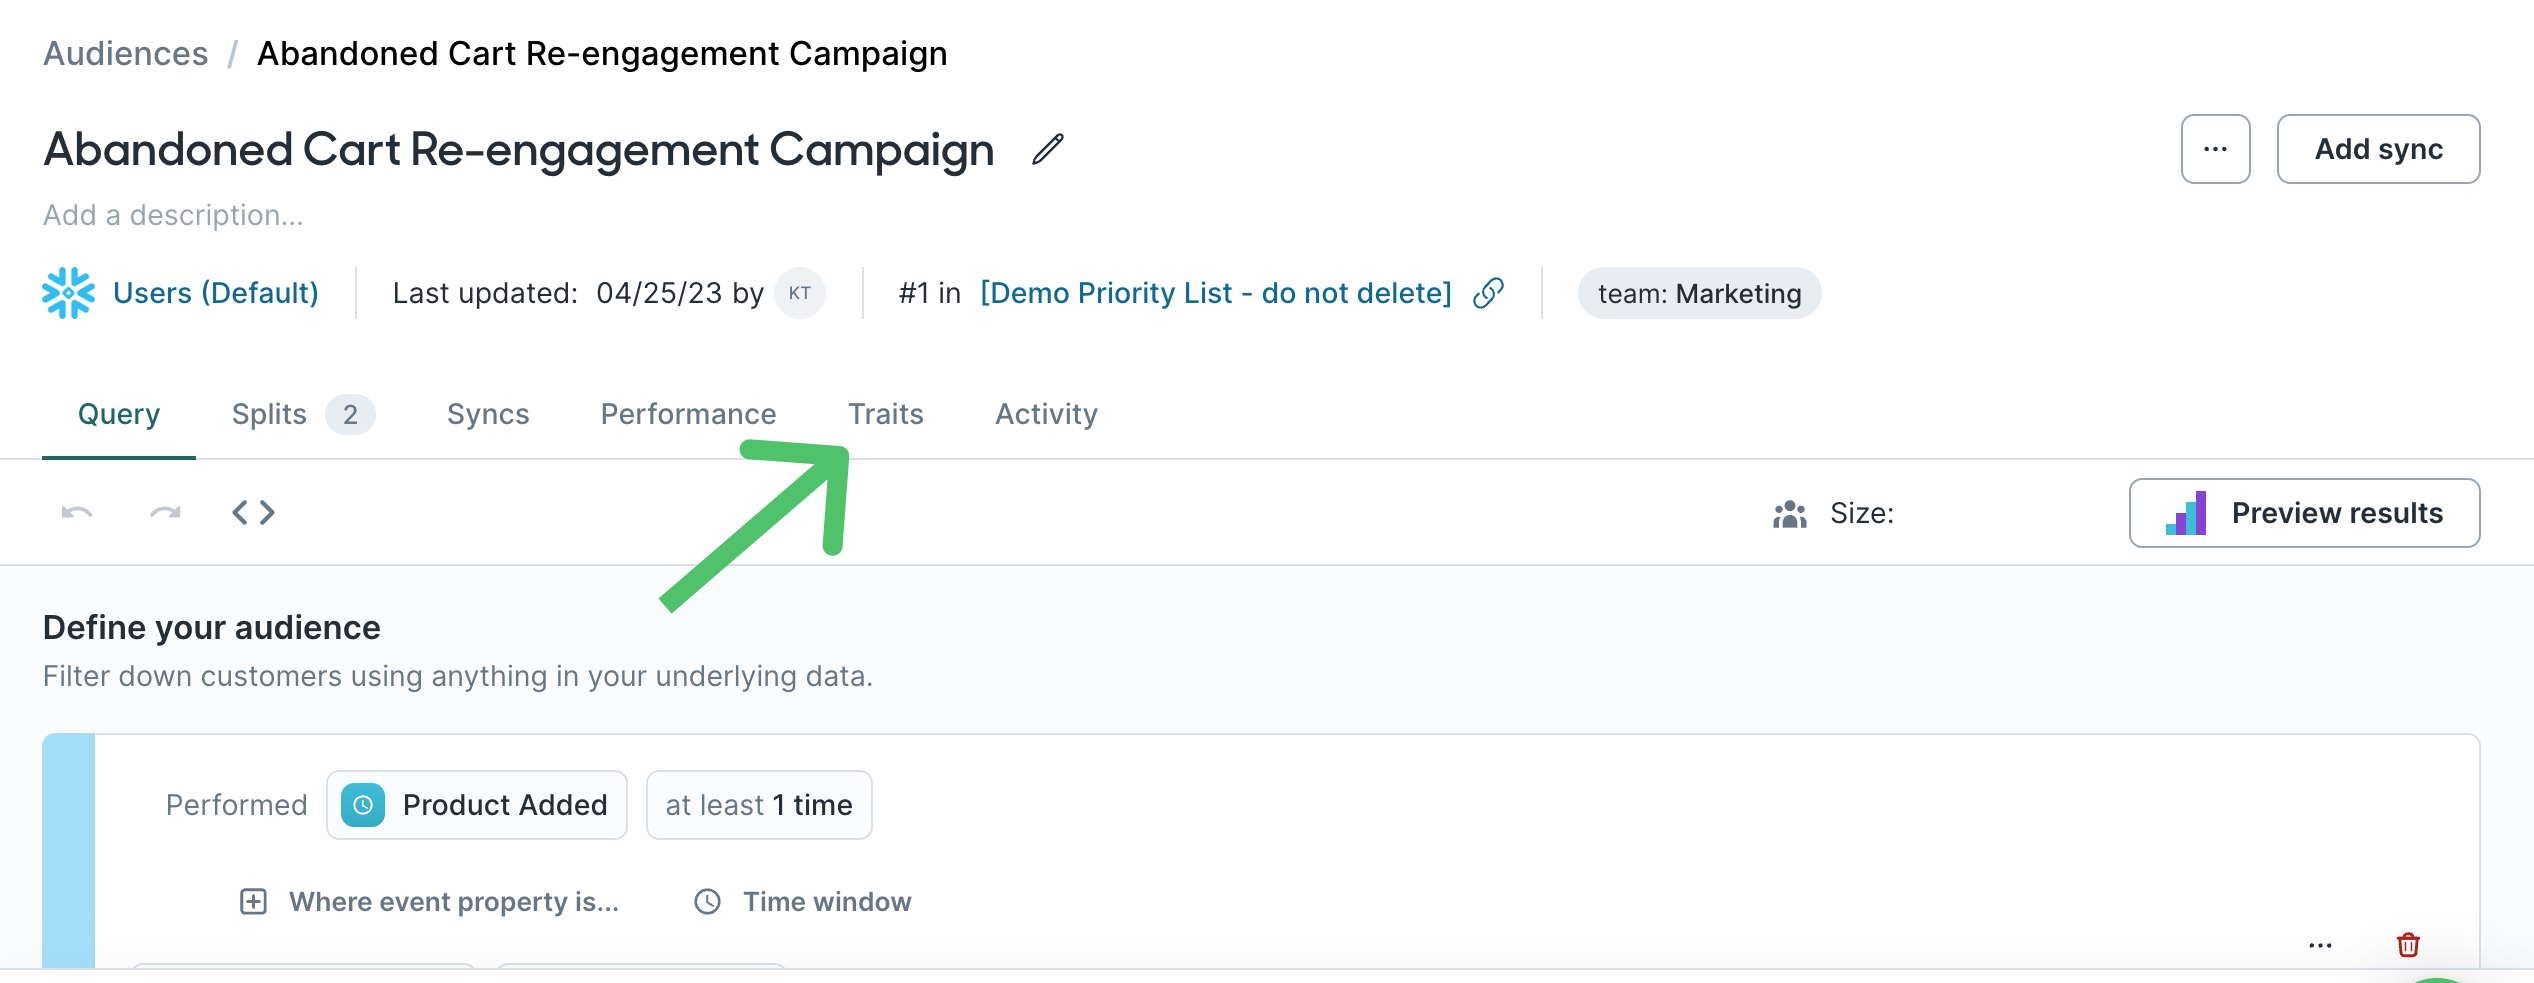
- Go to the Traits tab of the audience you want to add enrichments to.
- Click Create trait.
- Enter a Name and select the Parent trait.
- [Optional] Add conditions to apply on top of the parent trait.
Once created, these enrichment traits appear in the Audience preview and sync configuration like any other field.
Event trait enrichments
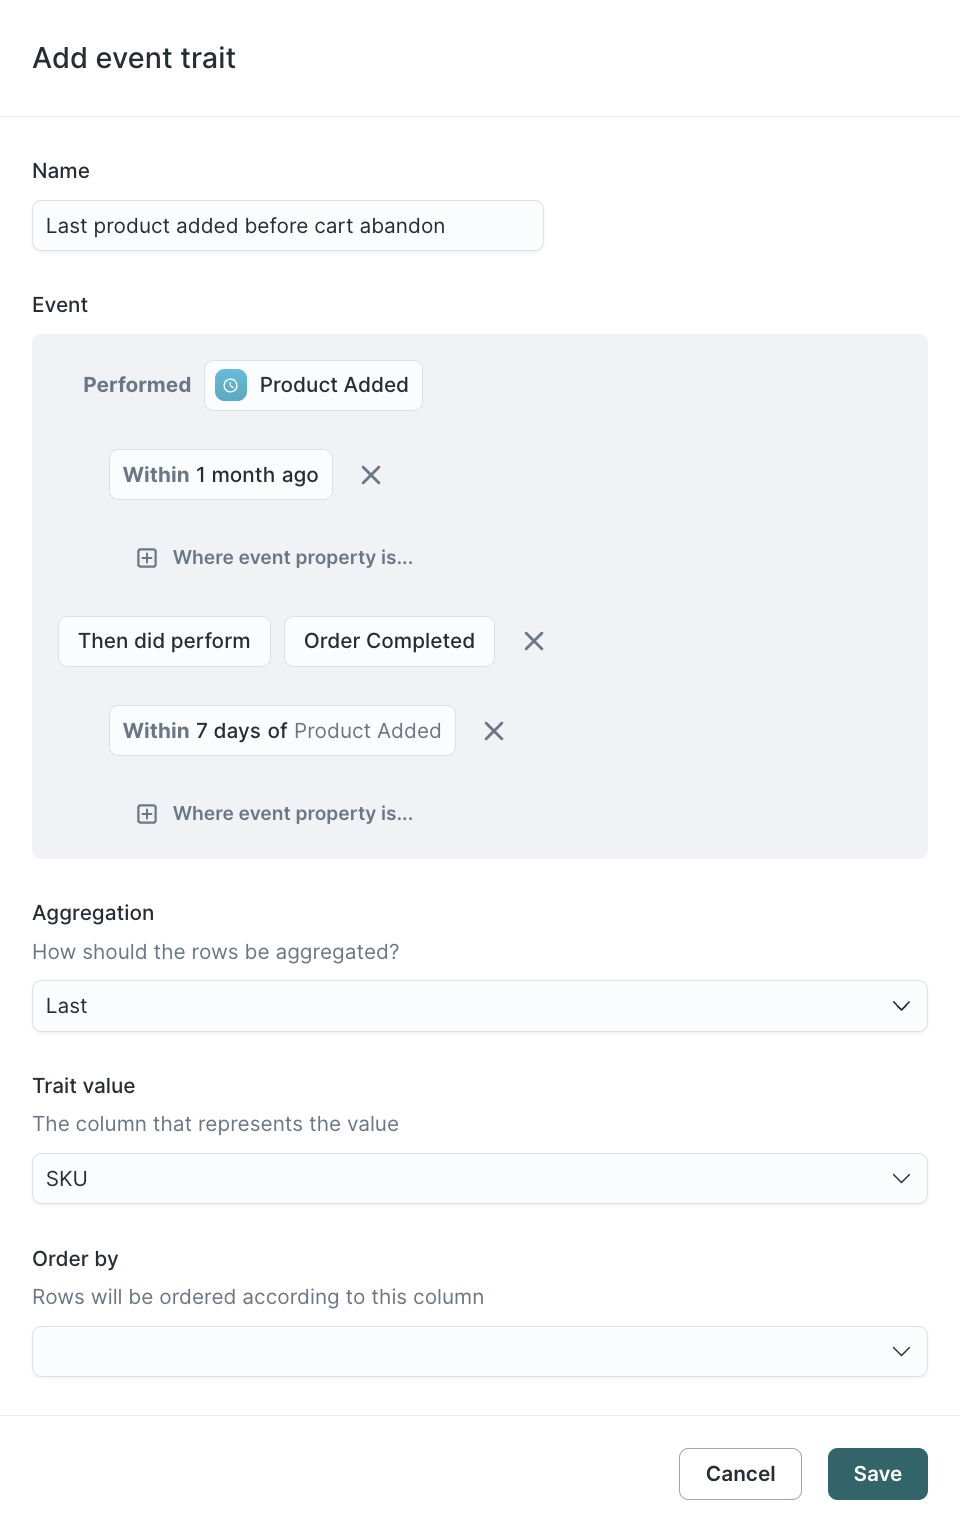
You can also create traits from events in the audience builder. These automatically become trait enrichments, meaning you can view them in the preview and sync their values. One common use case for event traits is to capture information about abandoned carts.
- To create a new event trait enrichment, click Add trait on an event condition in the audience builder.
You can only access the Add trait option from an event filter once you've saved the audience.
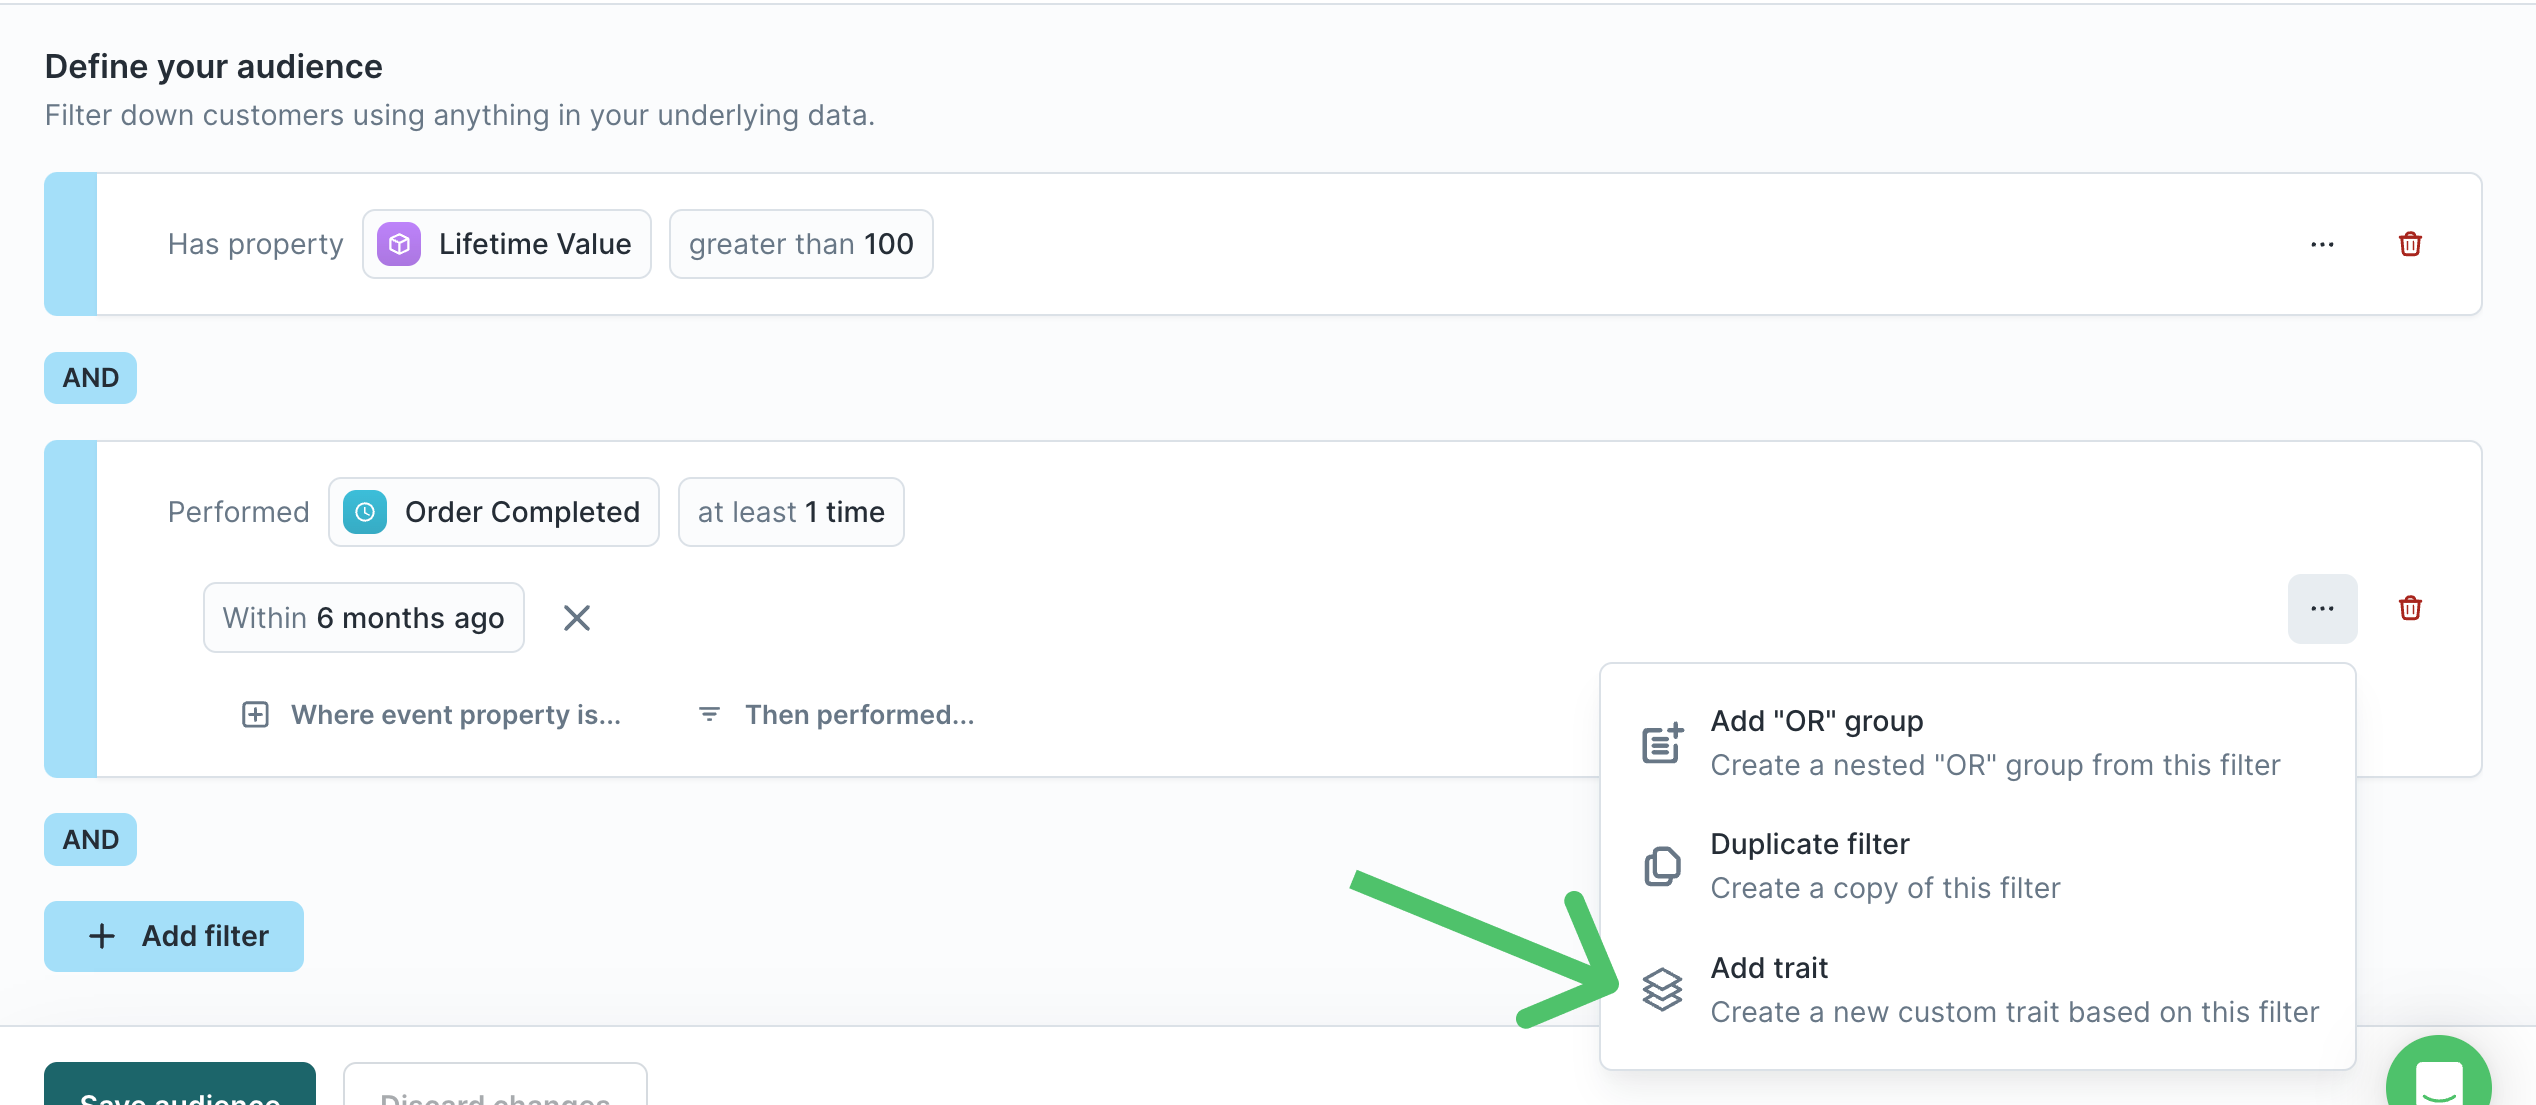
- Give the event trait enrichment a descriptive Name.
- Select the aggregation you want to use, for example, Last.
- Select the information you want to capture about the event. For example, you may want to capture the
Product_ID,SKU, orBrandof the final product a user added to their cart before abandoning it.
SQL Aggregation traits
Custom SQL traits let you write custom aggregations that the default aggregations don't cover. To build a SQL trait, create a trait and follow these additional instructions:
- Select SQL as the Aggregation type.
- Enter a raw SQL aggregation. For example, to create a
SUMtrait with just SQL, you would enterSUM({{ column "price" }}).
Column references must use the syntax shown in the SQL editor: double curly braces around the keyword column followed by the column name in quotes. Column names are case-sensitive.
- Enter a default value for when the SQL returns no rows.
- Define the Property type of the SQL aggregation result.
JSON aggregations
JSON aggregations are a helpful way to aggregate the raw data in a related model. For example, imagine you want to get a list of all product IDs users have purchased. You can do this with the following SQL trait:
ARRAY_AGG(DISTINCT {{column "product_id"}})
CASE statements
CASE statements are a useful way to create friendly options for aggregations. For example, imagine you want to bucket customers into low, medium, and high LTV. You can do this with the following SQL trait:
CASE
  WHEN SUM( {{column "price"}} ) > 100 THEN 'high'
  WHEN SUM( {{column "price"}} ) > 50 THEN 'medium'
  ELSE 'low'
END
SQL Formula traits
Formula traits allow you to reference the columns, merged columns, and other traits belonging to the trait model to build inline transformations. Unlike Custom SQL Traits, there is no aggregation against a single related model. Instead, you can reference columns from a multitude of sources. This lets you compose columns directly within Hightouch.
- Select Formula as the Aggregation type.
- Enter raw SQL. To reference a column or trait, type the name for the autocompletion dropdown to show up. Then, select it to populate the editor as shown above. Here are a few examples of SQL queries that can be done using formula traits:
- Combine multiple columns into one:
CONCAT({{"first_name"}}, ' ', {{"last_name"}}). - Use a string column to create a boolean flag:
CASE WHEN {{"merged.pets.animal"}} LIKE 'dog' THEN true ELSE false END - Reference other traits:
CASE WHEN {{"trait.lifetime_total_value"}} > 1000 THEN 'high' ELSE 'low' END.
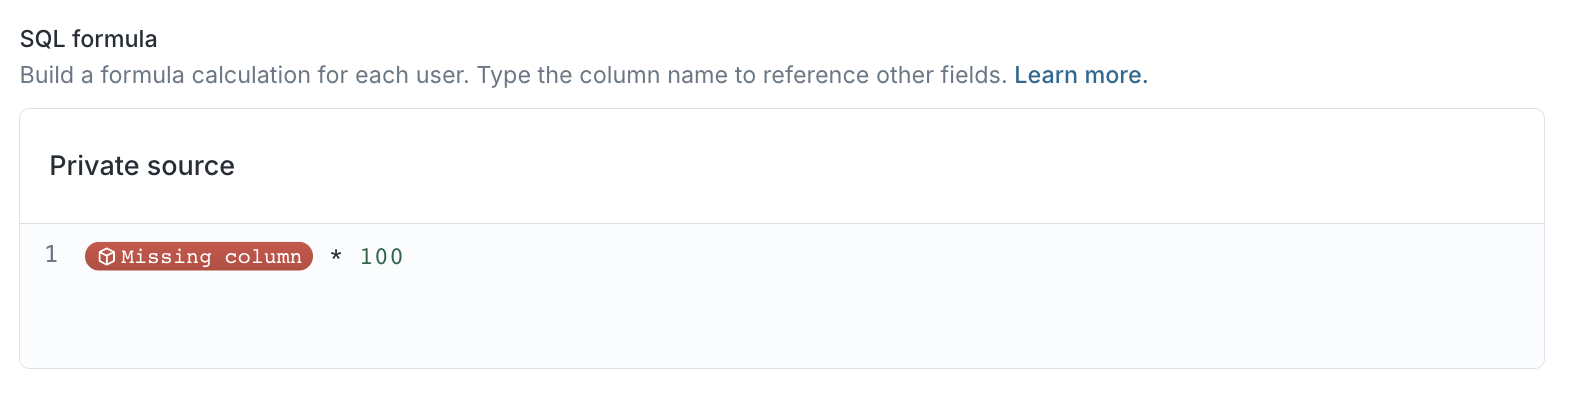
Column references in formula traits use special syntax. Use the SQL editor's autocompletion feature to write column references.
References to non-existent columns or traits are shown with a red pill.
- Define the Property type of the SQL aggregation result.
Trait value suggestions
Most Frequent, First, Last, Custom SQL, and Formula traits that result in a string type support trait value suggestions. When enabled this provides suggested values for the visual audience builder. For example, if you're creating an audience you want to filter on a "Most Recent City" trait, turning on suggestions populates a dropdown with values—San Francisco, Los Angeles, etc.—found in the dataset.
Enabling suggestions
Trait value suggestions can be enabled when creating or viewing a trait.
Traits on event or related models
You can define traits on related or event models (e.g. Purchase, Session) as well as the parent model (e.g. User). This enables traits that compute within the scope of a related row and can be referenced in audience filters.
Example use cases
- Per purchase, how many items over 1K do I have? Filter for users with purchases that include 3 items over $1000.
- I only have a timestamp column on my event. How many events occurred on the weekend vs the weekday? Filter for users with purchases that occurred on a weekend.
Key notes
- Traits "live" on the event or related model: the event or related model is the trait model, and the trait is calculated relative to it.
- In non-formula traits you can aggregate across models related to trait models. In formula traits, you can use the trait model's columns directly in the formula.
- You can’t sync these traits directly. They can only be filtered.
- Preview rows show the join key and, for events, timestamp and primary key if available.