| Field | Content |
|---|---|
| Audience | Organization admins |
| Prerequisites | Organization admin permissions, or membership in a group with access to Organization settings. |
Overview
Hightouch uses role-based access control (RBAC) to define what actions users can take across workspaces and resources.
Each group in your organization is assigned one or more roles that determine permissions for specific workspaces, sources, destinations, and Customer Studio models.
This version of role management was introduced with Permissions V2. For older implementations, see the Access control (legacy) documentation.
Why use roles?
Roles help you manage access safely and consistently across your organization. They define who can view data, build or publish syncs, and manage workspace settings.
Using roles keeps your workspaces organized and secure by ensuring each person only has access to the tools and data they need.
Common examples:
- Give your marketing team access to Customer Studio, but not to source connections.
- Allow your data team to manage syncs and schema configurations.
- Limit view-only roles for stakeholders who just need to monitor sync health or insights.
Role types
Hightouch offers two kinds of roles:
- Pre-built roles: Ready-made access levels (Admin, Editor, Draft Editor, Viewer) that make onboarding fast.
- Custom roles: Fine-grained roles you can tailor to match your teams, regions, or workflows.
Start with pre-built roles for onboarding. When your organization grows, switch to custom roles to fine-tune access by workspace or product.
How roles work
Hightouch’s permissions system is built around data flow (who can see data and where it can be sent) rather than micromanaging every model or sync.
Access is based on sources and destinations
Every sync involves multiple resources. For example, syncing BigQuery → Salesforce includes:
- The source (BigQuery)
- The model built from BigQuery
- The destination (Salesforce)
- The sync that connects them
Rather than managing permissions for each model or sync, Hightouch groups access by source (where data comes from) and destination (where it goes).
Models and syncs inherit permissions from these top-level resources.
To create or run a sync, users need permission for both the source and the destination. Having access to one side alone isn’t enough.
Governance in context
RBAC defines who can act in a workspace, but it’s only one part of Hightouch’s governance framework.
While roles manage user access, they don’t enforce organization-wide policies like redacting PII or honoring consent requirements. Maintaining compliance and data quality at scale often requires additional controls that apply across all users and workspaces.
Hightouch provides complementary governance features to manage data access and operational workflows:
- Destination rules – Control what types of data can be sent to specific destinations (for example, ensuring only consented users are synced to email marketing).
- Subsets – Divide your total addressable customer base into smaller segments, which is especially useful in workspaces that span multiple brands or regions.
- Approval flows – Add peer review for sync and model changes before publishing.
- Staging environments – Test and validate syncs in a dedicated space before going live to reduce the risk of errors in production.
Together, these features create a unified framework for managing visibility, data movement, and change control. You can use them independently or in combination, depending on your organization’s size, compliance needs, and collaboration model.
You don’t need to enable every governance feature—especially when you’re just getting started. Many are built for large enterprises with complex brand or compliance needs. If you’d like help designing the right setup, — we’re here to help.
The anatomy of a role
Each role in Hightouch is made up of grants (specific permissions). There are four types:
| Grant Type | Description |
|---|---|
| General | Controls whether users can create new sources or destinations in the workspace. |
| Sources | Defines how users interact with connected data sources (view row-level data, manage credentials, create models). |
| Destinations | Defines what users can do with destinations (create syncs, trigger sync runs, set up alerts). |
| Customer Studio | Controls access specifically to the Customer Studio product. They function just like source-level grants, except they apply to parent models instead of the underlying source. These grants mainly control the types of audiences users can create and determine if users can view data about individual members of those audiences. |
Reference list of individual grants
When configuring a custom role, you'll see a list of individual grants that can be toggled on or off. These grants are built around two key pillars of governance: managing data visibility and controlling data flow. Below, you'll find a breakdown of each grant, detailing its function and how it affects different features across the Hightouch app.
Jump to:
General · Sources · Destinations · Customer Studio · Subsets · Approval Flows
General
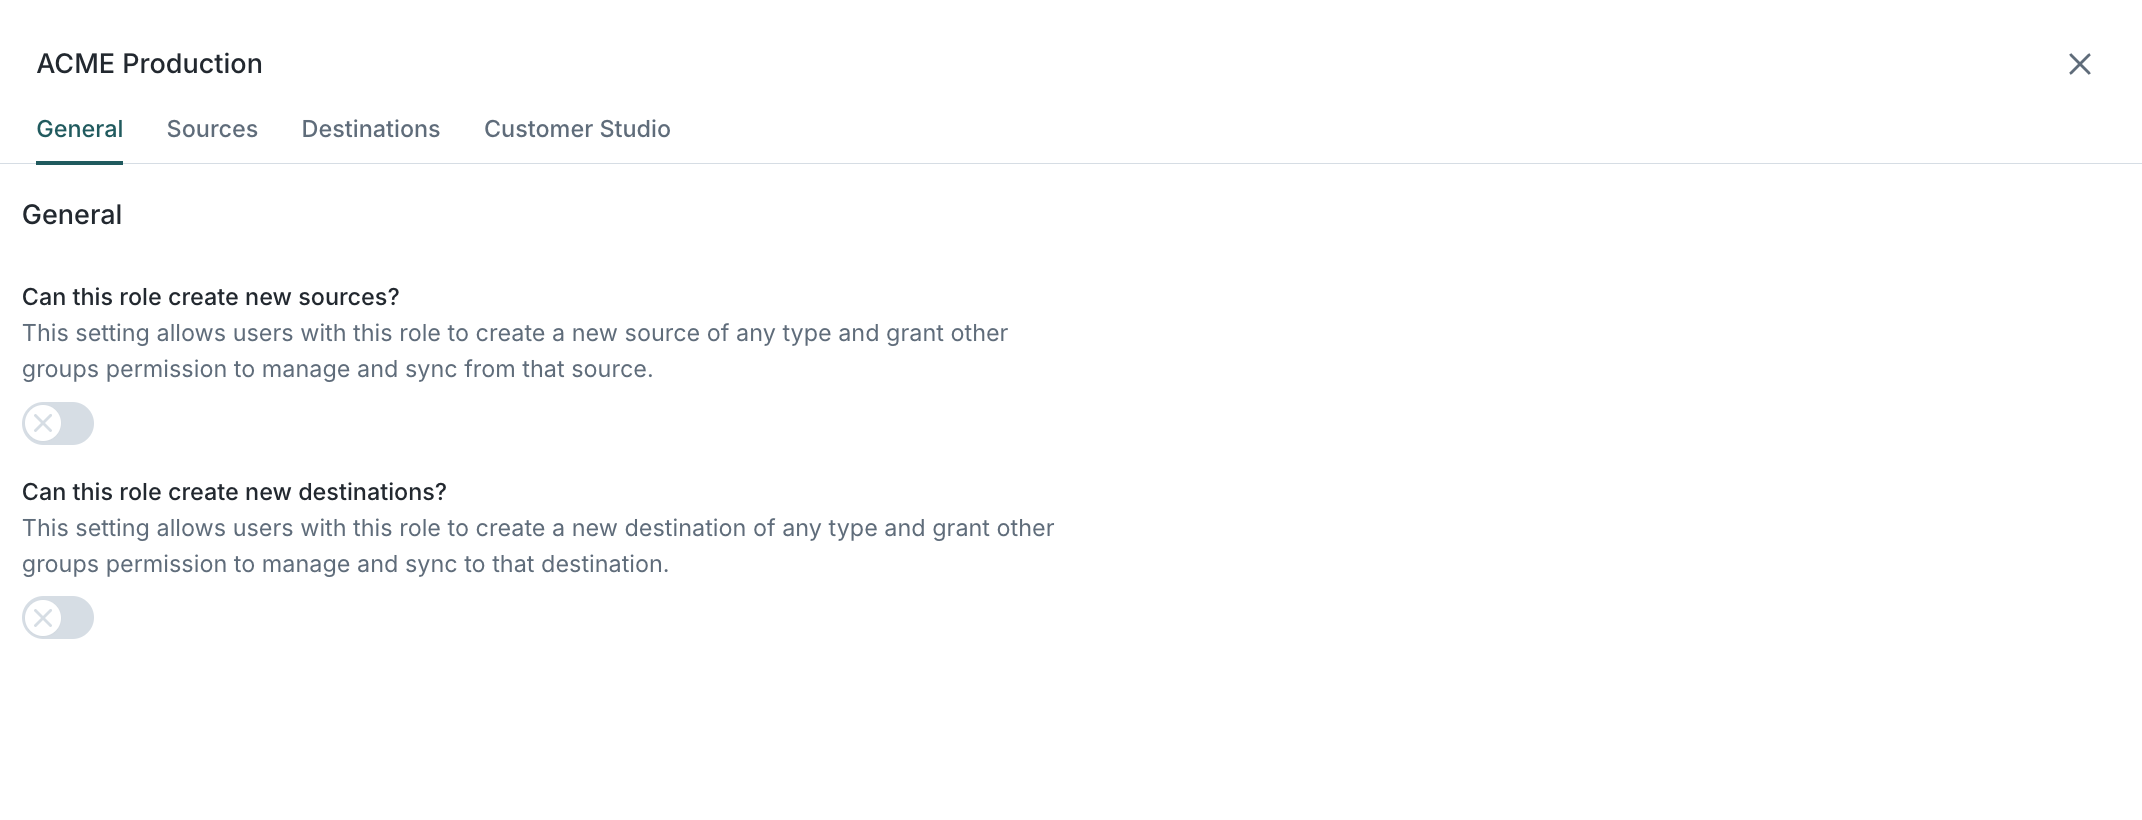
Can this role create new sources?
Allows users to create new data sources within the workspace. During setup, they can assign access permissions for other groups.
Can this role create new destinations?
Allows users to create new destinations within the workspace and assign access permissions for other groups.
Workspace-level resources—such as folders, extensions, custom storage, and API keys—can only be configured by workspace admins.
Source
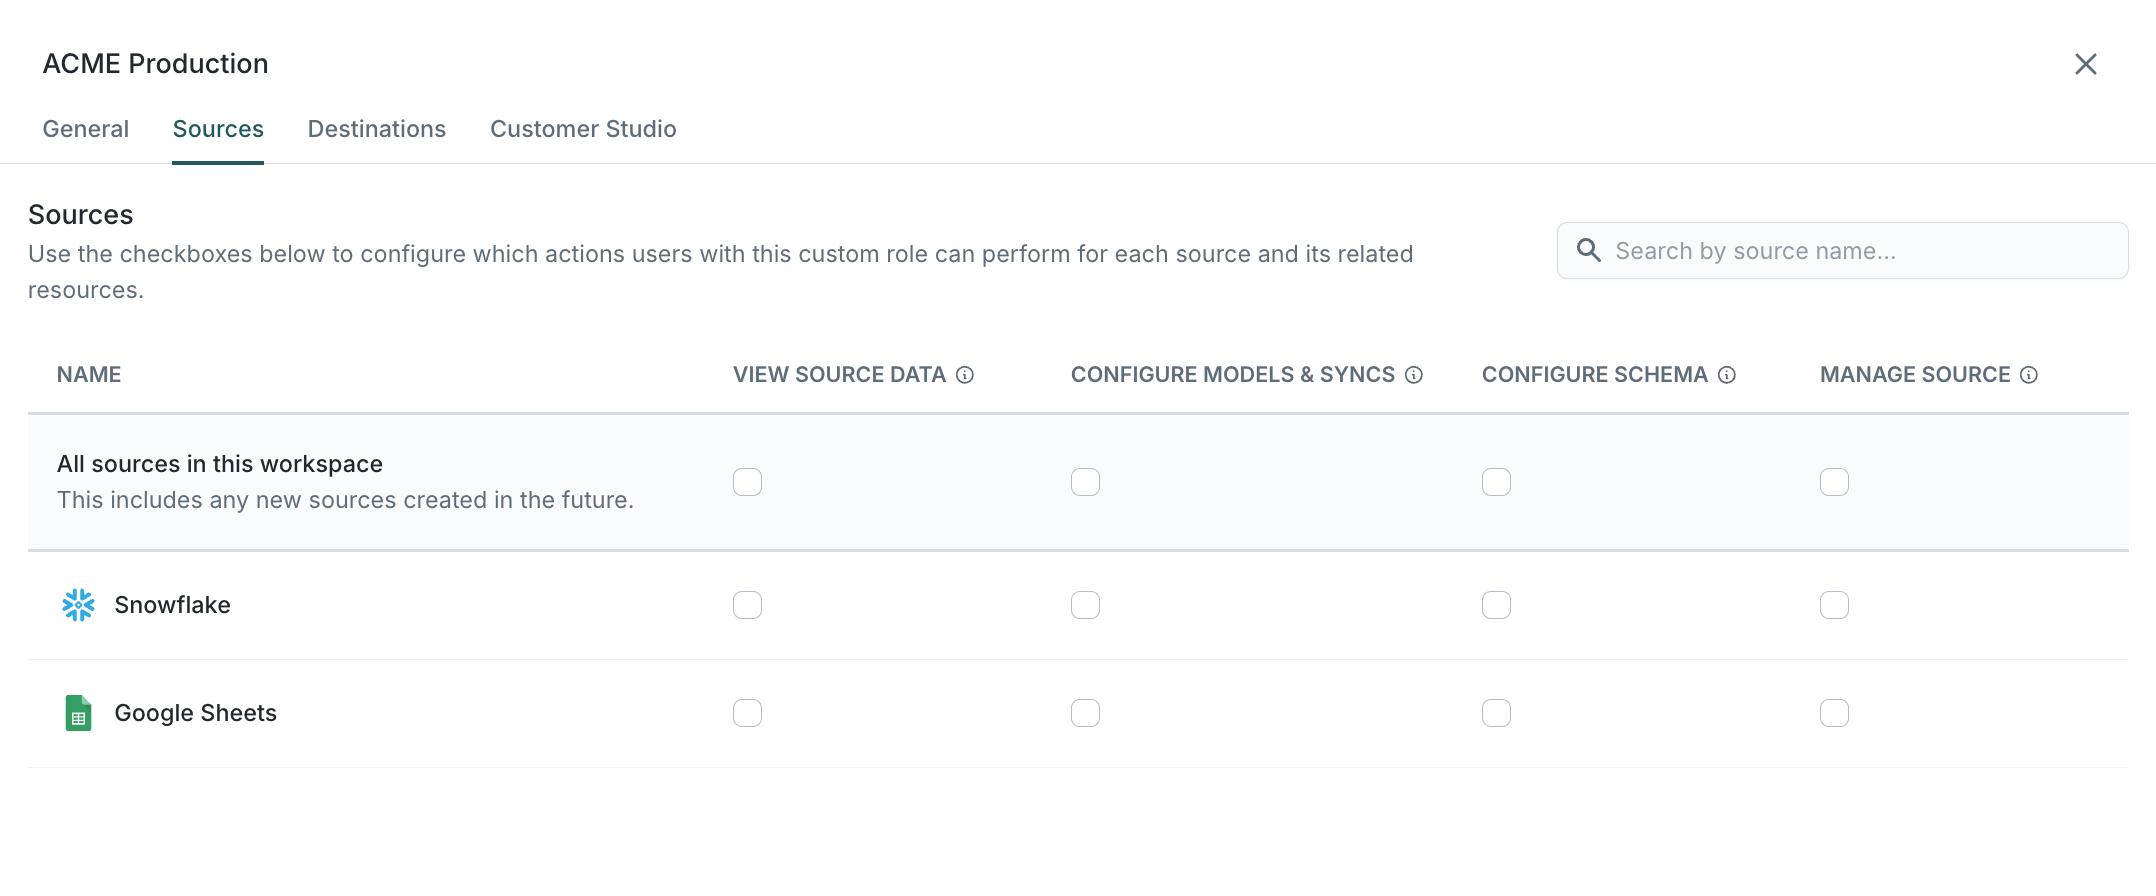
Source-level permissions are designed primarily for Reverse ETL use cases, where users need the flexibility to run custom SQL when pulling data from the source. If you're creating a role for marketers in Customer Studio, it's best to avoid enabling any source grants. Instead, use Customer Studio grants, which limit access to specific parent models and subsets, ensuring that marketers work within your pre-approved Customer Studio schema.
View source data
With this grant enabled, users can view row-level data from this source across the Hightouch app. This includes:
- Previewing models
- Viewing row-level data when testing rows during sync creation
- Accessing row-level data in the debugger for historical sync runs
Primary keys and error messages are not classified as row-level data to preserve basic sync observability. If you choose not to assign this grant, avoid using columns with PII (like email or phone number) as primary keys, as these fields will be visible to all users across the app.
Configure models & syncs
When enabled, this grant allows users to:
- Create, edit, or delete models that pull data from the source
- Use these models for syncing (provided the user has permissions to sync data to destinations)
Users can only edit existing models if they can also edit all of the syncs that rely on that model.
Configure schema
Applicable only to workspaces with Customer Studio, this grant allows users to configure the schema layer for Customer Studio, including traits, destination rules, and subsets.
Manage source
With this grant enabled, users can edit the source configuration, which includes:
- Updating connection details and credentials
- Adjusting the sync engine choice
- Setting source-level defaults for Warehouse Sync Logs
Destination
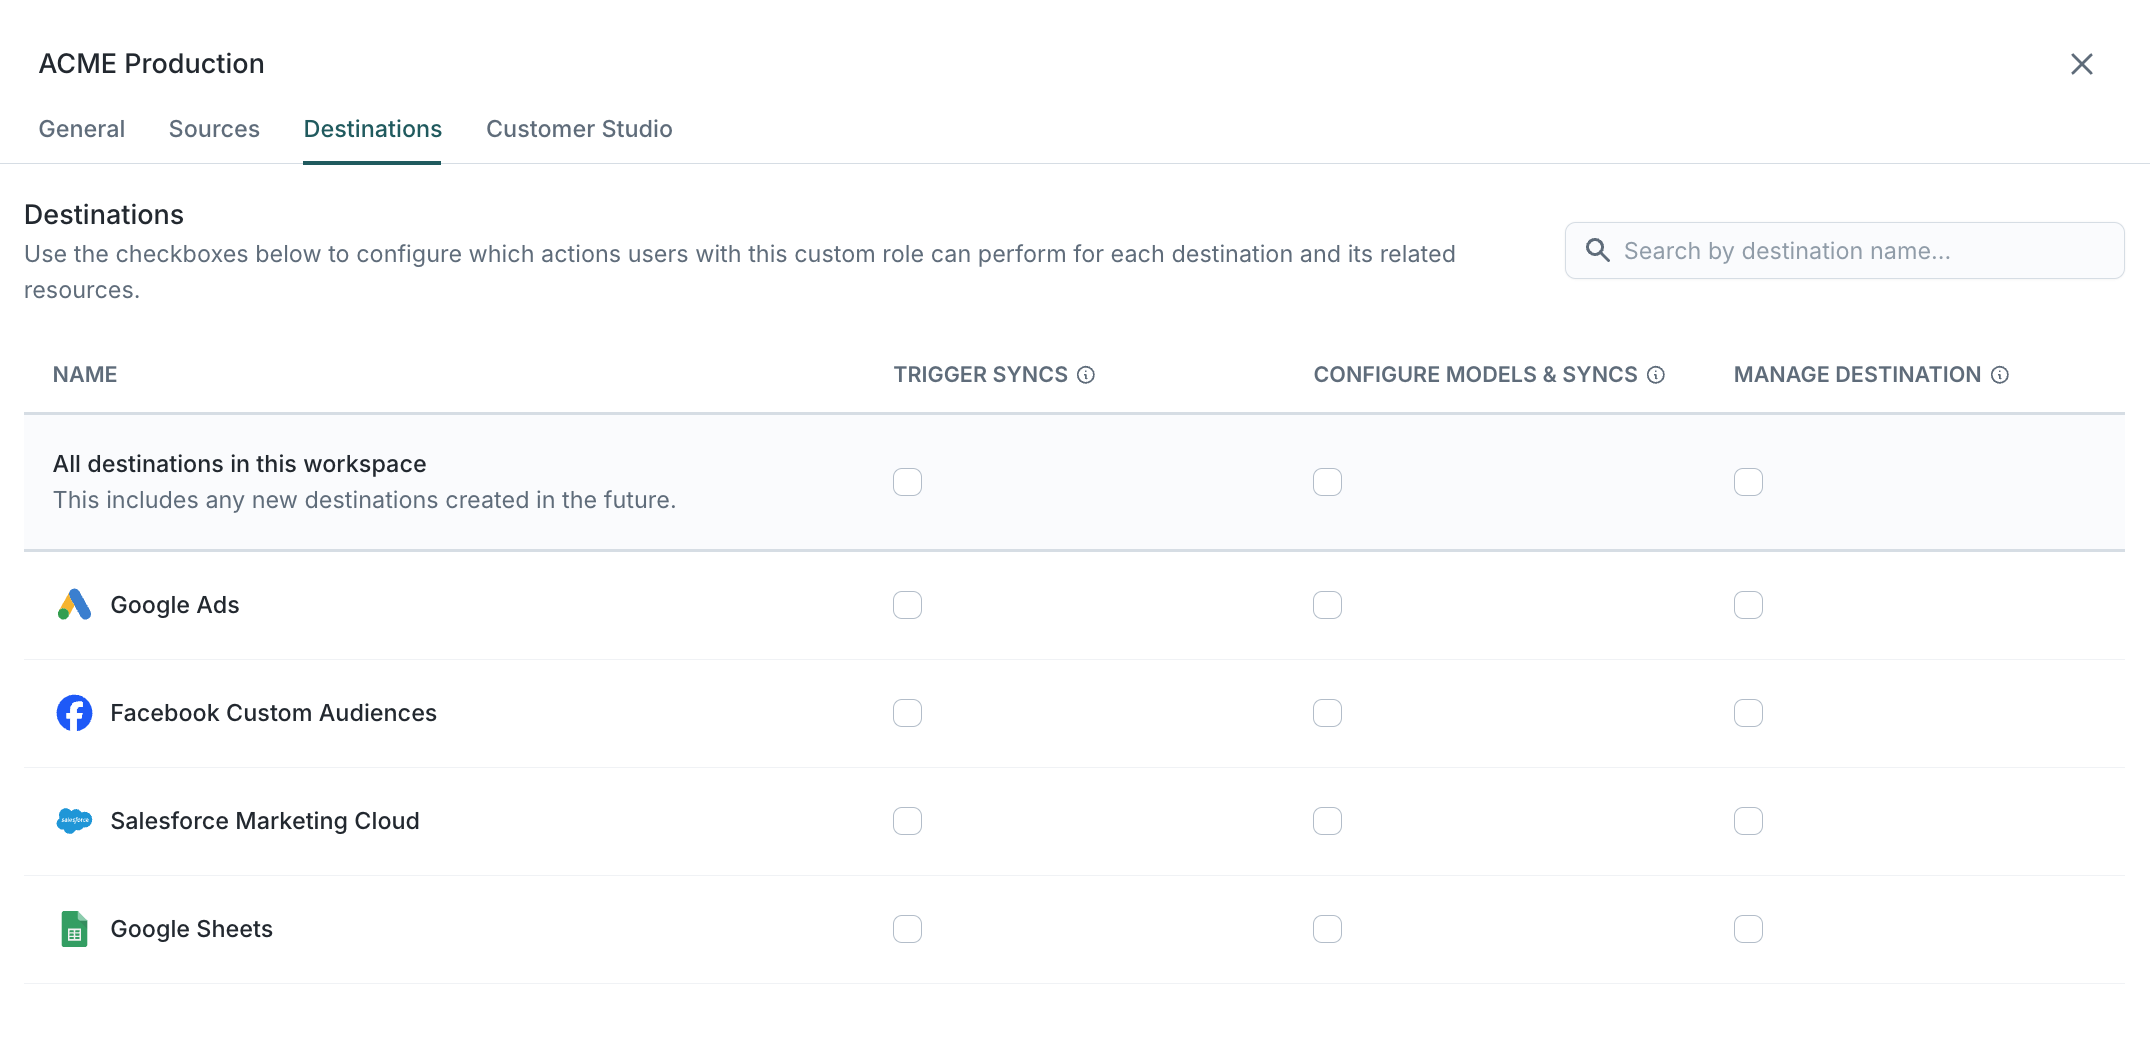
Trigger syncs
Lets users manually trigger sync runs. Does not allow editing schedules.
Configure syncs
Lets users create, edit, or delete syncs to the destination and set their schedules. Does not allow manual triggering.
Manage destination
Allows users to modify the destination's configuration, including:
- Updating connection details and credentials
- Configuring defaults for alert triggers and recipients
Customer Studio
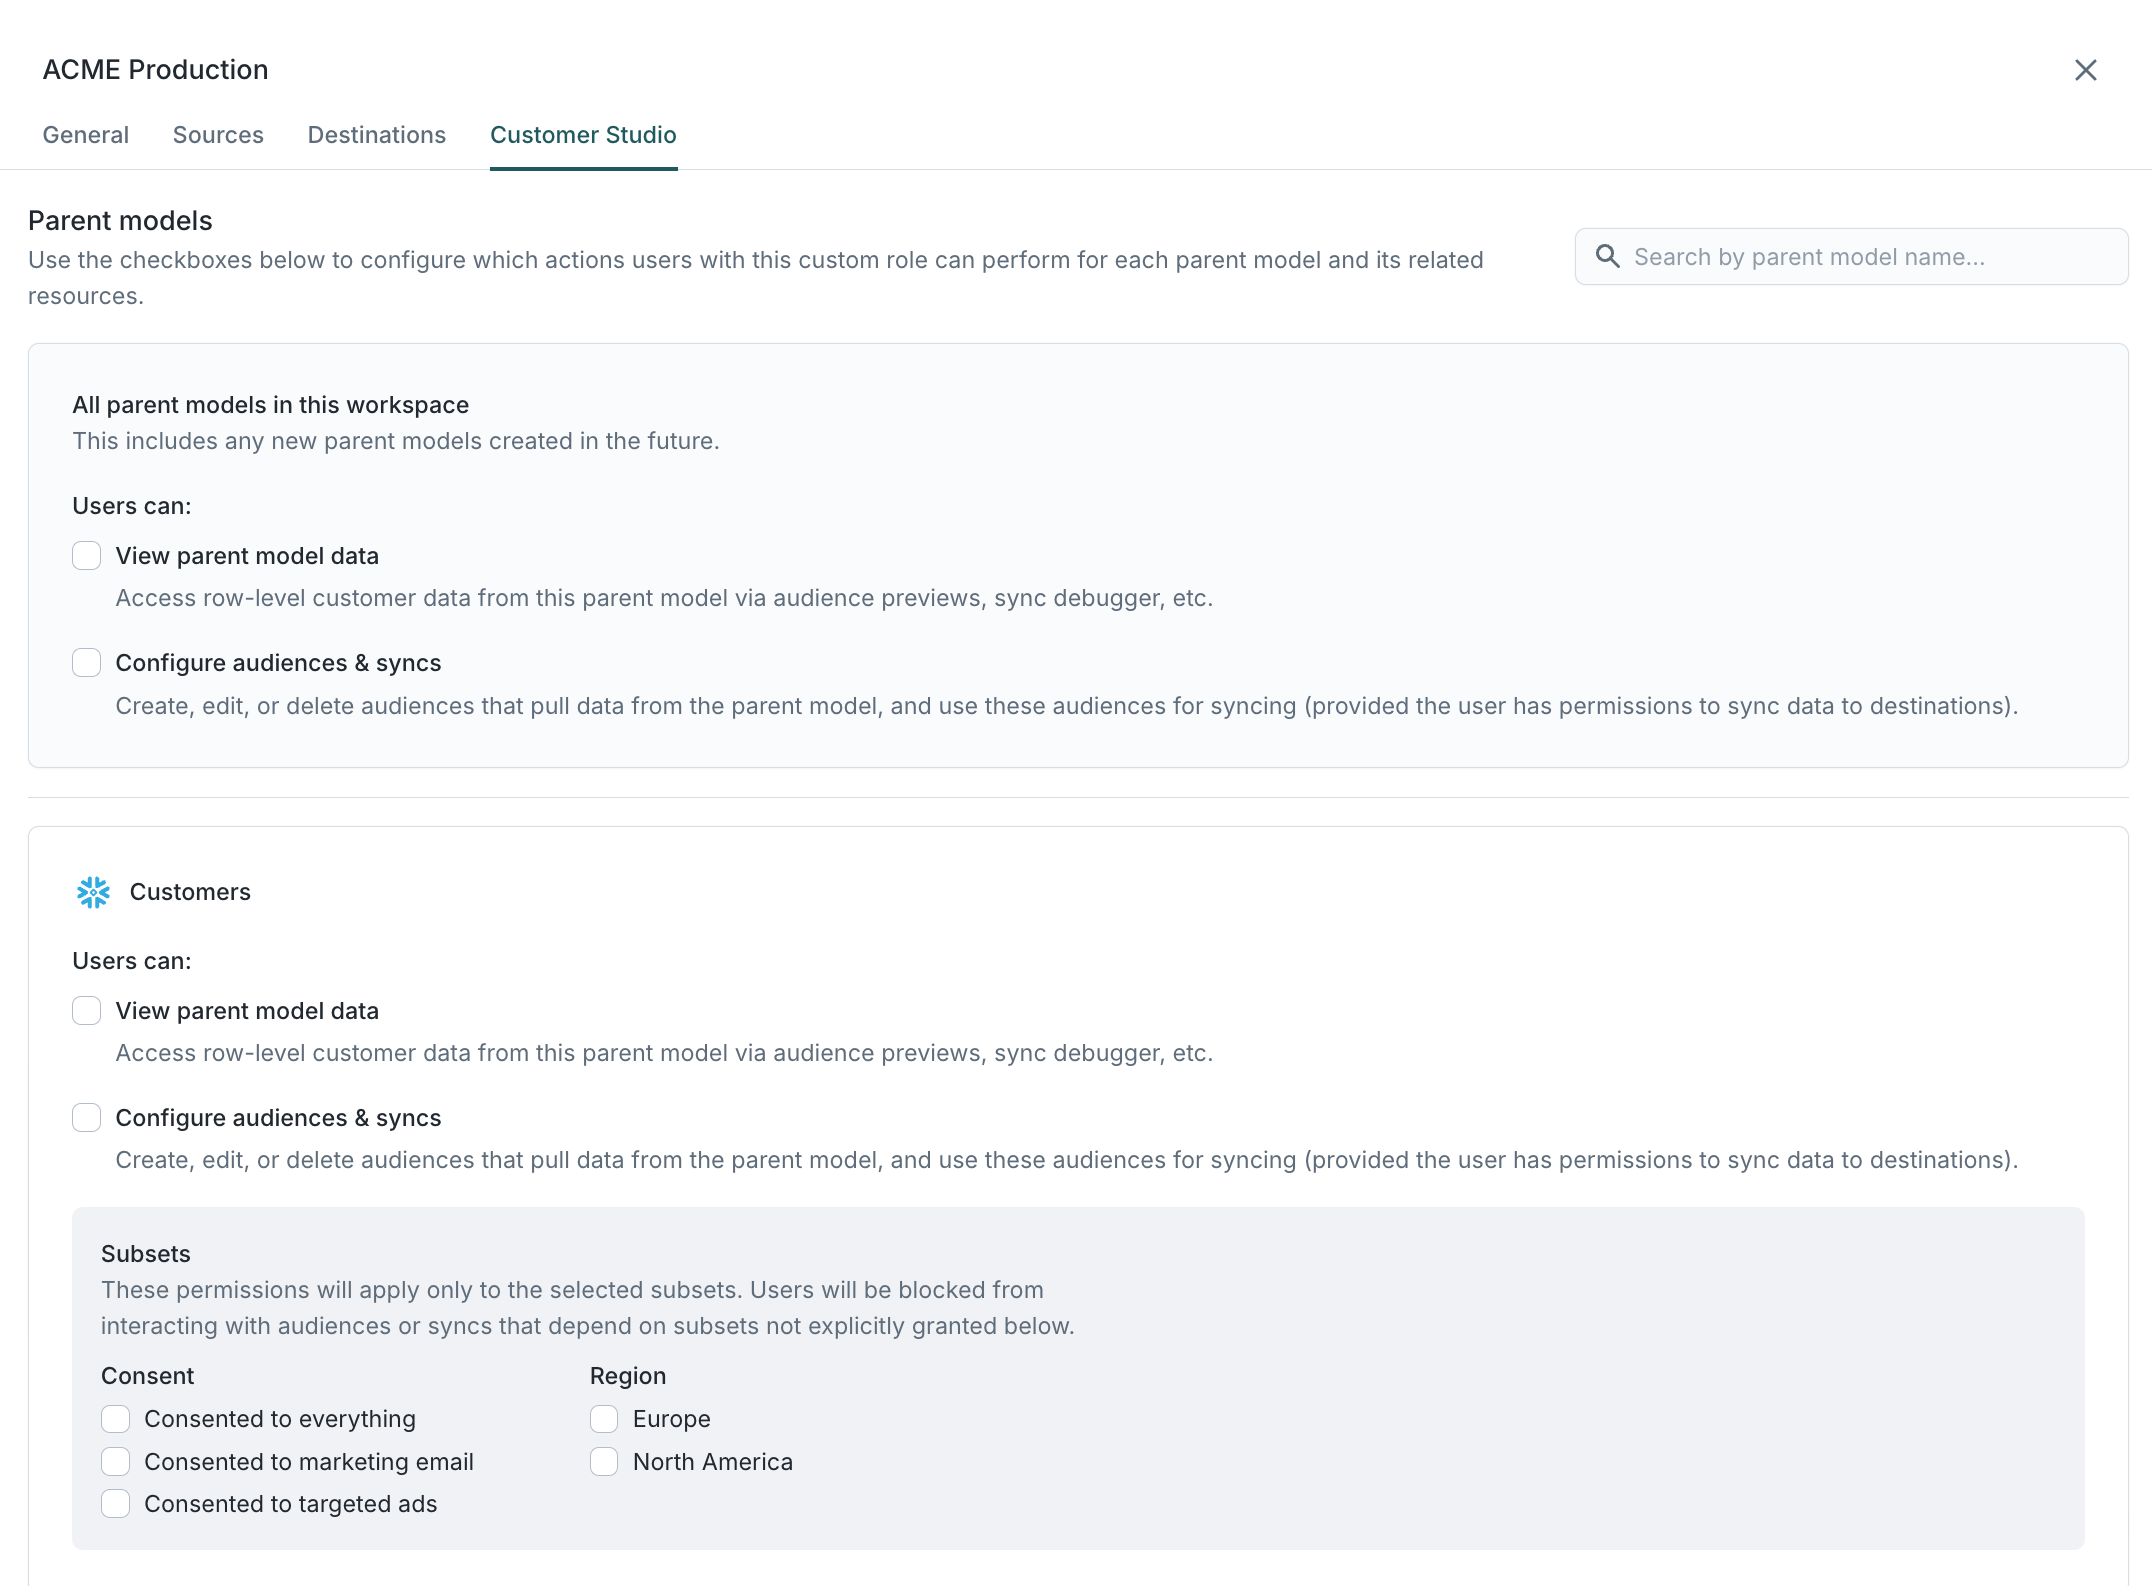
These grants function similarly to source-level grants but are scoped to specific parent models within the Customer Studio schema.
View parent model data
Enabling this grant allows users to view row-level data from the parent model throughout the Hightouch app. This includes:
- Previewing audiences to see row-level data for individual members
- Viewing row-level data when testing rows during sync creation
- Accessing row-level data in the debugger for historical sync runs
If a user has the Configure audiences & syncs grant but lacks the View parent model data grant, they can still preview audiences, but they'll be limited to aggregate counts and insights, without row-level data for each audience member.
Configure audiences & syncs
When enabled, this grant allows users to:
- Create, edit, or delete audiences that pull data from the parent model
- Use these audiences for syncing (provided the user has permissions to sync data to destinations)
Users can only edit existing audiences if they can also edit all of the syncs that rely on that audience.
Configure journeys
When enabled, this grant allows users to:
- Create, edit, or delete journeys and journey templates.
Publish journeys
When enabled, this grant allows users to:
- Launch, pause, or stop live journeys
Differences when subsets are enabled
Subsets let you divide a parent model into smaller, permissioned segments (e.g., by brand, region, or consent type).
They're configured in Customer Studio → Governance → Subset categories.
For example:
- Your EU marketing team can only build audiences using EU data.
- Your email marketing team can only use consented audiences.
When subsets are active, you'll see a separate set of checkboxes that let you apply earlier grants (like View parent model data and Configure audiences & syncs) to specific subsets. The behavior of these checkboxes varies based on whether the subset category is marked as "required."
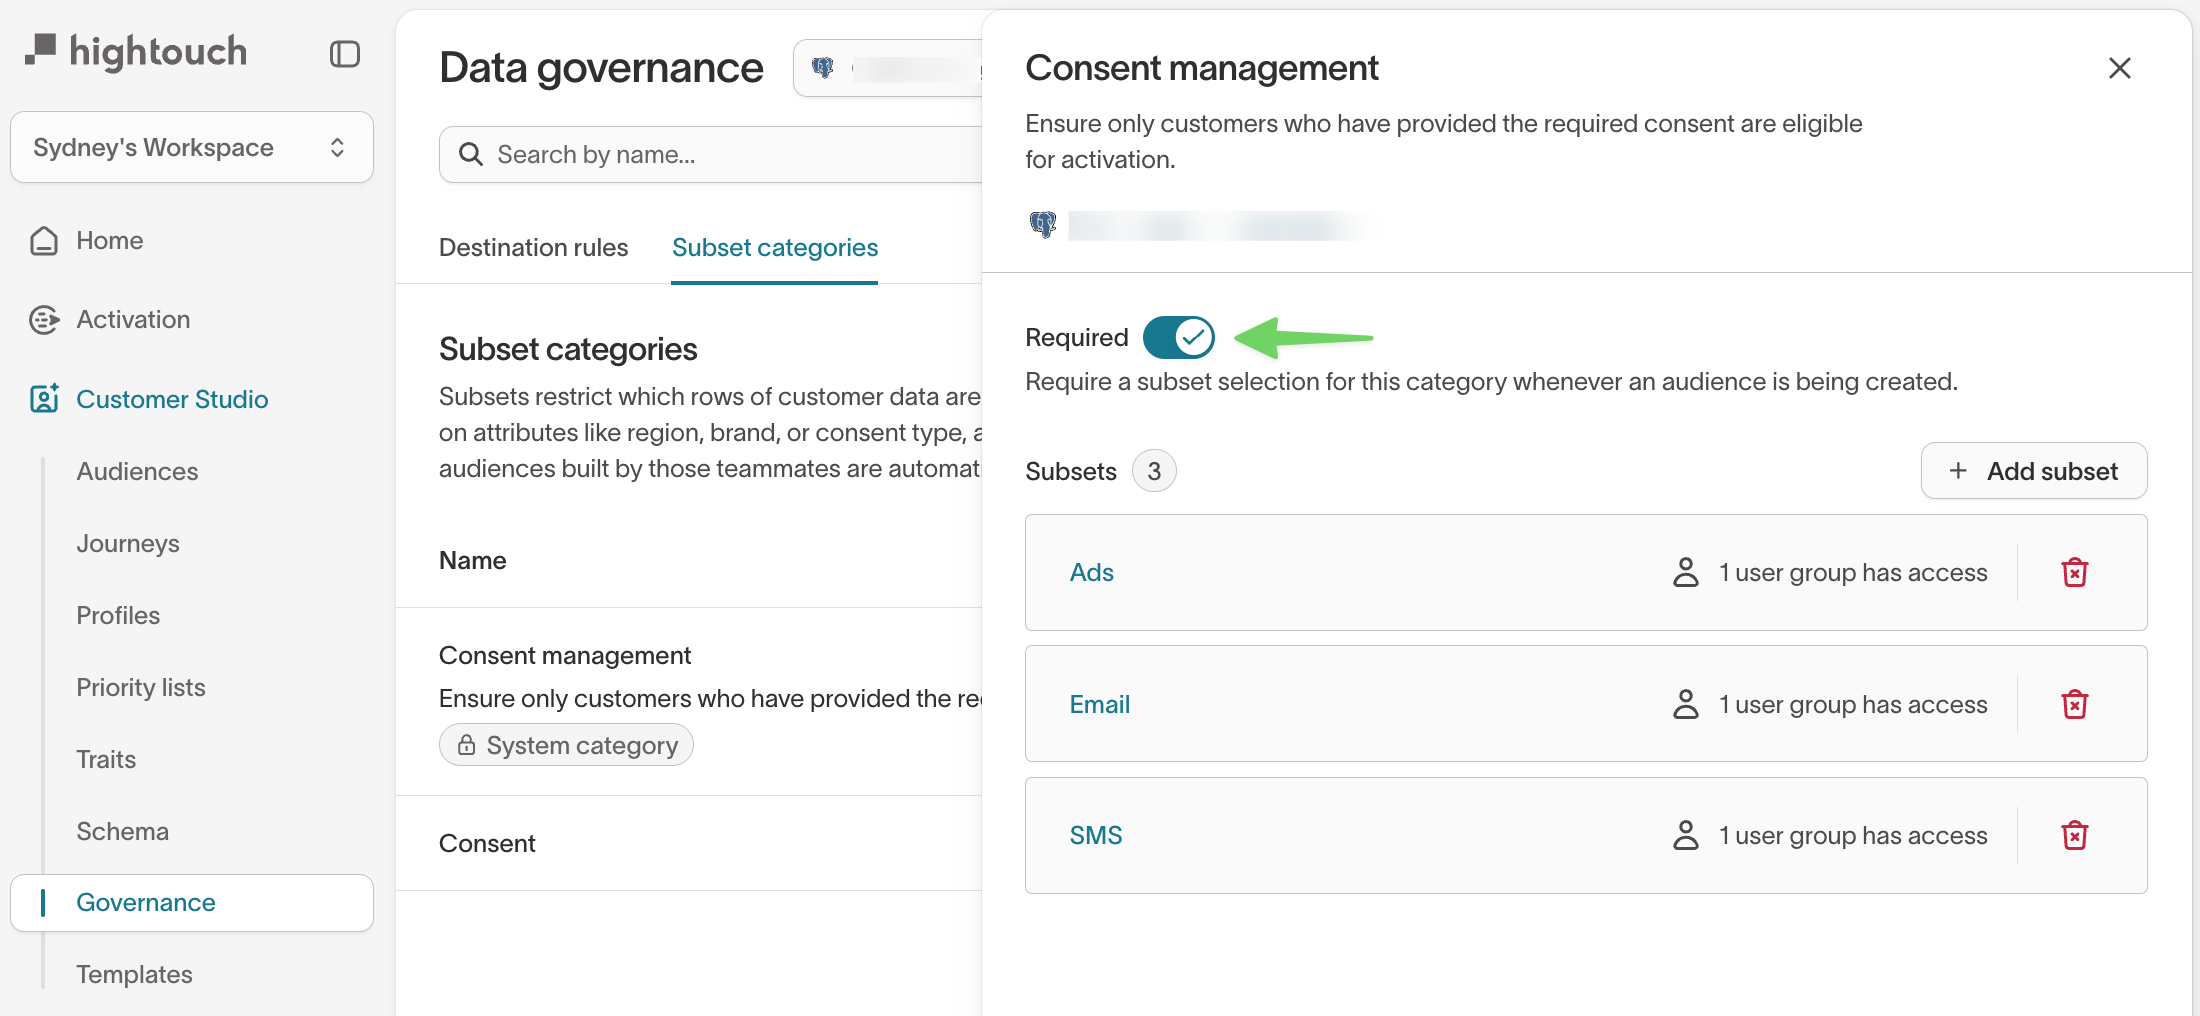
- If the subset category is required, the user will only be able to configure and use audiences within the selected subset values. (If no values are checked, the user will not be able to configure or use any audiences at all.)
- If the subset category is not required, the user can configure and use audiences with the selected subset categories, or without subsets altogether.
Differences when approval flows are enabled
Approval flows add review steps before publishing model or sync changes.
They’re enabled in Settings → Workspace → Configuration → Require approvals.
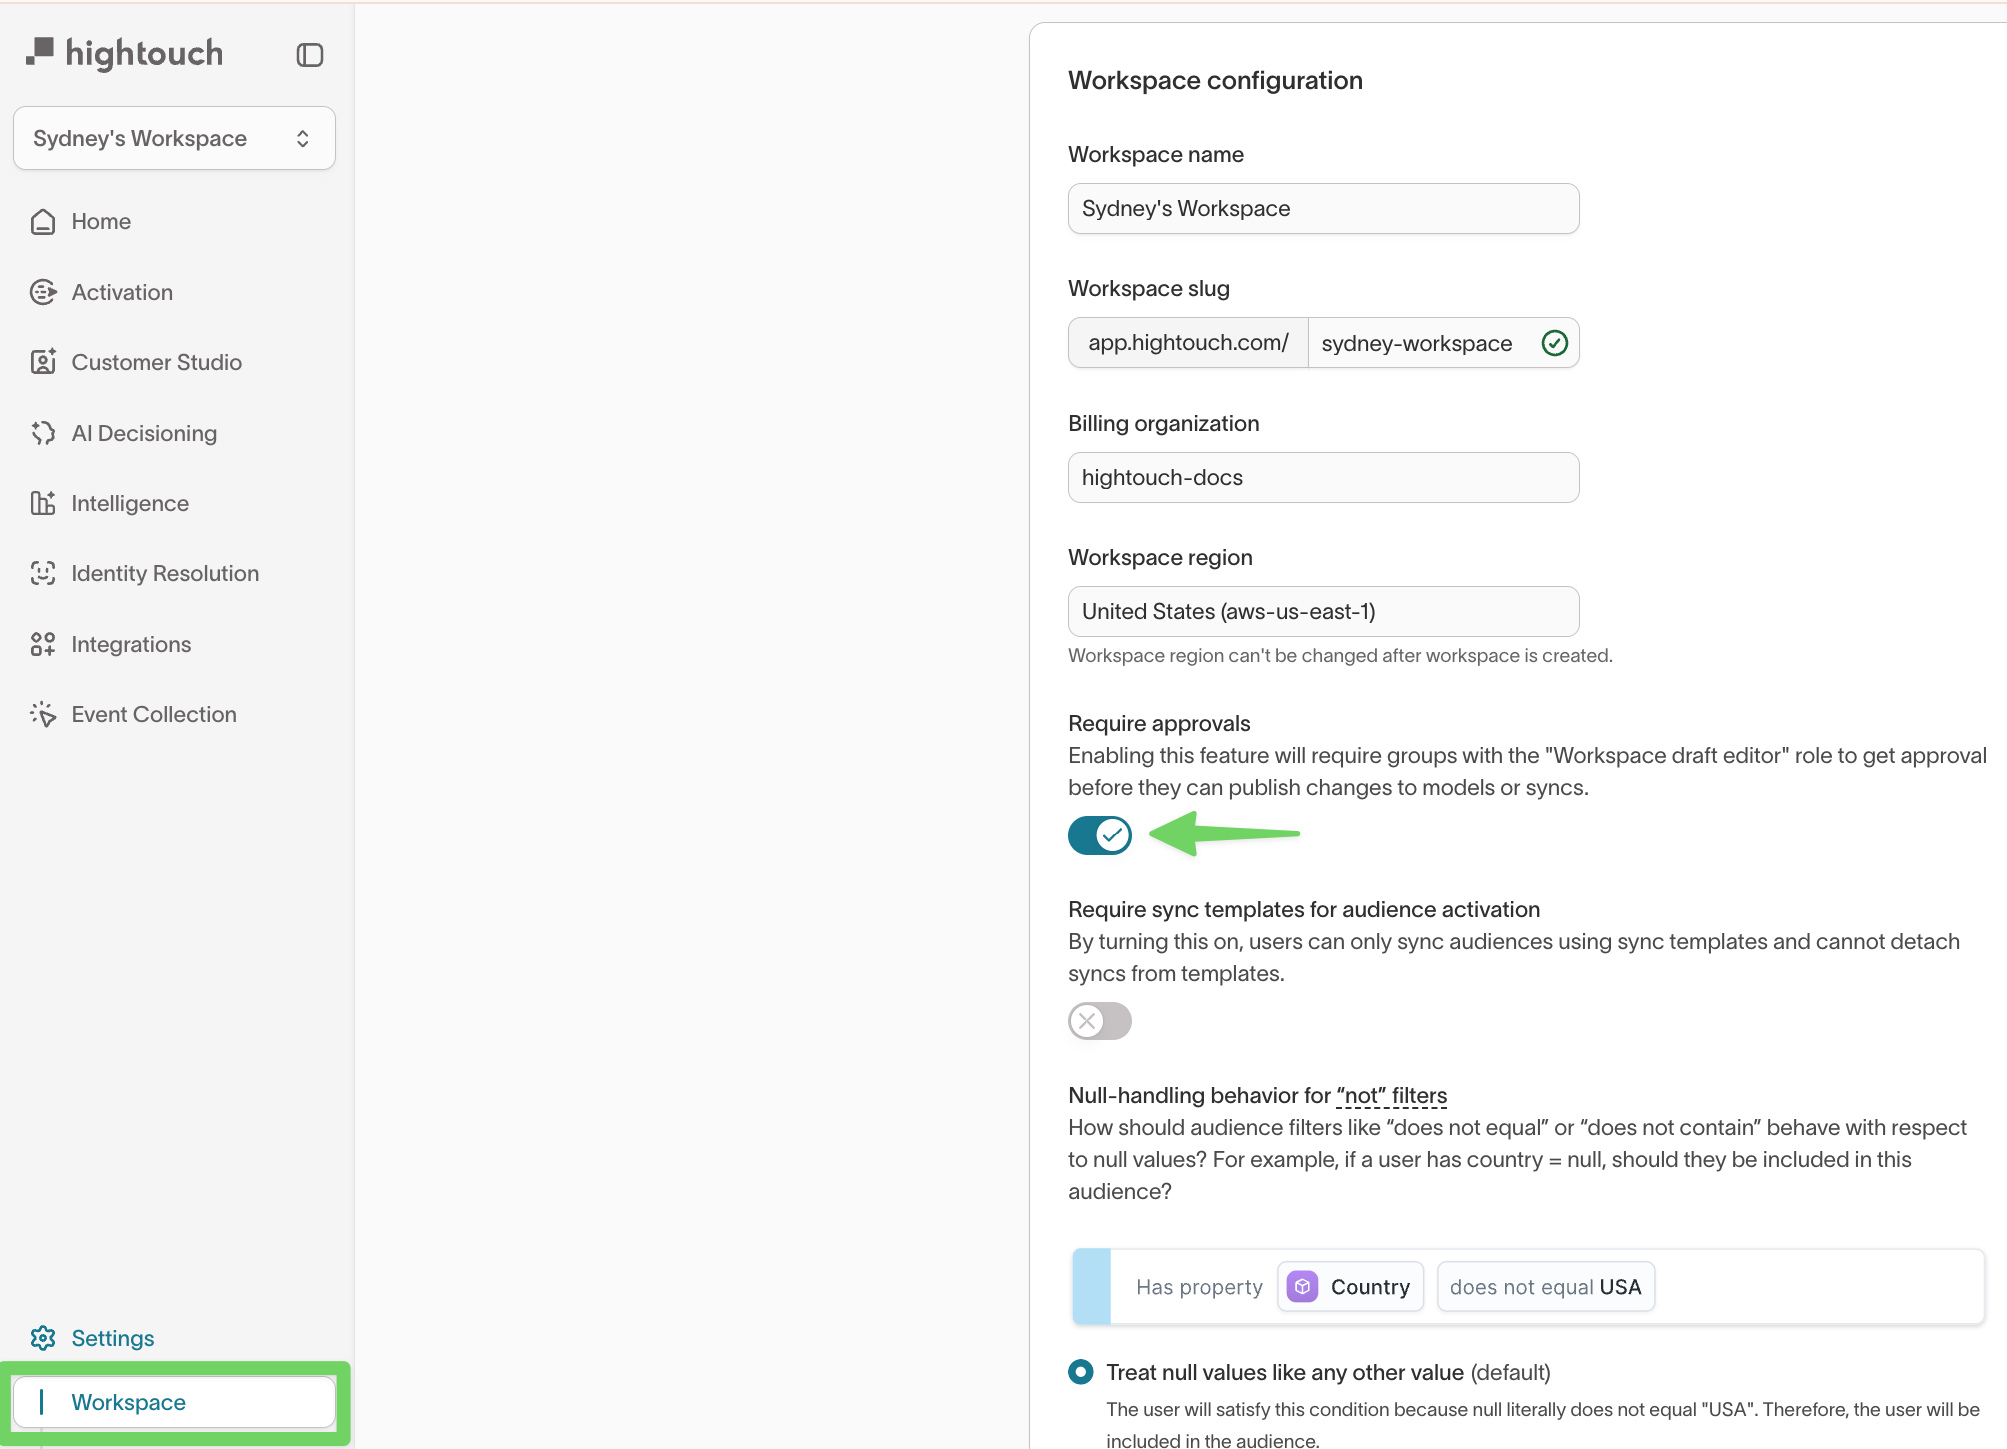
When enabled, the Configure models & syncs grant splits into:
- Draft models & syncs – Create or edit drafts (cannot delete published resources).
- Approve models & syncs – Review and approve or deny drafts.
Together, these two grants provide the same functionality as the original Configure models & syncs grant.
Approval flows do not apply to audience creation in Customer Studio, as there is no concept of a draft audience. However, approval may be required to sync an audience to a destination.
The Draft and Approve grants are separate and do not overlap. To allow a user to publish changes without requiring approval, you need to assign both the Draft and Approve grants. (Under the hood, the user creates a draft and then immediately self-approves it.)
To approve a sync, a user needs the Approve grant for both the source and the destination.
Pre-built roles
We recommend starting with pre-built roles during onboarding. These cover common access levels and make setup fast.
Once your workspace is established, switch to custom roles for more granular control.
There are four pre-built roles:
- Workspace admin – Full access to all resources and settings. Can manage, approve, and configure everything. Organization admins automatically inherit this role.
- Workspace editor – Can create and edit most resources but cannot approve or manage credentials.
- Workspace draft editor – Can create and edit drafts (where supported) but cannot trigger or approve syncs.
- Workspace viewer – Read-only access. Cannot see row-level data or make changes.
All built-in roles apply to all sources, destinations, and Customer Studio parent models. If you need to scope permissions to specific resources, use a custom role.
Pre-built role permissions
General
| Permission | Admin | Editor | Draft editor |
|---|---|---|---|
| Create new sources | ✅ | ✅ | ❌ |
| Create new destinations | ✅ | ✅ | ❌ |
Source
| Permission | Admin | Editor | Draft editor |
|---|---|---|---|
| View row-level data | ✅ | ✅ | ✅ |
| Draft syncs & models | ✅ | ✅ | ✅ |
| Approve syncs & models | ✅ | ✅ | ❌ |
| Configure schema | ✅ | ❌ | ❌ |
| Manage source | ✅ | ❌ | ❌ |
Destination
| Permission | Admin | Editor | Draft editor |
|---|---|---|---|
| Trigger syncs | ✅ | ✅ | ❌ |
| Draft syncs & models | ✅ | ✅ | ✅ |
| Approve syncs & models | ✅ | ✅ | ❌ |
| Manage destination | ✅ | ❌ | ❌ |
Customer Studio
| Permission | Admin | Editor | Draft editor |
|---|---|---|---|
| View parent model data | ✅ | ✅ | ✅ |
| Create and edit audiences | ✅ | ✅ | ✅ |
| Trigger audience syncs | ✅ | ✅ | ❌ |
| Approve audience syncs | ✅ | ❌ | ❌ |
- Create & edit audiences - No approval step; available to all roles except Viewer.
- Trigger audience syncs - Starts a sync run for an audience; requires source and destination permissions.
- Approve audience syncs - Required if approval flows are enabled for syncing audiences.
- Draft Editor - Can create and edit audiences, but cannot trigger or approve audience syncs.
Assign a pre-built role
Roles are assigned to user groups, not individual users. By default, new groups don't have access to any workspaces.
To manage group roles:
- Go to Settings → Organization → Groups.
- Select or create a group.
- In the Workspaces tab, use the Role dropdown to assign a pre-built role.
- Save changes.
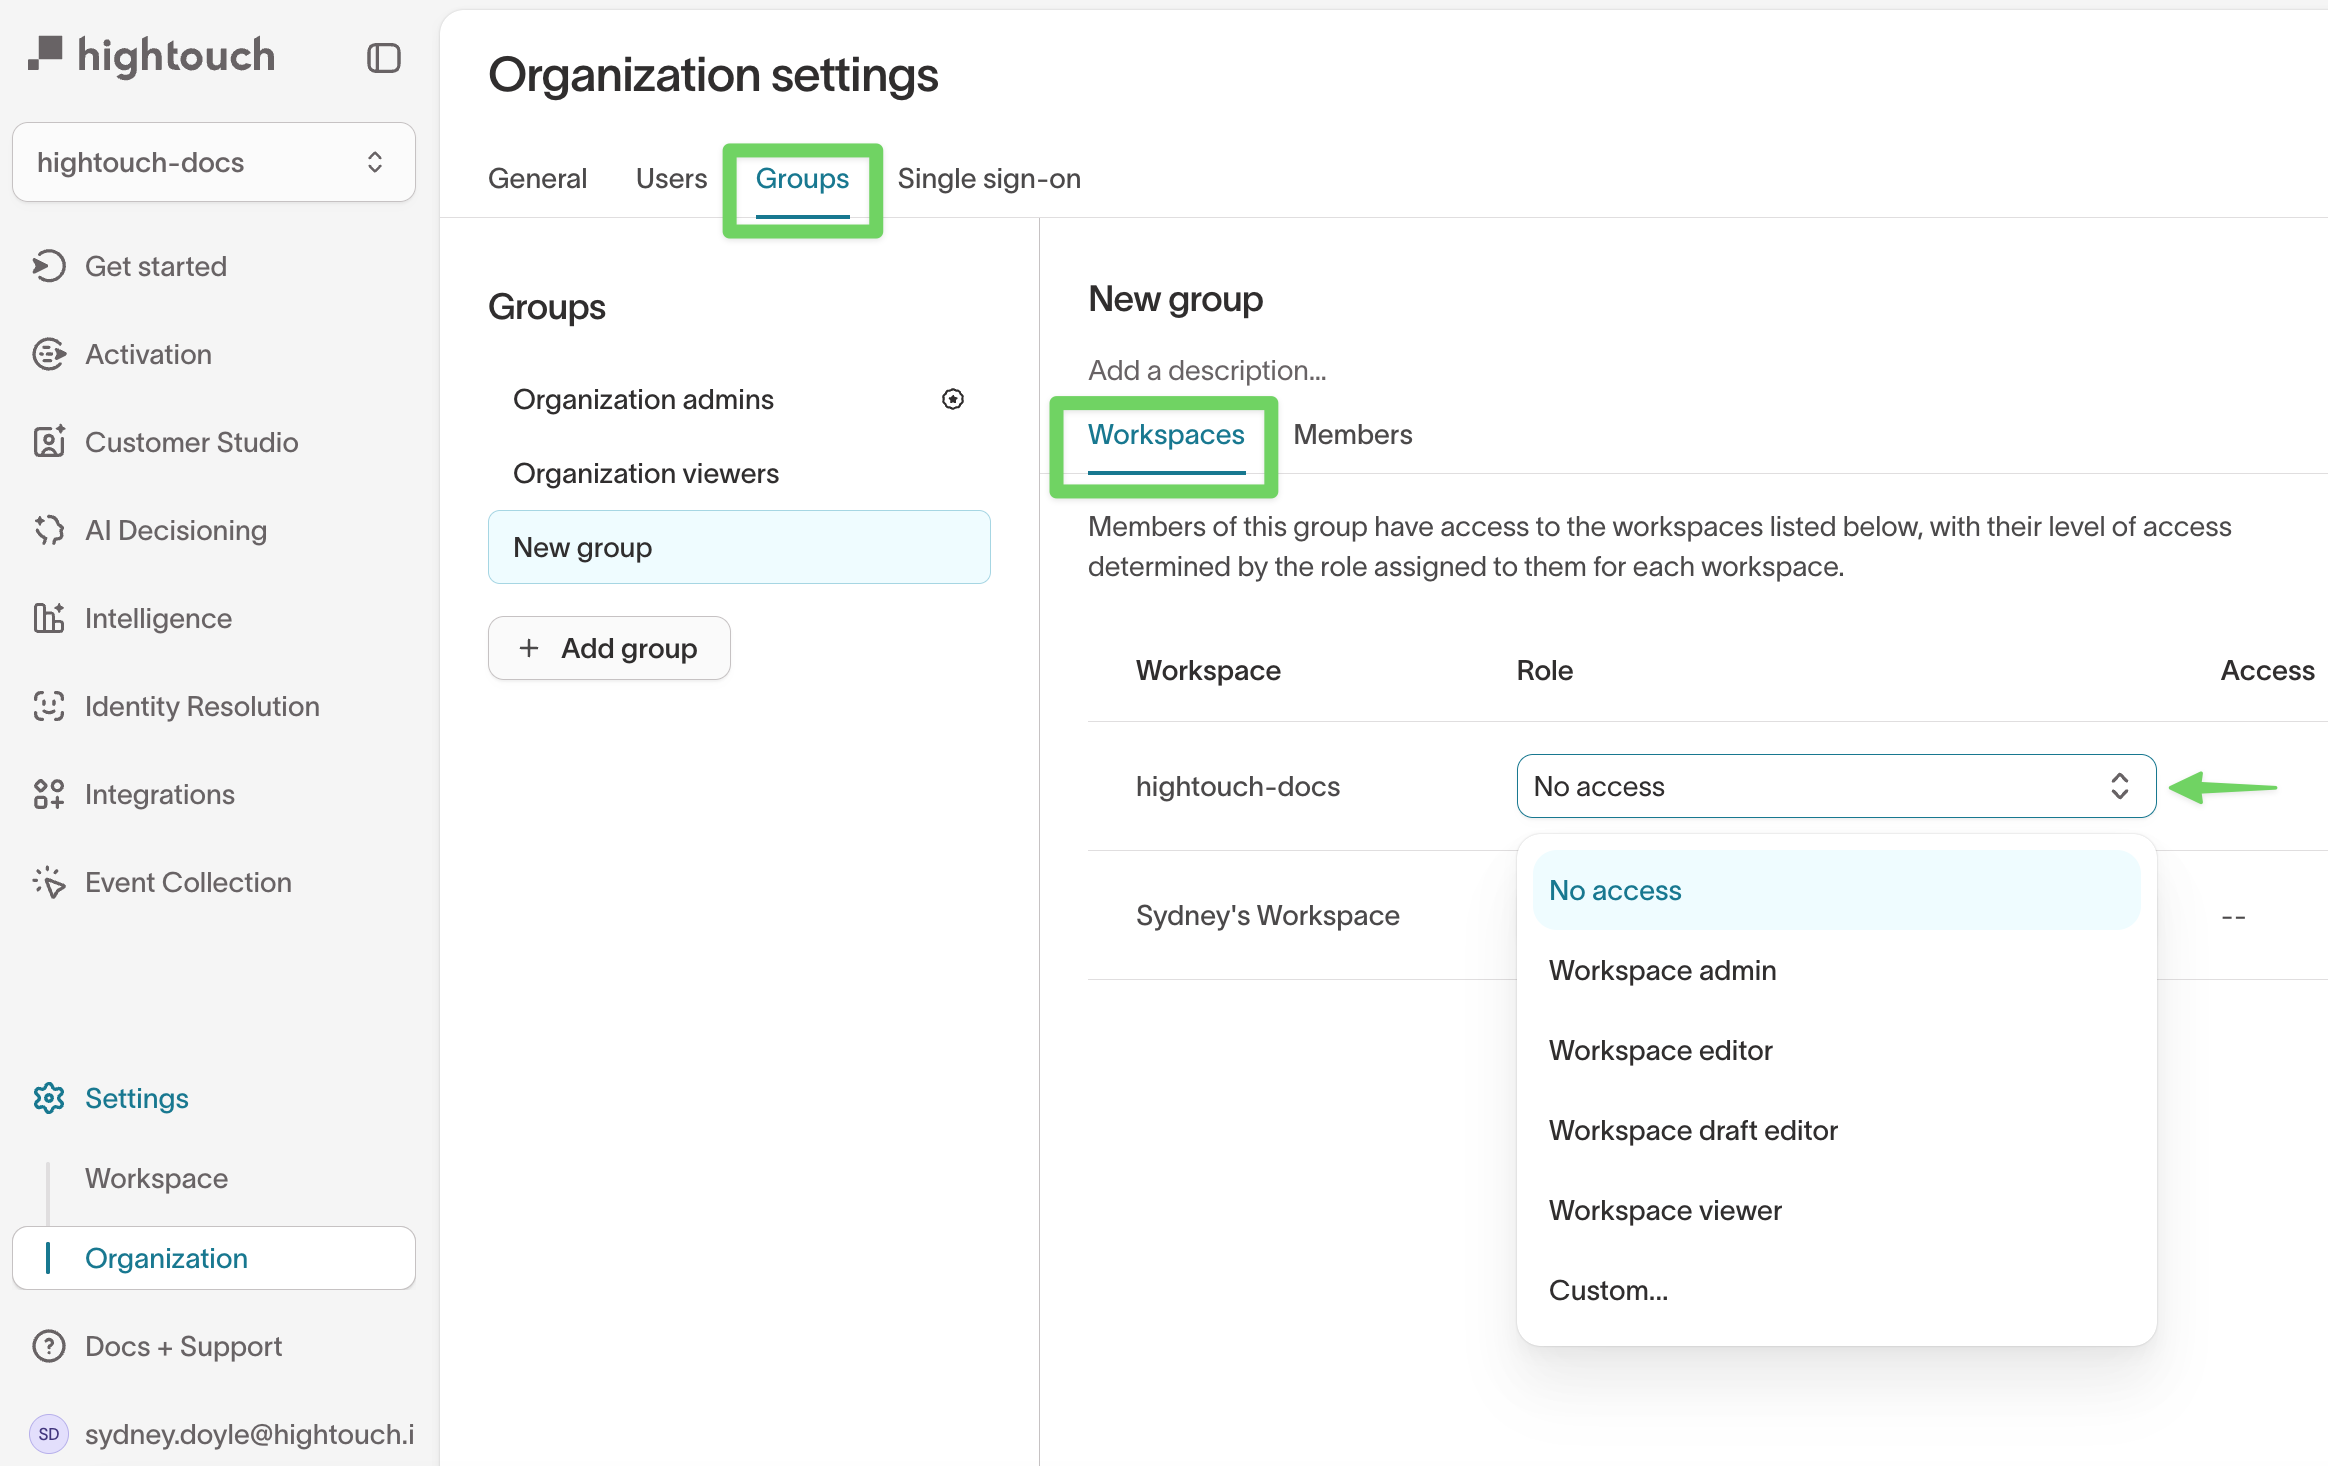
The Access column provides an overview of the group's permissions for each workspace, showing the actions they can take for each destination. While it gives a helpful summary, it doesn't display every possible grant or cover permissions related to other resource types.
Custom roles
Custom roles let you define precise permissions for each team, workspace, or use case. They’re ideal once your organization scales beyond standard access levels and you need finer control over who can view, edit, or publish data connections and audiences.
When to use a custom role
Use custom roles when:
- Different teams (e.g., marketing, data, and engineering) share a workspace but need distinct permissions.
- You want to restrict access to certain sources or destinations.
- You’re managing multiple brands, business units, or regions with different data governance policies.
- You use Approval flows, Subsets, or Destination rules and need to define roles that align with those governance features.
How to create or edit a custom role
- Go to Settings → Organization → Groups.
- Select or create a group.
- In the Workspaces tab, select
Custom...from the Role dropdown. - Save changes.
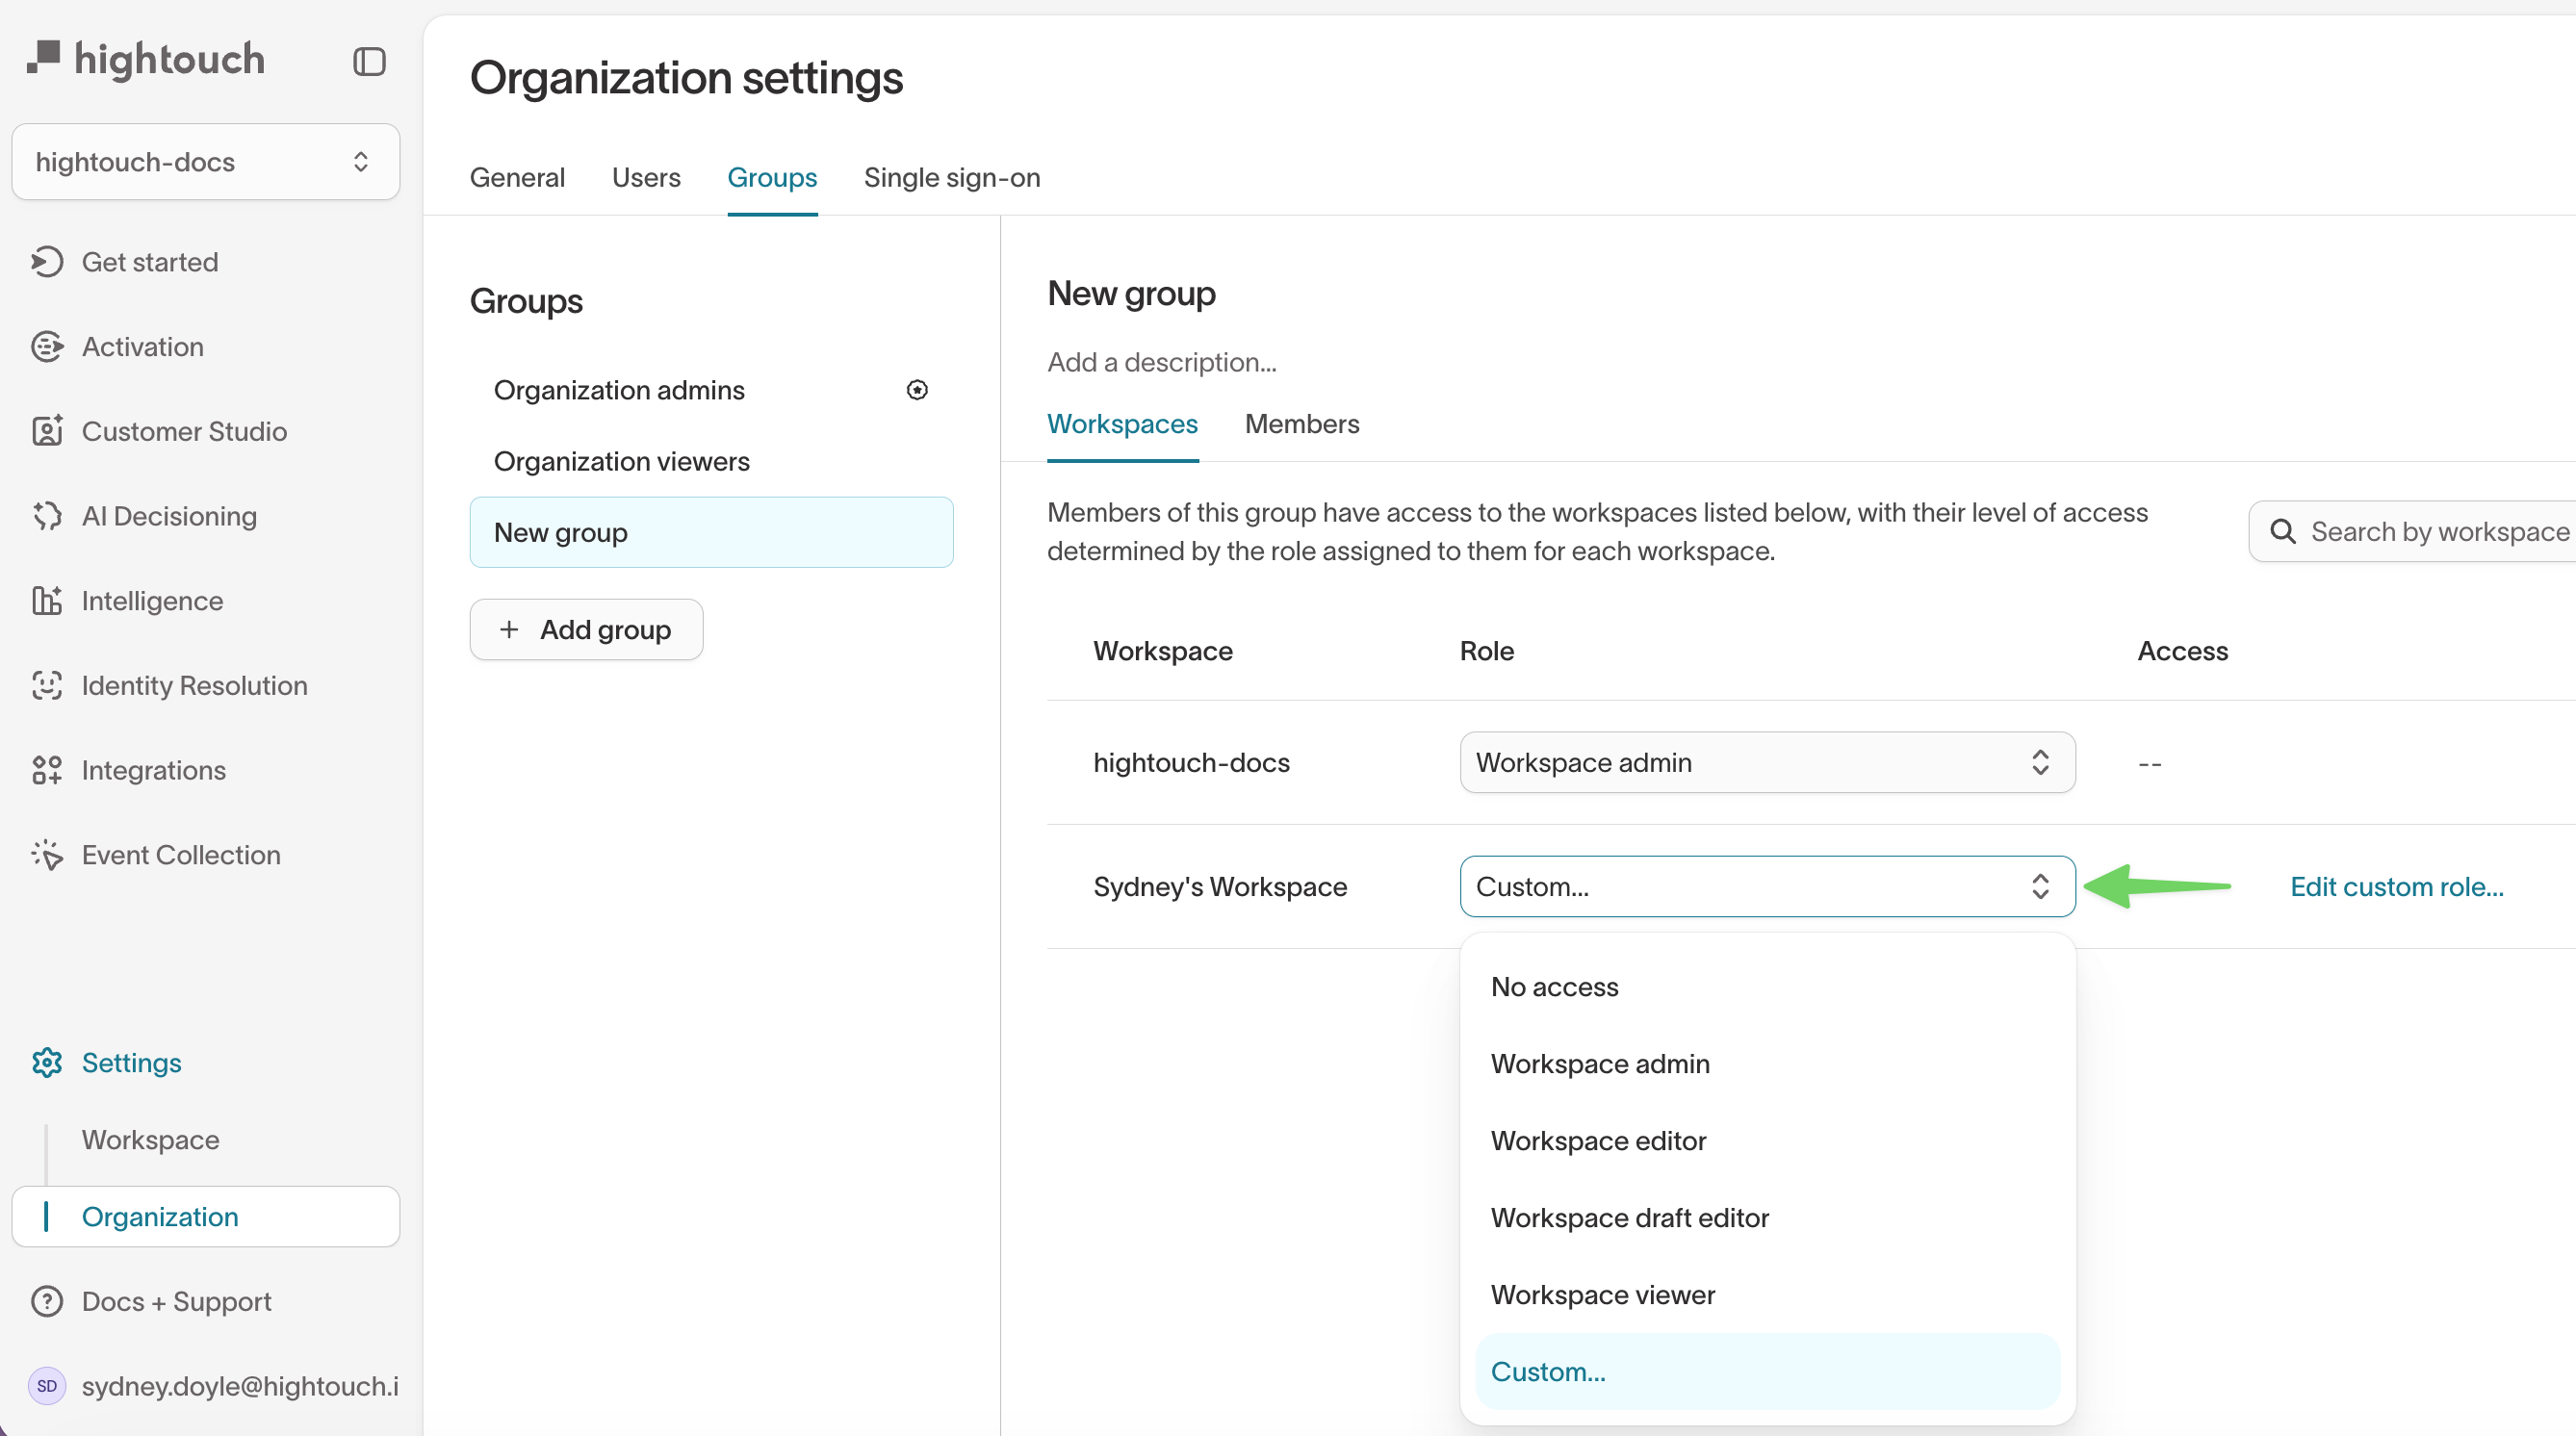
- Click Edit custom role to open the configuration panel.
You’ll see four tabs that correspond to different types of permissions:- General — Grants permission to create new sources and destinations.
- Sources — Defines what users can do with connected sources (view data, configure models, manage credentials).
- Destinations — Defines what users can do with connected destinations (configure or trigger syncs, manage credentials).
- Customer Studio — Defines permissions for building and managing audiences.
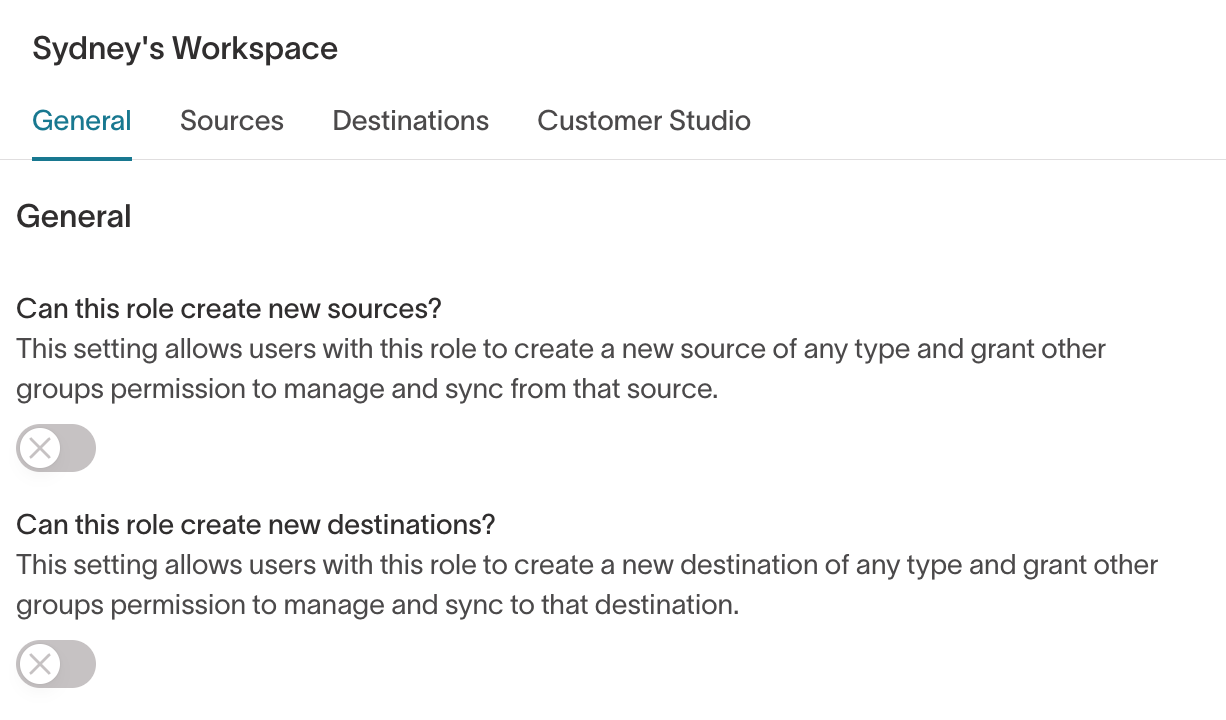
Changes save automatically when you click Save changes in the bottom-right corner.
Next steps
Once your roles are in place, explore additional governance tools that complement RBAC:
FAQ
How do I prevent a user from seeing a resource?
In Hightouch, all resources in a workspace are intentionally visible to all workspace members; configuration details are not hidden. Access control determines who can create or modify resources, but it cannot make resources invisible. If you need to restrict visibility of sensitive resources for certain users, consider placing these resources in a separate workspace.
What happens if a user belongs to more than one group?
Users can belong to multiple groups within the same workspace, allowing them to inherit permissions from more than one role at a time.
This setup is common. When a user is part of multiple groups, they receive the combined permissions of all their group memberships, meaning that they can perform all actions permitted to members of any of those groups.
However, this does not allow them to “mix and match” permissions across groups. In other words, if one group can sync from source A to destination B, and another group can sync from source C to destination D, a user who belongs to both groups can sync from A to B and C to D—but not from A to D or C to B.