| Audience | Data or analytics engineers, platform admins, technical marketers |
| Prerequisites |
|
Configure the Customer Studio schema that marketers use to build audiences. Start with the record you're targeting, add the attributes and activity marketers need, then test the result with a real audience before marketers use it.
How schema setup works
A Customer Studio schema starts with a parent model and connects additional data to it.
For example, a schema for audiences of users might include:
Users <- parent model
region
plan_tier
signup_date
Purchases <- related model
user_id
amount
purchased_at
Product Viewed <- event model
user_id
product_id
occurred_at
Lifetime value <- trait
This structure lets a marketer build an audience such as:
Users in New York who purchased in the last 90 days and have lifetime value over $500.
The setup workflow is:
- Create the parent model that represents each potential audience member.
- Add related records and events marketers need for filtering.
- Configure the fields marketers can find and use.
- Verify how models connect.
- Build a real audience to validate the schema.
- Add advanced relationship options, such as multiple join keys or through relationships, only when your data requires them.
The names, descriptions, and relationships you configure also help agents match natural-language audience requests to the right models and fields.
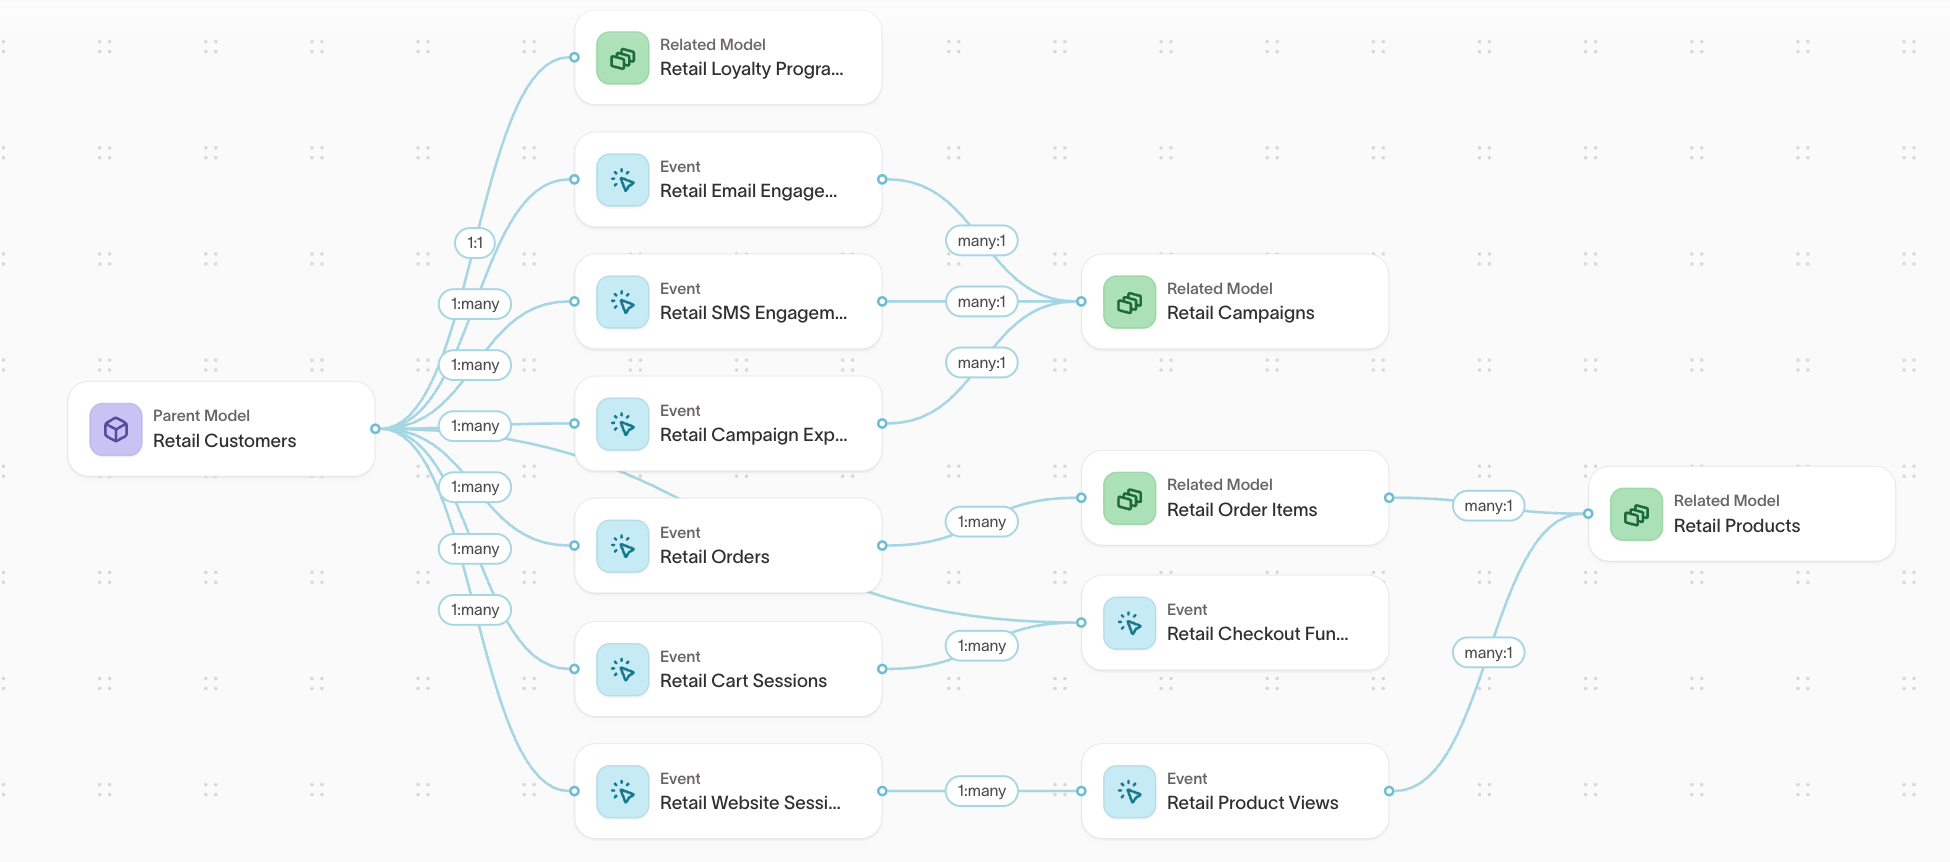
Create the parent model
The parent model defines who or what can become a member of an audience. Common parent models include Users, Accounts, Households, and Devices.
Before you create it, confirm that:
- one row represents one audience member
- the model has a stable, unique primary key
- it contains or can connect to the data required by your planned audiences
For help choosing the parent model, see Decide what one audience member represents.
Before adding a model, run SELECT * FROM your_table LIMIT 1 in your
warehouse. If returning a single row is slow, the model likely depends on
expensive joins — flatten or materialize it upstream first to keep audience
previews and syncs fast.
Create a parent model
-
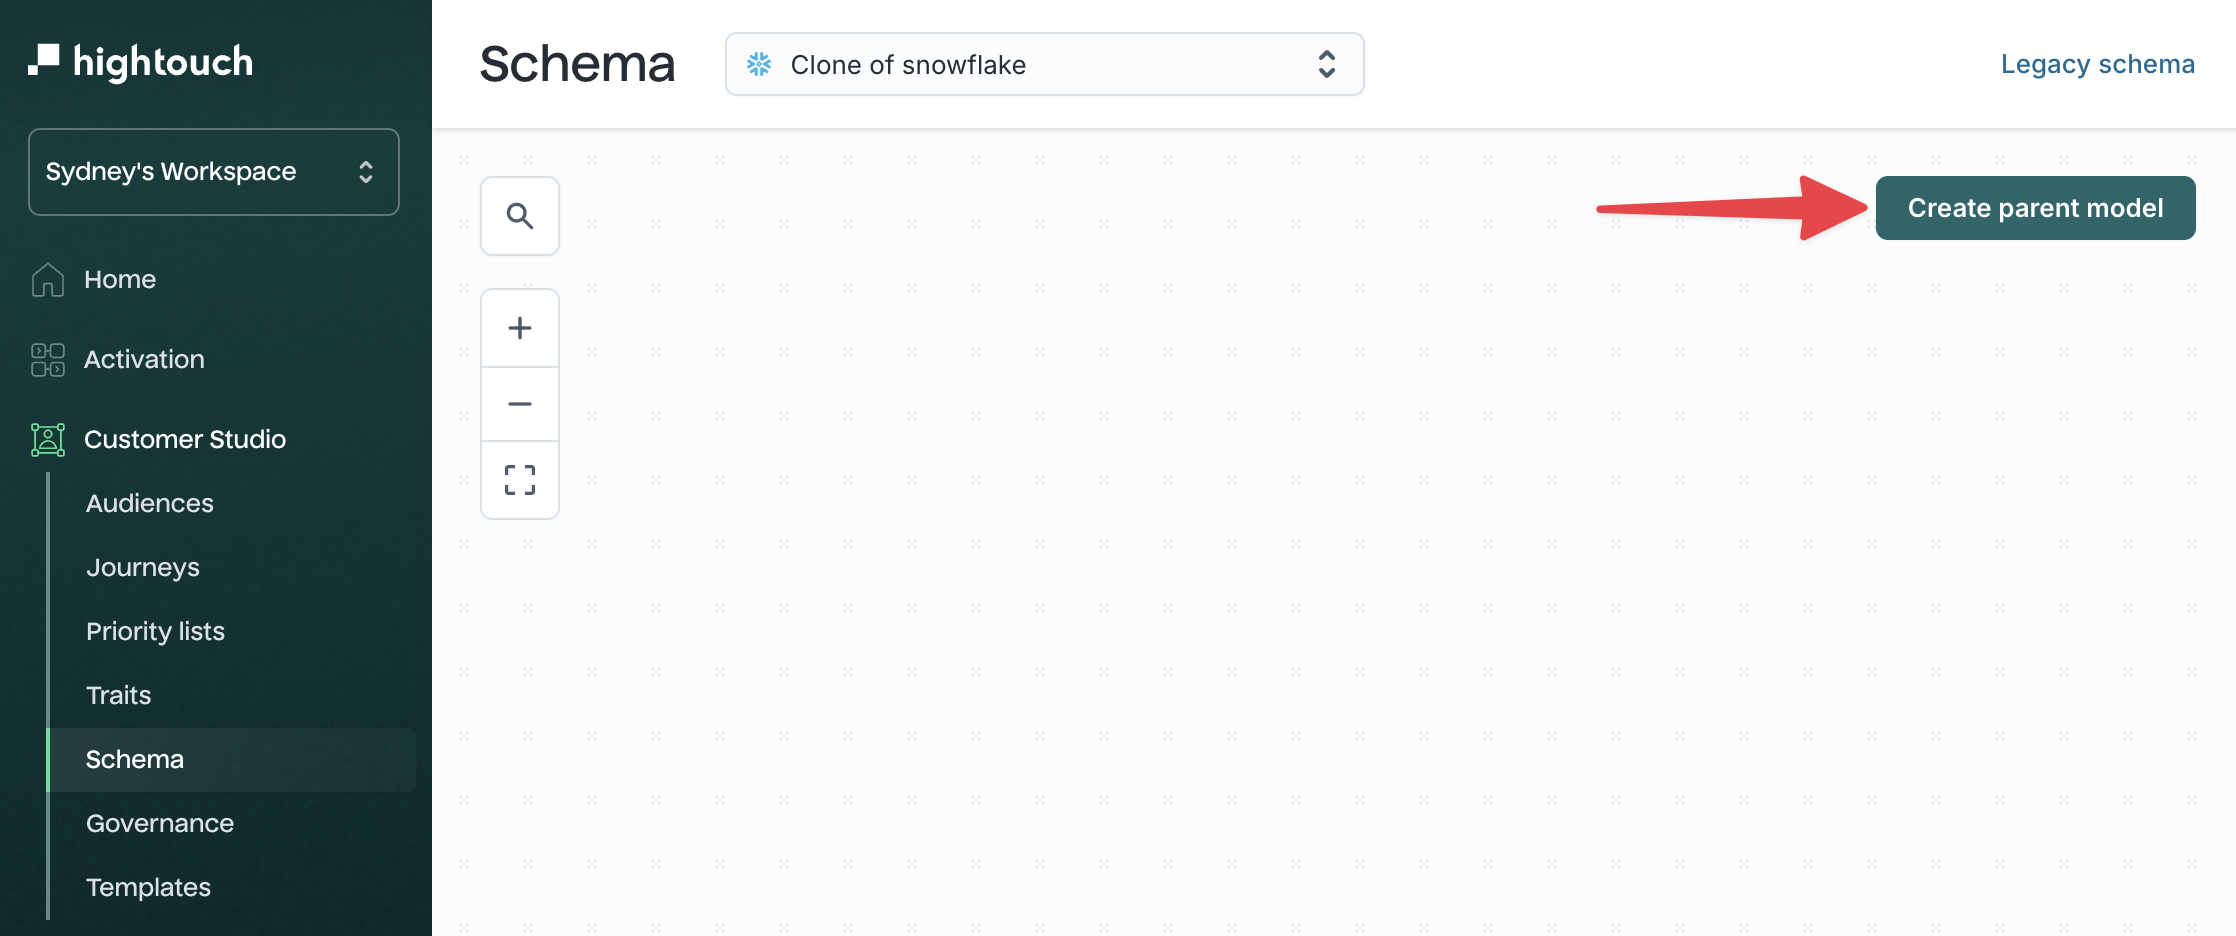
Go to Customer Studio > Schema.
-
Click Create parent model.
-
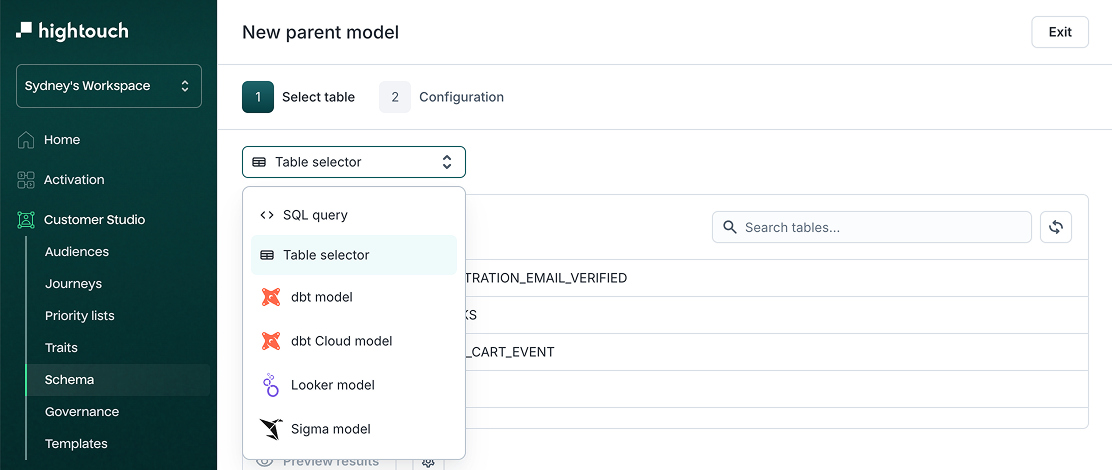
Select a modeling method:
- Table selector
- SQL query
- dbt model
- dbt Cloud model
- Looker model
- Sigma model
-
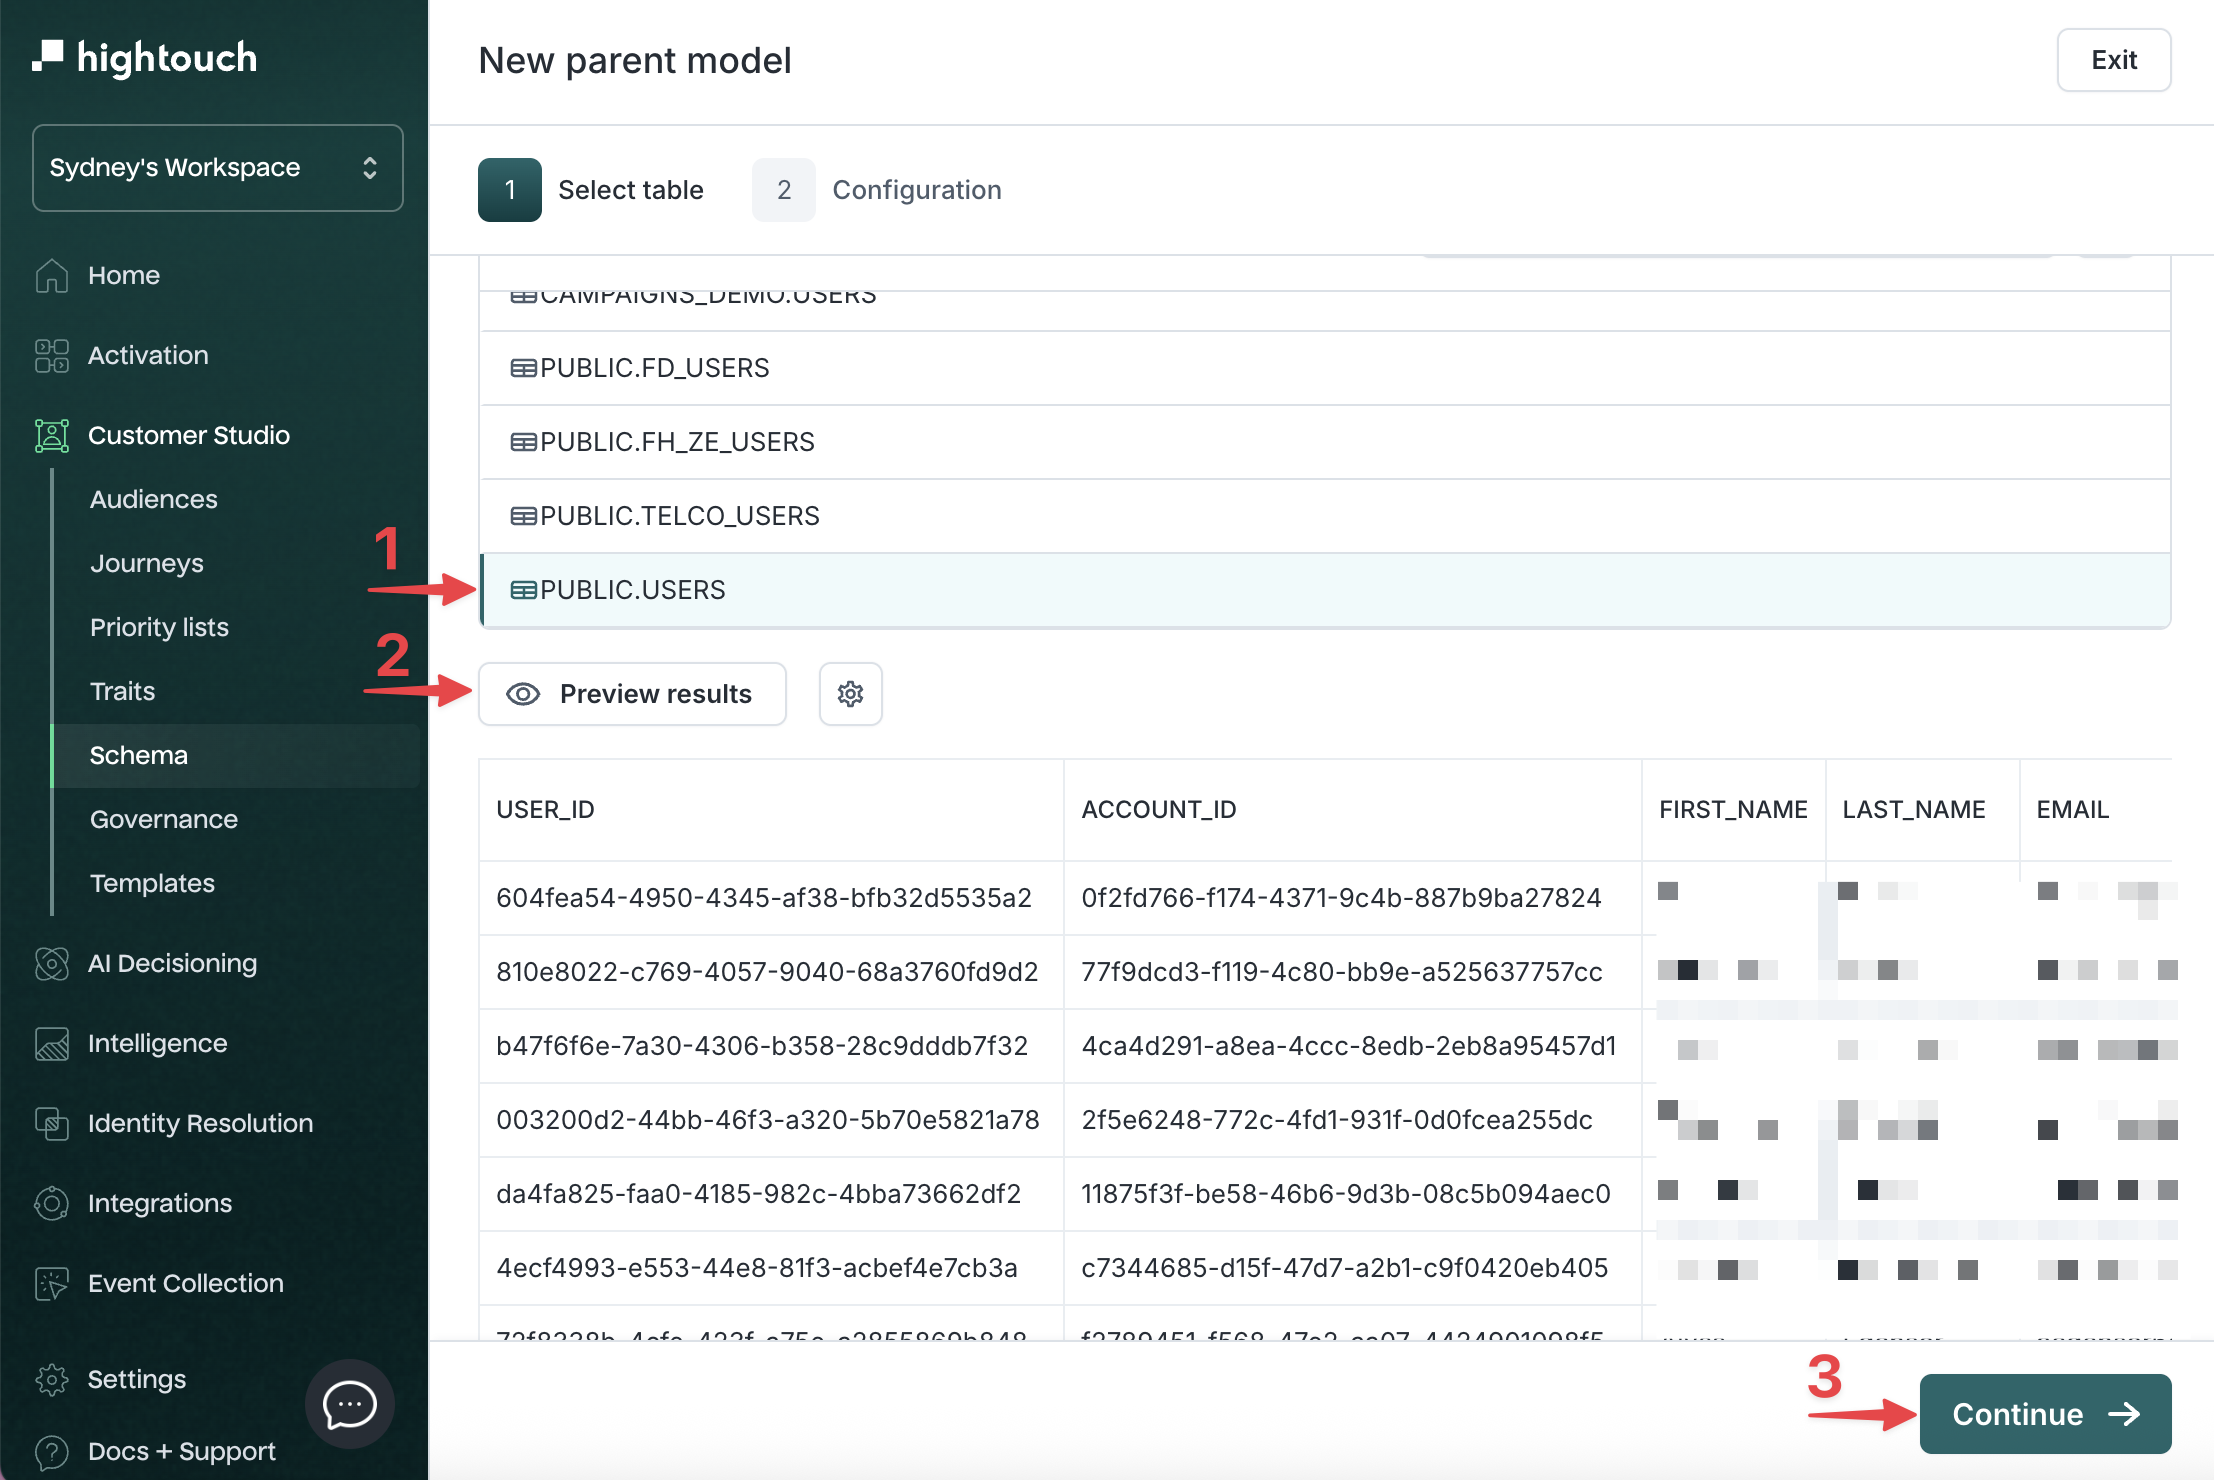
Preview the results, then click Continue.
-
Configure the model:
| Field | What it controls | Example |
|---|---|---|
| Name | How marketers see the model | Users |
| Description | Context about what each row represents | One row per product user |
| Primary key | The column that uniquely identifies each row | user_id |
| Primary label | The main value shown in previews | full_name or email |
| Secondary label | Additional context shown in previews | signup_date |
-
Click Create parent model.
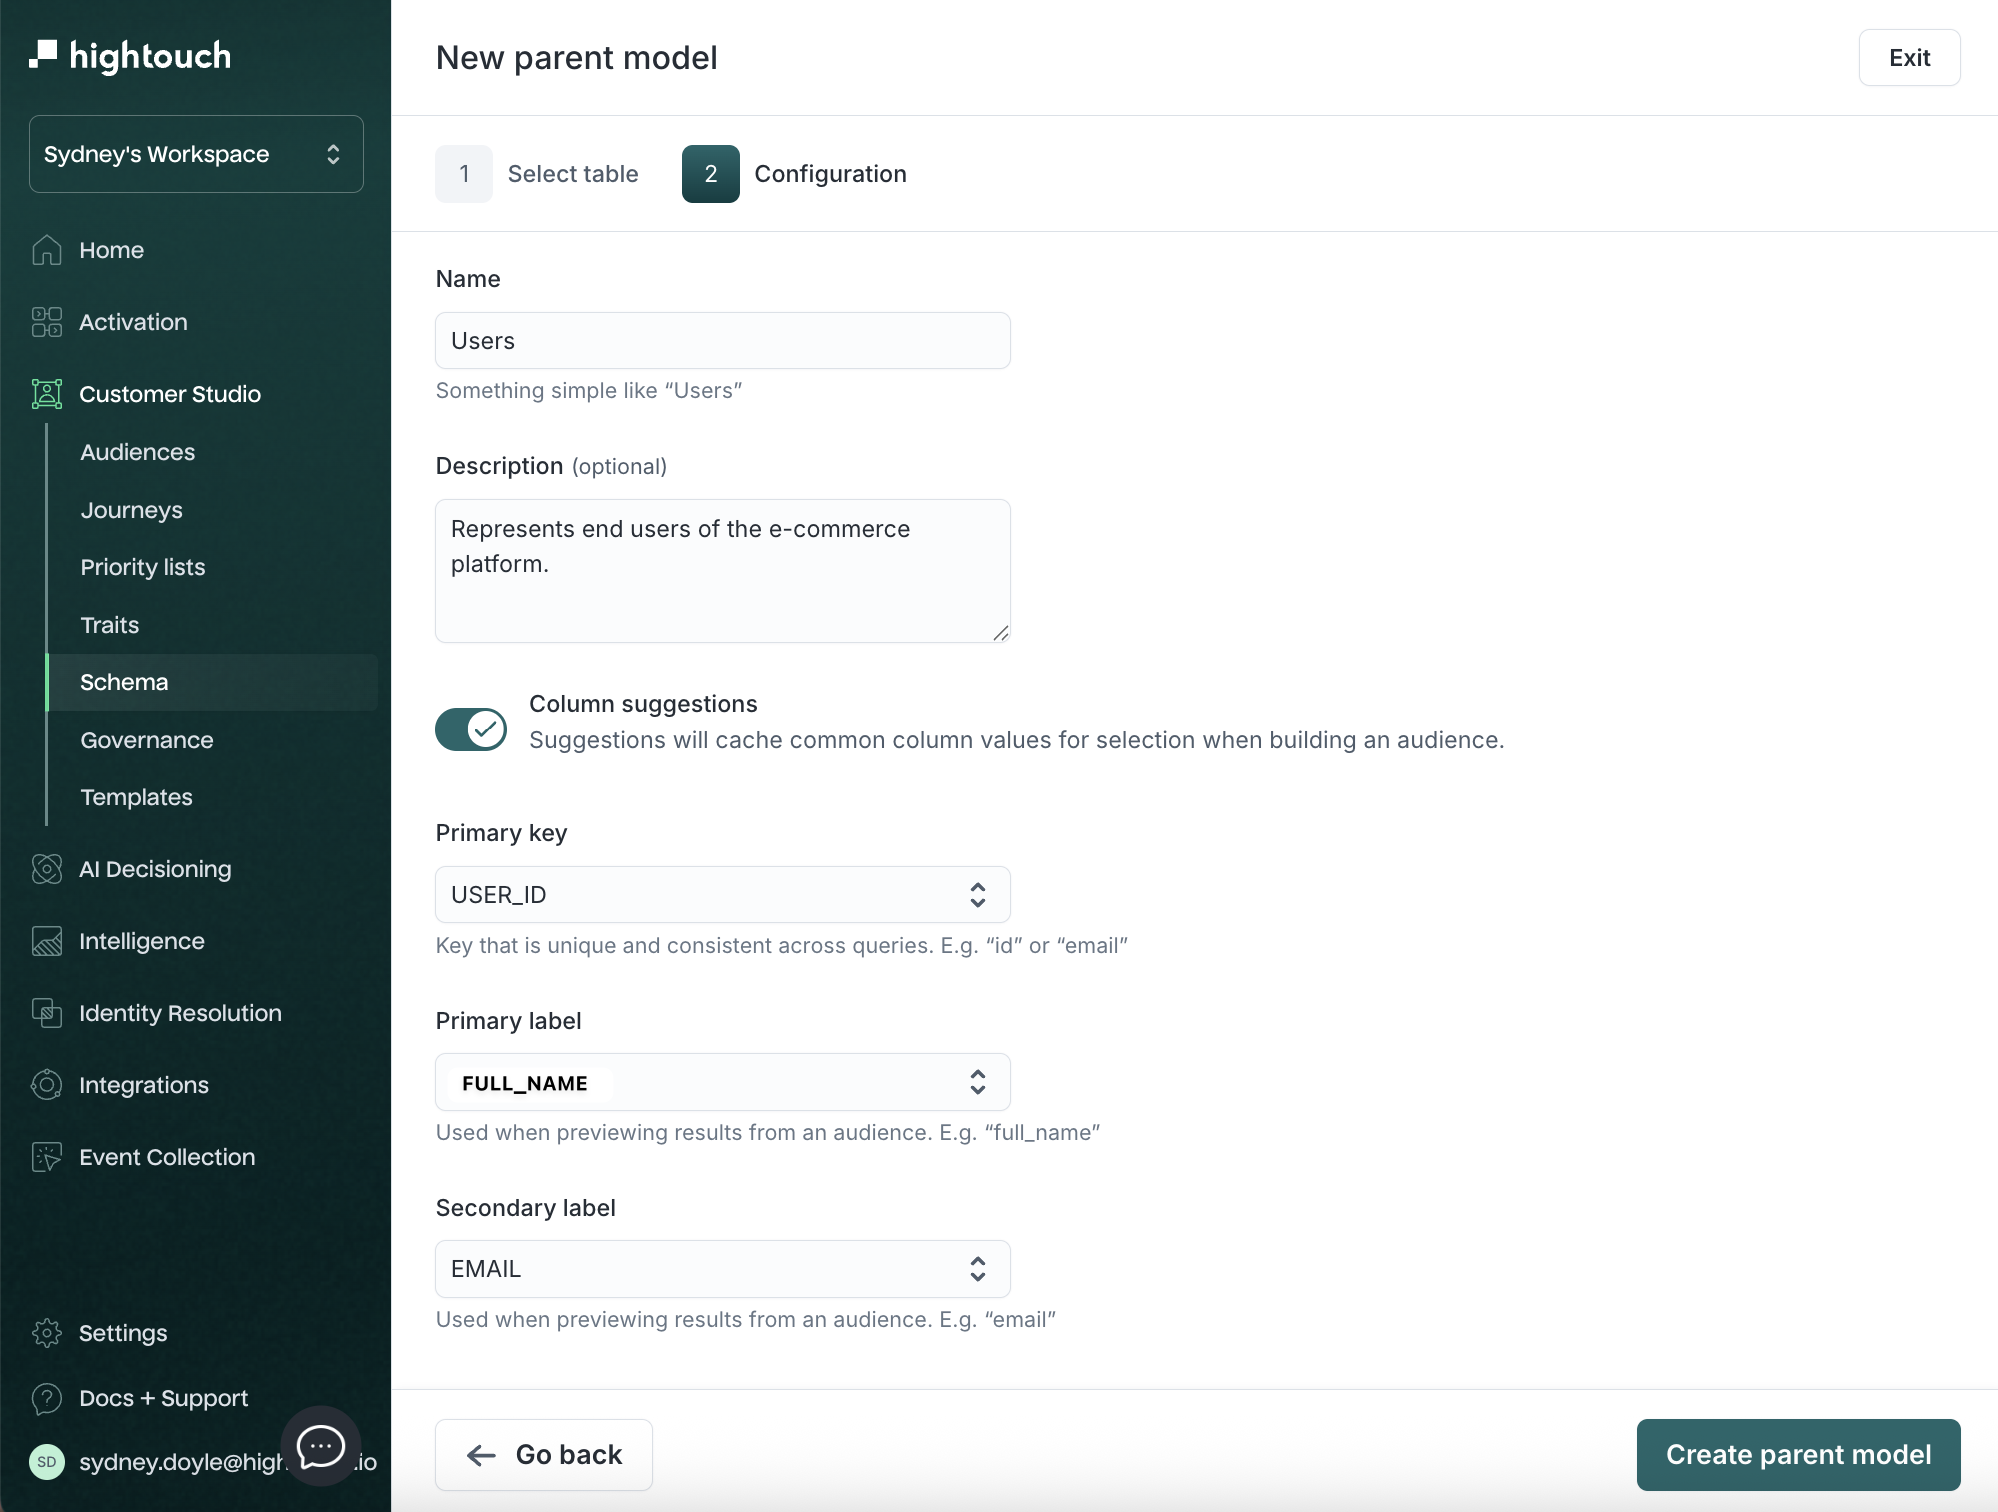
The primary key must uniquely identify each parent row. If the same primary key appears more than once, audience counts and sync behavior can be incorrect.
Add data marketers need for filtering
After creating the parent model, connect records and activity that marketers need to evaluate audience membership.
Add a related model
Use a related model for records associated with the parent, such as purchases, subscriptions, support tickets, or devices.
For example, if one user can make many purchases:
Users.user_id = Purchases.user_id
The relationship lets marketers build filters such as:
Users who made at least three purchases.
or:
Users with a subscription whose status is
past_due.
Create a related model
-
Go to Customer Studio > Schema.
-
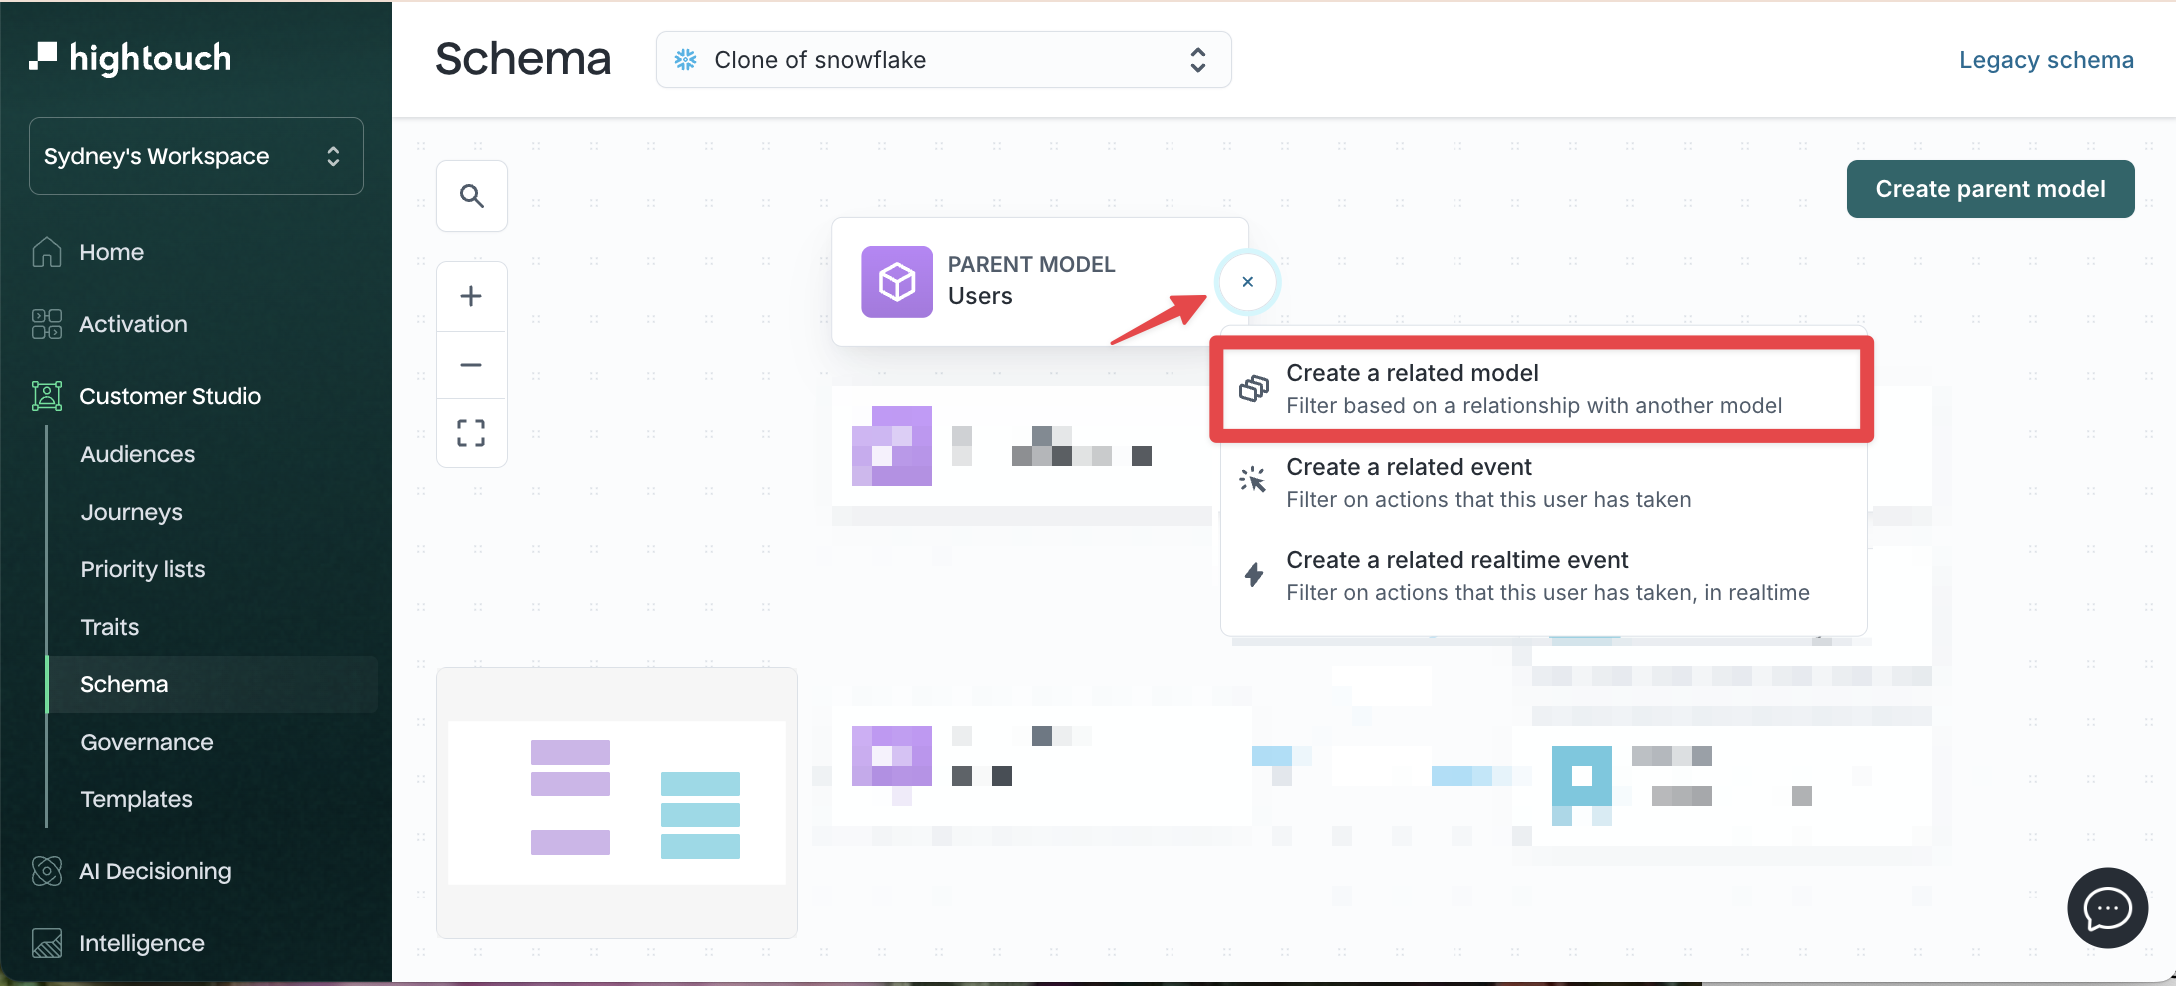
Click the + icon next to the parent model.
-
Select Create a related model.
-
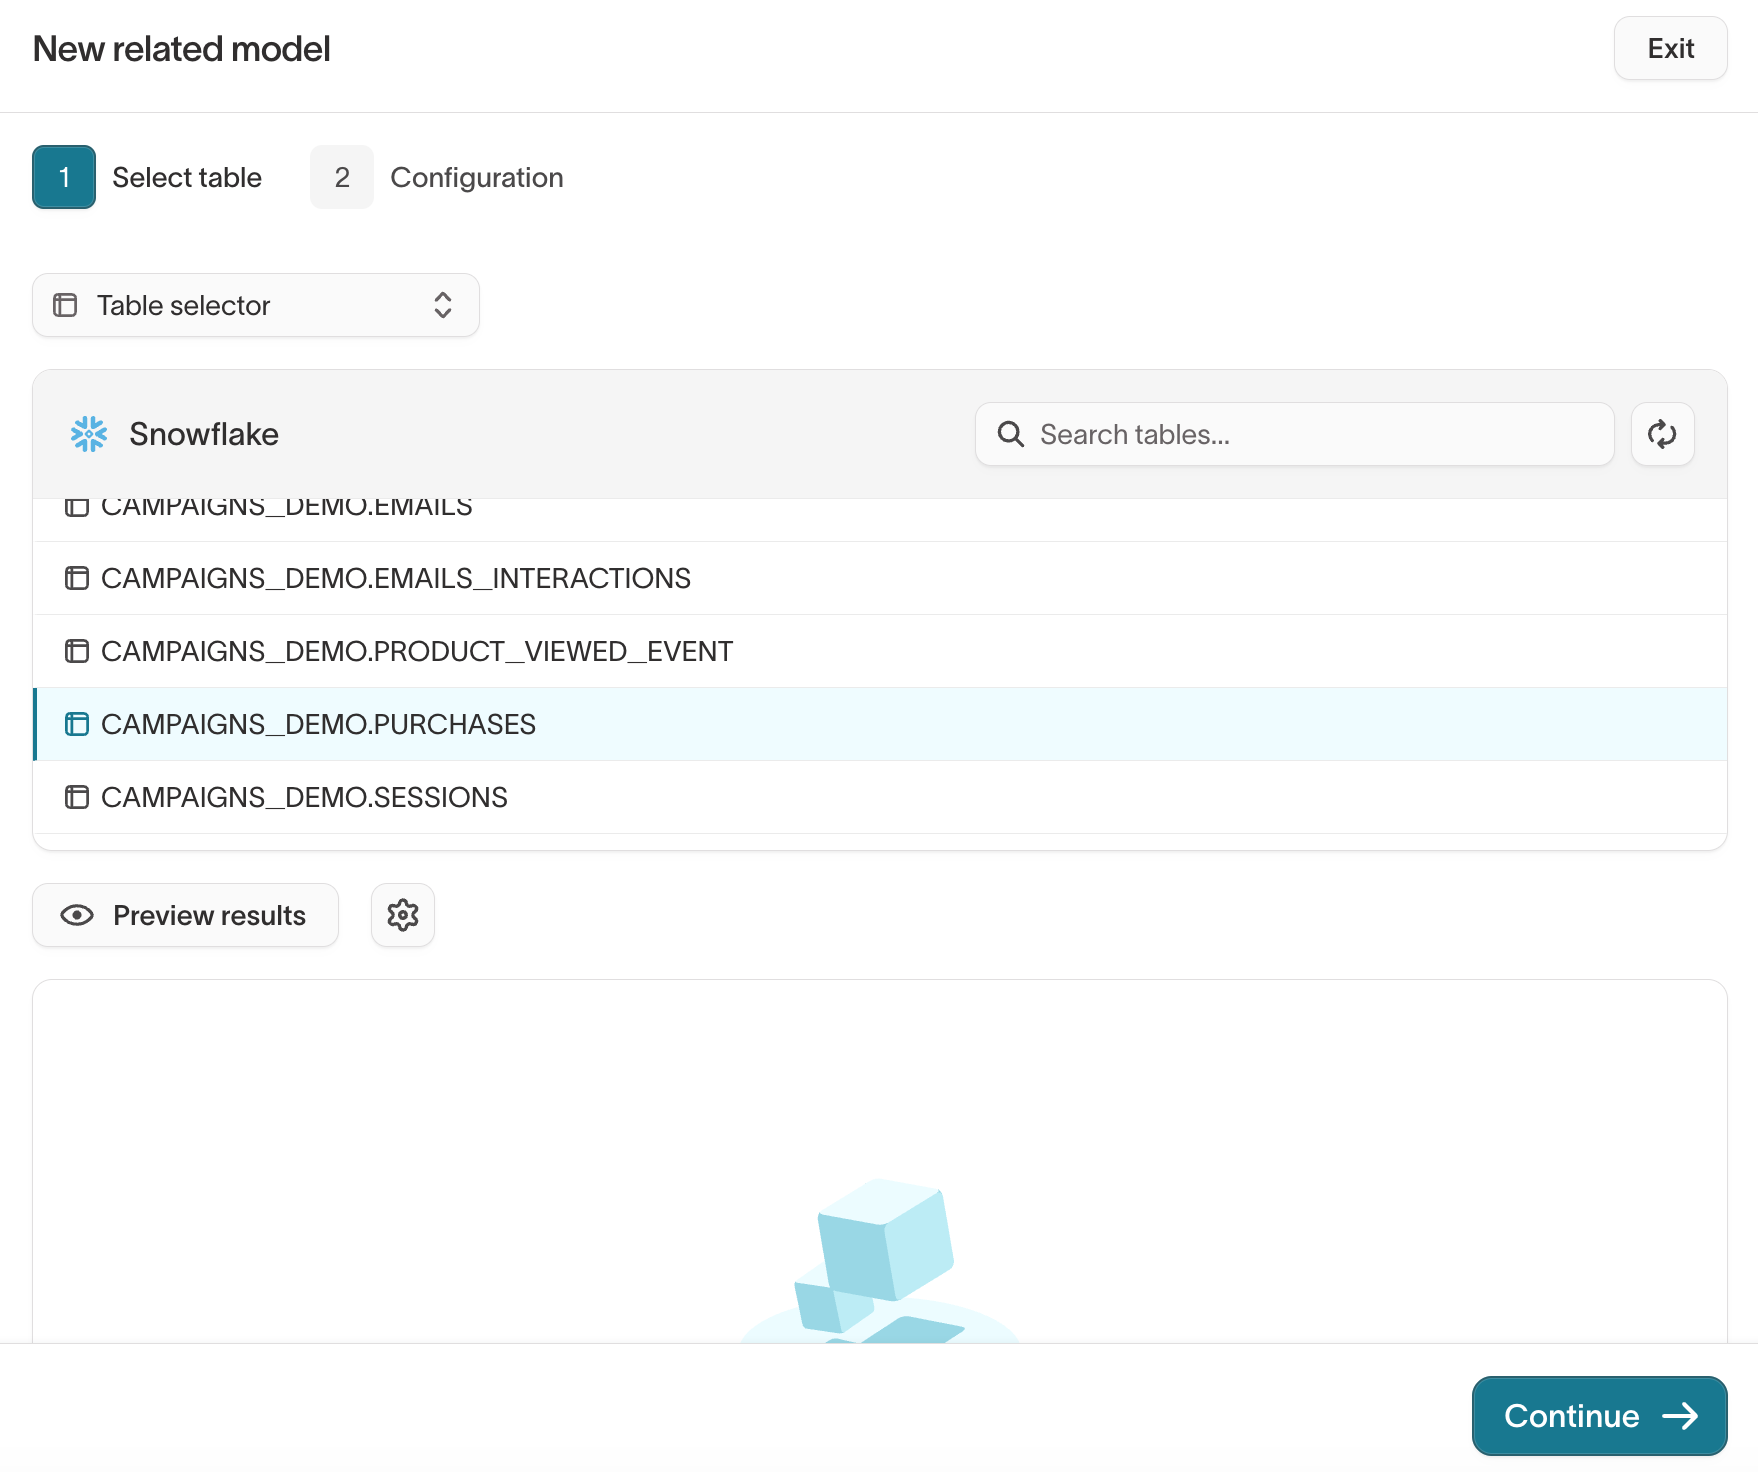
Choose the table or modeling method and preview the results.
-
Configure the model and relationship:
| Field | What it controls | Example |
|---|---|---|
| Name | How marketers see the related records | Purchases |
| Description | What the records represent | Completed and refunded purchase records |
| Relationship | How many records can exist on each side | 1:many |
| Foreign key (join key) | The column that connects the related record to the parent | user_id |
-
Click Create related model.
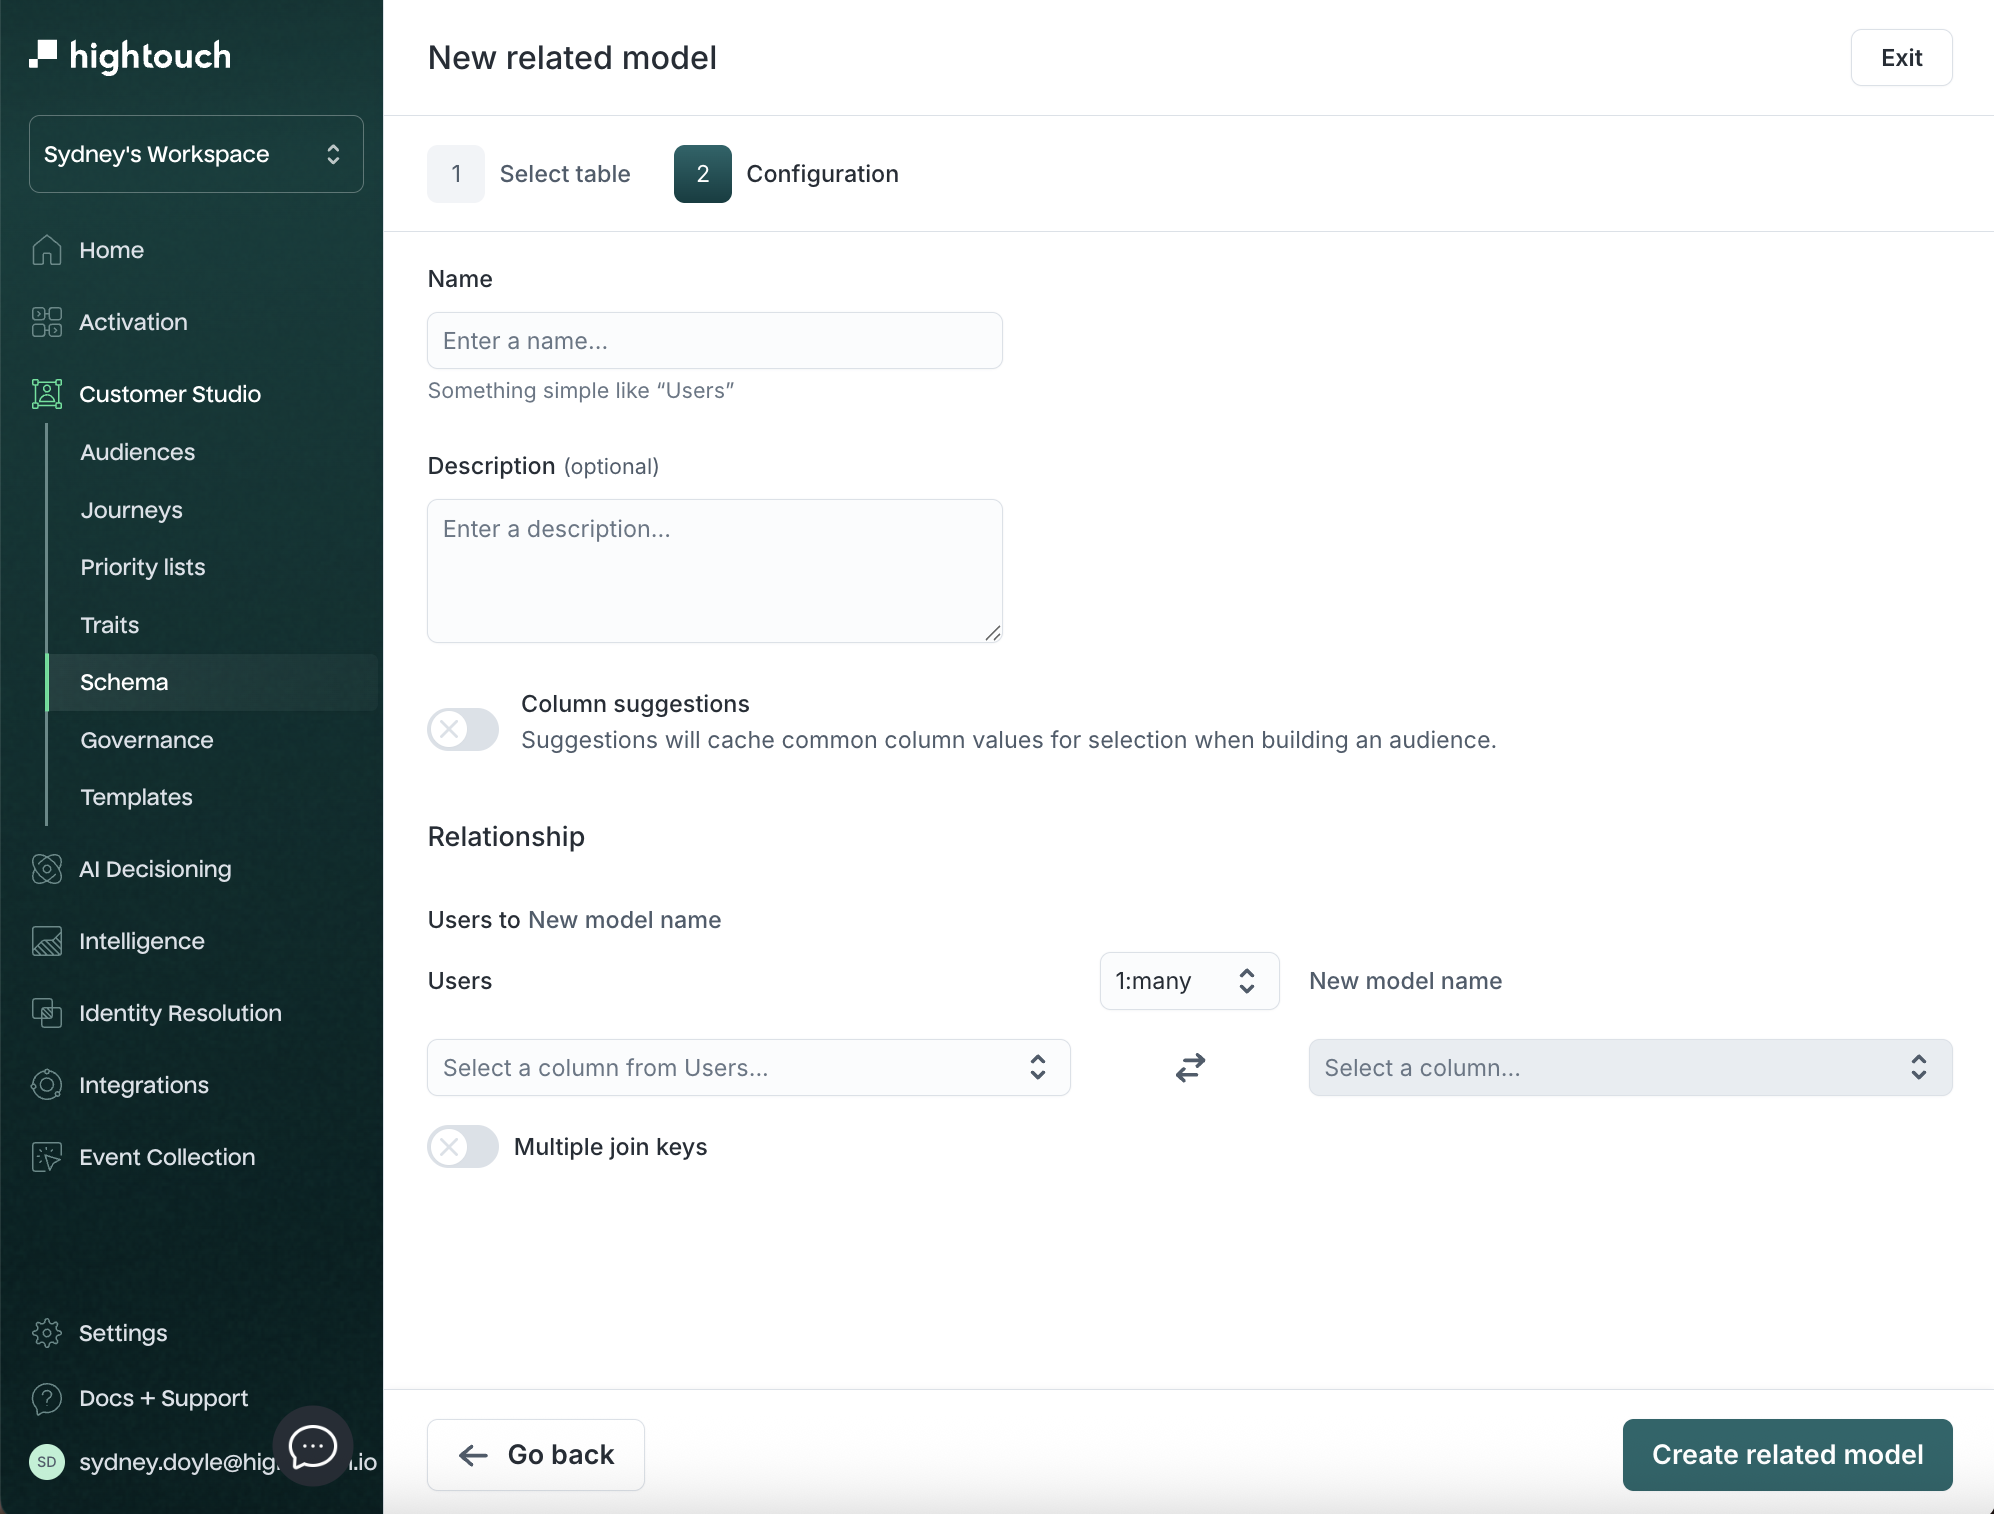
A primary key answers "which row is this?" A join key answers "which
record in the other model does this belong to?" In Purchases, purchase_id
might identify the purchase while user_id connects it to a user.
Add an event model
Use an event model for timestamped activity such as product views, logins, or checkouts. The timestamp lets marketers filter on when the activity occurred.
For example:
Users who viewed a product in the last 7 days.
An event model needs:
- a timestamp column, such as
occurred_at - a join key that connects the event to the parent, such as
user_id
Create an event model
-
Go to Customer Studio > Schema.
-
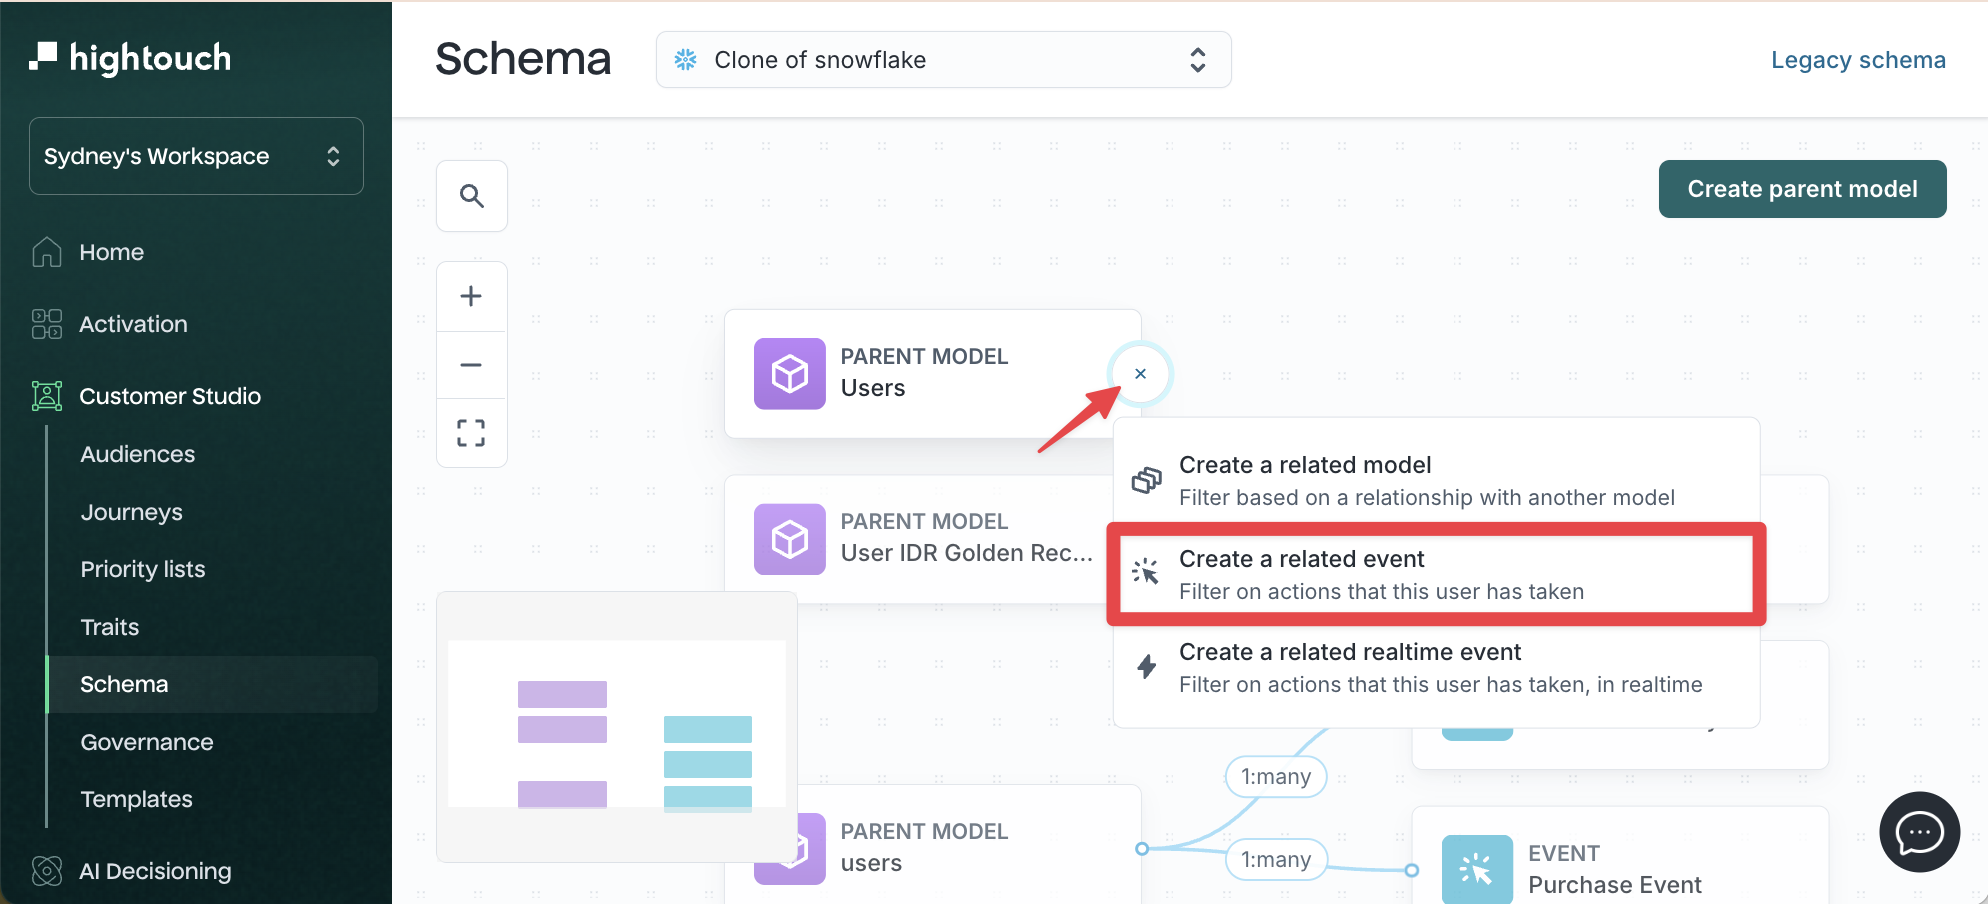
Click the + icon next to the parent model.
-
Select Create a related event.
-
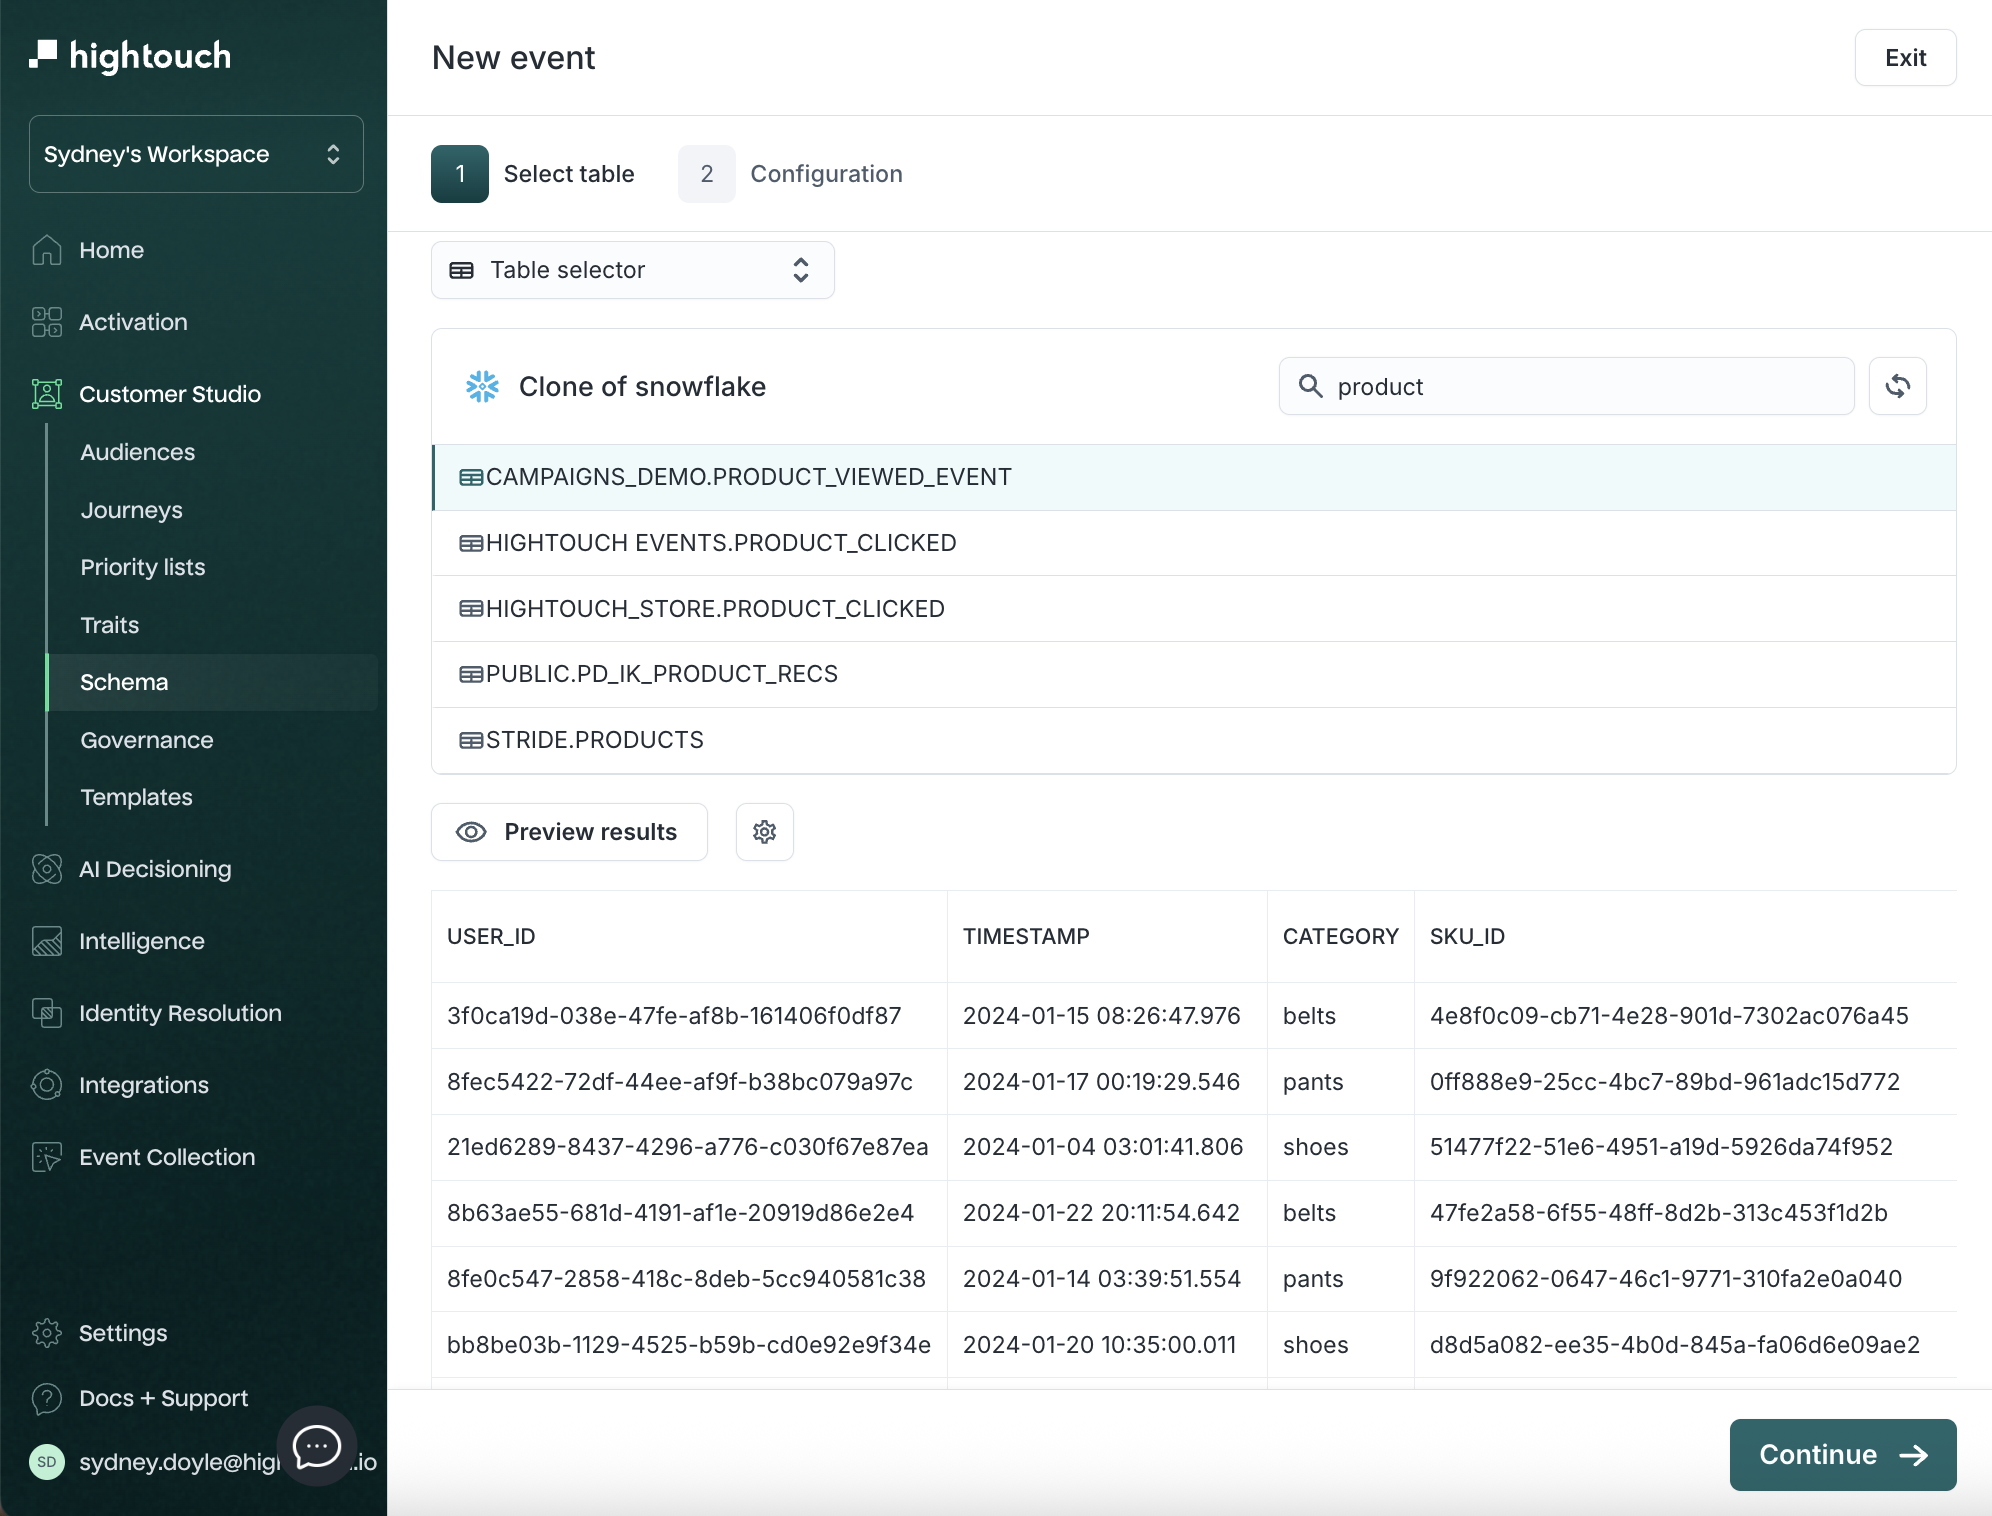
Choose the table or modeling method and preview the results.
-
Click Continue.
-
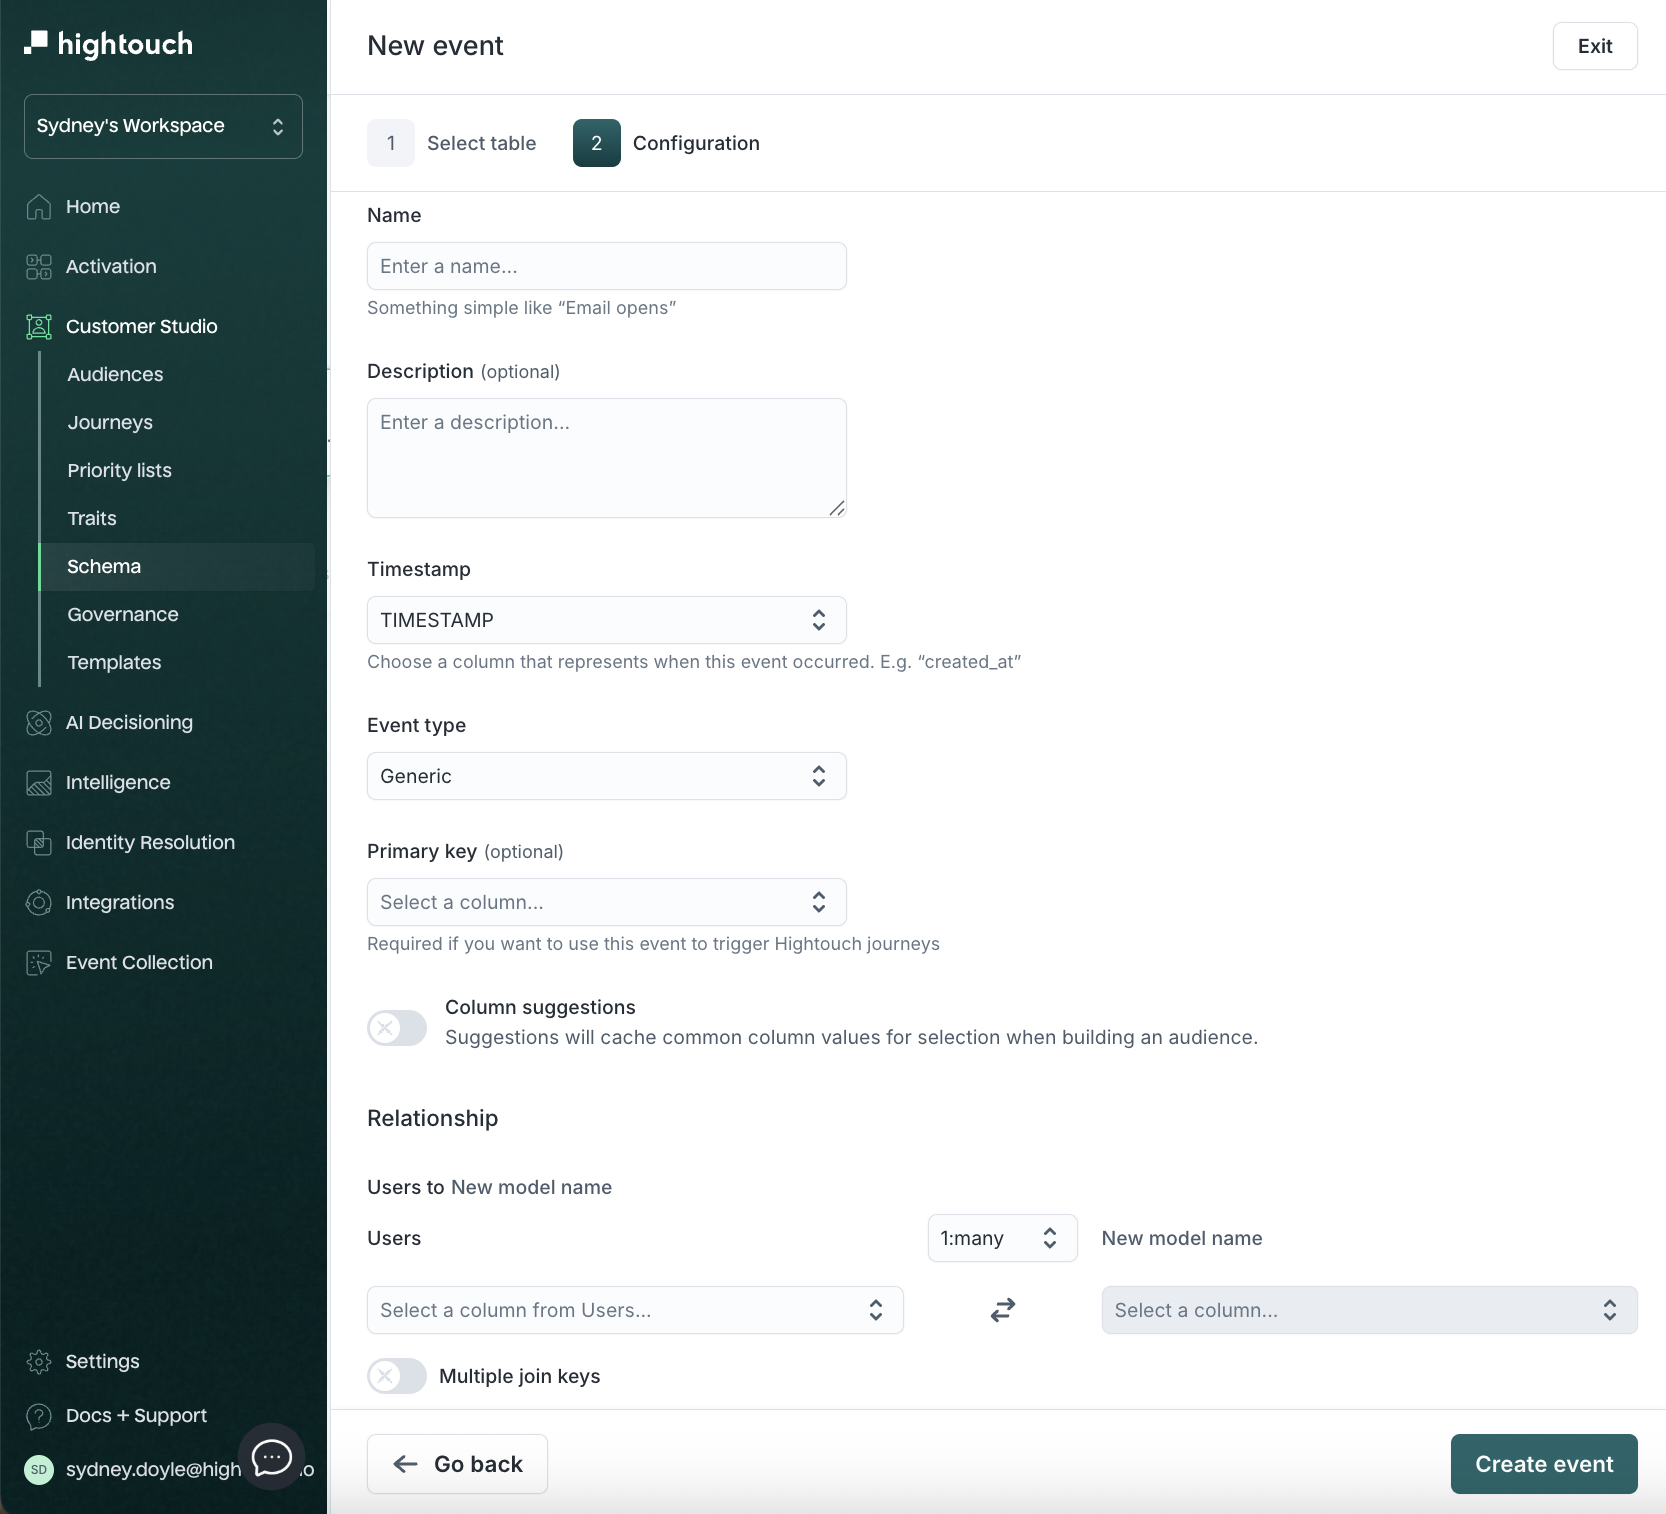
Configure the event:
| Field | What it controls | Example |
|---|---|---|
| Name | How marketers see the activity | Product Viewed |
| Description | What the event represents | A user viewed a product detail page |
| Timestamp column | When the event occurred | occurred_at |
| Event type | Event category | Generic |
| Primary key | The value that uniquely identifies the event, when required | event_id |
| Relationship | How many events can belong to a parent record | 1:many |
| Foreign key (join key) | The column that connects the event to the parent | user_id |
-
Click Create event.
If multiple event types live in the same warehouse table, you can create separate event models by filtering that table — for example, Product Viewed and Checkout Started.
Name events for marketers
Name events with an Object + Verb pattern so related actions group together in the audience builder: Product Viewed, Cart Abandoned, Checkout Started, Subscription Renewed. For the broader naming strategy, see Name data for marketers.
Configure how fields appear to marketers
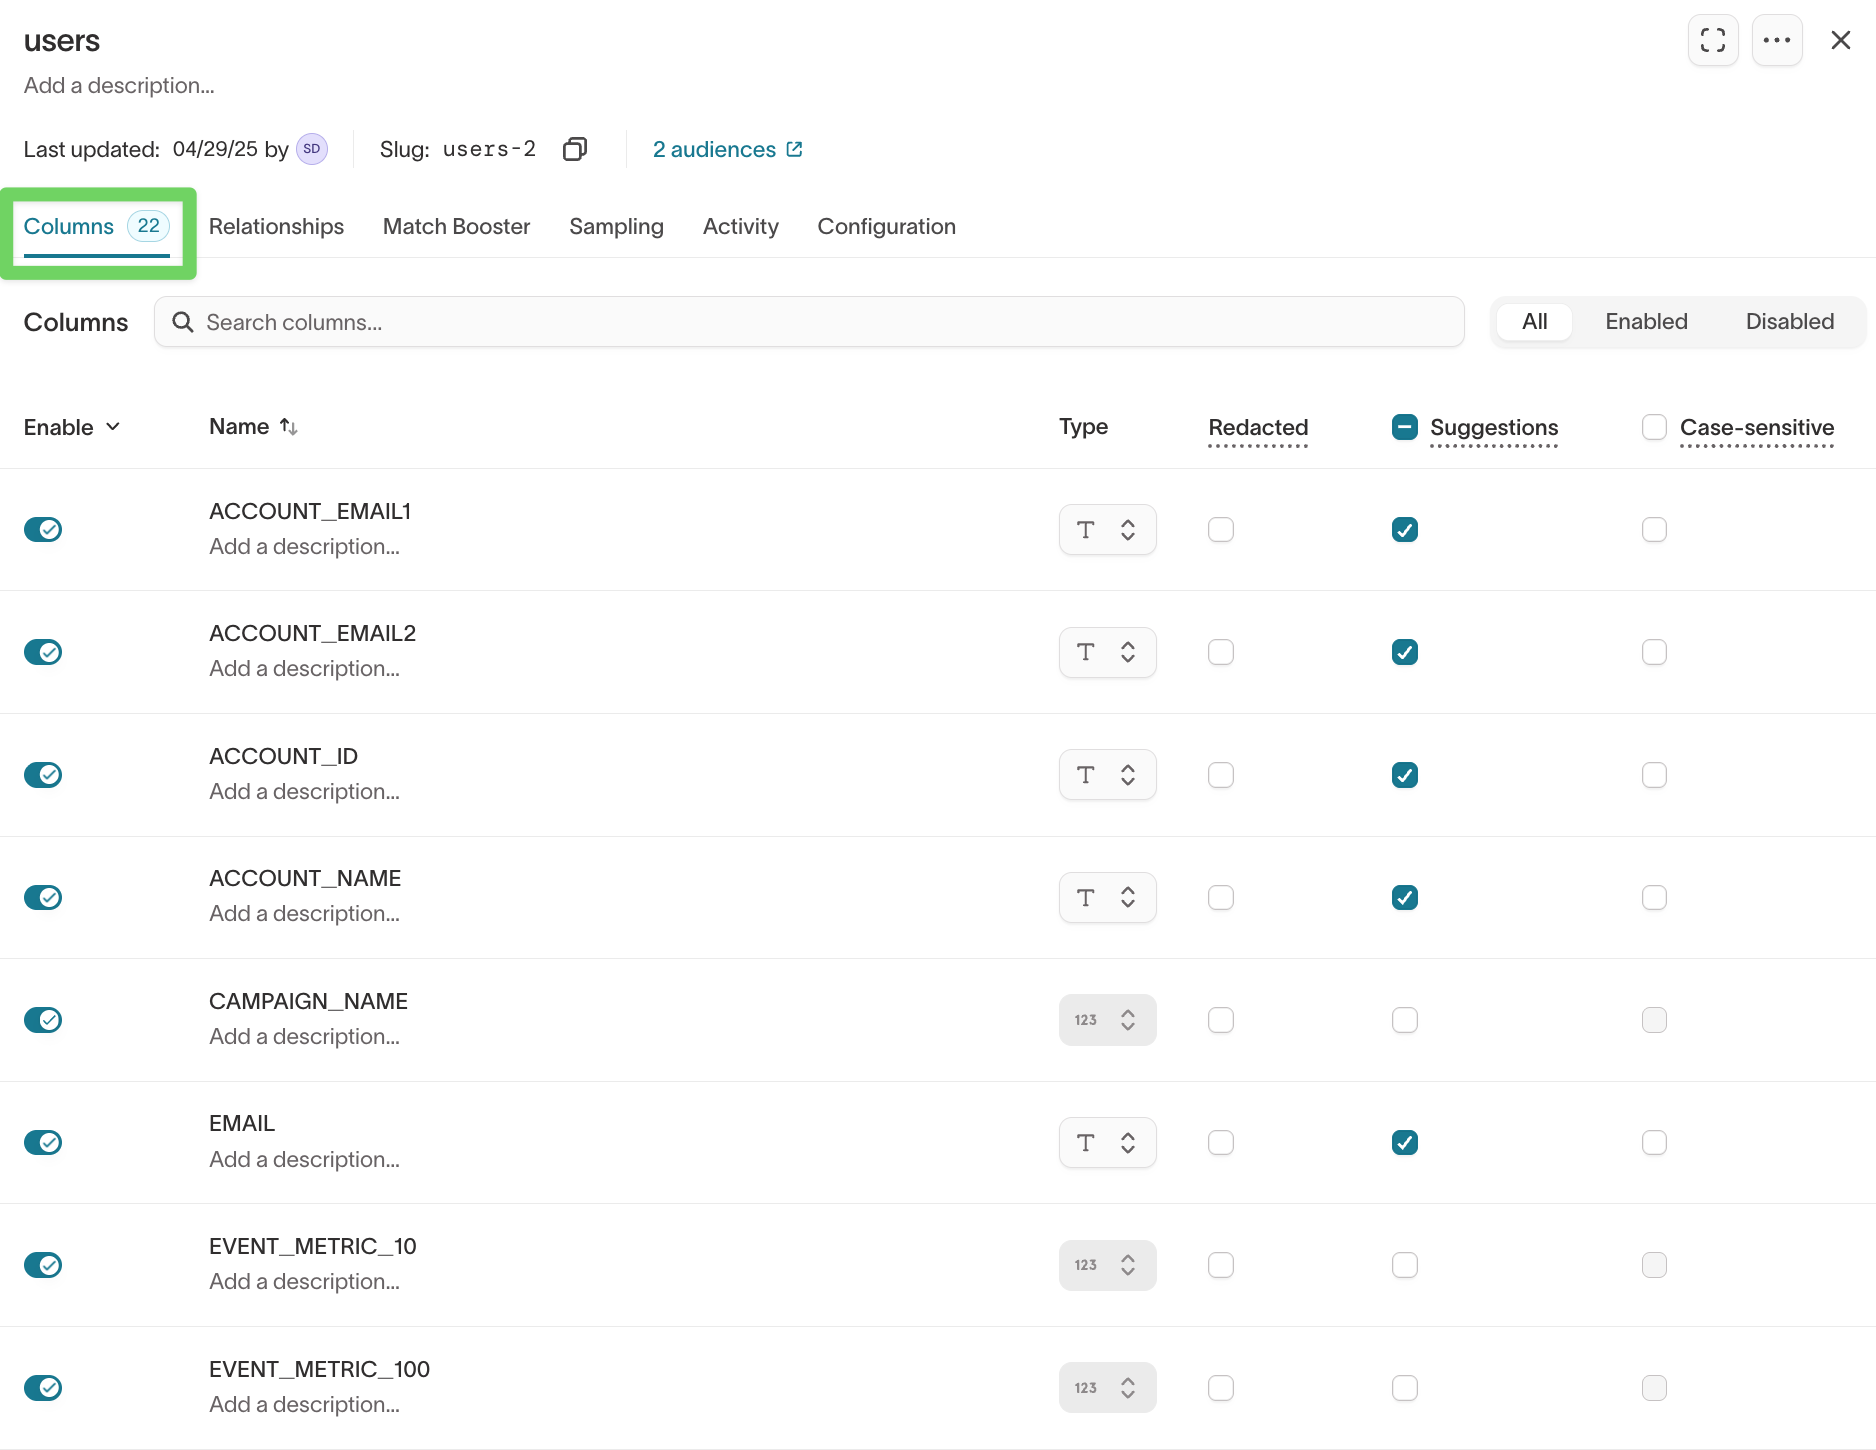
Use the Columns tab to control which fields appear in Customer Studio and how marketers see them.
- Open a model.
- Go to the Columns tab.
Show only the columns marketers need
Use the toggle next to each column to control whether it appears in Customer Studio. Enable the columns marketers need for audience building, profile exploration, or syncs. Hide fields marketers don't need for audience building or investigation.
Common fields to hide include:
- ETL metadata
- debugging fields
- technical status flags that marketers don't use
- internal IDs that don't help with audience decisions
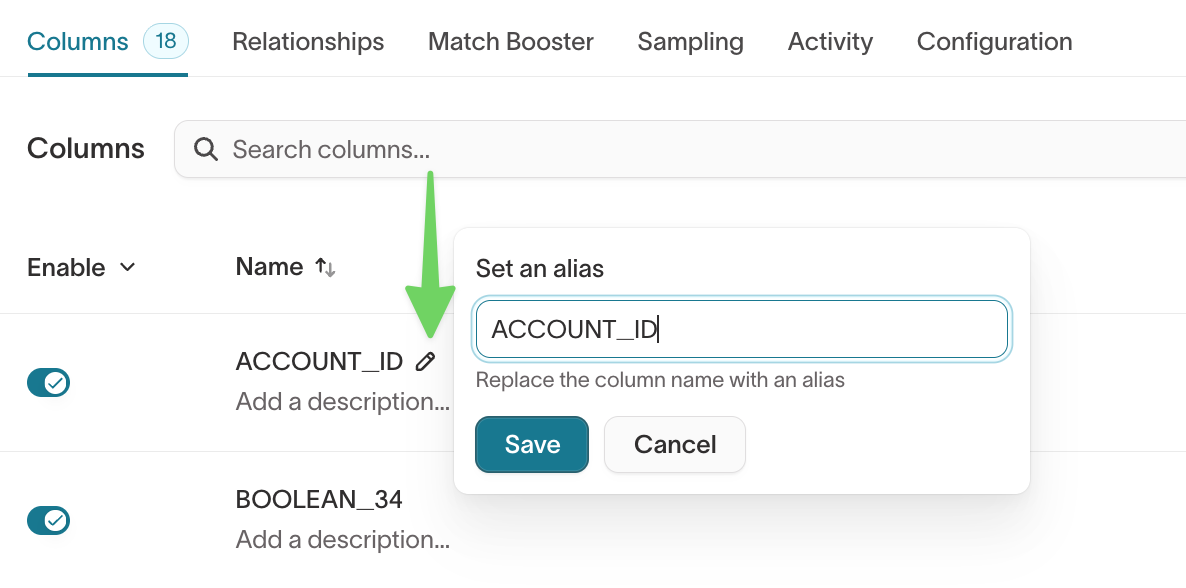
Rename columns with aliases
Aliases change how warehouse columns appear in Customer Studio without requiring you to rename the source column.
For example:
geo_region→Regioncreated_at→Signup date
To set an alias, hover over the column and click the pencil icon.
Add descriptions and metadata
Use descriptions when a field's meaning isn't obvious from its name. Where possible, add descriptions in your modeling layer (for example, dbt column descriptions) so Customer Studio inherits business context directly. When that's not practical, use the description field on the model.
Descriptions can explain:
- how a metric is calculated
- whether a timestamp is UTC
- whether revenue includes refunds
- whether a status is current or historical
Clear descriptions help marketers understand fields and help agents match natural-language requests to the right models and fields. Treat descriptions as part of the data interface, not optional prose.
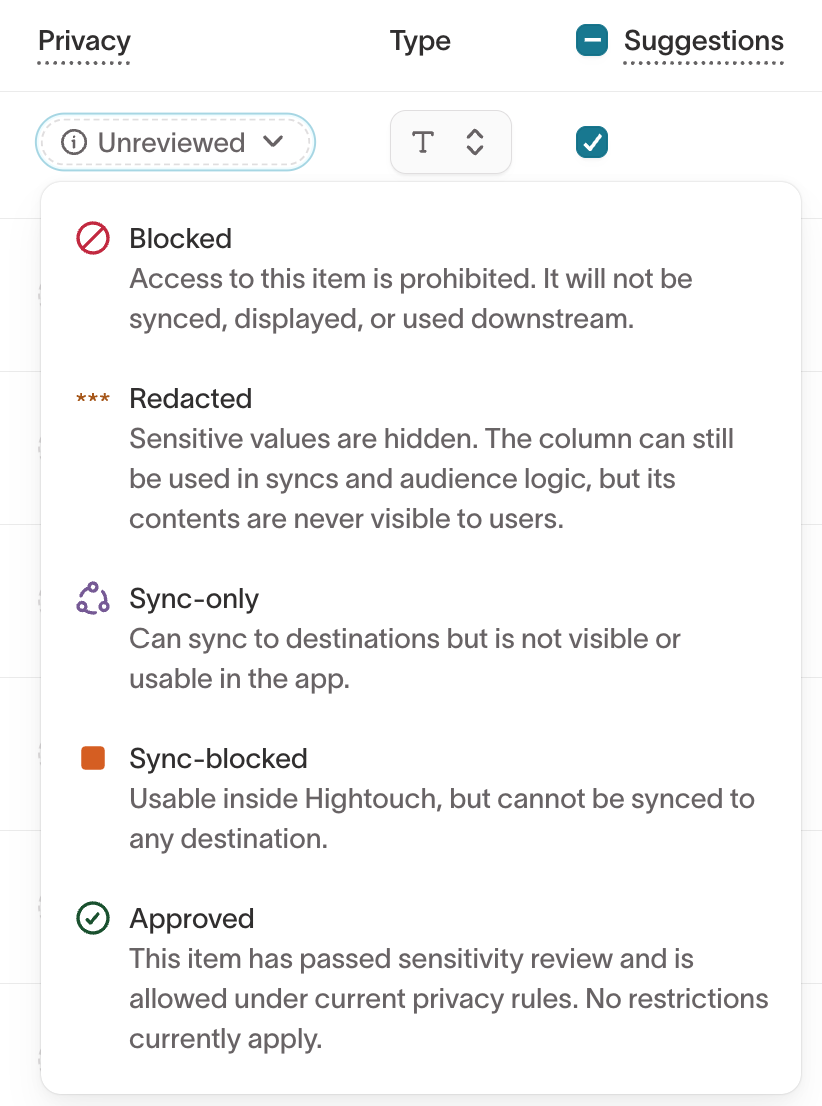
Set privacy levels for columns
Privacy levels control how column values appear in places such as audience previews and profile exploration while keeping the field available for supported operations.
Review sensitive fields such as:
- email addresses
- phone numbers
- internal identifiers
Each column has a Privacy dropdown. The default value is Unreviewed. Select the level that matches each column's sensitivity.
As a starting point:
- Use Redacted when marketers need to filter on a field but shouldn't see raw values in previews.
- Use Sync-only or Sync-blocked for operational identifiers that aren't useful for audience building.
- Use Approved only when values are safe to display in previews and profile exploration.
If you're unsure, start more restrictively and loosen visibility later.
Configure case sensitivity
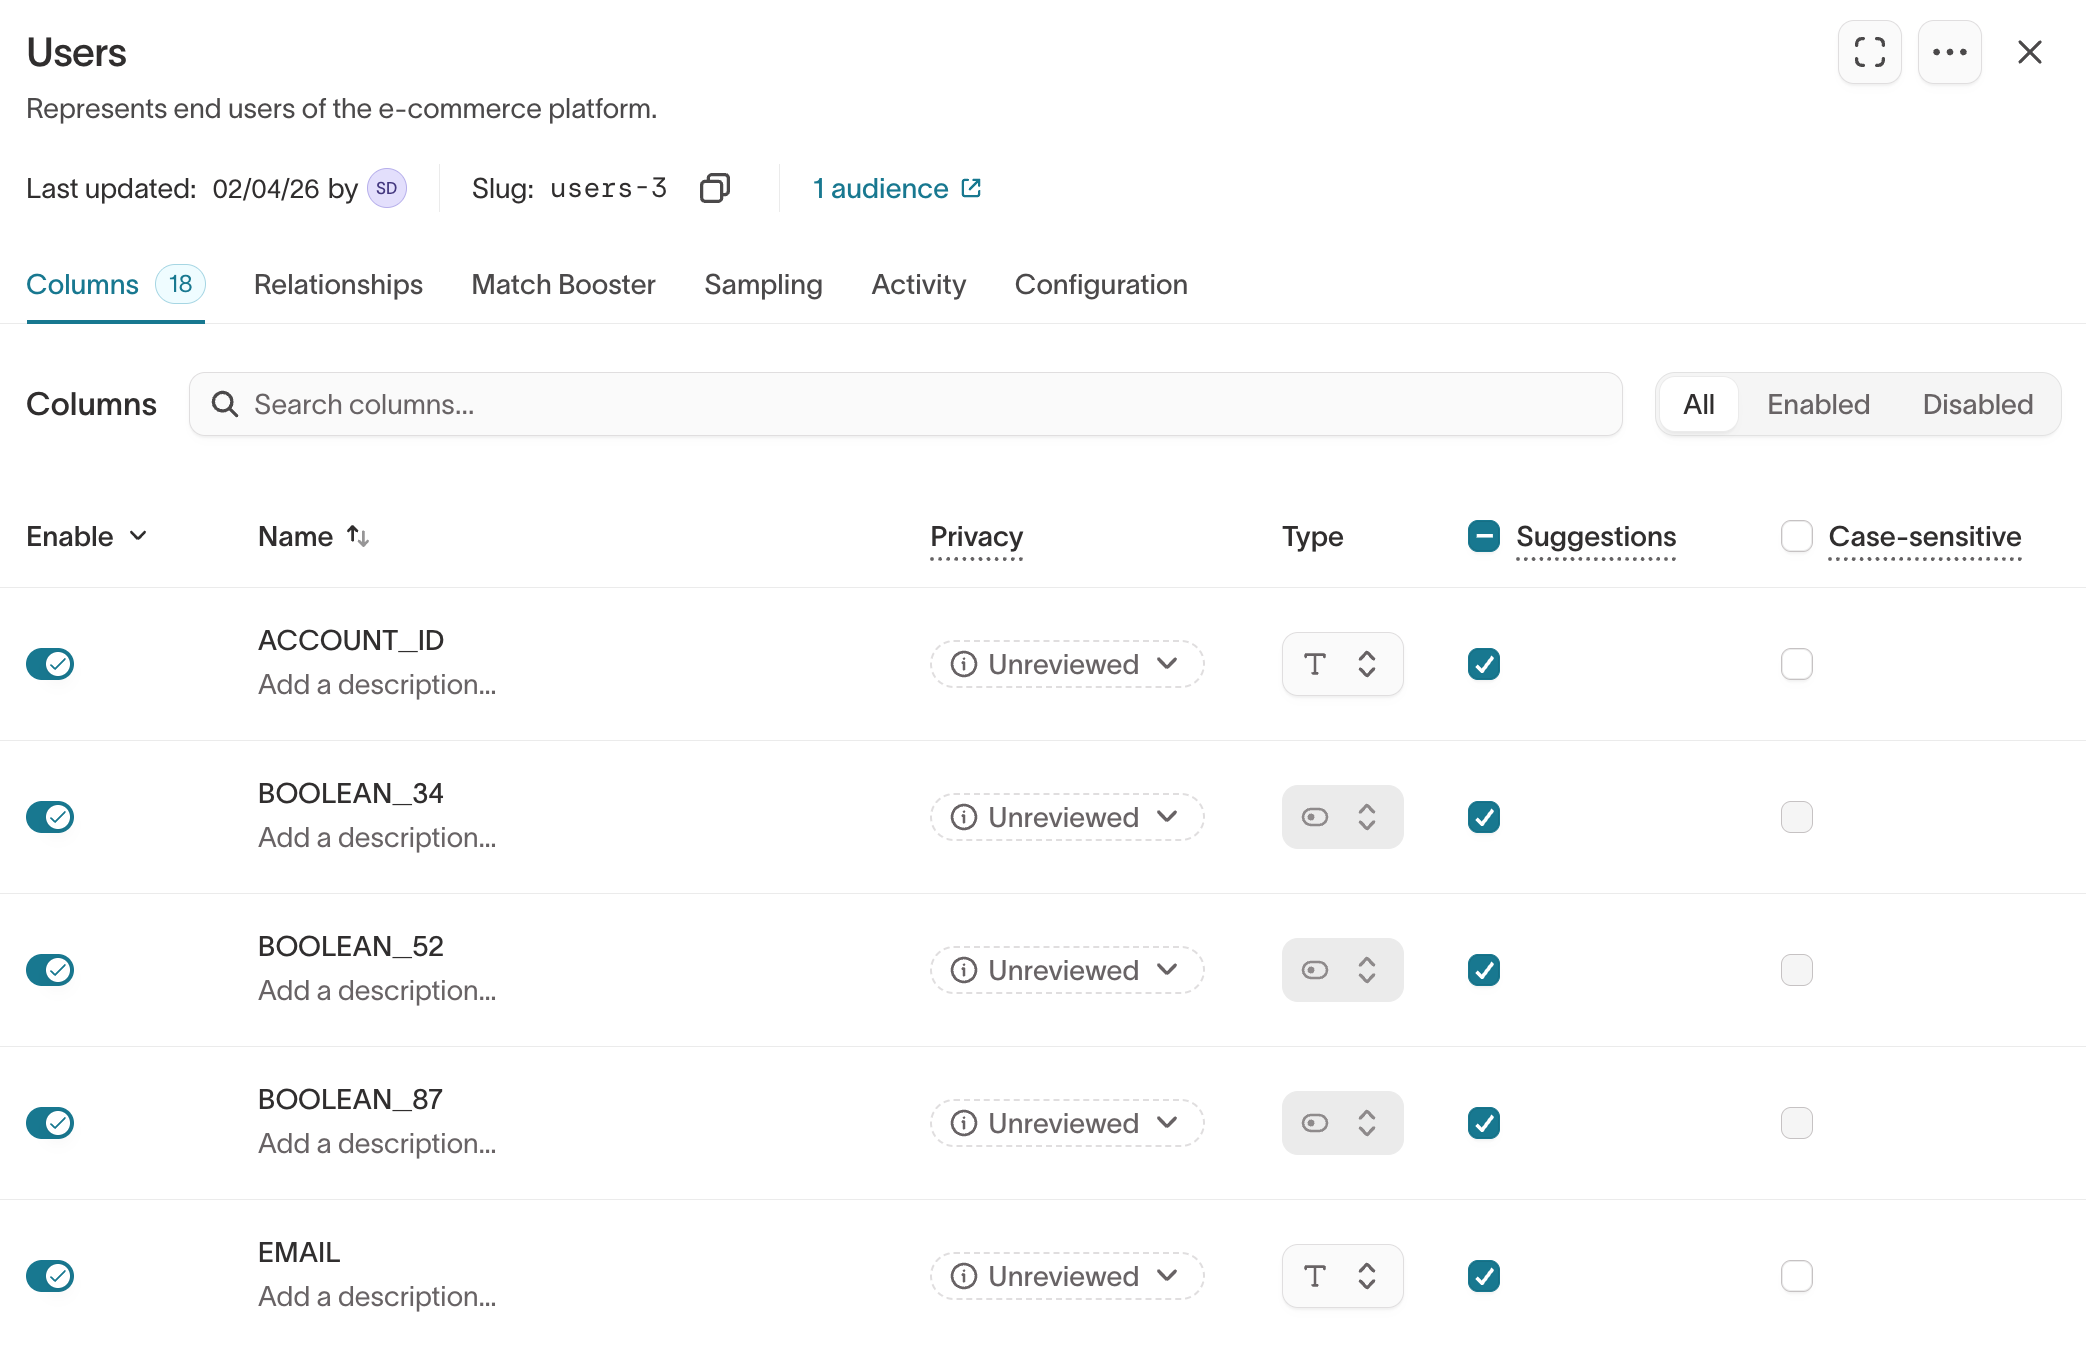
When enabled for your workspace, new string columns added to a schema model default to case-sensitive matching. Filters like equals and contains then distinguish between uppercase and lowercase values — for example, "Nike" and "nike" are treated as different values.
This applies to columns added after case sensitivity was enabled for your workspace. Existing columns keep their previous behavior unless you update them. Case sensitivity is configured per column in the Columns tab.
Enable filter value suggestions
Suggestions help marketers choose common values from a dropdown when filtering — for example, brands like Nike or Adidas. Enable them for low-cardinality fields such as region, plan_tier, or status.
Enable suggestions for columns with fewer than 100 distinct values. High-cardinality columns like email addresses or order IDs don't benefit and add unnecessary compute during refreshes. Suggestions help users discover values. They don't change the live data used to evaluate an audience. You can control how often suggestions refresh from the model's Configuration settings.
Refresh columns from your source
If columns are added, removed, renamed, or change types in the warehouse, refresh the model so Customer Studio sees the latest source schema.
- Open the model.
- Click the three-dot menu.
- Select Refresh columns available in source.
- Review aliases, visibility, privacy levels, and dependent assets before you use the changed columns in audiences or syncs.

A warehouse column change can affect filters, traits, audiences, journeys, and sync mappings. Treat renames, type changes, and removals as schema changes — review the dependent Customer Studio configuration before you make them, not as warehouse-only maintenance.
Understand how relationships work
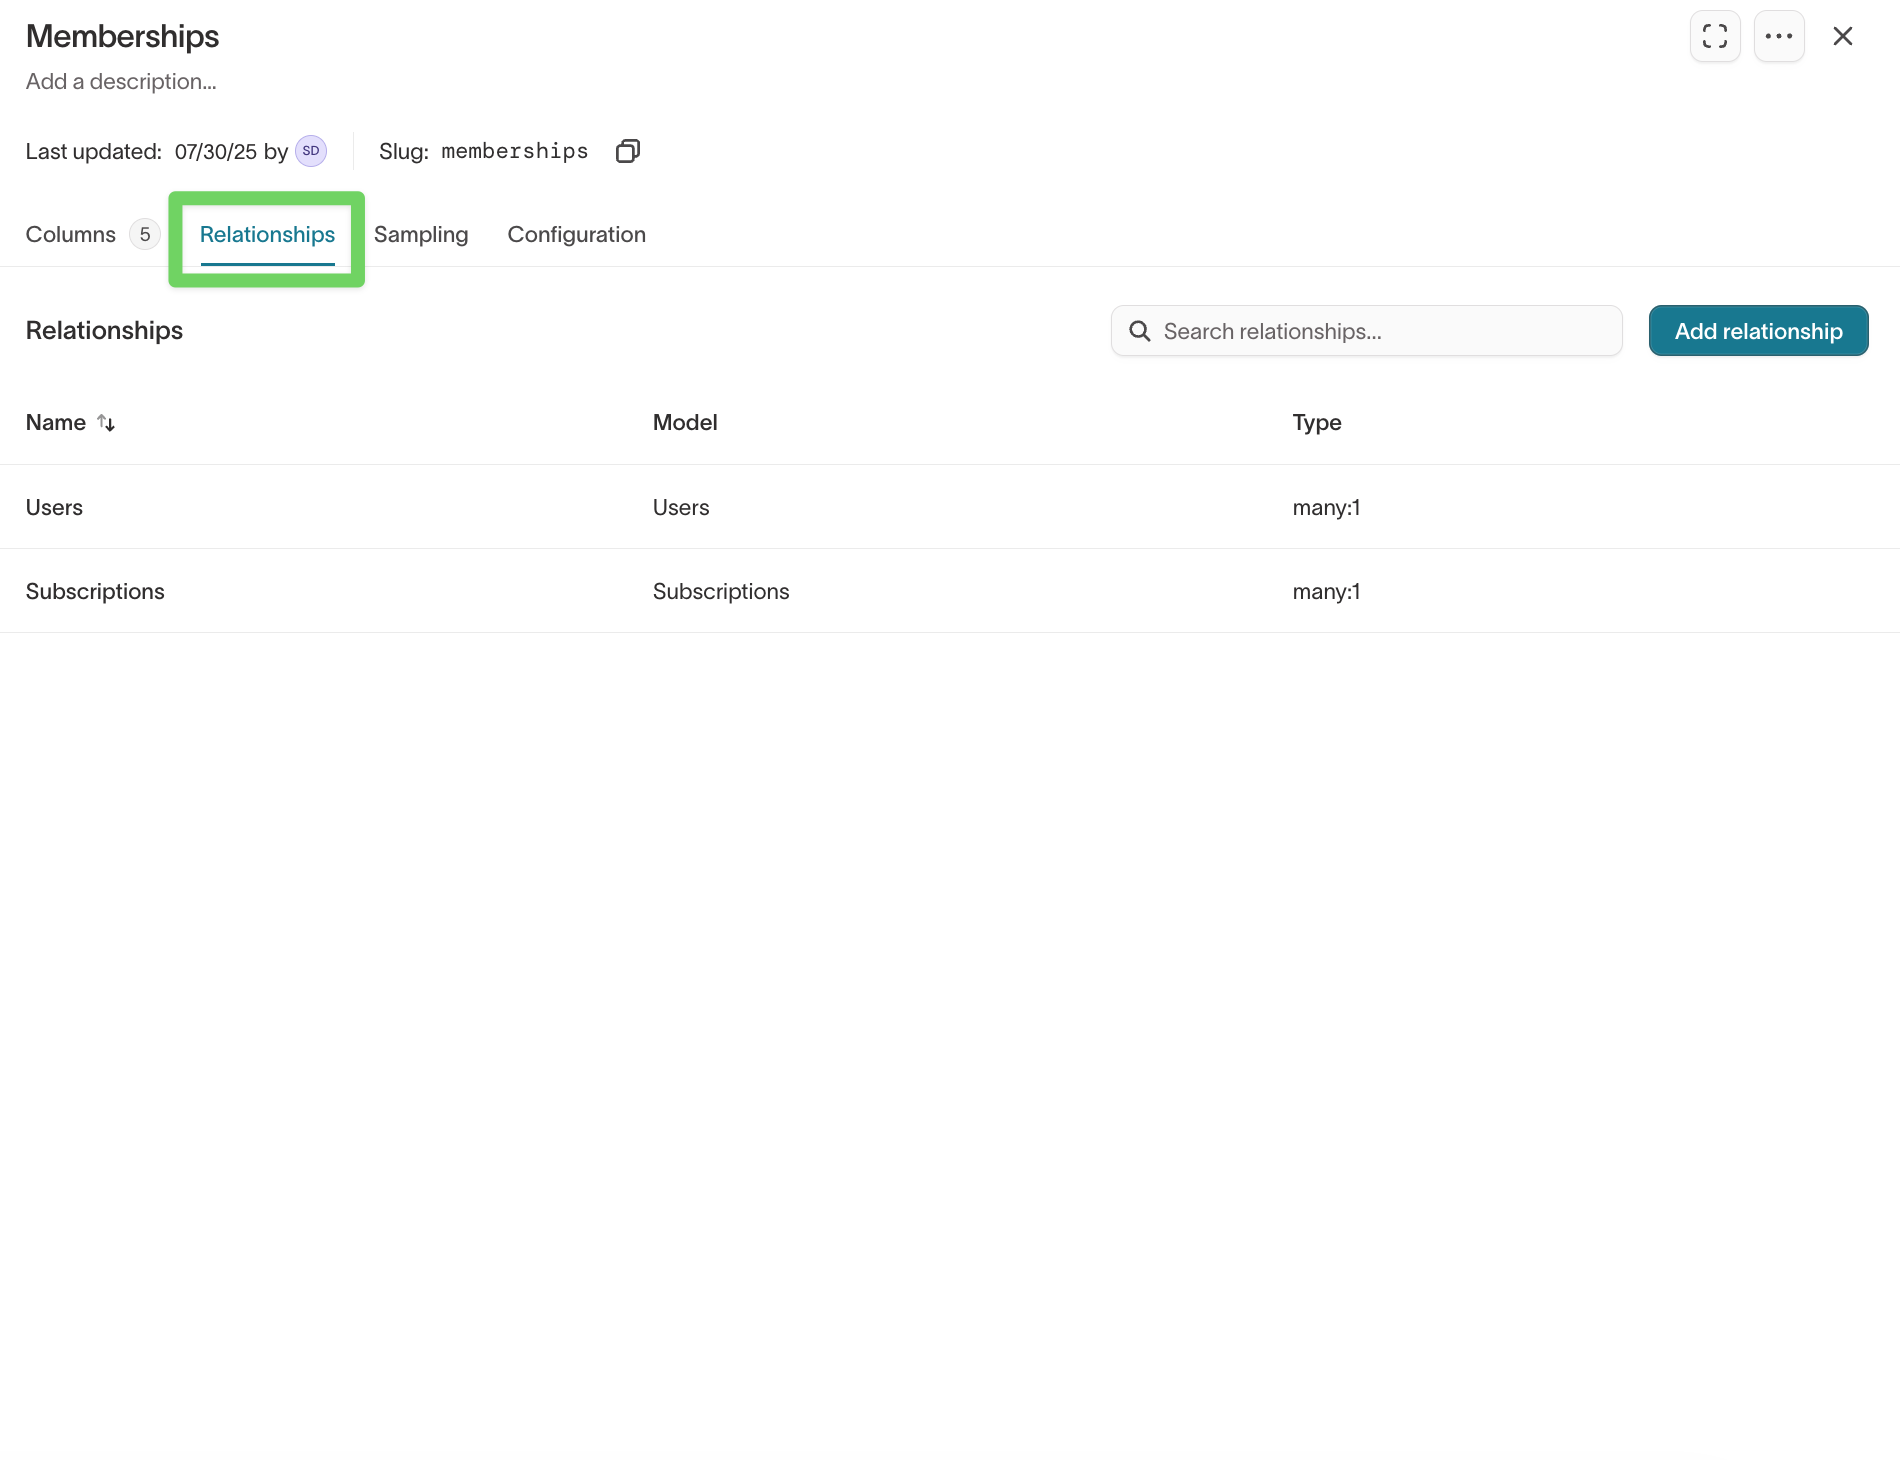
A relationship tells Hightouch how a record in one model belongs to a record in another. Define relationships in the Relationships tab. Relationships let marketers filter using fields from connected models in the audience builder.
For example:
Users
user_id = 123

Purchases
purchase_id = 456
user_id = 123
Because both models contain user_id = 123, Hightouch can evaluate purchase conditions for that user.
Relationship types
The relationship type describes how many records can exist on each side of the connection:
- One-to-many (
1:many): one parent record can connect to many related records — for example, one user has many purchases. - One-to-one (
1:1): one record on each side — for example, one account has one active subscription. - Many-to-one (
many:1): many records can connect to one shared record — for example, many users belong to one household. - Many-to-many: records on both sides can connect to multiple records, usually through an intermediate model (see Through relationships).
Most user-to-activity relationships are one-to-many. Set the relationship type to match the actual cardinality in your data. In particular, don't label a one-to-many relationship as one-to-one to make merge columns available — it can multiply parent rows and cause duplicate-primary-key failures.
Validate a relationship before saving it
Before saving, confirm that:
- the join values represent the same identifier on both sides
- the join-key data types are compatible — a mismatch (for example,
integeron one side andbiginton the other) can cause silent join failures - the relationship direction matches the actual cardinality in your data
- if you use multiple join keys, every key pair matches (a partial match returns no results)
A relationship can save successfully and still produce incorrect audience counts if the join keys don't represent the same thing. After editing or recreating a relationship, re-check any dependent traits, audiences, or journeys — recreating a relationship generates a new internal ID, and existing references keep pointing at the old one until you update them.
Add or edit a relationship
- In the Relationships tab, click Add relationship.
- Choose the relationship type (for example,
1:manyormany:1). - Select the model you want to connect to.
- Choose join keys for each model.
- Click Save.

To update an existing relationship, select it in the Relationships tab, change the join keys, connected model, or cardinality, then click Save changes. After changing a relationship, rebuild a small validation audience before you use the relationship in production audiences.
Advanced relationship options
Start with direct relationships on a single join key, and add these options only when your data requires them.
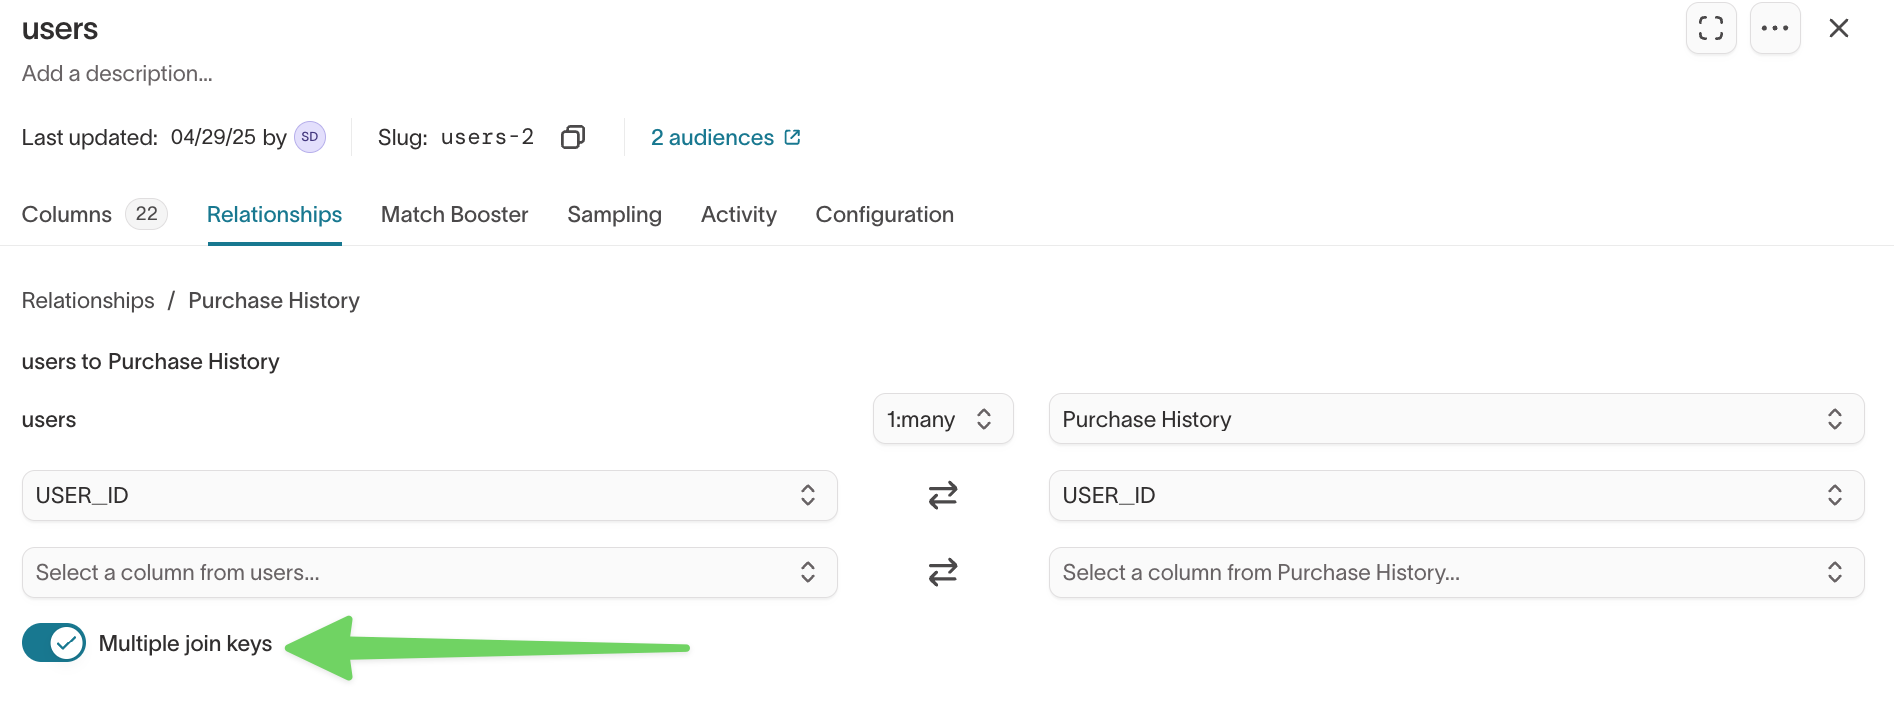
Use multiple join keys
Use multiple join keys when two records match only if more than one column is equal — for example, product_id and location_id.
- Open the model and go to the Relationships tab.
- Select the relationship you want to edit.
- Toggle Multiple join keys on.
- Select the additional join key columns.
- Click Save changes.
Merge columns across models
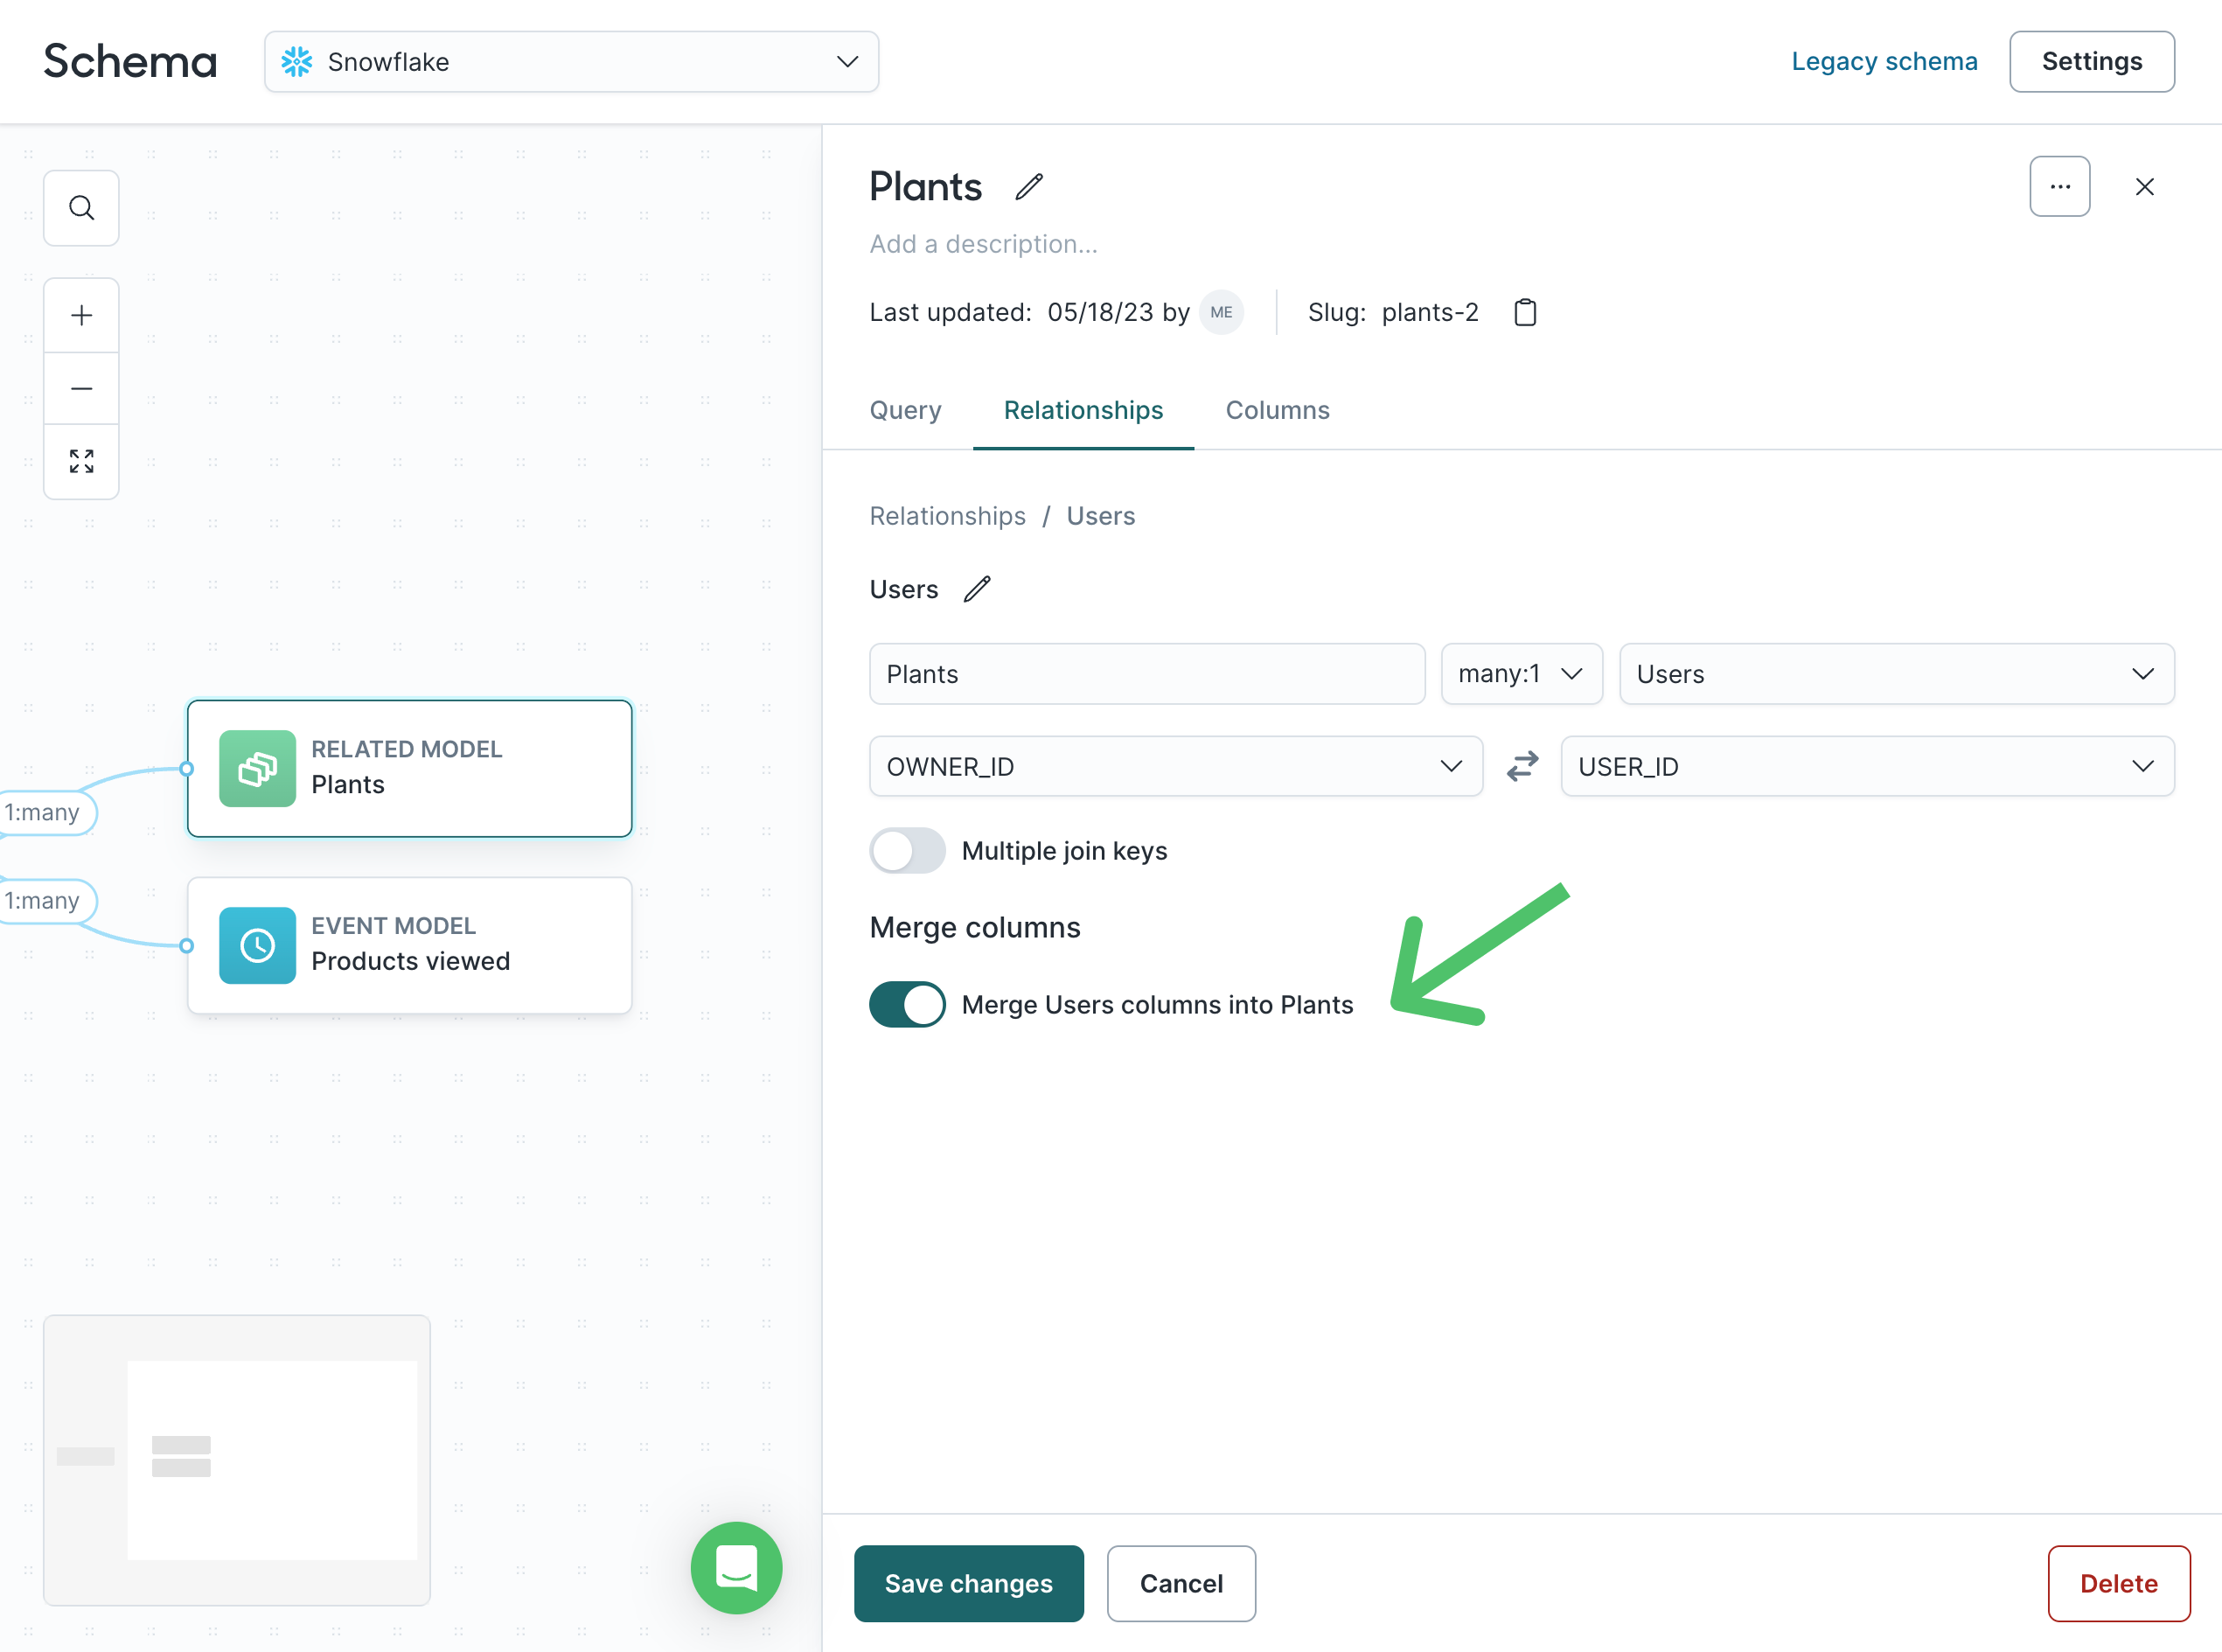
Merge columns show fields from one model in a related or event model, so marketers can filter on those fields without switching models. Merged columns appear as read-only copies in the target model and are filterable like native fields.
Whether you can merge depends on the cardinality:
- In a
1:1relationship, you can merge in either direction. - In a
many:1relationship, you can merge columns from the1side into themanyside — for example, merging Household columns into Users when many users belong to one household. - In a
1:manyrelationship, the merge toggle is not available. To merge in this direction, view the relationship from the other model, where it appears asmany:1.
To enable merge columns, open the Relationships tab, select the relationship, toggle Merge columns on, choose the columns to merge, then click Save changes.
Use merge columns for fields marketers frequently need while filtering a related or event model — for example, region or plan_tier on purchase records. Don't merge everything from adjacent models. Keep it to the fields marketers need. Merge columns are also one way to make a related-model value available for sync field mappings — see Understand filtering data and sync fields.
Through relationships
Use a direct relationship whenever two models can be joined directly. Use a through relationship only when the models can't be joined directly. Through relationships are more brittle: if any link in the chain is deleted, recreated, or has its join key changed, the entire path can break without a clear error message.
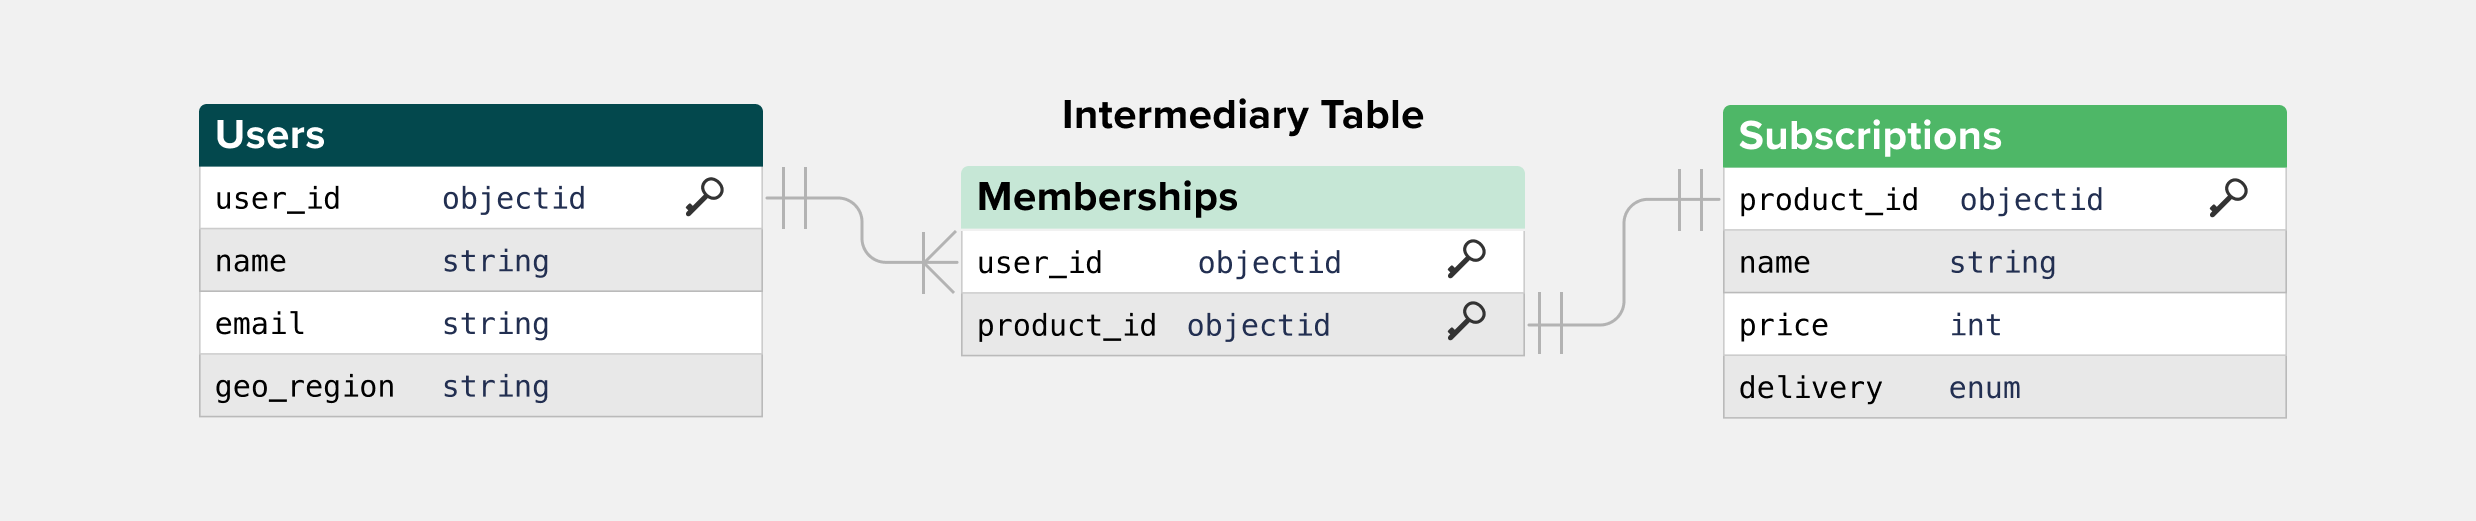
Through relationships connect two models through an intermediate model (a linking table), which is useful for many-to-many scenarios.
Example: Users → Memberships → Subscriptions
- Users join to Memberships on
user_id - Memberships join to Subscriptions on
subscription_id
This lets marketers build filters like "users with an active subscription" without duplicating logic.
To set up a through relationship:
-
Create the two direct relationships (for example, Users → Memberships as
1:many, and Memberships → Subscriptions asmany:1).
-
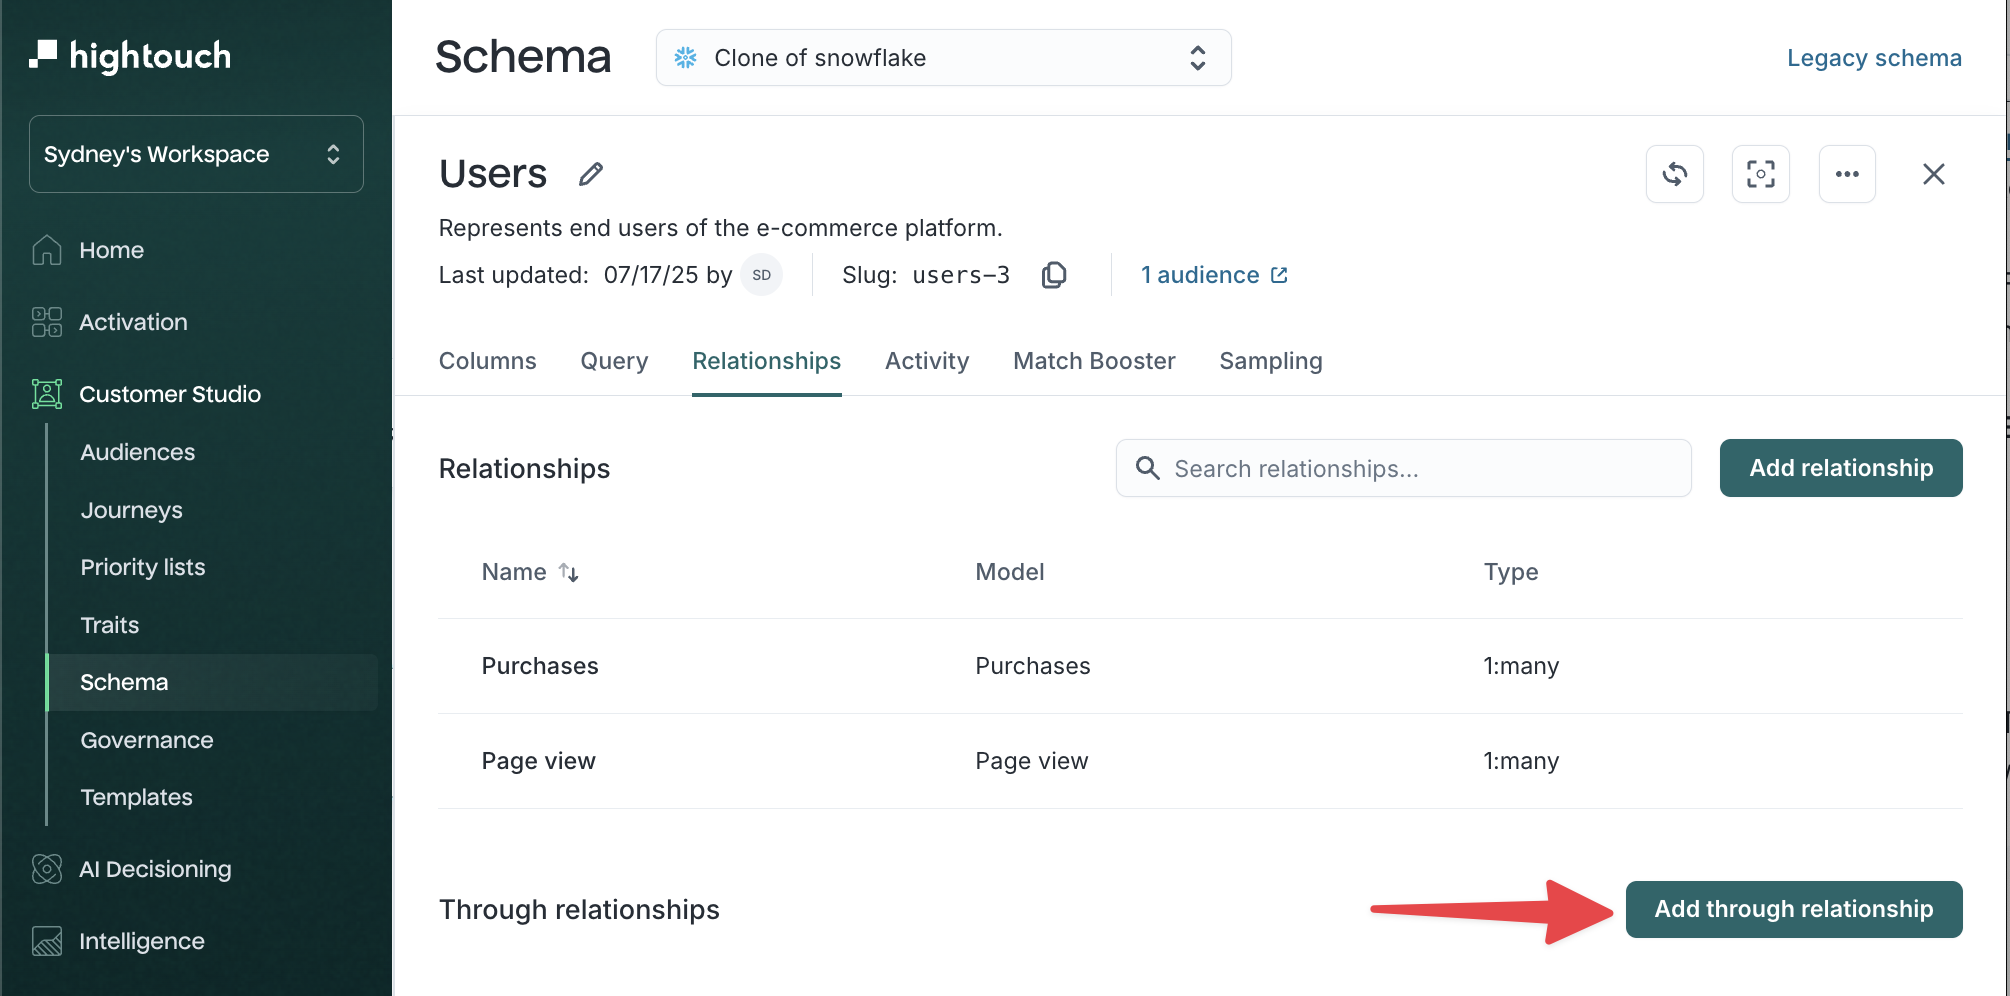
Select your parent model, then open the Relationships tab.
-
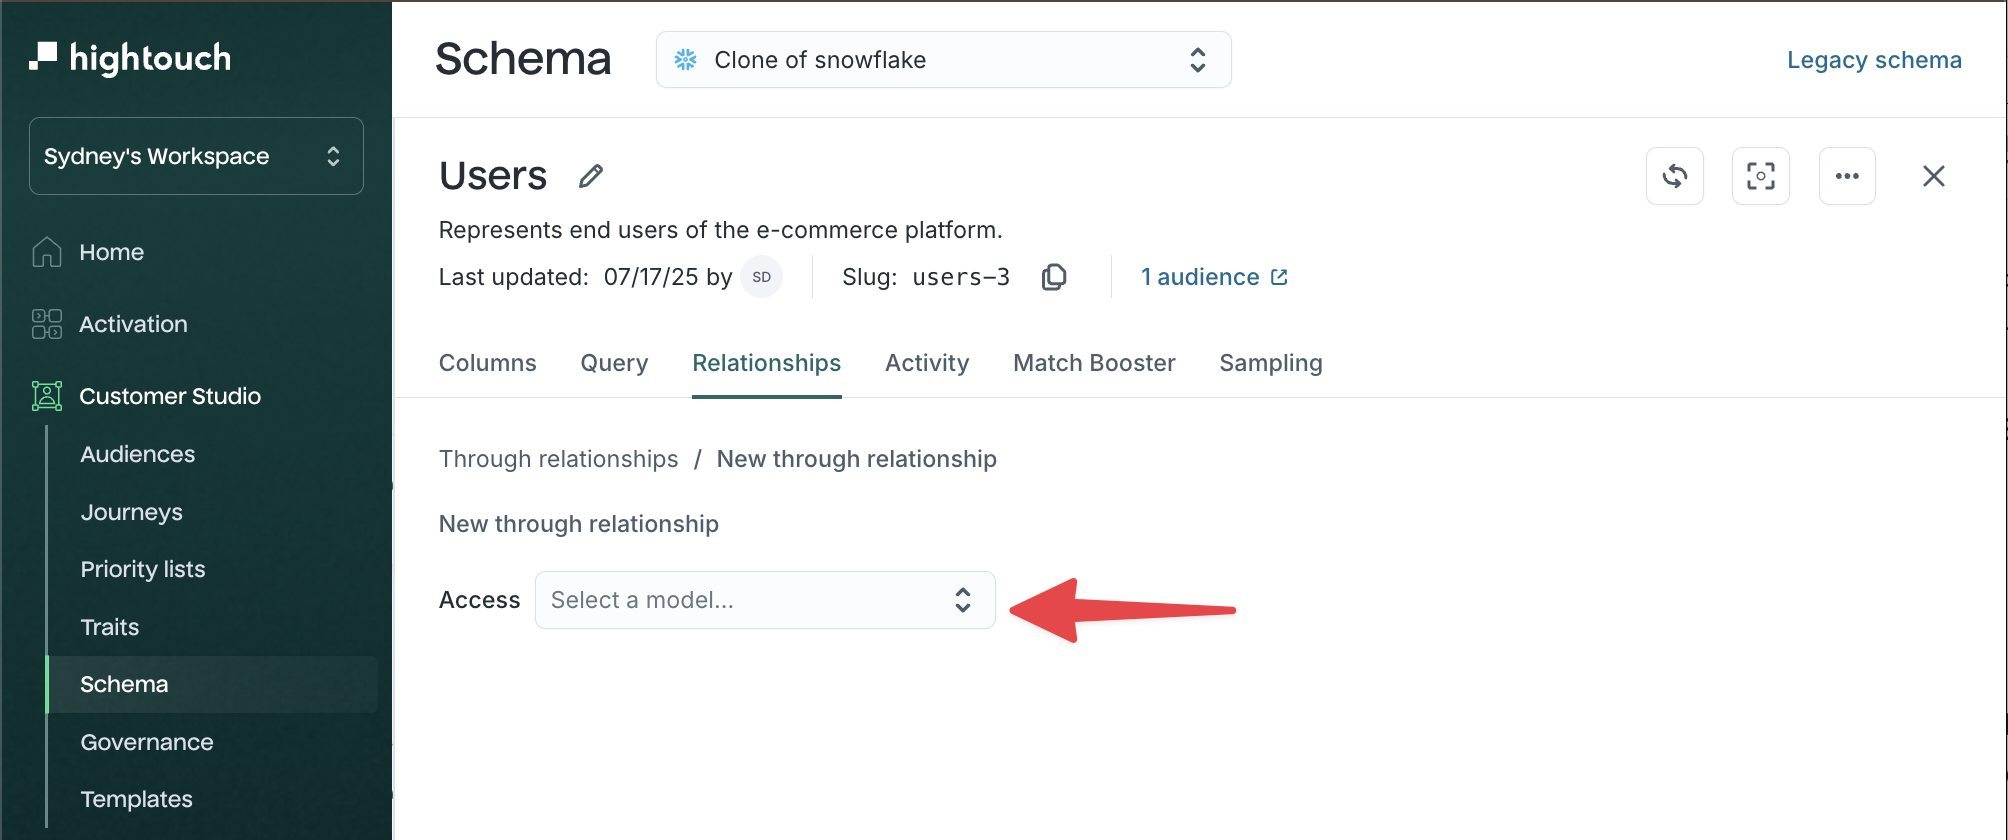
Click Add through relationship.
-
Under Access, select the model you want to reach.
-
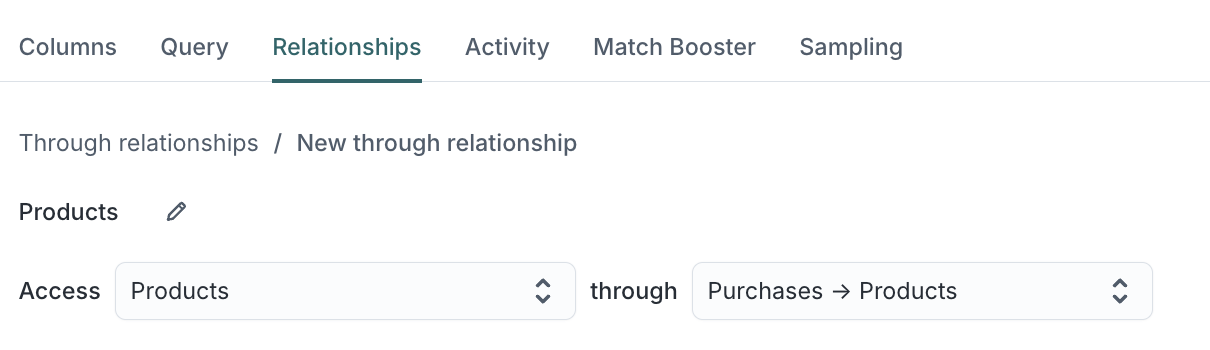
In the through dropdown, choose the indirect path that connects your parent model to the target model.
-
Click Save.
Validate your schema with real audiences
Before handing the schema to marketers, rebuild the audience examples you collected during planning. For each example, check both correctness and usability.
Check primary key uniqueness
Each row in your parent model should have a unique primary key value. Duplicate keys cause audience membership to be evaluated multiple times for the same entity, inflating counts and producing unexpected sync behavior. Run a quick query to confirm there are no duplicates:
SELECT primary_key_column, COUNT(*)
FROM your_parent_table
GROUP BY primary_key_column
HAVING COUNT(*) > 1
Confirm join key types match
Open each relationship and verify that the join key columns use the same data type on both sides. If Users.user_id is a string and Purchases.user_id is an integer, normalize them upstream. See Keep data types consistent across joins.
Test a simple audience first
Start with a filter that's easy to verify directly in the warehouse:
Users whose
regionisNY.
Then add a relationship-backed condition:
Users whose
regionisNYand who purchased in the last 90 days.
Compare counts and sample records with a warehouse query or a validated result from another environment before testing more complex logic. If counts are off, the issue is usually a grain mismatch or a misconfigured join key. See Troubleshoot schema issues.
Test how marketers will find the data
Ask someone who didn't configure the schema to find the fields and build one of the planned audiences. Check whether:
- model names match business terminology
- fields are easy to locate
- descriptions explain ambiguous values
- unnecessary technical columns are hidden
- privacy settings show only the values marketers are allowed to see
Test natural-language interpretation
If your team uses agents, ask the agent for one or two of the same audiences using business terms rather than warehouse column names — for example, "customers who churned last quarter." Confirm that it selects the expected models, fields, and relationships. If the agent selects the wrong models or fields, improve model names, aliases, descriptions, event names, and relationships before adding more schema complexity.
Add reusable calculated values with traits
If marketers need a value that isn't stored directly on the parent model, create a trait.
For example:
- lifetime spend
- days since last login
- number of purchases in the last year
- most frequent category
A trait calculates one reusable value for each parent record from related or event data. Traits can then appear in audience filters and supported sync field mappings. For guidance on deciding whether a calculation belongs in Hightouch or in your warehouse, see Traits in Plan your data model.
Manage your schema
After launch, schema work shifts from initial setup to maintenance.
Change a schema safely
Once marketers depend on a schema, keep the parent model and its primary key stable. Add new related models, events, traits, or rules as use cases grow, instead of replacing shared objects.
Before you change or remove anything in a live schema:
- Add before you replace. Add new objects instead of recreating shared ones. Recreating a relationship generates a new internal ID, and dependent traits, audiences, and journeys keep pointing at the old one until you update them.
- Check dependencies first. Use the Activity tab to see which audiences, traits, and syncs reference a model or relationship before you edit or delete it.
- See where a resource is used. Open a model's Usage tab to trace which audiences, syncs, and journeys depend on it, directly or indirectly. See Usage.
- Treat identity changes as a migration. Renaming or replacing the parent primary key invalidates joins and every dependent audience, so plan it as a phase rather than a quick edit.
- Test affected audiences. After a change, rebuild a few of the audiences that depend on it and confirm counts before you use it in production campaigns.
- Apply settings Git Sync doesn't version. Schema Git Sync version-controls models and relationships but not UI settings like privacy levels, suggestions, and display configuration, so apply those in each workspace.
Edit a model
Open the model and use its configuration tabs to update settings, labels, columns, or modeling logic. Review dependent audiences, traits, and syncs before making breaking changes.
If your team uses Git for version control, you can manage your Customer Studio schema — including parent models, related models, event models, and relationships — using Schema Git Sync. Some UI-configured settings aren't synced. See Git Sync limitations for Customer Studio schema for details.
Delete a model
Before deleting a model, review anything that depends on it in the model's Usage tab.
- Open the model you want to remove.
- Click the three-dot menu, then select Delete.
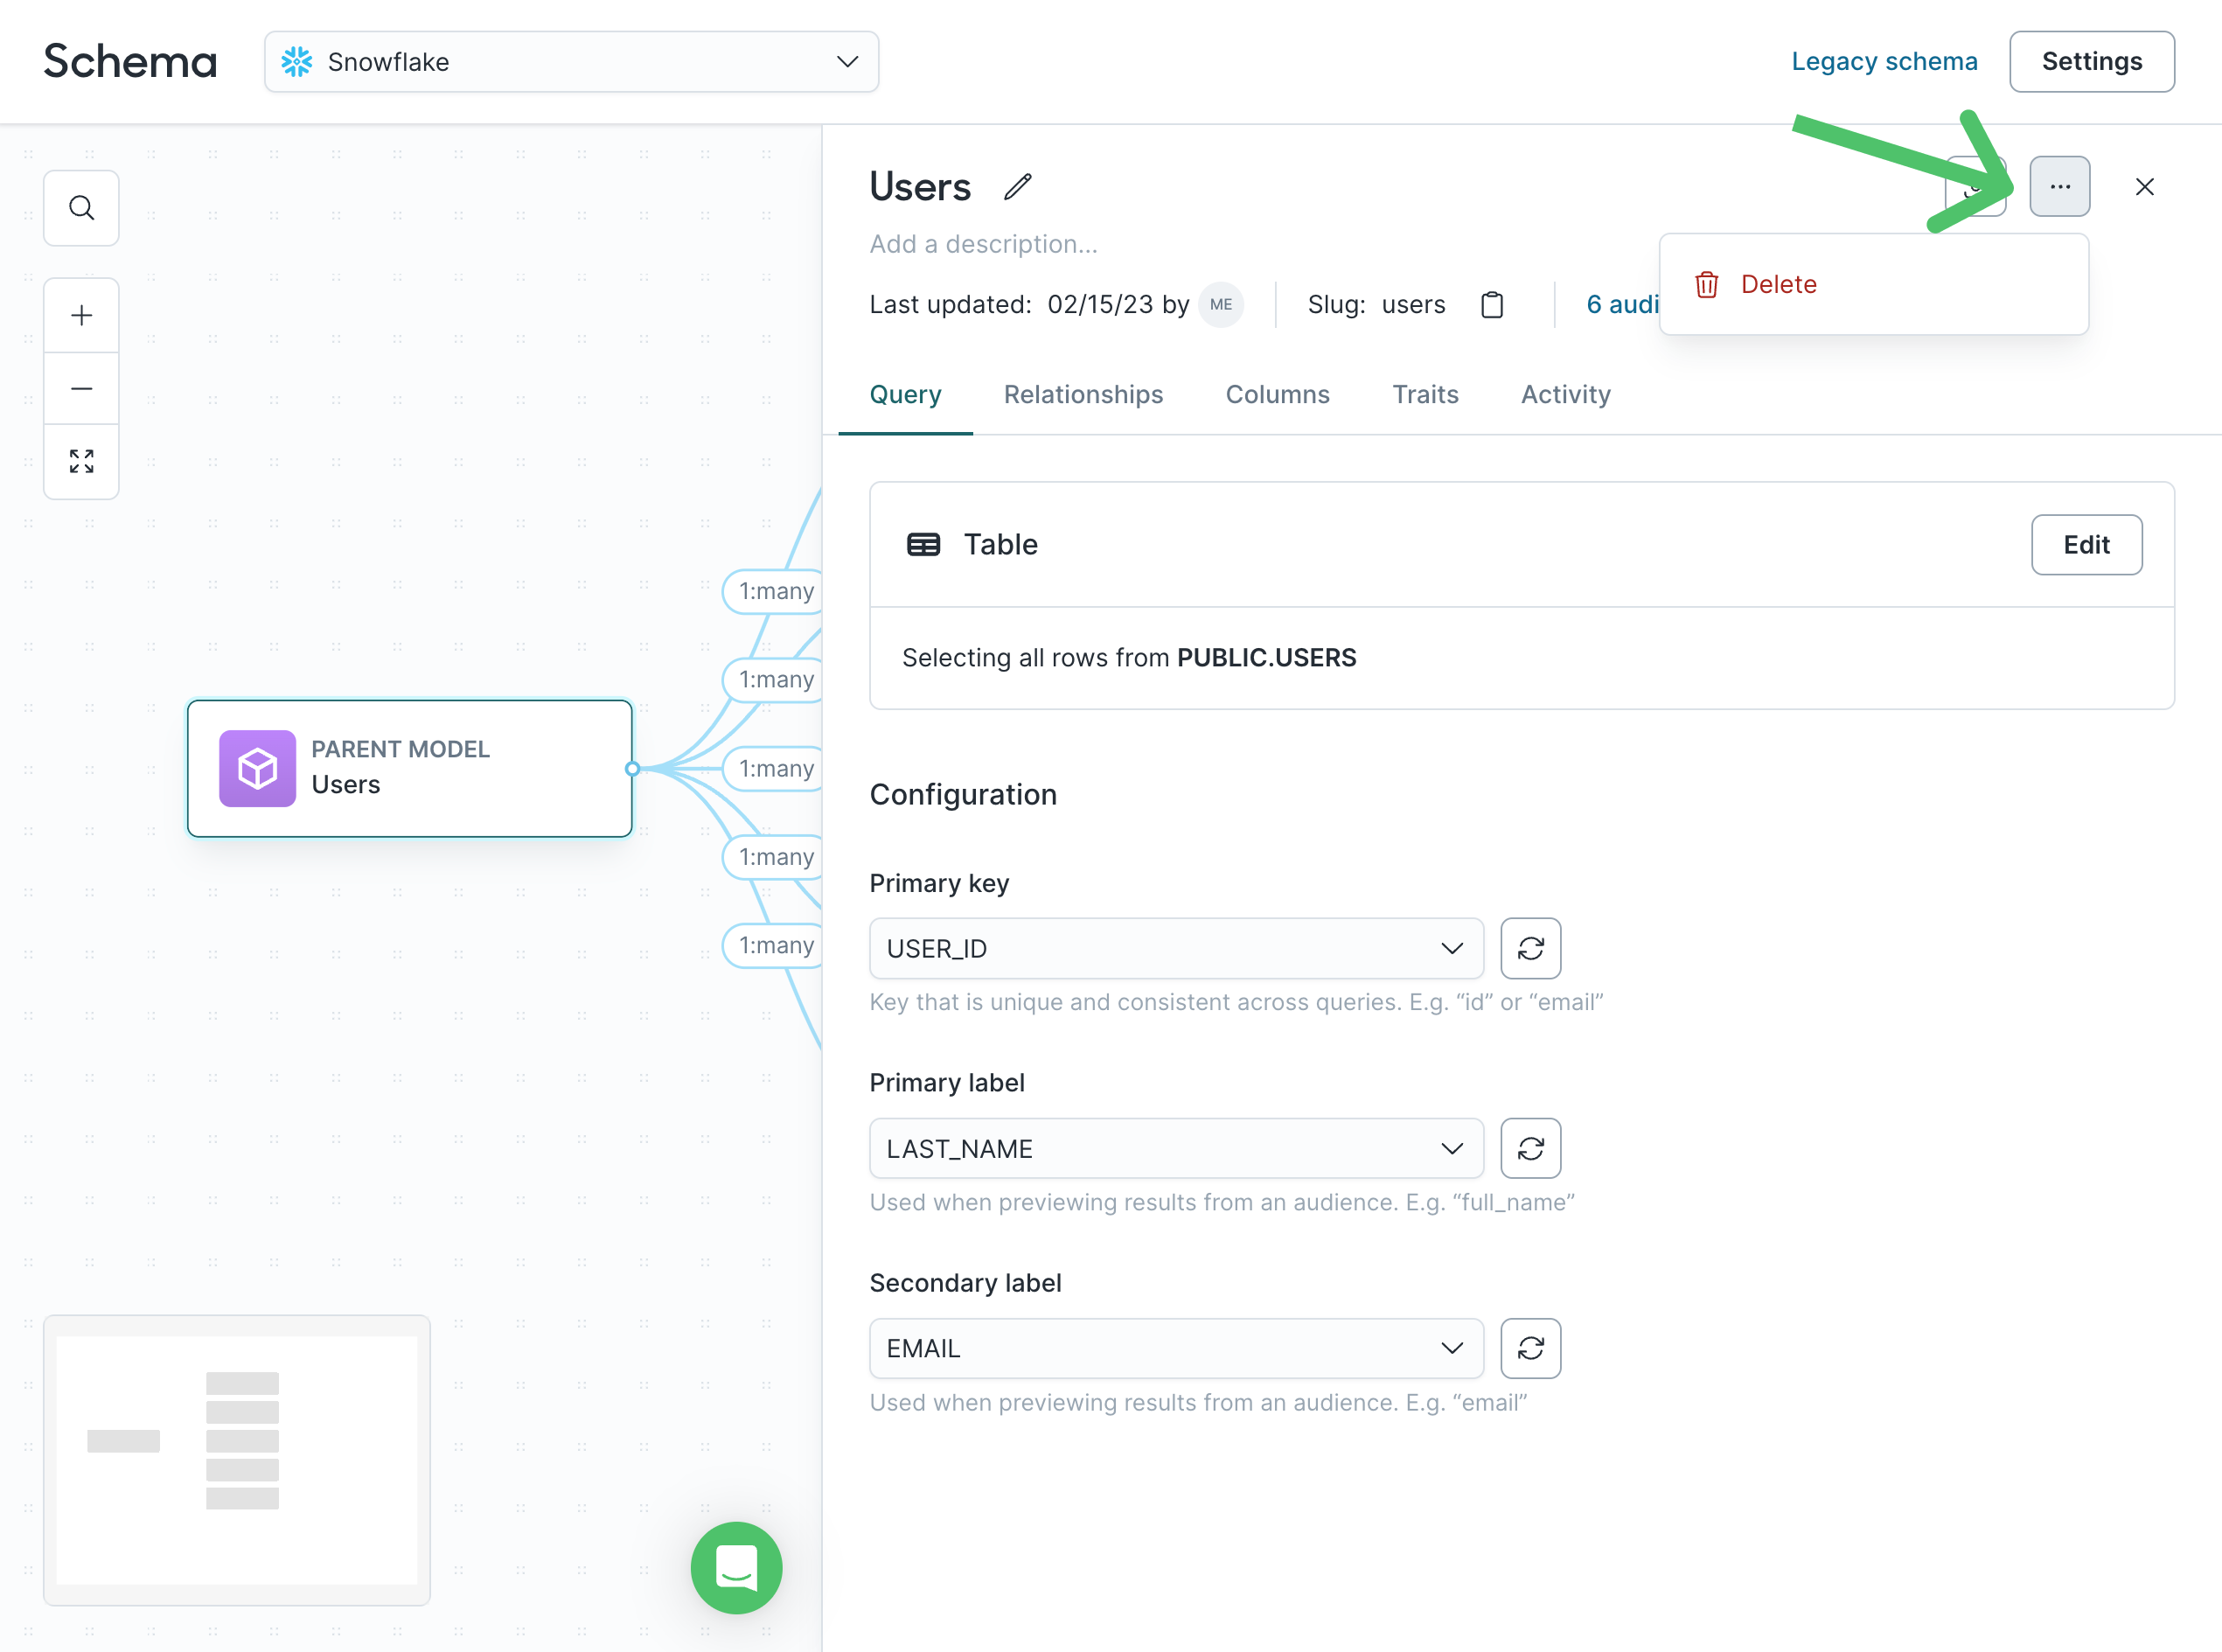
Deleting a model removes it from the audience builder. Any audiences, traits, or syncs that reference it will break and must be updated.
Label your models
Schema labels identify the business entity each model represents, so the audience builder can use business terminology. When labels are applied, filters and insights adjust automatically — for example, a People-labeled parent model with a Household-labeled related model lets marketers build audiences using both individual and household-level data.
Label models based on the business entity they represent, not the warehouse table they came from:
Peoplefor individual users, leads, or contactsHouseholdsfor shared consumer entitiesAccountsfor companies or organizations
If a model could reasonably be interpreted in multiple ways, choose the label that best matches how marketers will use it in audience building. When you label a model as Households or Accounts, you'll also select a name column (for example, last name for households, company name for accounts).
Enrich match rates with Match Booster
If your workspace uses Match Booster, you can enrich a parent model with additional identifiers from Hightouch's identity graph.
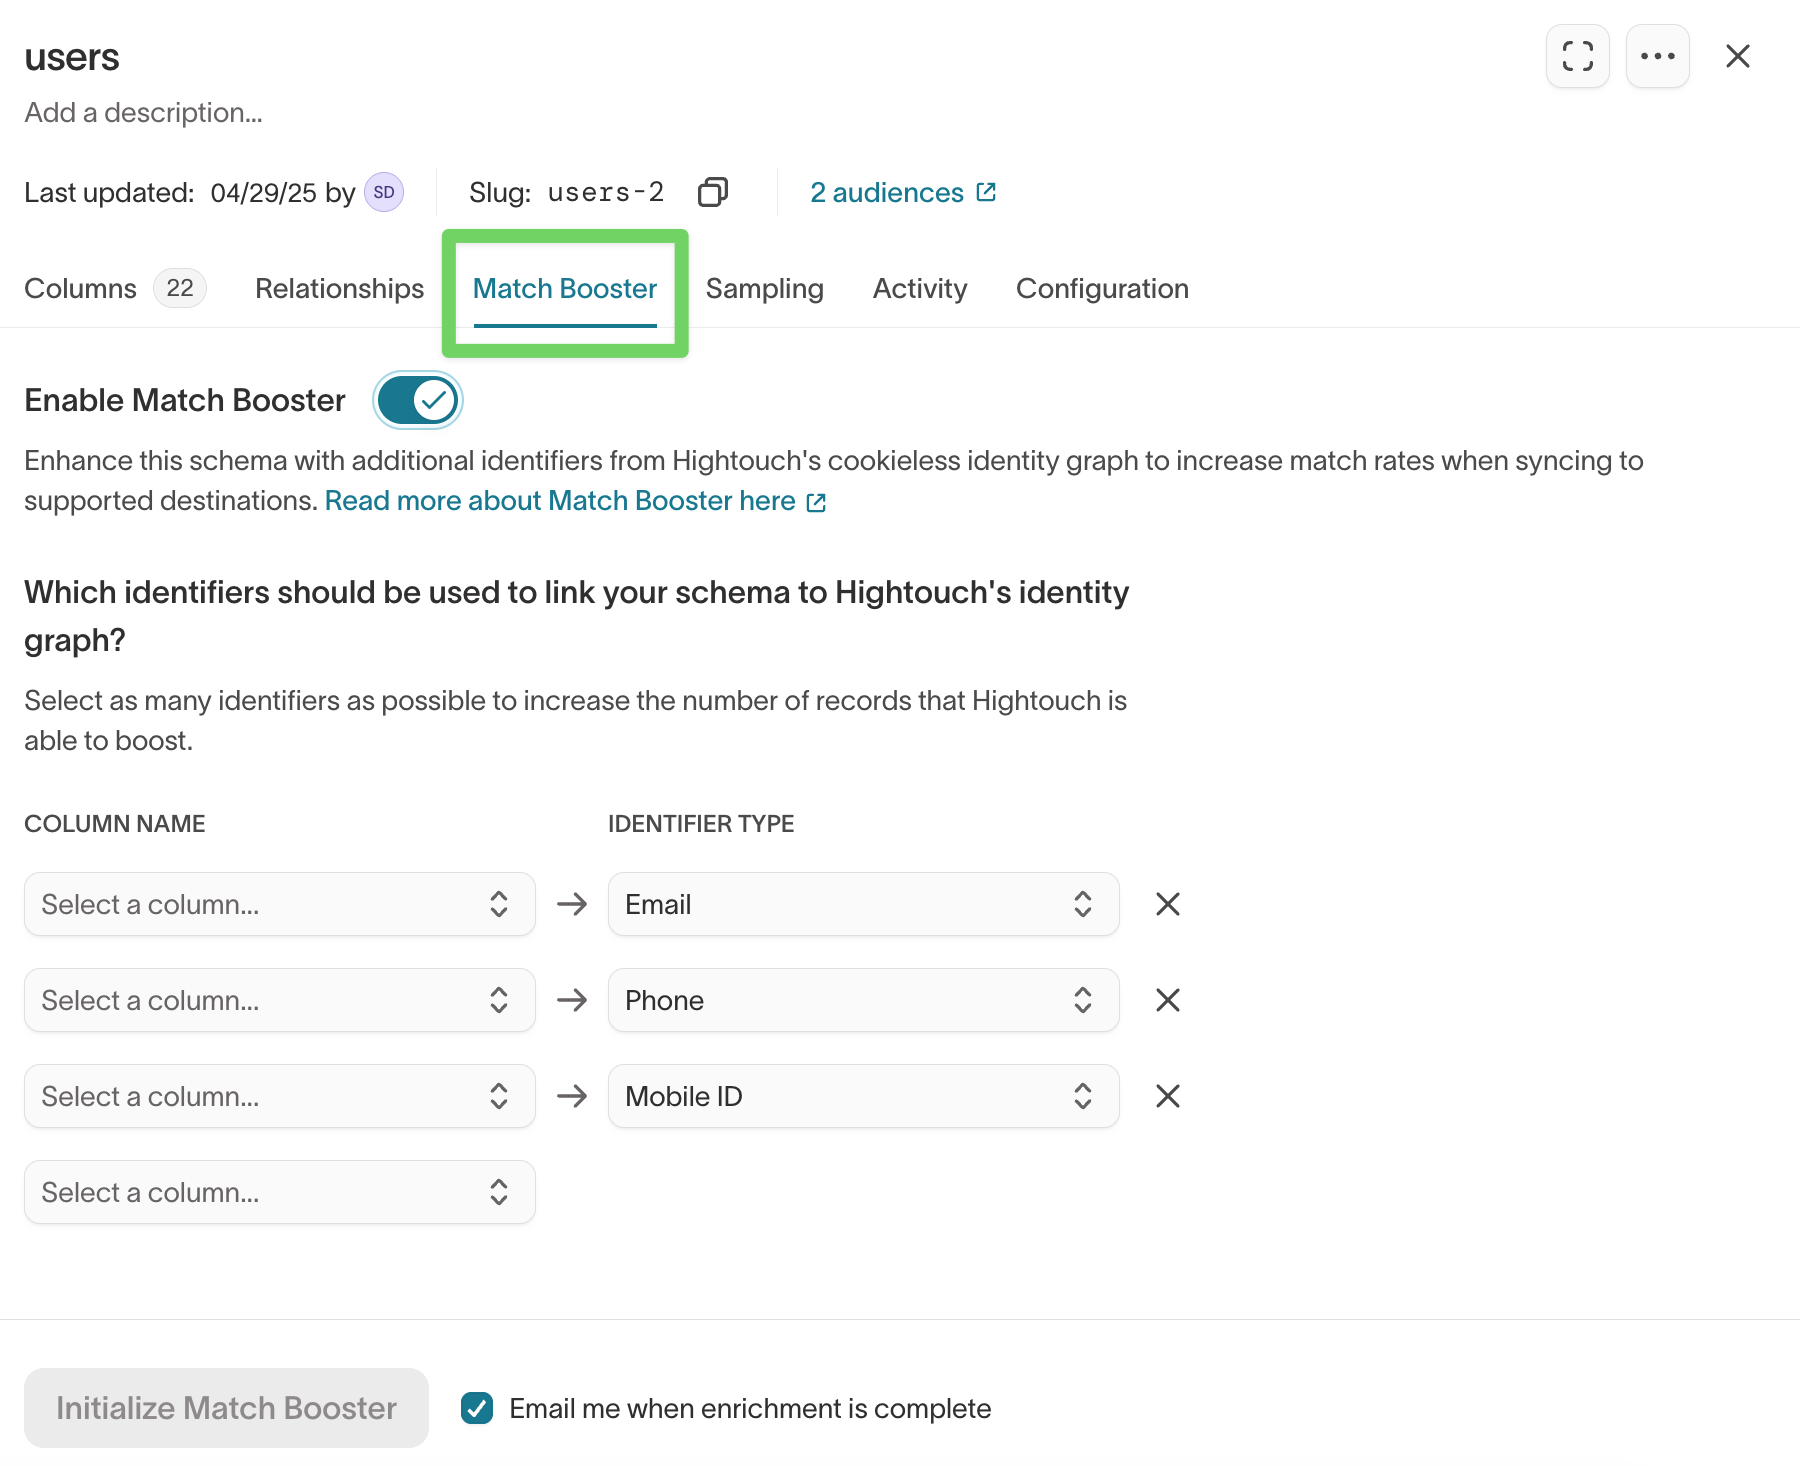
- Open the parent model.
- Go to the Match Booster tab.
- Toggle Enable Match Booster.
- Select one or more identifier columns (for example, email or phone).
- Click Initialize Match Booster.
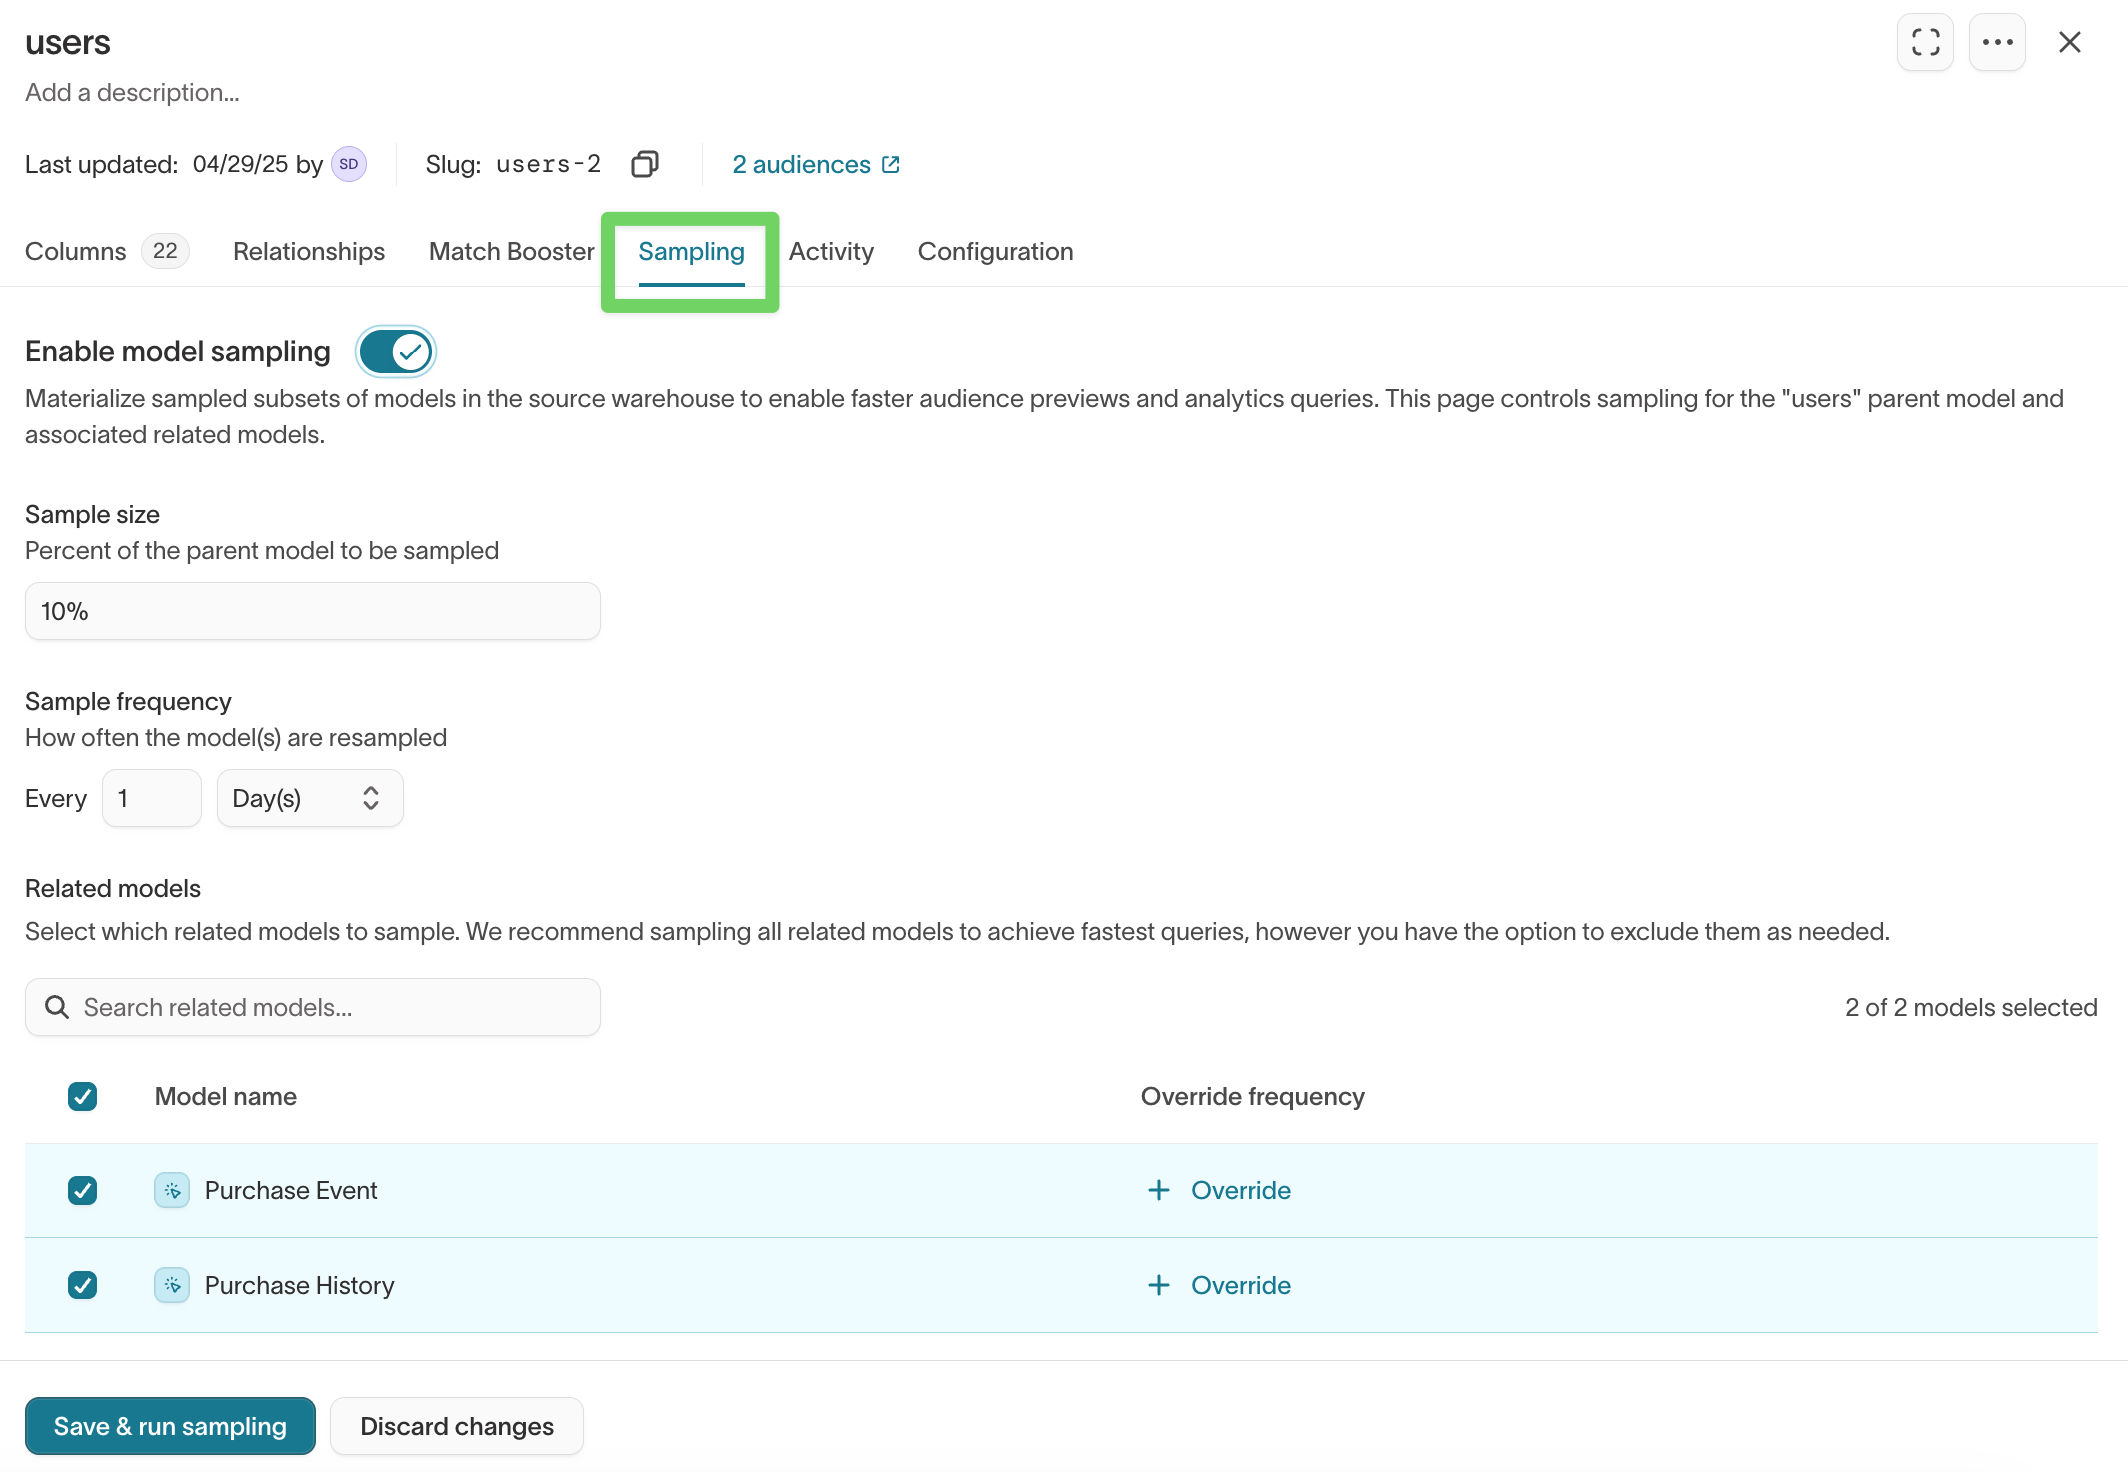
Speed up previews with sampling
For very large schemas, sampling lets marketers preview audiences and traits against a smaller subset of the data while they build.
- Open your model.
- Go to the Sampling tab.
- Turn on sampling and configure the settings.
- Click Save & run sampling.
Enable sampling only when full-data previews are too slow or consume more warehouse compute than you want for interactive work.
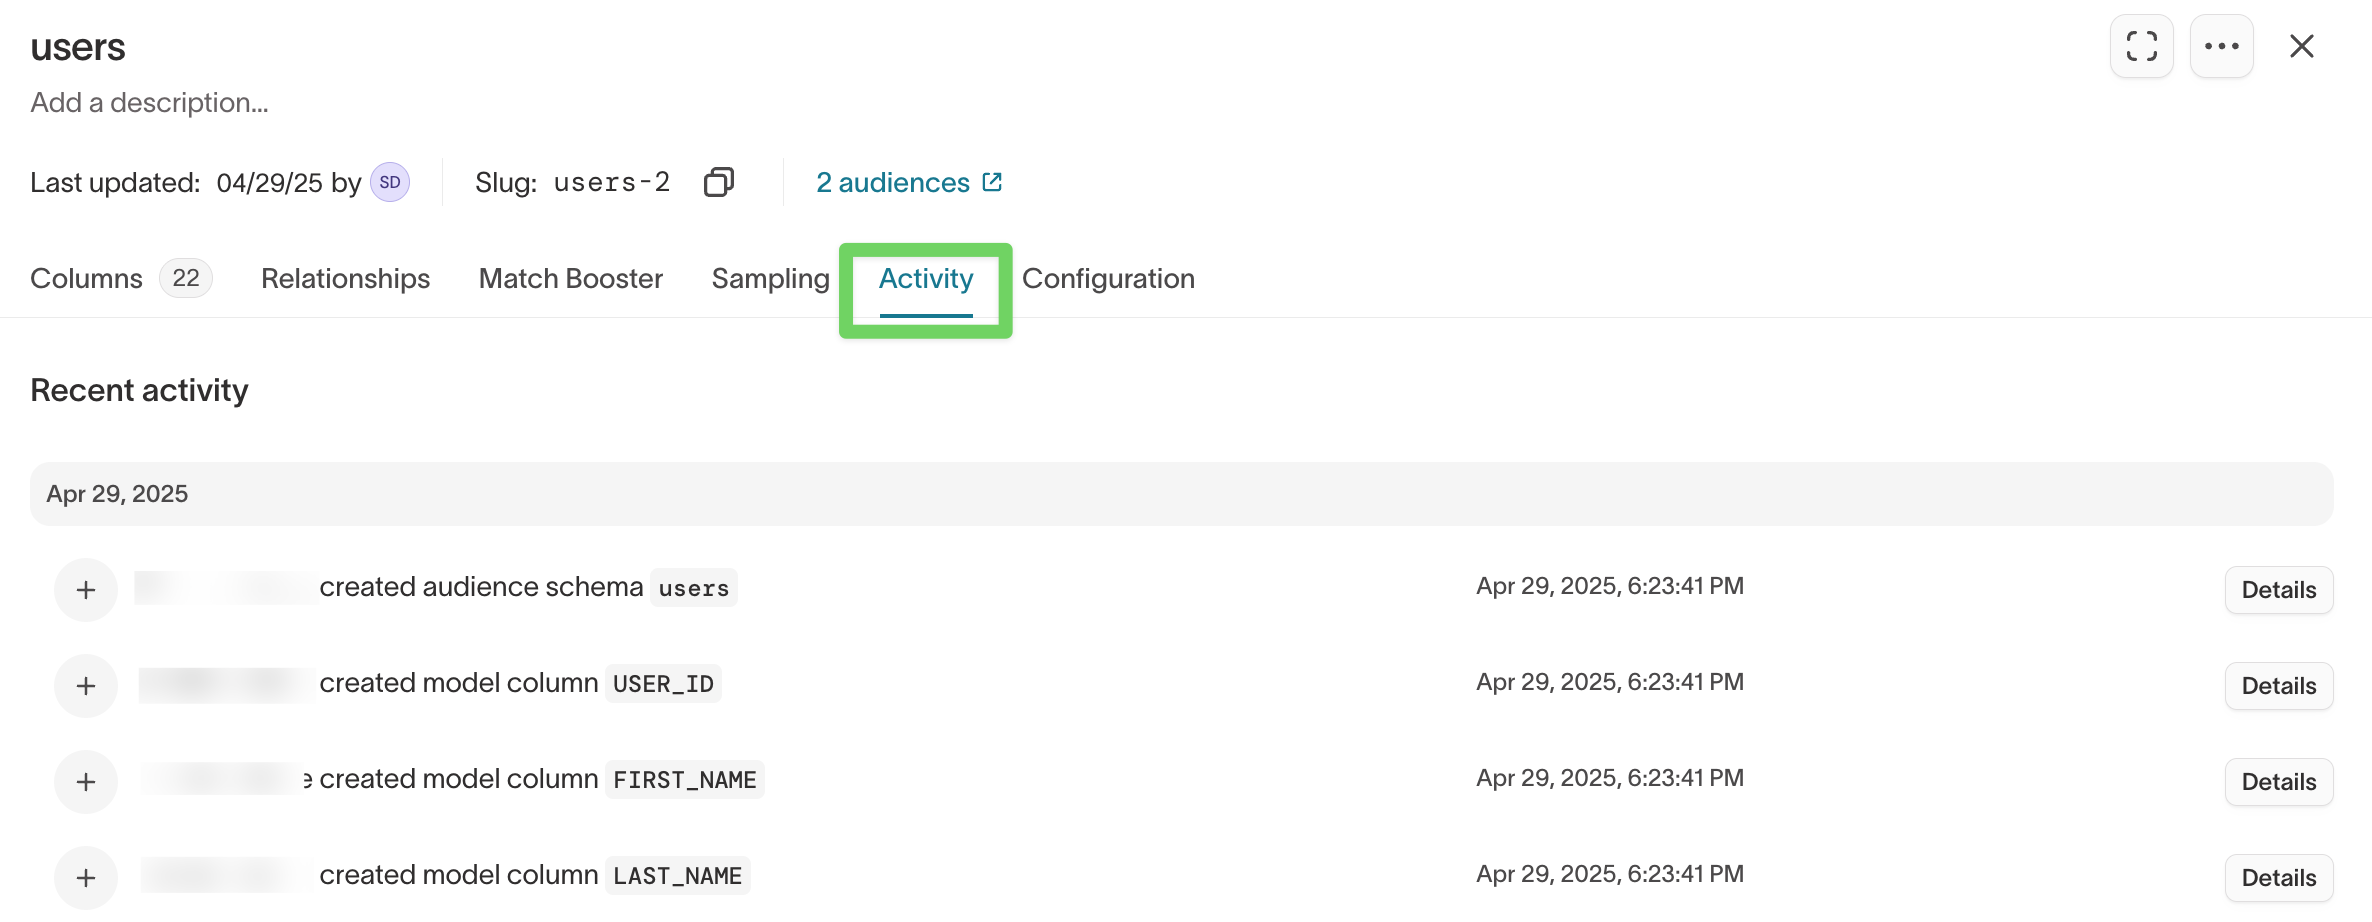
Review model activity
Use the Activity tab to review recent changes and see audiences, traits, or syncs that reference a model.
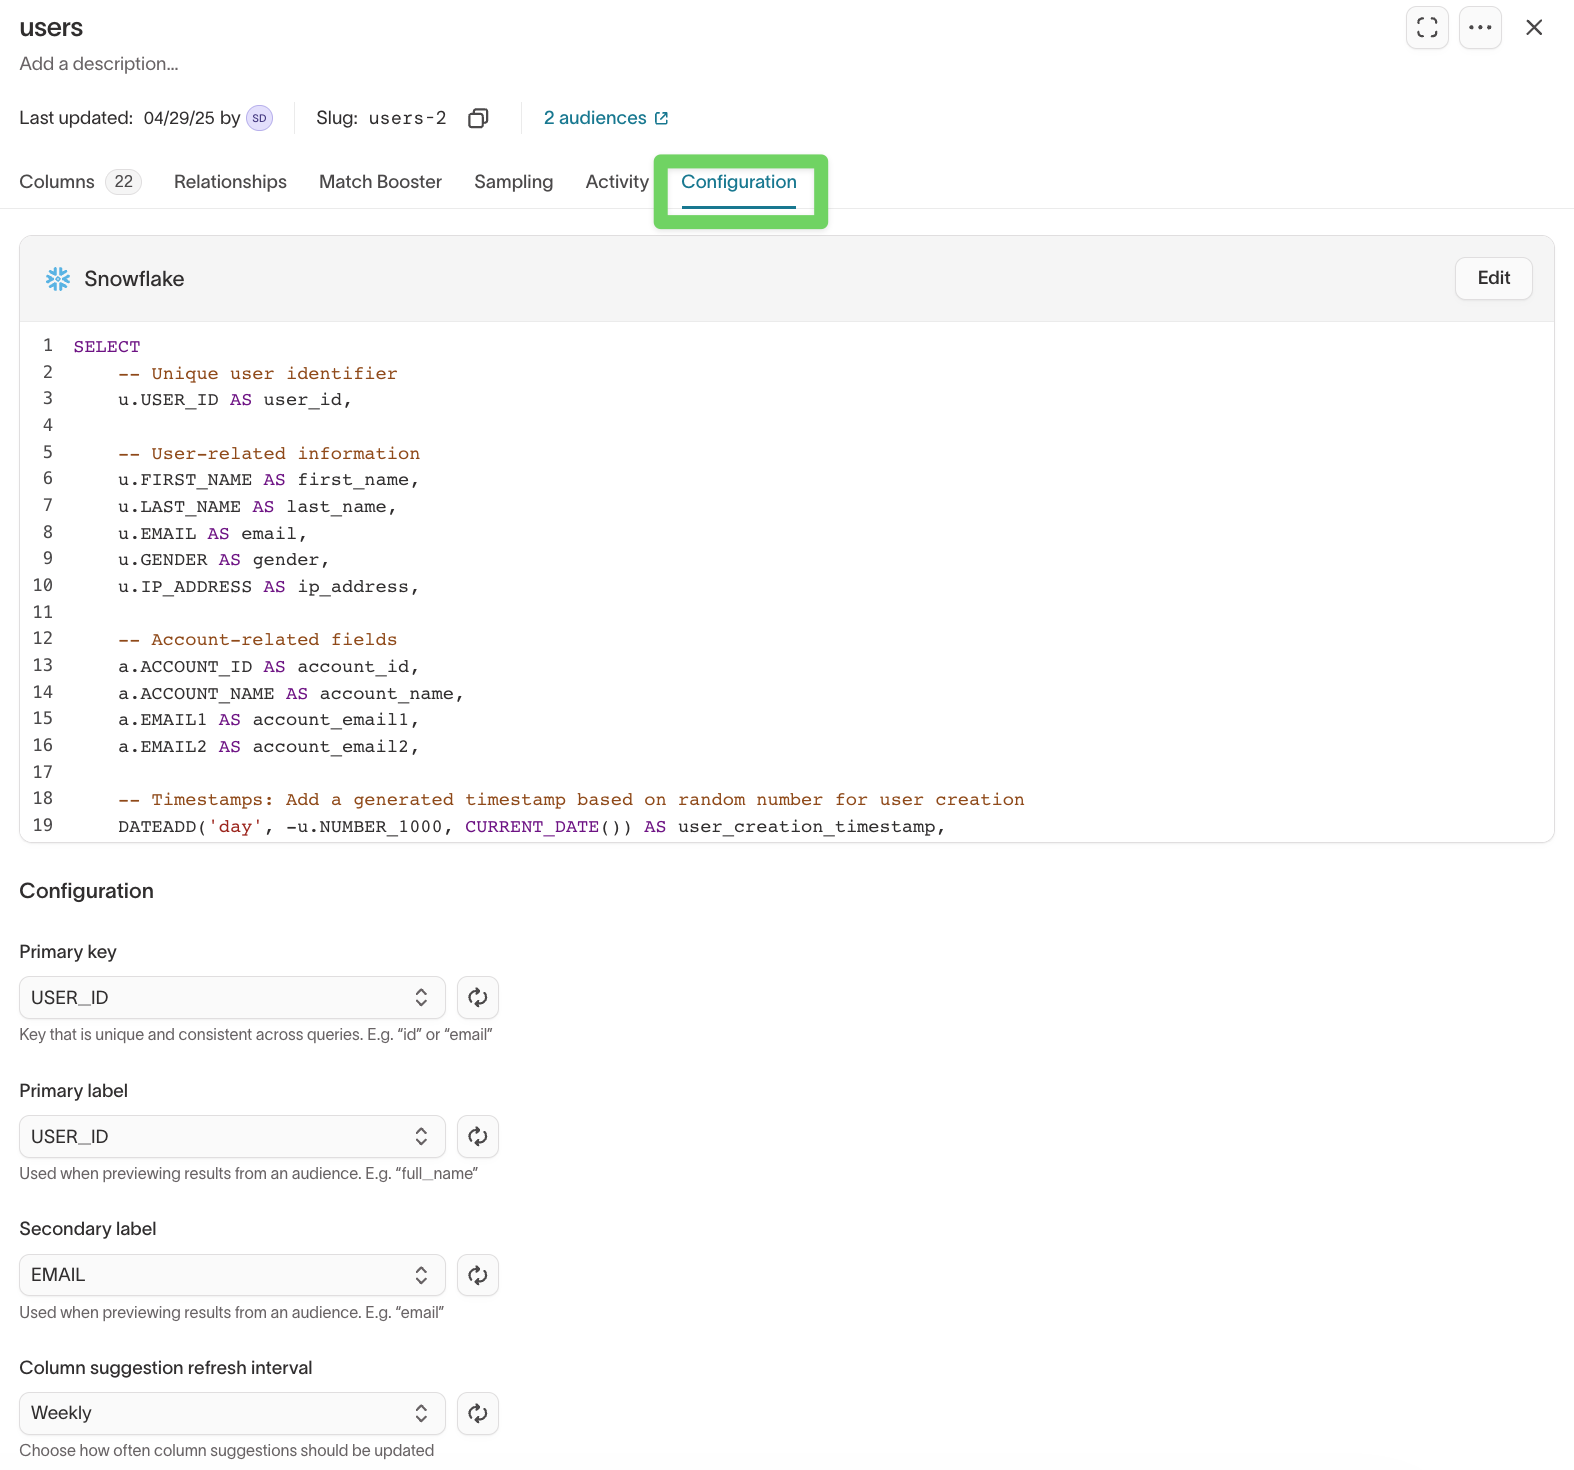
Update model settings
Use the Configuration tab to manage model settings such as primary key, preview labels, and column suggestion refresh interval.
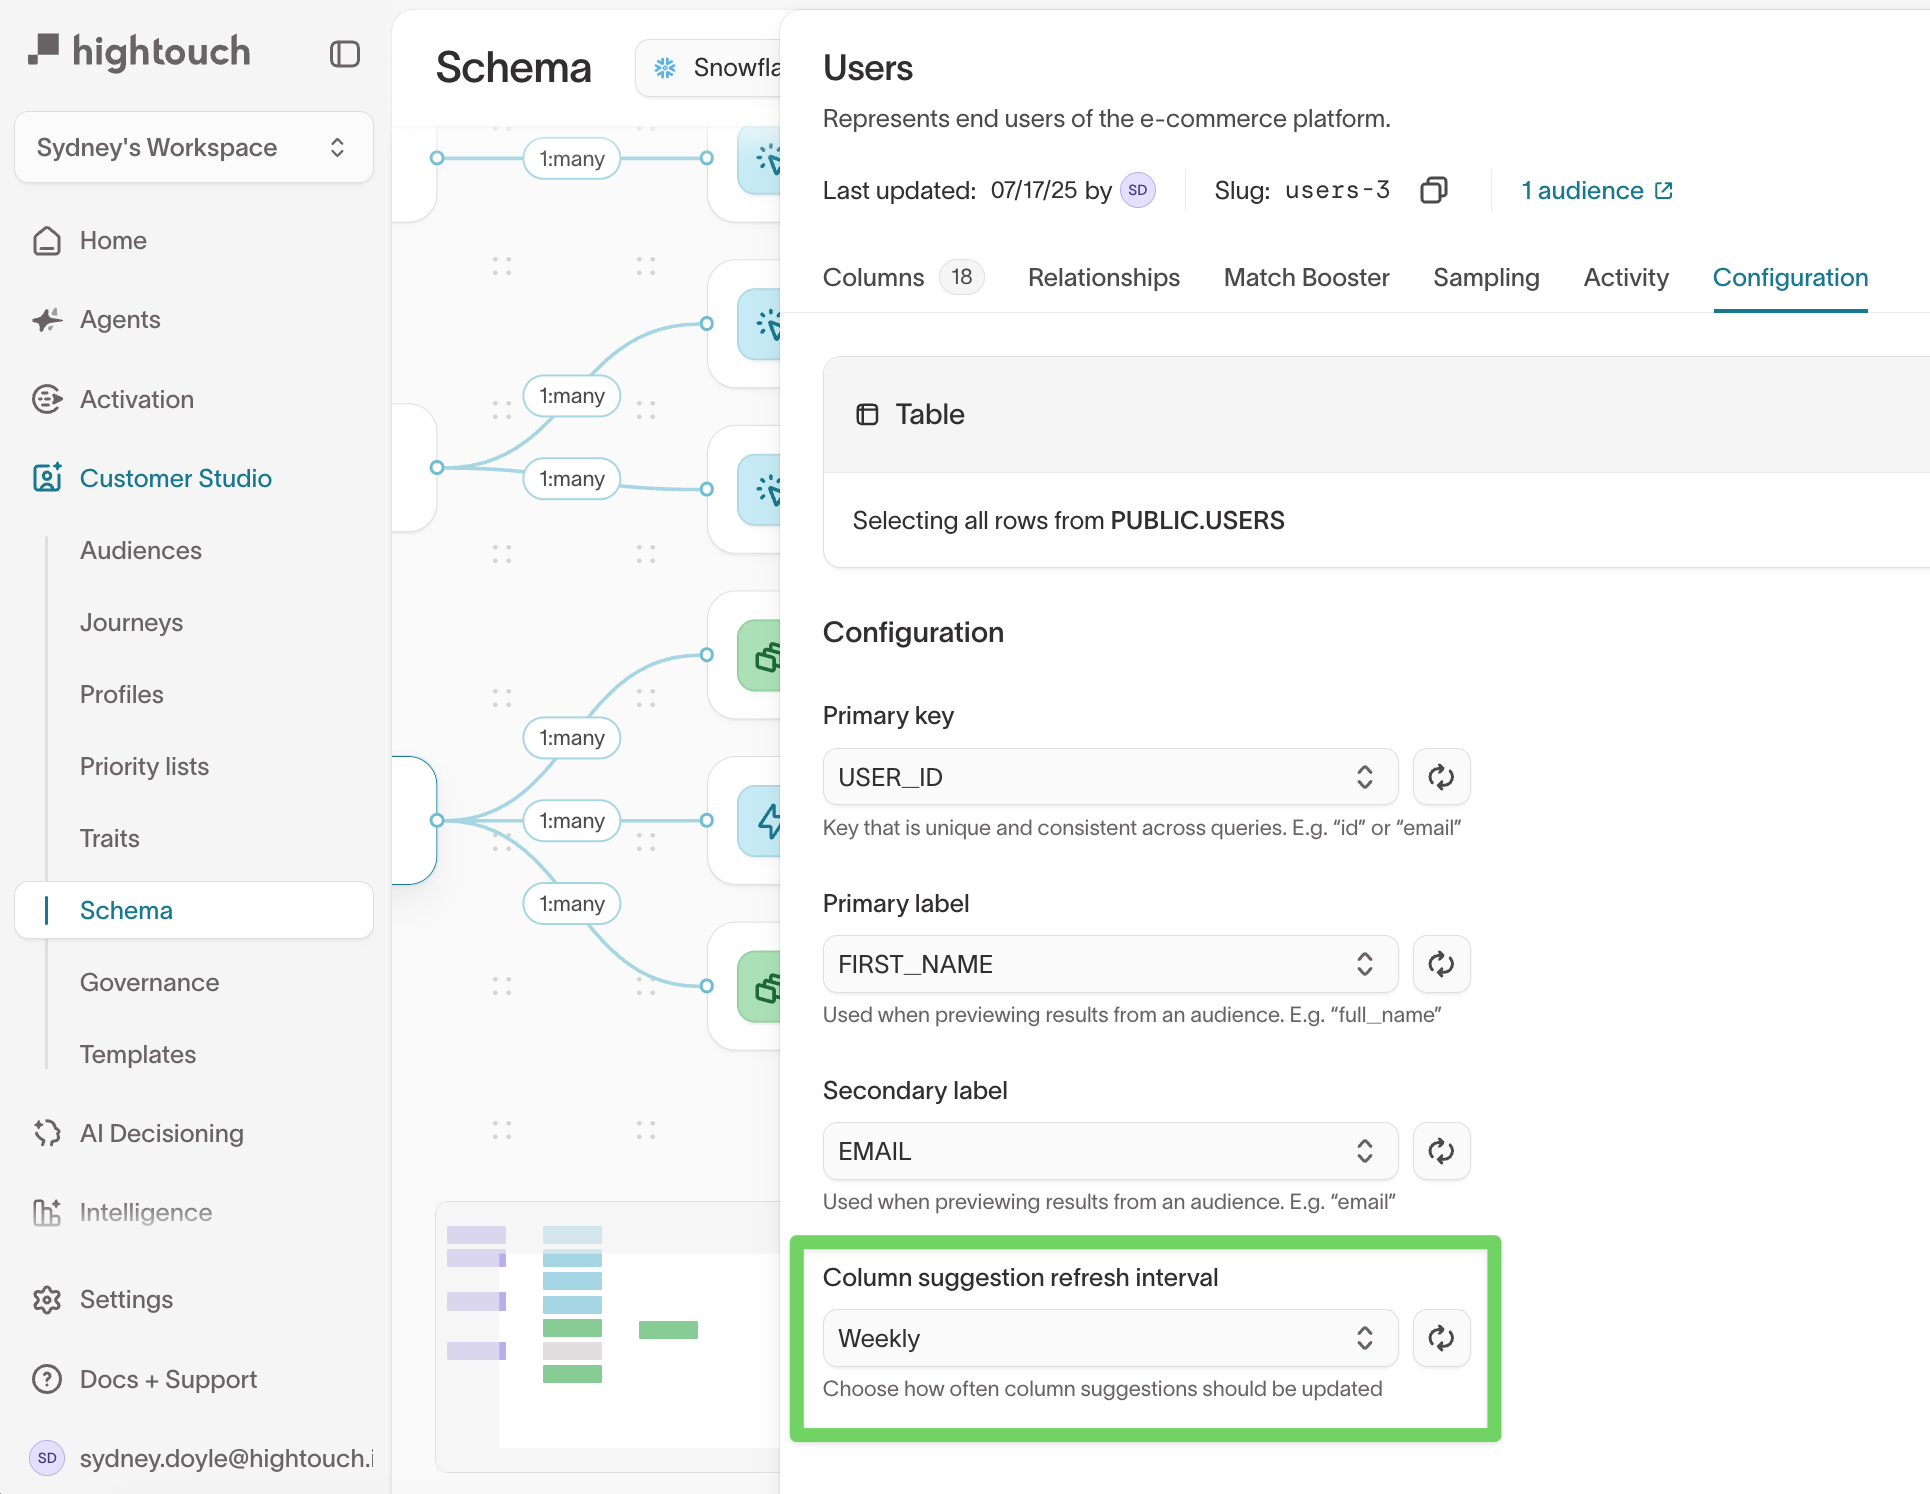
Column suggestion refresh interval
Choose how often Hightouch refreshes suggested dropdown values shown in audience filters. This setting affects suggestions only. It doesn't change your warehouse data, live audience results, or sync behavior.
Troubleshoot schema issues
Audience counts are unexpectedly high or low
Cause: The parent model grain or a relationship's cardinality doesn't match what you expect. If the parent model is at the account grain but you expected user-level targeting, every qualifying account counts as one row regardless of how many users belong to it. A one-to-many relationship mislabeled as one-to-one can also duplicate or suppress parent rows.
Resolution: Open the parent model and check what one row represents, and verify each relationship's cardinality against the data. If the grain is wrong, switch the parent model to the right table or restructure the schema. See Decide what one audience member represents.
Relationship setup fails with a type error
Cause: A mismatch between the primary key type on one model and the foreign key type on another. For example, an integer primary key on the parent and a bigint foreign key on a related model can cause join failures.
Resolution: Cast both columns to the same type upstream in your warehouse, then open the affected model and select Refresh columns available in source from the three-dot menu.
A field exists in the warehouse but doesn't appear in the audience builder
Cause: The column may not be added to the schema, may be disabled, or may be on a related or event model instead of the parent model.
Resolution: Check these in order:
- Open the model, select the three-dot menu, and choose Refresh columns available in source.
- In the Columns tab, check that the toggle for the column is on.
- If the field is on a related or event model, it's available for filtering but won't appear directly in sync field mappings unless exposed as a merge column or trait. See Decide how each kind of data should appear.
Errors containing "failed to find direct relationship by ID"
Cause: A trait, audience, or journey references a relationship ID that no longer exists. This typically happens when a relationship is deleted and recreated (which generates a new ID), or after a Git Sync update changes relationship IDs.
Resolution:
- Open the affected trait or audience.
- Remove the filter or condition that references the old relationship.
- Re-add it using the current relationship from the schema.
- If the relationship was deleted, recreate it in Customer Studio > Schema first.
Errors containing "bad relationship data"
Cause: The relationship record exists but is inconsistent or incomplete. Variants include "bad relationship data, cycle detected," "bad relationship data, no rows returned," and "bad relationship data, no path." Common causes include a partial save that was interrupted, or a relationship modified without saving all required fields.
Resolution: Delete the broken relationship and recreate it from scratch. Verify the join key columns exist on both models and use the same data type before saving.
A through-relationship chain breaks after a link changes
Cause: Through relationships depend on a chain of direct relationships. If any link in the chain is deleted, recreated, or has its join key changed, the through relationship can break without a clear error message.
Resolution: Open the parent model's Relationships tab and check whether the through relationship still shows the correct path. If it's broken, delete the through relationship and recreate it after verifying both direct relationships in the chain are intact.
Audiences or traits break after an upstream change
Cause: Renaming columns, changing join keys, or modifying relationships can break traits, audiences, or journeys that reference the old configuration. This is especially common after Git Sync updates that change relationship IDs.
Resolution:
- Go to Customer Studio > Schema and check the Activity tab on the affected model to see what changed.
- Open the broken trait or audience and update it to reference the current column or relationship.
- If the issue is a stale relationship ID, delete and recreate the relationship.
Git Sync reports schema serialization errors
If you manage Customer Studio schemas through Git, see Schema Git Sync for workspace, slug, alias, and synchronization troubleshooting.
Next steps
- Build an audience to verify the schema in the workflow marketers will use.
- Create traits for reusable calculated values.
- Sampling to speed up interactive previews for large datasets.
- Schema Git Sync if your team manages schema configuration through Git or across multiple Hightouch workspaces.
- General models to make additional warehouse tables available to agents without adding them to the audience schema.
- Destination rules and Subsets to govern which data can leave to a destination and which rows each user can work with.
- OneTrust Snowflake Native App to enforce consent policies on the schema you just built.