
Build robust marketing campaigns on Marketo using rich customer data from your data warehouse
Supported syncing
| Sync Type | Description | Supported Sync Modes | API Reference |
|---|---|---|---|
| Standard and custom objects | Sync data to custom or standard objects including leads, companies, and opportunities | Upsert, Update | Object docs |
| Custom activities | Sync data to custom activities | Insert | Activities docs |
| Static lists | Update membership in static lists | Add, Update | Static lists docs |
| Campaign triggers | Trigger campaigns using source data | Insert | Campaign docs |
For more information about sync modes, refer to the sync modes docs.
Marketo setup
Giving Hightouch access to Marketo's API requires you to create a Custom Service and API Only User for that service in Marketo. Even if you already have a Marketo API User, it's best to create one that's solely for the Hightouch service you'll create. Having a dedicated user for the Hightouch integration lets you more easily track changes from Hightouch syncs.
Create Marketo service
Before you can create a Custom Service, you need to create a Marketo role with API Access and a user with that role. None of the default Marketo Roles have API access, so if this is your first API integration in Marketo, you first need to create an API access role.
Create Marketo API access role
- In Marketo, go to Admin > Users & Roles > Roles and click New Role.
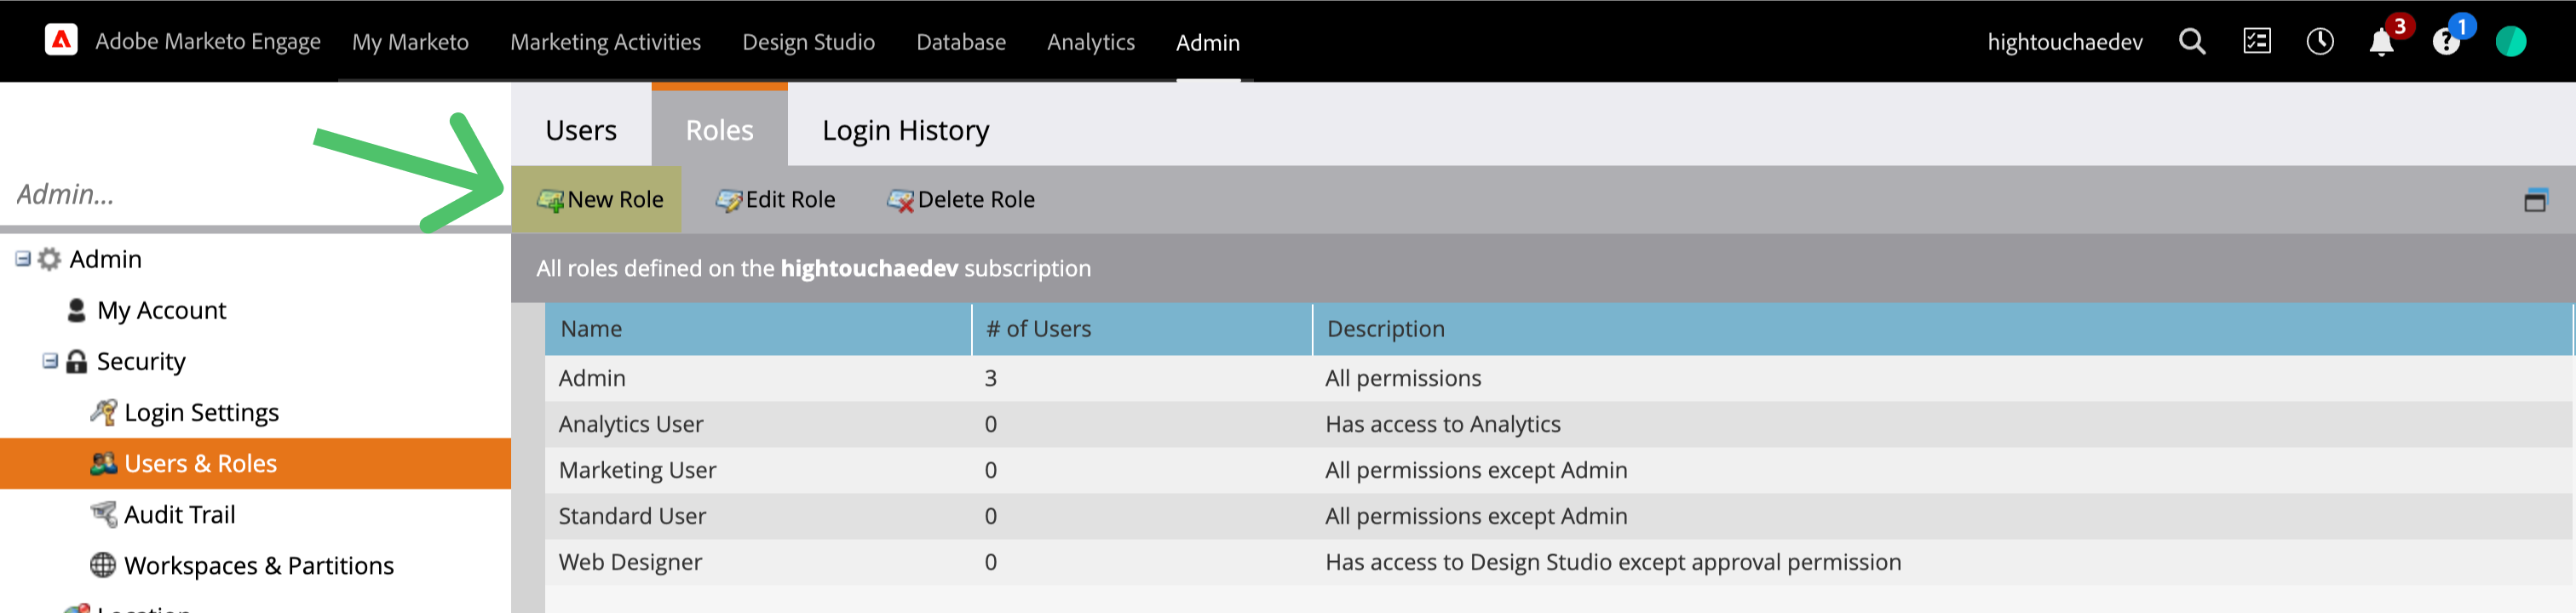
- Enter a Role Name (for example, "Hightouch Integration Role") and Description. Then assign all permissions listed in this table to the role:
| Sync Type | Necessary permissions |
|---|---|
| Standard and custom objects | Read-Write Company (for company objects), Read-Write Opportunity (for opportunities), Read-Write Person (for leads), and Read-Write Custom Object and Read-Write Custom Object Type (for any custom objects) |
| Custom activities | Read-Write Activity, Read-Write Activity Metadata |
| Static lists | Access Marketing Activities > List Import |
| Campaign triggers | Read-Write Assets, Activate Campaign |
- Click Create.
If you try setting up a Marketo destination with an API access role that wasn't assigned all permissions in the table above, the destination setup fails with a 603 - Access denied error.
Create Marketo API user
After creating a role, you need to create an API-Only user. API-Only users are a special type of user in Marketo, as they are administrated by other users and cannot be used to log in to Marketo.
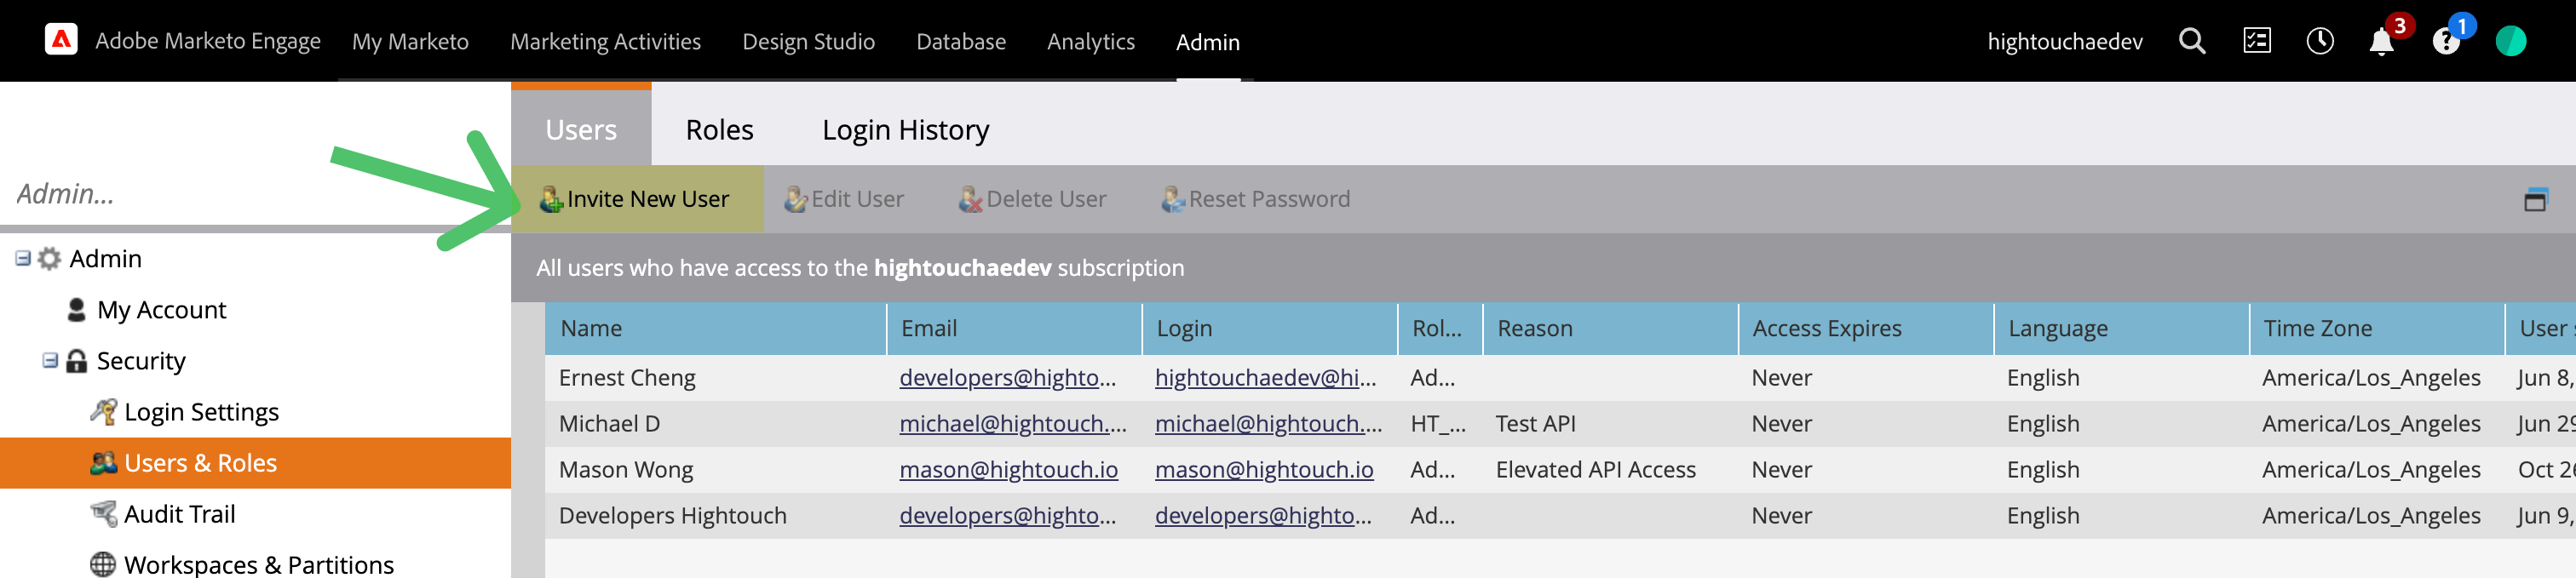
- In Marketo, go to Admin > Users & Roles > Users and click Invite New User.
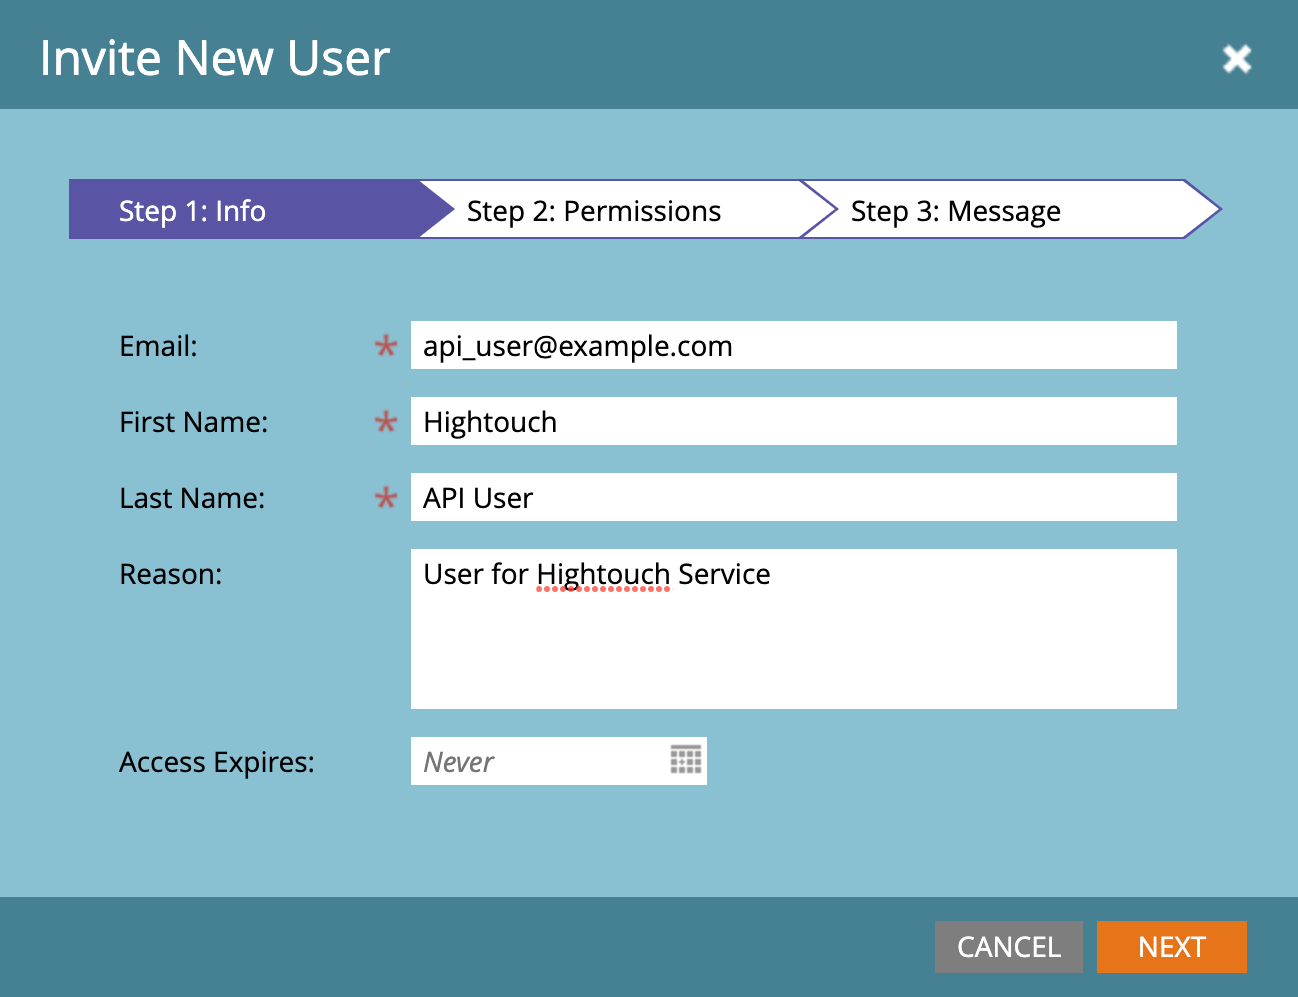
- Enter an email address, first name, and last name for the user. (These don't need to be valid.) Click Next.
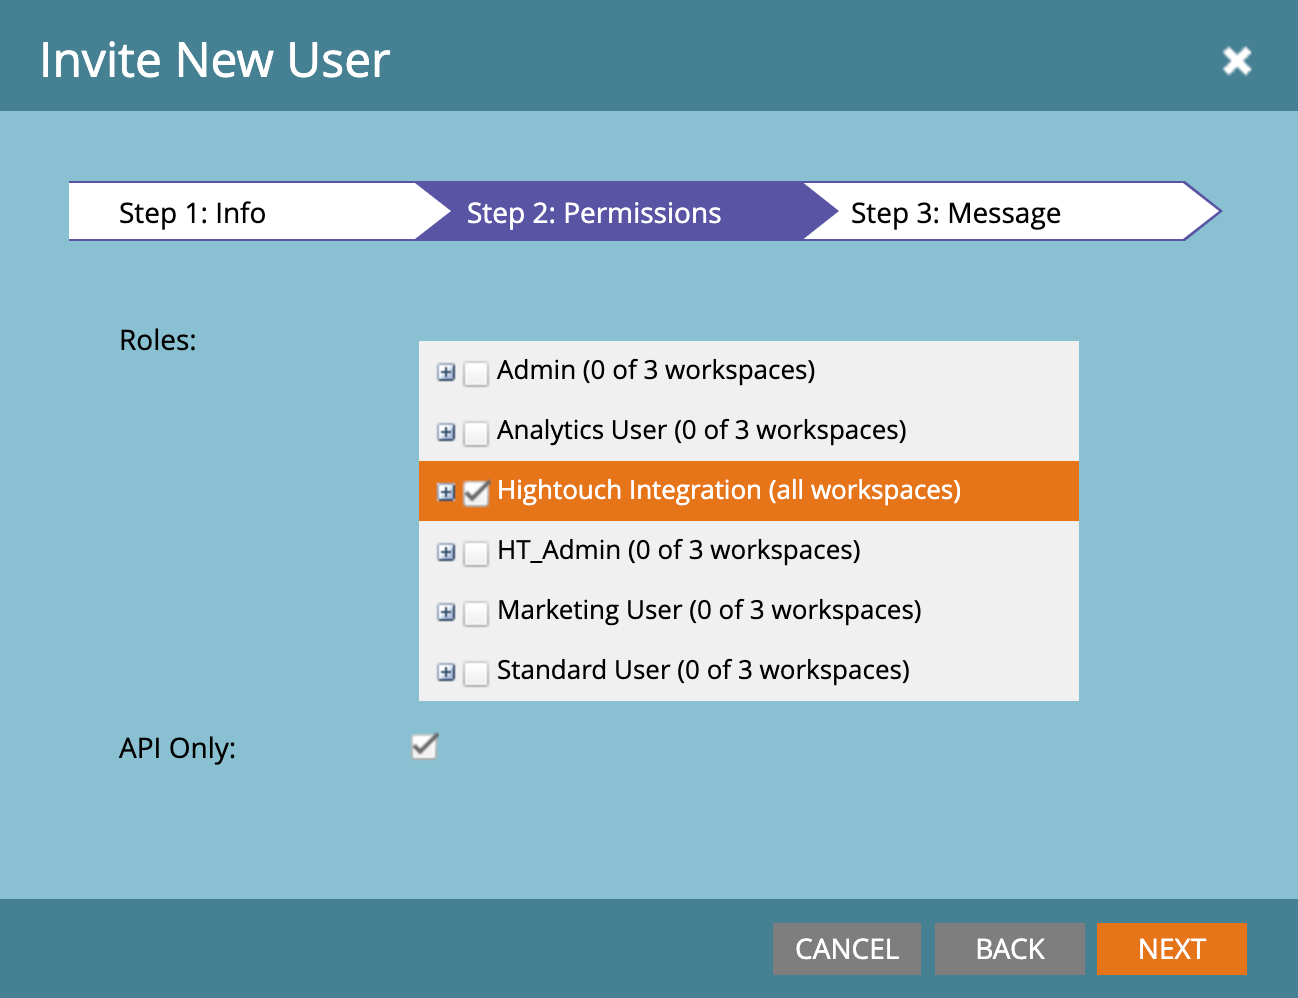
- Assign the previously created role, click the API Only checkbox, and click Next.
- The last screen for user creation says "An invitation is not required for API only." Click Send to create the API-Only user.
Ensure that this user has access to the workspaces and partitions you want to use in Hightouch. You can read more about this in the 603 - Access denied section.
Create a custom service
Custom Services provide the actual credentials required to authenticate Marketo to Hightouch. To provision one, follow these instructions:
- In Marketo, go to Admin > LaunchPoint and select New Service.
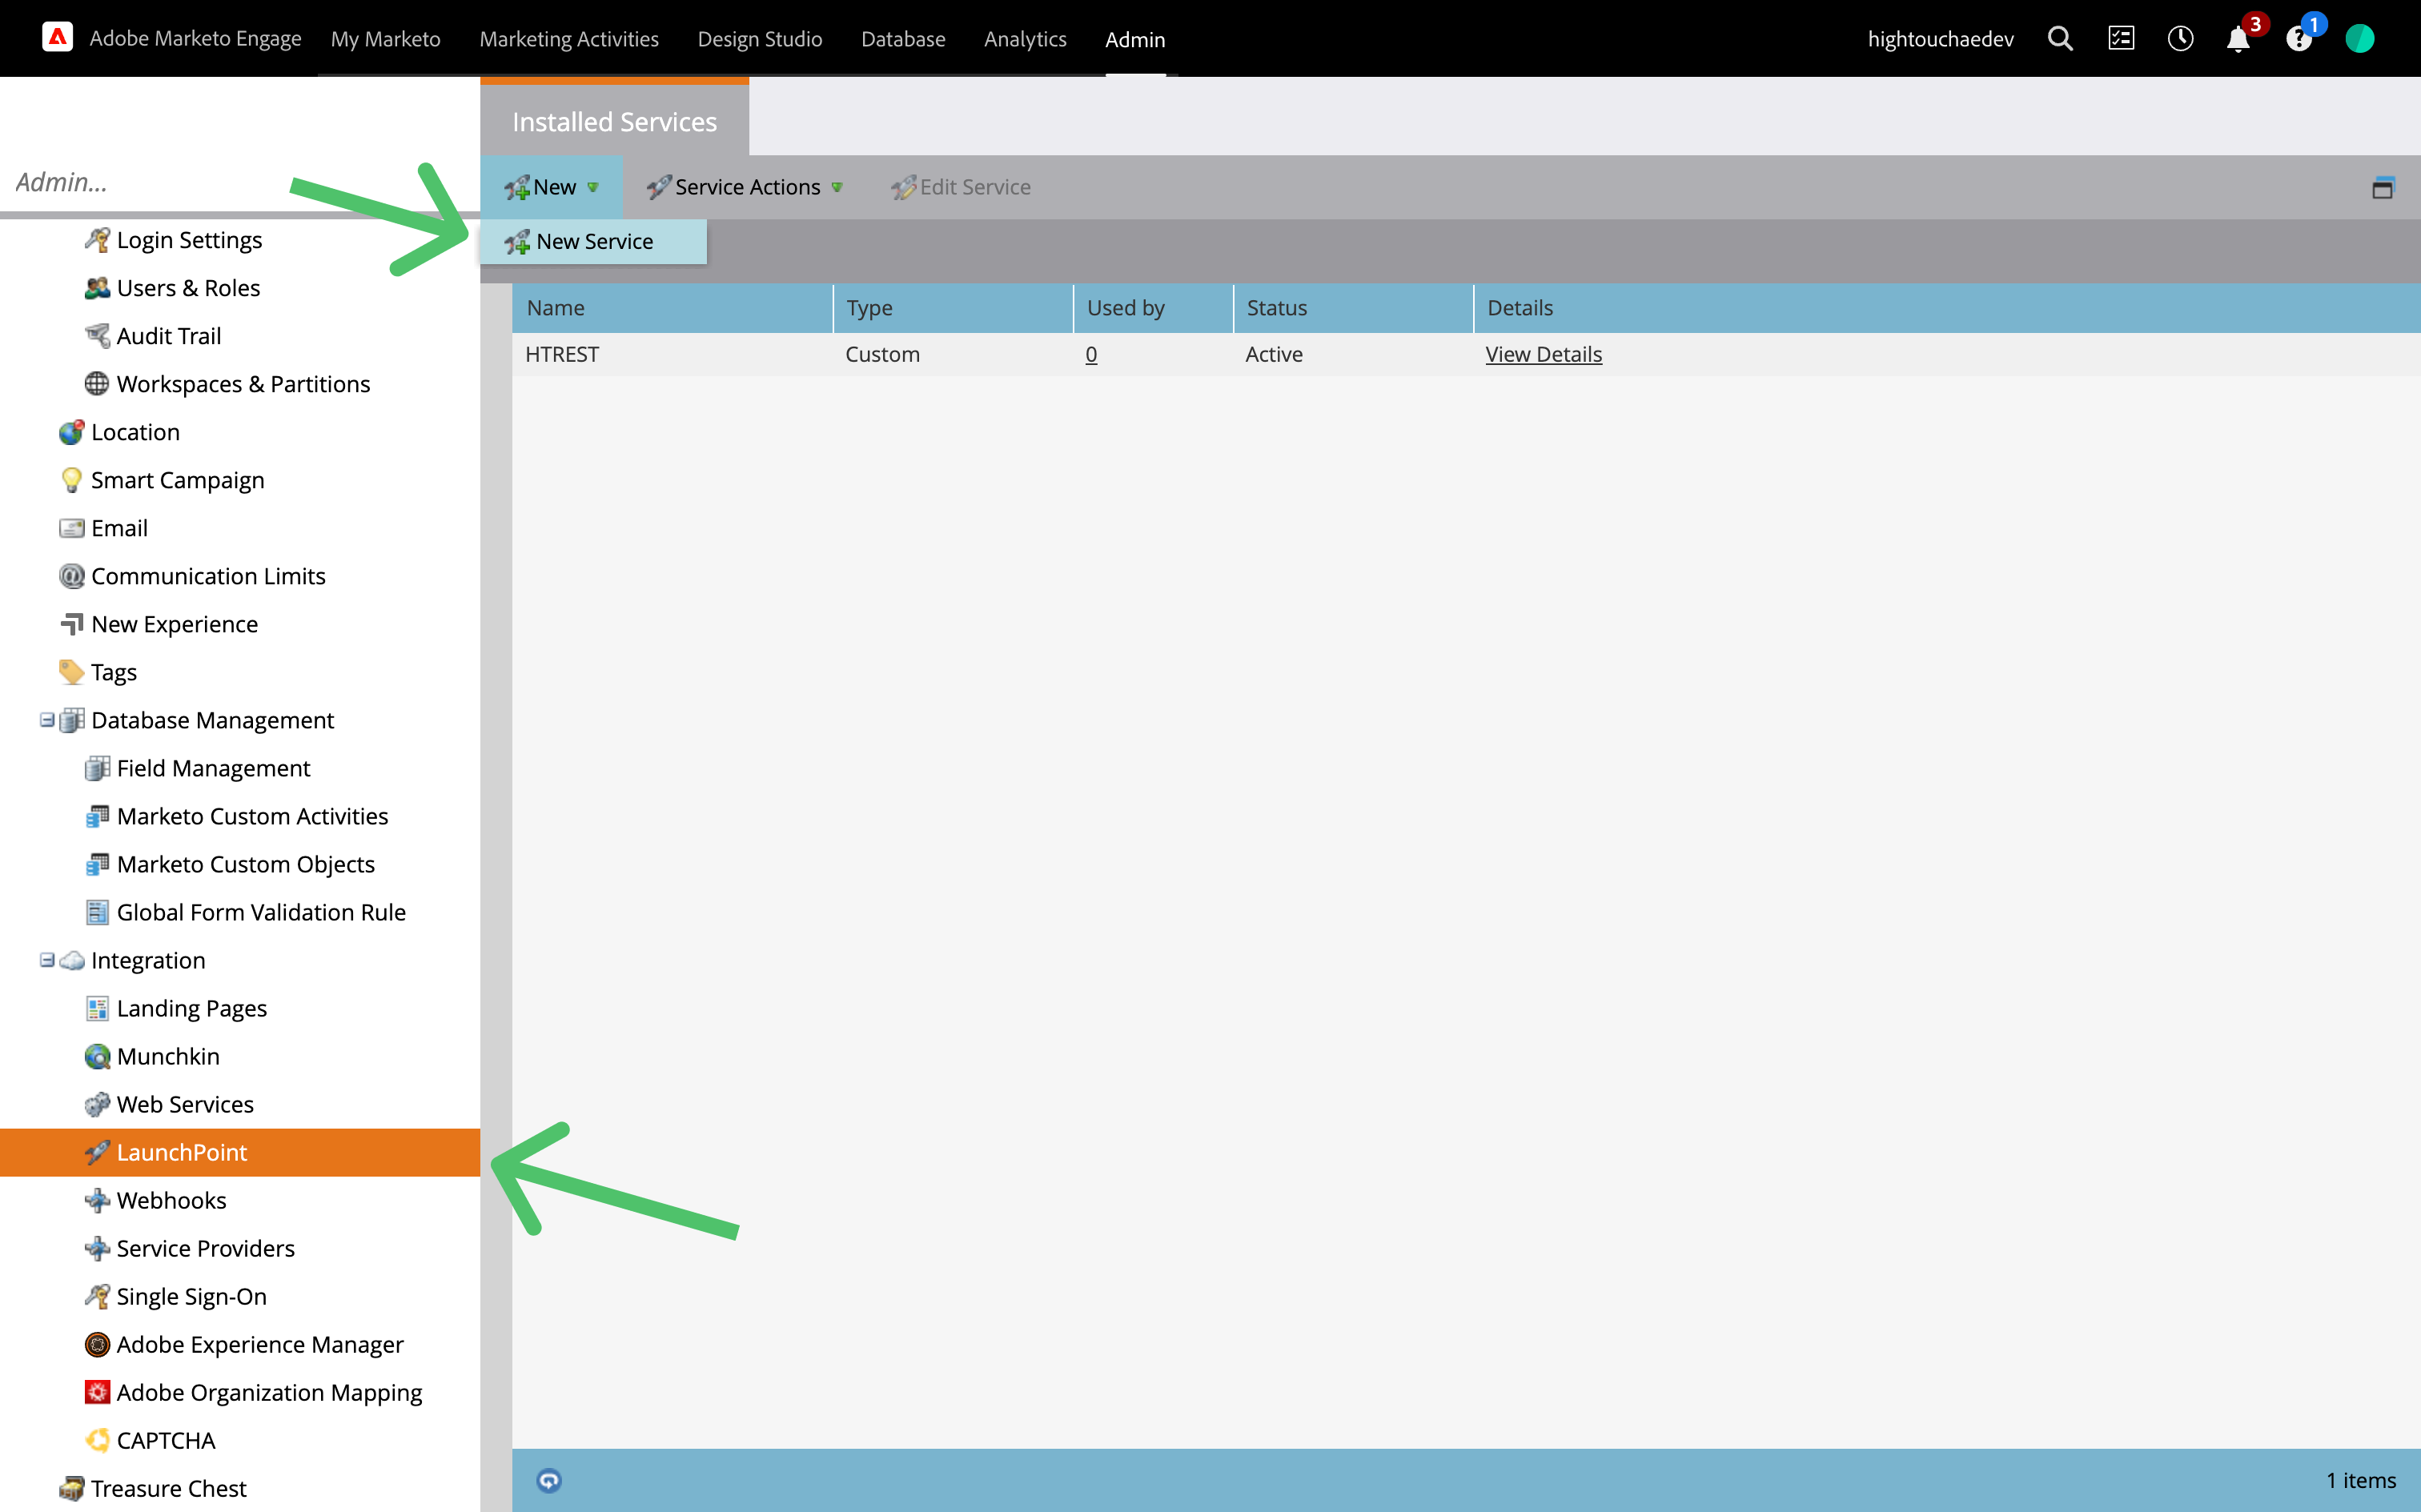
- Give your service a descriptive name. From the Service list, select the Custom. Give your service a description, for example, "Hightouch Integration" and select the API Only user you previously created, then click Create.
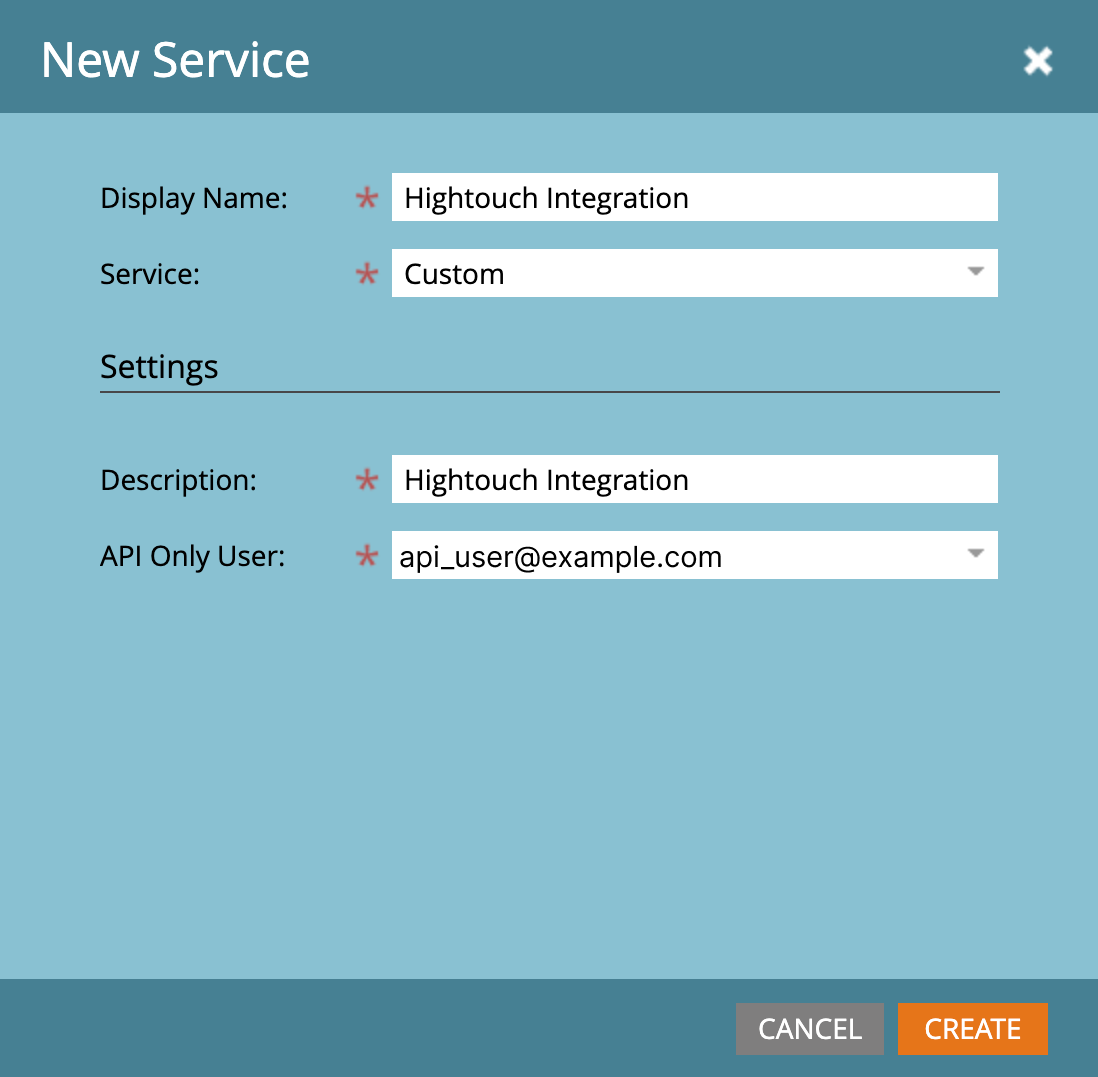
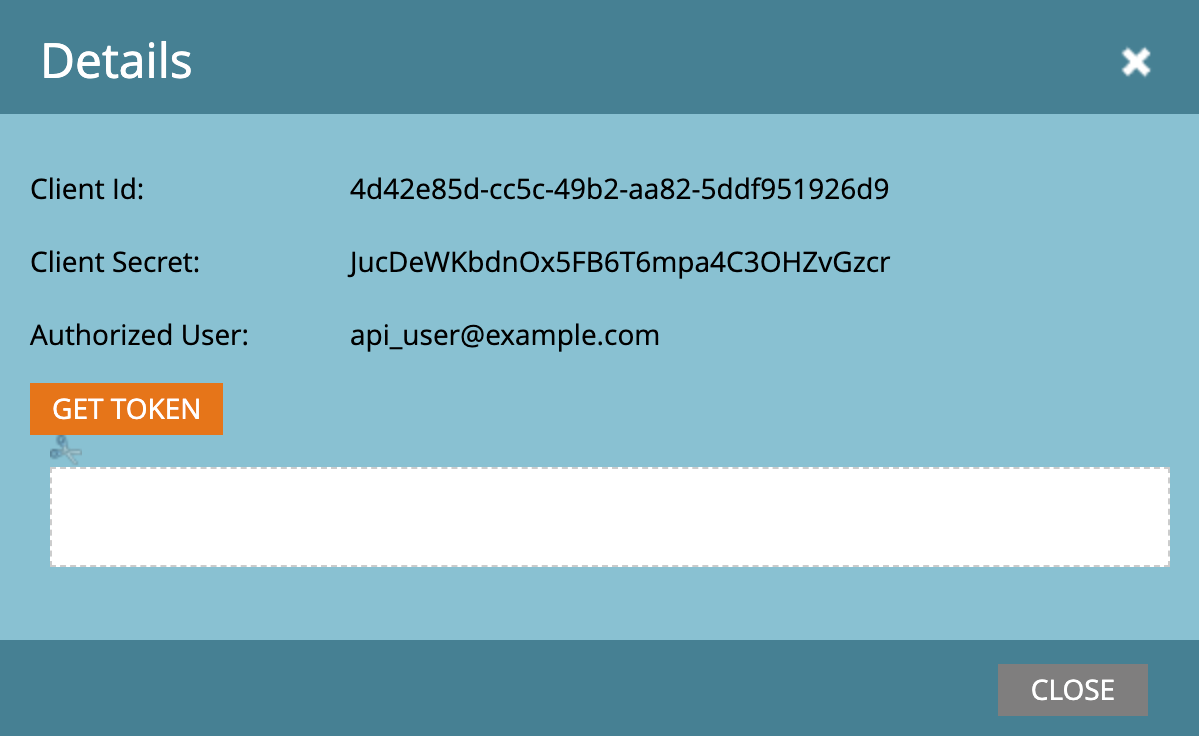
- This adds a new service to your list of LaunchPoint services, and the option to View Details. Click on View Details and save the Client Id and Client Secret for use in Hightouch.
You're now ready to provide Hightouch access to Marketo.
Connect to Marketo
If you created an IP Allowlist in your Marketo settings, make sure to allowlist Hightouch IP addresses so Hightouch can reach your cluster. Refer to our IP address docs to find the relevant IP addresses for your Hightouch region.
In Hightouch, go to the Destinations overview page and click the Add destination button. Select Marketo and click Continue. You can then authenticate Hightouch to Marketo by entering the following fields:
- Client ID
- Client Secret
- Base URL
To find the Client ID and Secret, navigate to Admin > LaunchPoint in your Marketo account and select the service you created for Hightouch.
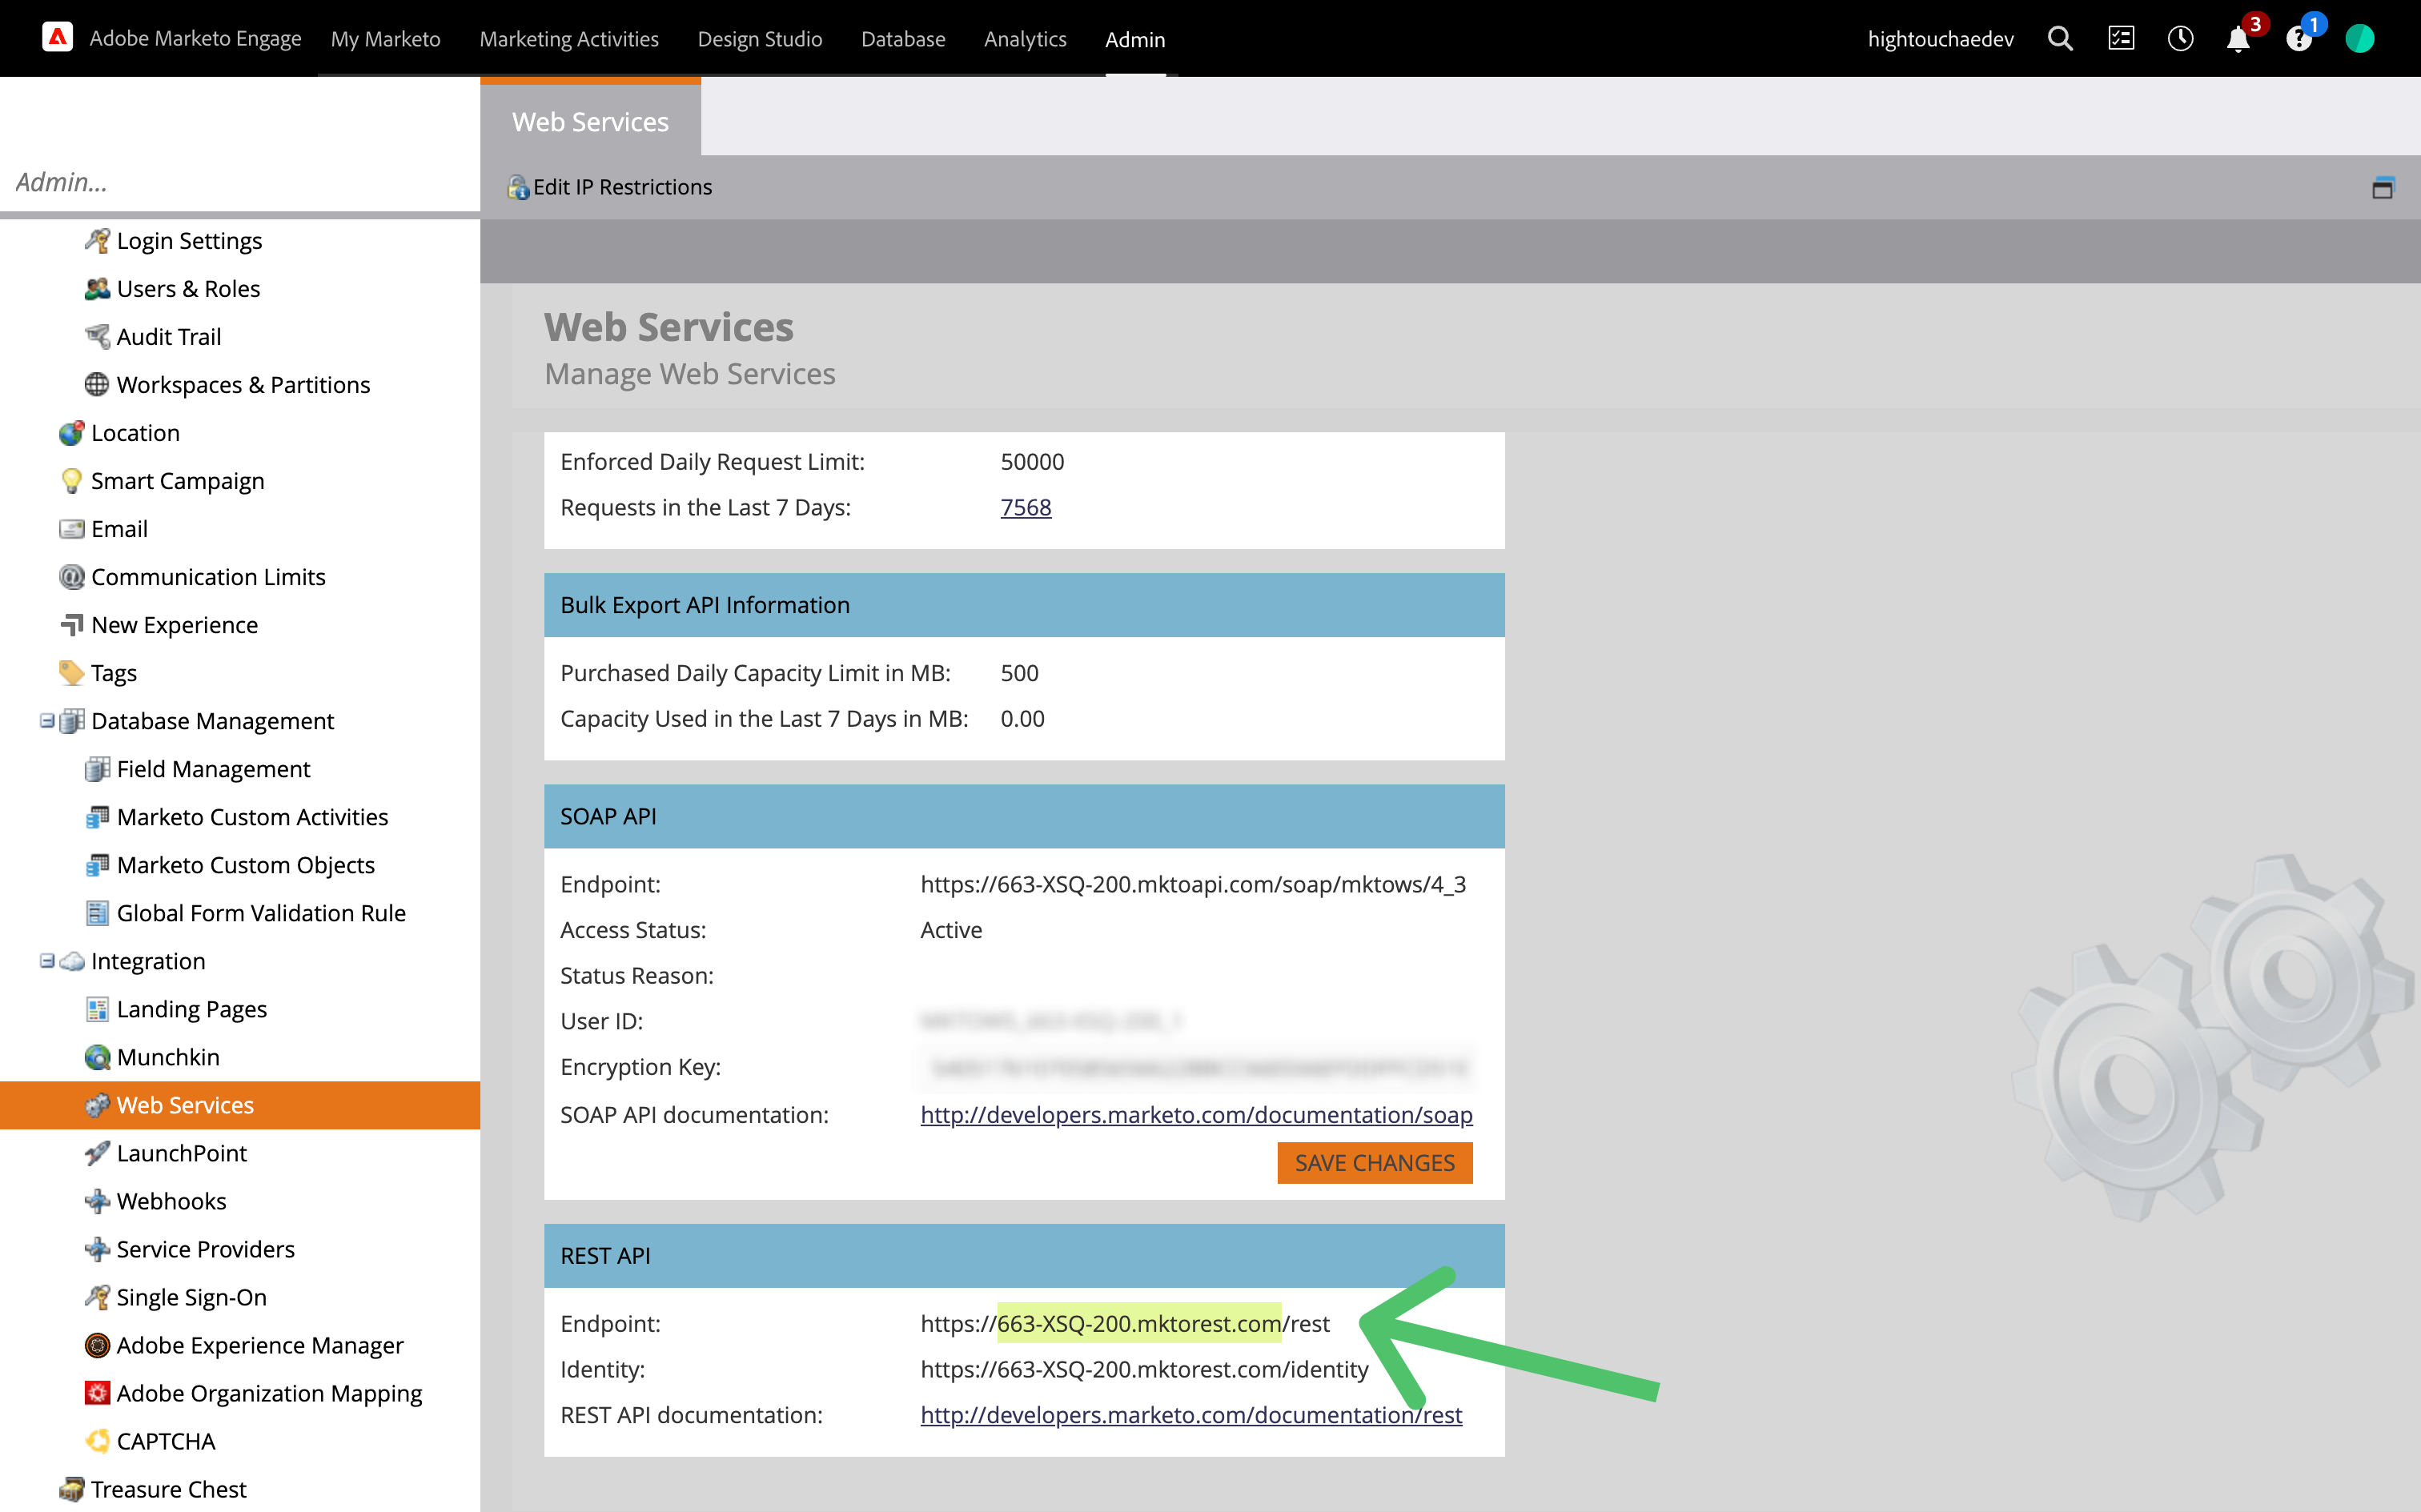
You can find the Base URL in Admin > Integration > Web Services under REST API.
Only use the part after https:// and before /rest as your base URL, for example, 663-XSQ-200.mktorest.com.
Sync configuration
Once you've set up your Marketo destination and have a model to pull data from, you can set up your sync configuration to begin syncing data. Go to the Syncs overview page and click the Add sync button to begin. Then, select the relevant model and the Marketo destination you want to sync to.
Syncing objects
Hightouch supports syncing to both standard and custom Marketo objects. The standard objects that Hightouch supports are:
- Leads
- Companies
- Opportunities
Record matching
You can match rows from your model to objects in Marketo on any column in your model and certain fields in Marketo. To avoid duplications or other data issues, it's imperative to choose a column with unique values. Refer to the record matching docs for more information.
The Marketo fields available for record matching depend on the object:
- for the Lead object, Hightouch lists all
persontype custom fields for record matching, - for custom objects, Upsert mode lists all dedupe fields, whereas Update mode lists all dedupe fields and
MarketoGUID.
Field mapping
Hightouch lets you sync object fields via field mapping. You can map data from any of your model columns to an object's default fields. Ensure your model columns data types match the data types of the fields you want to sync to.
Delete behavior
The delete behavior you select dictates what to do when a row no longer appears in your model's query results. You have the following options:
| Behavior | Description |
|---|---|
| Do nothing | Keep the record in Marketo with all its synced fields |
| Delete record | Delete the record from Marketo |
| Clear fields | Keep the record, but clear the mapped fields |
In Upsert mode, you can select between Do nothing and Delete record. In Update mode, you can select between Do nothing and Clear fields.
Batch size
By default, Hightouch sends 300 objects in a batch. You can lower the batch size to mitigate 413 Request Entity Too Large errors.
Syncing custom activities
When syncing custom activities, Hightouch treats any records added to your model as new activities and sends them to Marketo when your sync runs.
To sync custom activities, the custom activity type must first be created and approved in Marketo. You can learn more about creating custom activities in Marketo's docs.
Activity selection
To start, select a custom activity type you've already created in Marketo. If you don't see it in the dropdown, make sure it's approved in Marketo and then click Refresh in Hightouch.

Event timestamp
You can optionally select a column that contains timestamps of when activities occurred. If this field is empty, Marketo uses the time the activity arrives at the server.
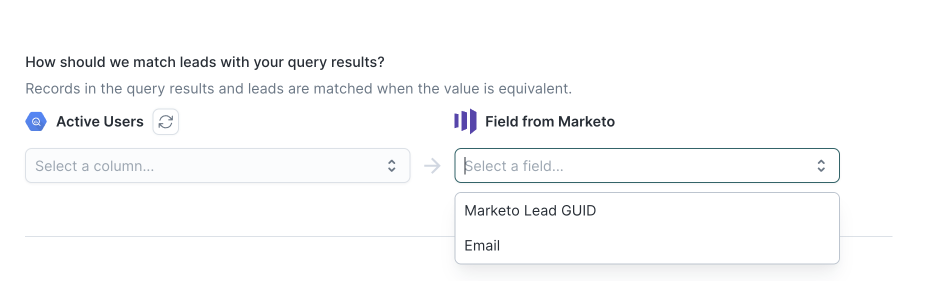
Lead matching
To associate activities to leads, select the model column that contains either the leads' Marketo GUID or Email.
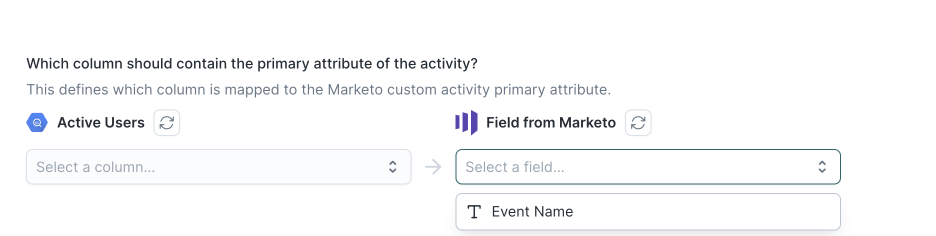
Activity primary attribute
Select the model column to map to the primary attribute field for your custom activity.
Field mapping
You can also map data from any of your model columns to a custom activity's non-primary attributes. Ensure your model columns data types match the data types of the fields you want to sync to.
Syncing static lists
Static lists are a list of names in Marketo. You can configure Hightouch syncs to manage these lists by adding and updating users.
User identifiers
To identify which users to add or update in an static list, select a model column and the corresponding Marketo attribute, for example Lead ID.
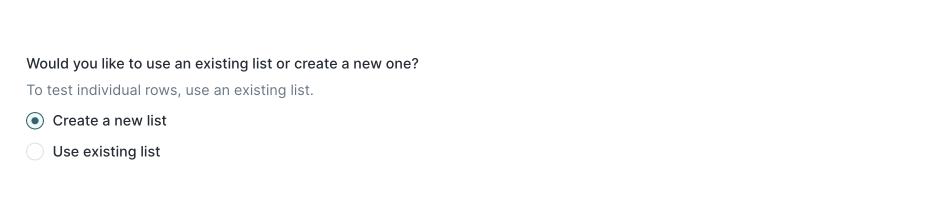
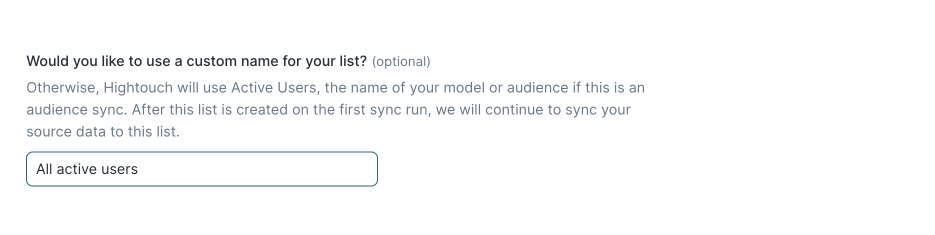
Select an existing static list or create a new one
You can create a new static list or use an existing one. When creating a new static list, you can optionally enter a name; otherwise, Hightouch defaults to the name of the associated model. To use an existing static list, select the desired static list from the dropdown.
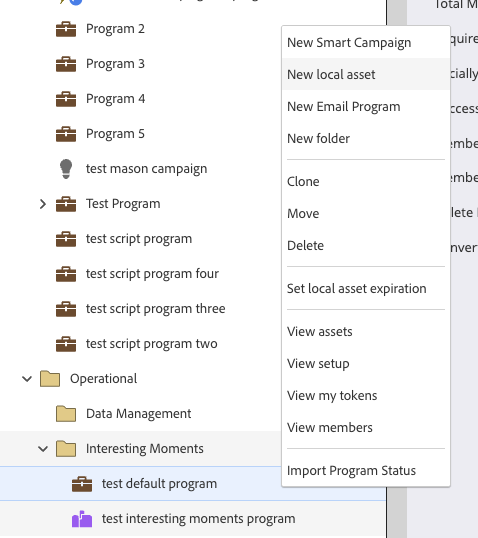
Folder selection
If you're creating a new static list in Marketo, you need to select the folder/program to create the list in. Static lists can only be created in folders and programs of the following types:
- Email Batch Program
- Marketing Program
- Nurture Program
- List
In the Marketo UI, you can tell whether the folder is one of the above types by right clicking the folder in the Marketing Activities sidebar. If the "New local asset" or "Create list" options are available, then the folder supports static lists.
Static list description
If you're creating a new static list in Marketo, you can optionally Hightouch add a description for the static list.
Split retries
By default, Hightouch retries all records in a rejected batch. To pinpoint which users are getting rejected with which errors and reduce the number of valid users that get retried, you can enable split retries.
Trigger campaigns
Hightouch lets you use records from your models to trigger campaigns through the Marketo Campaign API.
Prerequisites
Before you can set up a Hightouch sync to trigger a campaign, you need to have an active trigger campaign with Web Service API as the source in Marketo. For details, follow the setup instructions below.
Trigger campaign setup
-
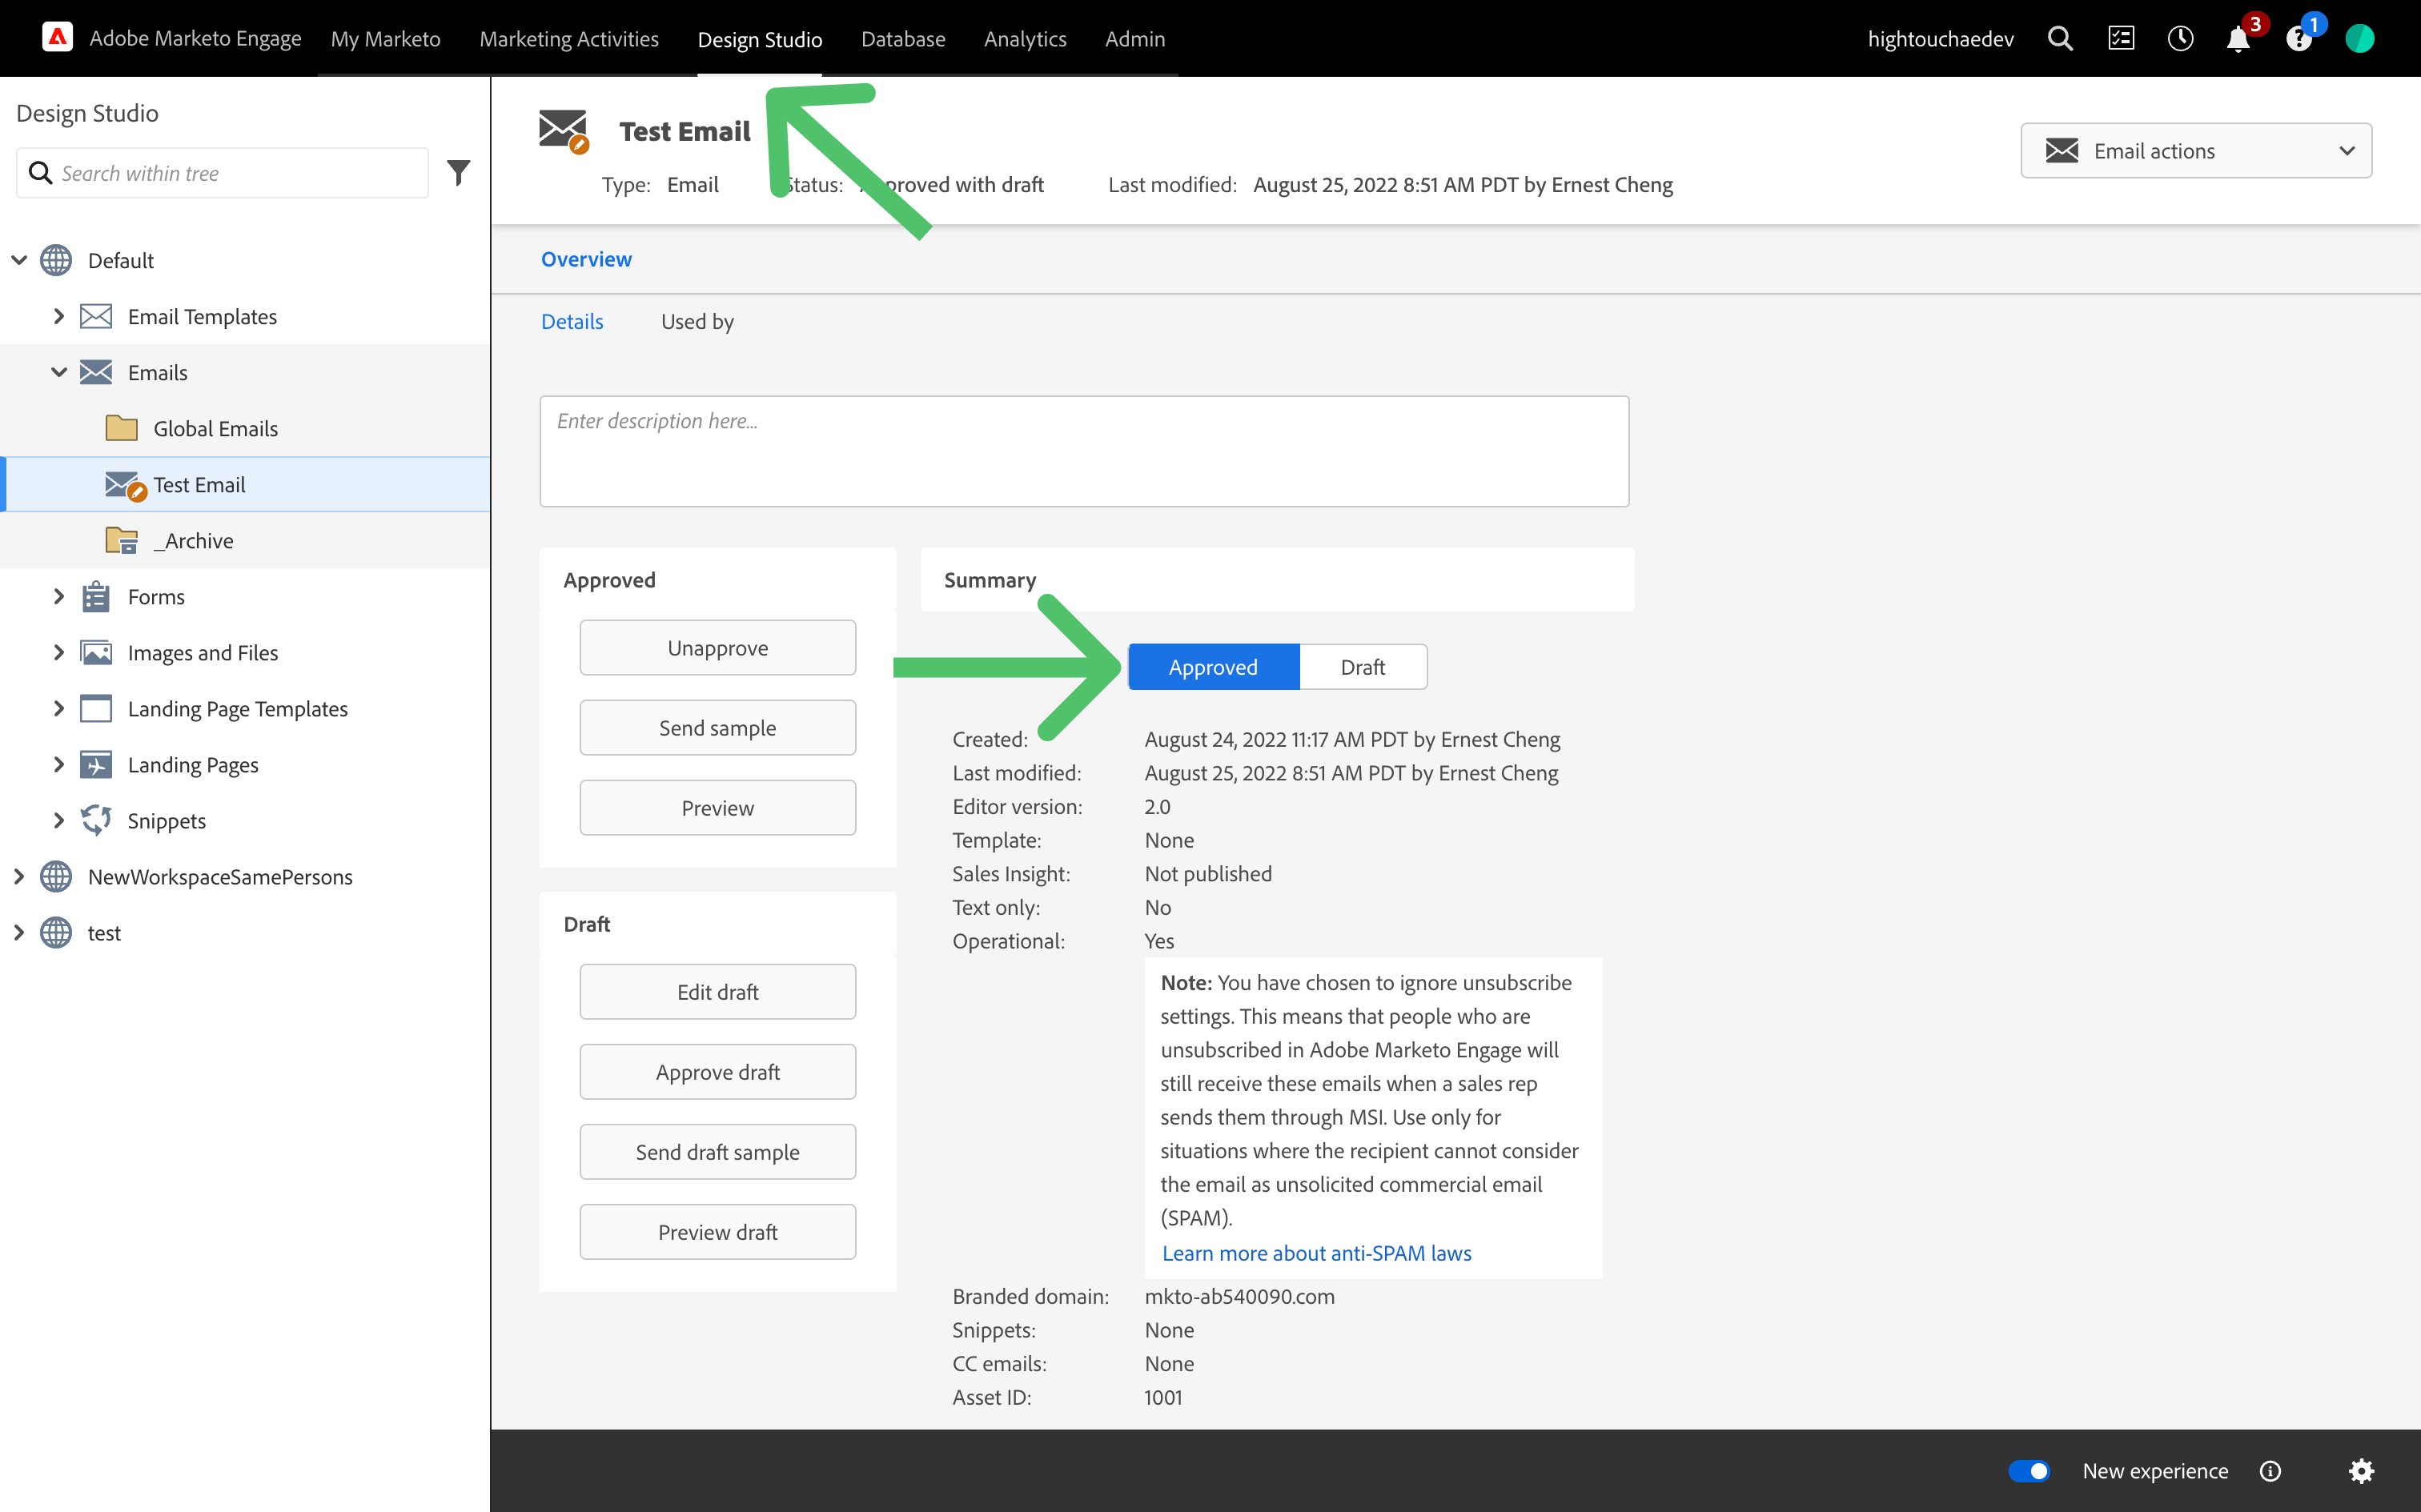
If you haven't already, go to Design Studio to draft an email template in your Marketo instance. Before your email template you can use the email template in Hightouch, your draft must be approved.
You can use custom tokens to populate your email template with data from your model.
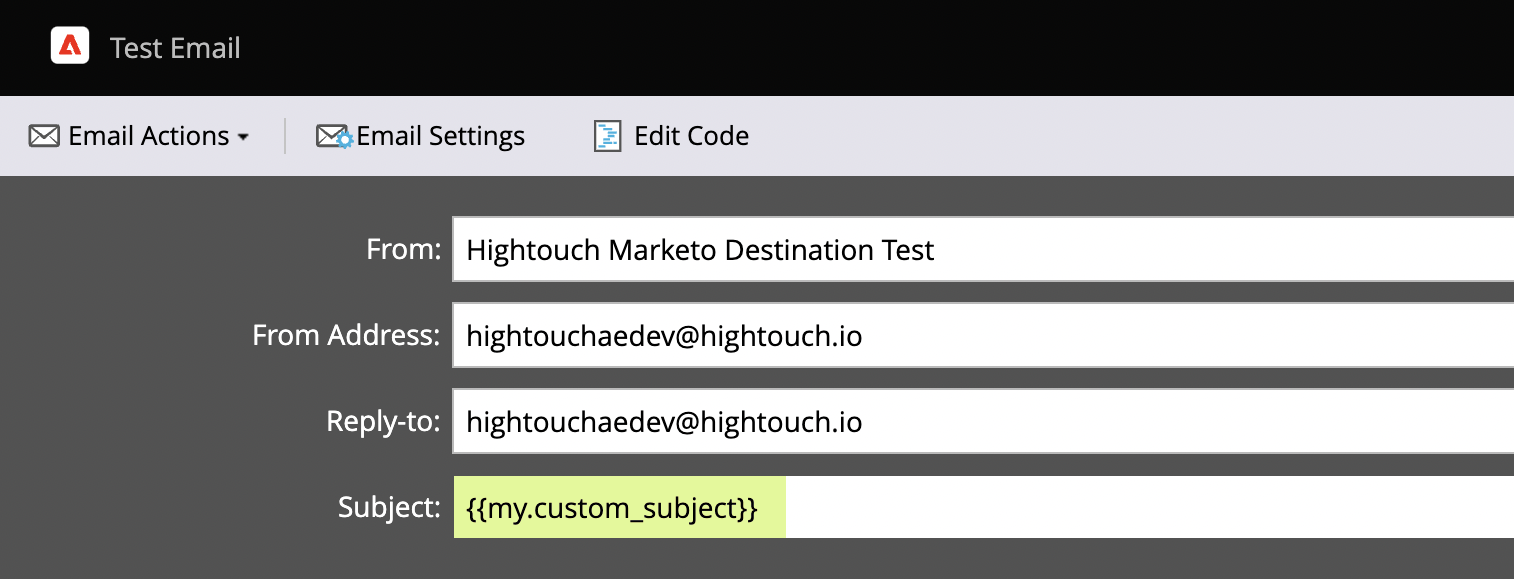
In the example screenshot above, a custom token makes it possible to dynamically populate the email subject.
-
Next, you need a Smart Campaign to trigger. Follow these steps if you need to create a new one. Make sure that your campaign belongs to a program.
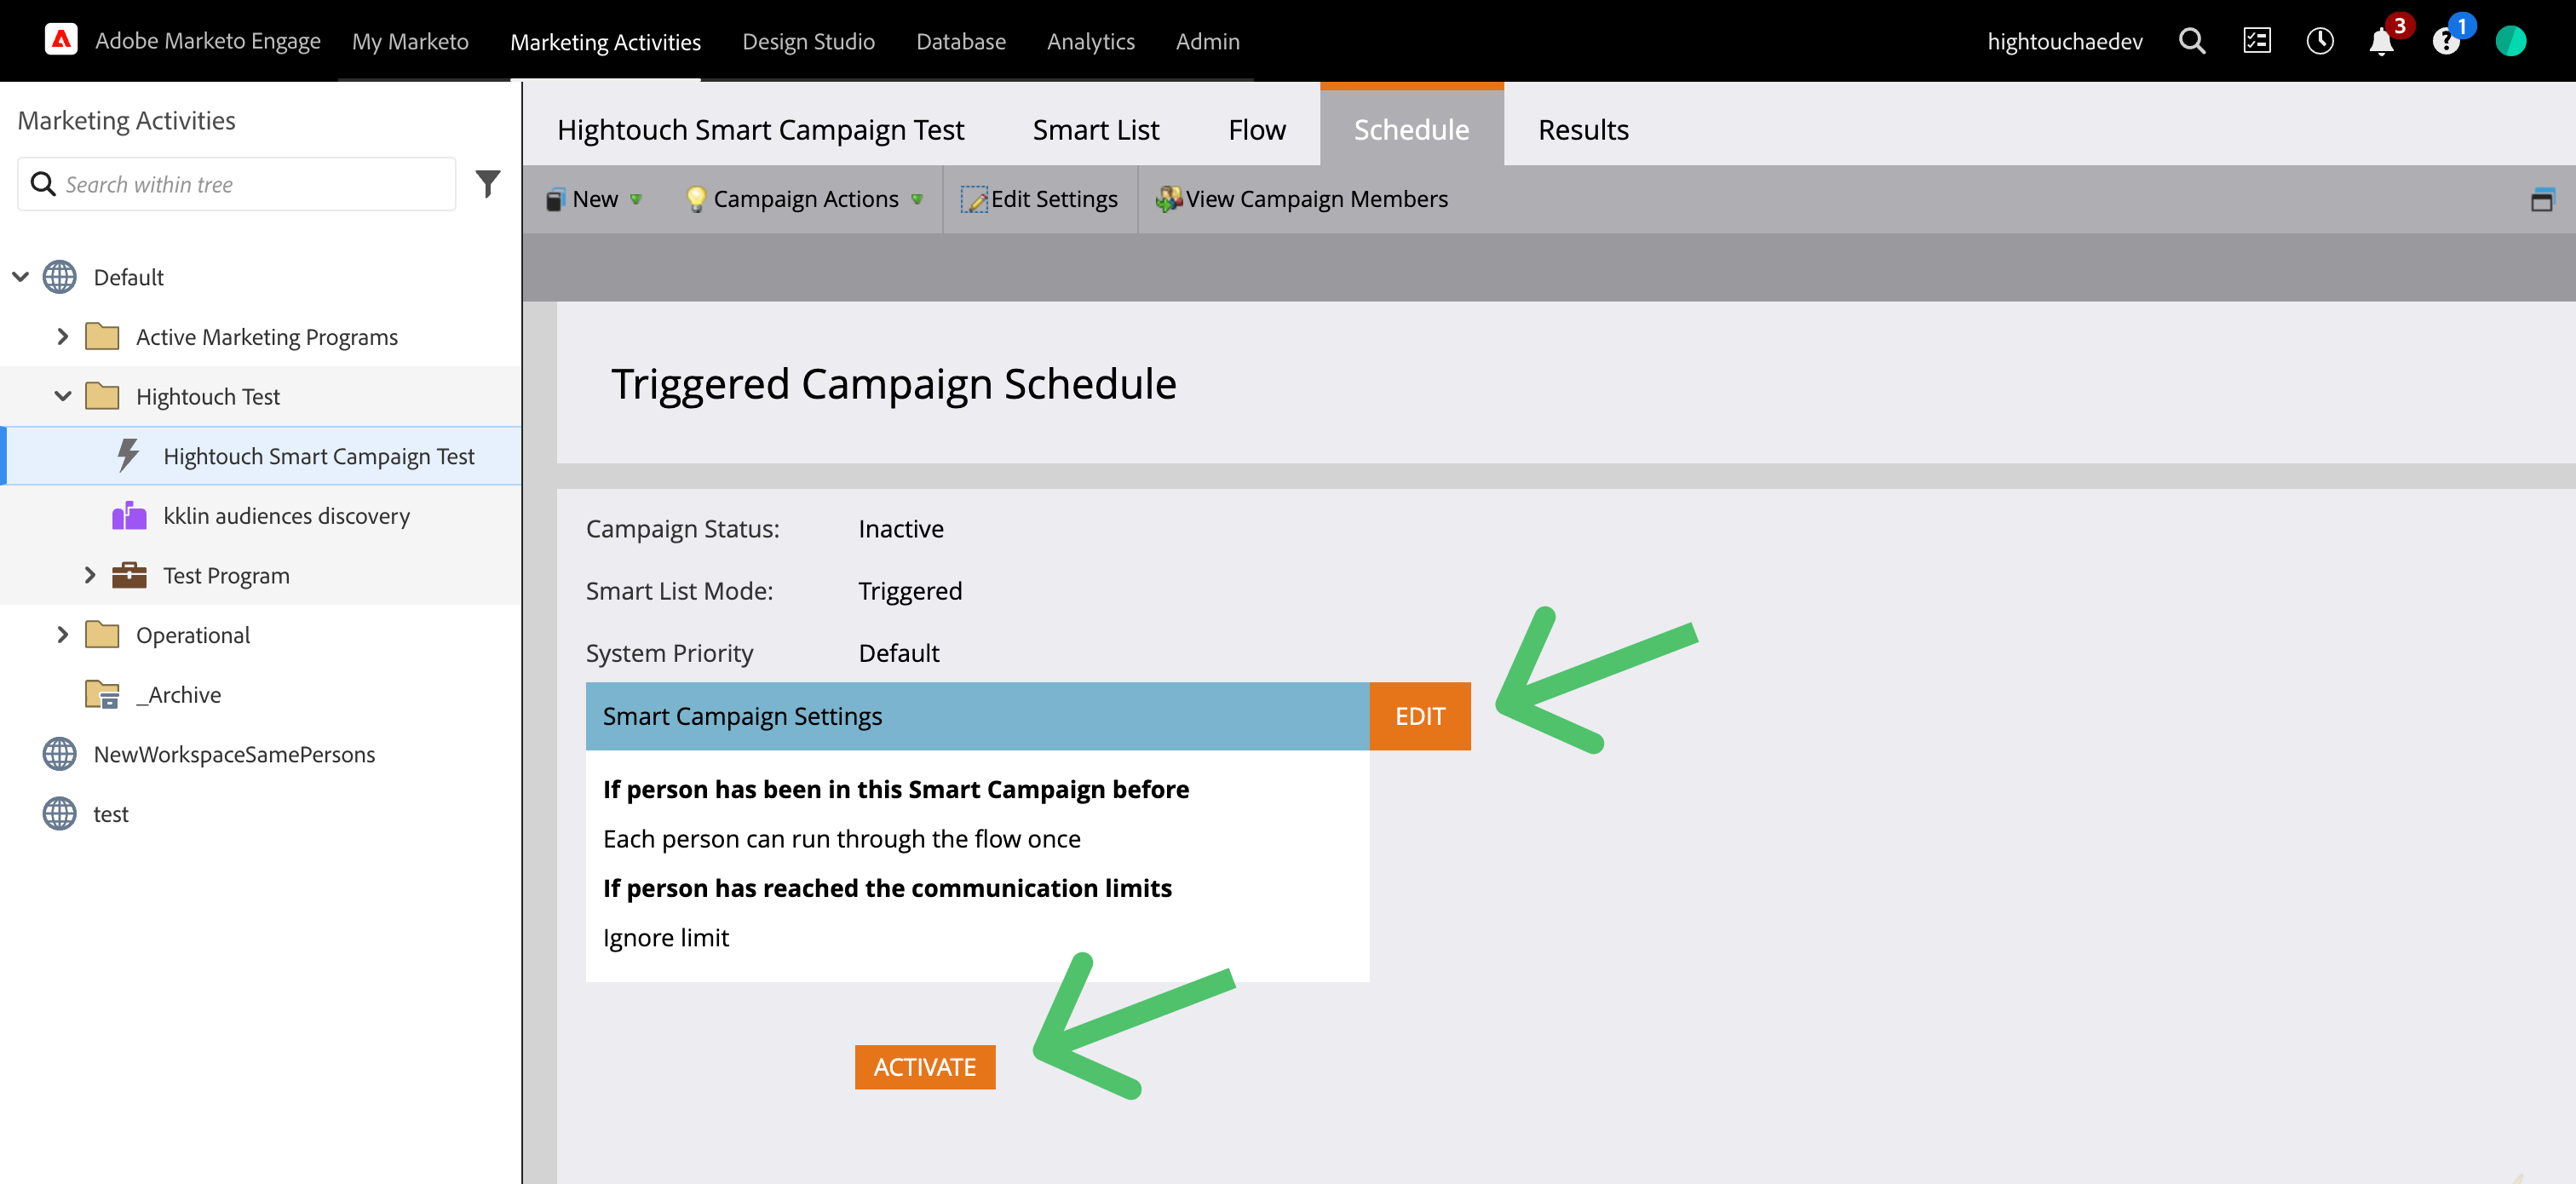
-
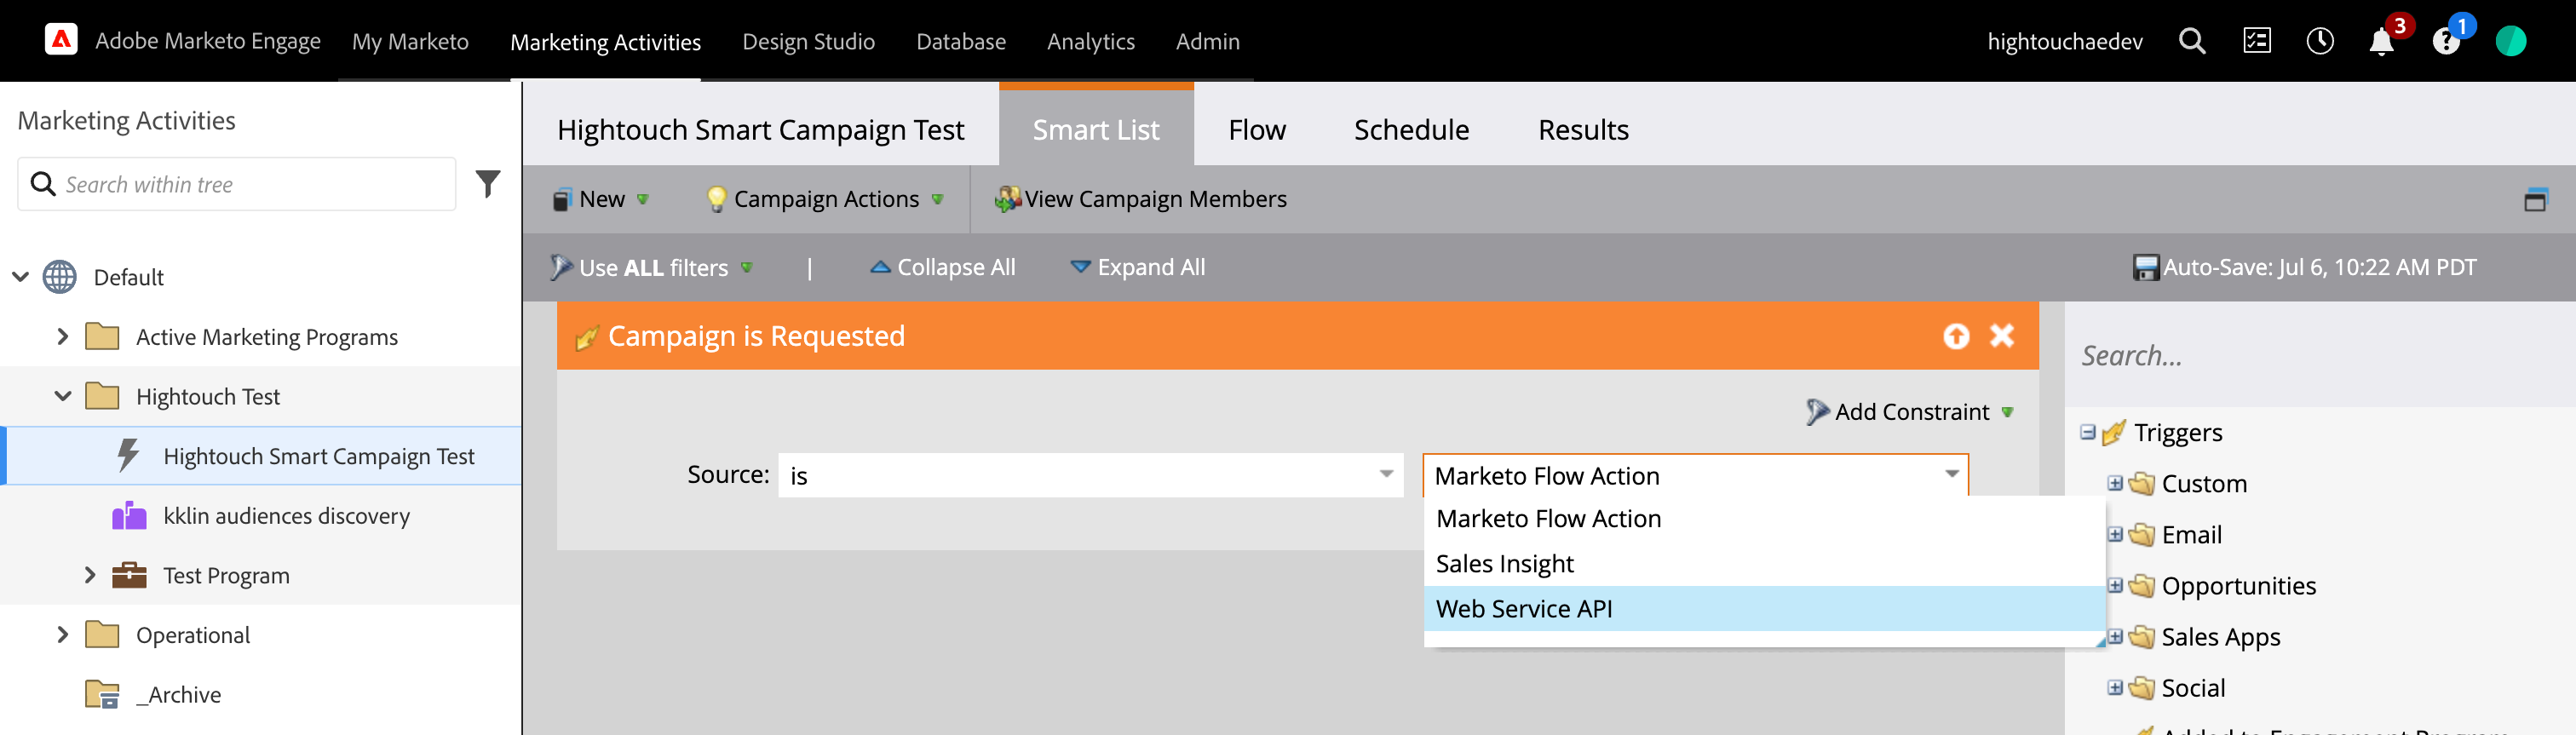
Open the Smart List tab in the top nav to configure the trigger. Drag and drop Campaign is Requested from the triggers list on the right.
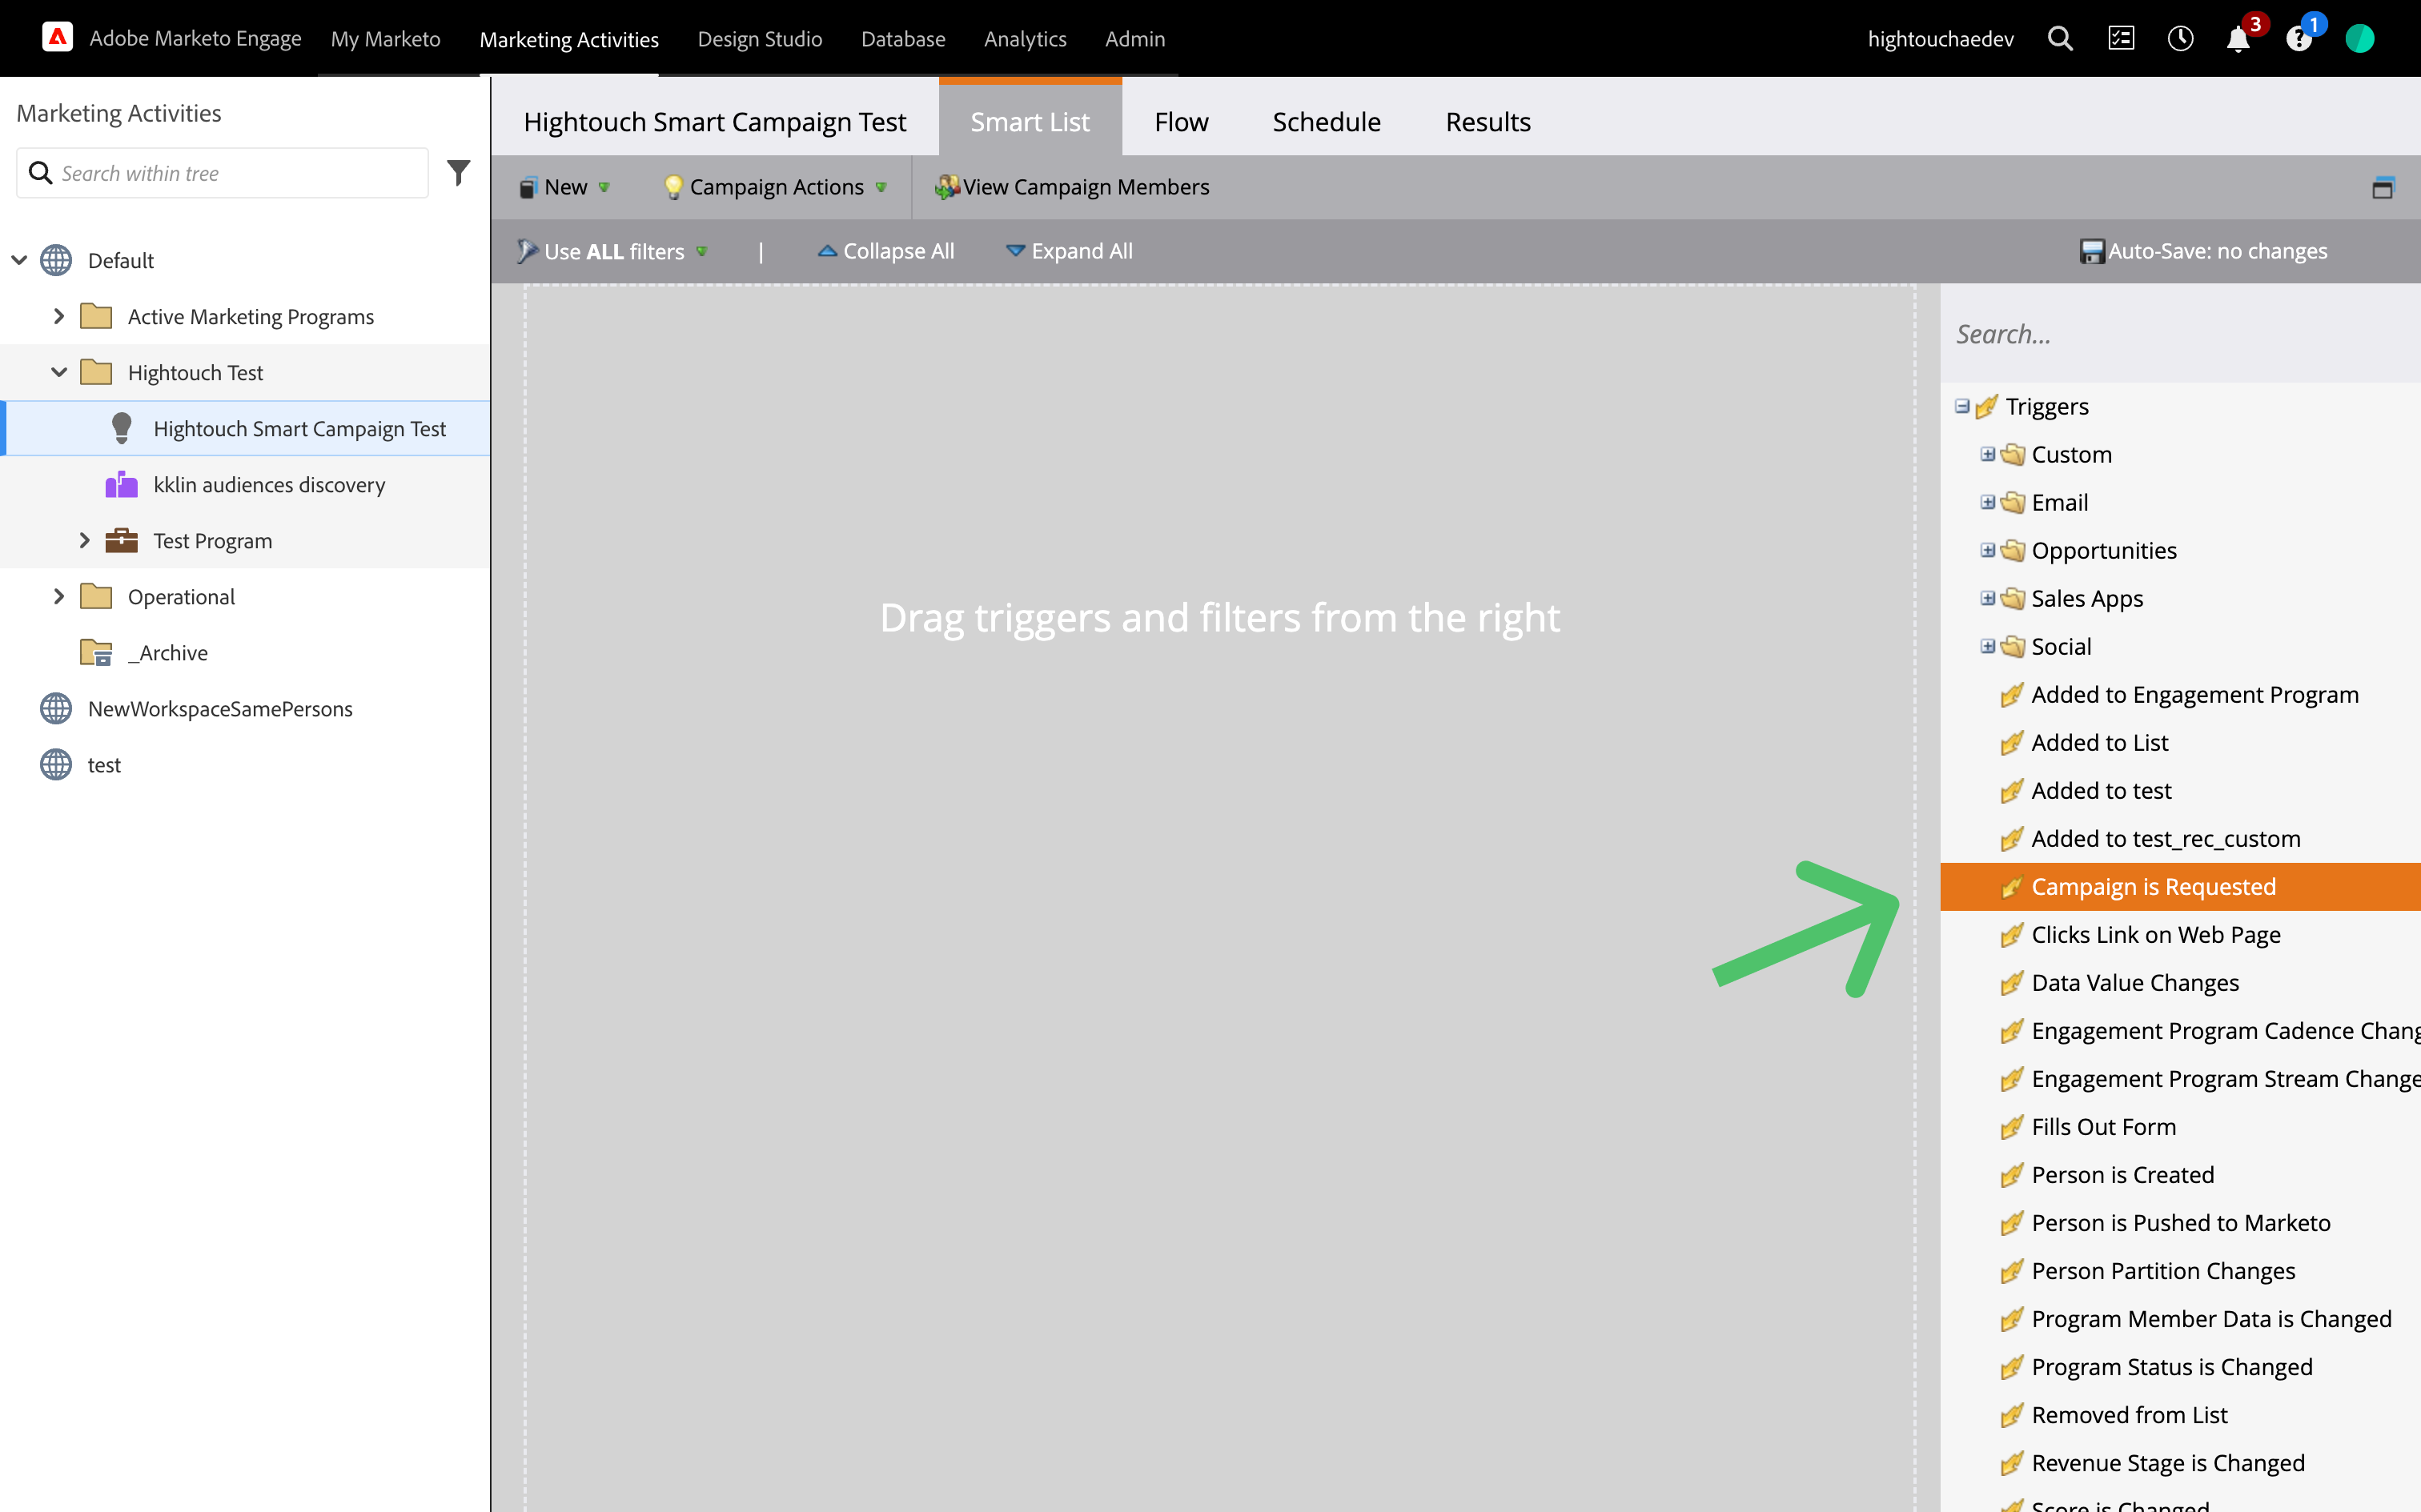
- Select that the source is Web Service API.
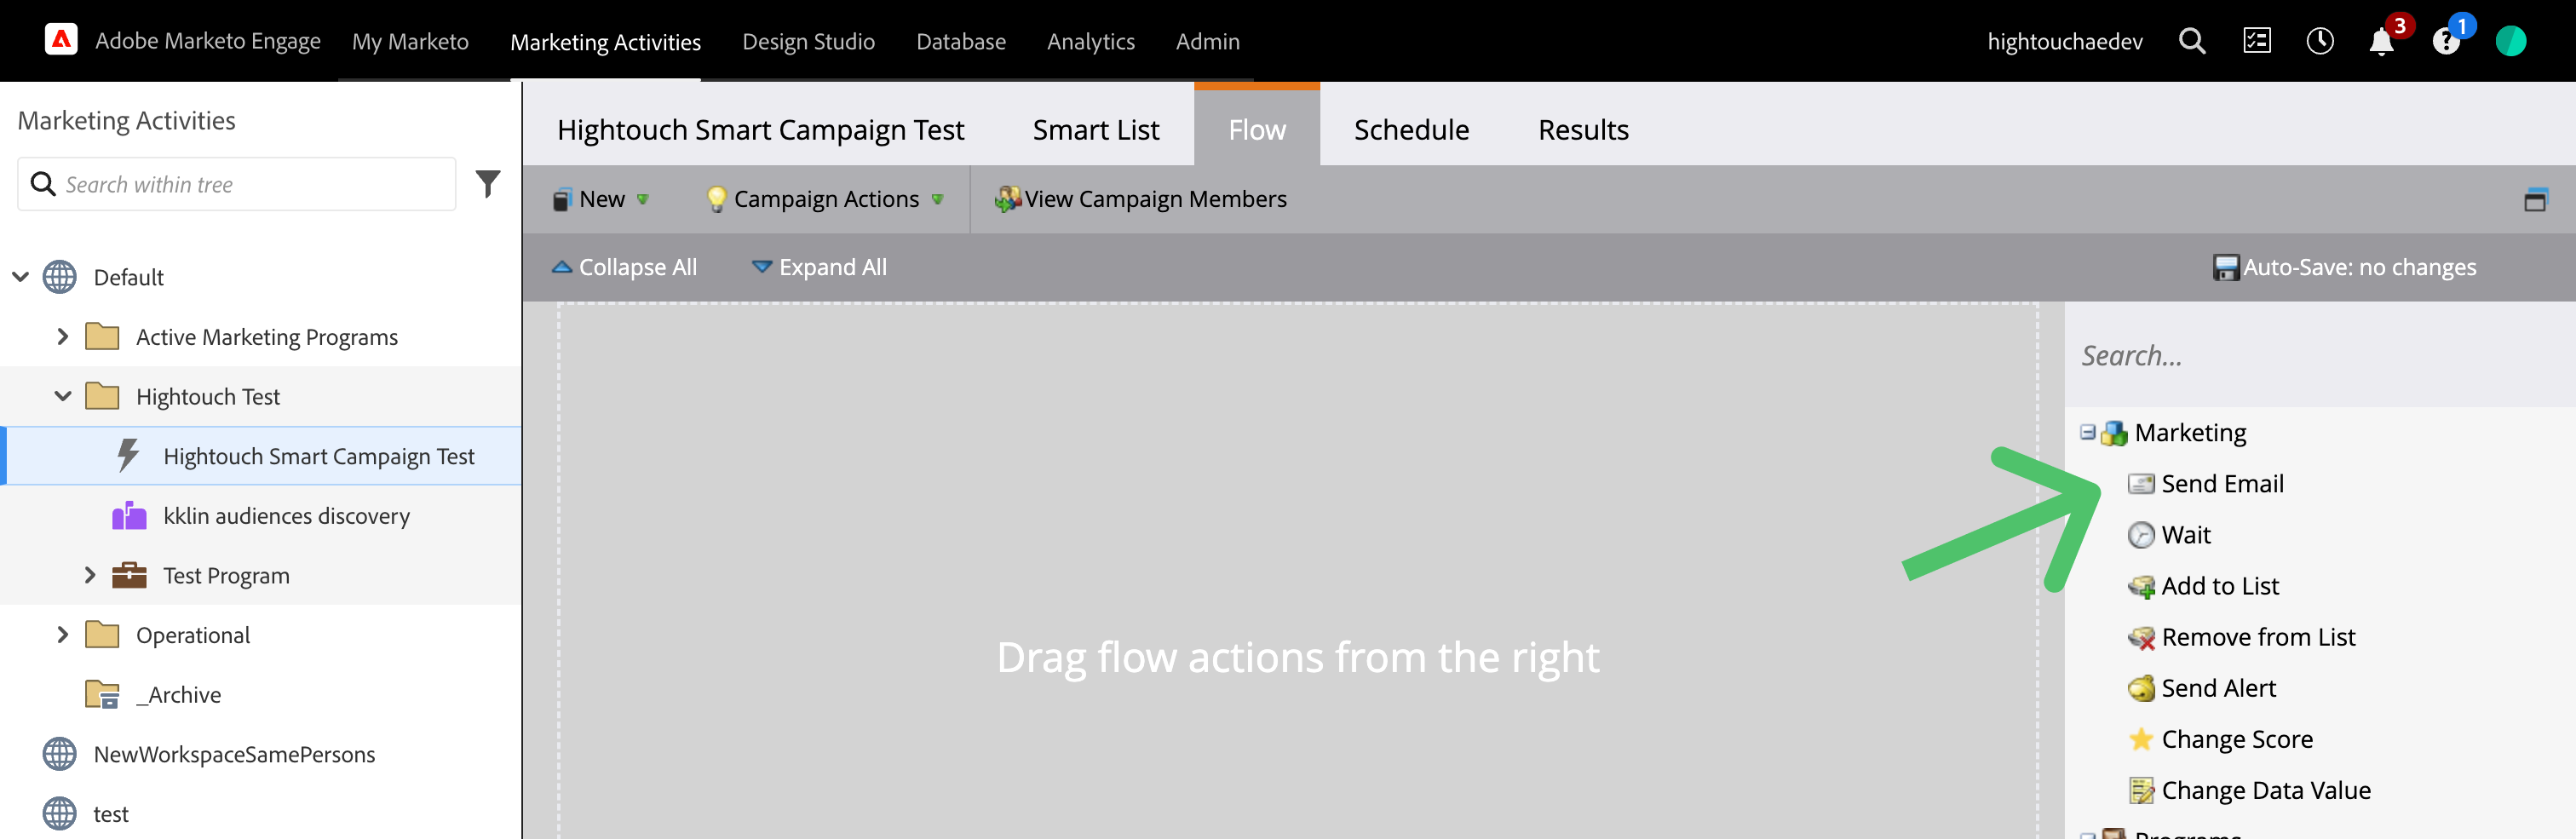
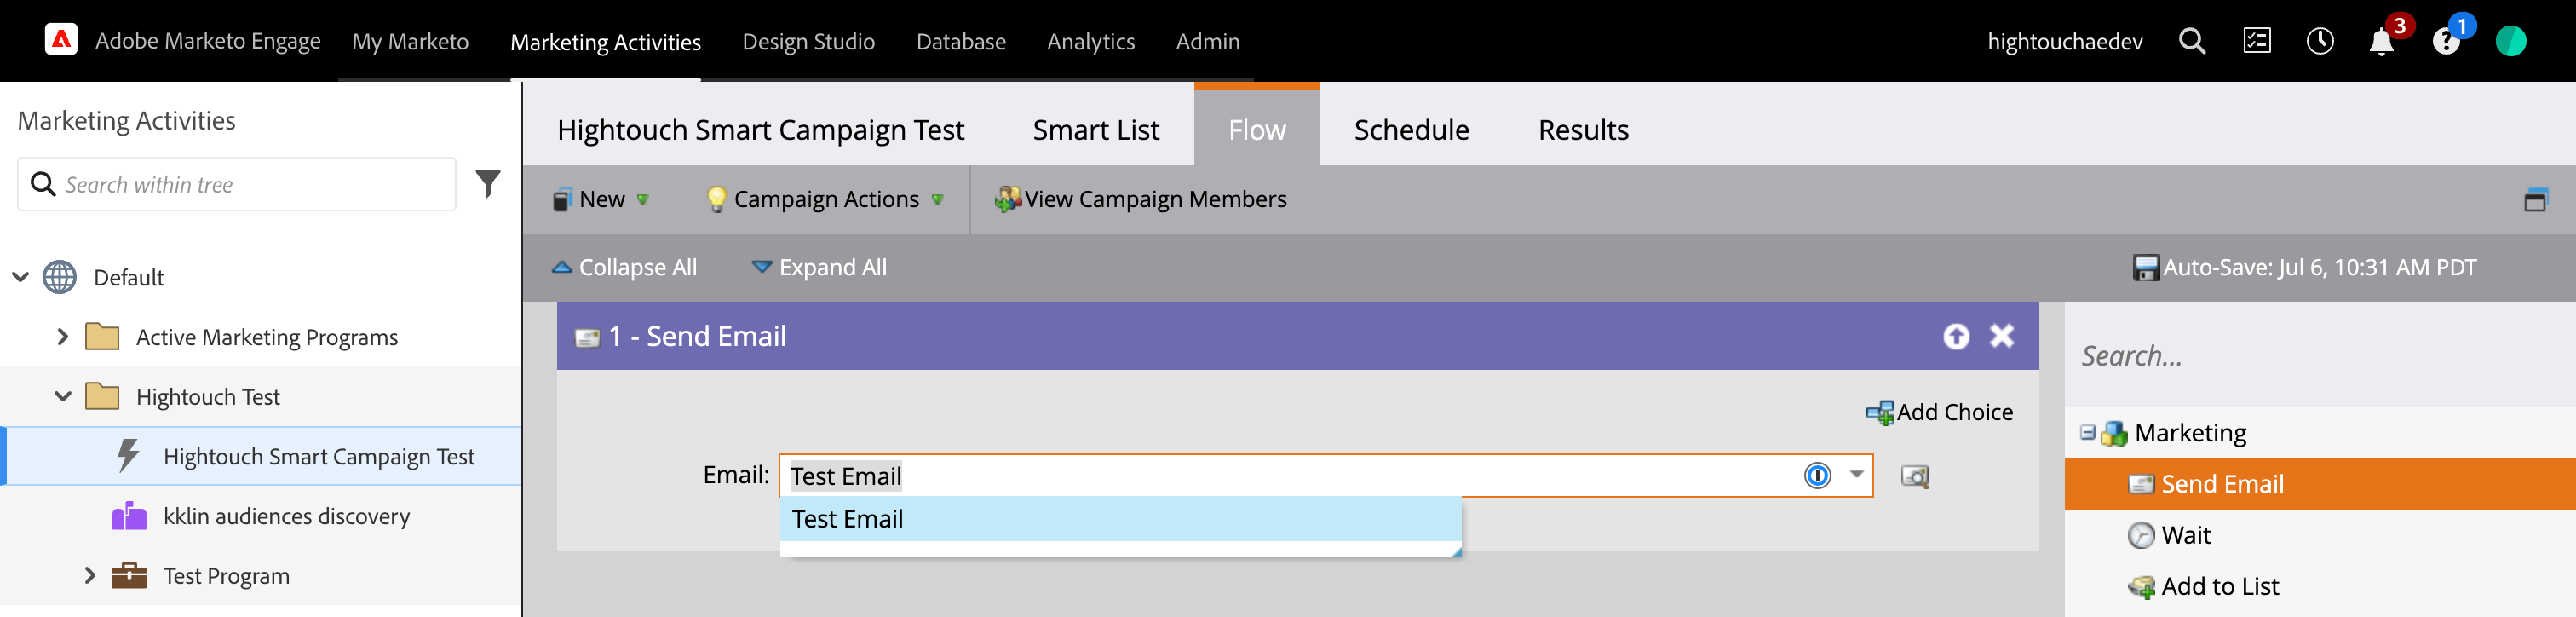
- Open the Flow tab in the top nav to configure your flow. Drag and drop Send Email from the actions on the right.
- Select the email template you want to send.
- Open the Schedule tab in the top nav to configure your qualifications. Click on Edit to edit your qualifications.
Hightouch doesn't check if an email has been sent to
a distinct lead before trigger a campaign. For example, if a lead with email janedoe@example.com
appears in two of the queried rows from your model, then Hightouch triggers
an email for each of these rows. Two emails would be sent to janedoe@example.com. If you want to only send
one email per lead, set your qualifications in Marketo to only
once. 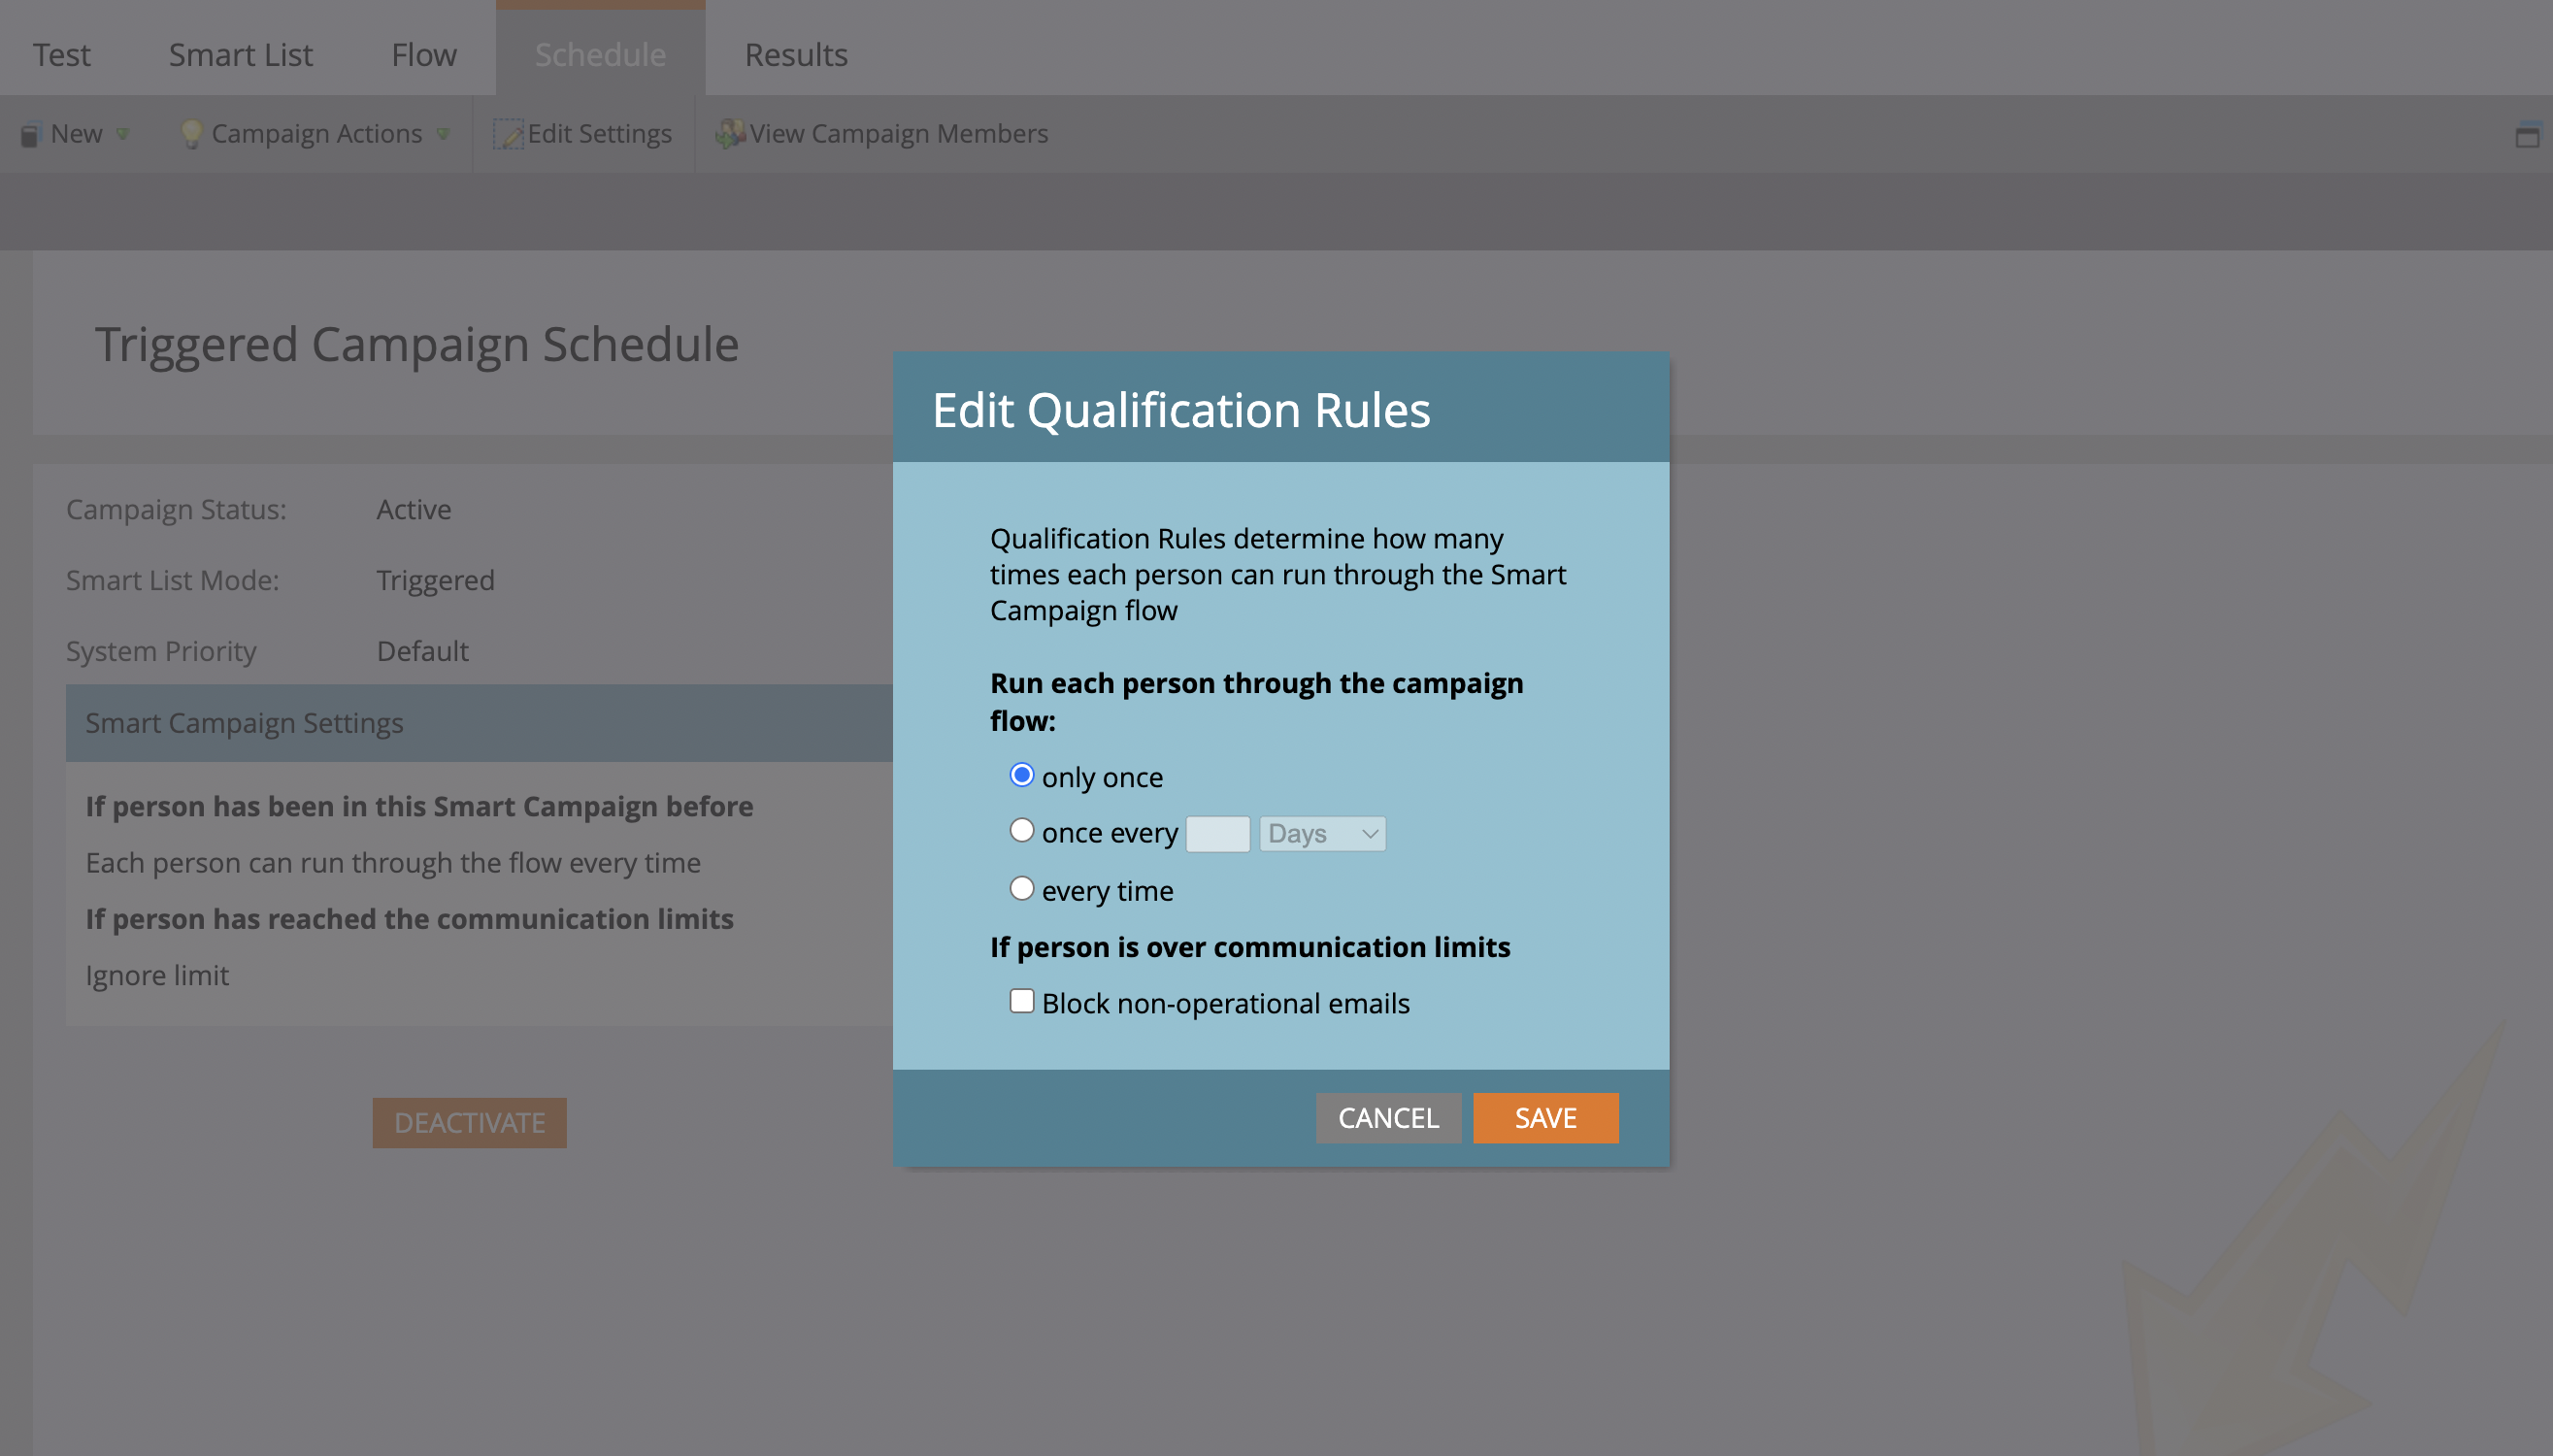
- Click Activate when you're finished.
For additional reference, see Marketo's how-to article.
Sync configuration
Each new row in your model triggers your Marketo Smart Campaign. That means that Hightouch triggers the campaign for every row in your model on your first sync run, or if you trigger a full resync. In subsequent sync runs, only new rows in your model's query results trigger the campaign.
Campaign selection
To start, select a campaign you've created in Marketo. Only campaigns triggerable via web service API are listed here. If you don't see the campaign you want to trigger in the dropdown, make sure it's follows the prerequisites and then click Refresh in Hightouch.

Lead matching
Marketo Smart Campaigns can only be triggered for leads that already exist in your Marketo instance. To trigger an email for the intended leads, select the model column that contains either the leads' Marketo GUID or Email.
If you use email for your lead matching and your leads aren't
de-duplicated by email, Hightouch uses the latest lead based on the
createdAt timestamp.
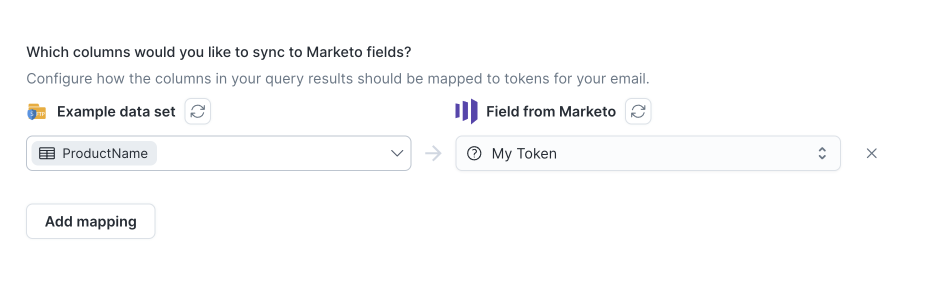
Token mappings
Use this section to map custom token values. You only need to add mappings for tokens used in your email template.
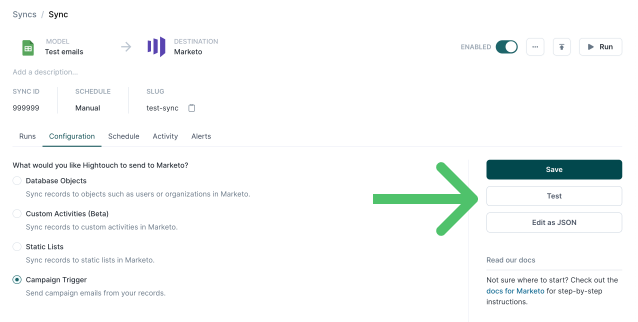
Testing
Before activating your campaign trigger sync, it's best to test it with with an example lead whose email inbox you have access to. This lets you inspect the test email.
Click Test from the sync configuration page.
You can manually overwrite columns of a test row. In the example below, since the sync uses the Email column to match leads, you can manually overwrite the Email field to test lead's email address.
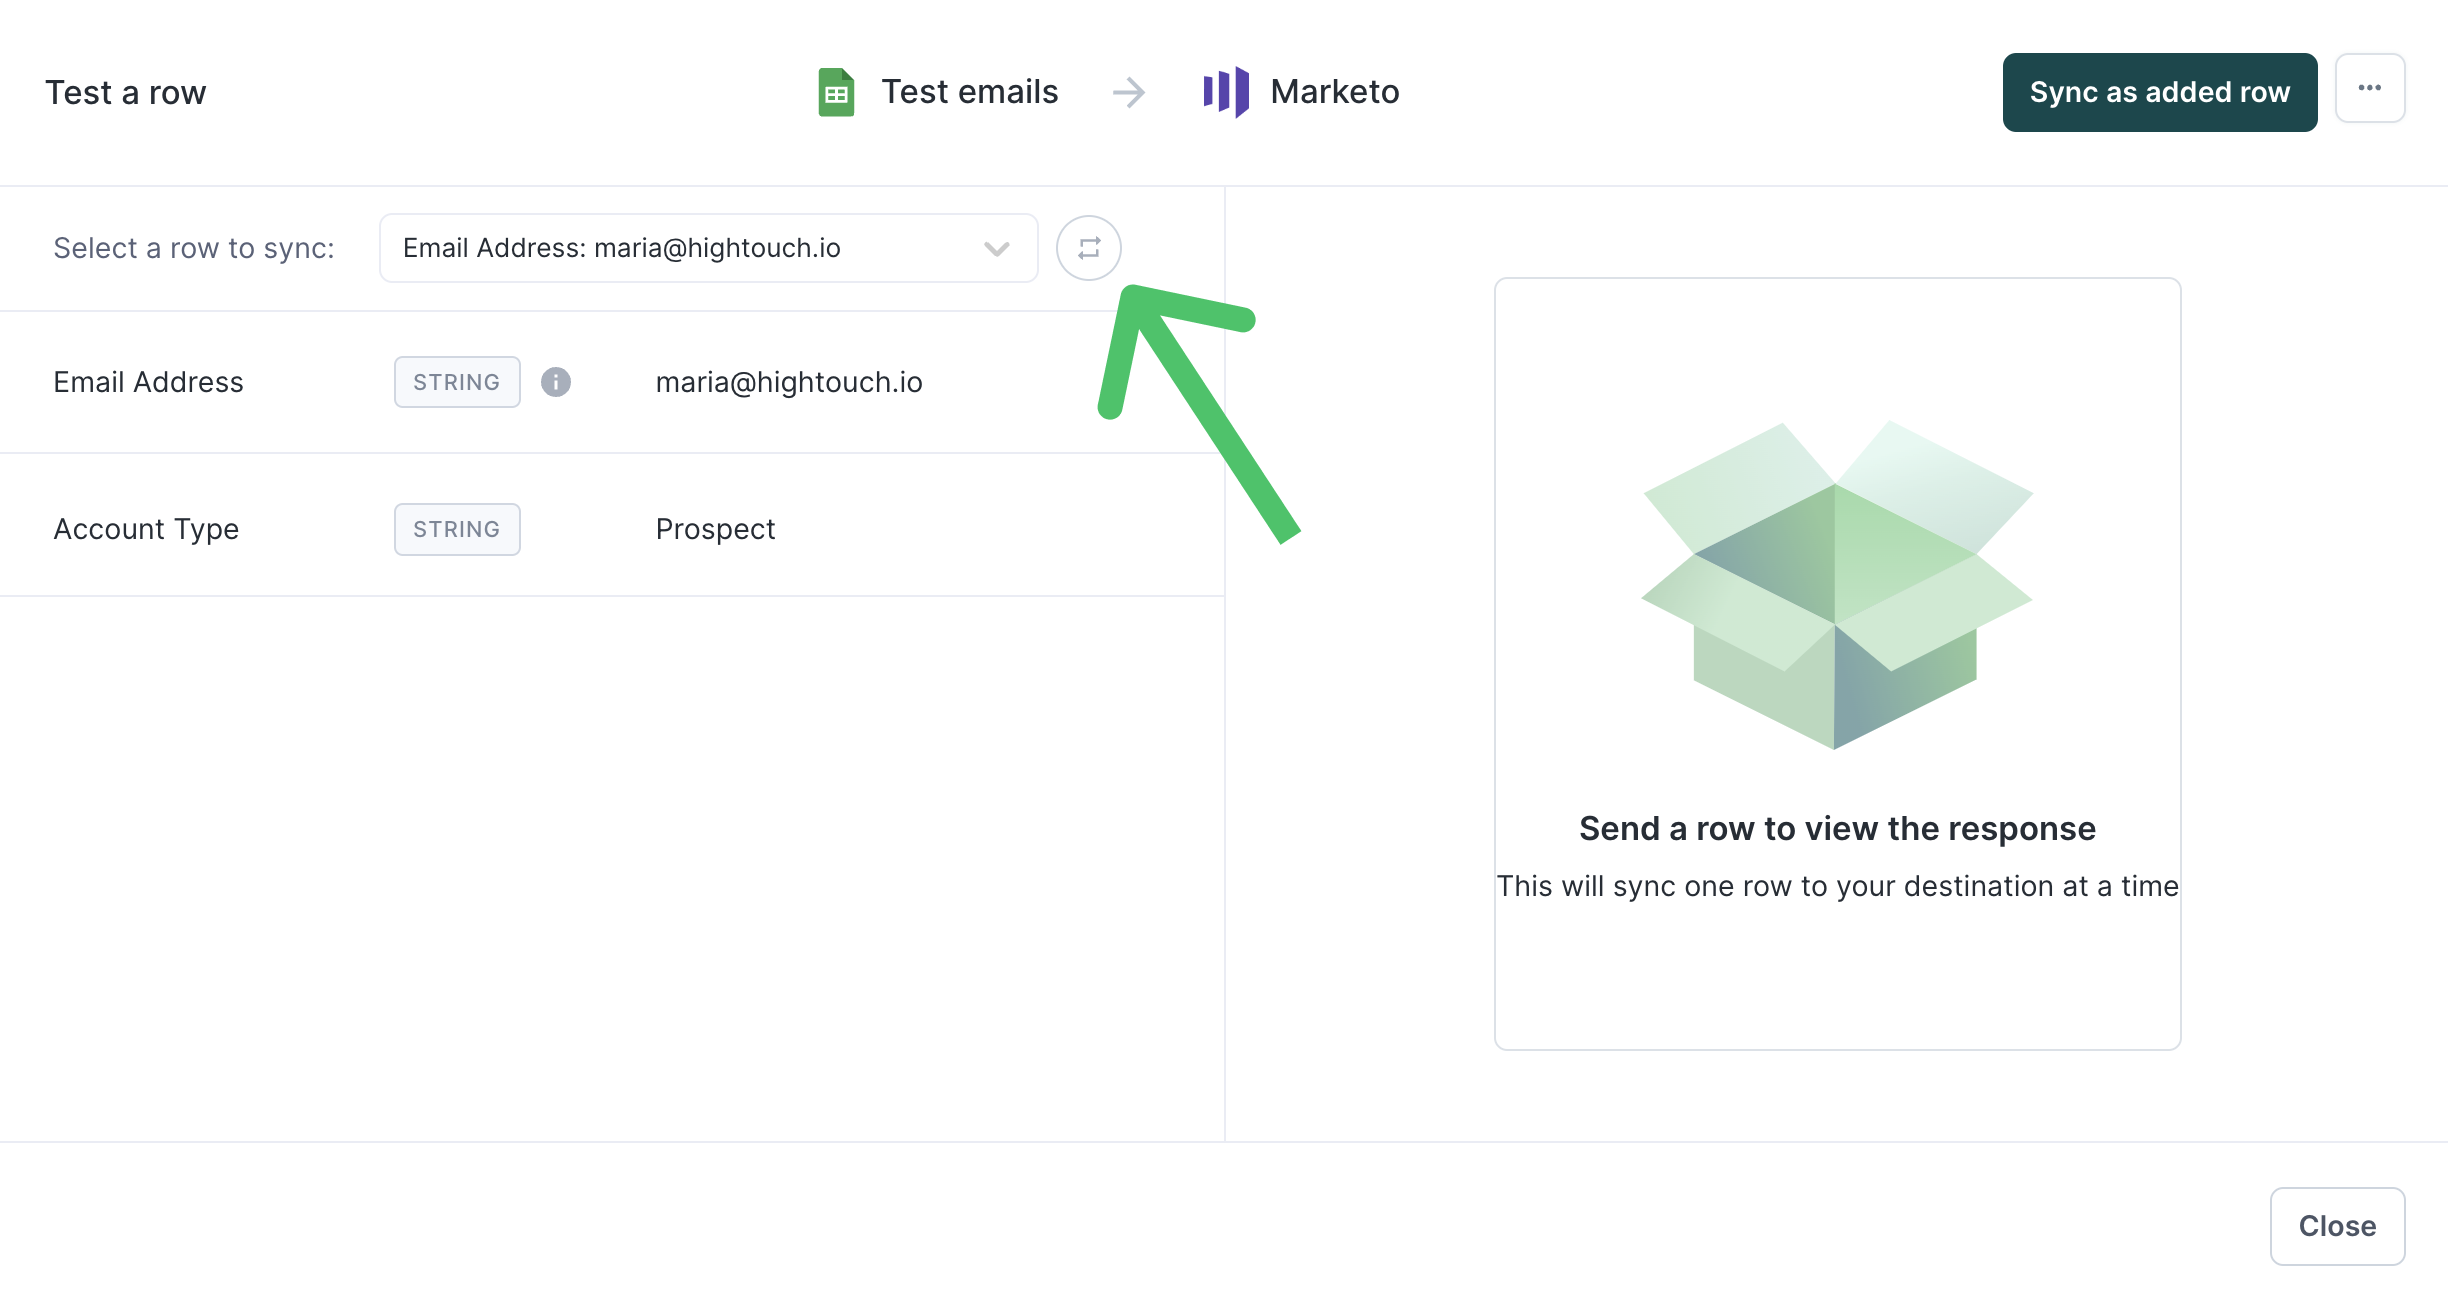
If you're using the Marketo GUID column to match leads, you need to manually overwrite the Marketo GUID field to the test lead's Marketo GUID to send a test email.
Once you've altered the email or Marketo GUID, press Sync as added row. This triggers the campaign for the test lead and sends an email to their inbox.
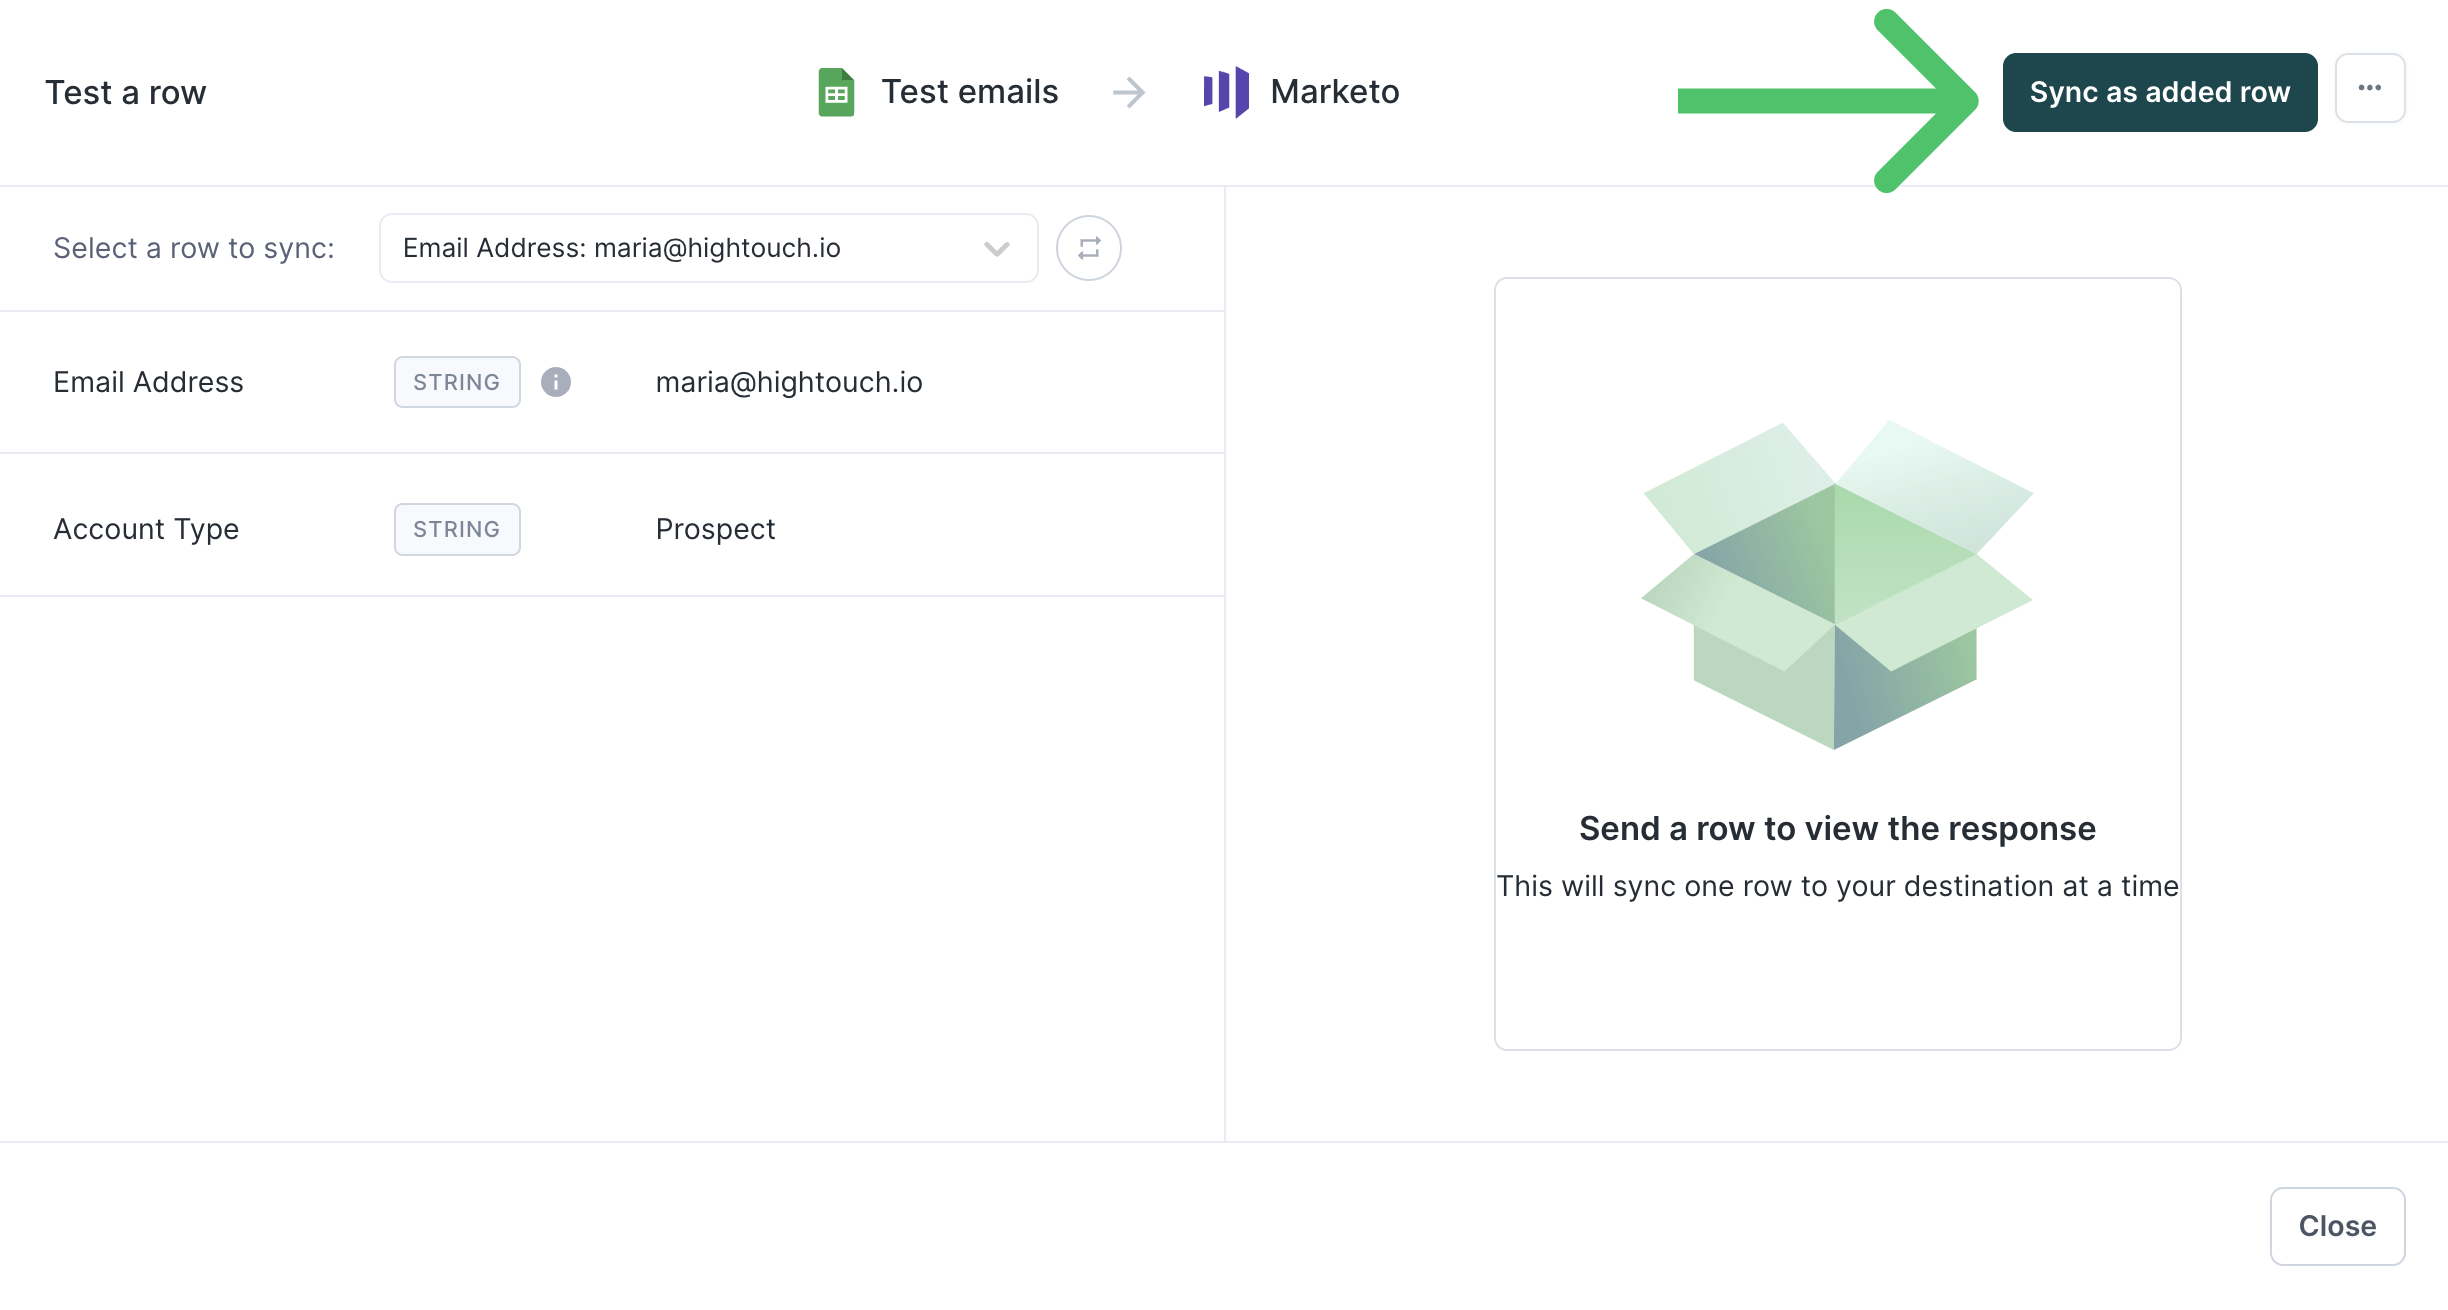
Check the test lead's email inbox to verify that your configuration sent the intended email with custom tokens populated as expected.
Tips and troubleshooting
Common errors
If you encounter an error or question not listed below and need assistance, don't hesitate to . We're here to help.
Code 413 "Request Entity Too Large"
This error means that size of Hightouch's API request to Marketo was too large. Lower the batch size to mitigate it.
Code 603 "Access denied"
This error means that authentication to Marketo was successful but the account you authenticated with doesn't have sufficient permission to call the Marketo API. For more information, see Marketo's help article.
As explained in the Create Marketo service section, ensure that:
- you assigned all permissions listed in the table to the API access role (especially the Read-Write Activity permission),
- and that the Marketo API user has access to the Marketo workspaces and partitions you want to use in Hightouch.
Code 1003 "Campaign is not part of a program"
To resolve this error, move your campaign into a program.
Code 1007 "Multiple lead match lookup criteria"
To resolve this error, remove any duplicate rows with the same primary key in your model.
Code 1013 "Record not found"
This error can happen if you select Update mode when syncing to standard and custom objects. If a record doesn't exist in Marketo yet, you need to select Upsert mode instead, which updates existing records and creates new ones, if needed.
Live debugger
Hightouch provides complete visibility into the API calls made during each of your sync runs. We recommend reading our article on debugging tips and tricks to learn more.
Sync alerts
Hightouch can alert you of sync issues via Slack, PagerDuty, SMS, or email. For details, please visit our article on alerting.