
Hundreds of industry leaders use Hightouch to turn Snowflake into a marketing, sales, success and operational engine
Overview
Hightouch lets you pull data stored in your Snowflake warehouse and push it to downstream destinations.
You can connect Snowflake to Hightouch using Snowflake Partner Connect to bypass the setup steps outlined below. You can learn more about this in Snowflake's documentation.
Connecting Hightouch to Snowflake requires some setup in both platforms. It's recommended to set up a service account with the correct permissions in Snowflake before configuring the connection in Hightouch.
Snowflake credential setup
To allow Hightouch access to Snowflake, it's best to create a user specifically provisioned with access to the required tables and schemas. You can also use a personal Snowflake login for your credentials, as long as it has the correct permissions.
You can use the following SQL template to create a service account with the necessary roles and permissions with some considerations:
- This snippet provides an example of creating a service account; you may need to alter it depending on your Snowflake implementation details.
- RSA key pair authentication setup is detailed in the Provide credentials section.
- If you want Hightouch to access multiple databases, run the snippet multiple times, changing
ht_databaseeach time. - If you want Hightouch to have read-only access, omit the last line of the query.
- The snippet includes lines for creating a new warehouse and database for Hightouch to use; if you already have databases and warehouses you intend to use, omit these lines
-- Edit the following variables
set ht_username='HIGHTOUCH_USER';
set ht_default_warehouse='<warehouse>';
set ht_database='<database>';
set ht_default_namespace='<database.schema>';
set ht_default_role='HIGHTOUCH_ROLE';
set ht_comment='Used for Hightouch integrations';
-- Set role for grants
USE ROLE ACCOUNTADMIN;
-- Create a role for Hightouch
CREATE ROLE IF NOT EXISTS identifier($ht_default_role)
COMMENT = $ht_comment;
-- Only if you want to create a new warehouse for Hightouch to use
CREATE WAREHOUSE IF NOT EXISTS identifier($ht_default_warehouse);
-- Create Hightouch's user
CREATE USER IF NOT EXISTS identifier($ht_username)
TYPE=service
rsa_public_key='<public_key>'
DEFAULT_WAREHOUSE=$ht_default_warehouse
DEFAULT_NAMESPACE=$ht_default_namespace
DEFAULT_ROLE=$ht_default_role
COMMENT=$ht_comment;
-- Grant permissions to the role
GRANT ROLE identifier($ht_default_role) TO ROLE SYSADMIN;
GRANT USAGE ON WAREHOUSE identifier($ht_default_warehouse) TO ROLE identifier($ht_default_role);
GRANT ROLE identifier($ht_default_role) TO USER identifier($ht_username);
-- Only if you want to create a new database for Hightouch to use
CREATE DATABASE IF NOT EXISTS identifier($ht_database);
GRANT USAGE ON DATABASE identifier($ht_database) TO ROLE identifier($ht_default_role);
GRANT USAGE ON ALL SCHEMAS IN DATABASE identifier($ht_database) TO ROLE identifier($ht_default_role);
GRANT SELECT ON ALL TABLES IN DATABASE identifier($ht_database) TO ROLE identifier($ht_default_role);
GRANT SELECT ON FUTURE TABLES IN DATABASE identifier($ht_database) TO ROLE identifier($ht_default_role);
GRANT SELECT ON ALL VIEWS IN DATABASE identifier($ht_database) TO ROLE identifier($ht_default_role);
GRANT SELECT ON FUTURE VIEWS IN DATABASE identifier($ht_database) TO ROLE identifier($ht_default_role);
-- Grant write access for the Lightning Sync Engine (faster syncs) & Sync Logs - Optional
USE identifier($ht_database);
CREATE SCHEMA IF NOT EXISTS hightouch_audit;
CREATE SCHEMA IF NOT EXISTS hightouch_planner;
GRANT OWNERSHIP ON SCHEMA hightouch_audit TO ROLE identifier($ht_default_role);
GRANT OWNERSHIP ON SCHEMA hightouch_planner TO ROLE identifier($ht_default_role);
If you opt to use the Lightning engine, you must grant additional permissions.
Once you've created a Snowflake service account, you're ready to set up the connection in Hightouch.
Connection configuration
You may need to allowlist Hightouch's IP addresses to let our systems connect to your Snowflake account. Reference our networking docs to determine which IP addresses you need to allowlist.
You can also securely connect to your Snowflake account using AWS PrivateLink. AWS PrivateLink is a Business Tier feature.
To get started, go to the Sources overview page and click the Add source button. Select Snowflake and follow the steps below.
Configure your source
Enter the following required fields into Hightouch:
- Account identifier: You can find this identifier at the beginning of your Snowflake URL, for example, (
https://ACCOUNT_IDENTIFIER.snowflakecomputing.com). Only enter theACCOUNT_IDENTIFIERand not the full URL. - Warehouse: This specifies the warehouse to use when Hightouch executes queries in Snowflake.
- Database: This specifies the database to use when Hightouch executes queries in Snowflake.
Account identifier format may differ based on Snowflake account age.
For example, older Snowflake accounts often have identifiers that look like ACCOUNT_LOCATOR.CLOUD_REGION_ID.CLOUD, whereas newer Snowflake accounts have identifiers that look like ORGNAME-ACCOUNT_NAME.
For more details, visit Snowflake's account identifier docs.
Choose your sync engine
For optimal performance, Hightouch tracks incremental changes in your data model—such as added, changed, or removed rows—and only syncs those records. You can choose between two different sync engines for this work.
The Basic engine requires read-only access to Snowflake. Hightouch executes a query in your database, reads all query results, and then determines incremental changes using Hightouch's infrastructure. This engine is easier to set up since it requires read—not write—access to Snowflake.
The Lightning engine requires read and write access to Snowflake. The engine stores previously synced data in a separate schema in Snowflake managed by Hightouch. In other words, the engine uses Snowflake to track incremental changes to your data rather than performing these calculations in Hightouch. Therefore, these computations are completed more quickly.
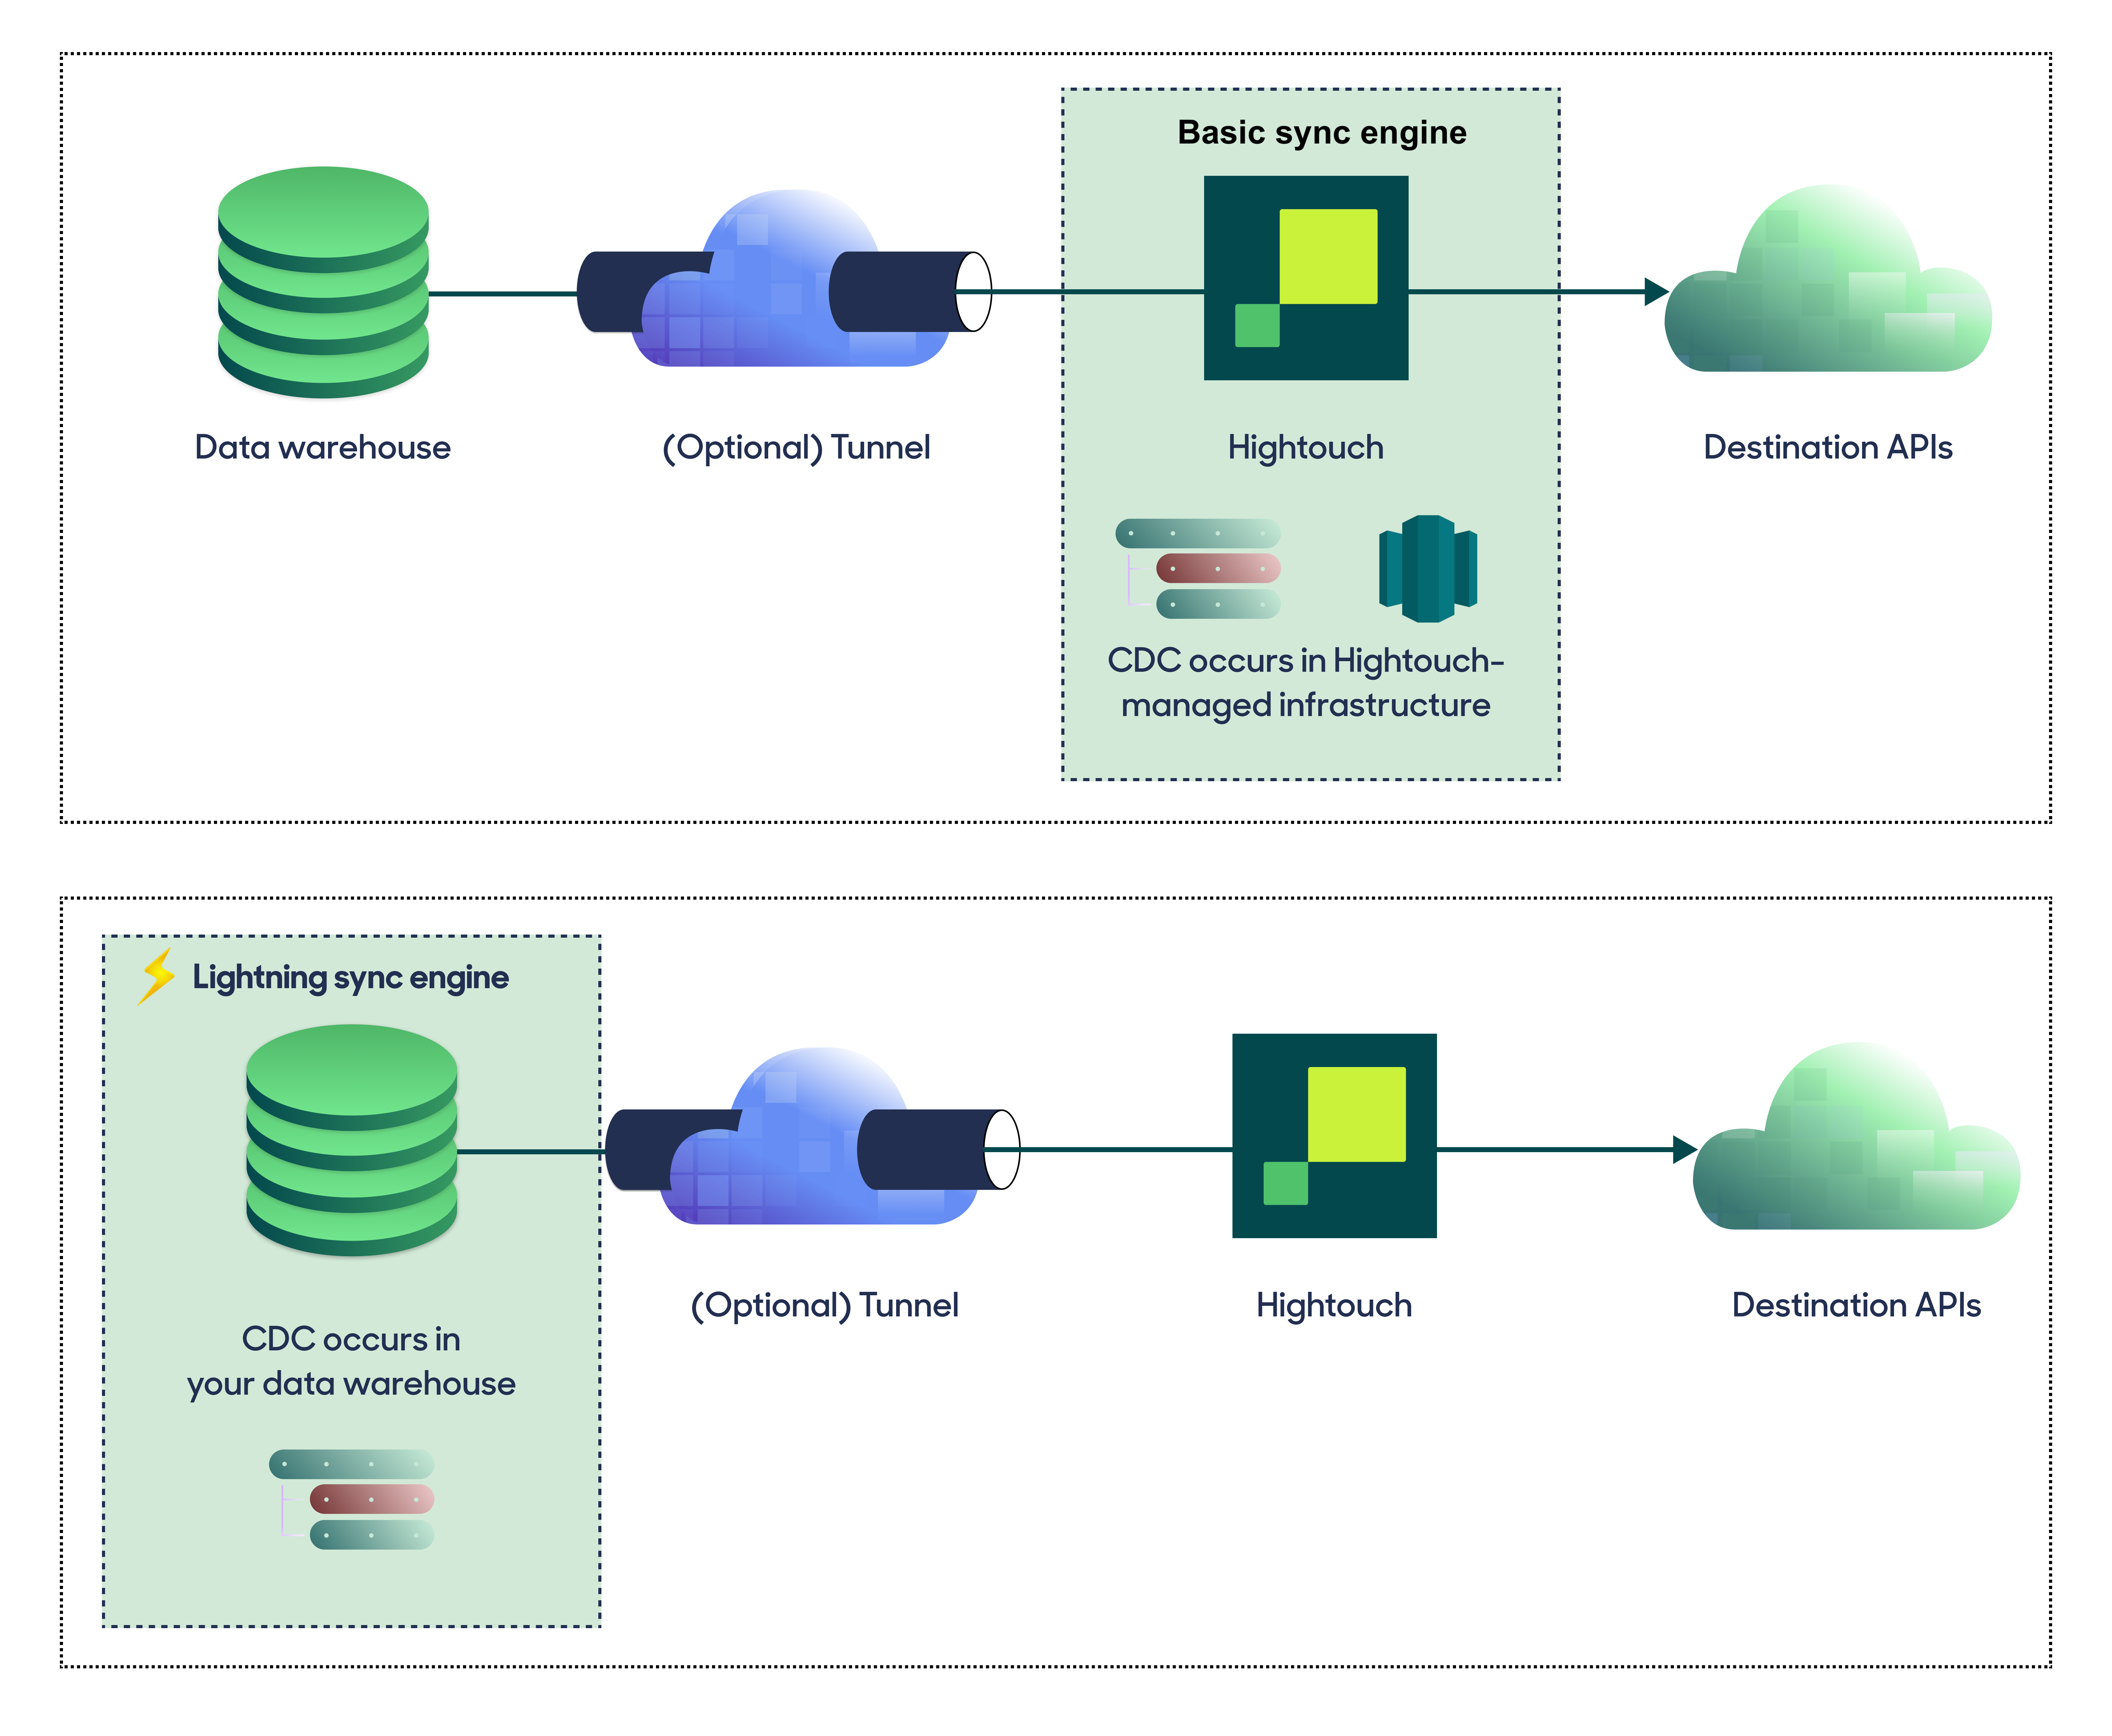
If you select the Basic engine, you can switch to the Lightning engine later. Once you've configured the Lightning engine, you can't move back to the Basic engine without recreating Snowflake as a source.
To learn more, including migration steps and tips, check out the Lightning sync engine docs.
Basic versus Lightning engine comparison
The Lightning sync engine requires granting write access to your data warehouse, which makes its setup more involved than the Basic sync engine. However, it is more performant and reliable than the Basic engine. This makes it the ideal choice to guarantee faster syncs, especially with large data models. It also supports more features, such as Warehouse Sync Logs, Match Booster, and Identity Resolution.
| Criteria | Basic sync engine | Lightning sync engine |
|---|---|---|
| Performance | Slower | Quicker |
| Ideal for large data models (over 100 thousand rows) | No | Yes |
| Reliability | Normal | High |
| Resilience to sync interruptions | Normal | High |
| Extra features | None | Warehouse Sync Logs, Match Booster, Identity Resolution |
| Ease of setup | Simpler | More involved |
| Location of change data capture | Hightouch infrastructure | Snowflake schemas managed by Hightouch |
| Required permissions in Snowflake | Read-only | Read and write |
| Ability to switch | You can move to the Lightning engine at any time | You can't move to the Basic engine once Lightning is configured |
Lightning engine setup
To set up the Lightning engine, ensure that the service account you previously created has the appropriate permissions.
Specifically, append these commands to the service account creation:
CREATE SCHEMA IF NOT EXISTS hightouch_audit;
CREATE SCHEMA IF NOT EXISTS hightouch_planner;
GRANT OWNERSHIP ON SCHEMA hightouch_audit TO ROLE identifier($ht_default_role);
GRANT OWNERSHIP ON SCHEMA hightouch_planner TO ROLE identifier($ht_default_role);
Provide credentials
Enter the following fields into Hightouch:
- Username: This can be your personal Snowflake login or a dedicated user for Hightouch. When using the Basic engine, this user must have read access to the data you wish to sync. If using the Lightning engine, you must also grant the permissions described in the preceding snippet.
- Role (optional) - Use this field to specify the role Hightouch should use when executing queries in Snowflake. If left blank, Hightouch uses the user's default role.
You have two options for finalizing your credentials:
- RSA key pair (recommended)
- Password
Snowflake is deprecating password authentication in favor of RSA key pair authentication or multi-factor authentication. Hightouch will continue to support password authentication for existing customers until they have migrated.
RSA authentication
Generate a private key and public key by running the following commands in your terminal:
$ openssl genrsa 2048 | openssl pkcs8 -topk8 -inform PEM -out rsa_key.p8
$ openssl rsa -in rsa_key.p8 -pubout -out rsa_key.pub
Then in Snowflake, execute an ALTER USER command to assign the public key to your Hightouch Snowflake user:
alter user ht_user set rsa_public_key='MIIBIjANBgkqh...';
In the Authentication Method of the Snowflake Source settings, drag and drop or upload the private key you just generated into the Private key file field.
Test your connection
When setting up a source for the first time, Hightouch validates the following:
- Network connectivity
- Snowflake credentials
- Permission to list schemas and tables
- Permission to write to
hightouch_plannerschema - Permission to write to
hightouch_auditschema
All configurations must pass the first three, while those with the Lightning engine must pass all of them.
Some sources may initially fail connection tests due to timeouts. Once a connection is established, subsequent API requests should happen more quickly, so it's best to retry tests if they first fail. You can do this by clicking Test again.
If you've retried the tests and verified your credentials are correct but the tests are still failing, don't hesitate to .
Next steps
Once your source configuration has passed the necessary validation, your source setup is complete. Next, you can set up models to define which data you want to pull from Snowflake.
The Snowflake source supports these modeling methods:
- writing a query in the SQL editor
- using the visual table selector
- leveraging existing dbt models
- leveraging existing Looker Looks
- leveraging existing Sigma workbooks
The SQL editor allows you to query data from all databases that your Snowflake service account has access to. The table selector only supports querying from the database specified in the source configuration.
You may also want to consider storing sync logs in Snowflake. Like using the Lightning sync engine versus the standard one, this feature lets you use Snowflake instead of Hightouch infrastructure. Rather than performance gains, it makes your sync log data available for more complex analysis. Refer to the warehouse sync logs docs to learn more.
You must enable the Lightning sync engine to store sync logs in your warehouse.
Tips and troubleshooting
If you encounter an error or question not listed below and need assistance, don't hesitate to . We're here to help.
Connection timeout
When initially testing your connection, you may receive a connection timeout error. Once a connection is established, subsequent API requests should happen more quickly, so it's best to retry the tests if they first fail. You can do this by clicking Test again.
Network error: Could not reach Snowflake
You may receive this error if the input for Account identifier is invalid.
Instead of using the complete Snowflake URL, for example, https://ACCOUNT_IDENTIFIER.snowflakecomputing.com,
ensure that you're only using the ACCOUNT_IDENTIFIER part of the URL, for example, companyname-xu12345 or companyname-xu12345.us-east-1.