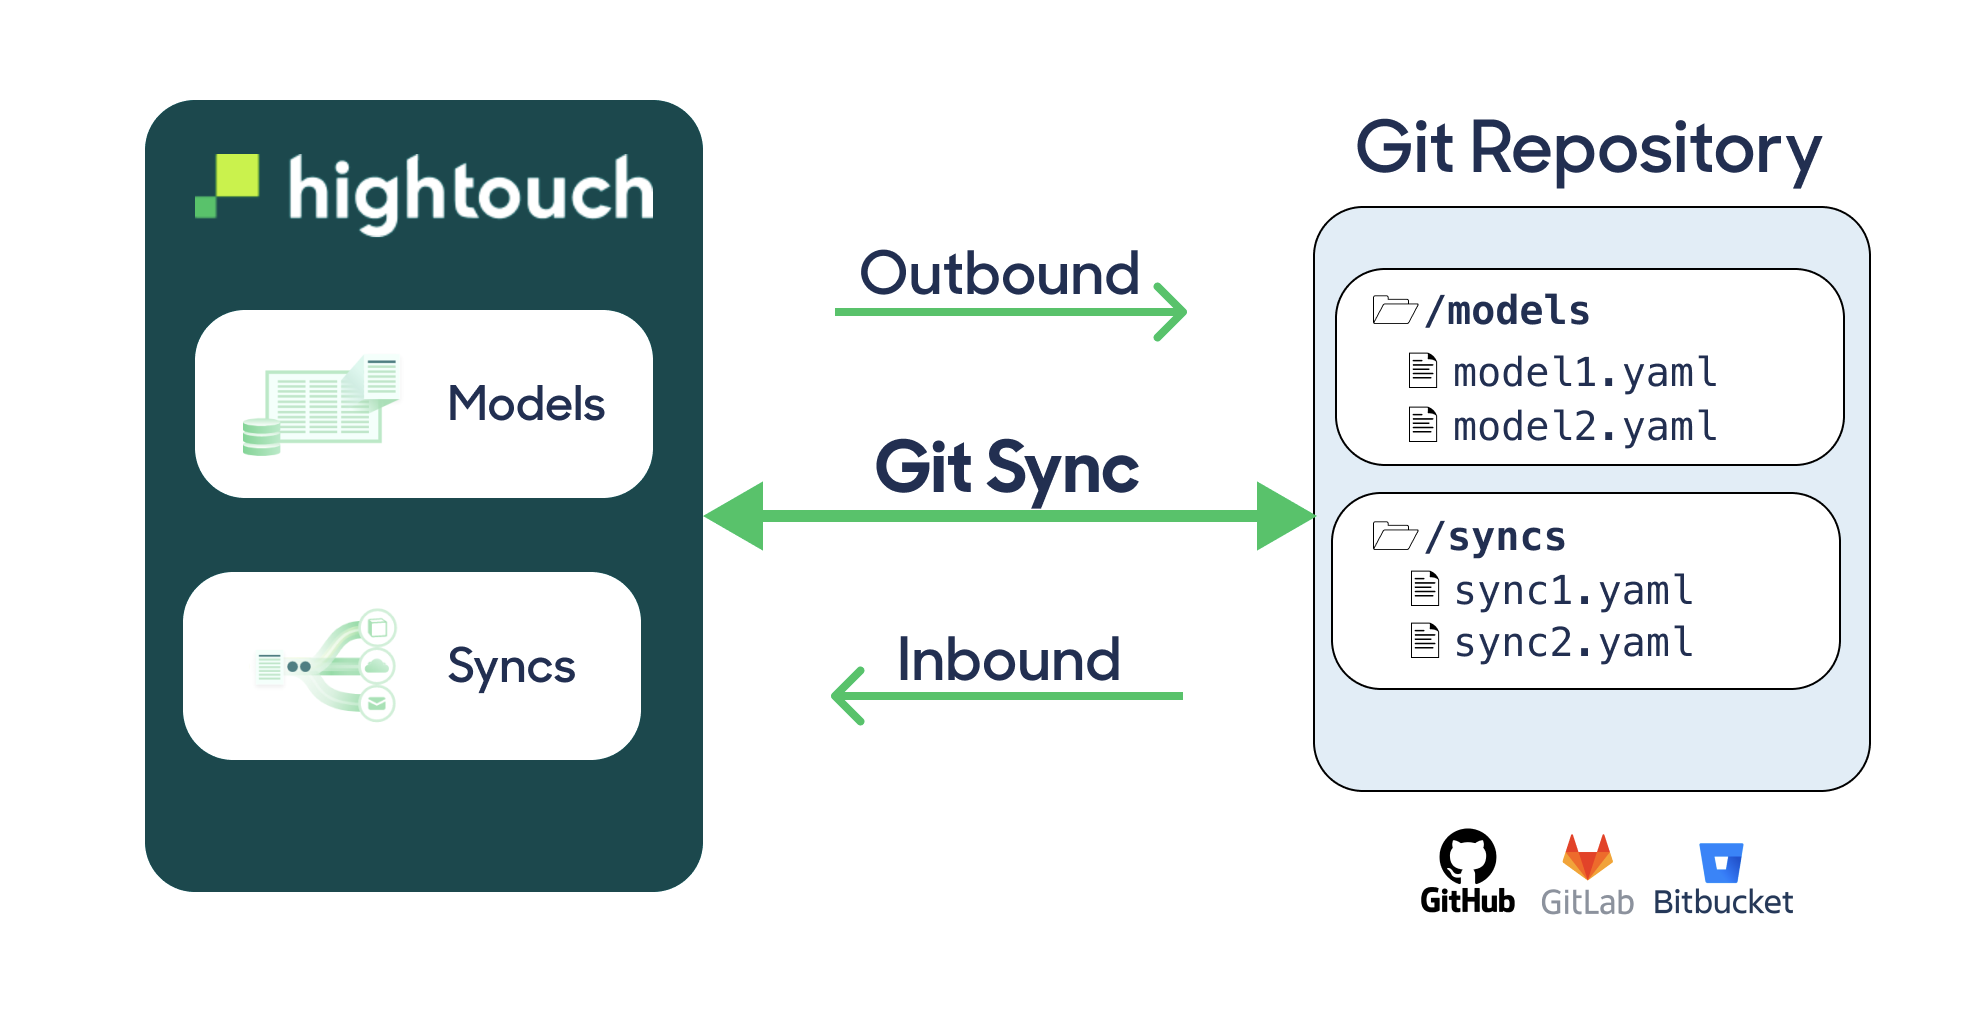
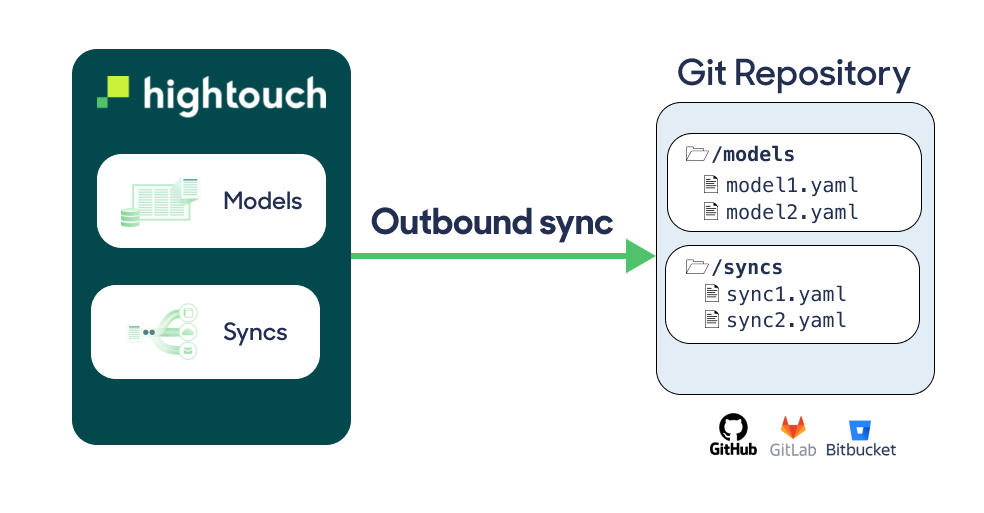
Git Sync connects your Hightouch workspace to a Git repository so you can version-control supported Hightouch resources.
With Git Sync, you can:
- Create and edit multiple Hightouch models and syncs in code
- Review changes through Git commits and file diffs
- Roll resources back to a previous version
- Keep staging and production workspaces aligned through shared YAML files
Git Sync is bidirectional:
- Changes made in the Hightouch UI are written to YAML files in Git. These changes are marked as
OUTBOUND. - Changes made to YAML files in Git are applied back to Hightouch. These changes are marked as
INBOUND.
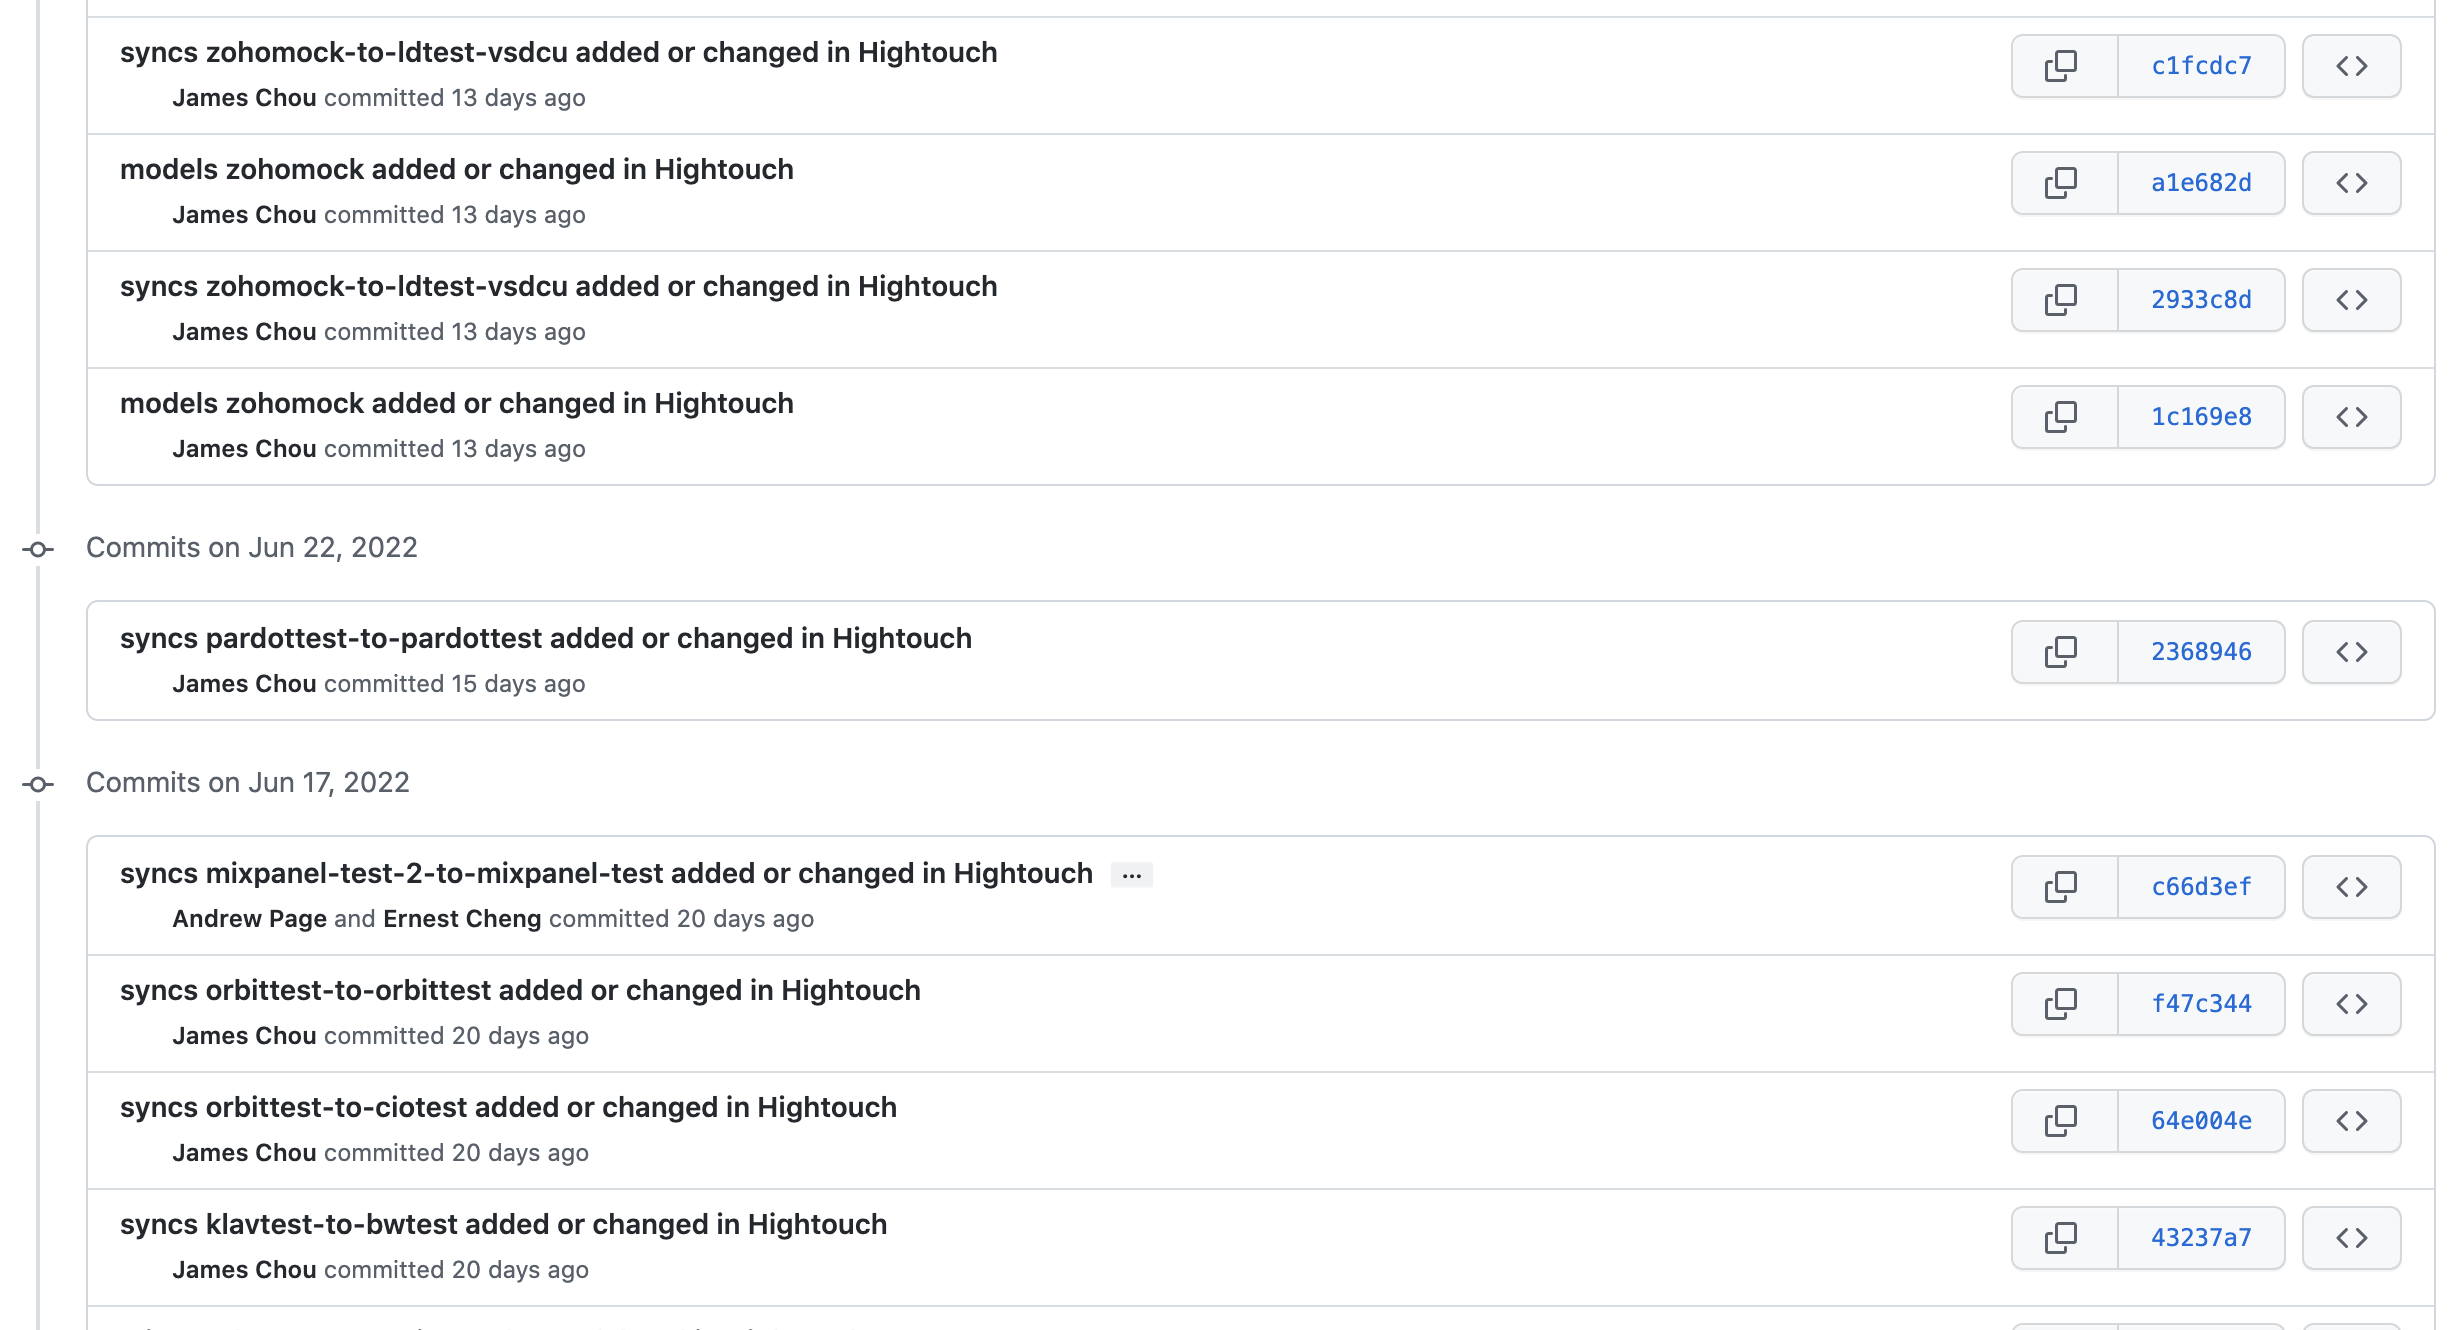
Each update to a supported resource creates a commit in your configured repository.
Git Sync currently supports models (including Customer Studio schema models), syncs, and event contracts. Git Sync does not currently support Customer Studio audiences or syncs created from those audiences.
Inbound changes made in your Git Sync repository don't require approval from another team member, even if your workspace uses approval flows.
Git Sync supports most Git providers, including GitHub, Bitbucket, GitLab, and private on-premise repositories. In most cases, changes sync between Hightouch and Git in about one minute.
Hightouch can connect to Git repositories for two different purposes.
Git Sync uses a Git repository to version-control Hightouch resources. This is separate from Git repositories used to leverage dbt models.
Setup
To set up Git Sync, complete these steps:
- Create or choose a Git repository.
- Authenticate Hightouch with your Git provider.
- Configure Git Sync in Hightouch.
Create or choose a Git repository
Use a Git repository to store the YAML files that represent your supported Hightouch resources.
If you are creating a new repository, GitHub repositories are the easiest to start with because they can use the Hightouch GitHub app.
If you create an empty repository, make an initial commit, such as adding a README file. This creates the branch Hightouch needs to connect to.
Authenticate to Git
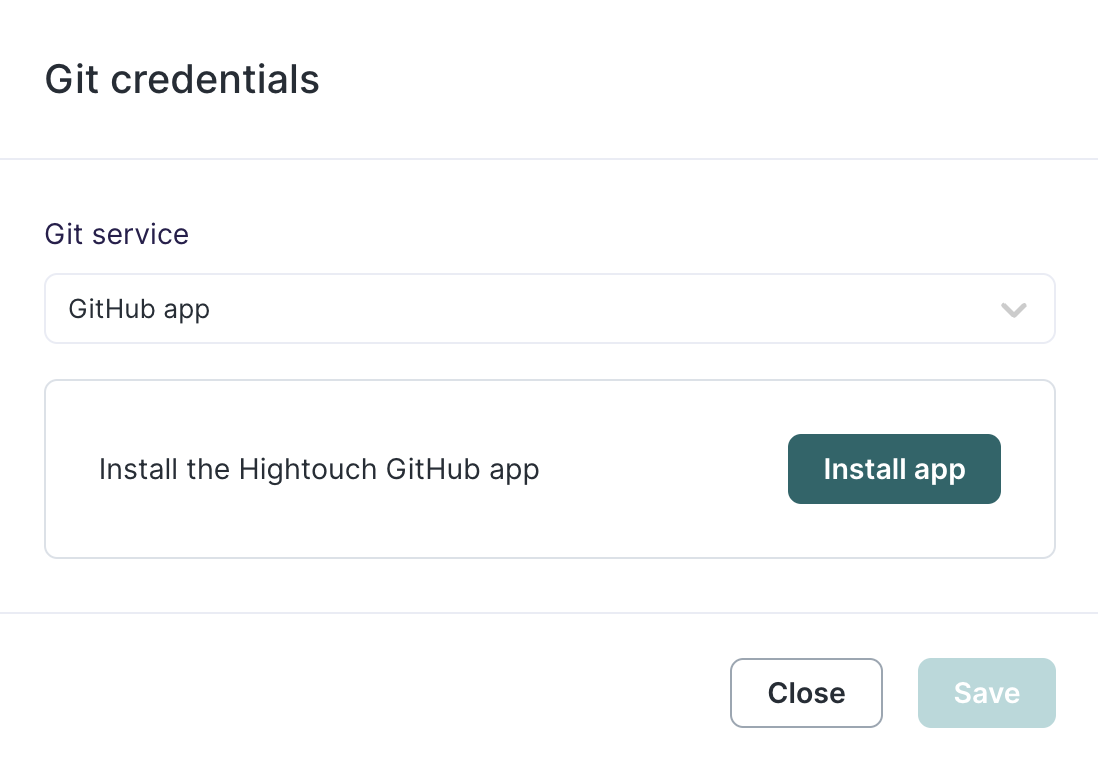
After you have a repository, configure your Git credentials in Hightouch.
- Go to the Git Sync configuration page.
- Under Configuration > Git credentials, select Set up.
- Choose your Git provider and authentication method.
If you use GitHub, we recommend using the Hightouch GitHub app for the most up-to-date feature support.
Regardless of provider, grant Hightouch access only to the repository or repositories you want to use with Git Sync.
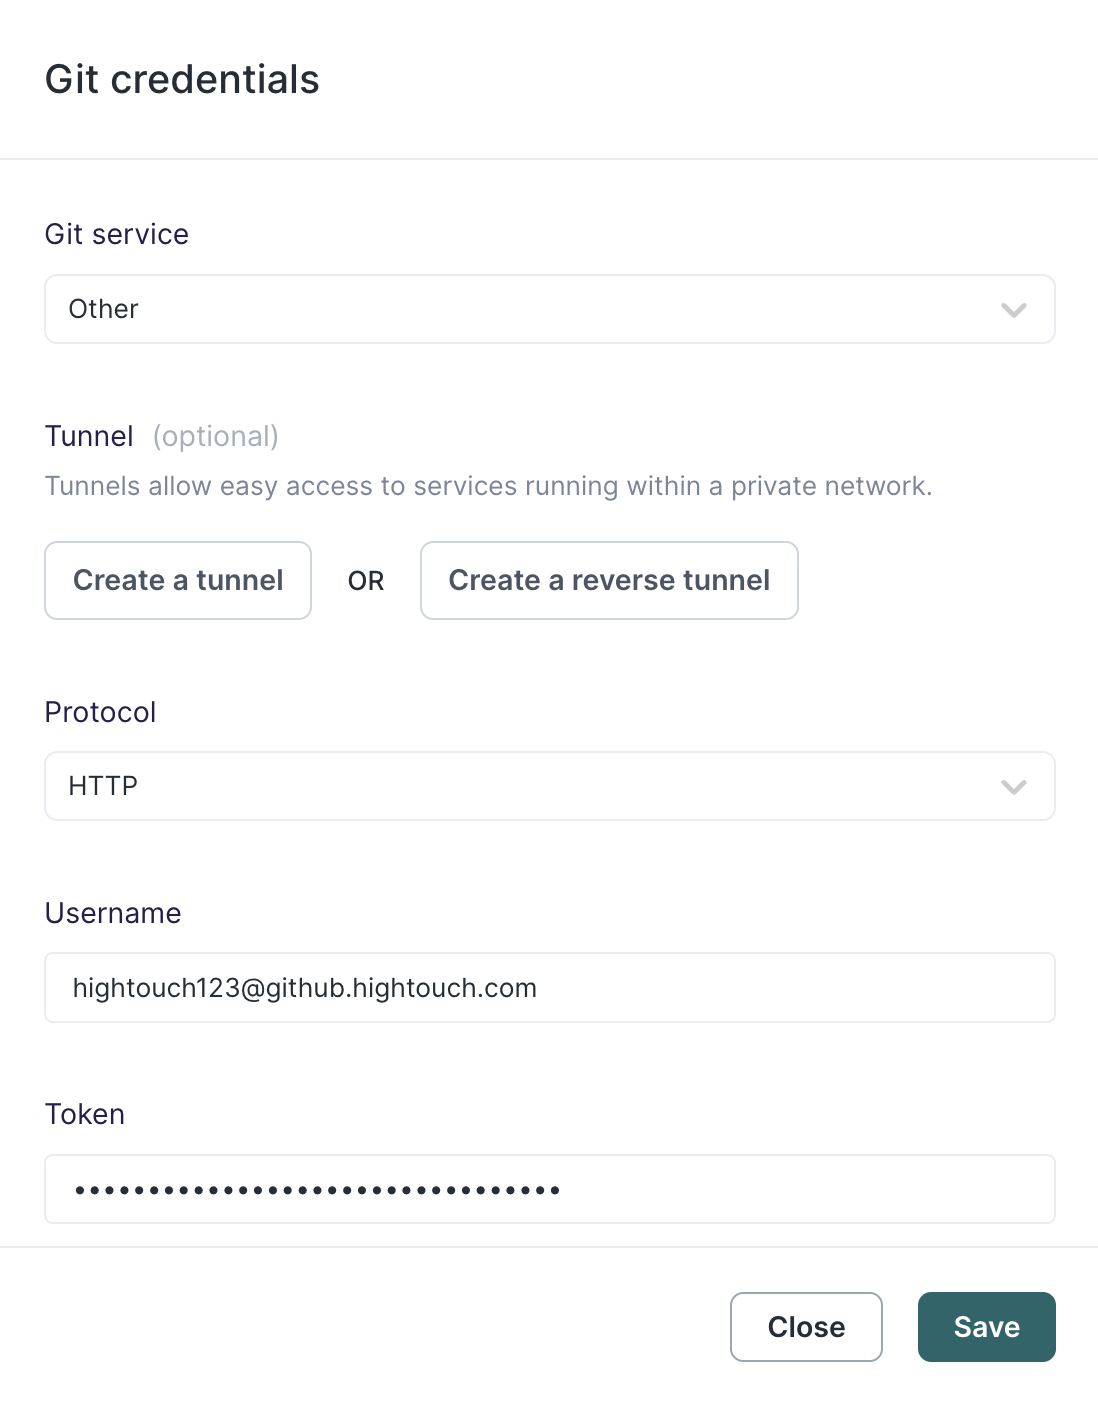
Authenticate to a GitHub Enterprise repository
If you use GitHub Enterprise with a self-hosted server:
- Under Git service, select Other.
- For Username, enter your full GitHub Enterprise username. For example,
hightouch123@github.hightouch.com. - For Token, enter a GitHub access token tied to that username.
- Make sure the token has access to the repository or repositories Hightouch should use.
Authenticate to an AWS CodeCommit repository
If you use AWS CodeCommit, you must use SSH to authenticate.
- Configure your AWS CodeCommit repository for SSH by following AWS's setup instructions.
- In Hightouch, select Other as the Git service.
- Select SSH as the Protocol.
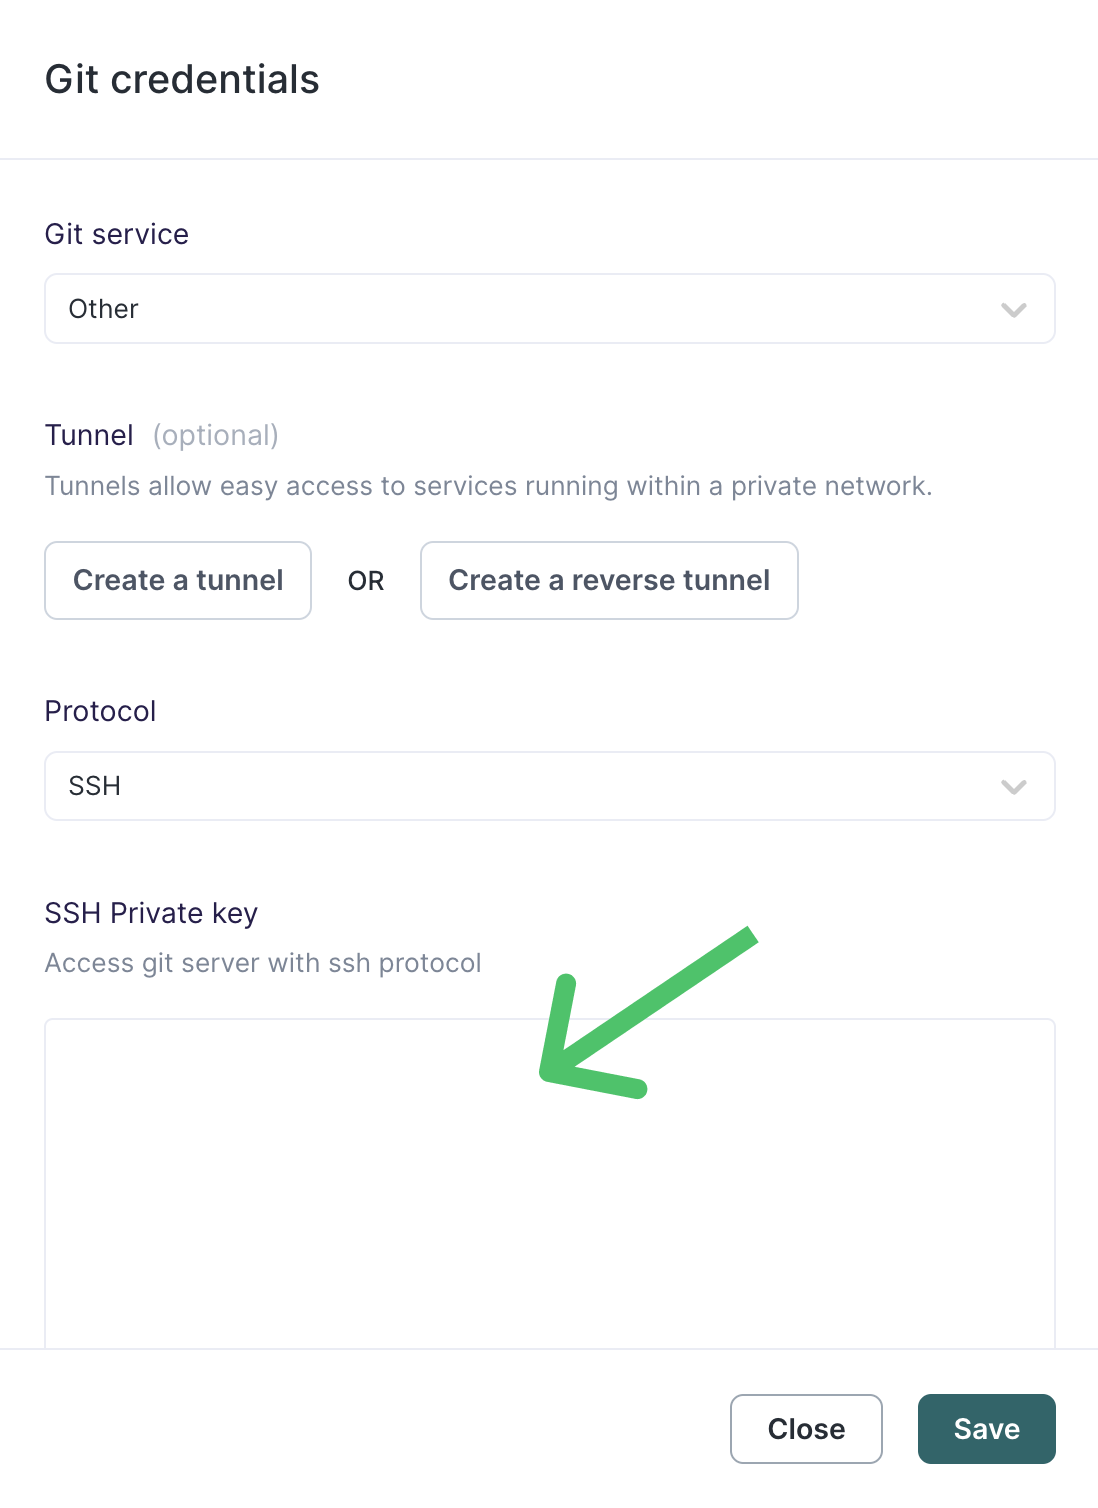
- Under SSH Private key, enter the private key you generated when configuring AWS CodeCommit.
- Select Save.
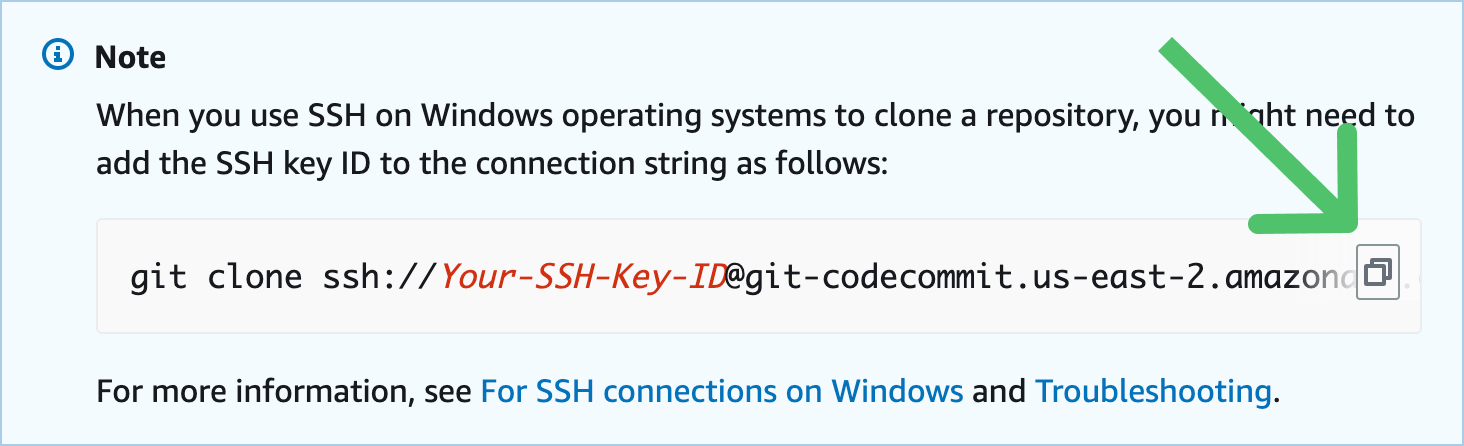
- For Repository, enter the full SSH URL, including the AWS SSH key ID.
The AWS SSH key ID is different from the general access keys in your AWS account.

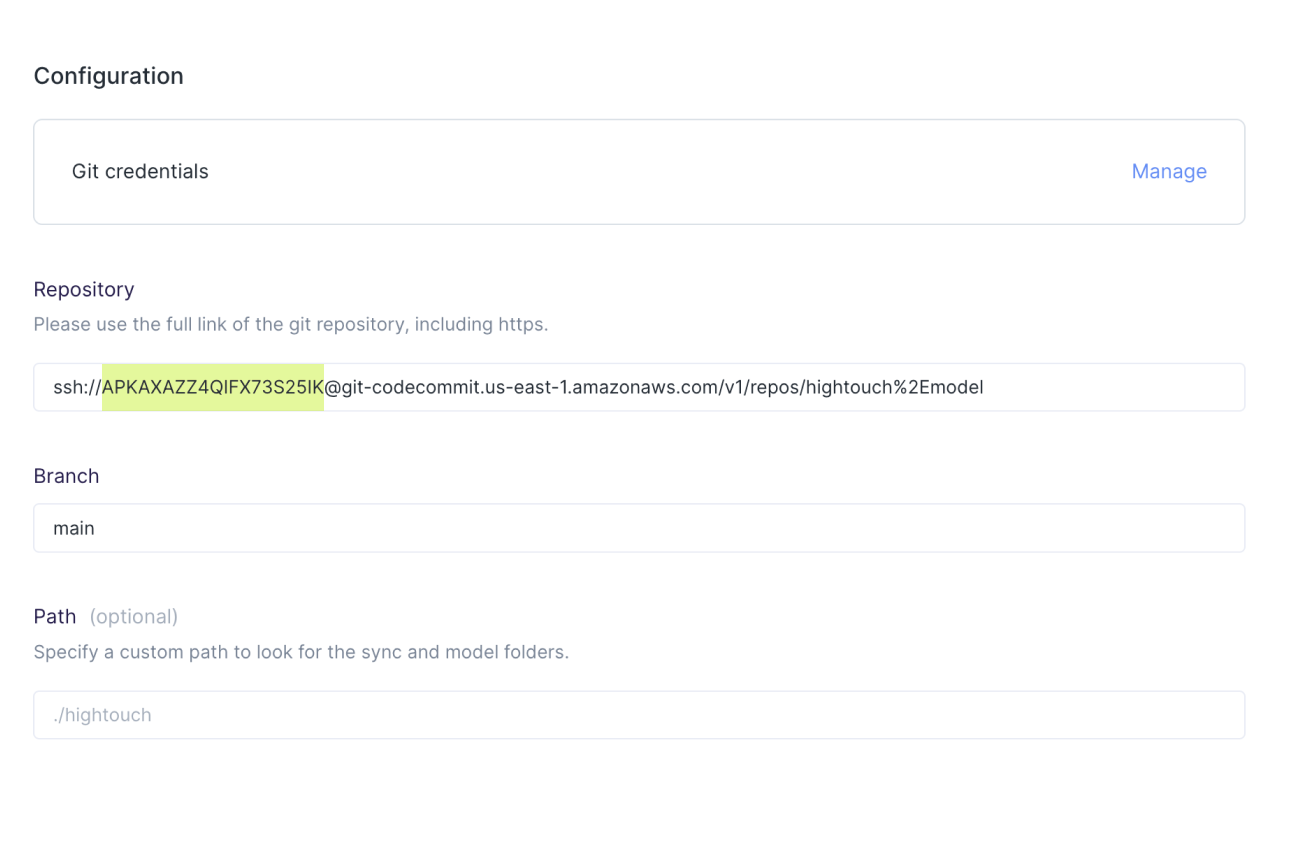
You can copy your URL from these instructions in AWS's docs.
Configure Git Sync
After you authenticate to Git, enable Git Sync for your workspace.
- Go to Integrations > Extensions.
- Open the Version control with Git extension.
- On the Configuration tab, enable Git Sync.
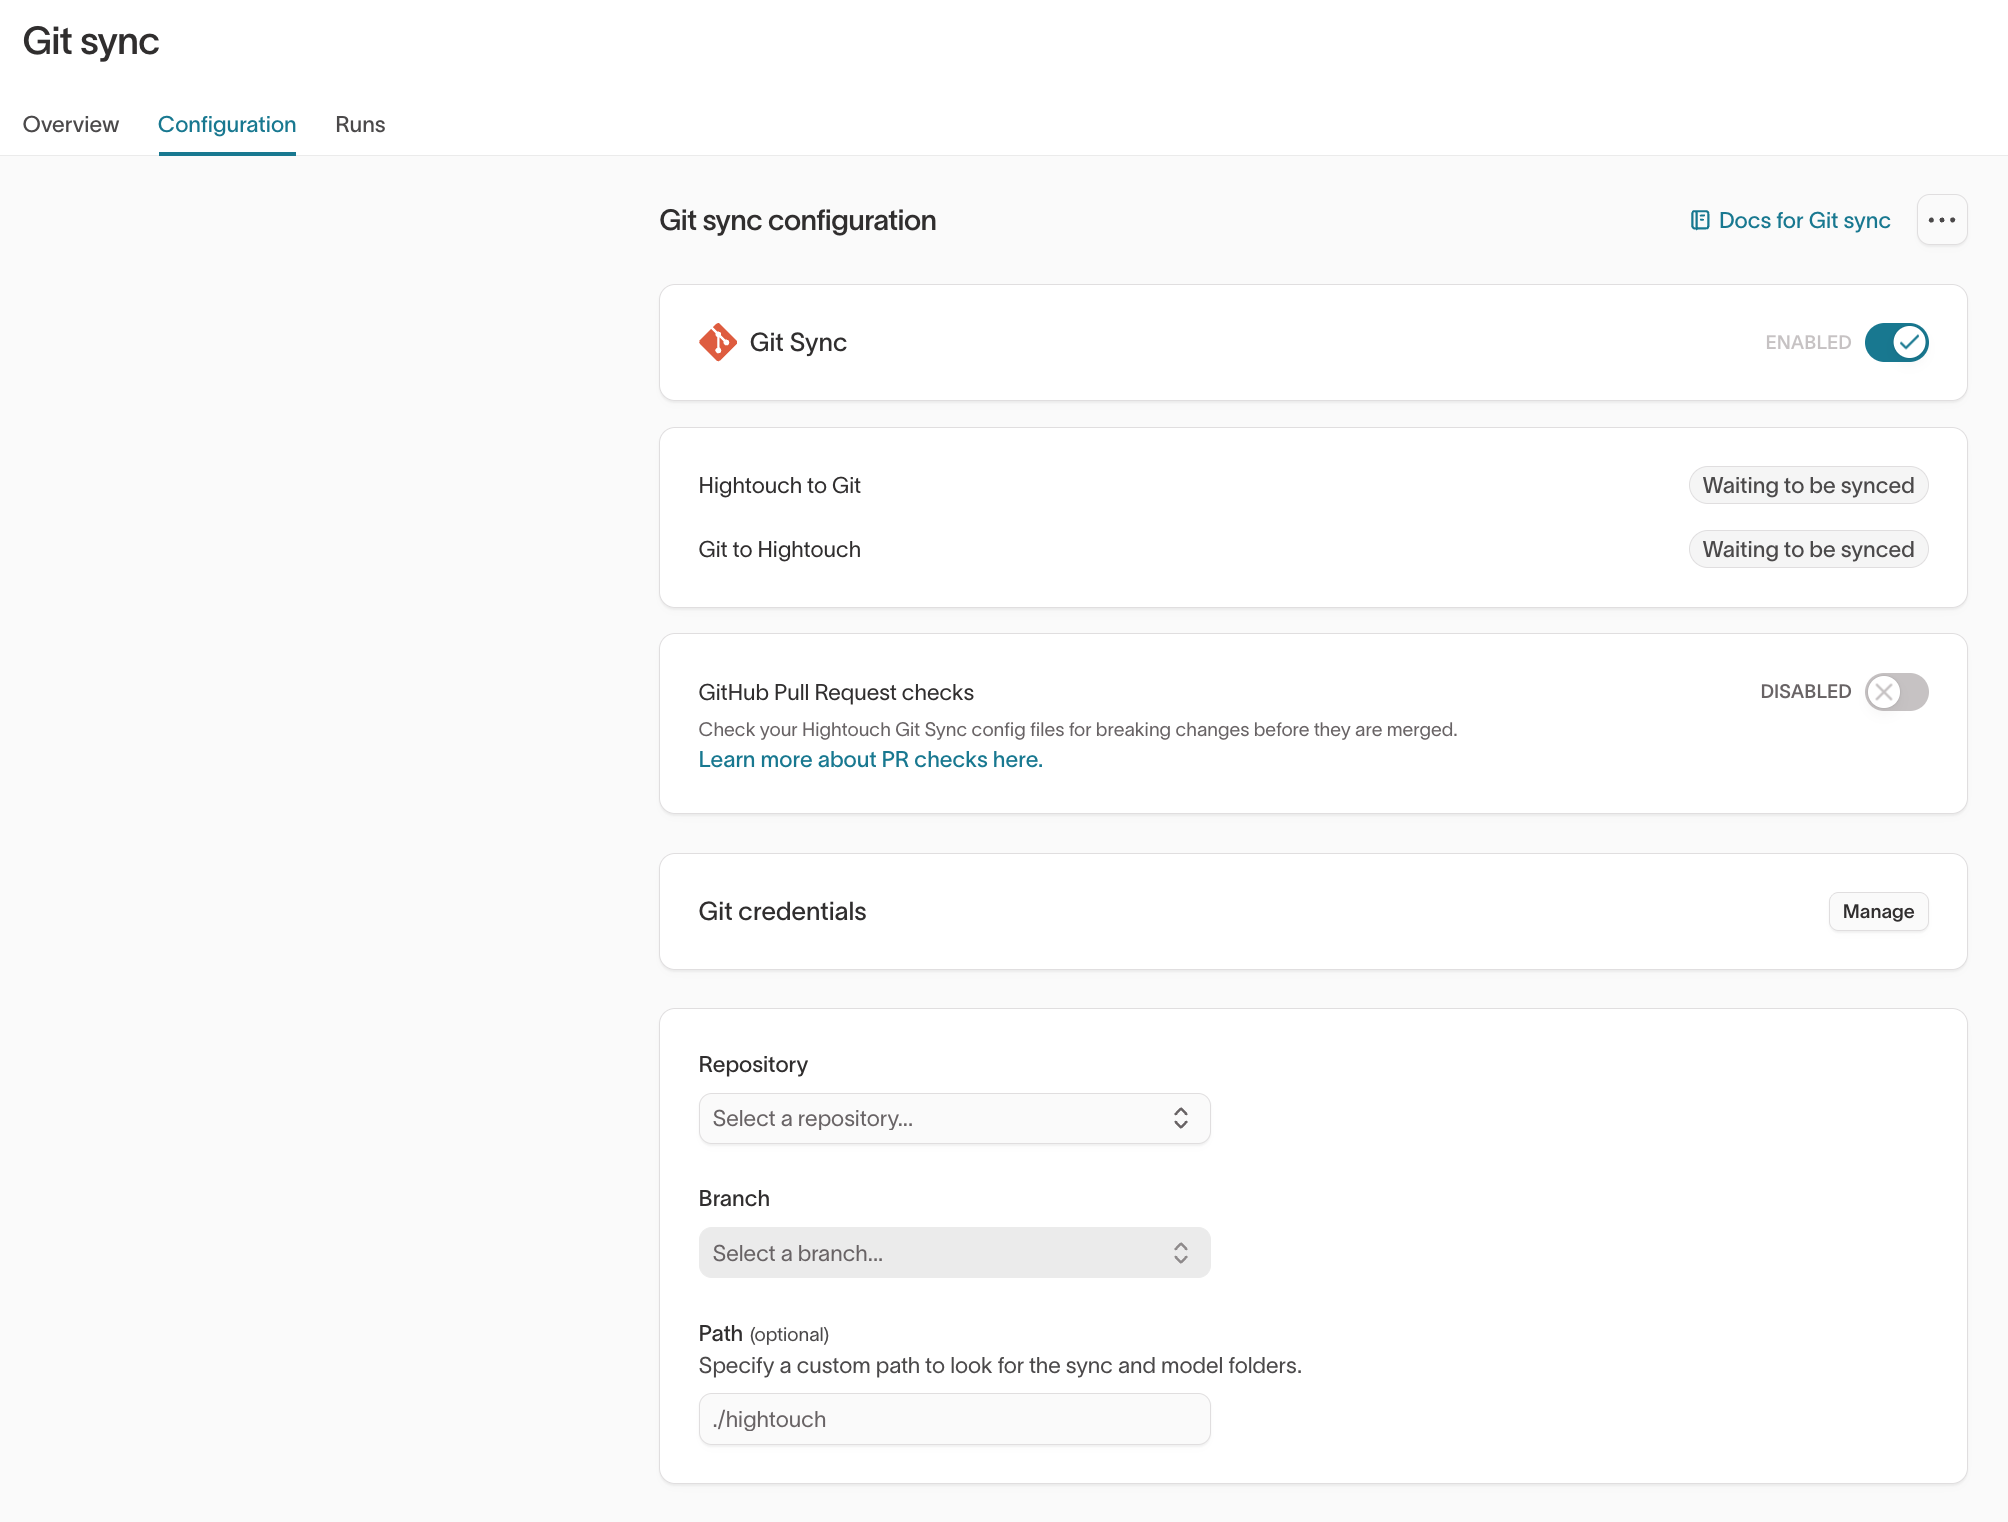
- Select the Repository and Branch Hightouch should read from and write to.
- Optionally, enter a Path where Hightouch should create folders for Git Sync files.
- Select Save.
If you enter a path, Hightouch creates the models, syncs, and other supported folders inside that subfolder. If you don't enter a path, Hightouch saves Git Sync files in the root of your repository.
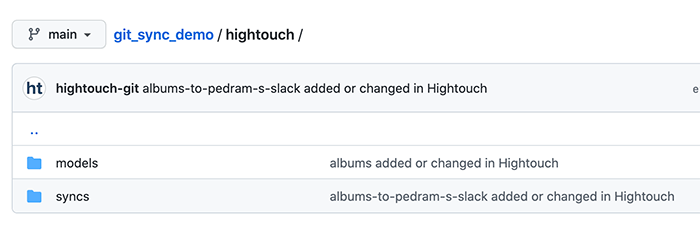
After you save the configuration, Hightouch creates the configured folder structure if needed. Git Sync then starts syncing supported resources between Hightouch and Git.
To start the syncing process immediately, select Full resync.
This pushes all supported workspace resources to Git, then pulls changes from Git back to your workspace. Because this happens in that order, a full resync can overwrite Git changes that have not synced to Hightouch yet.
For more information, see What does the Full resync button do?.
Git Sync does not support deletions from Git.
If you delete a YAML file in Git, the corresponding model or sync remains in Hightouch. The file is not recreated in Git until the next change is made in Hightouch or you trigger a full resync.
Use Git Sync with branch protection
If your repository uses branch protection, you may need to let the Hightouch Connect app bypass specific branch rules. The Hightouch Connect app can only push to a protected branch if you add it to the bypass list under GitHub rulesets.
To configure this in GitHub:
- Go to Settings > Rules > Rulesets.
- Add the Hightouch Connect app to the Bypass list.
- Configure the rest of the ruleset to enforce your branch protection requirements.
GitHub supports branch protection in both Settings > Branches and Settings > Rules > Rulesets.
The Hightouch Connect app only works with branch protection when you add it to the Bypass list under Rulesets and define the rest of your branch protection rules there. It does not work as a force-push app under Branches.
Connect staging and production workspaces
You can use Git Sync to keep staging and production workspaces aligned through the same Git repository. When multiple workspaces connect to the same repository, alias files handle environment-specific source and destination IDs.
Use the same branch
For most teams, the simplest setup is to point both workspaces to the same repository and branch, such as main.
- In each workspace, go to the Git Sync configuration page.
- Select the same repository and branch.
- Share model and sync YAML files between both workspaces.
- Create alias files for each workspace to map shared aliases to the correct source and destination IDs.
For example, both workspaces can reference aliased-postgres in their model files. The staging alias file maps aliased-postgres to staging-postgres, while the production alias file maps it to production-postgres.
For a full staging-to-production example, see Aliases.
Use separate branches
For a more controlled promotion workflow, use a separate branch for each environment.
- Point your staging workspace to a development branch, such as
develop. - Point your production workspace to your production branch, such as
main. - Test and iterate in staging. Changes sync to the development branch.
- When ready, open a pull request to merge the development branch into the production branch.
- After the pull request is merged, Git Sync picks up the changes in your production workspace.
Use CI checks to validate changes before they reach production.
Understand what syncs across environments
Git Sync can version-control and replicate the following resources across environments:
- Models
- Syncs
- Event contracts
- Customer Studio schema models, including parent, related, and event models
- Customer Studio schema relationships
Git Sync does not replicate everything. Configure the following manually in each workspace:
- Customer Studio traits, audiences, and syncs from audiences
- Workspace-level settings, such as approval flows, spaces, and environments
- Column-level schema settings configured in the UI, such as redaction, column suggestions, and display configuration
For Customer Studio schema setup instructions, see Configure Schema Git Sync.
Schemas
Git Sync represents supported Hightouch resources as YAML files in your Git repository.
Field names in YAML files are case-sensitive. For example, a field named
Email is not the same as email. This applies to all field references,
including source column names, primary keys, and field mappings. If you rename
a column in your warehouse changing only the casing, Git Sync treats it as a
different field, which can cause Git Sync errors or unexpected behavior.
Model schema
Models use the following schema:
name: > the model name/slug. unique per model
source: > the name/slug of the source. the slug is visible on the source page
type: > one of: raw_sql, table, or dbt_model
dbtModel: > null or the name of the dbt model to select, written as `model.<package_name>.<model_name>`
rawSql: > null or the sql to use, for example, select * from albums
tableName: > null or the table name to use
isSchema: > used internally by Hightouch, this should always be false
primaryKey: > primary key column for this model, for example, album_id
Model field reference
| Field | Required | Type | Valid values | Notes |
|---|---|---|---|---|
name | Yes | string | Any unique string | Acts as the model slug. Must be unique across all models. |
source | Yes | string | Source slug | Find the slug on the source's settings page in Hightouch. |
type | Yes | string | raw_sql, table, dbt_model | Determines which of the next three fields is used. |
rawSql | Conditional | string or null | Valid SQL | Required when type: raw_sql. Set to null otherwise. |
tableName | Conditional | string or null | Table reference | Required when type: table. Set to null otherwise. |
dbtModel | Conditional | string or null | model.<package>.<name> | Required when type: dbt_model. Set to null otherwise. |
isSchema | Yes | boolean | false | Always set to false for standard models. |
primaryKey | Yes | string | Column name | Must match an existing column in the model's query results. |
The name field doubles as the YAML filename. If you rename a model, rename
the file to match — otherwise Git Sync creates a new model instead of updating
the existing one.
Sync schemas
Sync schemas vary by destination. Because each destination has different configuration options, we recommend creating syncs in the Hightouch UI first. You can then use the generated YAML file as a starting point for updates or new syncs. The YAML filename is the sync name.
model: > model name/slug for this sync.
destination: > destination name/slug for this sync
config:
    > destination dependent configuration for this sync.
schedule: > type of schedule to use. the format here varies based on the
            schedule selected, we recommend using the UI as a starting point.
schedulePaused: > boolean, where this sync is paused, or enabled.
Sync field reference
| Field | Required | Type | Valid values | Notes |
|---|---|---|---|---|
model | Yes | string | Model slug | Must match the name of an existing model YAML file. |
destination | Yes | string | Destination slug | Find the slug on the destination's settings page or in the manifest file. |
config | Yes | object | Destination-specific | Structure varies by destination. Create a sync in the UI first to see the generated config shape. |
schedule | Yes | object | Schedule object | Format depends on schedule type (interval, cron, etc.). Use a UI-created sync as a reference. |
schedulePaused | Yes | boolean | true, false | Controls whether the sync is enabled or disabled. |
The safest way to learn the config structure for a destination is to create
a sync manually in the Hightouch UI, then inspect the generated YAML file in
your Git repository. Use that file as a template for additional syncs to the
same destination.
Avoid modifying YAML files while a sync is actively running. Pause the sync in the Hightouch UI before committing structural changes to prevent unexpected behavior.
Customer Studio Schema
Git Sync supports version-controlling your Customer Studio schema—including parent models, related models, event models, and relationships. For full setup instructions, see Configure Schema Git Sync.
Support for Customer Studio schema models is currently a beta feature. Please if you're interested in this feature.
Parent model schema
Parent models live in the schema/parent-models directory. They have the same schema as regular models, with the following additions:
primaryLabel: "primary_label_column" # Optional
secondaryLabel: "secondary_label_column" # Optional
Related model schema
Related models live in the schema/related-models directory. They have the same schema as regular models.
Event model schema
Event models live in the schema/event-models directory. They have the same schema as regular models, with the following addition:
eventTimestampColumn: "column_name" # Required
Model relationship schemas
Model relationships live in the schema/model-relationships directory.
The schema for model relationships depends on whether the relationship is direct or through other relationships.
Direct relationships look like this:
from:
  relationshipName: "" # Relationship name for from -> to
  slug: "model_slug"
  mergeColumns: false # or true
to:
  relationshipName: "" # Relationship name for to -> from
  slug: "model_slug"
  mergeColumns: false
cardinality: "1:1" # One of: "1:1", "1:many", "many:1"
mapping:
  - fromColumn: ""
    toColumn: ""
Through relationships look like this:
name: "relationship name"
from:
  slug: "model_slug"
to:
  slug: "model_slug"
through:
  # List of relationship slugs that constitute this through relationship.
  - relationship_slug_1
  - relationship_slug_2
Git Sync limitations for Customer Studio schema
Git Sync currently supports version-controlling model definitions and relationship structure. However, certain schema configurations set in the Hightouch UI are not synced across environments.
For example, Git Sync does not copy:
- Column-level settings (for example, redaction, column suggestions, or display configuration set in the UI)
- Merge column selections configured in the UI
- Column aliases
If you migrate a schema to another environment using Git Sync, you may need to reconfigure these settings manually after deployment.
Field names are also case-sensitive in YAML. If a column name changes only in casing (for example, user_id to User_Id), Git Sync treats these as different fields. Make sure column references in your YAML files match the exact casing used in your warehouse.
→ For full setup instructions, see Configure Schema Git Sync.
Event Contract Schema
Event Contracts
Event Contracts have a simple, consistent schema:
name: > name of the event contract
description: > optional: description for the contract
onUndeclaredSchema: > optional: one of "ALLOW_EVENT" (default) or "BLOCK_EVENT"
The name of the file is the slug of the event contract, which is derived from the name of the contract.
Events
Event Schemas are YAML files that define the allowed format of events sent to Hightouch. Each file represents a single version of a single event within a contract.
The files are located in the events/contracts directory, within a subdirectory named after the contract.
The filename is the slug of the event, which is derived from the name or type, the contract slug, and the version.
The schema for an event is as follows:
type: > one of "track", "identify", "group", "page", "screen", or "alias"
name: > for track events, the event name; otherwise should not be present
version: > optional: the version of the event; defaults to "default"
onSchemaViolation: > optional: one of "ALLOW_EVENT" (default) or "BLOCK_EVENT"
onUndeclaredFields: > optional: one of "ALLOW_EVENT" (default), "BLOCK_EVENT", or "OMIT_FIELDS"
includeBuiltInContext: > optional: one of "true" (default), or "false"
schema: |
  Schema object for validating the event, adhering to the JSON Schema spec
  Usually the root of this schema is an object which contains a nested object named properties
In the following example, we have a Sample Event that contains a single optional "id" field:
# events/contracts/web/sample-event-web-default.yaml
name: Sample Event
onSchemaViolation: ALLOW_EVENT
onUndeclaredFields: ALLOW_EVENT
schema:
  type: object # The root of our schema is an object
  properties: # Objects contain a "properties" element in the JSON Schema spec
    properties: # We define a single child named properties
      type: object # Which is an object
      properties: # Finally, the properties our child object contains
        id: # Which is only an optional id field
          type: string # Which is of type string
type: track
version: default
This corresponds to the following JSON in the in-app JSON Editor:
{
  "type": "object",
  "properties": {
    "properties": {
      "type": "object",
      "properties": {
        "id": {
          "type": "string"
        }
      }
    }
  }
}
Because event schemas may get complex, using Hightouch CI checks is a great way to validate your changes before merging them into your repository.
Manifests
Hightouch creates a manifest file at the root of your Git repository for each connected workspace. Manifest files list all sources and destinations in a workspace, making it easier for you to find their IDs to add to sync and model files or reference in aliases.
Manifest filenames follow this format: manifest-<your-workspace-id>.yaml. A manifest file follows this format:
# READ ONLY FILE
# Changes made here will be ignored. Please use the Hightouch dashboard to create and edit sources and destinations.

sources:
  production-postgres:
    name: Production postgres
    type: postgres
   snowflake-243-tenant:
    name: Snowflake EU instance
    type: snowflake
destinations:
  production-salesforce:
    name: Production Salesforce
    type: salesforce
Sources and destinations are listed by their ID. In the example file above, the Postgres source's ID is production-postgres and the Salesforce destination's ID is production-salesforce.
Manifest files are read-only. Git Sync overwrites any changes made to manifest files. Use the Hightouch dashboard to create and edit sources and destinations.
Aliases
Managing multiple Hightouch workspaces from the same Git repository can be difficult because source and destination IDs can differ between workspaces. Alias files let you create custom IDs for sources and destinations in a given workspace allowing model and sync files to work across different workspaces.
Hightouch creates an empty alias file in your Git repository for each connected workspace. Alias filenames follow this format: aliases-<your-workspace-id>.yaml.
You can then add sources and destinations to the alias file following this format:
# e.g. aliases-hightouch-production-workspace.yaml
sources:
  my-source-alias: my-actual-source-id
  othersourcealias: another-workspace-source
destinations:
  my-destination-alias: existing-destination
Each key is an alias and each value should be an actual source or destination ID. You can find source and destination IDs in the manifest file in the root of your Git repository.
Aliases should be unique across sources and destinations in the same workspace. In other words, you can't use the same alias for multiple resources in the same alias file.
Example alias usage
Consider a workspace, acme-staging, with a model stocking-list.yaml file like this:
name: Stocking list
source: staging-postgres
type: table
tableName: public.workspaces
isSchema: false
primaryKey: id
Another workspace called acme-production is connected to the same repository but can't use this model during Git Sync. That's because the acme-production workspace doesn't have a source with the ID staging-postgres. Instead, acme-production uses a Postgres source with the ID production-postgres.
You can use aliases so that both workspaces can use the same model stocking-list.yaml file.
- Add an alias to the
acme-stagingworkspace alias file:
# aliases-acme-staging.yaml
sources:
  aliased-postgres: staging-postgres
This creates the custom ID aliased-postgres that points to the source with the ID staging-postgres.
- Add an alias to the
acme-productionworkspace alias file:
# aliases-acme-production.yaml
sources:
  aliased-postgres: production-postgres
This creates the custom ID aliased-postgres that points to the source with the ID production-postgres. For the next step, it's important that both alias files use the same alias name. Since these aliases exist in different workspaces, they are still unique within their respective workspaces.
- Update the
sourcevalue ofstocking-list.yamltoaliased-postgres.
name: Stocking list
- source: staging-postgres
+ source: aliased-postgres
type: table
tableName: public.workspaces
isSchema: false
primaryKey: id
Now, during Git Sync, both workspaces resolve aliased-postgres to their respective Postgres slugs and Git Sync completes for both staging and production workspaces.
Validate changes
You can use Hightouch CI checks to validate changes in your Git Sync repository before merging them.
To enable CI checks, turn on GitHub Pull Request checks in your Git Sync configuration page.
After CI checks are enabled, Hightouch runs a check on each pull request made to the connected Git repository. If a breaking change is detected, such as deleting a model used by a sync, the CI check fails. Open the failed check details to see which sync is affected.
If the pull request does not affect any Hightouch syncs, the CI check passes.

Custom YAML validation in CI
In addition to Hightouch's built-in CI checks, you can add your own YAML validation step to your CI pipeline to catch syntax errors and missing required fields before a pull request is merged.
Here's an example using a simple validation script with yq (a YAML processor available in most CI environments):
# validate-git-sync-yaml.sh
# Validates model and sync YAML files for required fields.
set -euo pipefail
ERRORS=0
# Validate model files
for file in models/*.yaml; do
[ -f "$file" ] || continue
for field in name source type primaryKey; do
if ! yq -e ".$field" "$file" > /dev/null 2>&1; then
echo "ERROR: $file is missing required field '$field'"
ERRORS=$((ERRORS + 1))
fi
done
done
# Validate sync files
for file in syncs/*.yaml; do
[ -f "$file" ] || continue
for field in model destination config schedule schedulePaused; do
if ! yq -e ".$field" "$file" > /dev/null 2>&1; then
echo "ERROR: $file is missing required field '$field'"
ERRORS=$((ERRORS + 1))
fi
done
done
if [ "$ERRORS" -gt 0 ]; then
echo "$ERRORS validation error(s) found."
exit 1
fi
echo "All YAML files passed validation."
This script checks for required fields only. Hightouch's built-in CI checks handle deeper validation, such as verifying that referenced models and destinations exist. Use both for the most coverage.
Review change history
Git Sync gives you a changelog through commit history. You can also use audit logs to review changes in Hightouch.
You can use your Git repository to see who created or modified supported resources and when.
To show the correct user for Hightouch-created commits, the user's Hightouch email must match their GitHub email.
In GitHub, open the repository's Commits tab or file history to review changes.
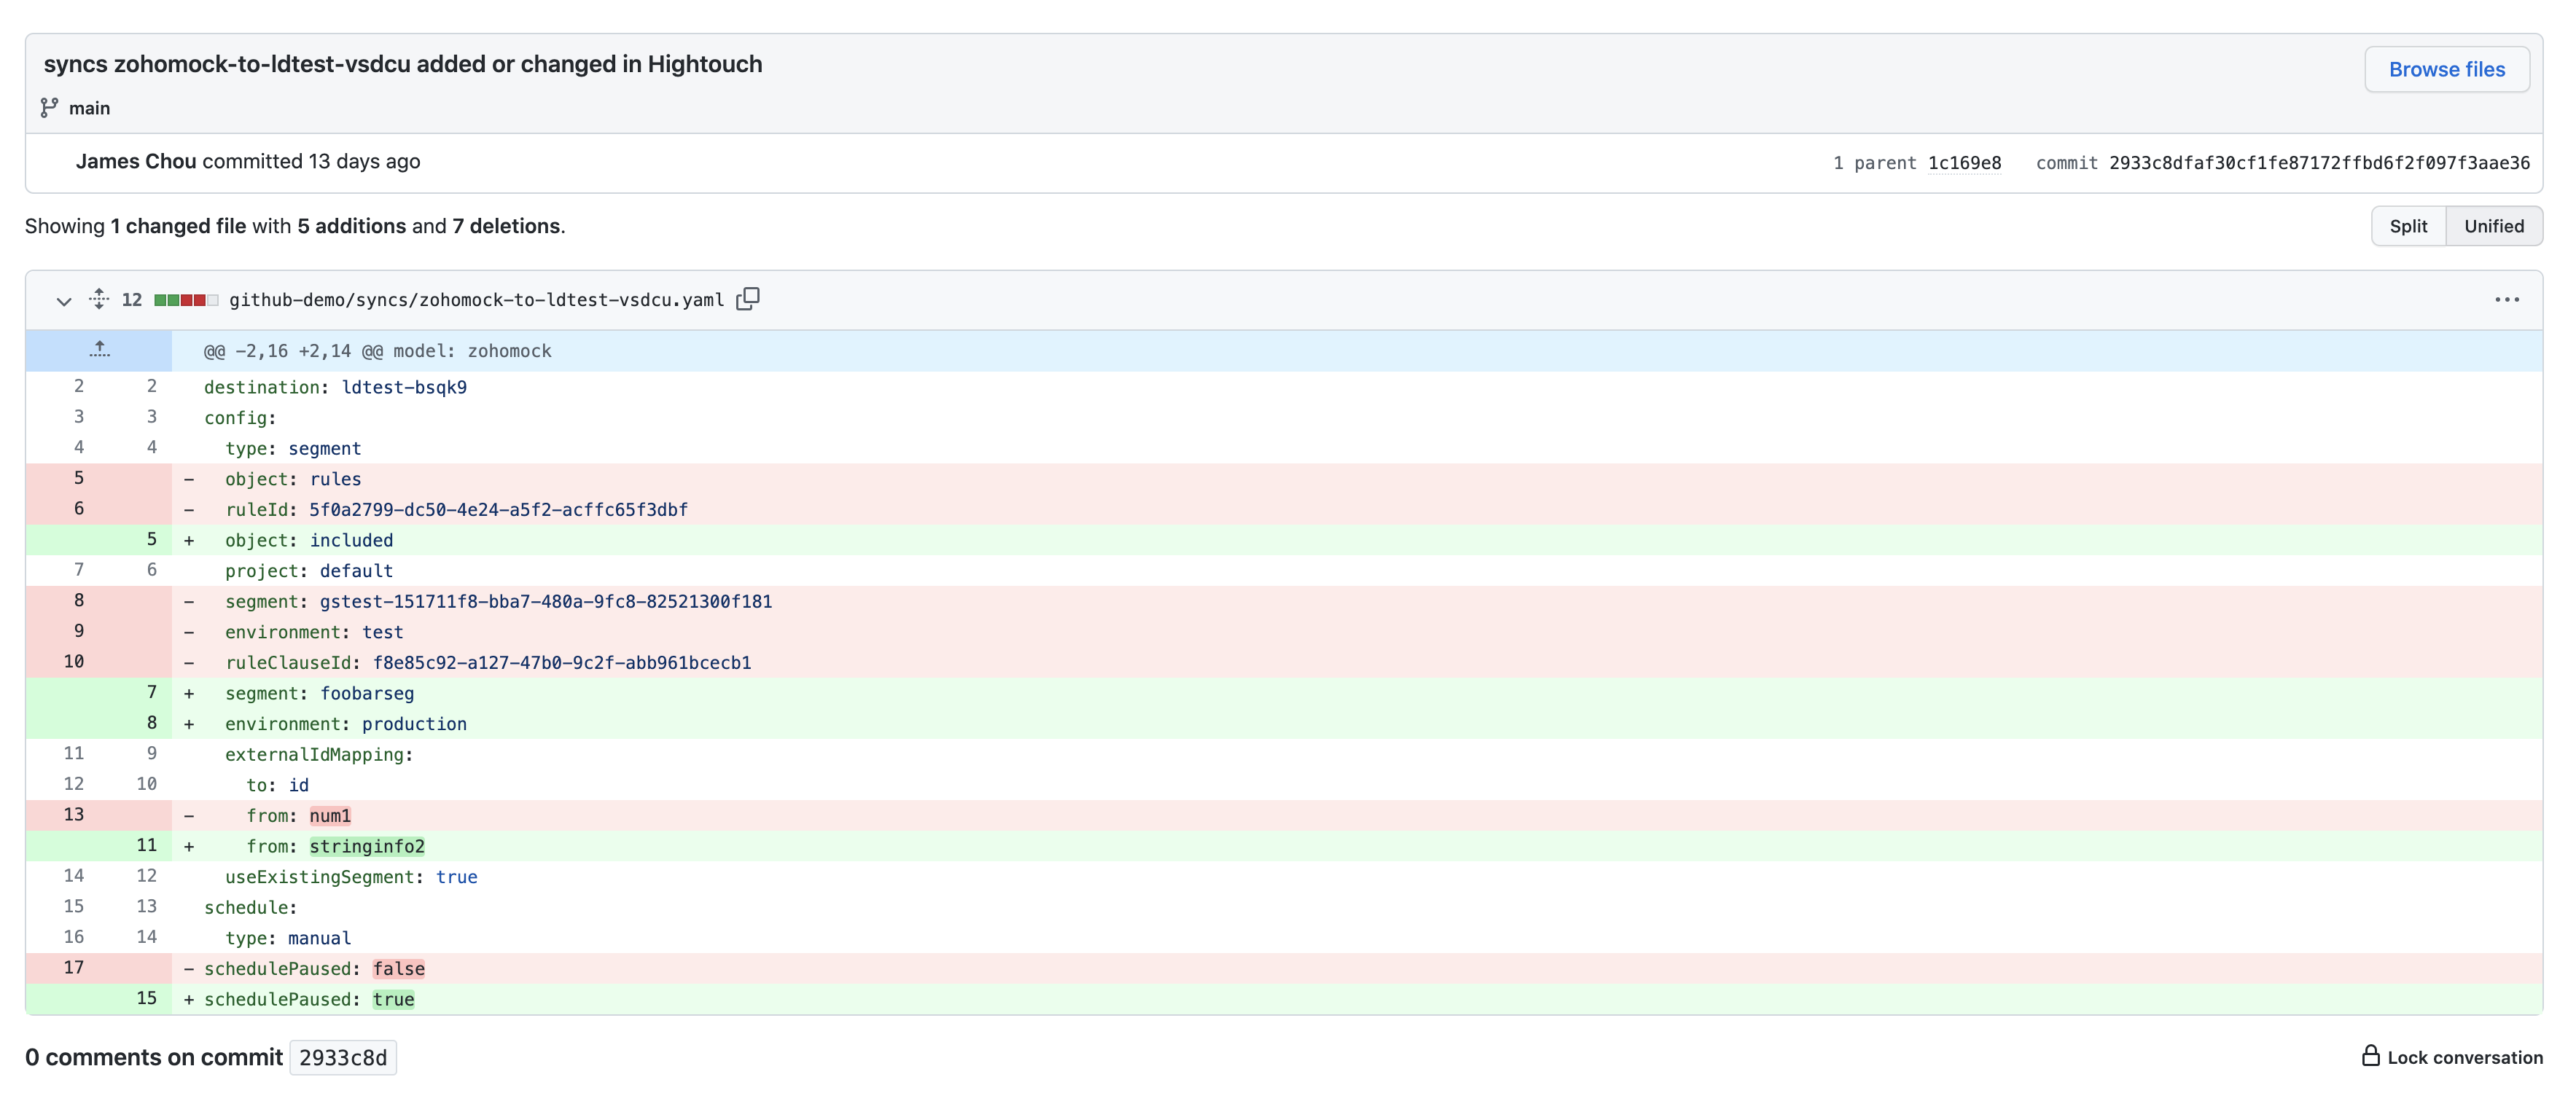
Open a commit to see the exact line-by-line diff.
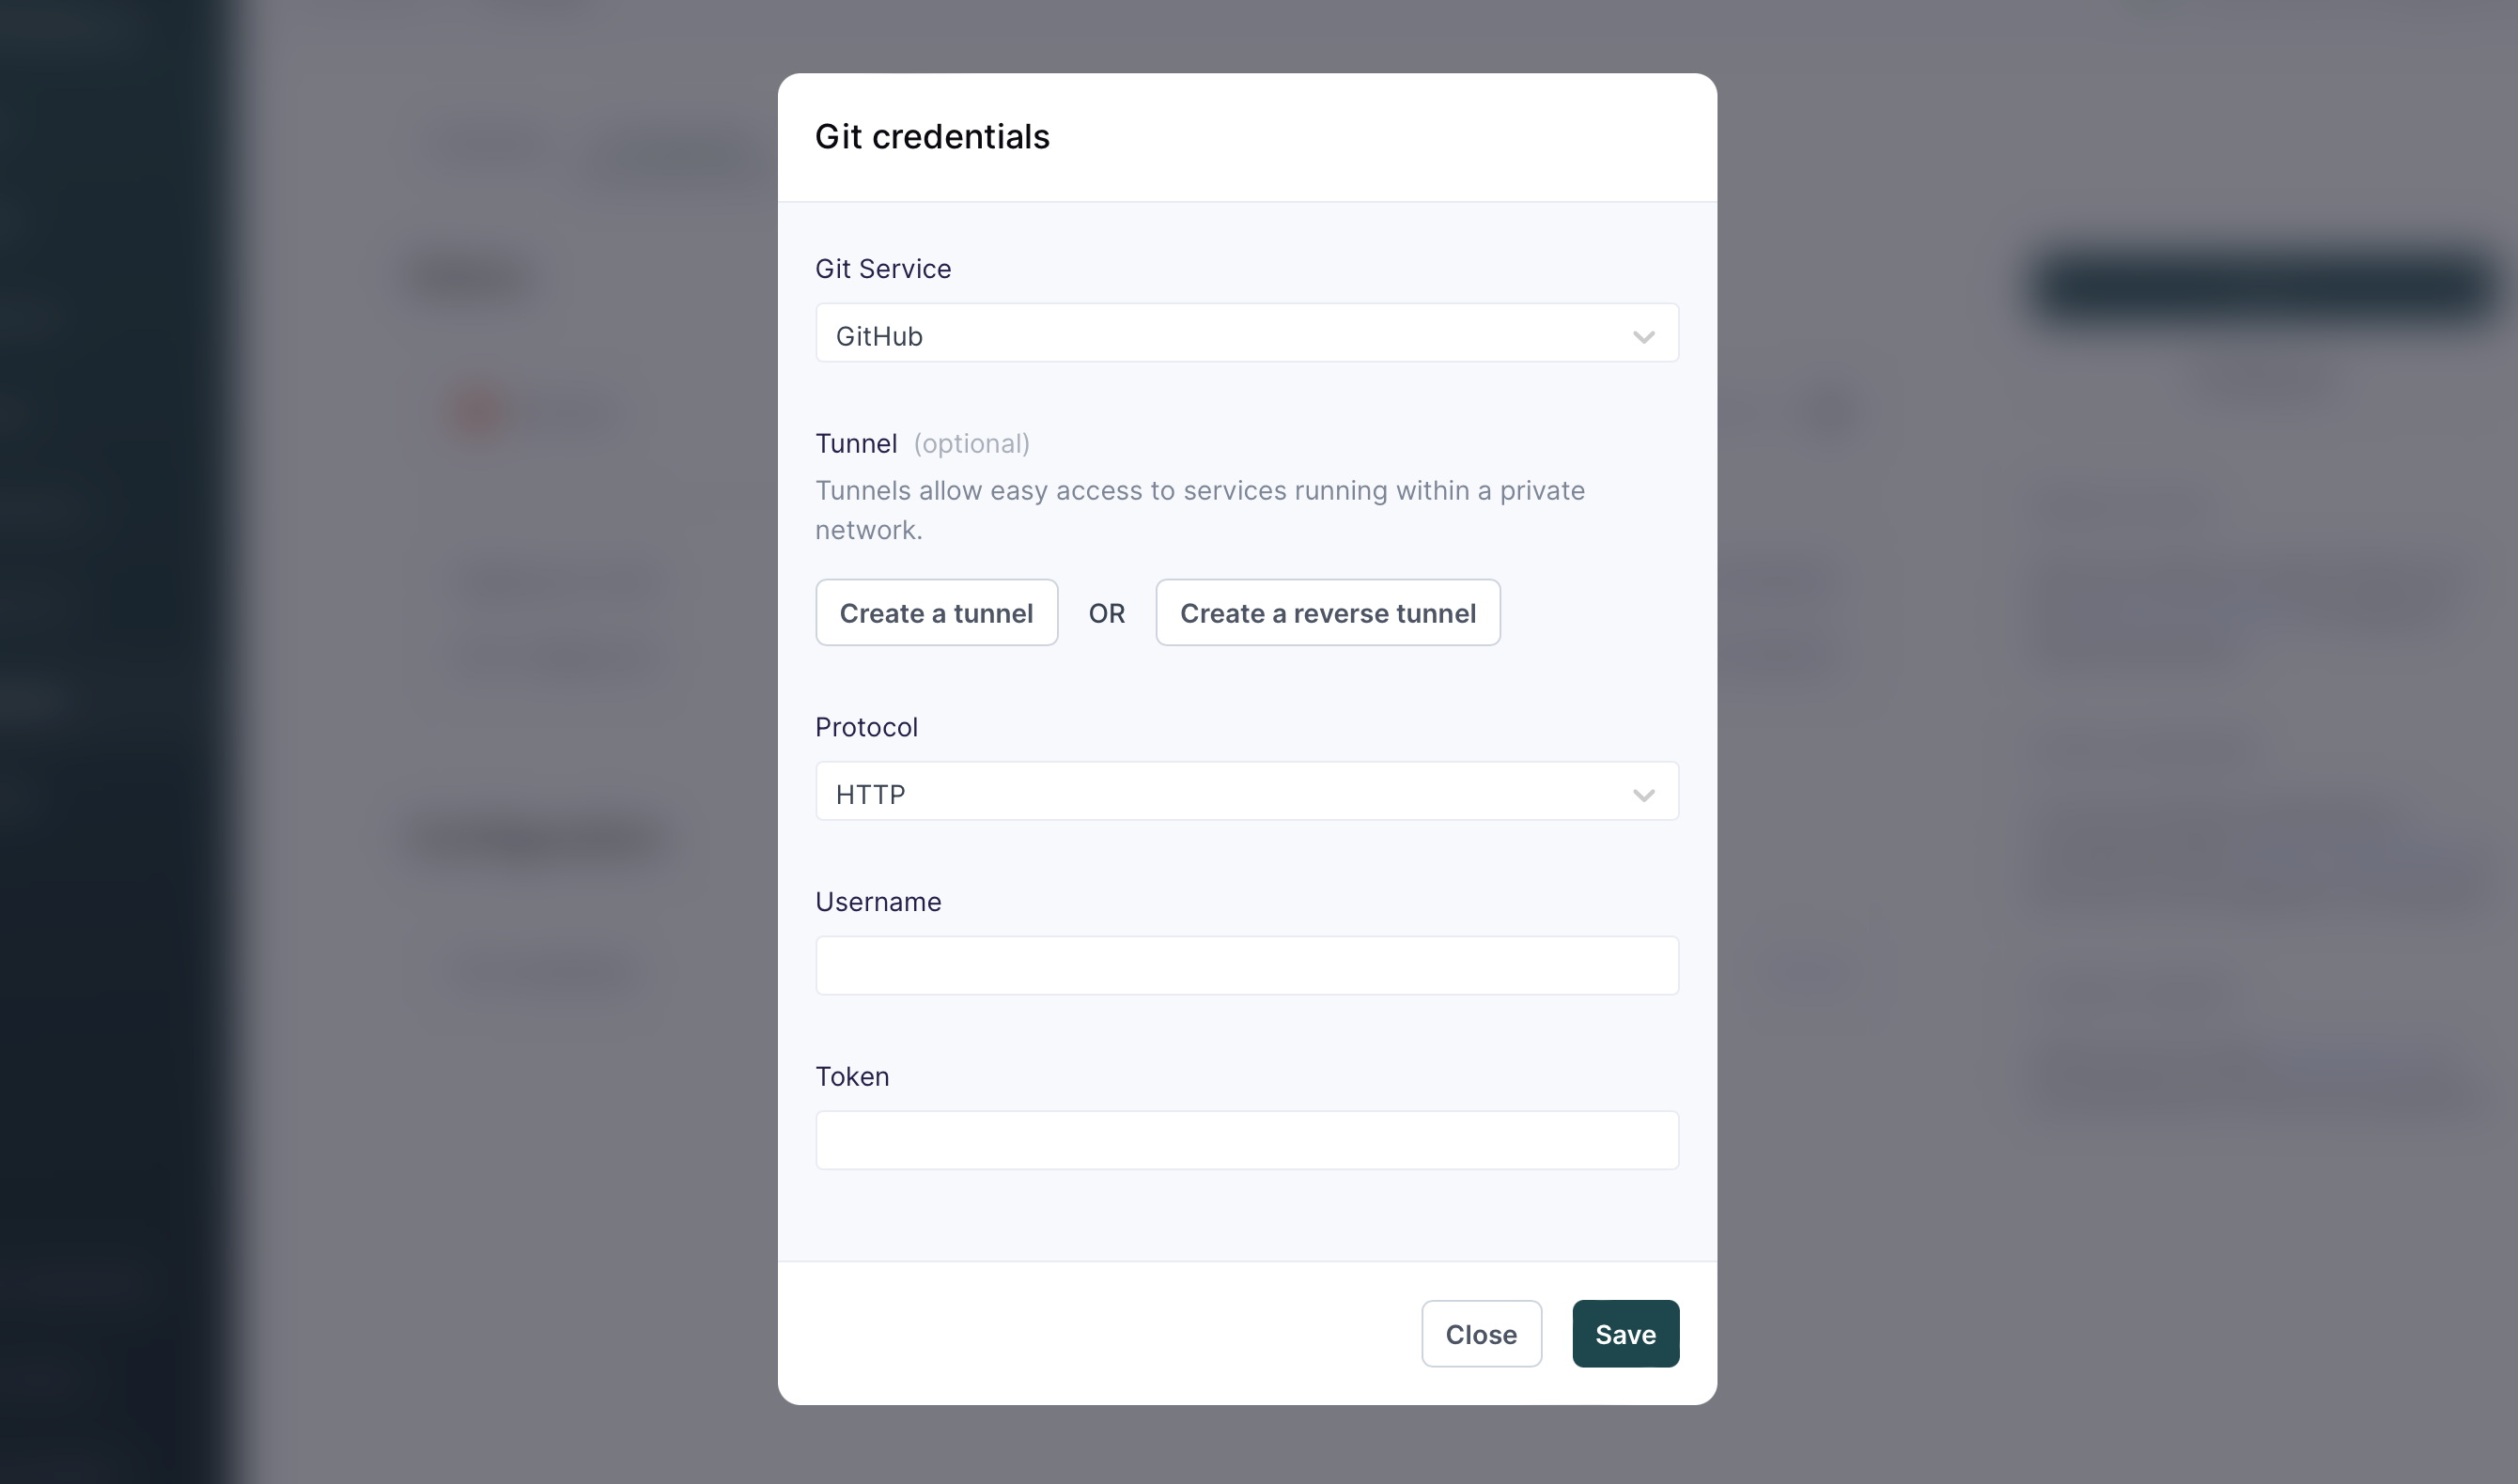
Use tunneling for private Git repositories
If your Git repository is hosted on an on-premise server without public internet access, use tunneling to connect Hightouch to your Git server.
- Go to the Tunnels tab on the Settings page.
- Create a tunnel or reverse tunnel that connects to your Git server. For more information, see the tunneling documentation.
- Go to the Git Sync configuration page.
- Under Configuration > Git credentials, select Manage.
- Add your Git credential and select the correct tunnel.
We recommend using the SSH protocol and ssh_privatekey to connect to private Git repositories.
Basic authentication can have issues forwarding authentication headers through an SSH tunnel and HTTP redirects. For more information about SSH authentication, see the GitHub SSH documentation.
Hightouch does not support ssh_privatekey with passphrases.
Next steps
After Git Sync is configured, you can use Git workflows to manage supported Hightouch resources. For example, you can:
- Create a new model by copying an existing model file and updating the name and query
- Create a new model and sync in the same pull request
- Use CI checks to validate changes before merging them
- Use aliases to share model and sync files across staging and production workspaces
FAQ
What does the Full resync button do?
Selecting Full resync runs an outbound sync for all supported resources in the workspace. This pushes all supported resources from Hightouch to Git, then pulls changes from Git back to your workspace.
If your Git repository has changes that have not synced to Hightouch yet, Full resync can overwrite those changes.
Recreate a deleted YAML file
Git Sync does not support deletions from Git. If you delete a YAML file in Git, the corresponding model or sync remains in Hightouch. The file is not recreated in Git until the next change is made in Hightouch or you trigger a full resync.
To recreate a deleted YAML file, select Full resync.
You can also recreate the file manually by adding a YAML file with the same filename and schema as the original file. Hightouch recognizes that the file refers to an existing model or sync and associates it with the existing resource.
Protected branch update failed
If you selected a protected branch, Git Sync setup might fail with this error:
Protected branch update failed - Changes must be made through a pull request
To resolve the error, use one of these options:
- Select a branch that is not protected, then open pull requests in GitHub to merge updates into the protected branch.
- Follow the instructions in Use Git Sync with branch protection to let the Hightouch Connect app work with your protected branch.