
Sync business-critical data from your data warehouse to Netsuite with Hightouch
Supported syncing
| Type | Description | Supported Sync Modes | API Reference |
|---|---|---|---|
| Entities | Sync data from any source to entities in NetSuite, for example, Customers, Invoices, Sales Orders, and Journal Entries | Upsert, Update, Insert | NetSuite schema browser |
For more information about sync modes, refer to the sync modes docs.
REST vs SOAP
The Hightouch NetSuite REST destination offers a few advantages over the SOAP destination:
- The NetSuite REST API uses JSON for web service requests and responses, which is easier to read and debug in the live debugger compared to XML.
- Hightouch prioritizes supporting the latest REST API features and versions.
- The NetSuite REST destination supports the inline mapper to build objects and arrays
Unless you have a particular entity that's only supported by the SOAP API, we recommend using the REST NetSuite destination.
Setup in NetSuite
Before you can use Hightouch to sync data to NetSuite, you need to create and and configure a NetSuite integration. Then, to grant access to Hightouch to synchronize data between your source and NetSuite, you need to create a role, a user, and an authentication token for the integration.
These steps are the same whether you choose to connect Hightouch to NetSuite with basic authentication or OAuth. The only difference is in the final step of enabling web services.
Depending on your NetSuite account's setup, you may need an admin role to complete setup in NetSuite. Netsuite permission changes to a role or user don't occur immediately. These changes can take a few minutes or hours to go into effect.
Create an integration
- Go to Setup > Integration > Manage Integrations or use the global search to find and go to the Manage Integrations page.
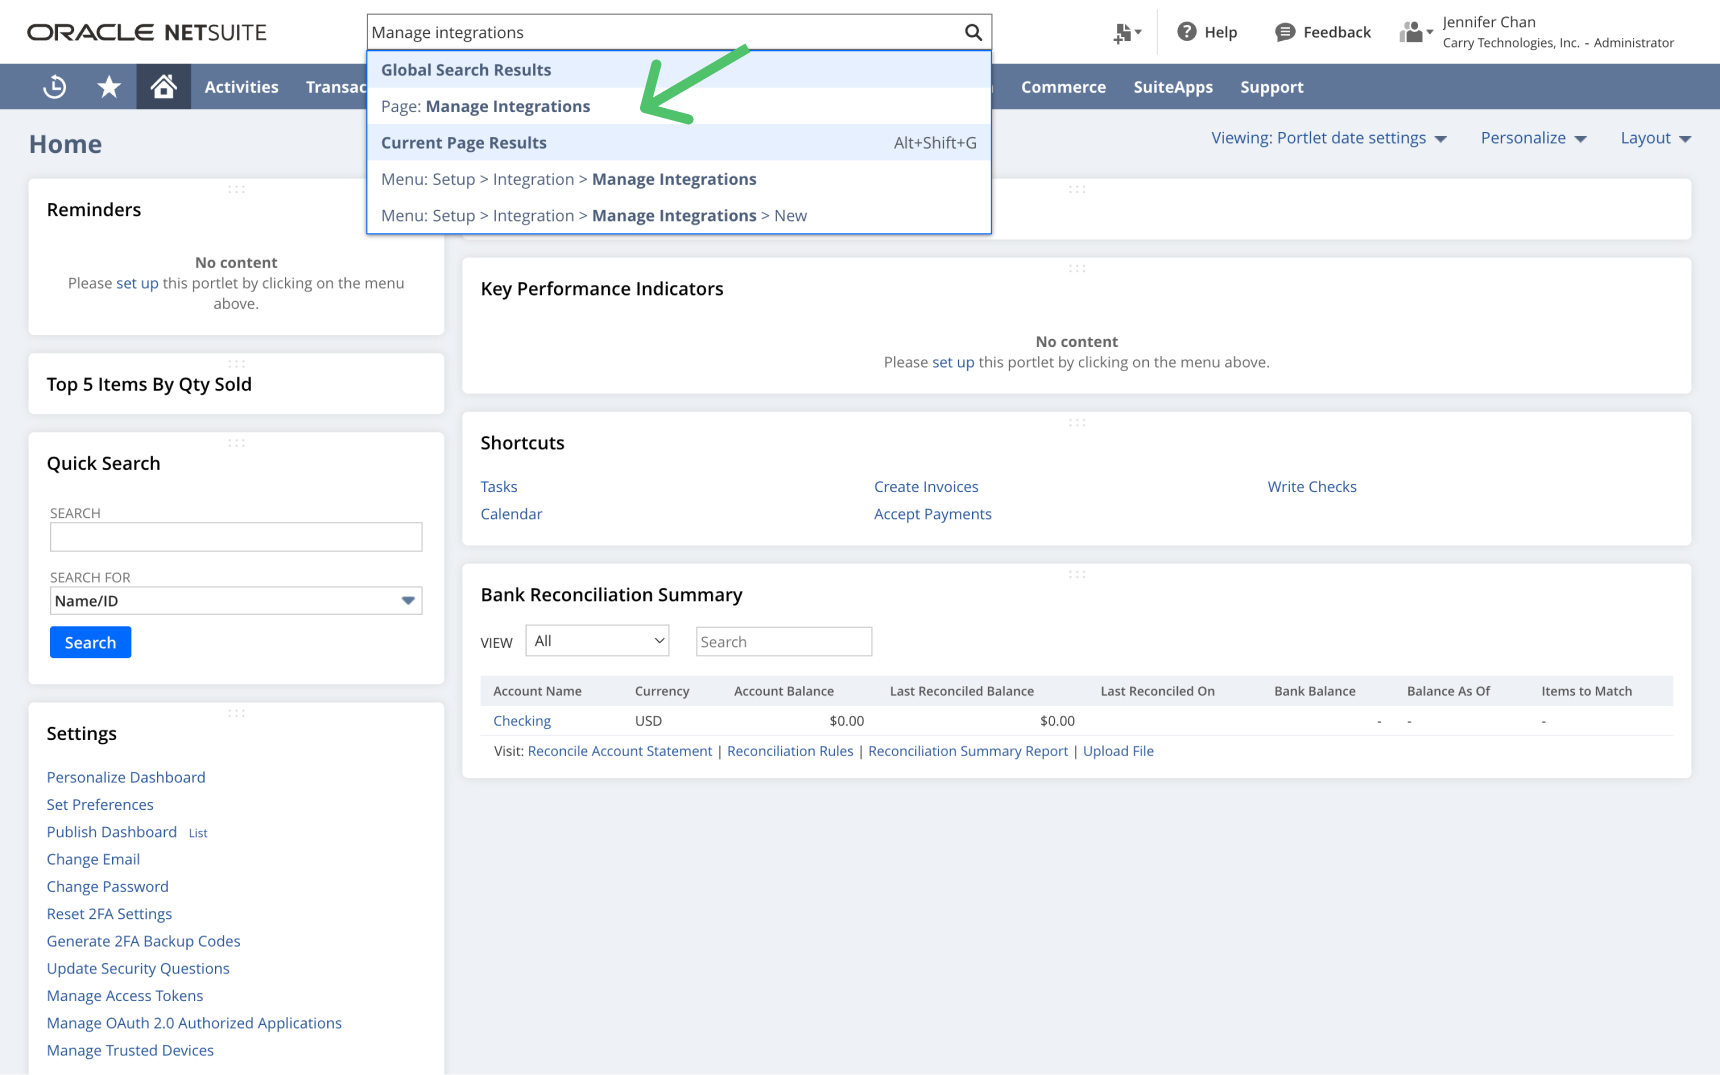
This page shows a list of enabled integrations for your account.
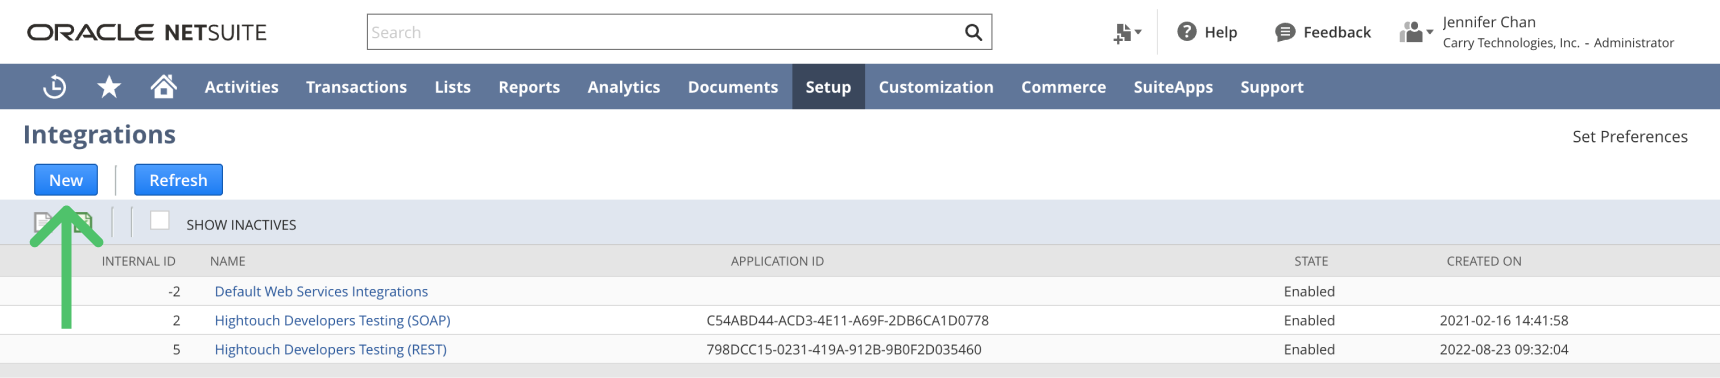
- Click New to create a new integration with the following properties:
- A Name that can easily be associated with Hightouch, for example, "Hightouch Integration"
- Set State to Enabled
- Check Token-Based Authentication
- Uncheck TBA:Authorization flow
- Uncheck Authorization Code Grant
- Leave other authentication options unchanged.

- Scroll to the bottom of the page and click Save.
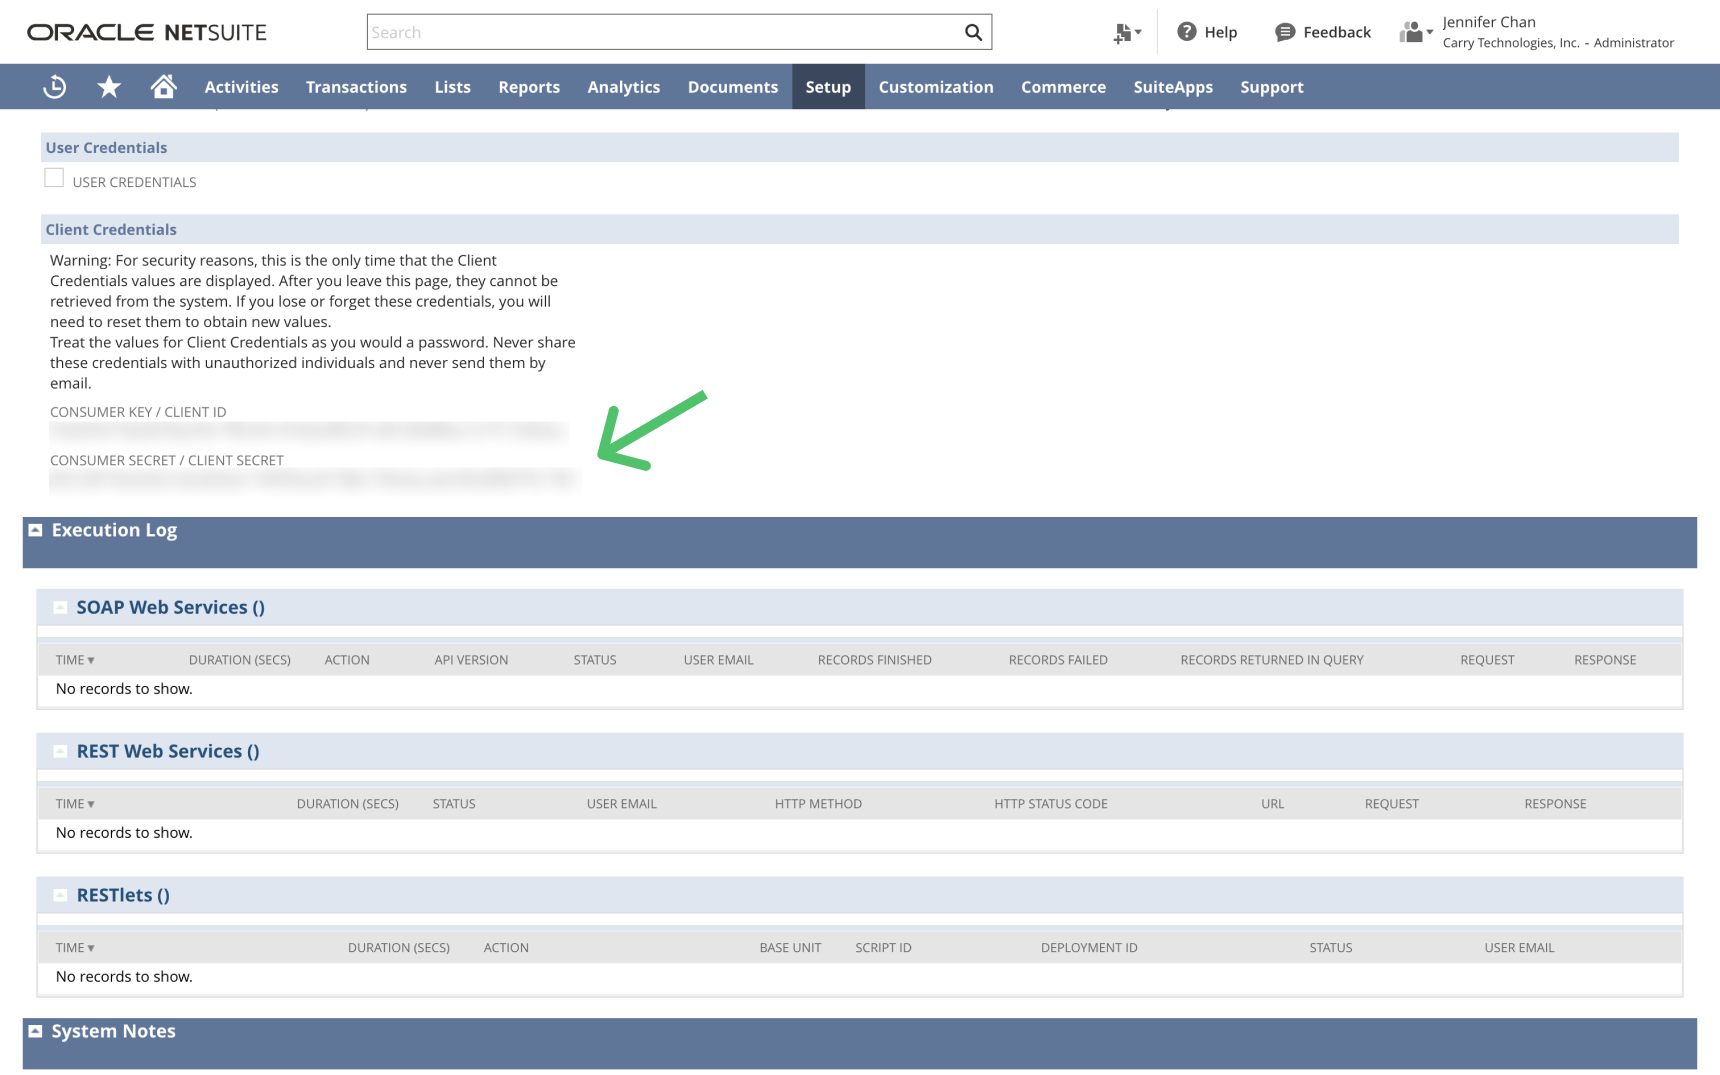
- Scroll to Client credentials and Copy and store the Consumer Key / Client ID and Consumer Secret / Client secret in a secure location. You'll need them to connect to Hightouch.
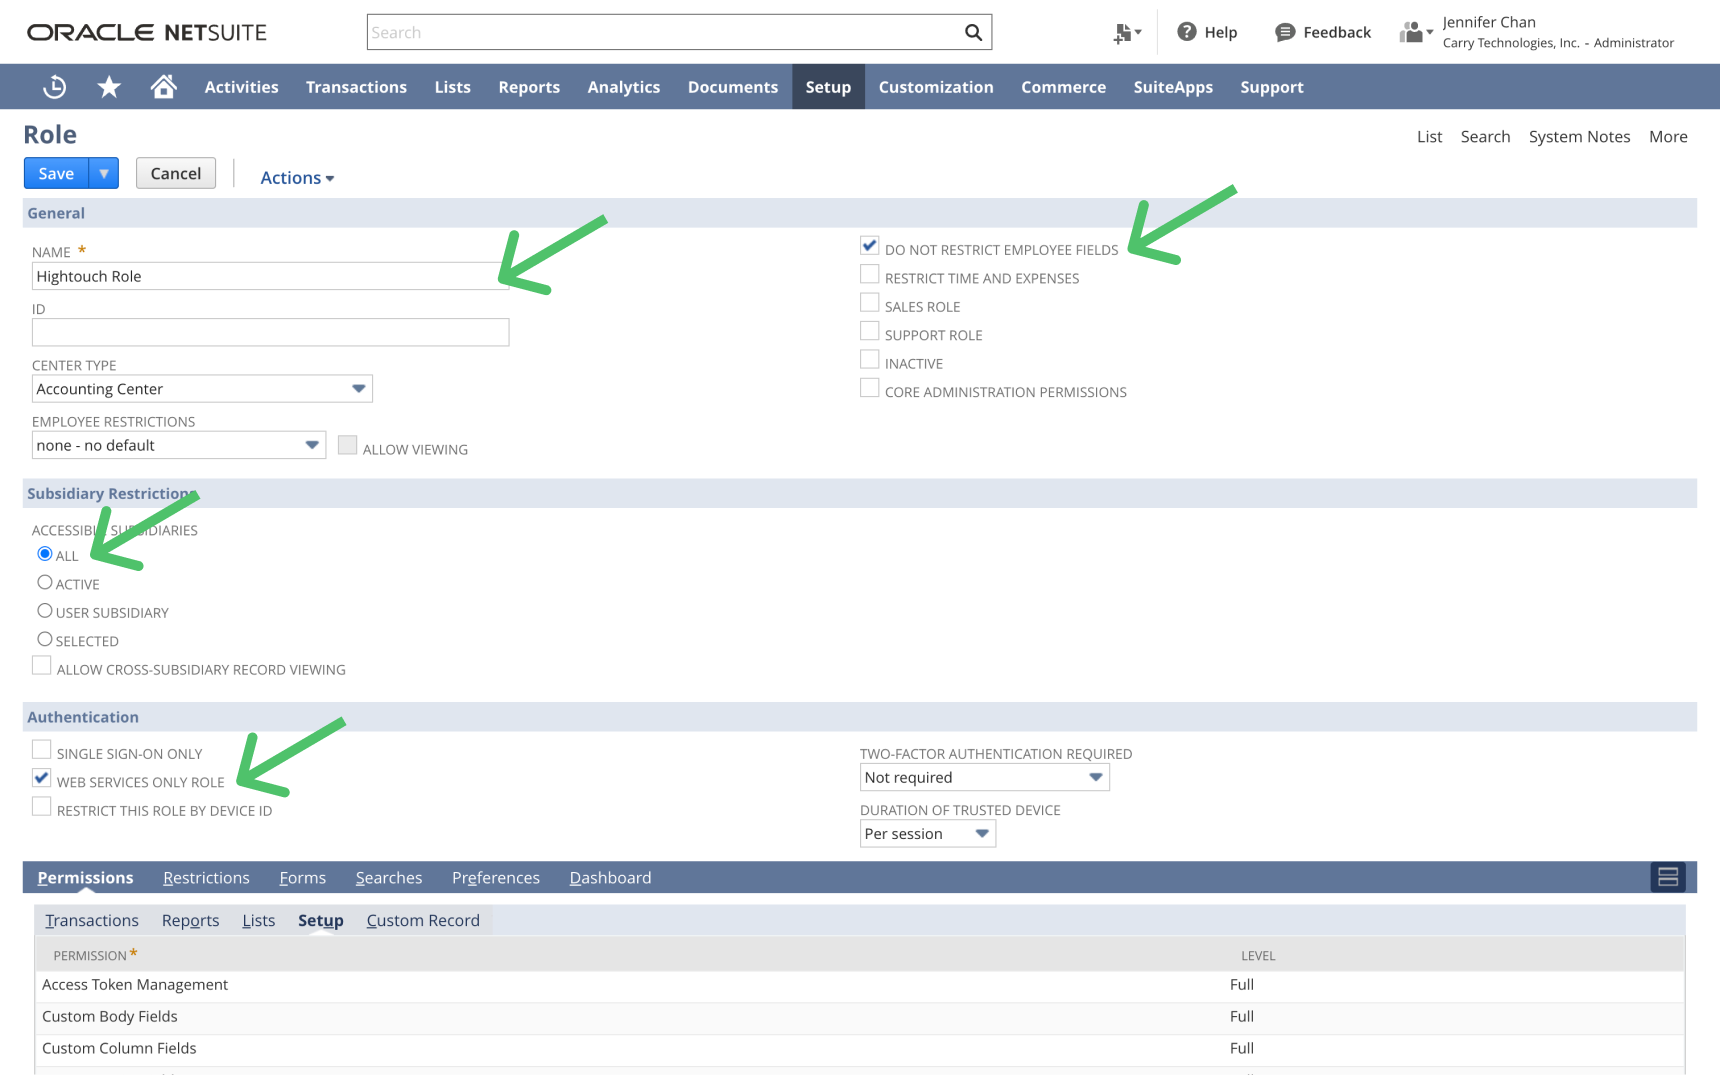
Create a role
- Go to Setup > Users/Roles > Manage Roles and click New or use the global search to find and go to the New Role page.
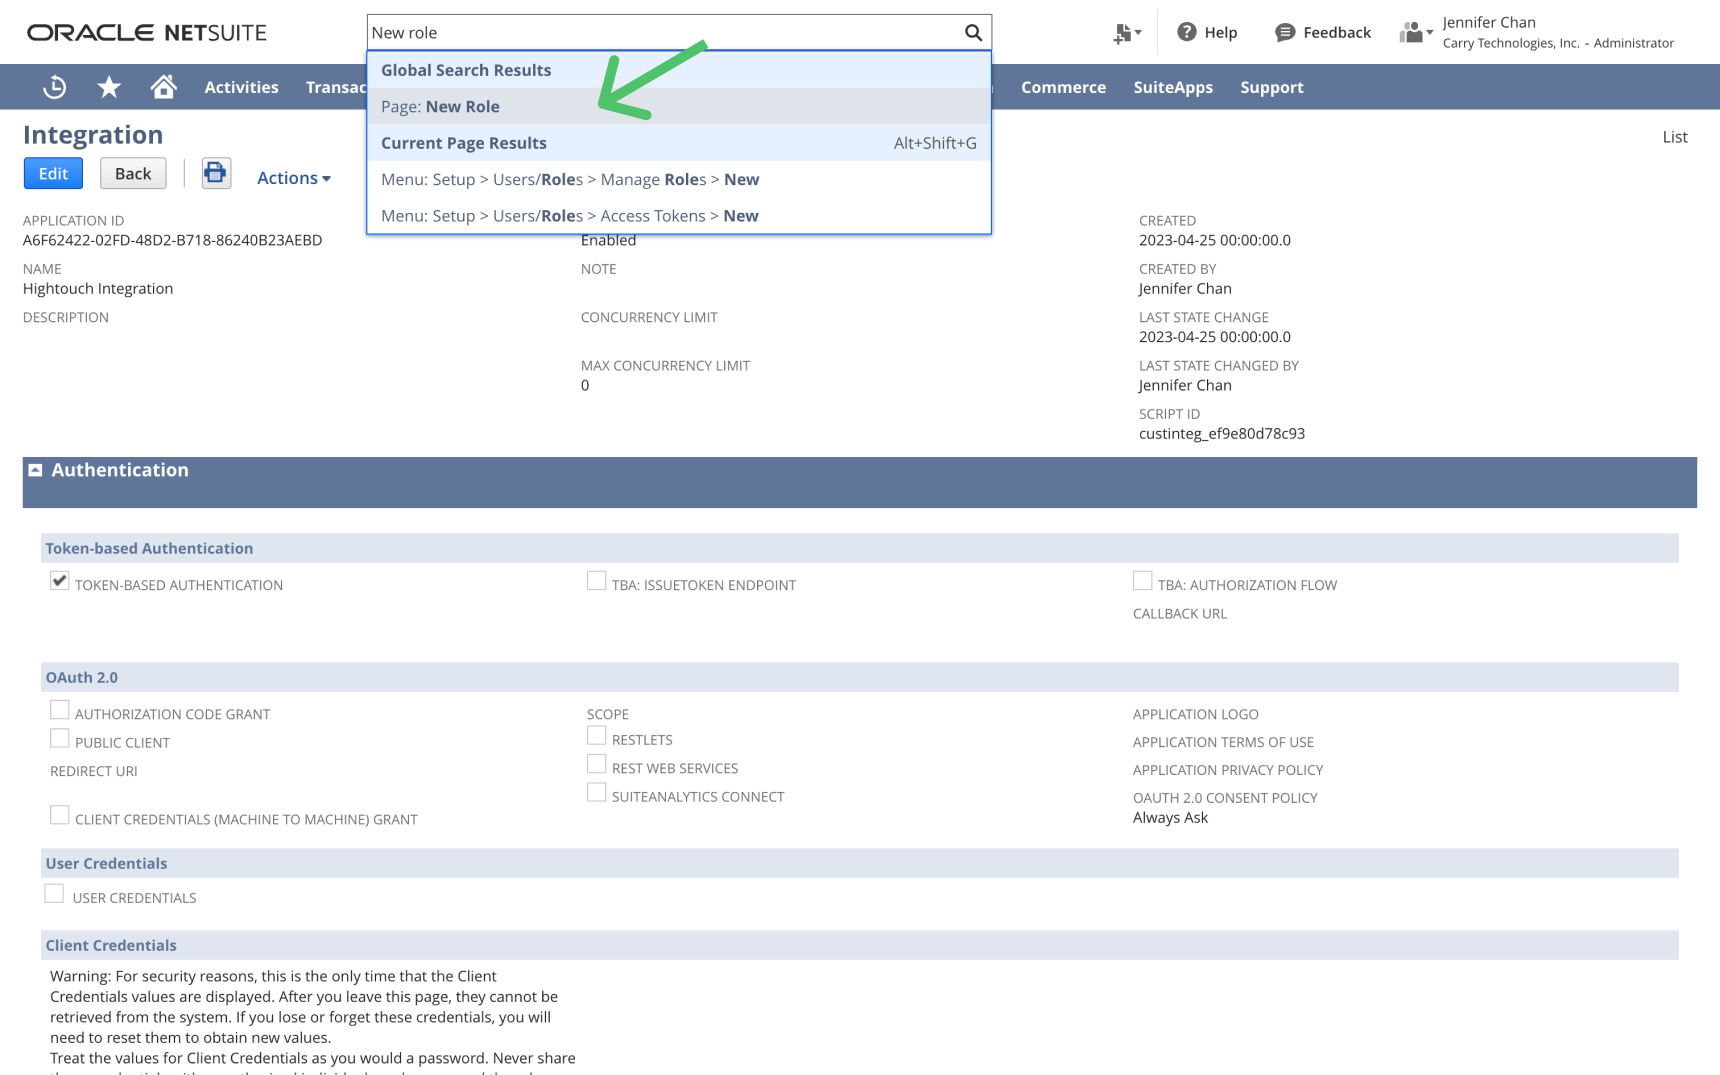
- Create a role with the following properites:
- A descriptive Name, for example, "Hightouch Role."
- Check Do not restrict employee fields
- For multi-subsidiary NetSuite users, check All under Accessible subsidiaries
- Under Authentication, check Web Services only Role.
- Add the following permissions under Permissions > Setup
- Access Token Management: Full
- Custom Body Fields: Full
- Custom Column Fields: Full
- Custom Entity Fields: Full
- Custom Fields: Full
- Custom Item Fields: Full
- REST Web Services: Full
- User Access Tokens: Full
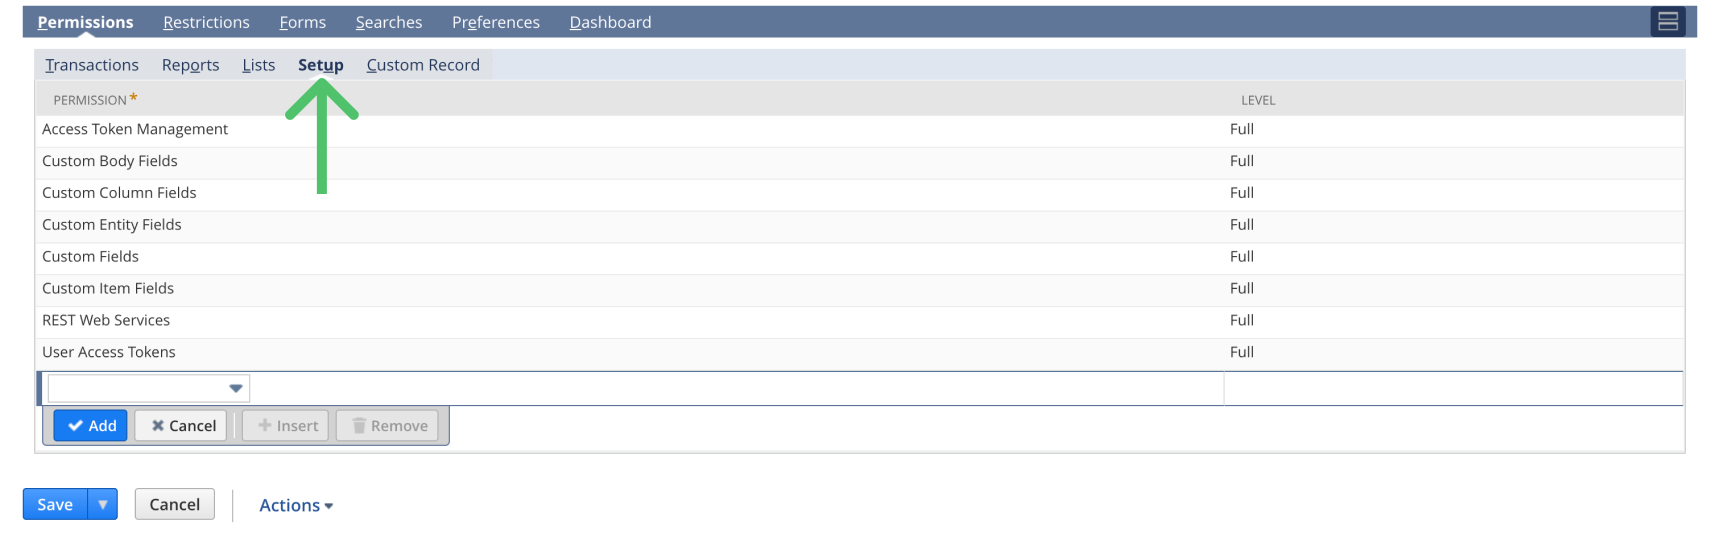
- Under Permissions > Lists and Permissions > Transactions, provide Full permissions for the NetSuite entities you plan on syncing to. For example, if you want to update sales orders, you need to go to the Transactions tab and select Sales Order from the list. If you want to update accounts, you need to go to Lists and select Accounts from the list.

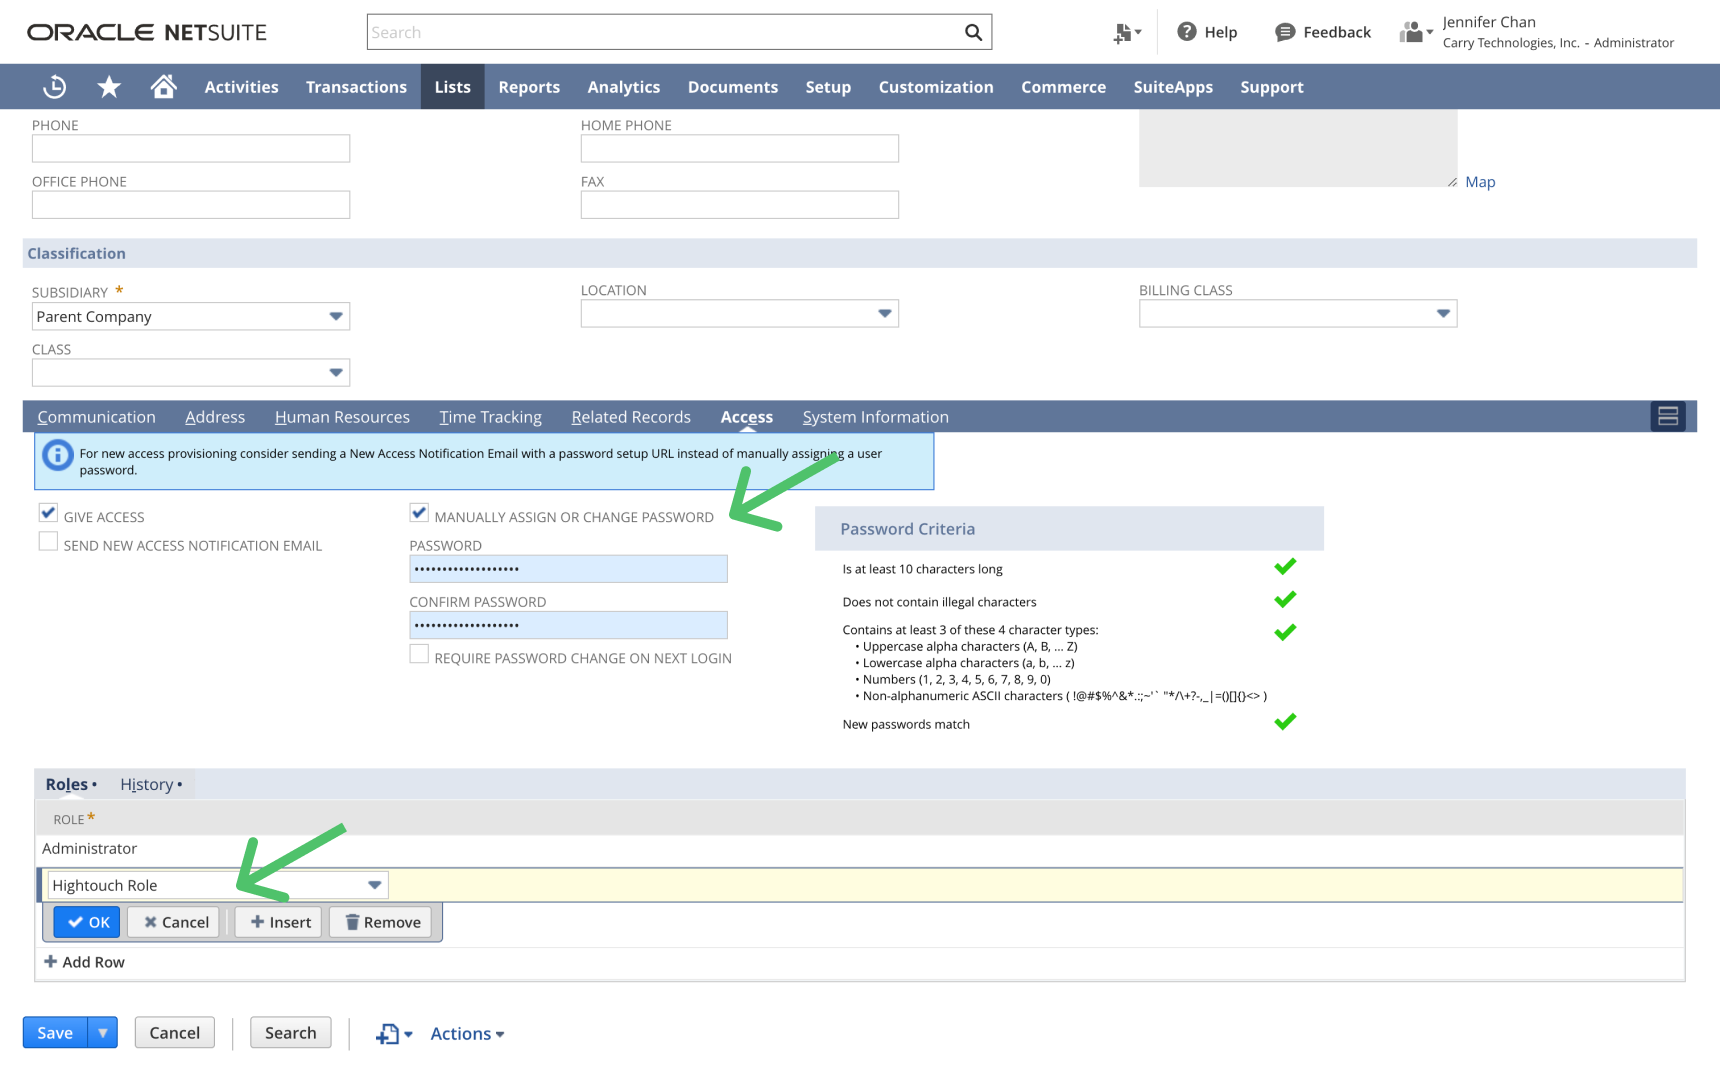
Create a user
Now you can create a new user that uses this role.
- Go to the Manage Users page. Create a new user or select the user you will be using Hightouch with.
- For new users: fill the Employee form with all required fields.
- On the Access tab, check Manually assign or change password and assign a secure password.
- Under Roles Assign the role, for example, "Hightouch Role," you previously created.
- Click Save.
Create an access token
- Go to the Setup > Users/Roles > Access Tokens page, or use the global search to find it.
- Click New Access Token.
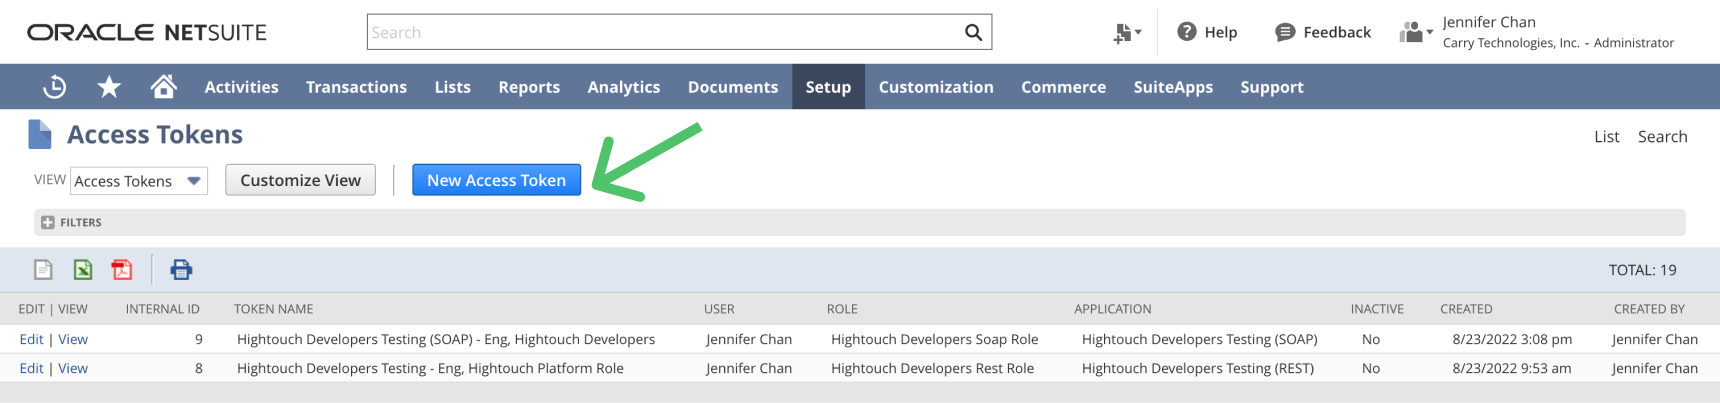
- Select the integration, user, and role you previously configured.
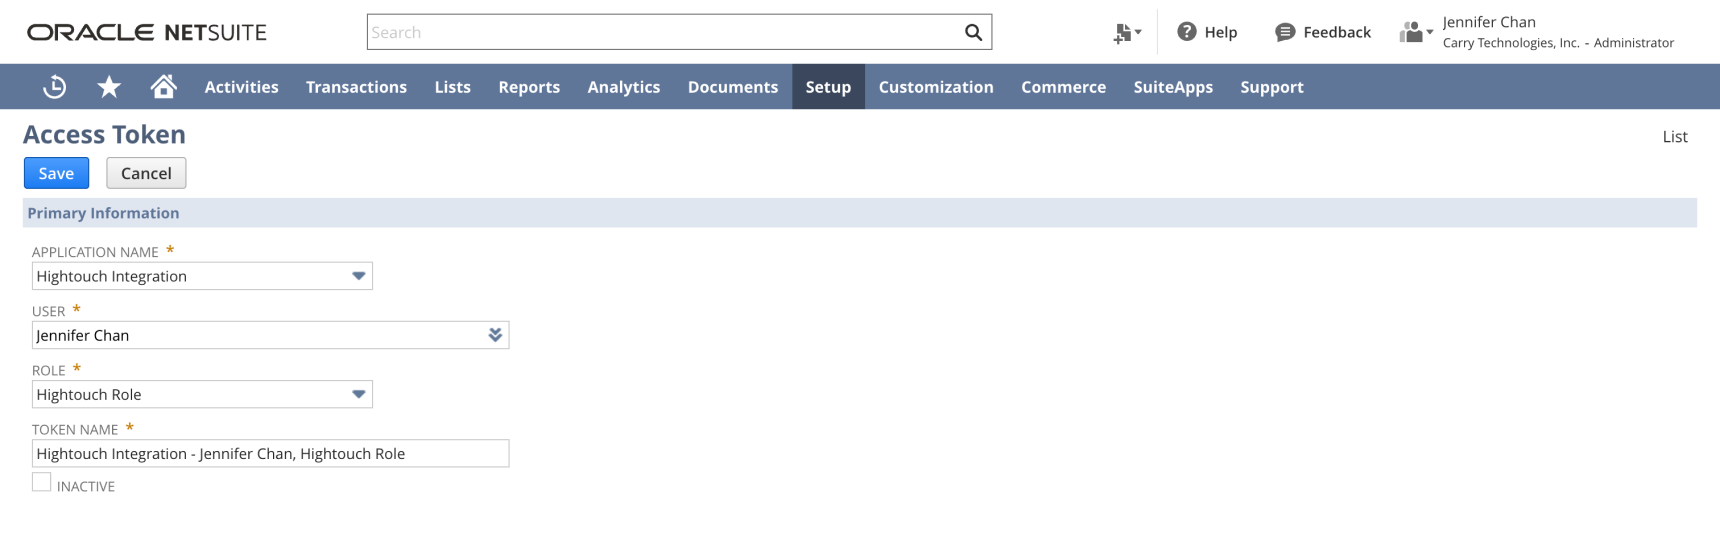
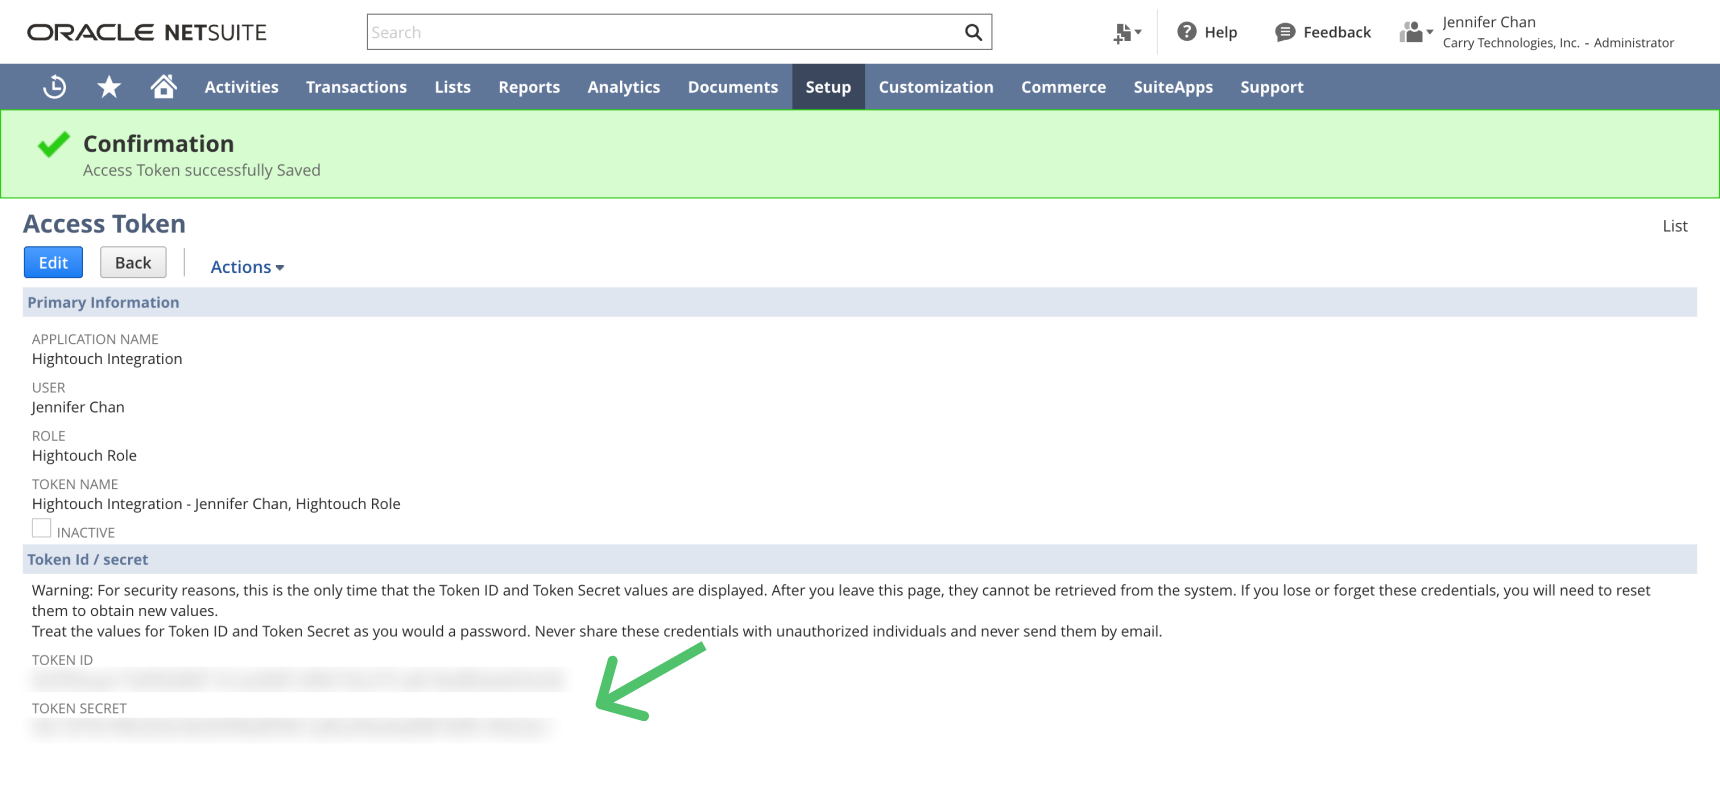
- When you click Save, NetSuite displays a Token ID and a Token Secret. Copy and store them in a secure location. You'll need them to connect to Hightouch.
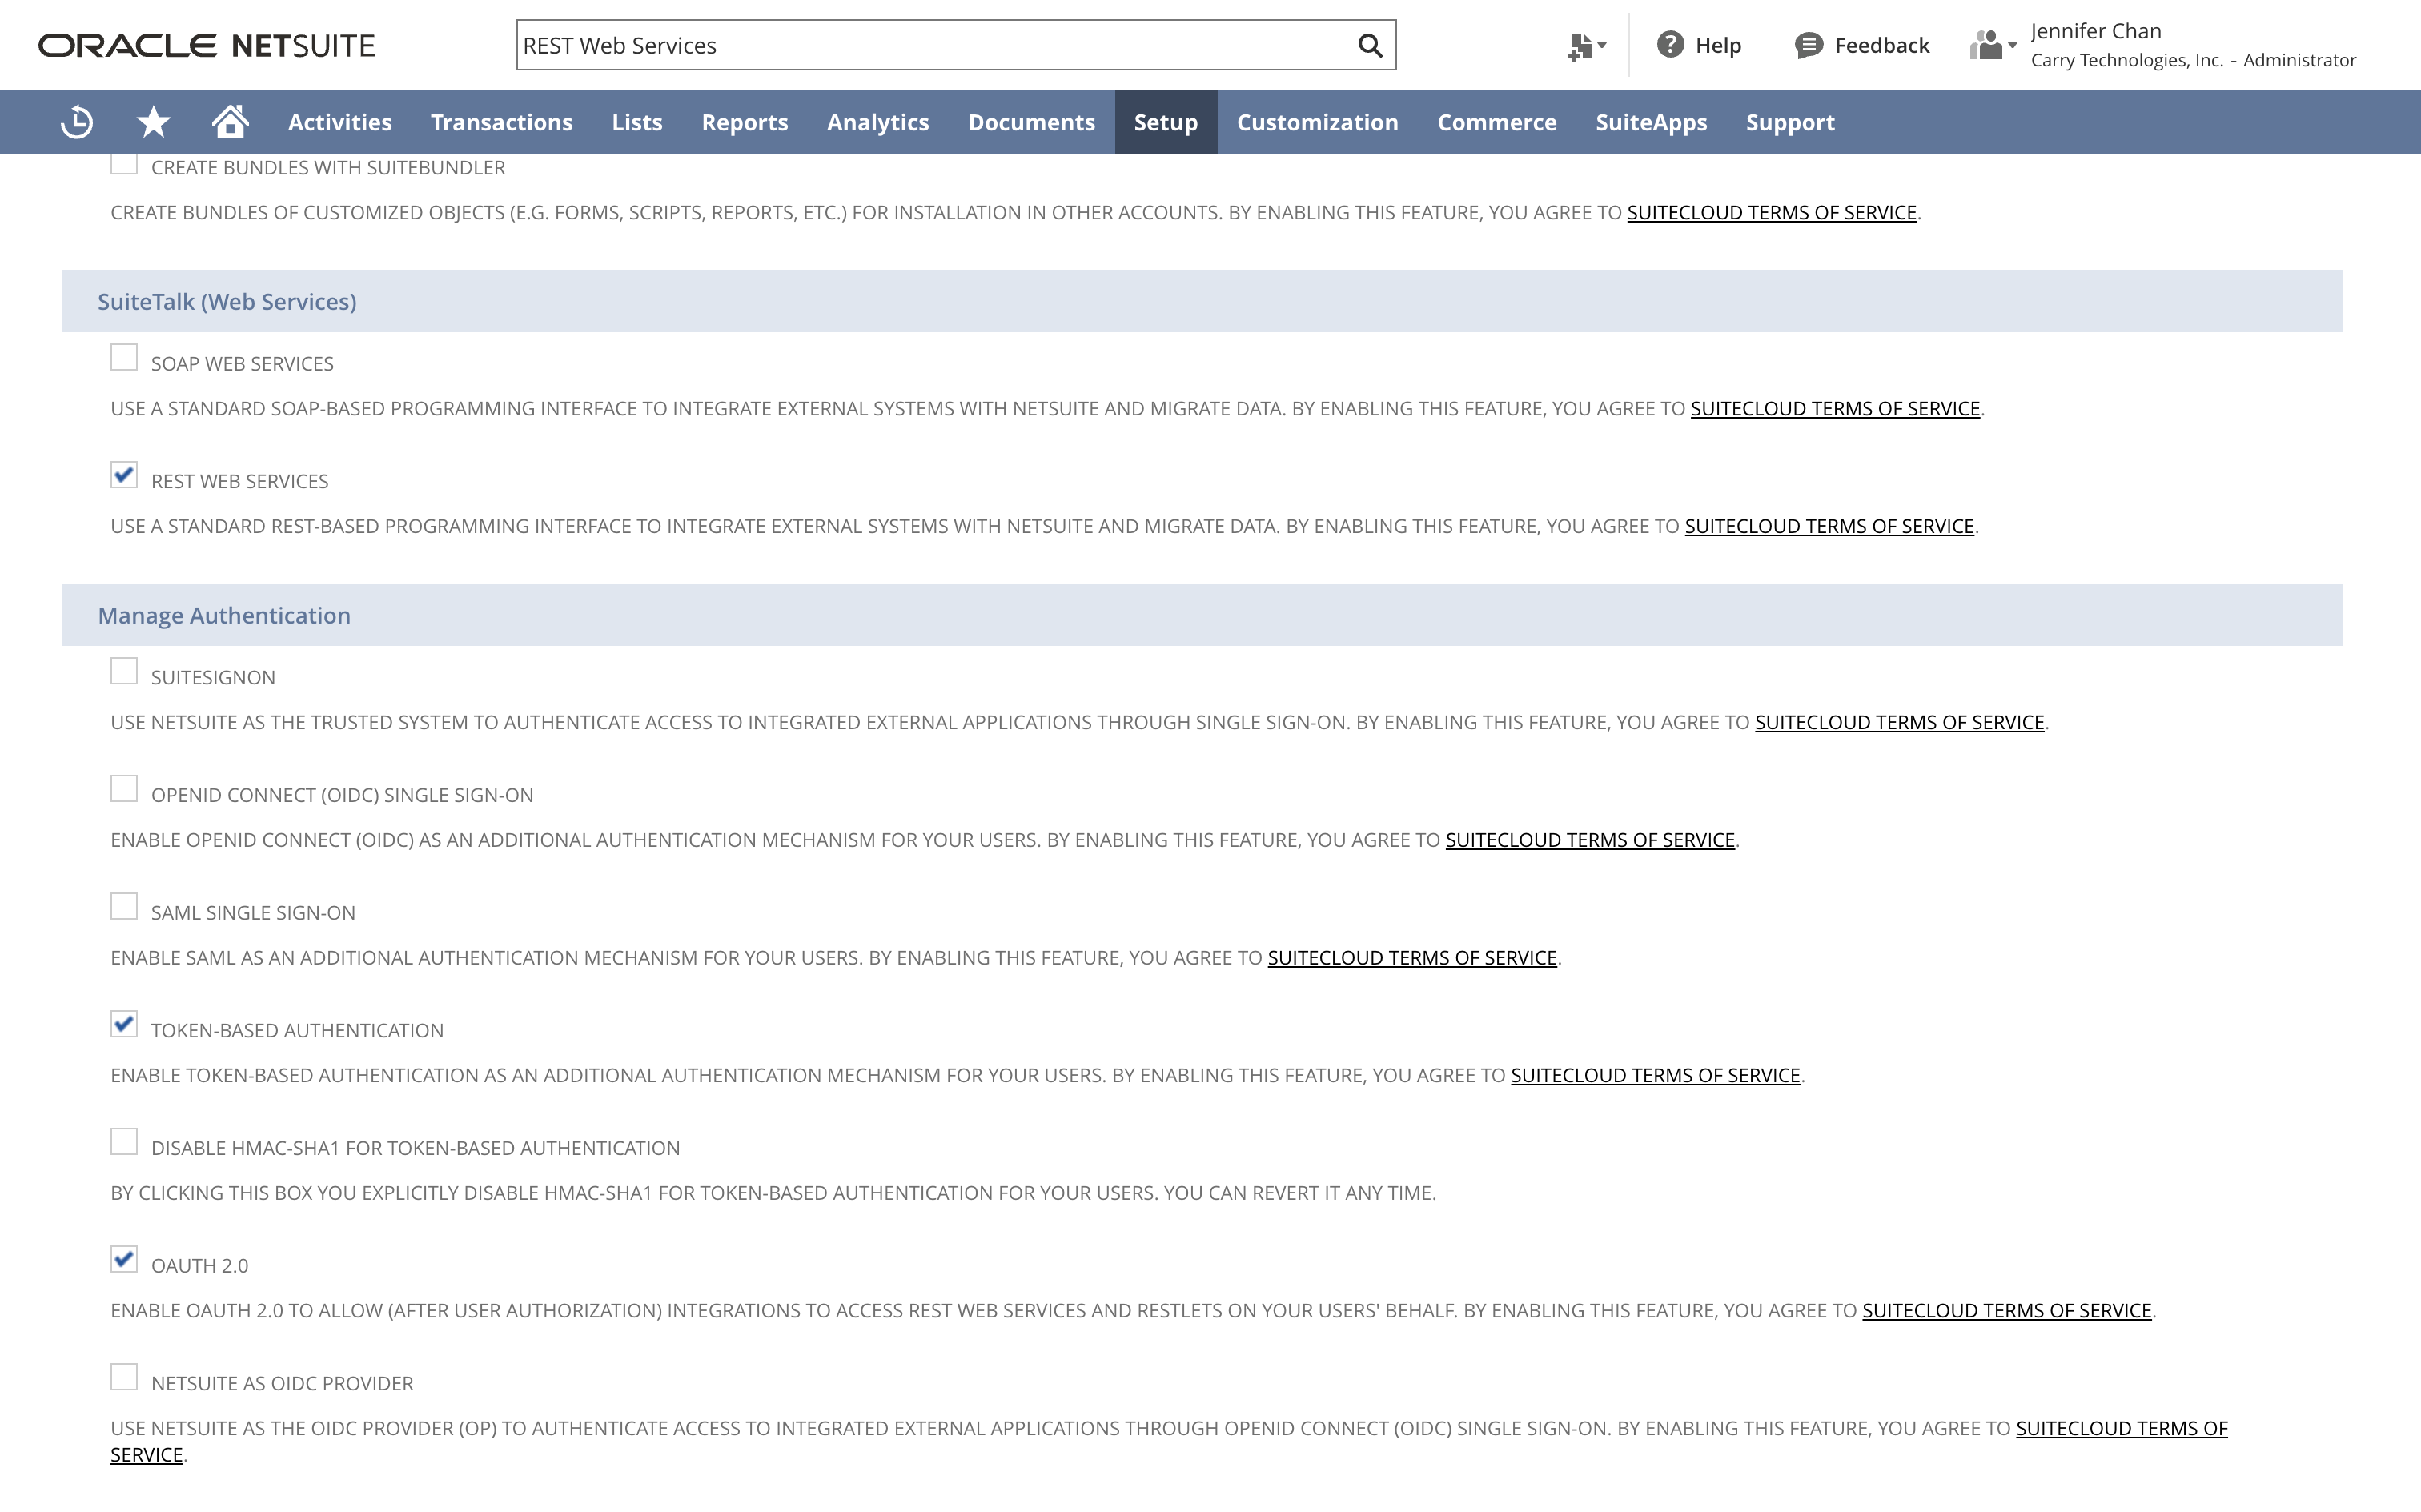
Enable REST web services
Finally, go to Setup > Company > Enable Features > SuiteTalk (Web Services) and enable REST Web Services. Once you check this box, NetSuite prompts you to agree to terms of service.
On the same page, under Manage Authentication, enable either :
- Token Based Authentication, if you plan on connecting Hightouch to NetSuite with basic authentication
- OAuth 2.0, if you plan on connecting Hightouch to NetSuite with OAuth
If you're not sure which you will use, you can check both of them.
Connect to NetSuite
You're now ready to create a NetSuite destination in Hightouch. Go to the Destinations overview page and click the Add destination button. Select NetSuite and click Continue. You can then authenticate Hightouch to NetSuite via Basic Auth or OAuth.
OAuth only requires you to login to your NetSuite account rather than enter credentials.
Authenticate with basic auth
Basic auth requires you to enter the following required fields into Hightouch:
- Account ID: You can find this on your Company information page in NetSuite.
- Consumer Key: From your new integration
- Consumer Secret: From your new integration
- Token Key: From your new access token
- Token Secret: From your new access token
If your account is a Sandbox account, you need to include the suffix _SB<number> as part of the Account ID:
SBshould be in uppercase.- The Sandbox suffix should be included with an underscore (
_).
For example, if the Account ID in your sandbox is 1234567-sb1, then you need to set your Account ID as 1234567_SB1 in your sync configuration.
Authenticate with OAuth
For the Authentication method, select OAuth and log into your NetSuite account. Once successful, you will be redirected back to Hightouch to enter a descriptive name for your destination and complete setup.
Sync configuration
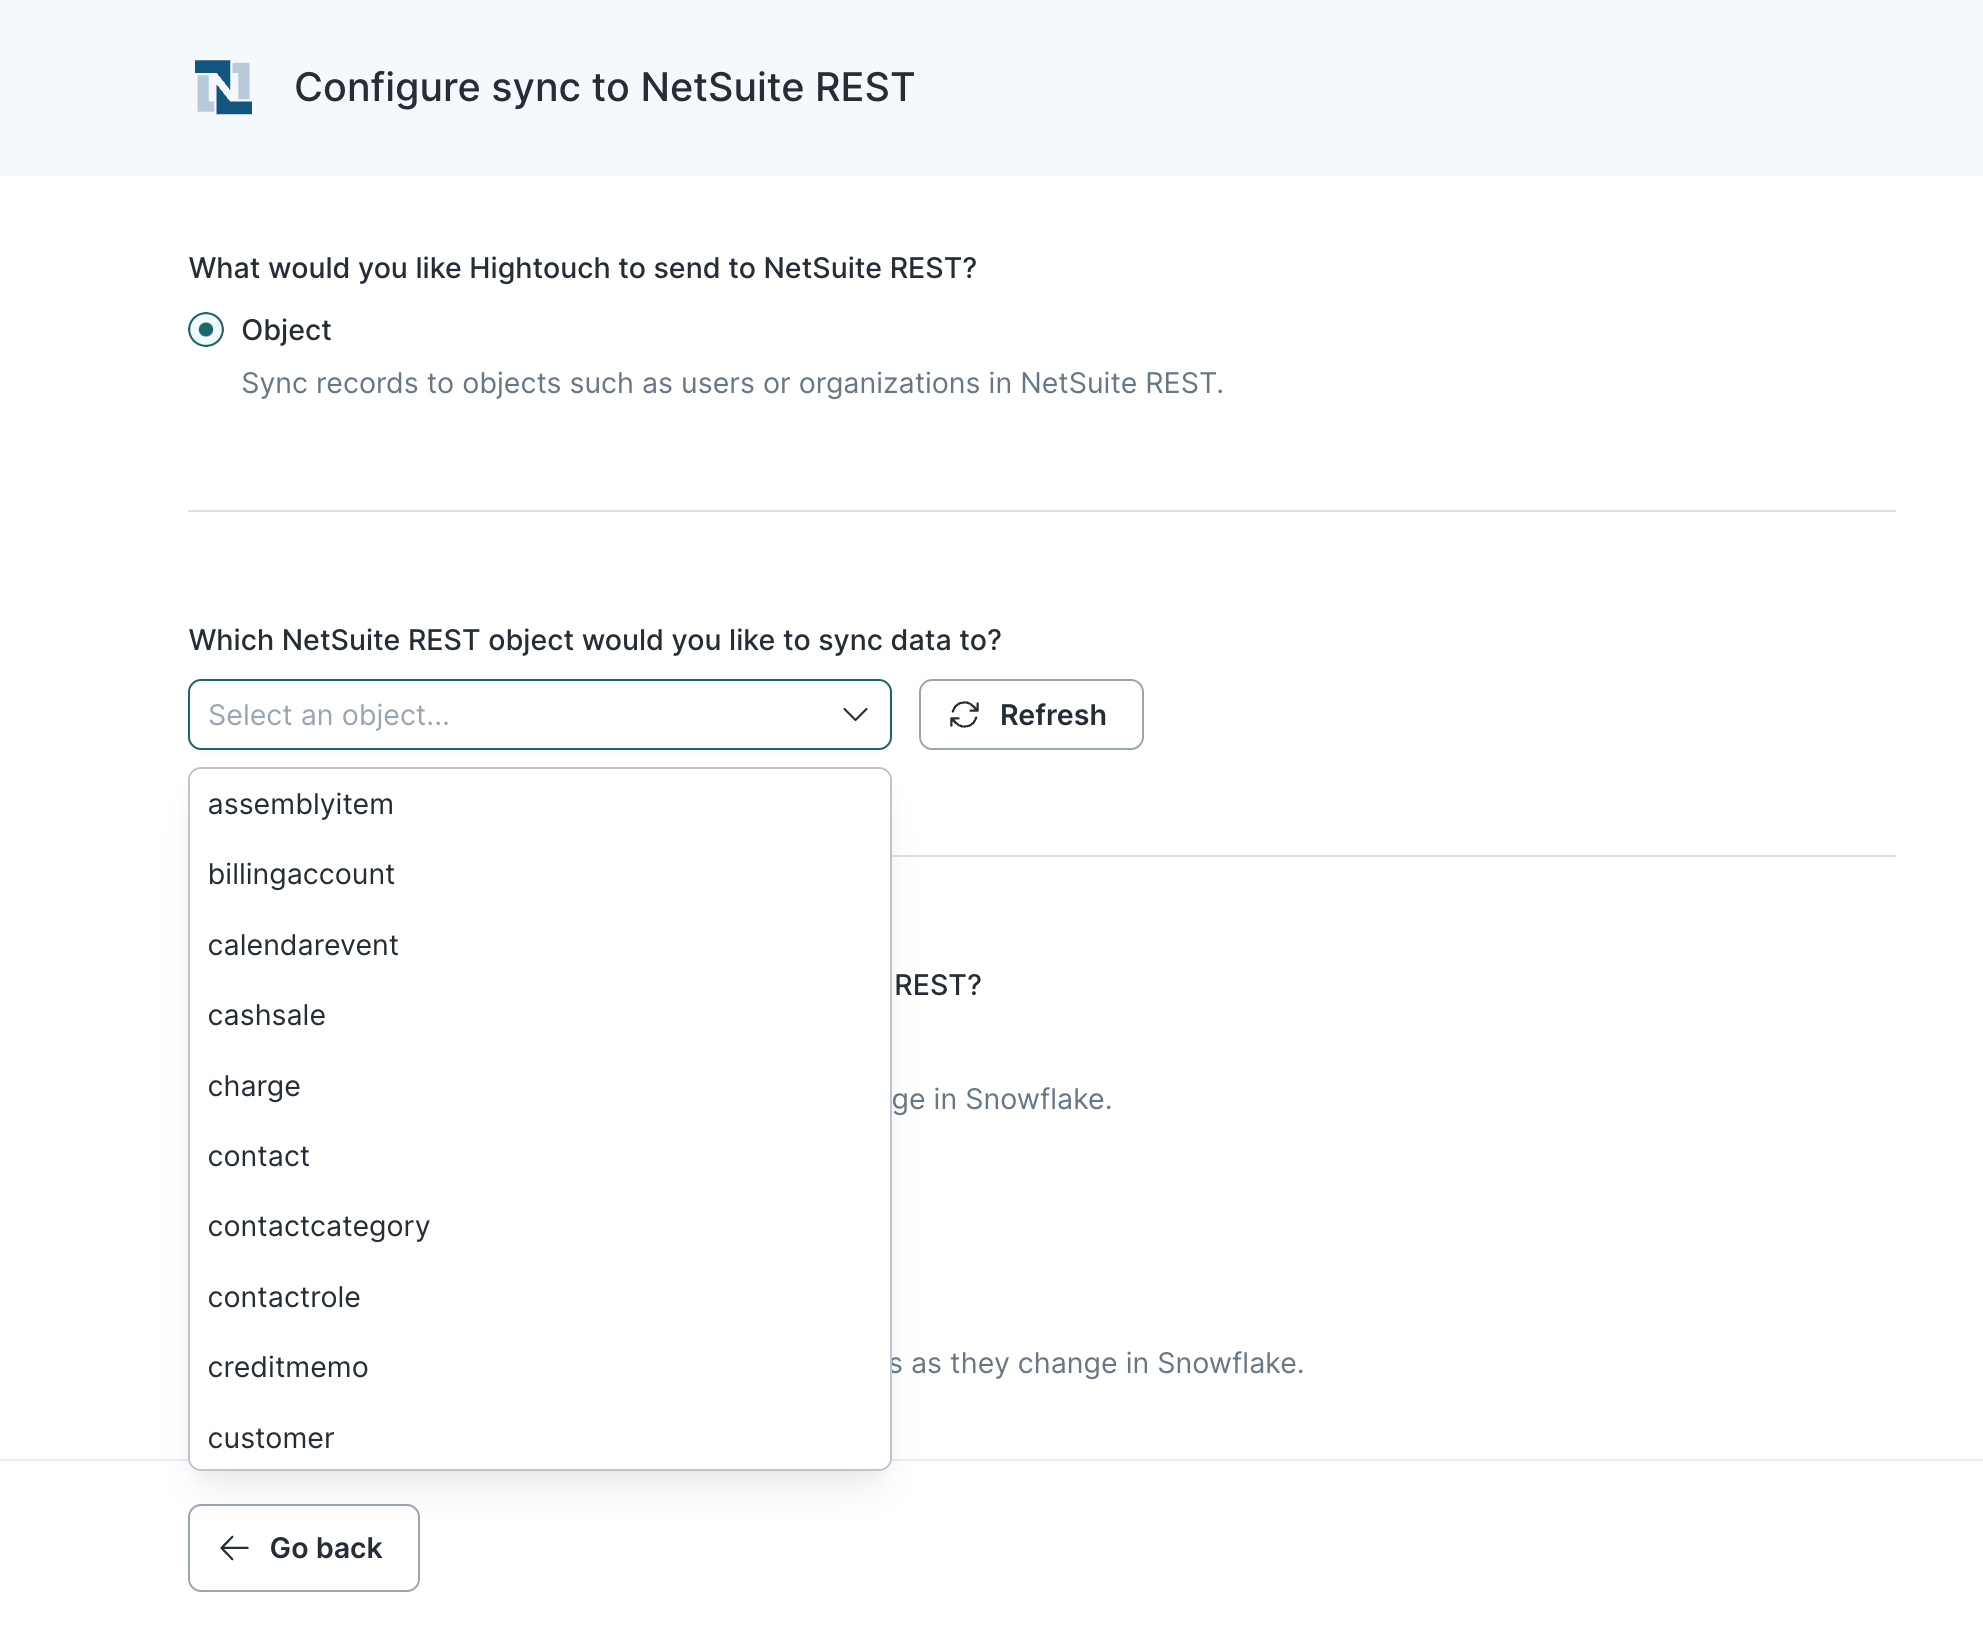
Once you've set up your NetSuite destination and have a model to pull data from, you can set up your sync configuration to begin syncing data. Go to the Syncs overview page and click the Add sync button to begin. Then, select the relevant model and the NetSuite destination you want to sync to.
Syncing entities
The Hightouch NetSuite destination allows you to sync data to supported NetSuite entities, for example, customers, invoices, vendors, etc. Hightouch also supports syncing custom records types.
The specific entities you can sync to depend on your NetSuite implementation. You can view your available entities in the dropdown. Because of the large catalog size, it's best to search for the entities you're interested in.
Record matching
To match source rows to entities in Netsuite, you need to select a source column and corresponding Netsuite field. Depending on the sync mode you select, you can match on the following Netsuite fields:
- External ID
- Internal ID
Update mode supports both, whereas Upsert mode only supports External ID.
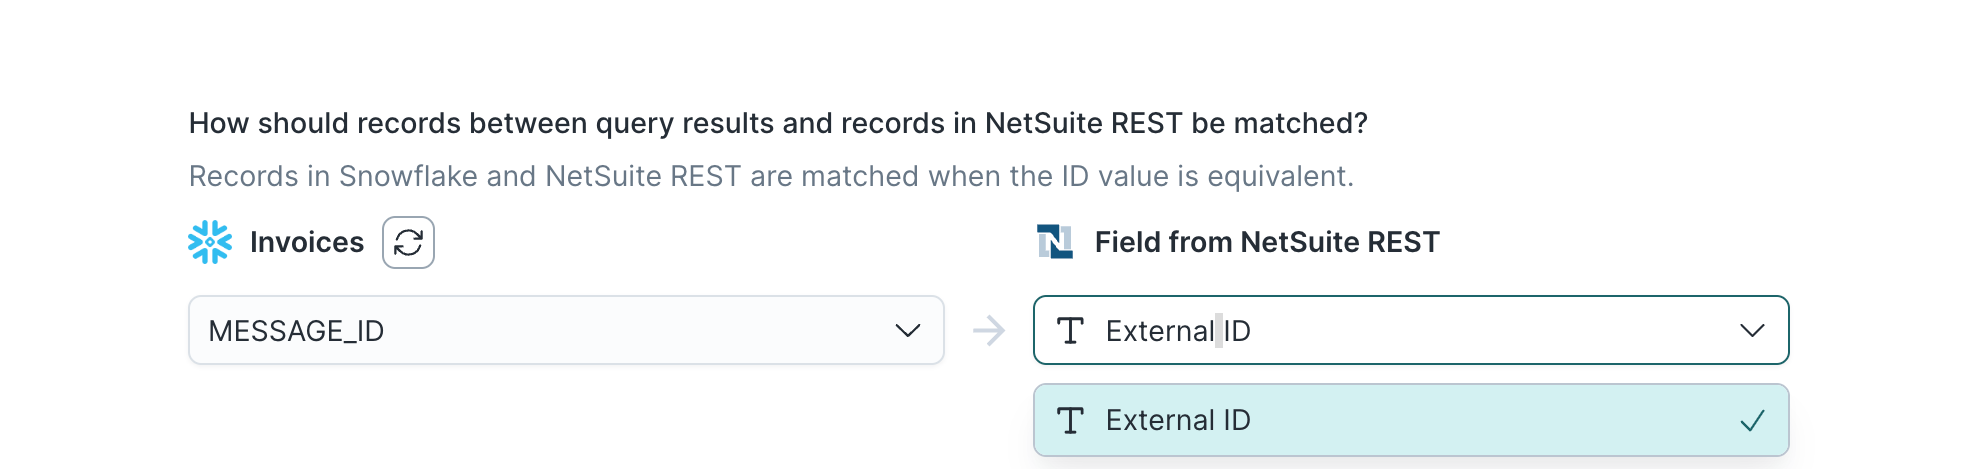
Refer to the record matching docs for more information.
In Insert mode, NetSuite automatically generates an identifier for every new record synced, so there is no need to match an existing record.
Field mapping
You can sync columns from your model to NetSuite default and custom fields.
Mappings mirror the NetSuite REST schema. That means some of your model columns might need to be JSON objects.
NetSuite generally expects JSON objects when an entity references another entity. For example, in an invoice, the entity field can reference a customer, partner, vendor, employee, contact, etc. by their ID. To make that reference, you need to map a JSON object like this to the entity field:
{ "id": 1 }
You can use also external IDs for references, for example:
{ "externalId": 1 }
The inline mapper is purpose-built to help you create JSON objects like this.
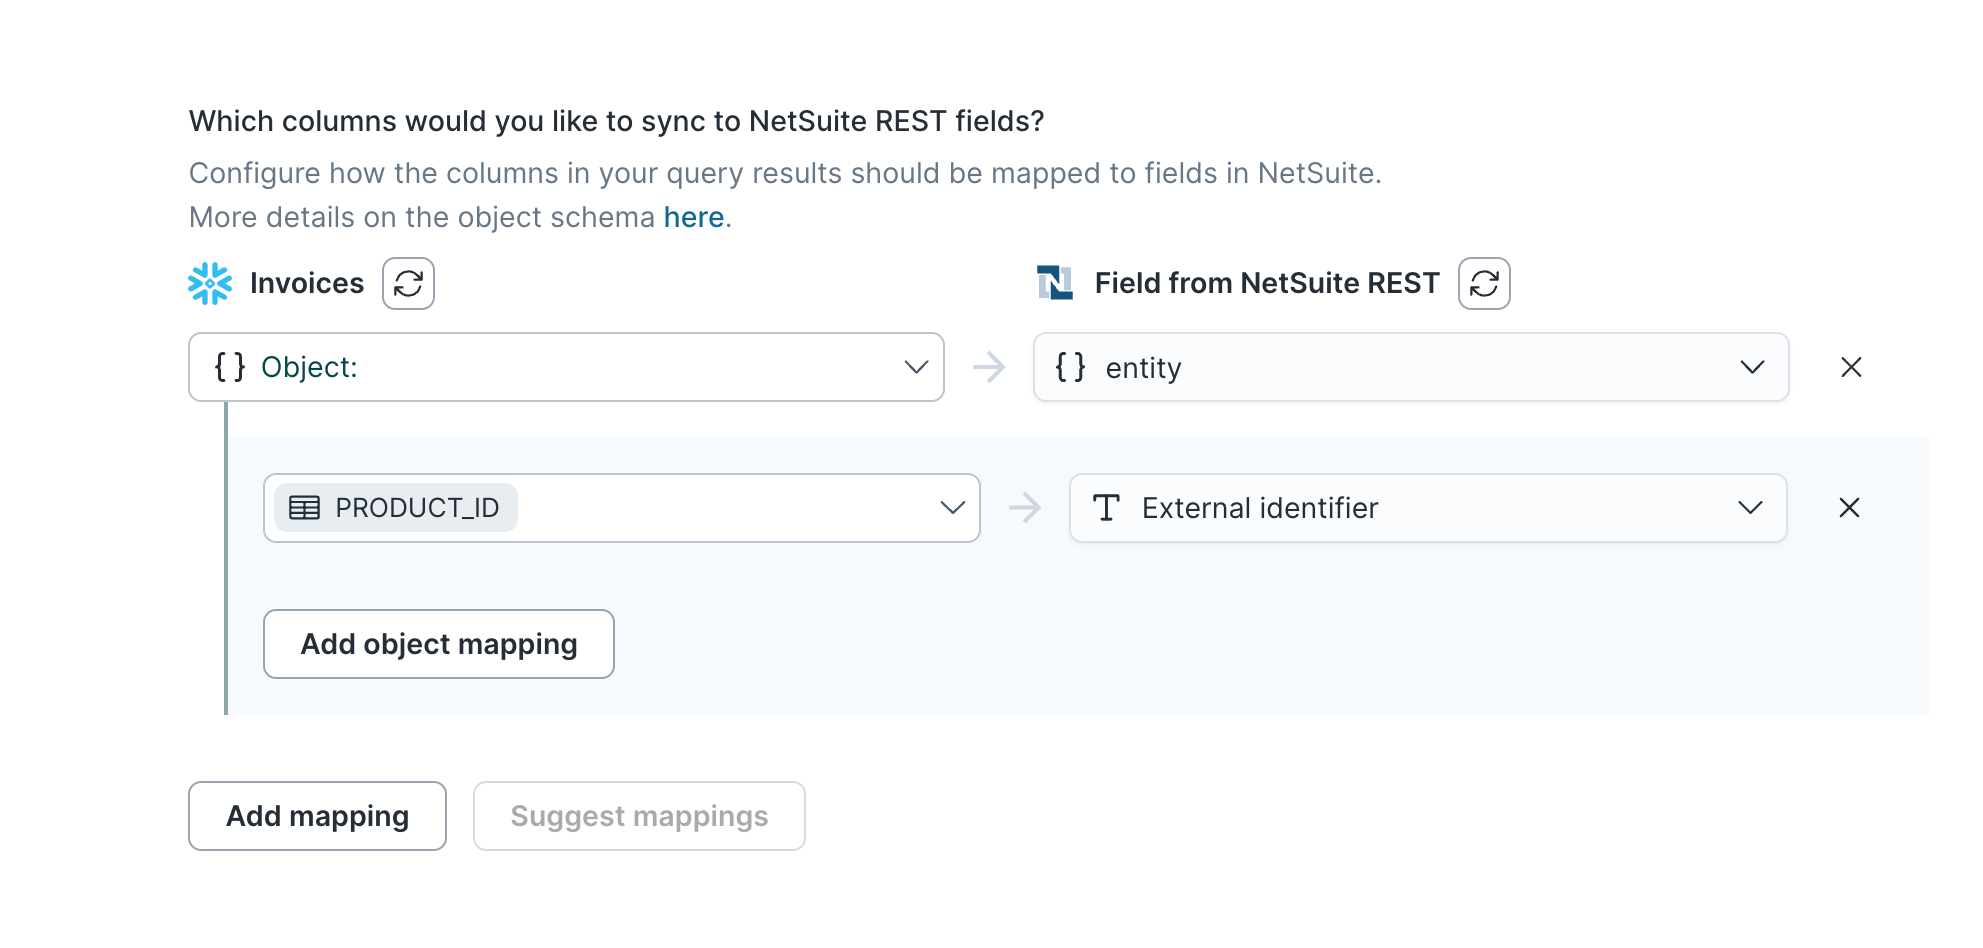
The inline mapper can also help you create arrays.
NetSuite arrays are often wrapped in a JSON object.
For example, an invoice supports an item field that expects an array of items:
{
  "items": [
    { "item": { "id": "8" }, "line": 1, "amount": 1, "price": { "id": "-1" } }
  ]
}
Refer to the inline mapping docs to learn how to create an array like this and what the required data format for your model is. To see the schema that NetSuite expects for different entities, go to the REST browser.
Overwrite sublists
Updating sublist properties can result in appending the mapped items to the record's existing sublist. This may result in unwanted duplicates. You can explicitly specify in Hightouch to overwrite your mapped sublist items in NetSuite. Overwriting the sublist removes all existing items and updates it with incoming data.
Delete behavior
The delete behavior you select dictates what to do when a row no longer appears in your model's query results. You have the following options:
| Behavior | Description |
|---|---|
| Do nothing | Keep the record in NetSuite with all its synced fields |
| Delete | Delete the synced record from your NetSuite instance |
Tips and troubleshooting
Common errors
To date, our customers haven't experienced any errors while using this destination. If you run into any issues, please don't hesitate to . We're here to help.
Live debugger
Hightouch provides complete visibility into the API calls made during each of your sync runs. We recommend reading our article on debugging tips and tricks to learn more.
Sync alerts
Hightouch can alert you of sync issues via Slack, PagerDuty, SMS, or email. For details, please visit our article on alerting.