| Audience | Technical marketers, marketing and lifecycle teams |
| Prerequisites | Prepare data for AID |
Connect Braze to AI Decisioning so agents can deliver personalized emails, SMS, push notifications, and in-app messages through your existing Braze Campaigns and Canvases.
What you'll learn
In this article, you'll learn how to:
- Set up Braze as a destination
- Add channels in AI Decisioning
- Add messages from Braze
- Configure Braze Campaigns and Canvases for AID
- Use dynamic variables in Braze templates
Overview
Delivering relevant and timely customer experiences in Braze requires up-to-date, contextual data. By integrating Hightouch's AI Decisioning (AID) with Braze, you can:
- Automatically trigger Braze Campaigns or Canvases based on predictions and behaviors surfaced by AID Agents
- Personalize message content using dynamic variables from your data warehouse
- Centralize targeting and decision logic in Hightouch, while using Braze to handle message delivery
1. Set Up Braze as a Destination
Already configured Braze? Even if you’ve previously set Braze up as a destination, you’ll still need to apply the required permissions for AID.
To connect Braze to Hightouch, you’ll need:
- An API key with the correct permissions
- Your Braze region identifier
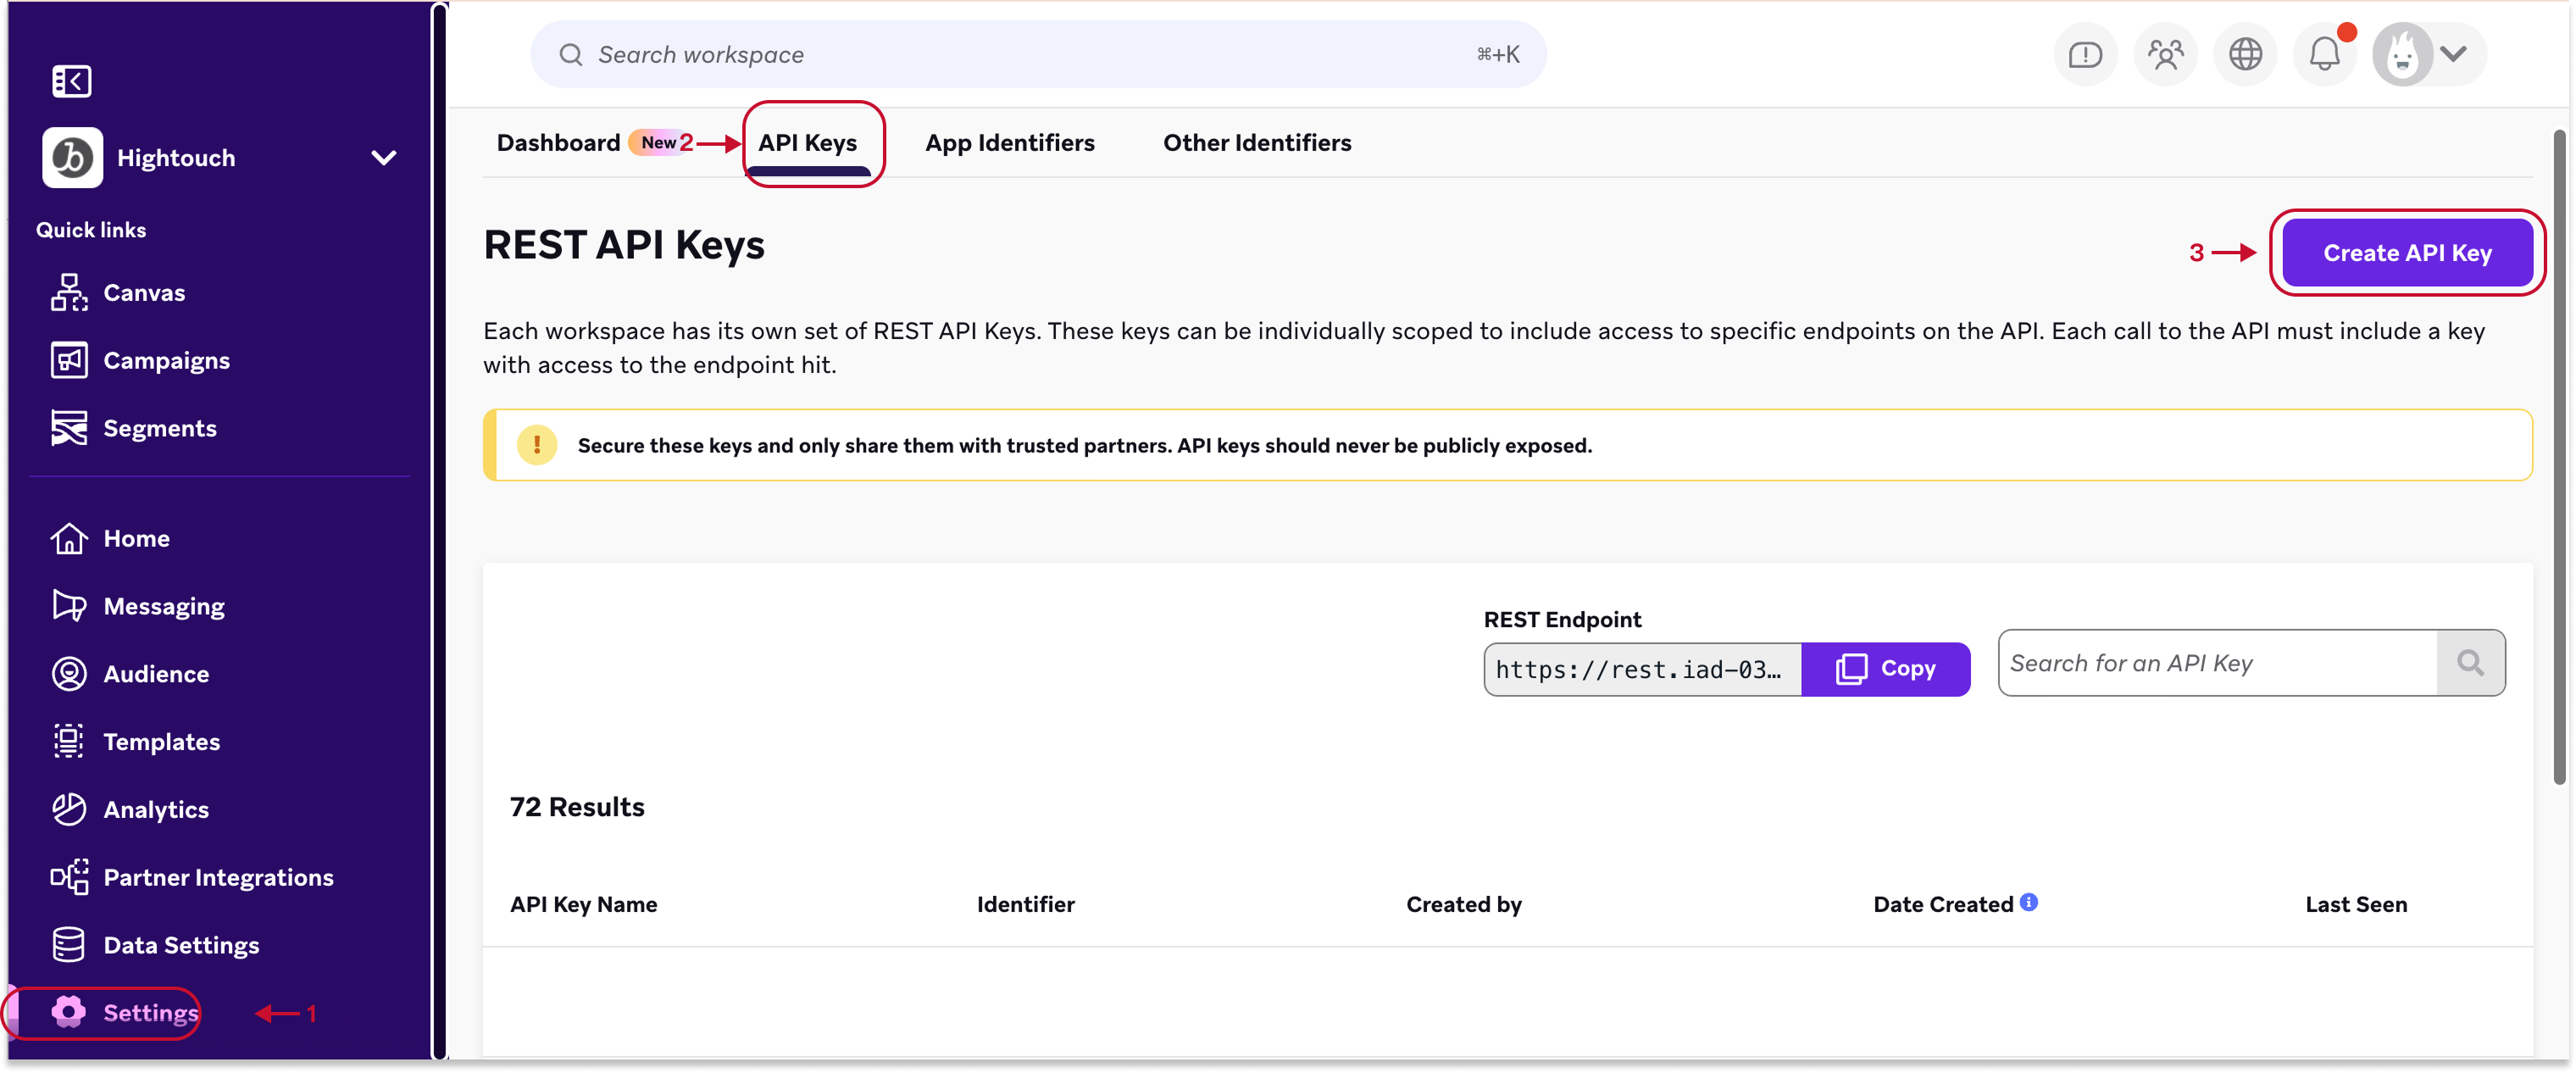
Step 1: Create API Key
In Braze:
- Go to Settings > APIs and Identifiers
- Click Create API Key
Step 2: Set required permissions
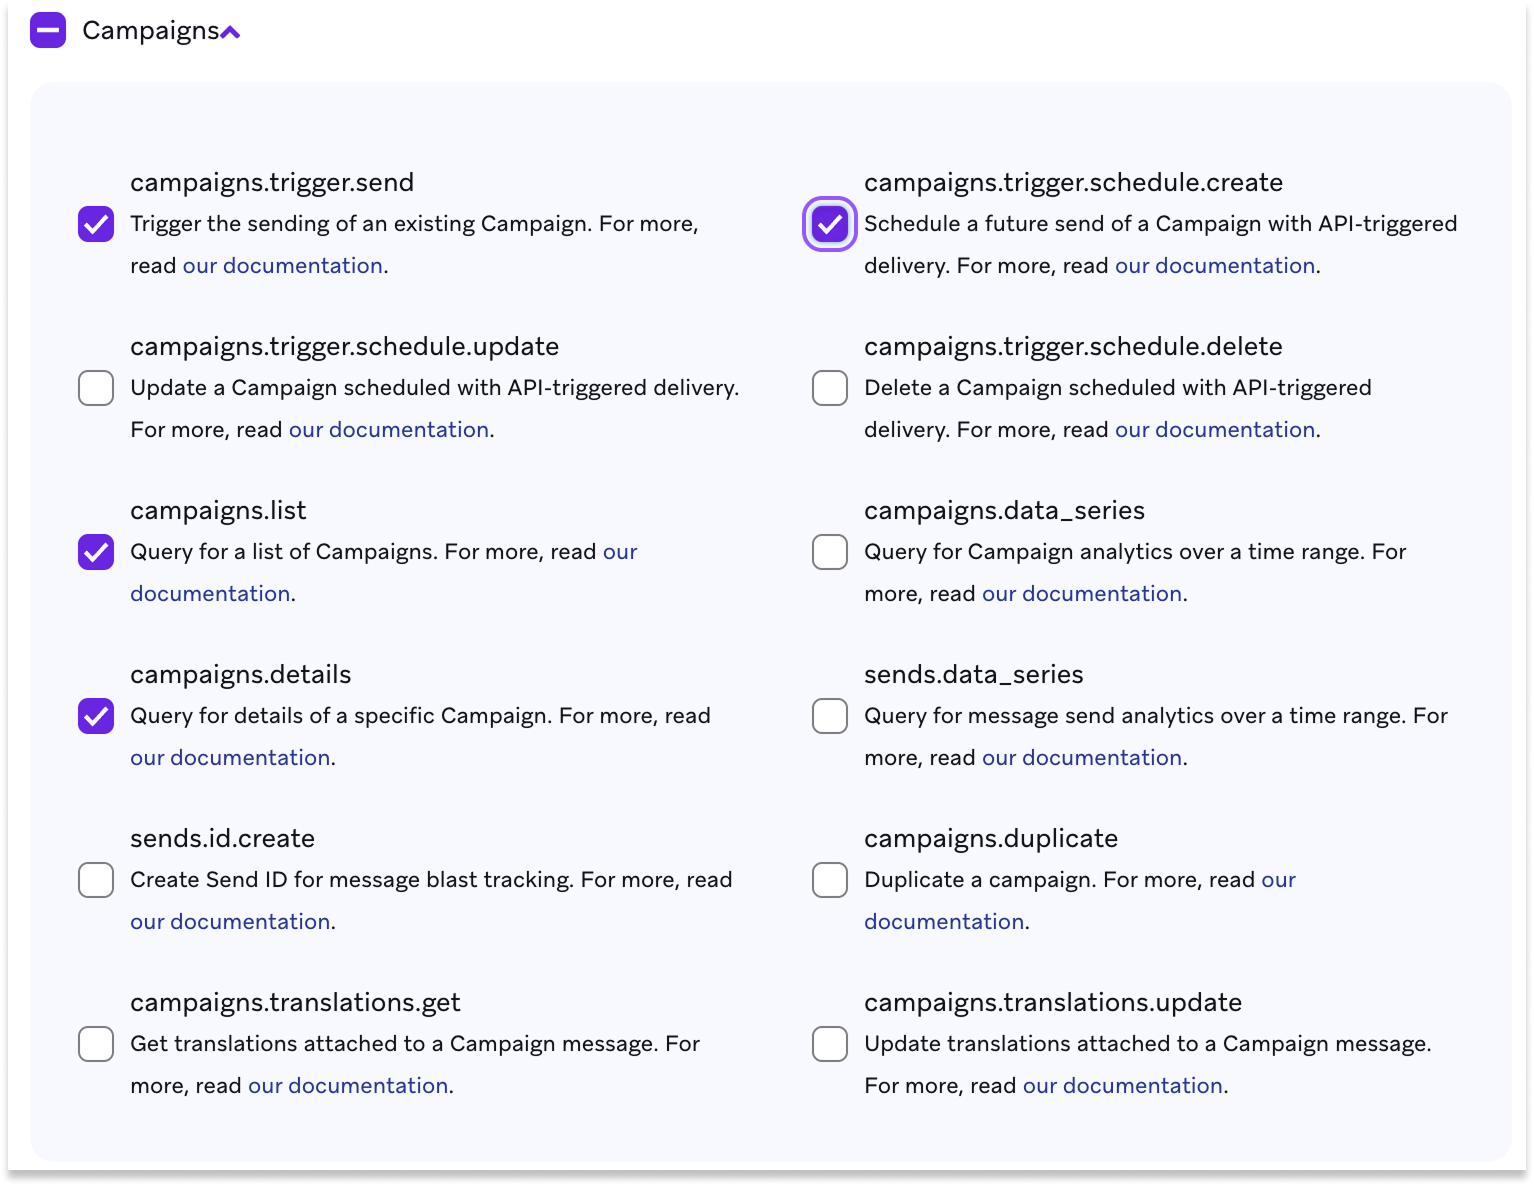
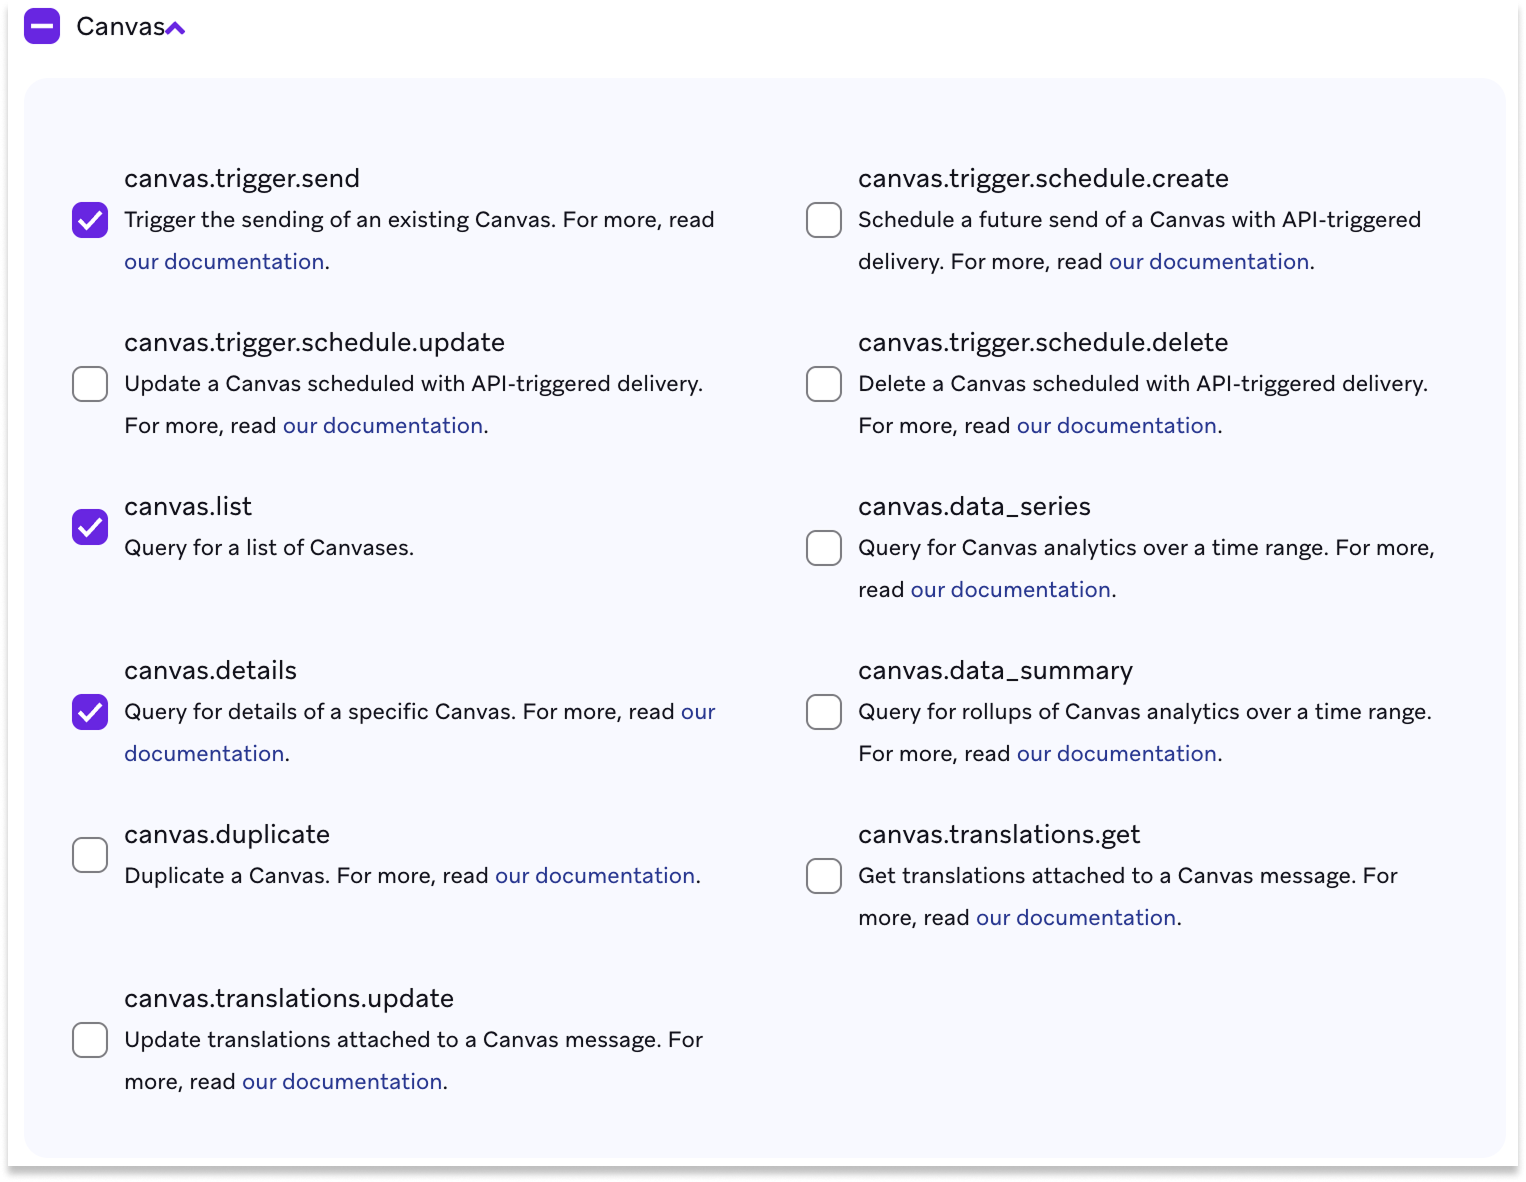
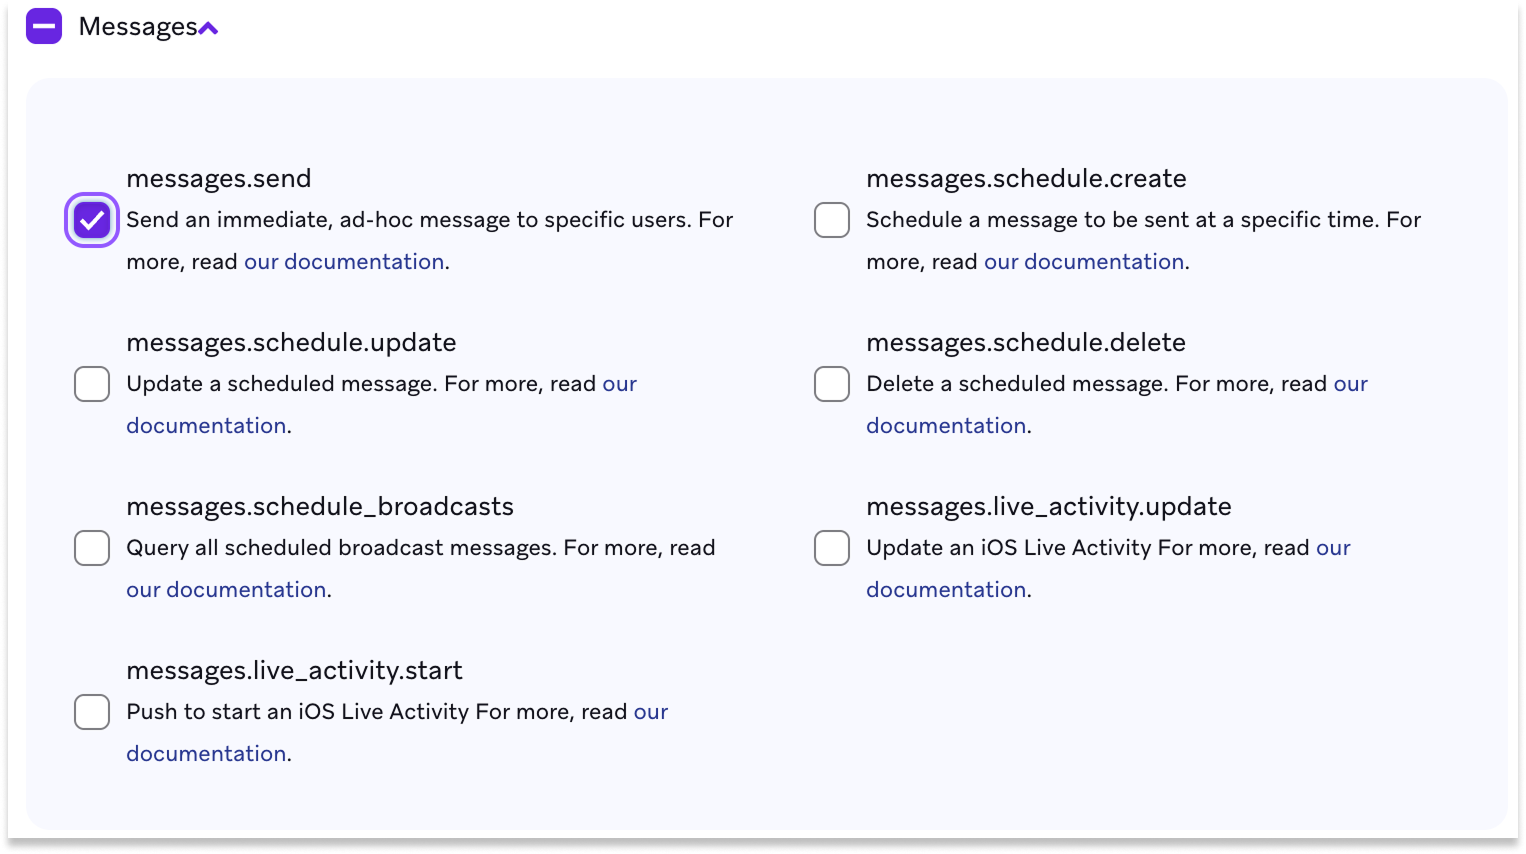
- Assign the following permissions:
| Sync Type | Required Permissions |
|---|---|
| Campaigns | campaigns.trigger.send, campaigns.list, campaigns.details, campaigns.trigger.schedule.create |
| Canvas | canvas.trigger.send, canvas.list, canvas.details |
| Messages | messages.send |
| Templates | templates.email.list, templates.info |

Step 3: Find your Braze region
Use the table below to find your Braze region:
| URL | Region |
|---|---|
| https://dashboard-01.braze.com | iad-01.braze.com |
| https://dashboard-02.braze.com | iad-02.braze.com |
| https://dashboard-03.braze.com | iad-03.braze.com |
| https://dashboard-04.braze.com | iad-04.braze.com |
| https://dashboard-05.braze.com | iad-05.braze.com |
| https://dashboard-06.braze.com | iad-06.braze.com |
| https://dashboard-07.braze.com | iad-07.braze.com |
| https://dashboard-08.braze.com | iad-08.braze.com |
| https://dashboard-01.braze.eu | fra-01.braze.eu |
| https://dashboard-02.braze.eu | fra-02.braze.eu |
Step 4: Connect to Hightouch
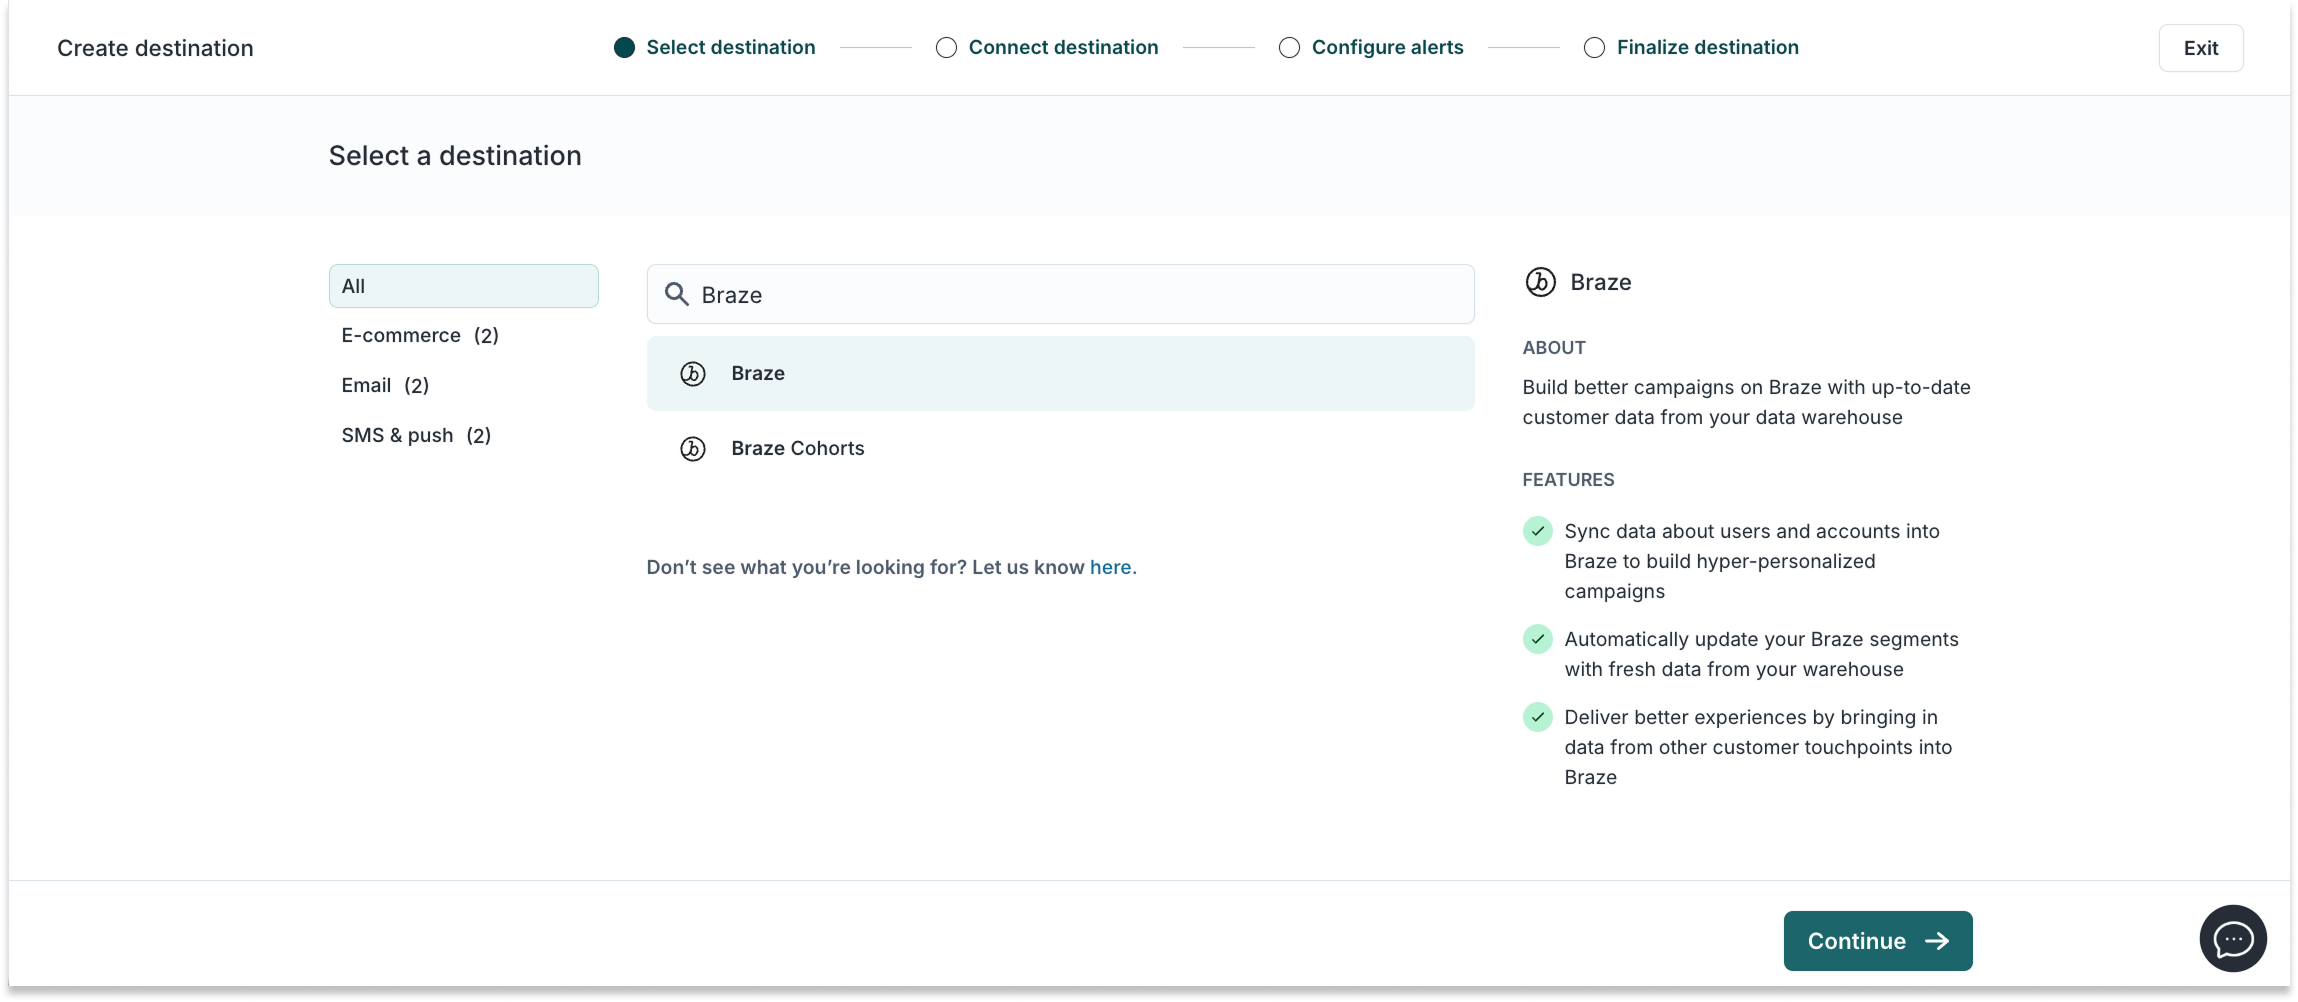
- Go to Integrations > Destinations
- Click Add destination
- Select Braze and click Continue
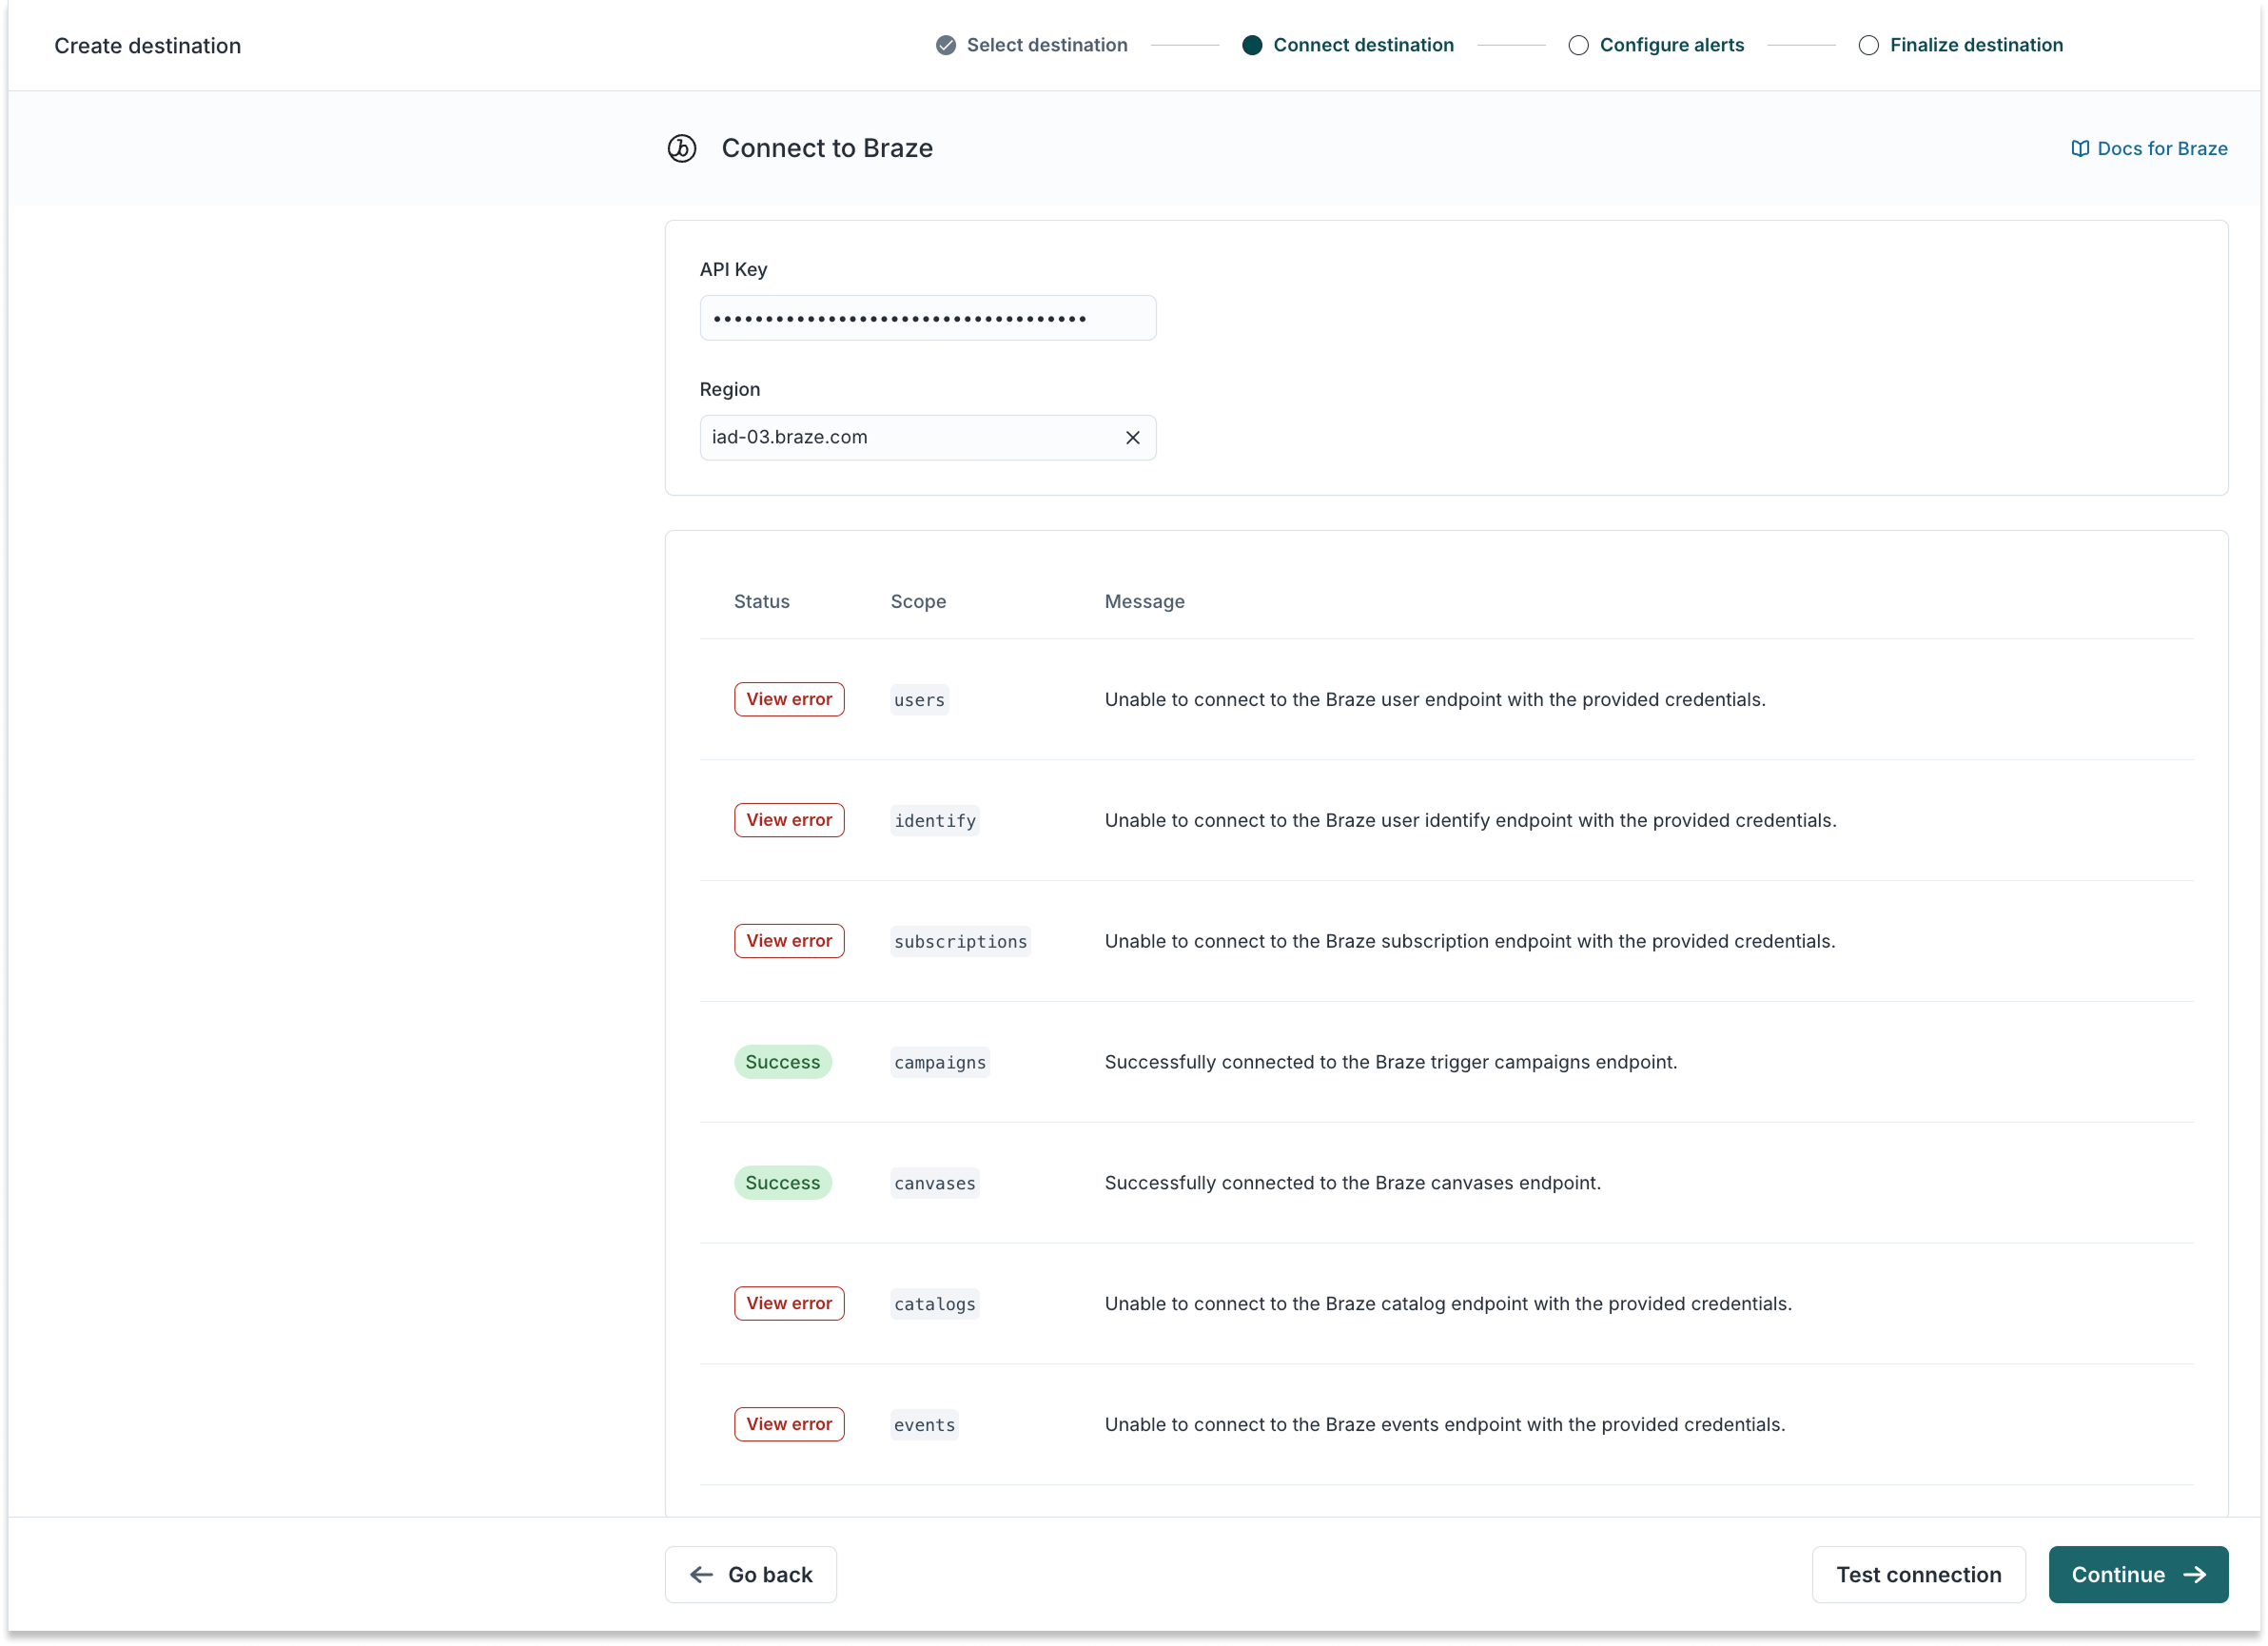
-
Paste your API key and select your Region.
-
Click Test Connection to verify setup. You should see
Successfor Campaigns and Canvases. -
Click Continue →.
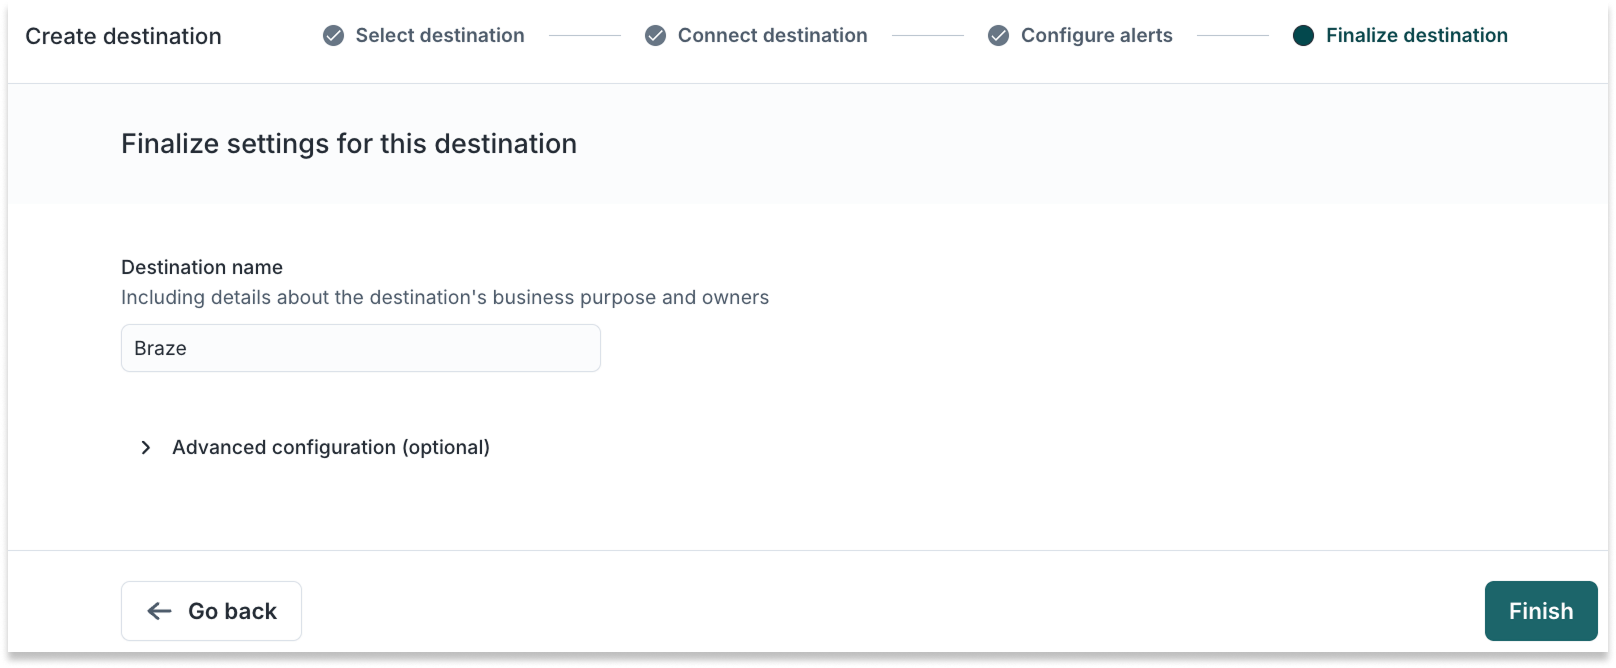
- Optional: configure alerts. You can also do this later in Integrations > Alerting.

- Finalize destination settings and click Finish.
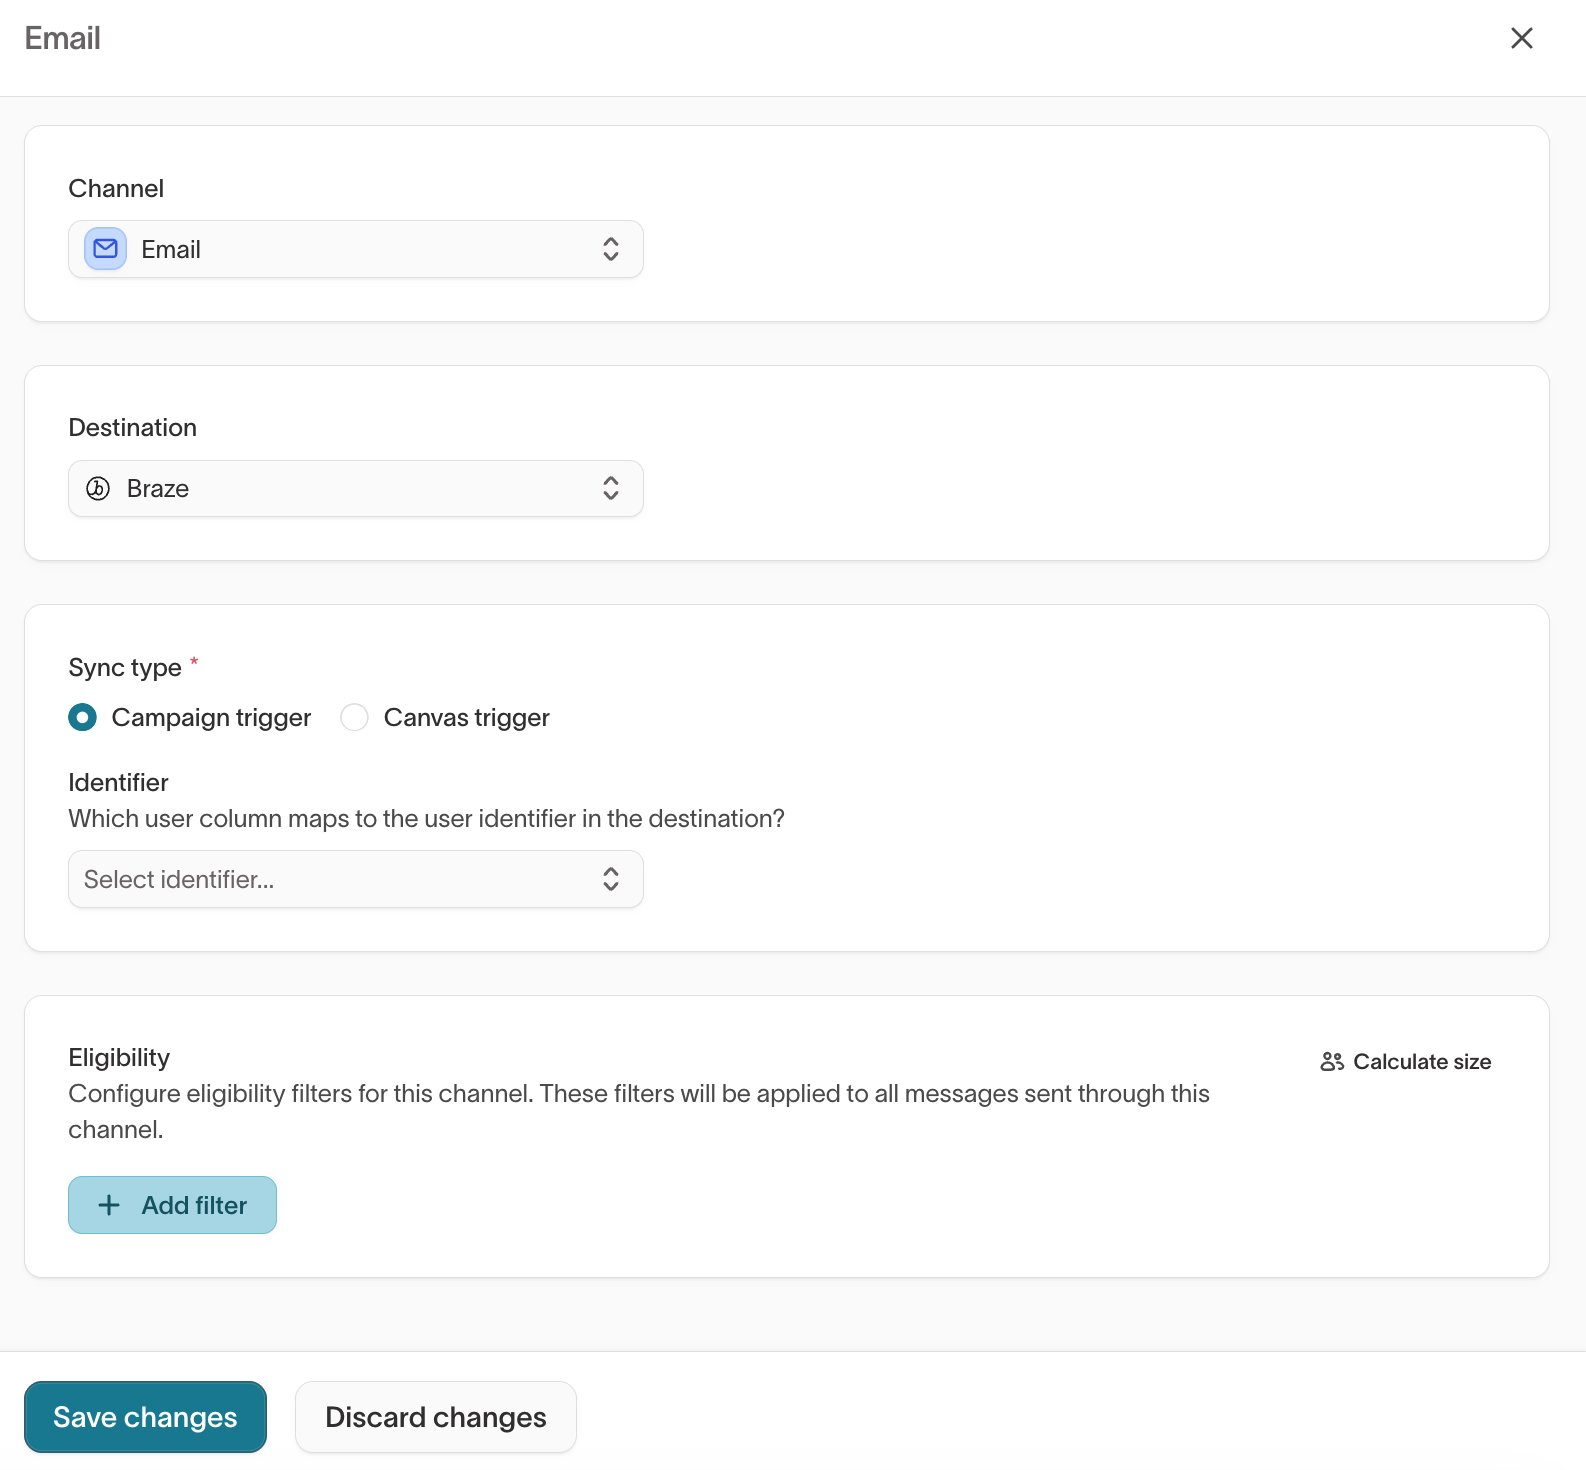
2. Add channels in AI Decisioning
Once Braze is set up as a destination, you can add channels. Channels define how Hightouch sends messages to Braze—via Campaigns or Canvases.
Set up a channel
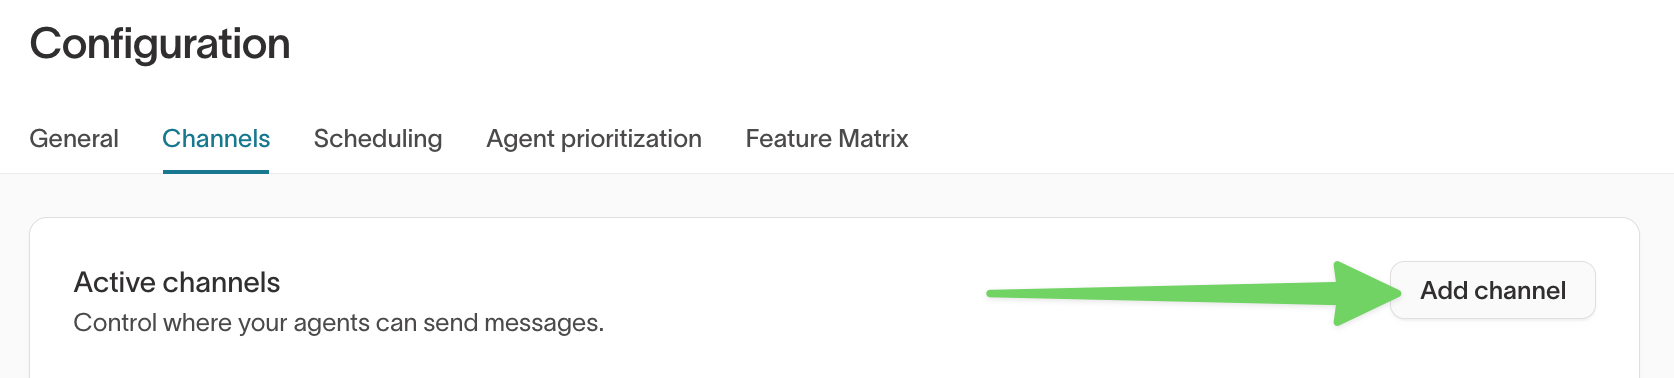
- Go to
AI Decisioning → Configuration → Channels. - Click
Add channel. - Choose a channel type: Email, SMS, Push, or In-App.
- Select Braze as the destination.
- Choose a sync type:
- Campaign: One-time, real-time sends used for email, push, and SMS
- Canvas: Journey flows used for triggering in-app messages
- Select an identifier (typically
external_idoremail). - Click
Add channel, - Select your new channel and click
Save changes.
Sync type comparison
The Sync Type determines how Hightouch sends messages through Braze. Here’s a breakdown of the available options:
| Channel | Campaign Trigger | Canvas Trigger |
|---|---|---|
| ✅ (recommended) | ✅ | |
| SMS | ✅ (recommended) | ✅ |
| Push | ✅ (recommended) | ✅ |
| In-App | ❌ | ✅ |
| Sync type | Best for | Message timing | Dynamic vars |
|---|---|---|---|
| Campaign trigger | Immediate, single-send campaigns for Email, SMS, and Push | Immediate | Fully supported |
| Canvas trigger | In-App Messages | Immediate | Limited (no API-triggered overrides) |
3. Add messages
After you add channels in AI Decisioning, you can add messages to your agents. Each message connects an agent’s decision to a Braze Campaign or Canvas.
For full details on message configuration, variants, and tags, see Messages →.
Add a message from Braze
- Go to
AI Decisioning → Agentsand select your agent. - Open the
Messagestab. - Click
Add messages, then select Add messages individually.
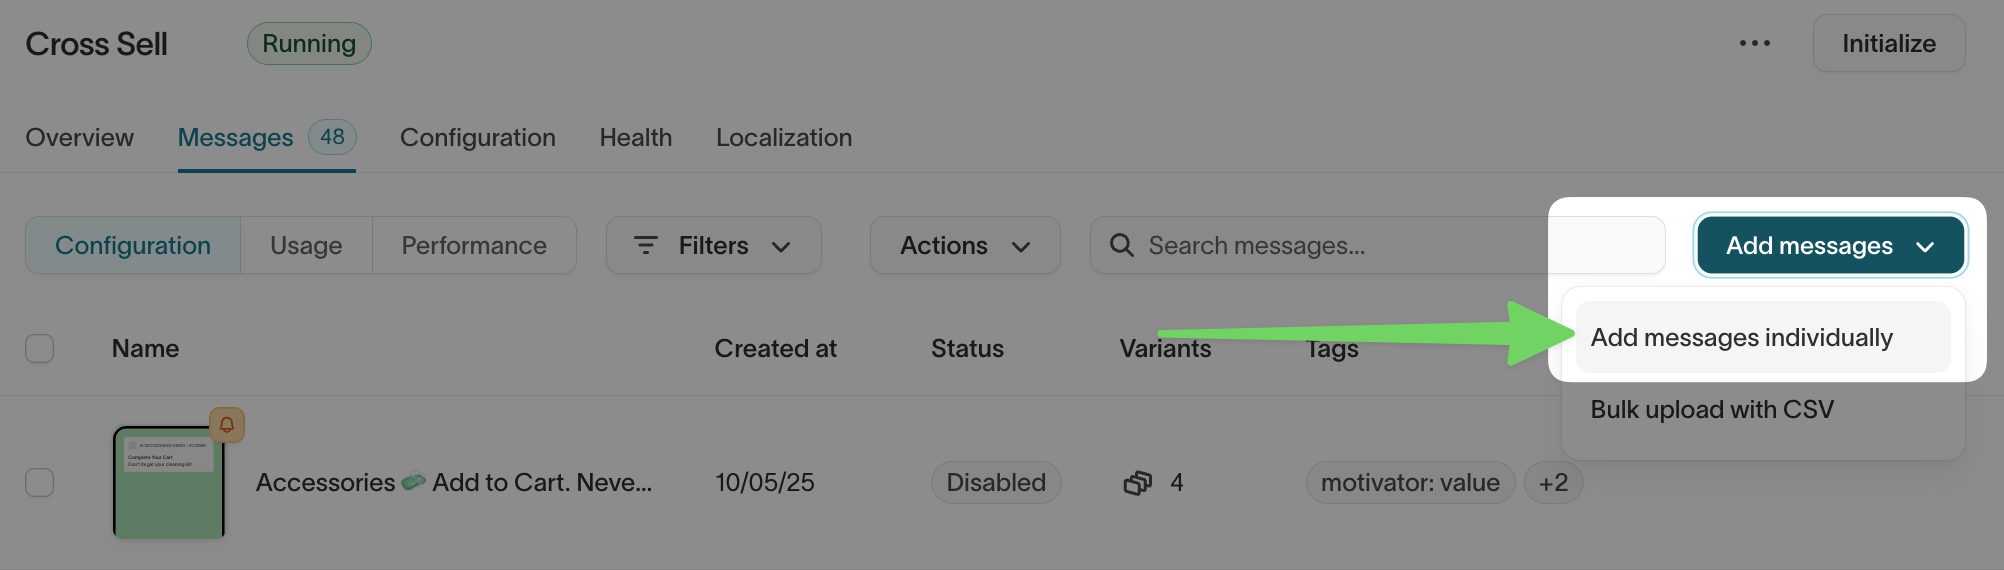
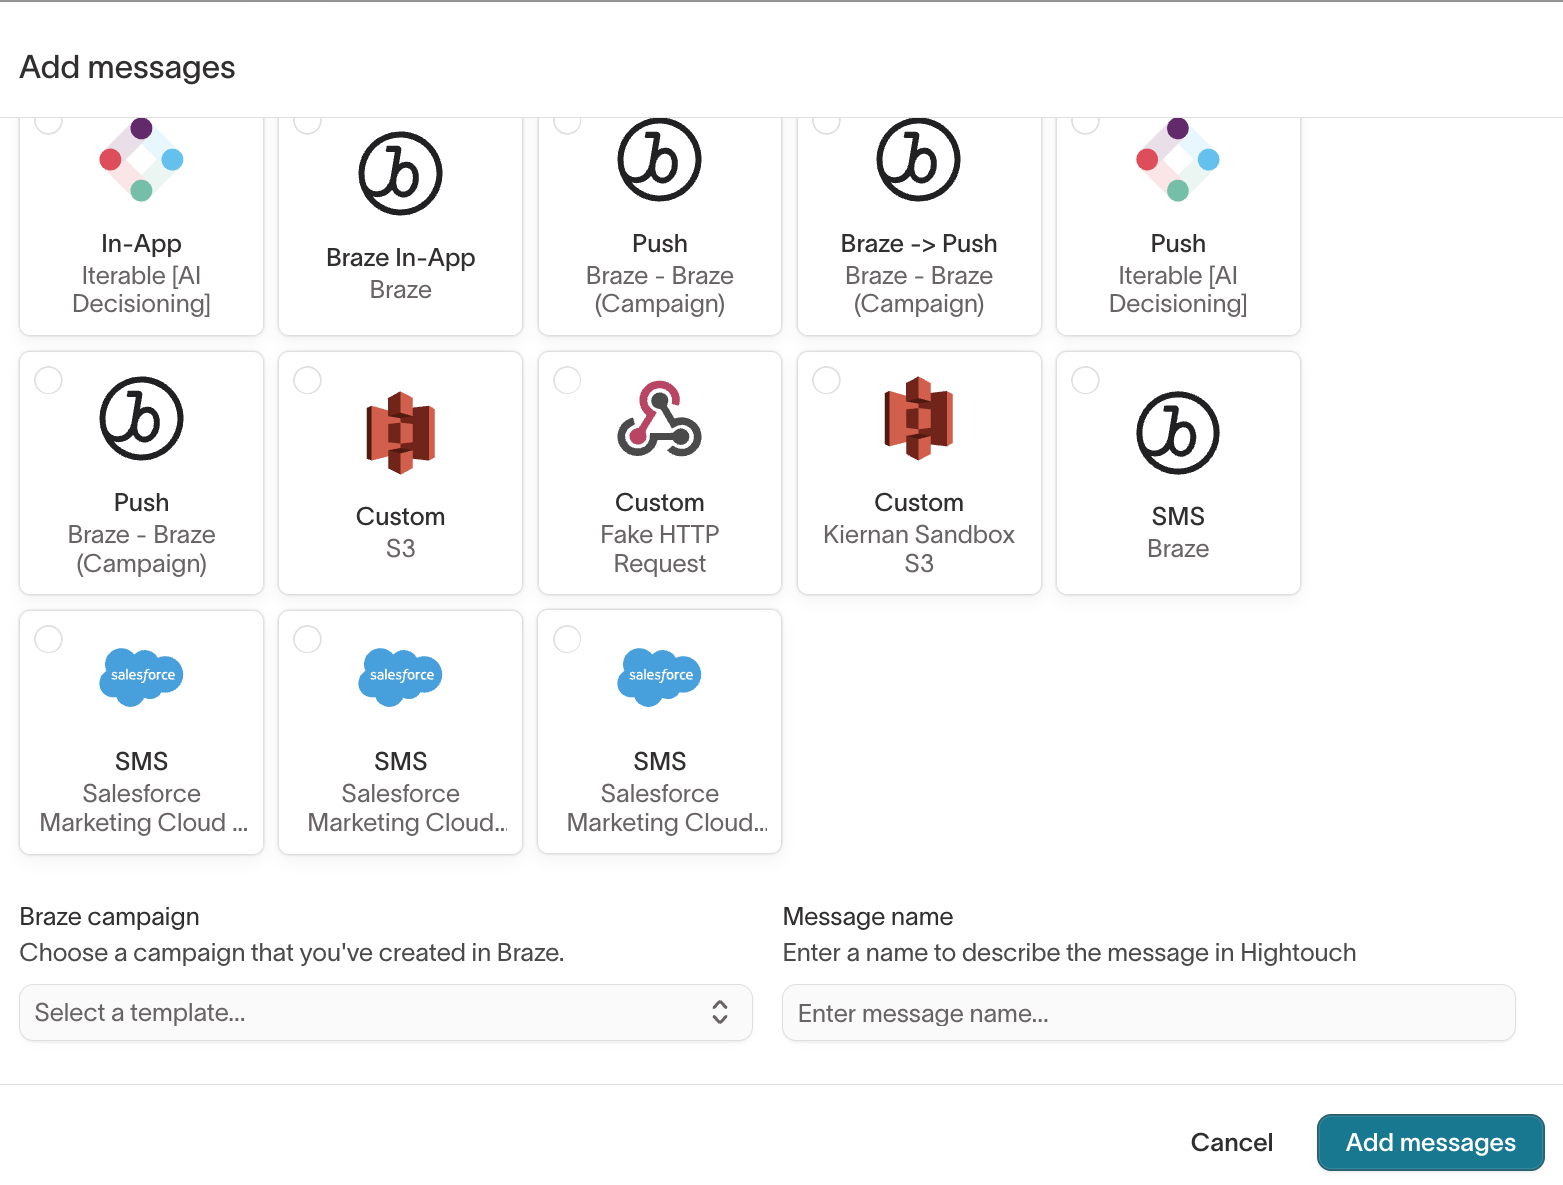
- Select your configured Braze channel and destination tile (for example, Push - Braze (Campaign)).
- Under Braze campaign, select the campaign or canvas you created in Braze.
- Enter a message name and click
Add messages.
You can repeat this process for each channel:
- Email via campaign trigger
- SMS via campaign trigger
- Push via campaign trigger
- In-app messages via canvas trigger
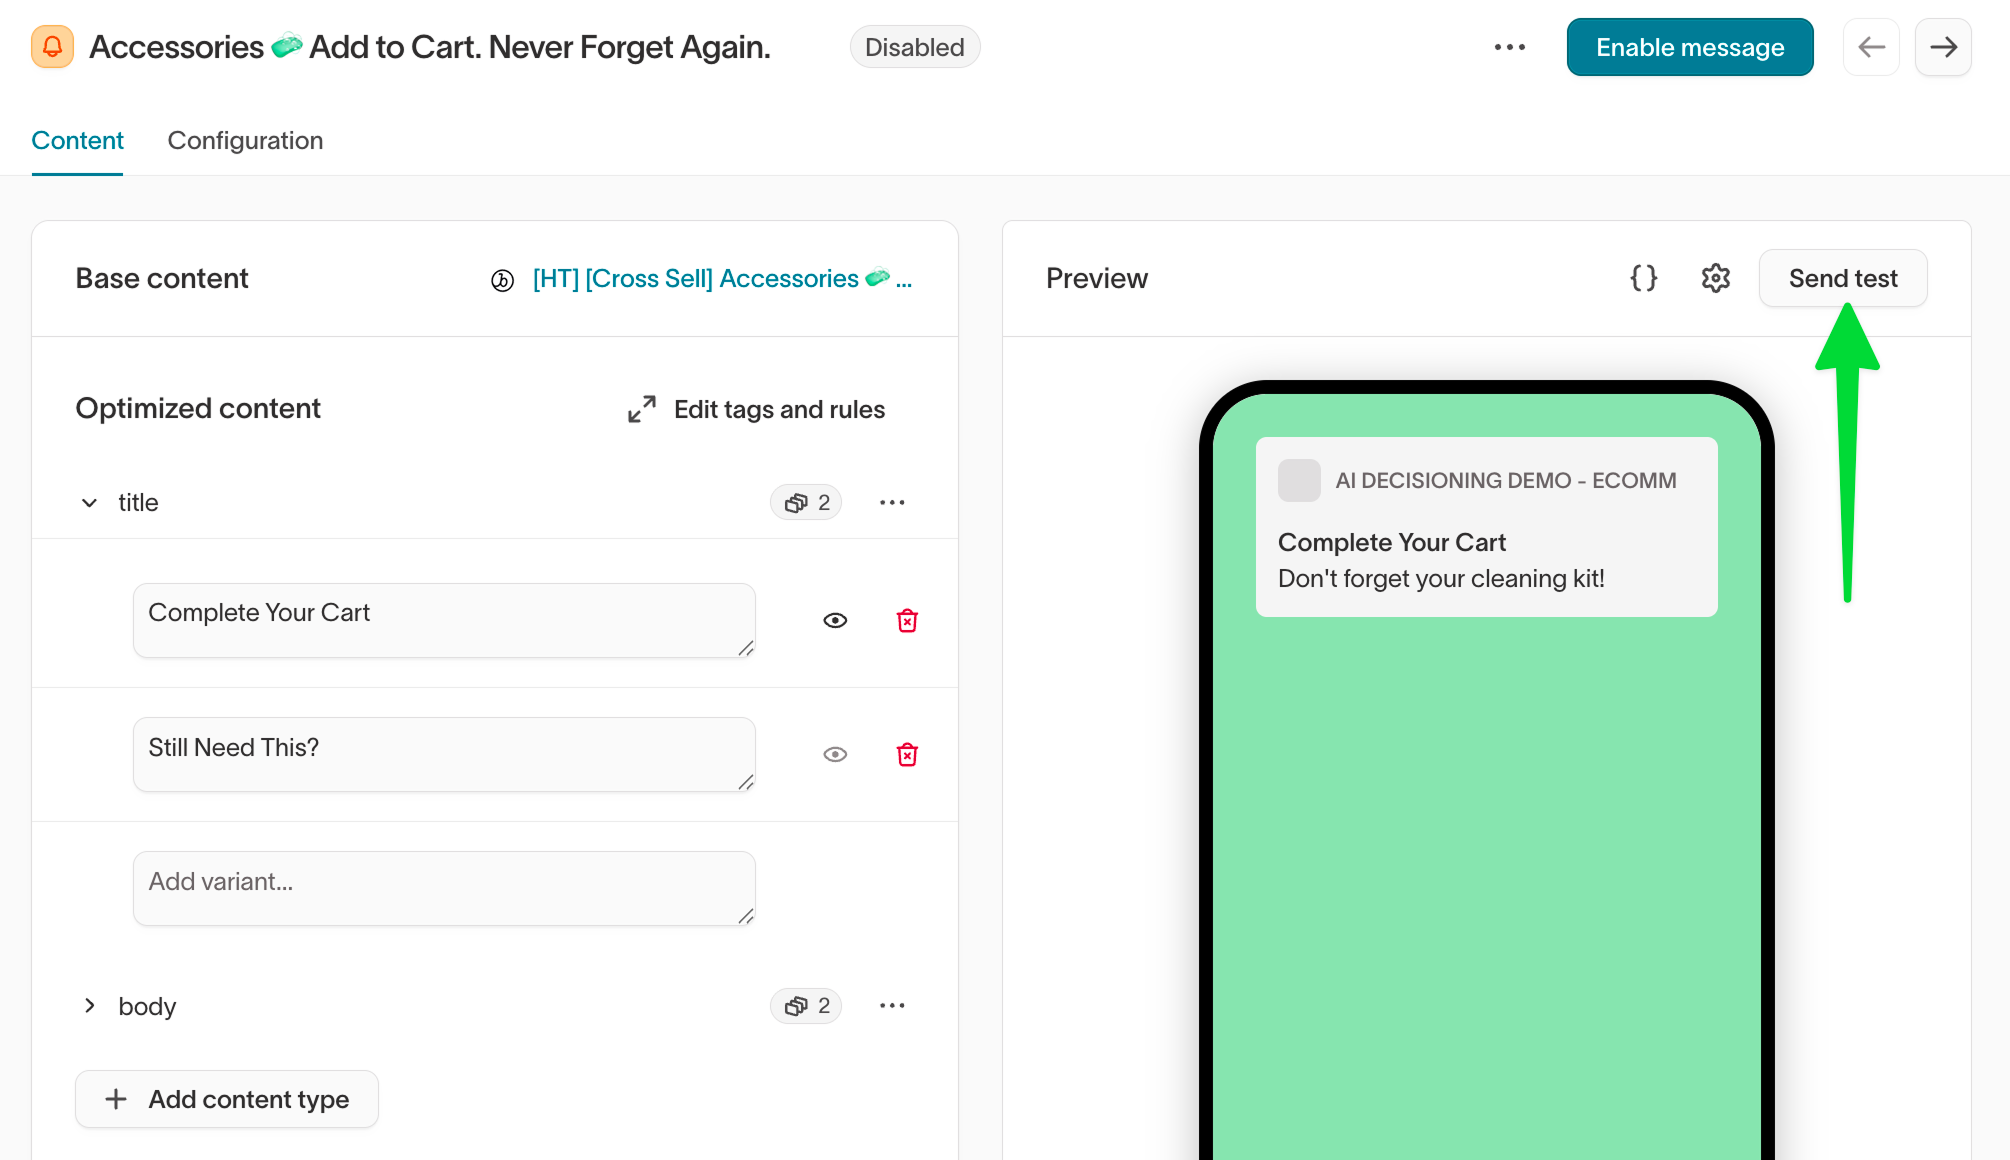
Test a message
- Open the message and go to the
Contenttab. - Under Optimized content, confirm your variants are configured. If your message uses dynamic variables, set values for testing.
- In the Preview panel, verify the rendered message looks correct.
- Click
Send testto send the message to a test user in Braze.
Test requirements
Your test will only succeed if:
- The Braze Campaign or Canvas is Active (not a draft or scheduled).
- Frequency Capping is turned off in Braze.
- The test user exists in Braze and has the appropriate identifier (for example,
user_id,external_id,email). - The user meets eligibility for the channel (for example, email opted-in, has a push token).
To test accurately, use a Braze user whose user_id or external_id matches the identifier configured for the channel. You can confirm delivery in Braze by checking message logs or the user’s messaging history.
4. Configure Braze Campaigns and Canvases for AID
Before adding a message in Hightouch, you need to configure or create the corresponding Campaign or Canvas in Braze.
For Campaign Triggers
Create a Campaign in Braze that supports API triggering.
In Braze
- Go to Campaigns > Create Campaign

- Choose your channel (Email, SMS, Push) and complete Campaign Details
-
On the Schedule Delivery step, select API Triggered as the Delivery Type
-
In Target Audiences, set a broad audience or include your test user via filters
-
In Assign Conversions, optionally define conversion goals
-
On the Review step, ensure your campaign is:
-
Active (not saved as Draft)
-
Has Frequency Capping disabled if applicable
-
Displays a full message preview
-
-
Note the Campaign ID for reference in Hightouch
In Hightouch
- Select the Campaign when adding a message.
- Test the message to confirm delivery.
For Canvas Triggers
Create a Canvas with an API entry event
In Braze
- Go to Canvases > Create Canvas
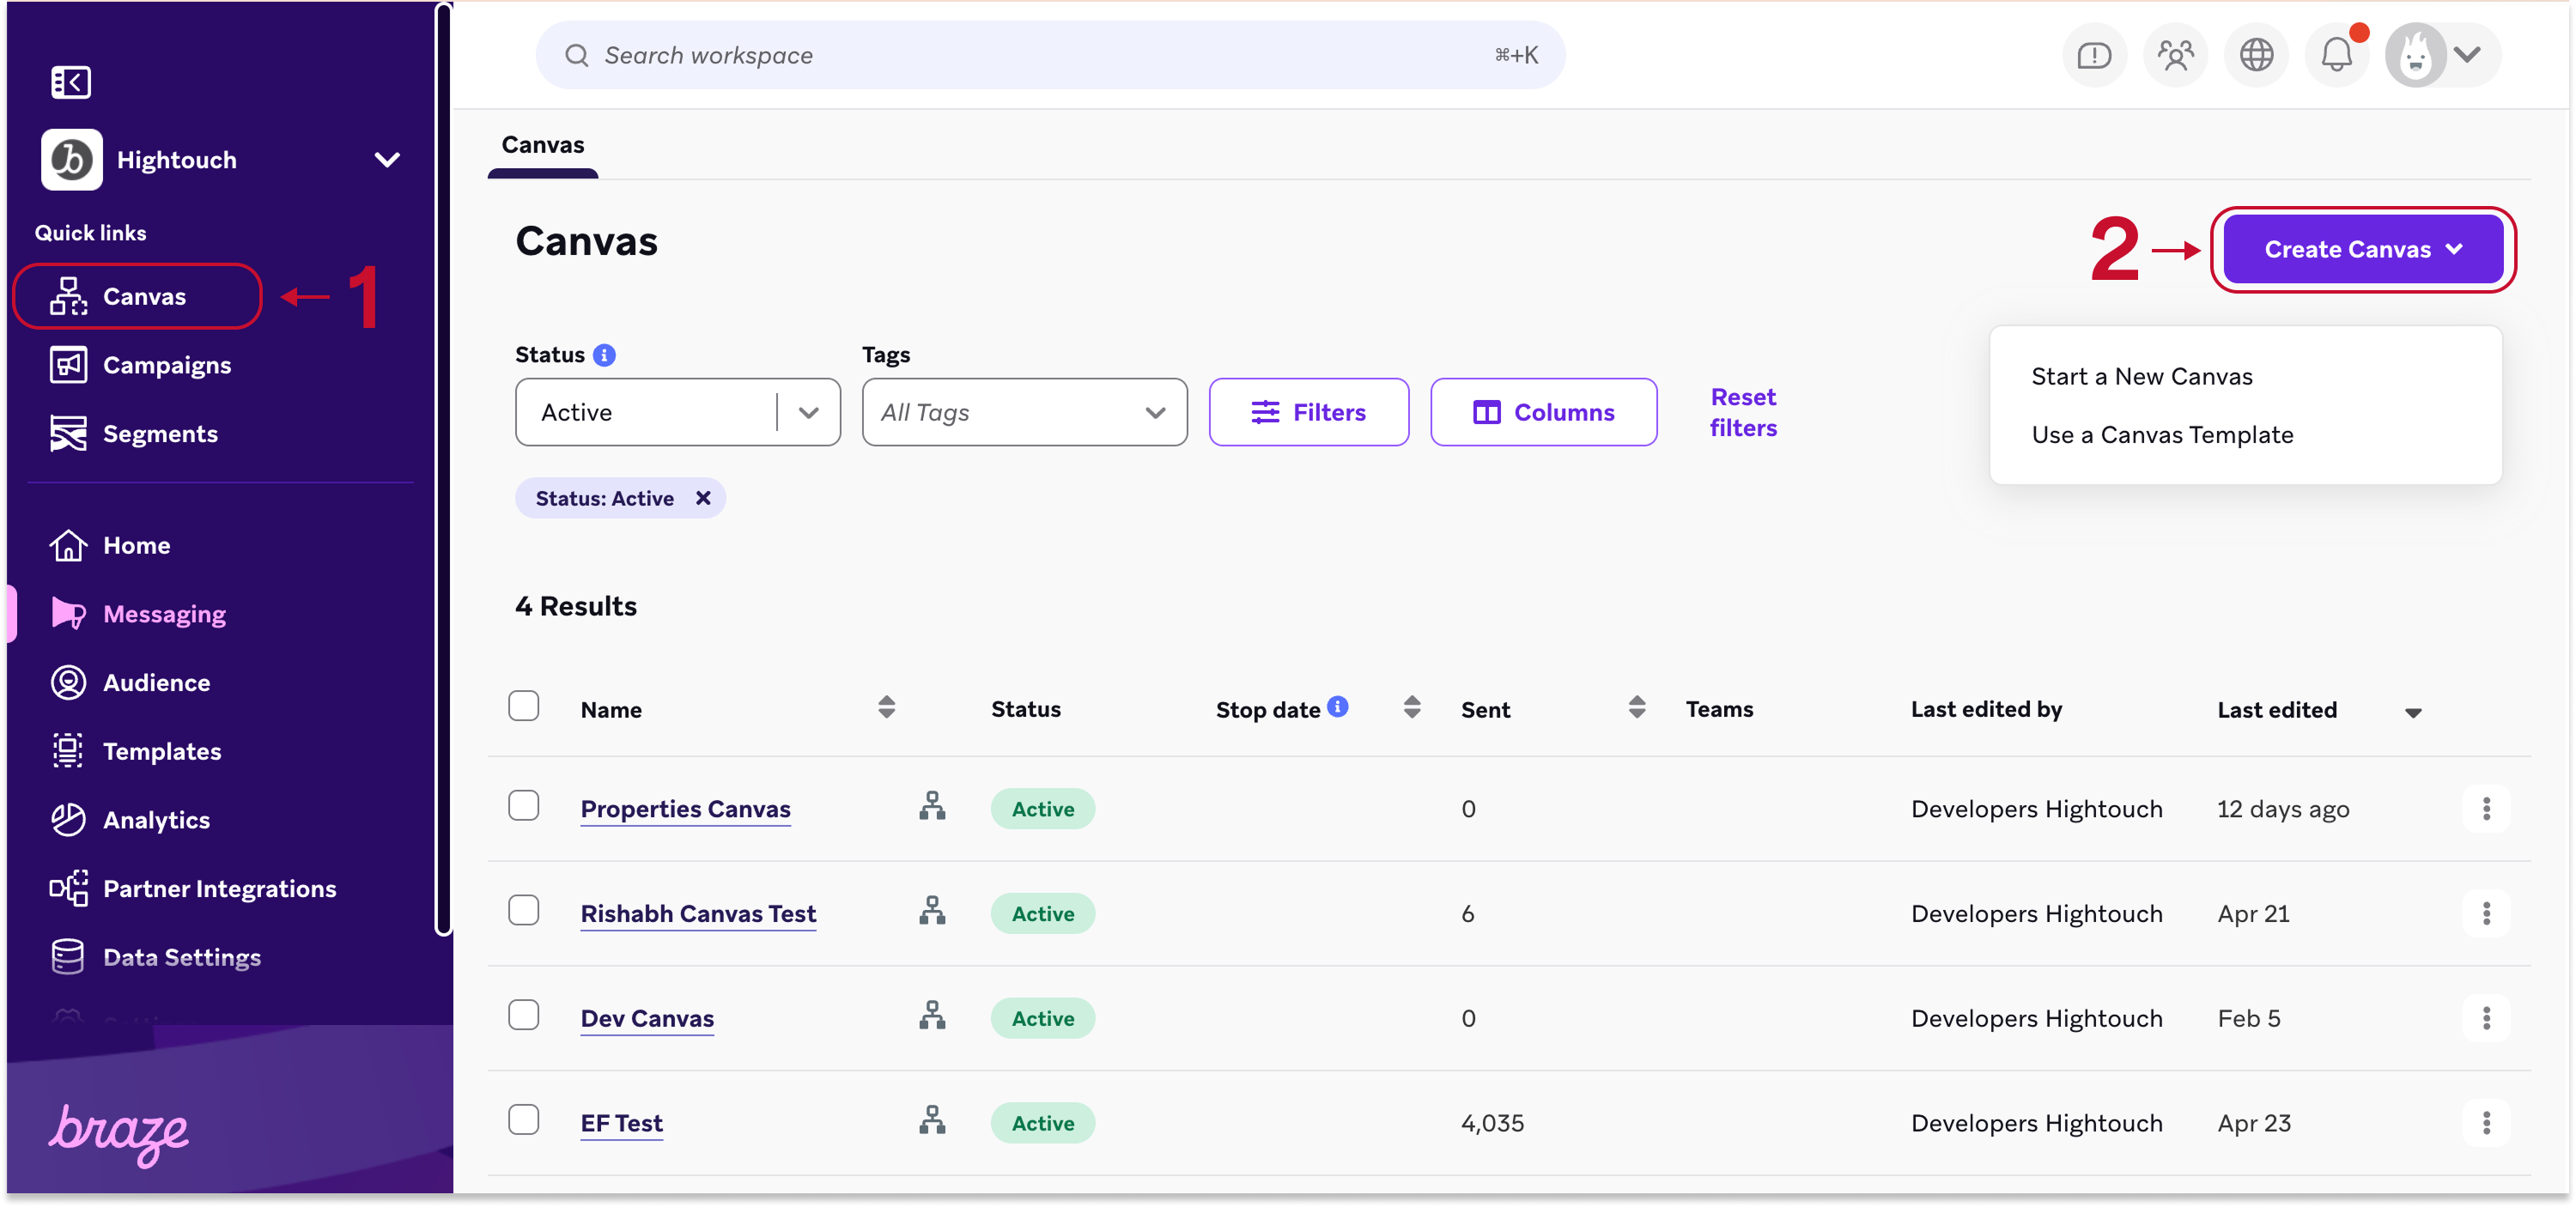
-
Fill out Canvas Details, and note the Canvas ID
-
On the Entry Schedule step, choose API Triggered
-
In Target Audience, optionally add filters or include a known test user
-
In Send Settings, confirm eligibility settings (e.g., subscription status, quiet hours, frequency capping)
-
Use the Build Canvas step to drag in components (like message or delay)
-
Use the Summary screen to review your configuration before launch
In Hightouch
- Select the Canvas when adding a message.
- Test the message to confirm delivery.
AID cannot override message properties in Canvas messages. Use default template values instead.
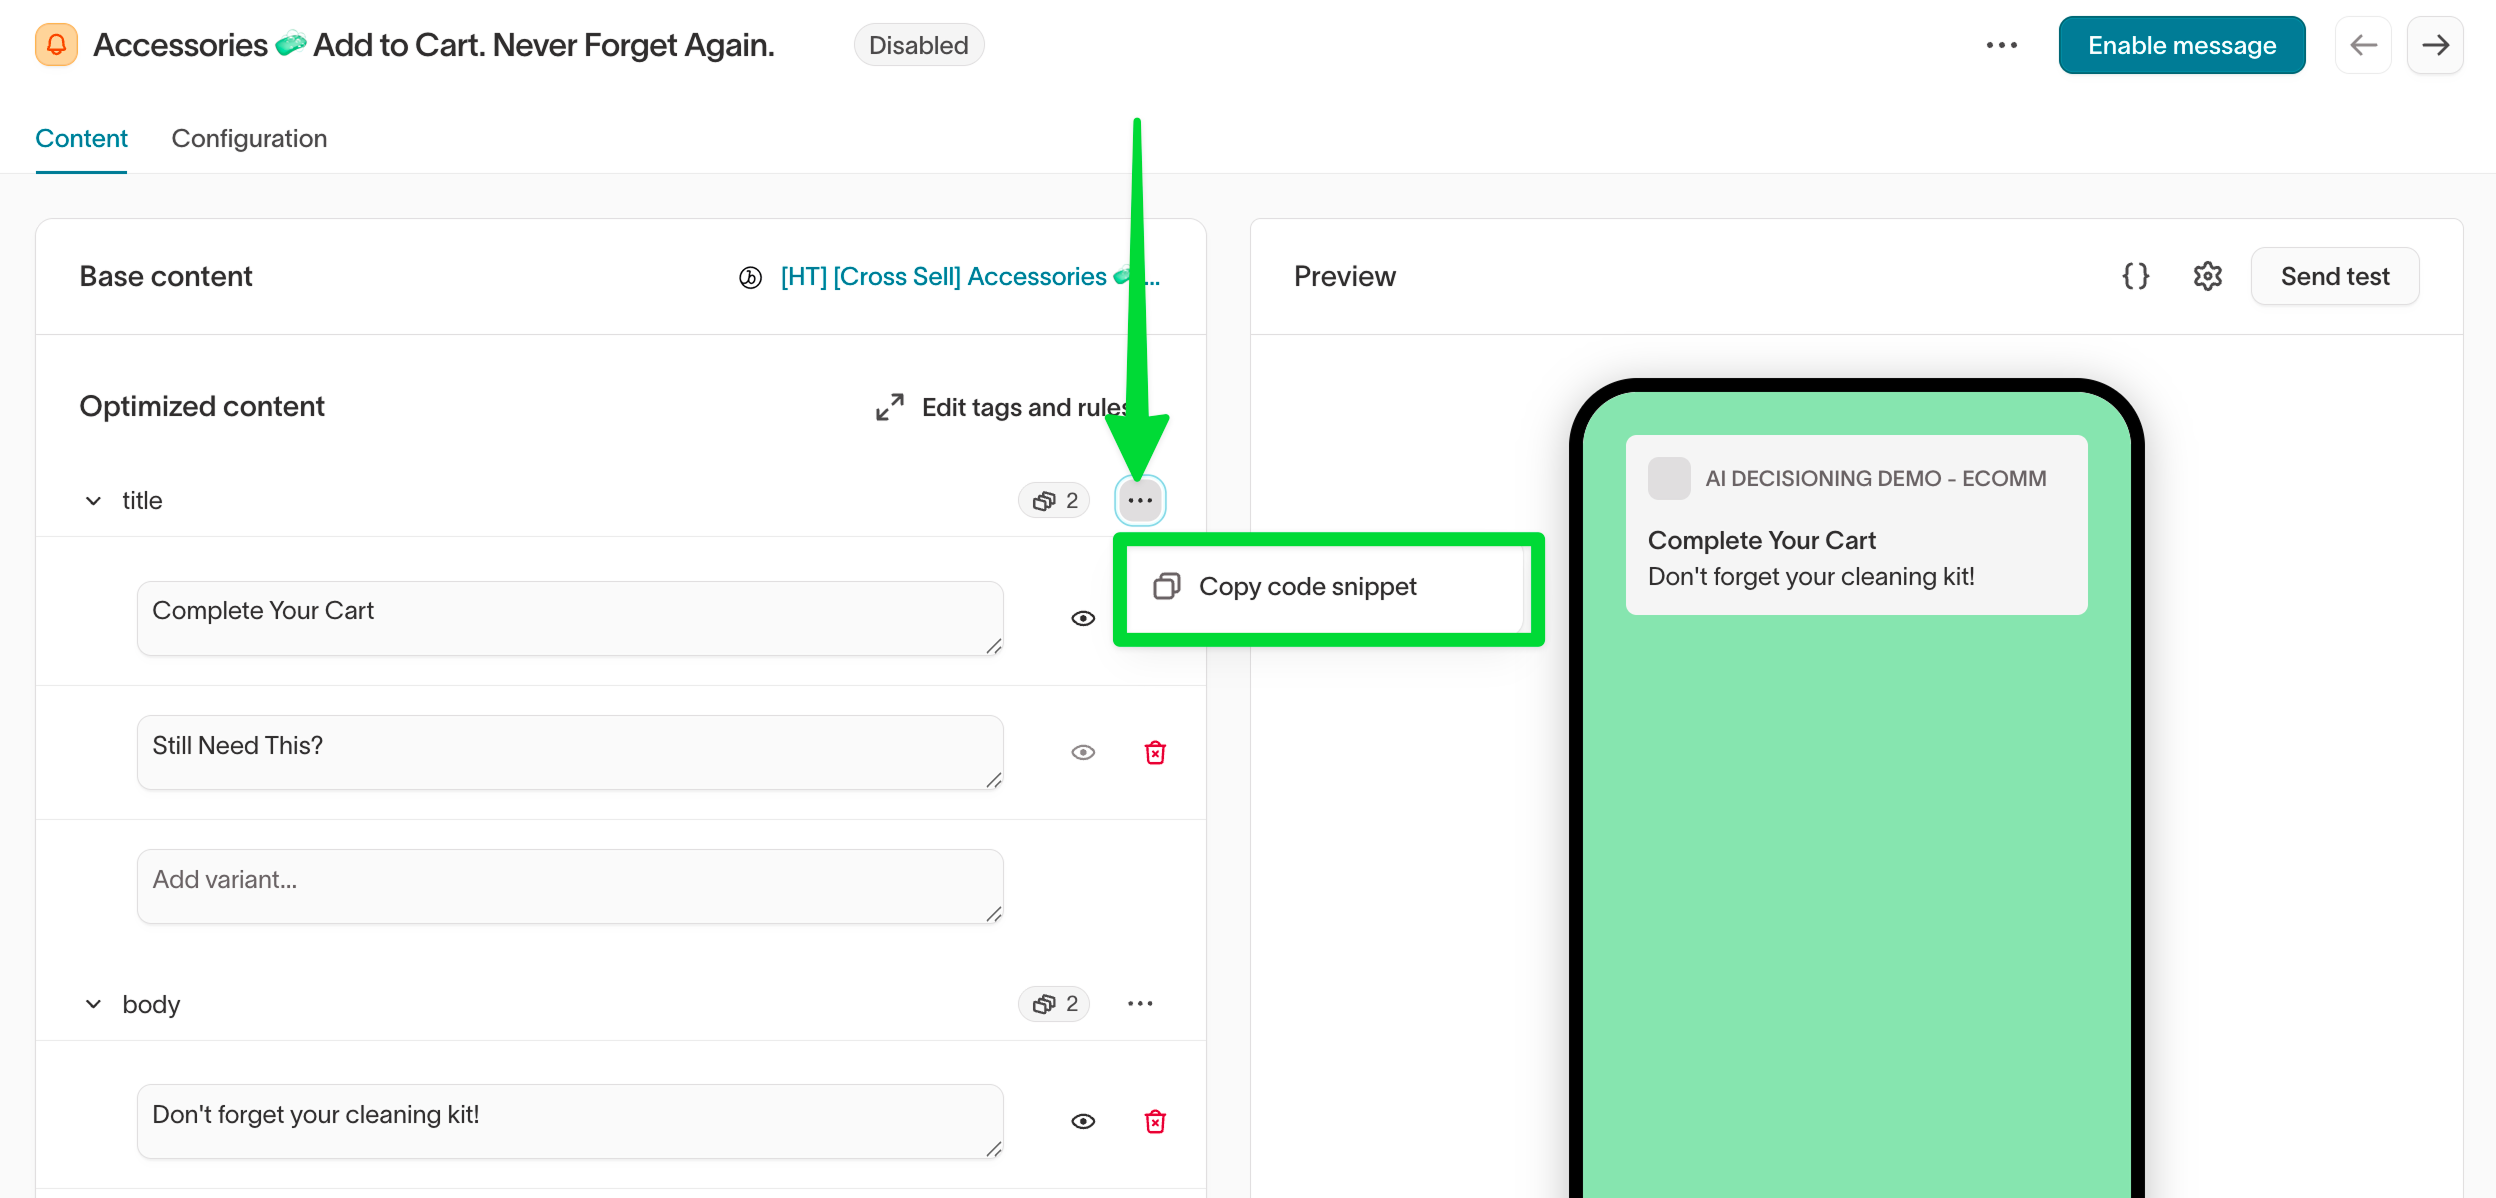
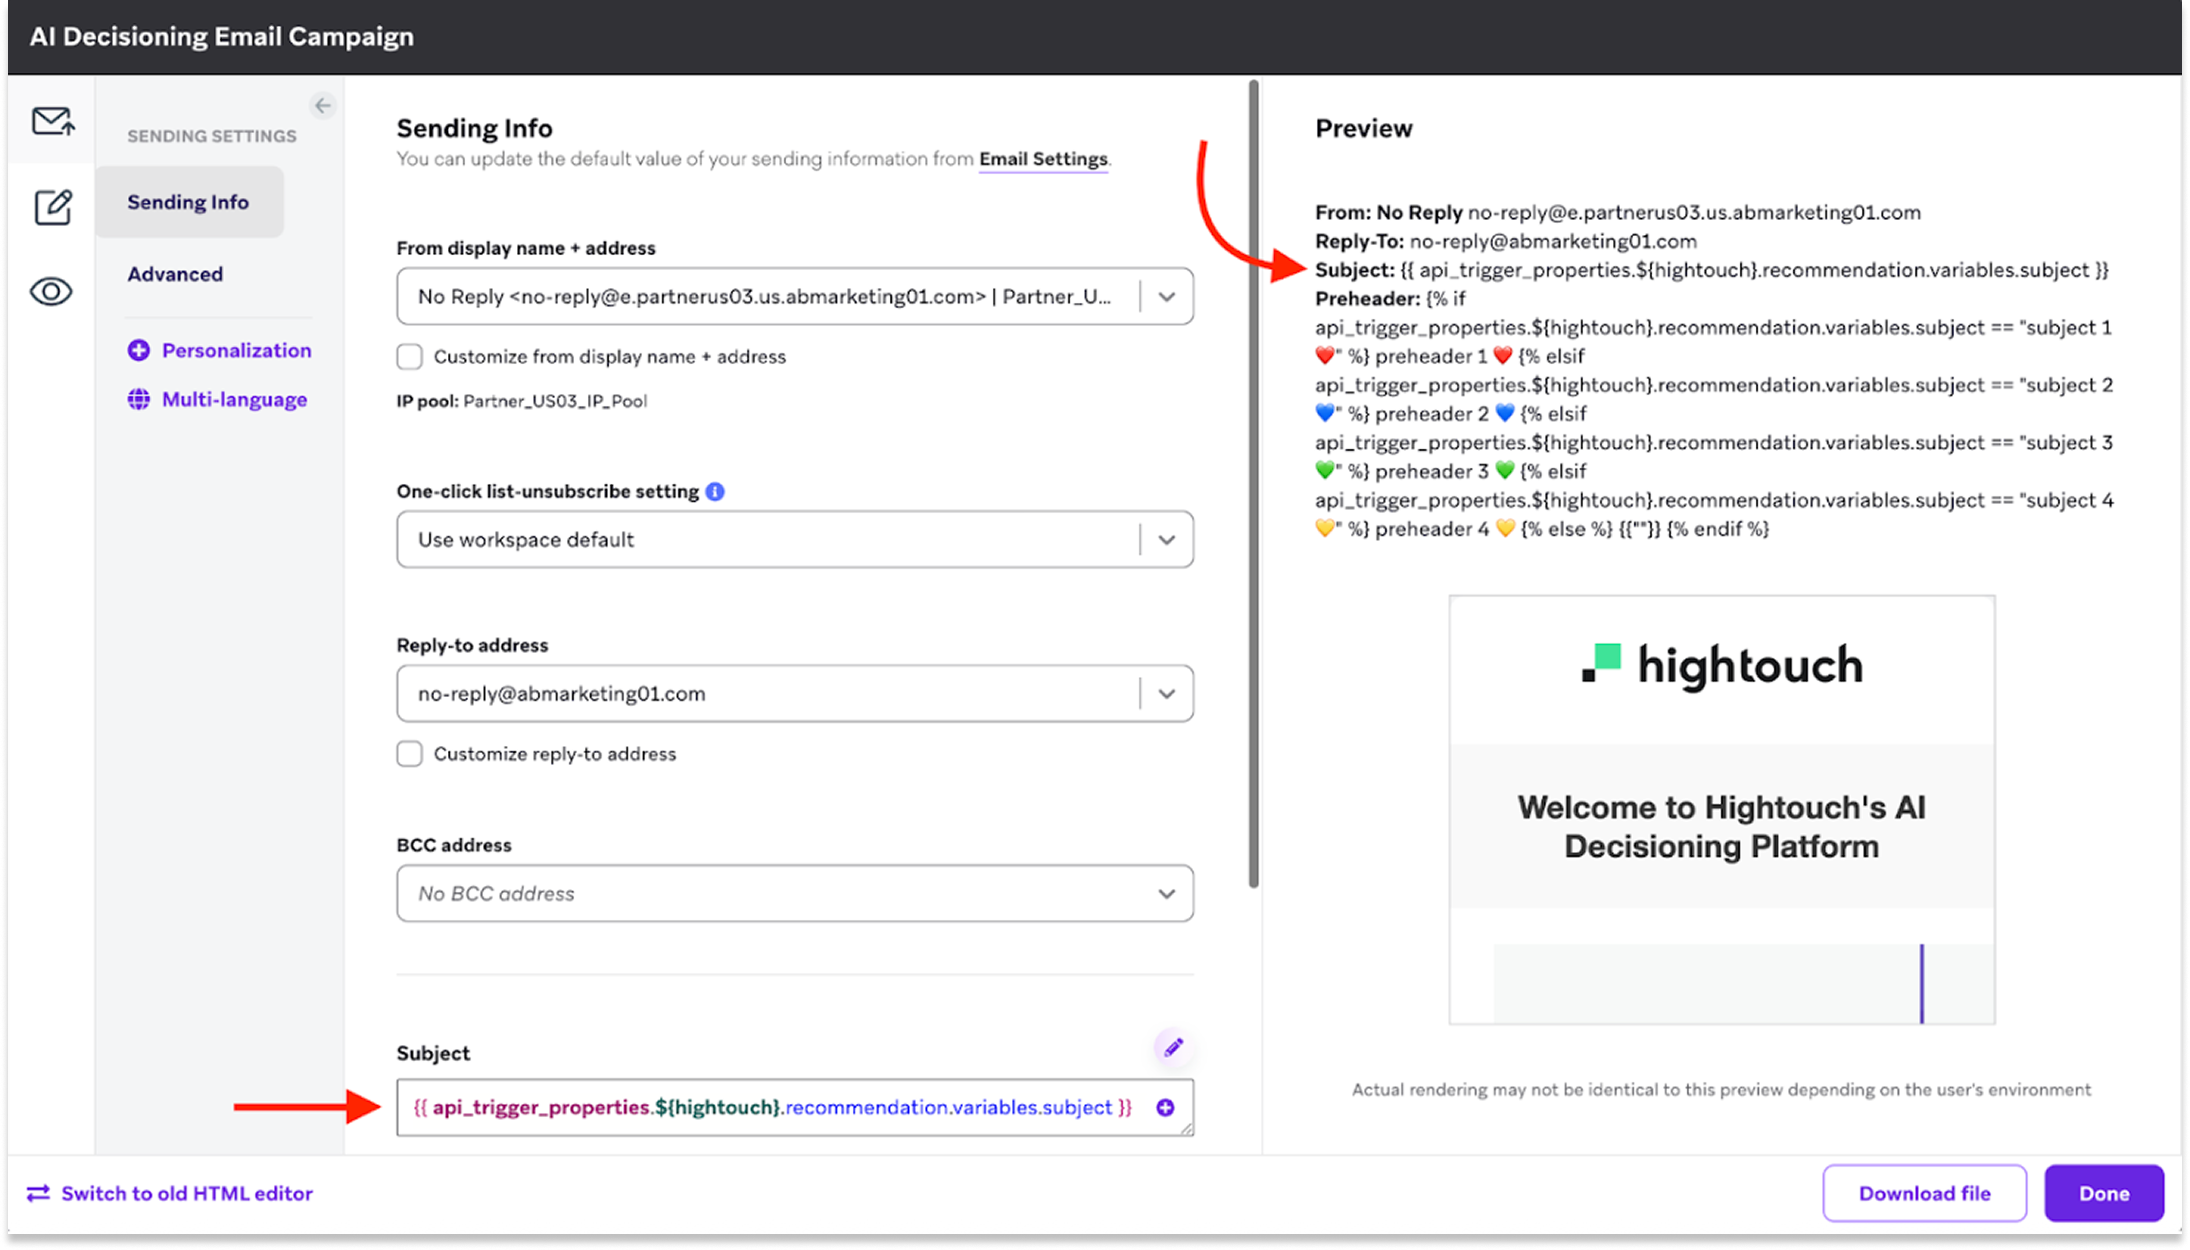
Use variables in Braze
Hightouch variables allow you to personalize Braze messages using live warehouse data, any variable you’ve defined within the message such as subject line variations, or different media assets or content blocks in your Braze library.
Access variables
- Open a message in Hightouch and go to the
Contenttab. - Under Optimized content, expand a content type (for example, title or body) and add your variants.
- Click the
...menu on a variant and selectCopy code snippetto get the variable code, for example:{{ api_trigger_properties.${hightouch}.recommendation.variables.subject }}. - In Braze, paste the variable tag into the corresponding field in your message template (for example, the Subject field).
Important notes
- Campaign triggers: Variables are fully supported.
- Canvas triggers: Only template-level defaults can be used—API-triggered variables won’t override content.
Troubleshooting
| Issue | Likely cause | Resolution |
|---|---|---|
| Message fails to send | API errors or misconfigured destination | Check Hightouch logs for API errors. |
| Test user not receiving messages | Identifier mismatch | Ensure your identifier matches a valid external_id or user property in Braze. |
| Canvas sends not triggering | Canvas not published or entry event misconfigured | Confirm the Canvas is published and the API entry event is configured. |