Audience: Technical Marketers, Marketing and Lifecycle Teams
Prerequisites: Prepare data for AID →
This guide will walk you through:
-
Setting up SFMC as a destination in Hightouch
-
Enabling supported channels (email, SMS, push, in-app)
-
Configuring message templates and variable mappings
-
Testing your messages across SFMC entry points
Overview
Hightouch’s AI Decisioning (AID) helps you deliver real-time, personalized messages based on live customer context and predictions. By connecting AID with Salesforce Marketing Cloud (SFMC), you can automatically send tailored messages—like product recommendations or abandoned cart nudges—through your existing SFMC email, SMS, push, and in-app channels.
With this integration, you can:
-
Automatically trigger messages from AID Agents via SFMC Triggered Sends or Journeys
-
Personalize SFMC templates using dynamic variables from Hightouch—no custom code required
-
Manage messaging and targeting logic in one place: Hightouch
1. Set up SFMC as a Destination
Why these permissions matter
To send messages through SFMC using AID, Hightouch needs access to certain channels, content, and user data. These permissions allow Hightouch to:
-
Trigger messages via Triggered Send and Journey Builder
-
Read and update subscriber data
-
Access and personalize email, SMS, push, and in-app templates
Connect SFMC and grant permissions
In SFMC:
-
Create an installed package in SFMC until you reach Set Server-to-Server Properties
-
Under Channels, enable the permissions for each message type you want Hightouch to use (read, write, send, publish, or post)
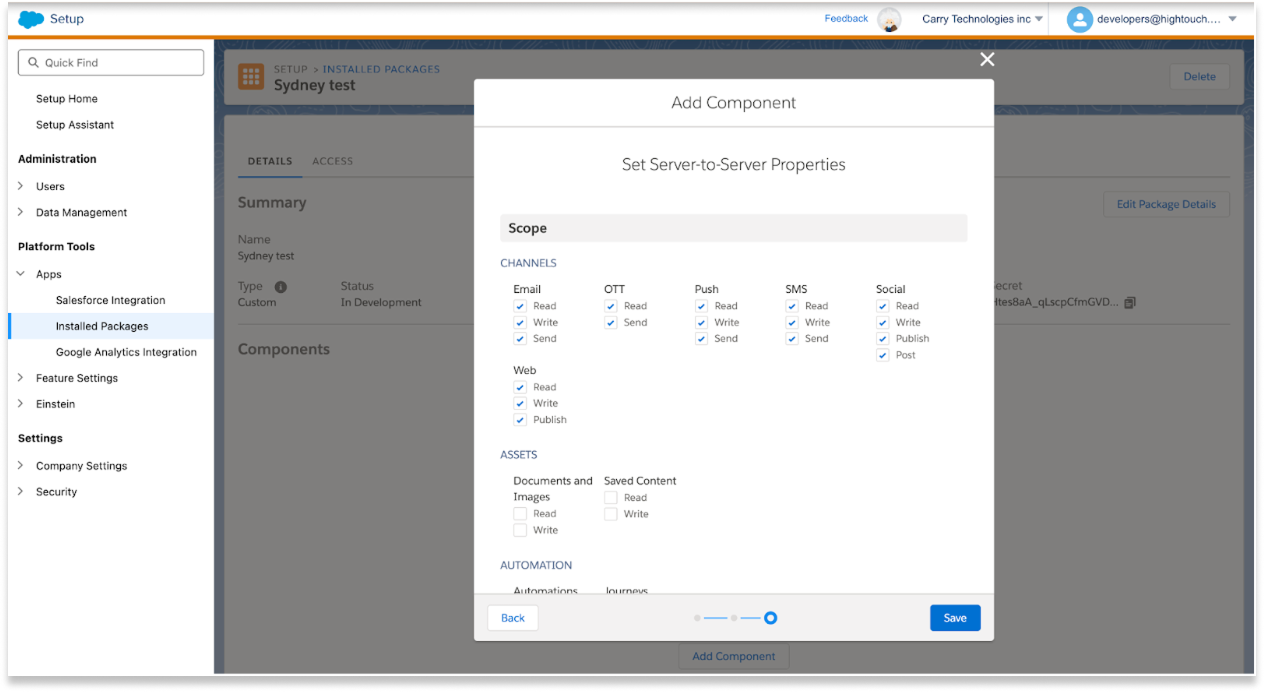
- Click Save
In Hightouch:
-
Continue setting up the SFMC destination until you reach the the Custom Scopes step
-
Under Advanced permissions > Custom Scopes, paste in the following:
email_read email_write email_send accounts_read data_extensions_read data_extensions_write journeys_read journeys_write journeys_aspr journeys_execute list_and_subscribers_write list_and_subscribers_read push_read push_write push_send
- Click Test Connection to verify that setup is complete.
2. Add channels in AI Decisioning
Channels define the type of message you want to send—like email,SMS, push, or in-app—and how Hightouch delivers it through SFMC.
By enabling a channel, you’re telling Hightouch how to send the output of your AID Agent (e.g., a product recommendation or promotional message) and where to send it.
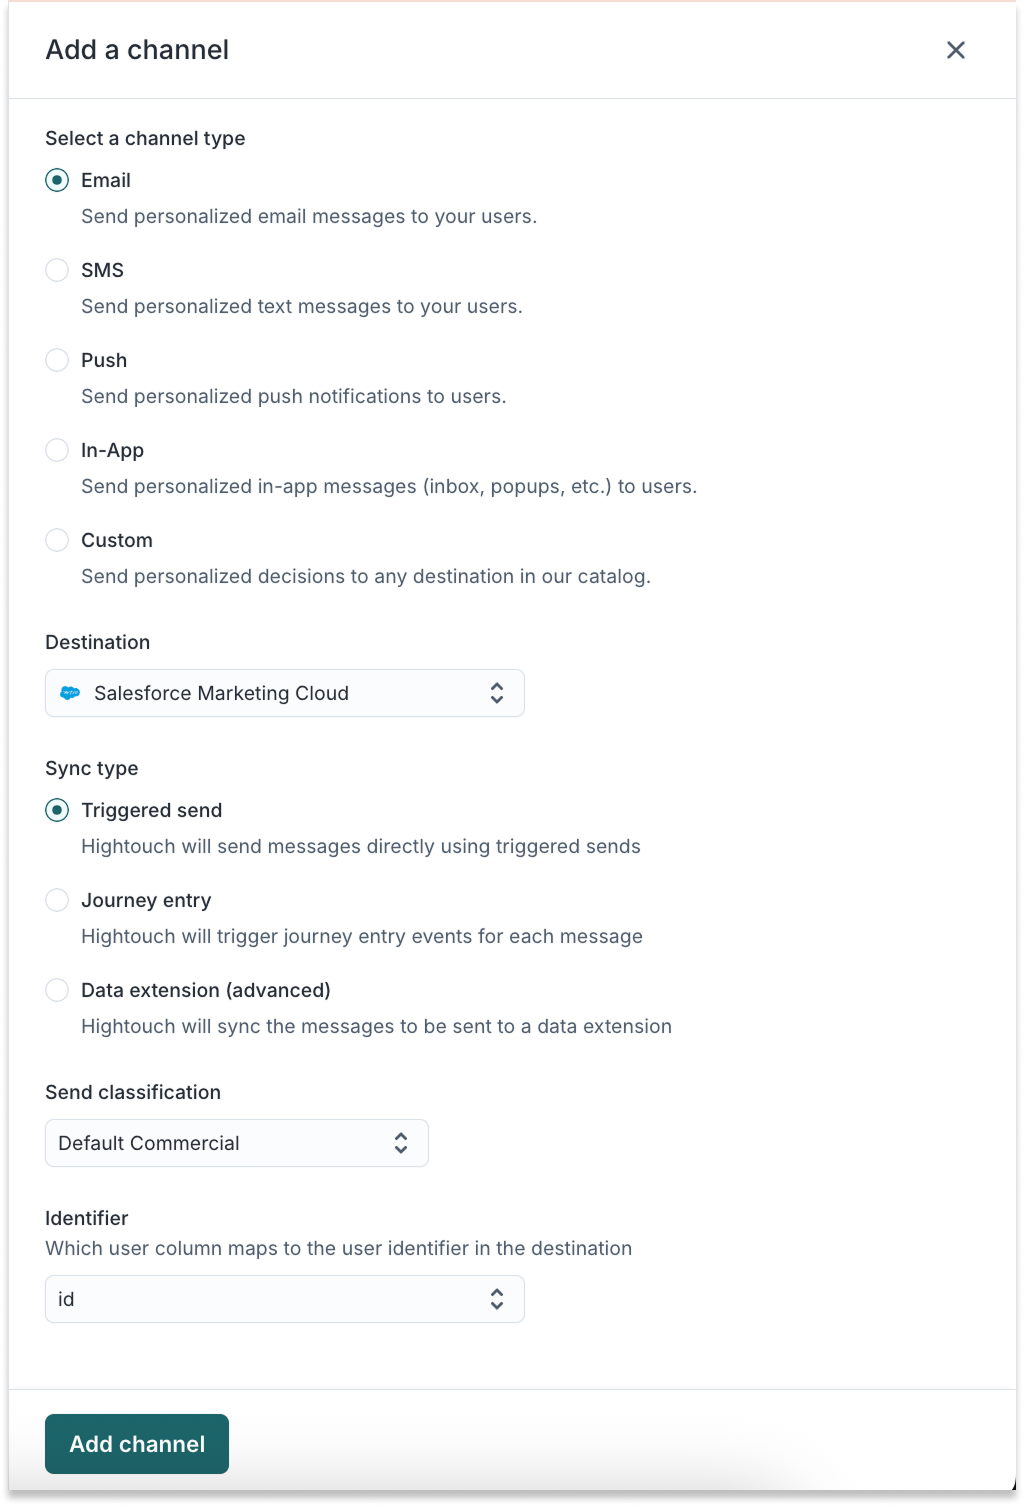
Shared steps for adding a channel
-
Go to AI Decisioning > Configuration
-
In Channels, click Add Channel
-
Select the channel type: Email, SMS, Push, or In-App
-
Choose Salesforce Marketing Cloud as the destination
-
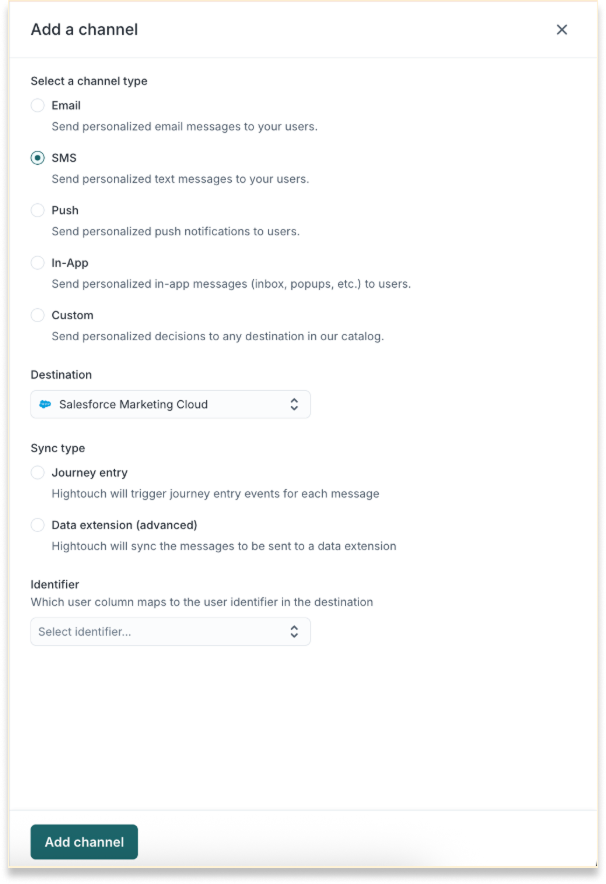
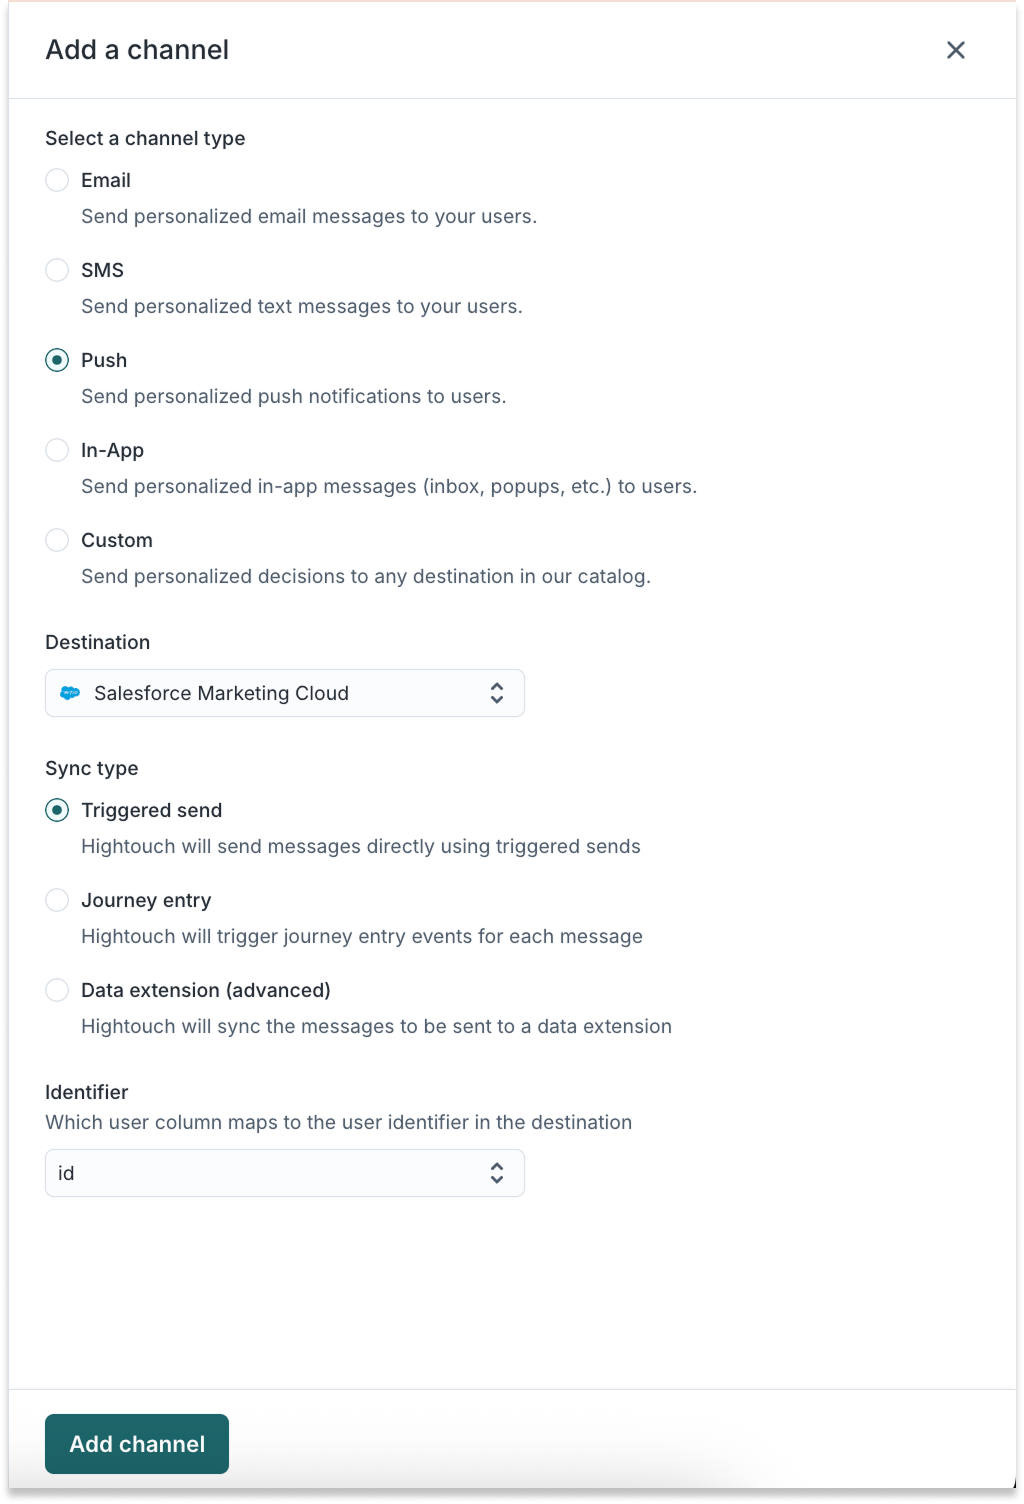
Select a Sync Type
- Triggered Send: Sends a 1:1 message in real time
- Journey Entry: Sends as part of a journey workflow
-
Choose an Identifier
- This should match the Subscriber Key field in SFMC (e.g. email or user ID)
- This is how SFMC matches each message to the right recipient
-
Click Add Channel, then Save changes
Sync type comparison
The Sync Type determines how Hightouch sends messages through SFMC. Here’s a breakdown of the available options:
| Channel | Triggered Send | Journey |
|---|---|---|
| ✅ | ✅ | |
| SMS | ✅ | ✅ |
| Push | ✅ | ✅ |
| In-App | ❌ | ✅ |
| Sync type | Best for | Set up notes |
|---|---|---|
| Triggered send | Real-time, event-based sends where each message is tied to a single user action | Requires send classification: - Use Commercial for marketing content (users can opt out) - Use Transactional for system notifications (users can’t opt out) |
| Journey entry | Automated, multi-step campaigns (e.g. onboarding, reminders, retargeting) | Select the Synced user columns (e.g. email, name, product interest) you want to sync. These fields will be available inside the journey’s data extension and can be used for personalization or decision splits. |
| Data Extension (advanced) | Batch sends and advanced setups | Requires managing delivery logic and scheduling within SFMC (outside of Hightouch). |
3. Add Actions
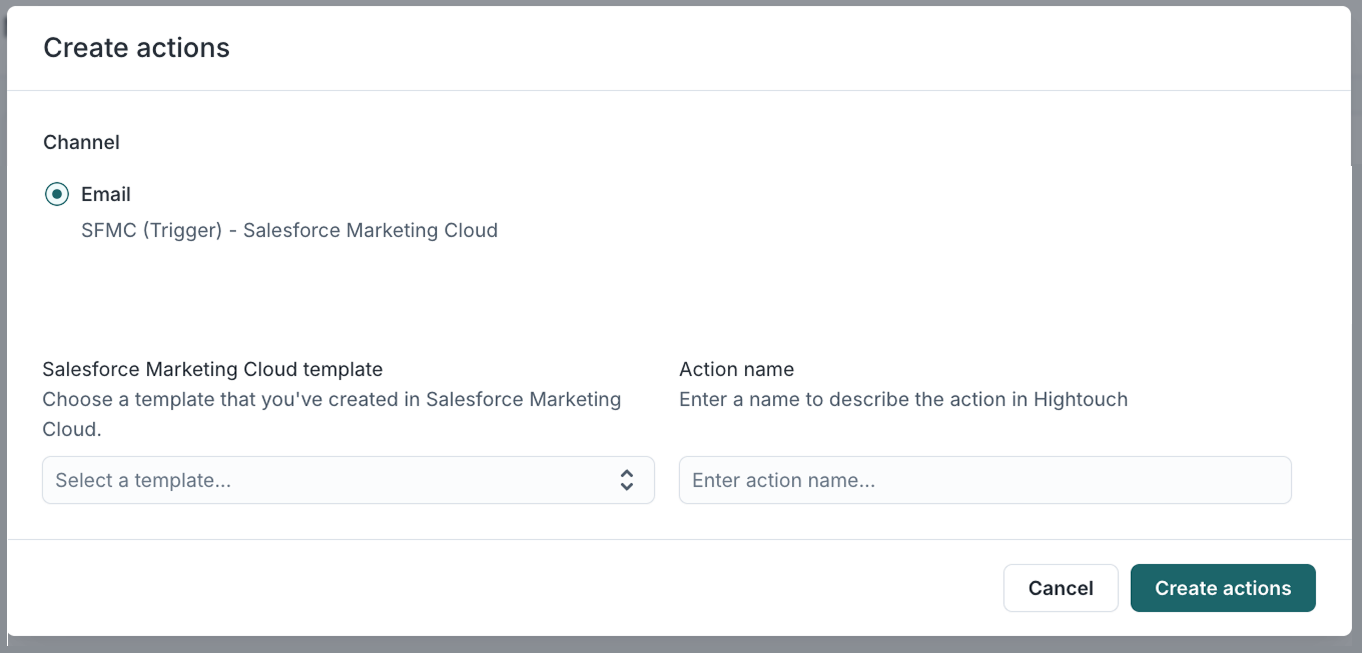
Once channels are configured, you can add AID actions that trigger SFMC messages. Each action links an AID Agent decision to a specific template in SFMC.
Shared steps for adding an action
-
Go to AI Decisioning > Agents and select an agent
-
Go to the Configuration tab
-
Click Add Actions
-
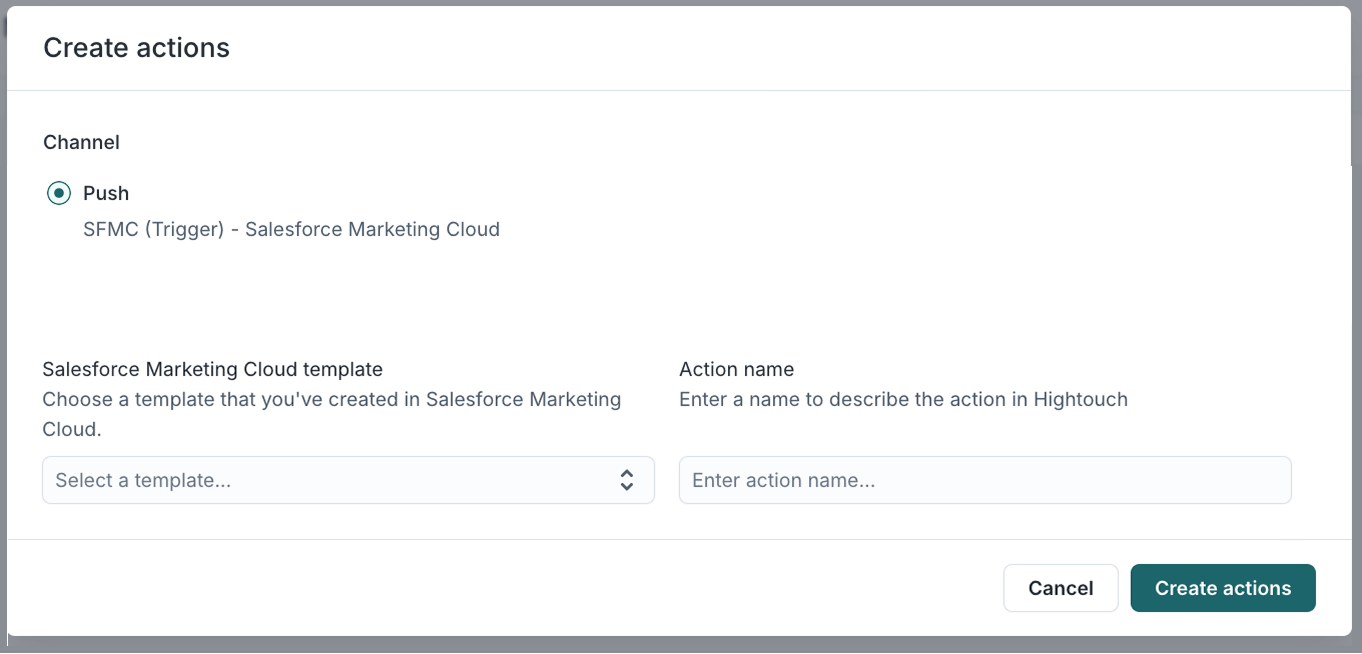
Choose your configured SFMC channel (e.g., Email - SFMC Trigger)
-
Select the appropriate template or event identifier from SFMC
-
Name your action and click Create Action
You can repeat this process for any channel (email, SMS, push, in-app) and any sync type.
Continue the set up process in the following sections:
4. Link AID actions to SFMC templates
Send emails via Triggered Send
-
Follow the steps to add channels. Make sure the selected Sync Type is Triggered Send
- Follow the steps to add an action.
-
Close out the window that opens for now and return to the Configuration view
-
Click the link in your newly created action under Destination Resource

-
This will prompt you to log in to SFMC, and should open the Email Studio > Interactions page.
-
Click Triggered Sends

-
Select the send name that corresponds with your newly created action
-
Click Start/Restart

-
Return to Hightouch, and select your action once again
-
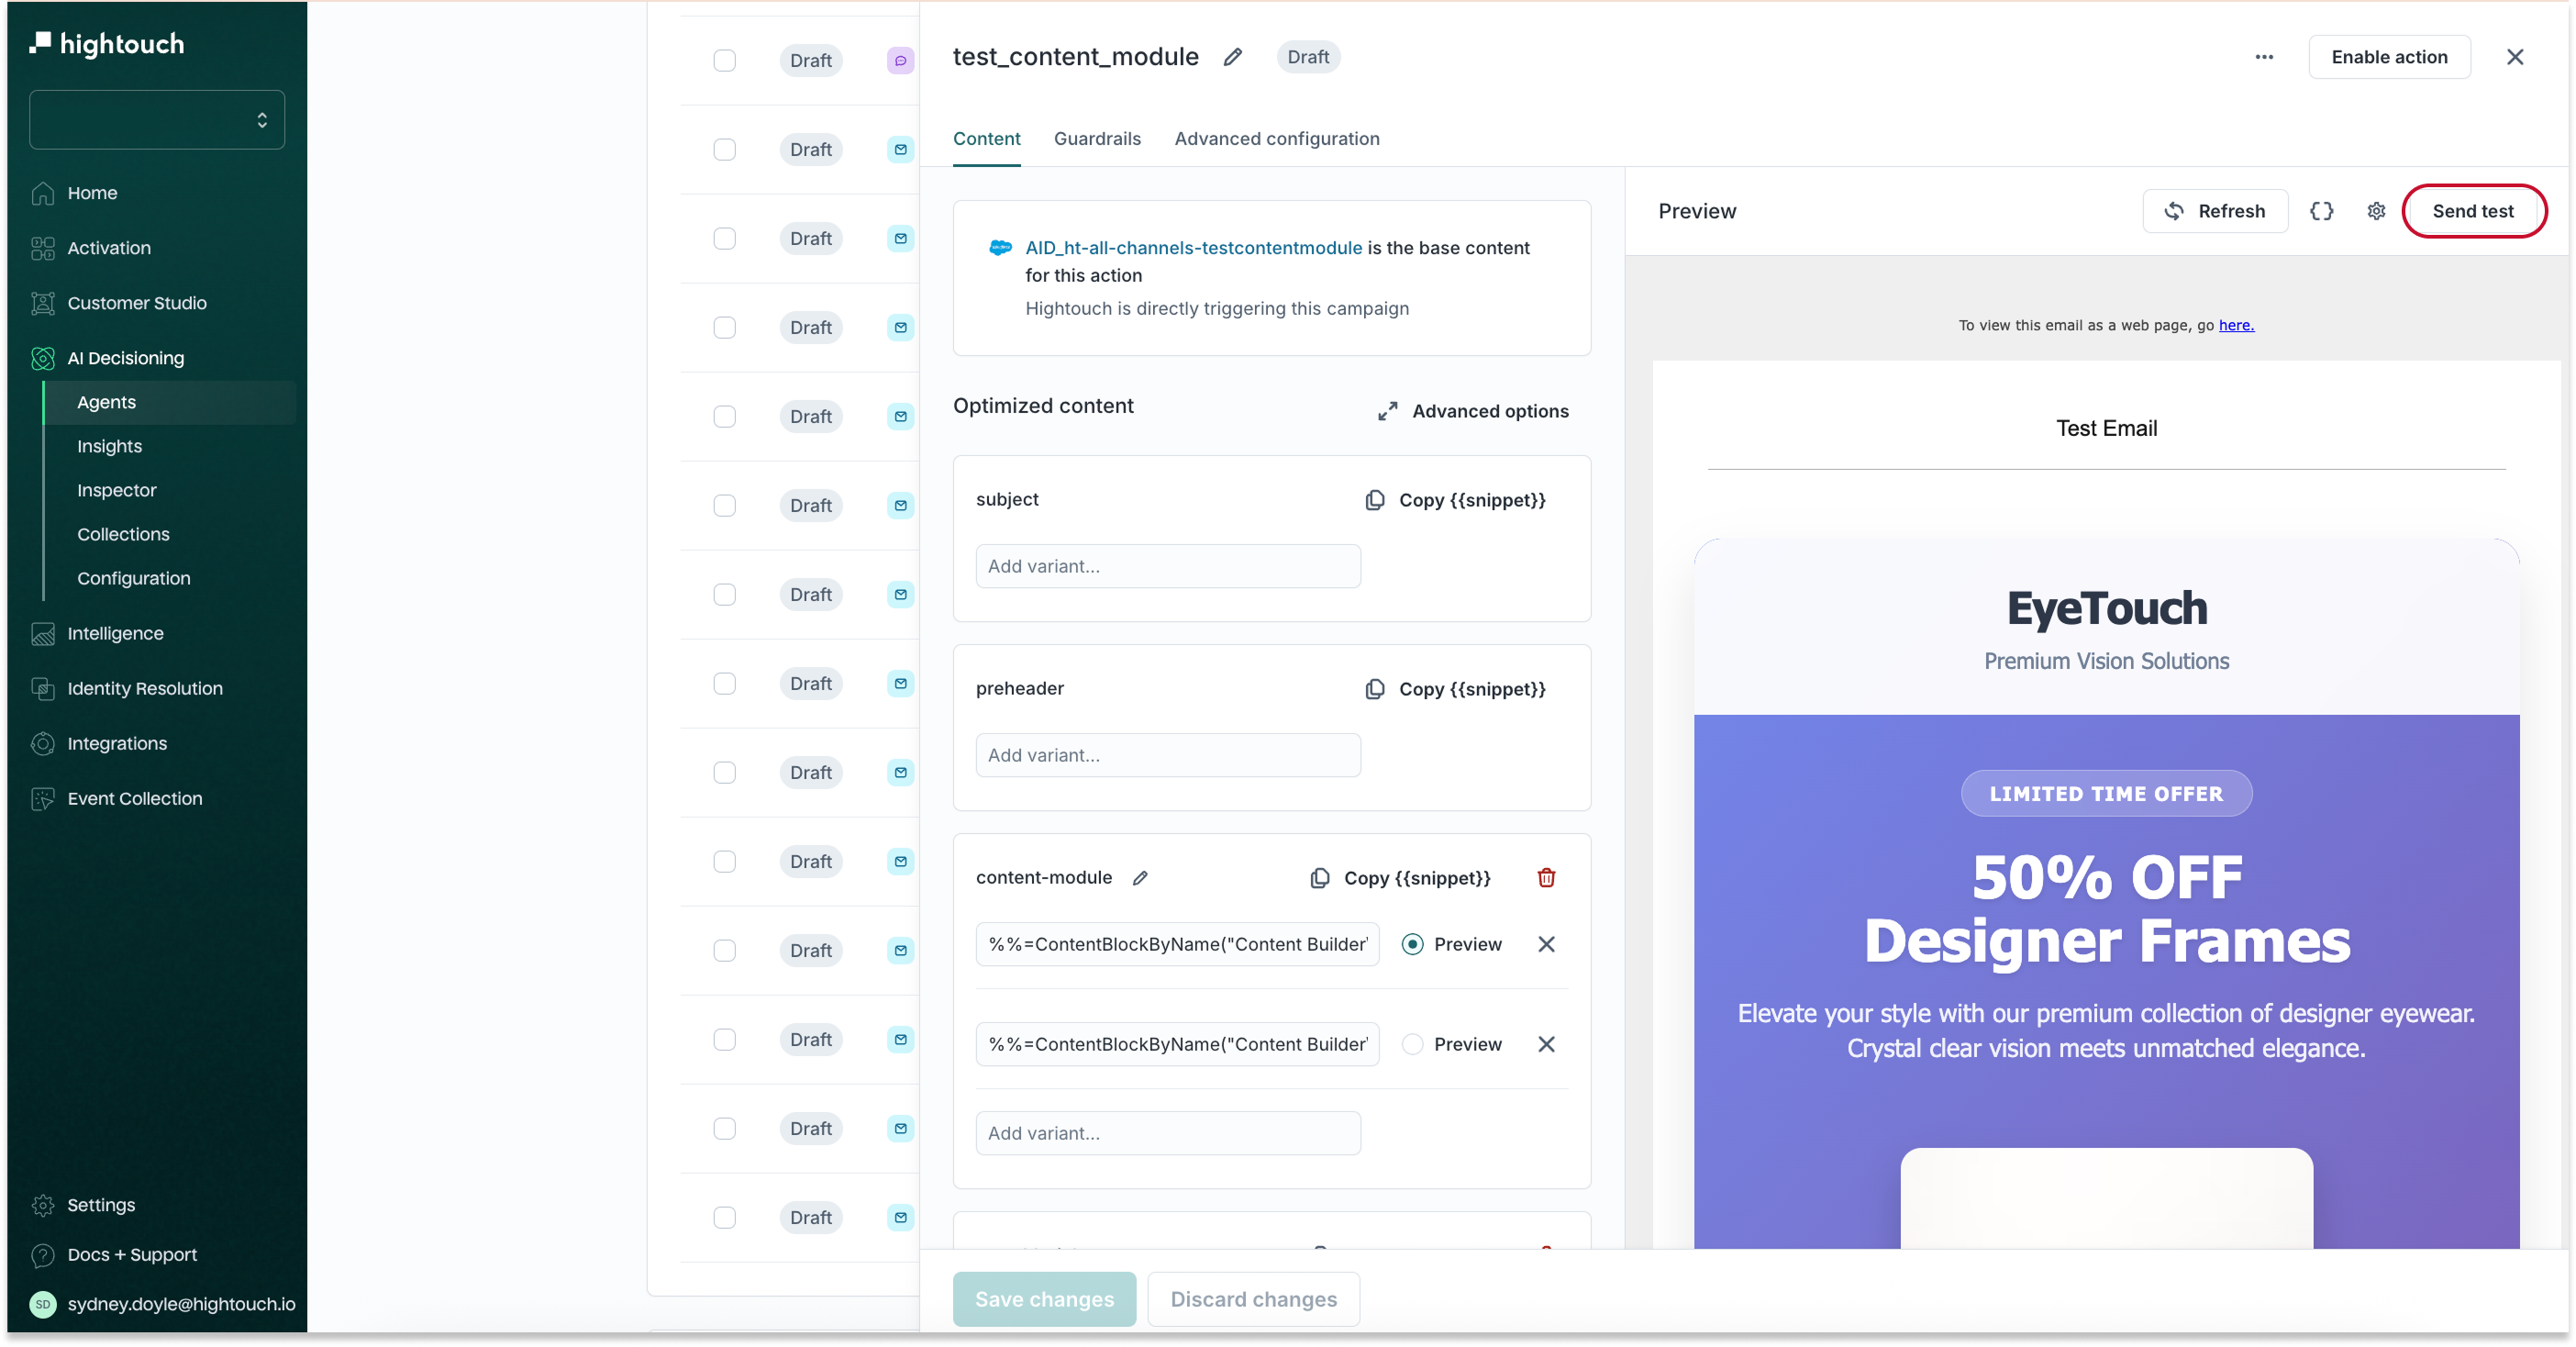
In the content tab, set the variables and click Send Test
Send emails via Journey
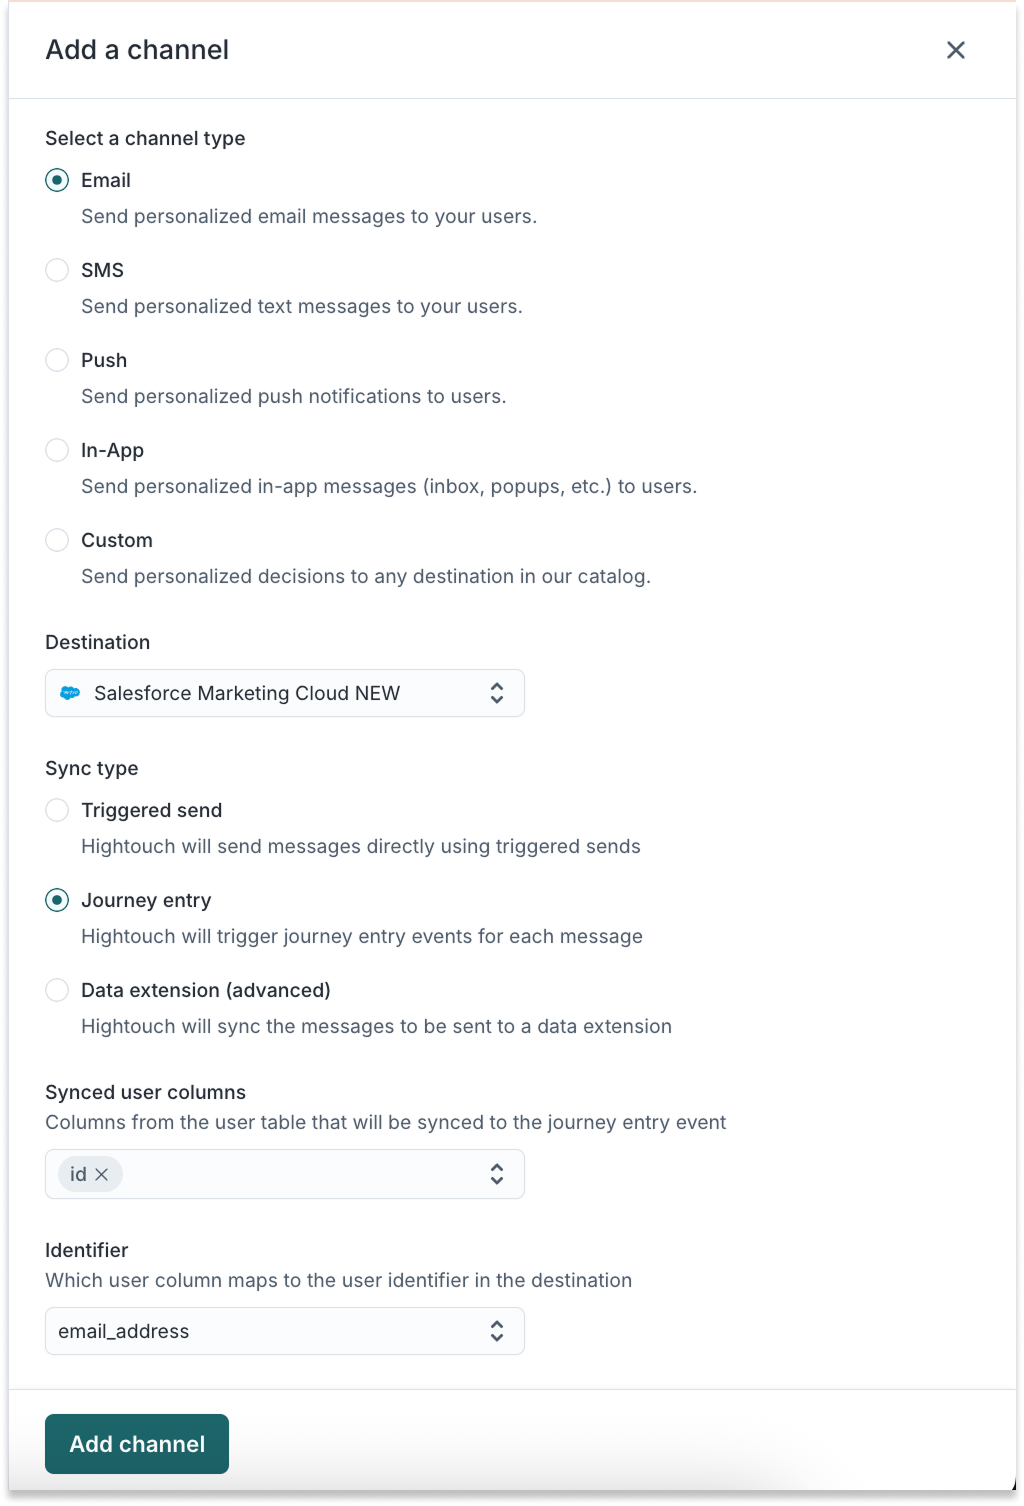
- Follow the steps to add channels. Make sure the selected Sync Type is Journey entry
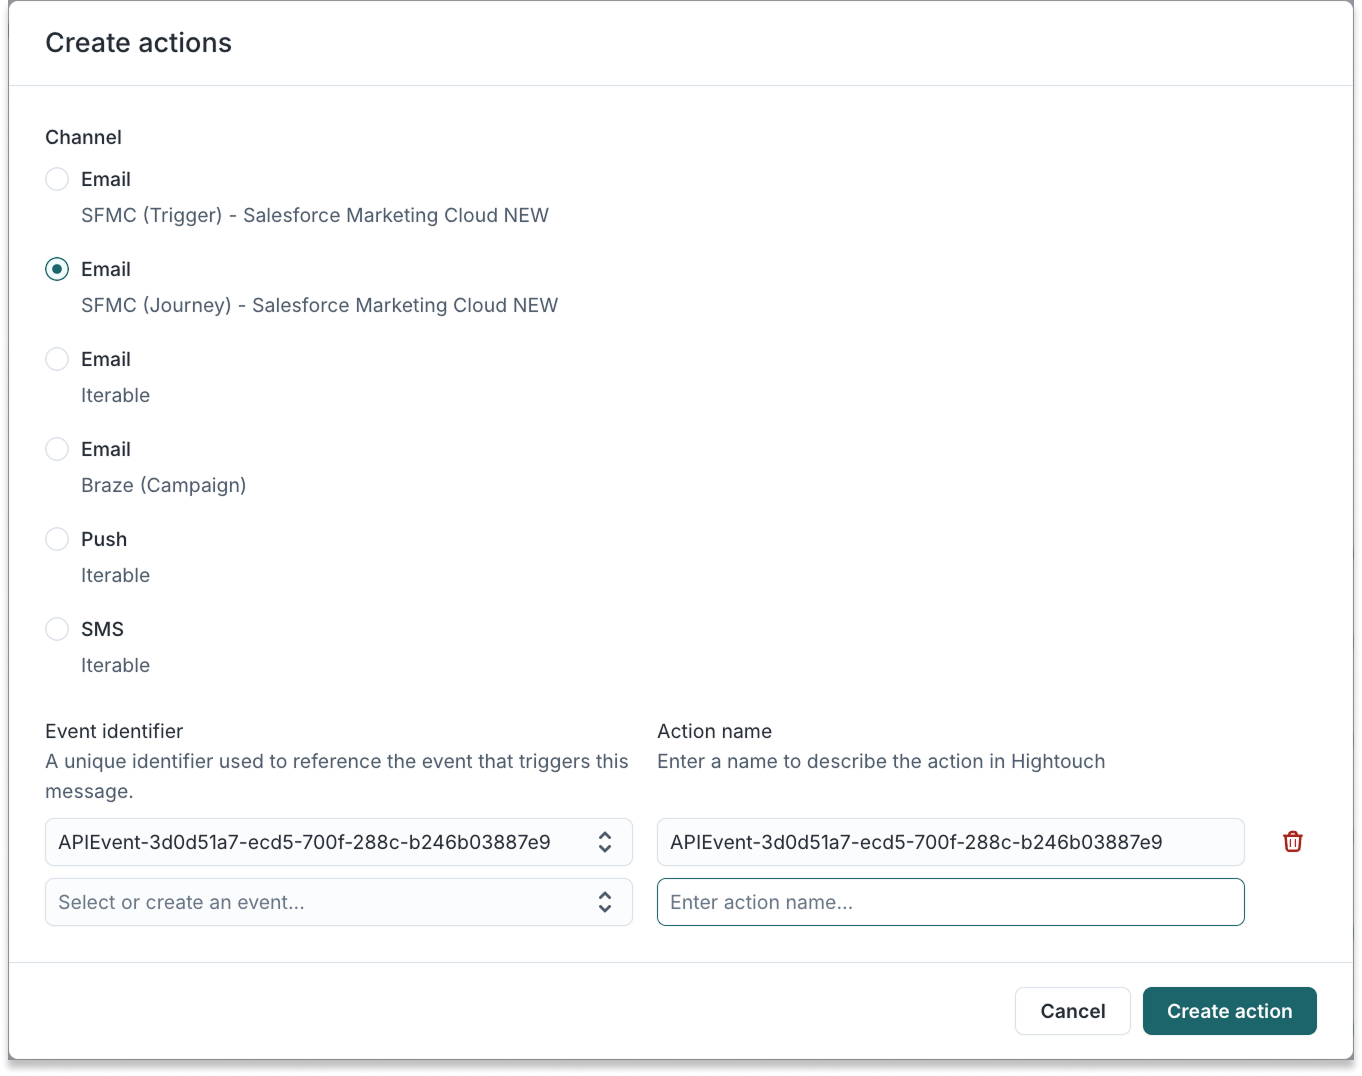
- Follow the steps to add an action
- In the content tab that opens, set the variables and click Send Test

Send SMS text messages via Triggered Send
-
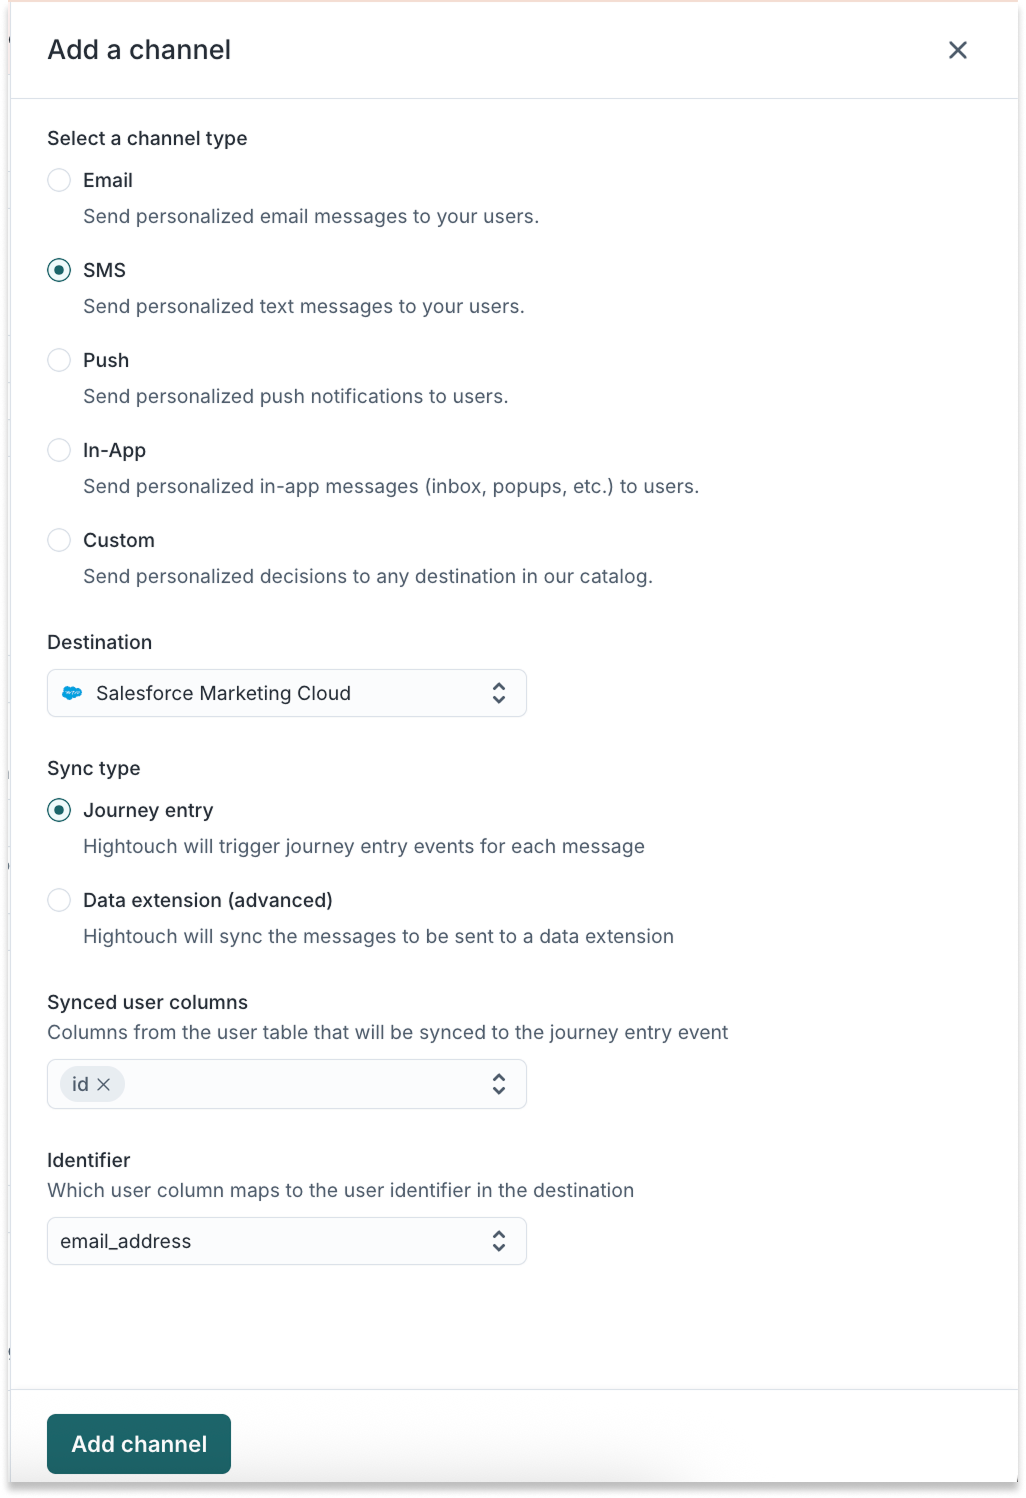
Follow the steps to add channels. Make sure the selected Sync Type is Triggered Send
- Follow the steps to add an action.
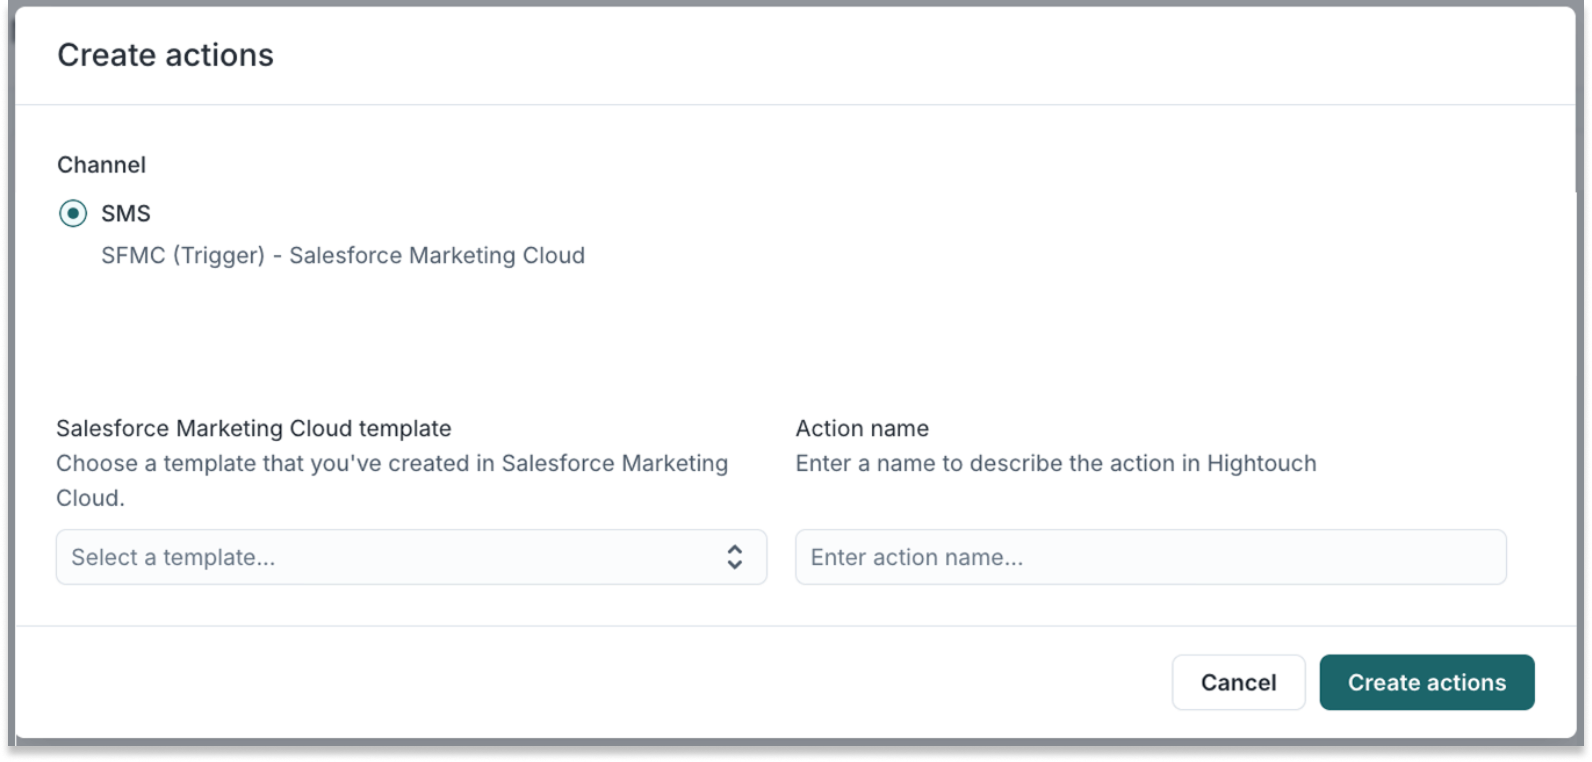
- In the content tab that opens, set the variables and click Send Test

Send SMS text messages via Journey
- Follow the steps to add channels. Make sure the selected Sync Type is Journey entry
- Follow the steps to add an action.
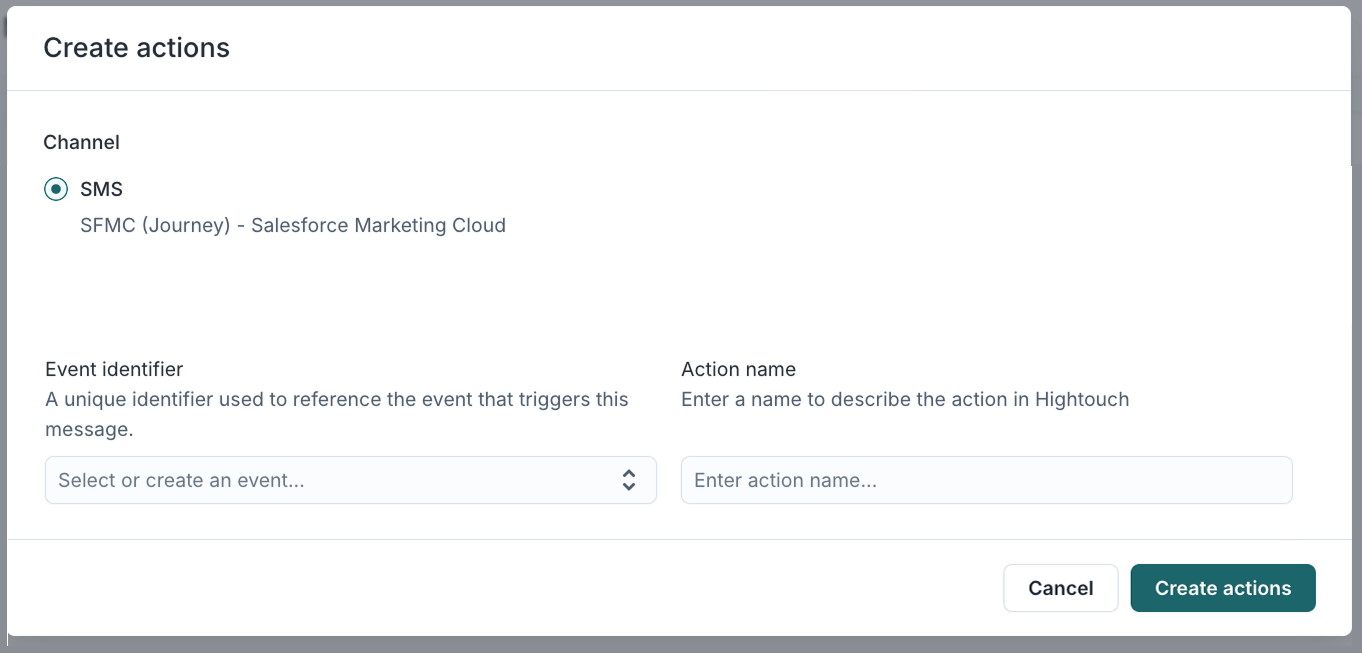
- In the Content tab that opens, set the variables and click Send Test

Send push (outbound) notifications via Triggered Send
Enable the in-app channel
- Follow the steps to add channels. Make sure the selected Sync Type is Triggered Send
Configure your push template in SFMC
In SFMC:
-
Go to Mobile Studio > MobilePush
-
Click Create Message

-
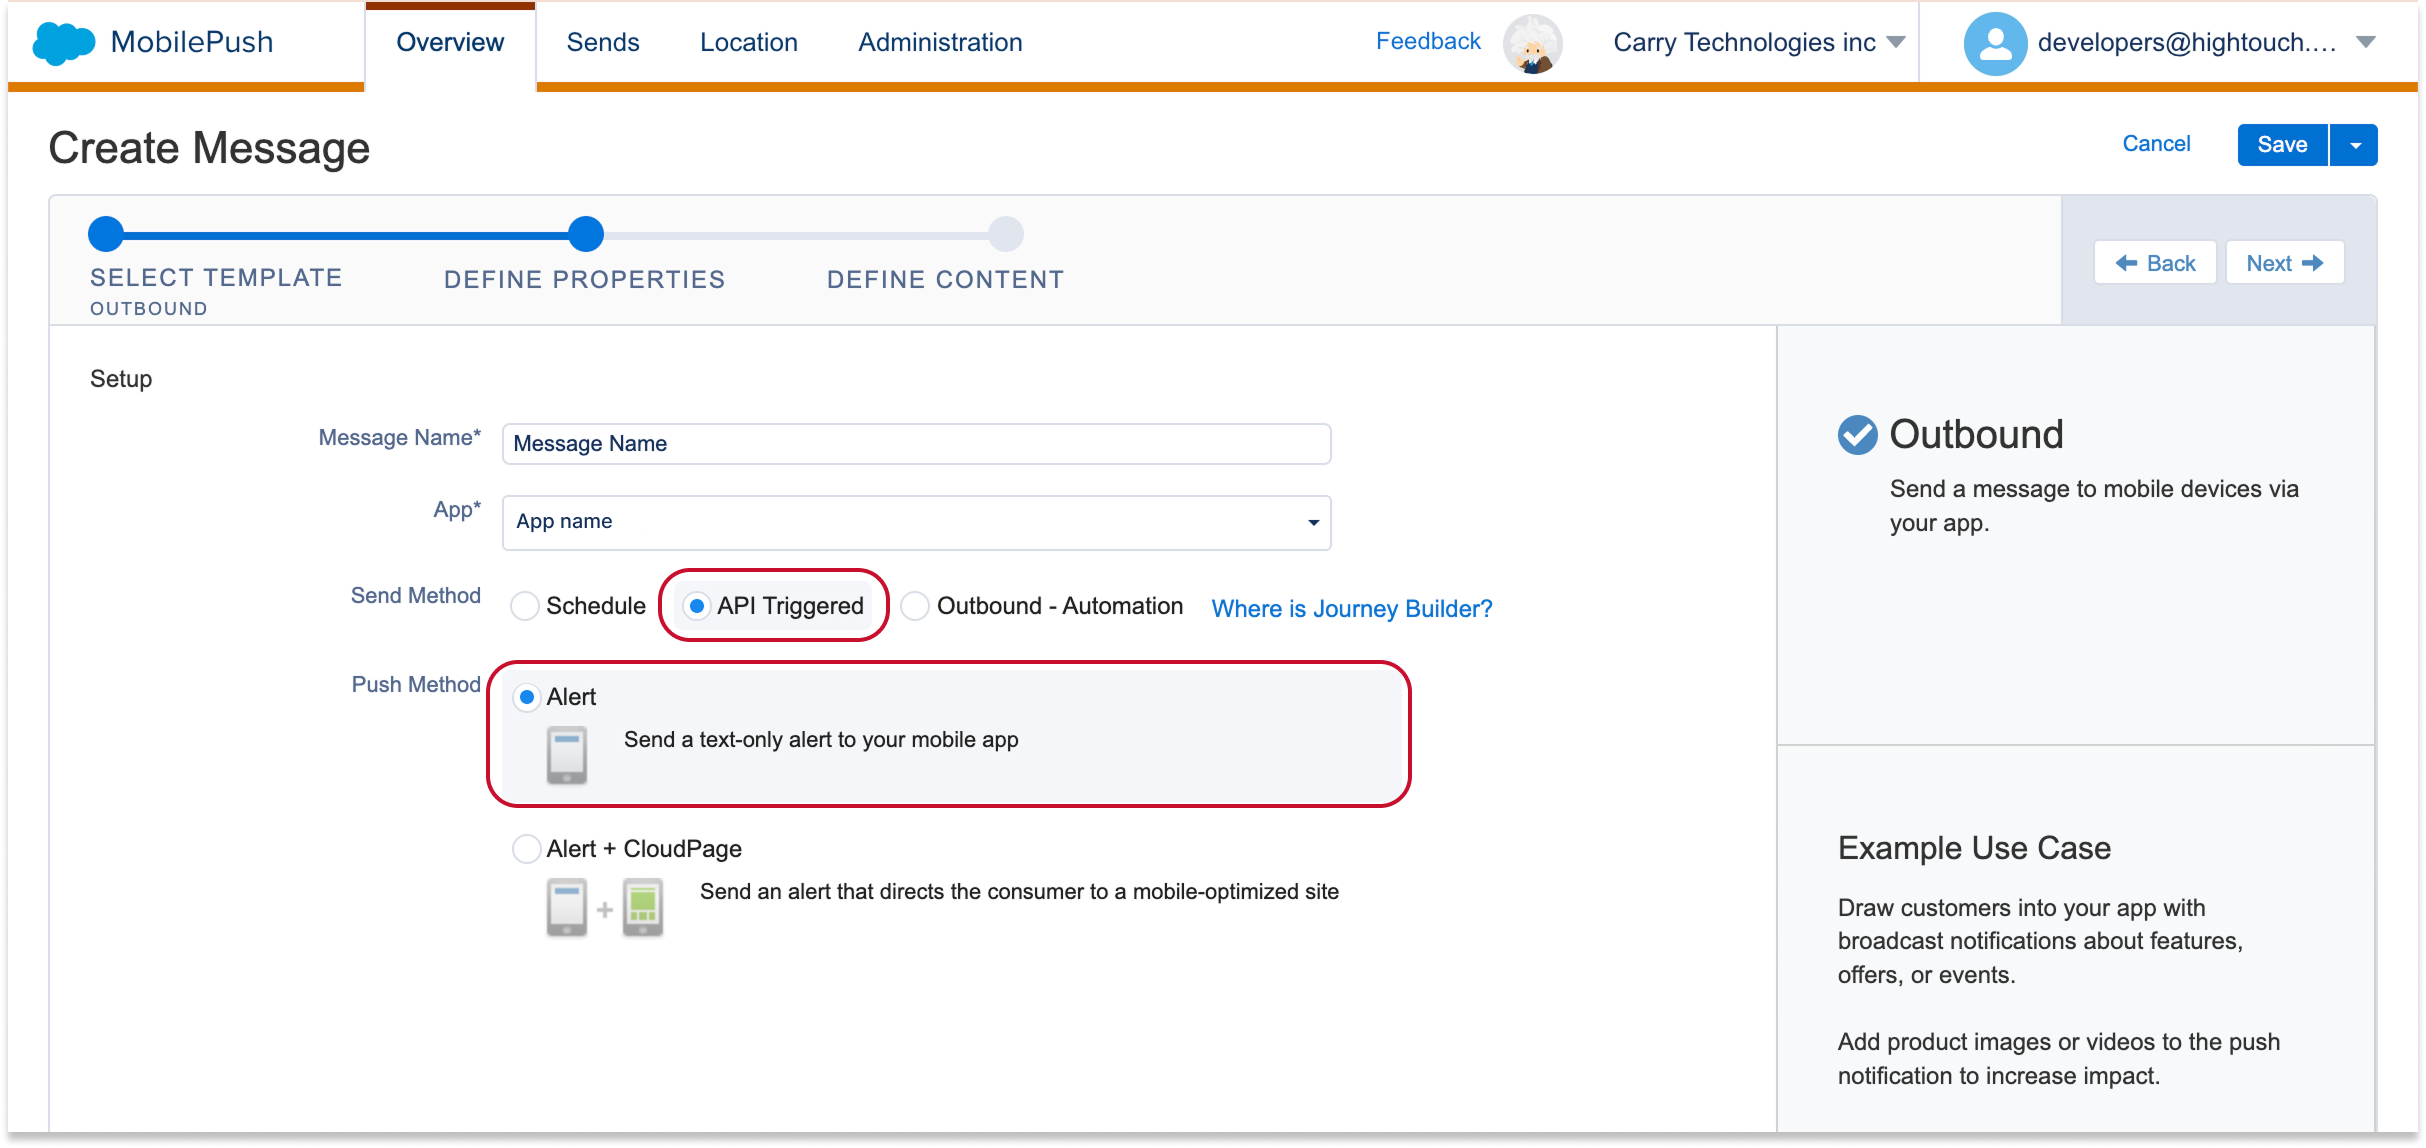
Select the Outbound template and click Next
-
Name your message and select your app
-
Select API Triggered as the Send Method
-
Select Alert as the Push Method and click Next
-
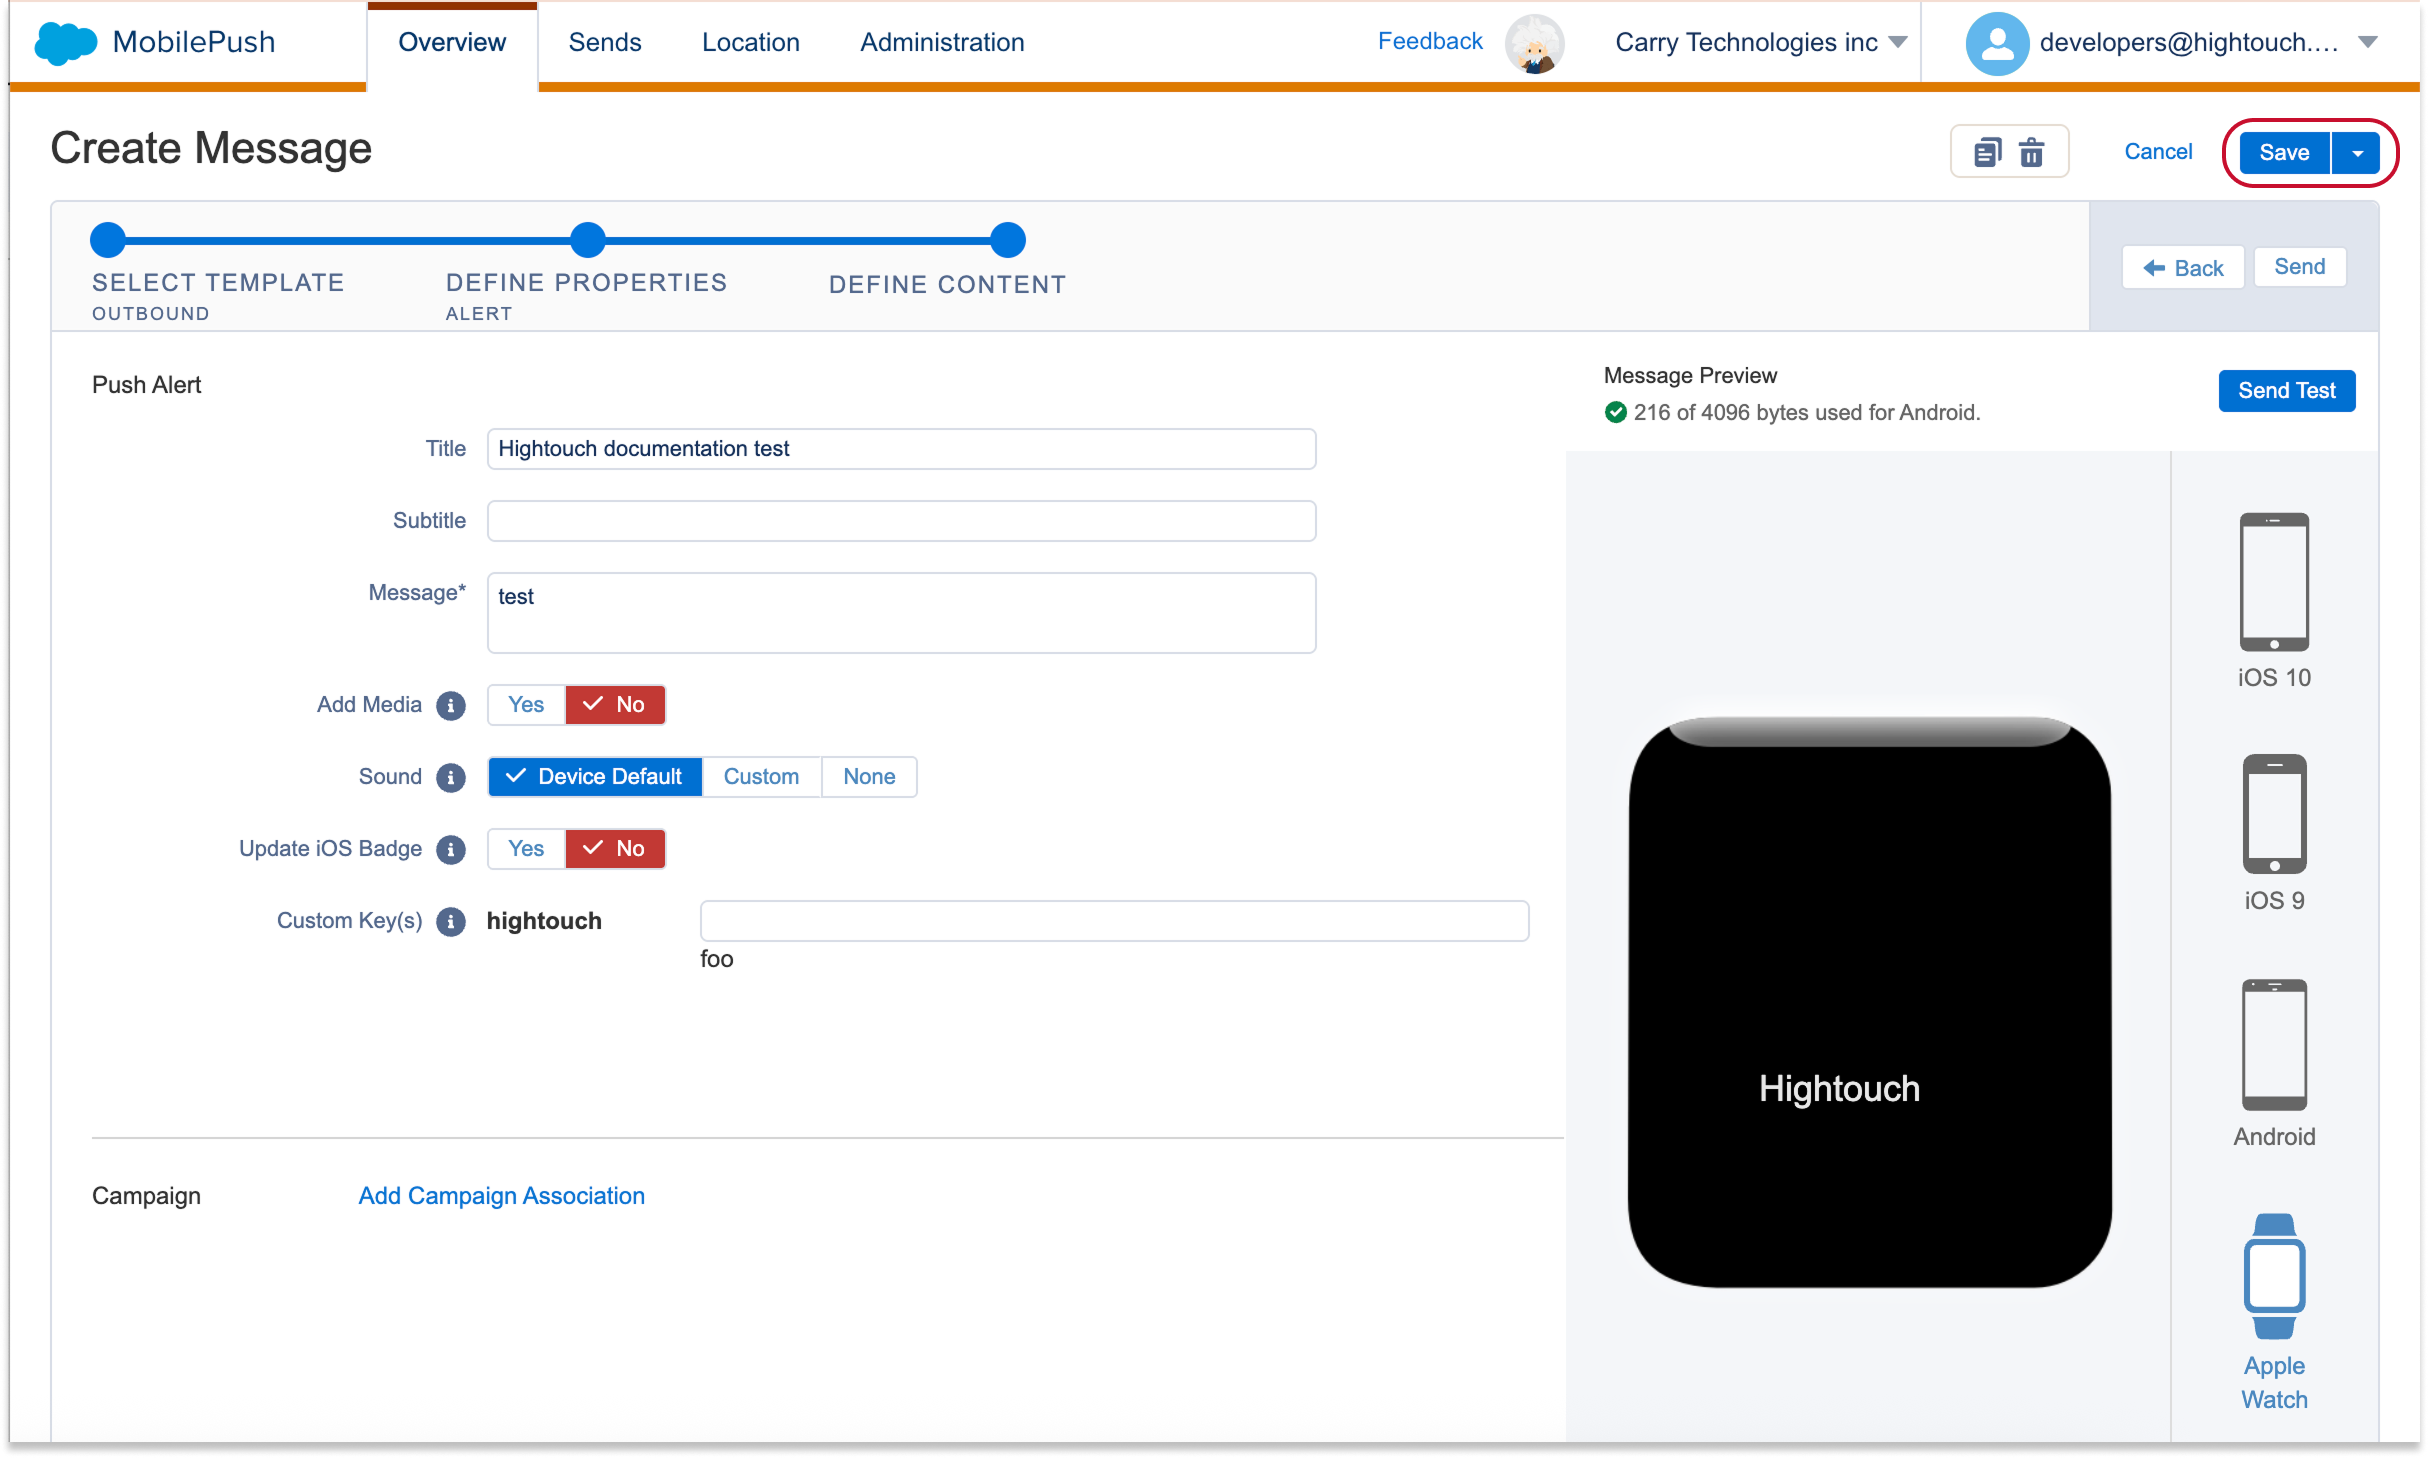
Create the template for your push alert
-
Save your message
-
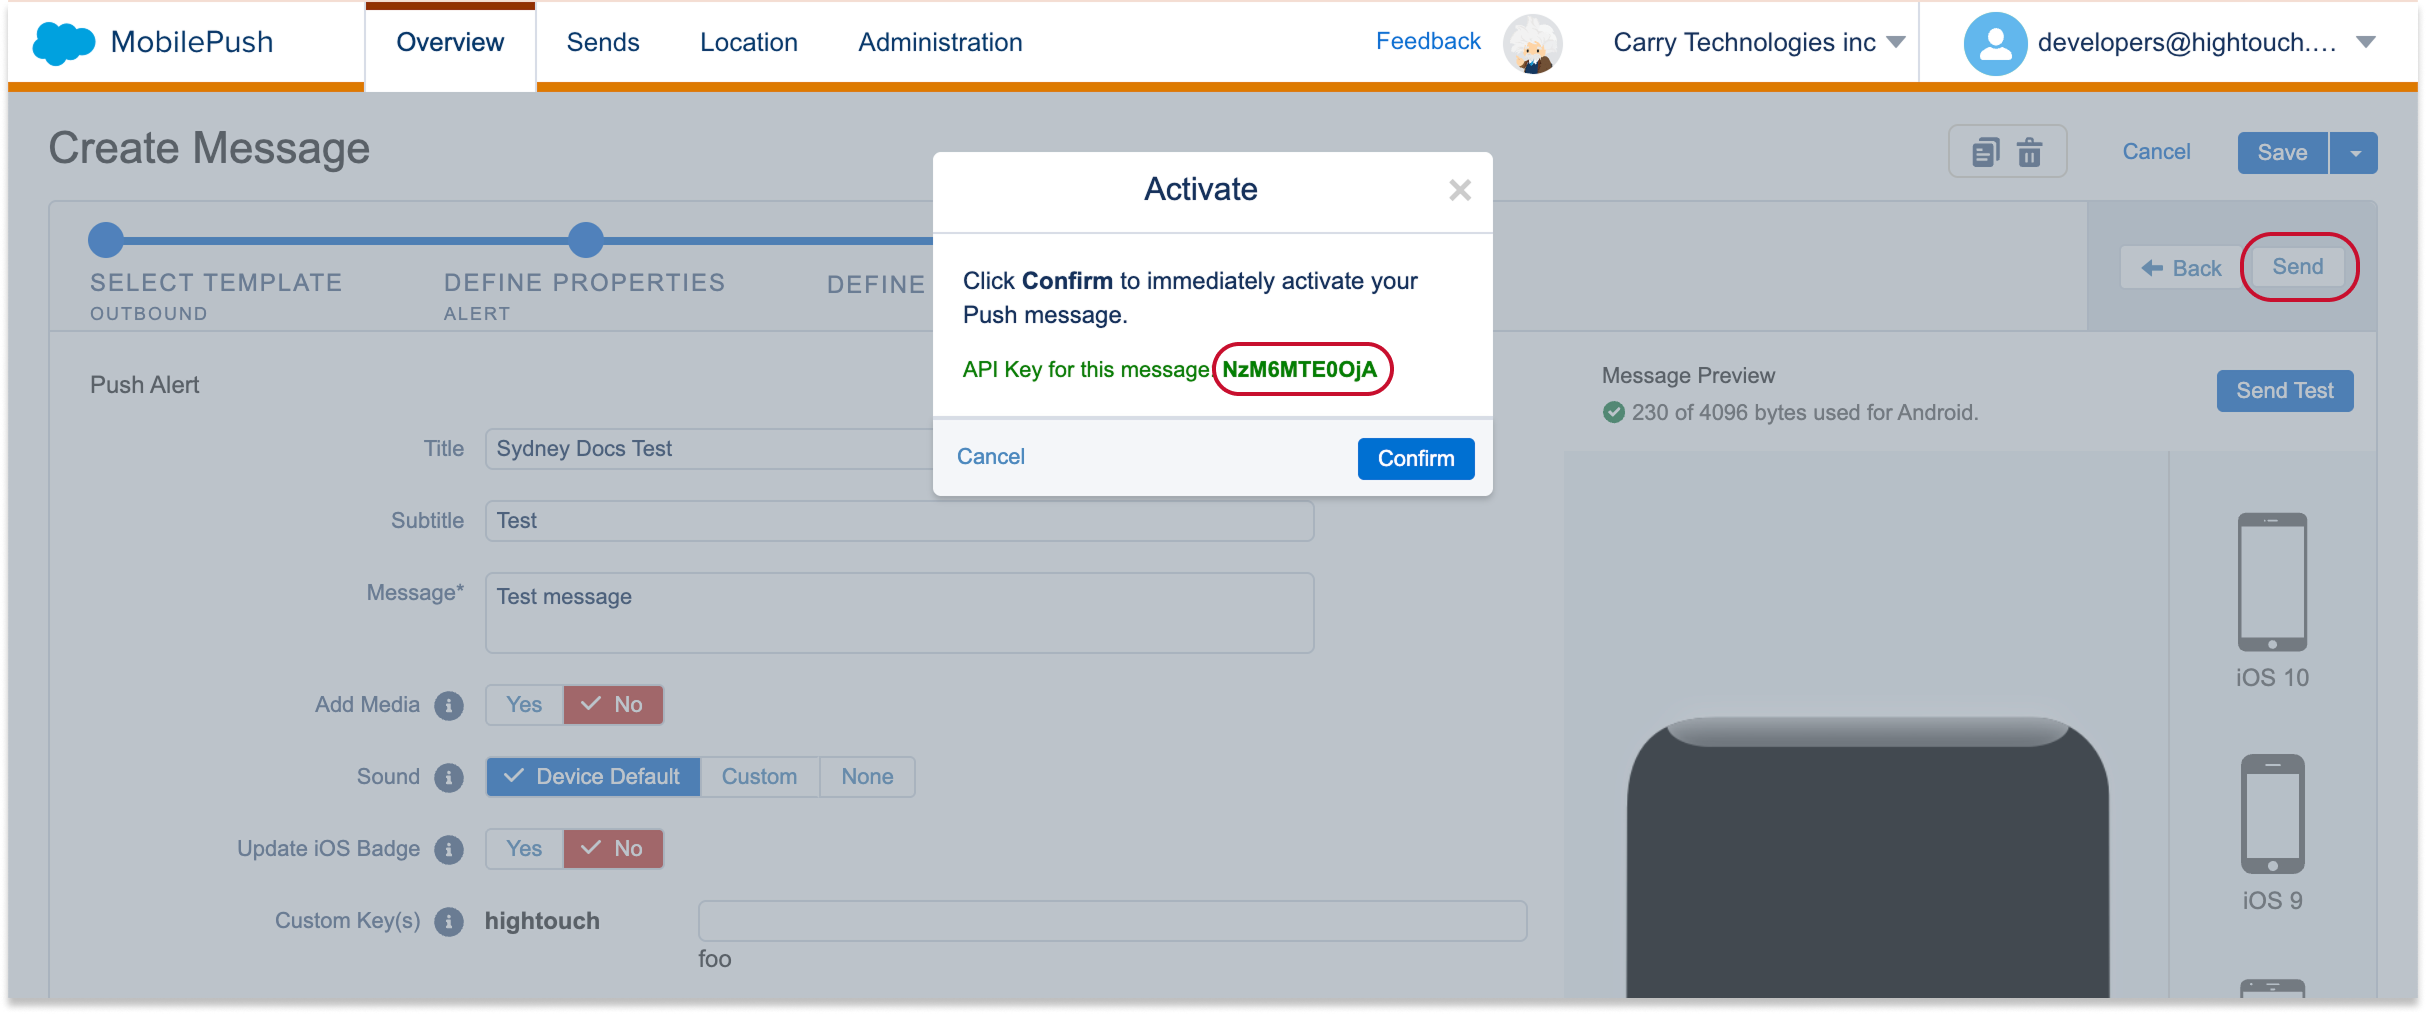
Click Send in the top right-hand corner
-
An activation window should pop up with an API key. Copy/save this API key to make it easier to find the template in Hightouch in a later step
Create an action in Hightouch
In Hightouch:
- Follow the steps to add an action.
Preview content
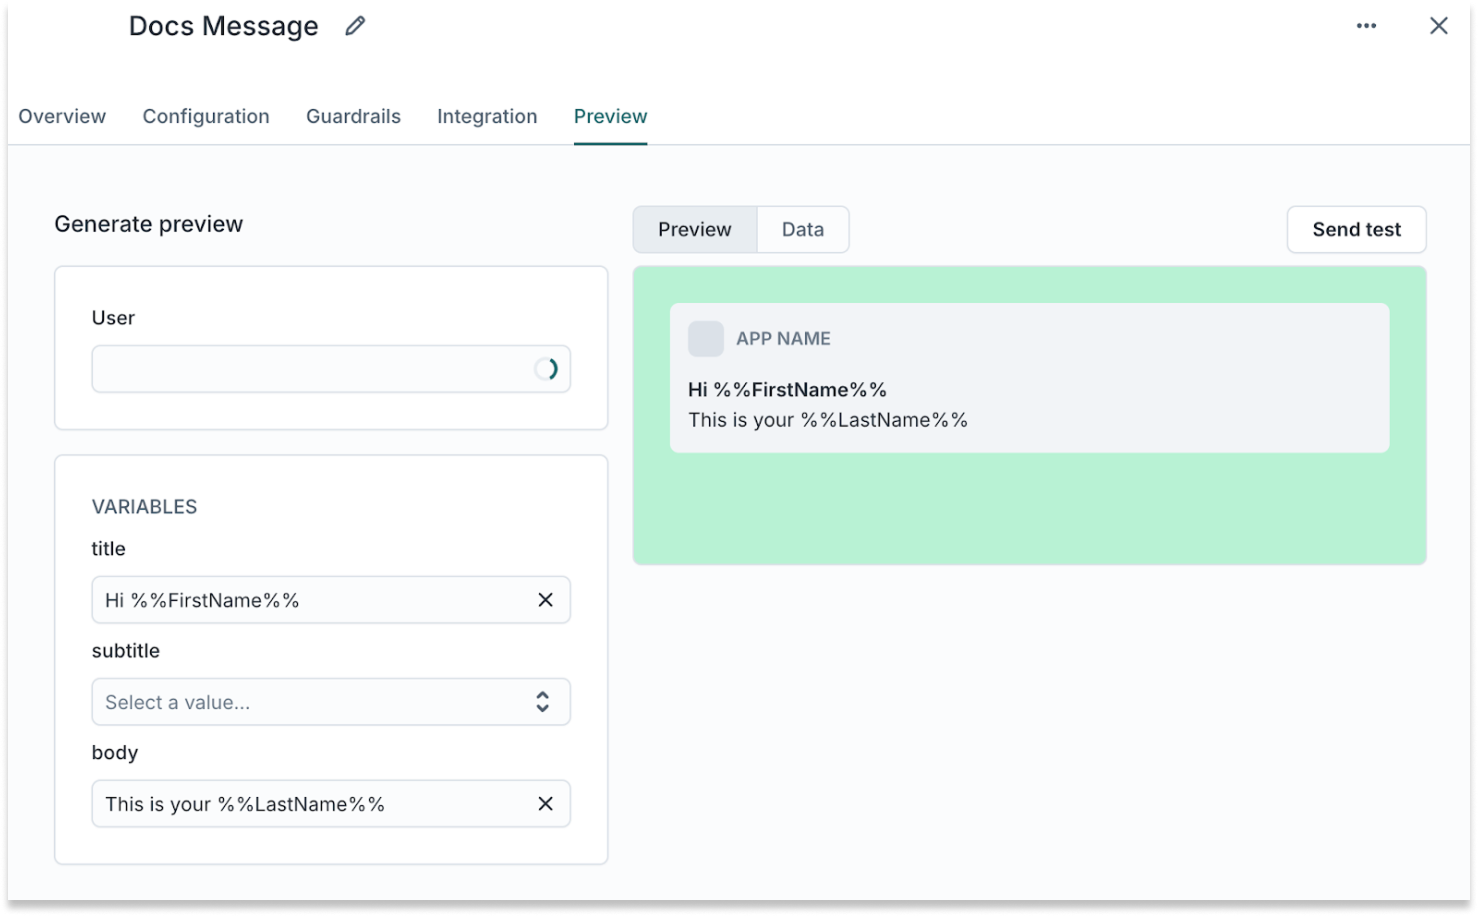
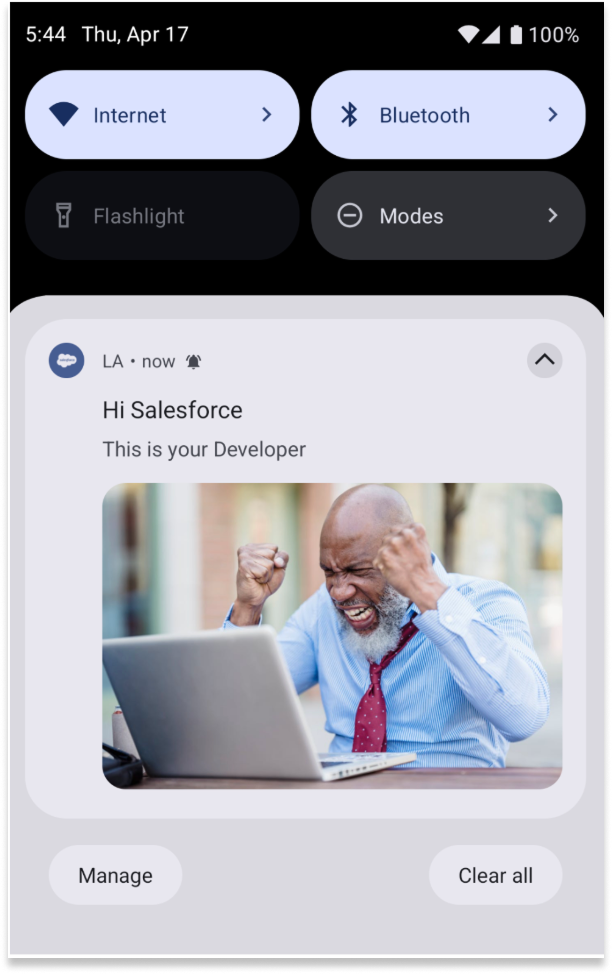
Hightouch automatically creates the variables for push notifications title, subtitle, and body, for the users to configure, the values supplied here can are then used directly in the push without any need for code snippets being pasted in the template. If these are left blank then Hightouch will use the default values in the template.
Note: Hightouch uses the override capabilities in the API and so the default values in the template for everything get overrode if even one of the variables has a value supplied for it, so make sure to supply at least the default value for all the variables even if you only want AID varying one variable.
Send tests
- To test push notifications, paste whatever you use as the contact key in your contacts in SFMC.

- Personalization strings can be supplied directly in the values for the variables without any need for code snippets being pasted into the template either.
Send push (app inbox) notifications via Triggered Send
Enable the in-app channel
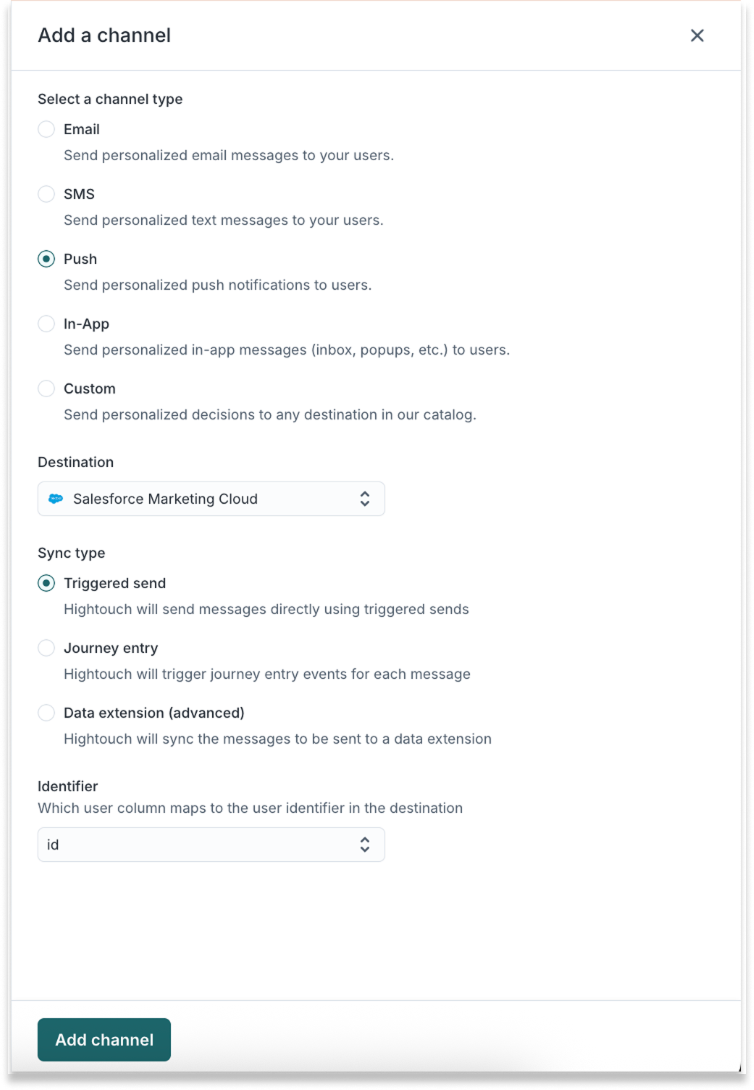
- Follow the steps to add channels. Make sure the selected Sync Type is Triggered Send
Configure your push template in SFMC
In SFMC:
-
Go to Mobile Studio > MobilePush
-
Click Create Message

-
Select the Inbox template and click Next
-
Name your message and select your app
-
Select API Triggered as the Send Method
-
Select Alert as the Push Method and click Next

-
Create the template for your push alert
-
Save your message

-
Click Send in the top right-hand corner
-
An activation window should pop up with an API key. Copy/save this API key to make it easier to find the template in Hightouch in a later step.

Create an action in Hightouch
In Hightouch:
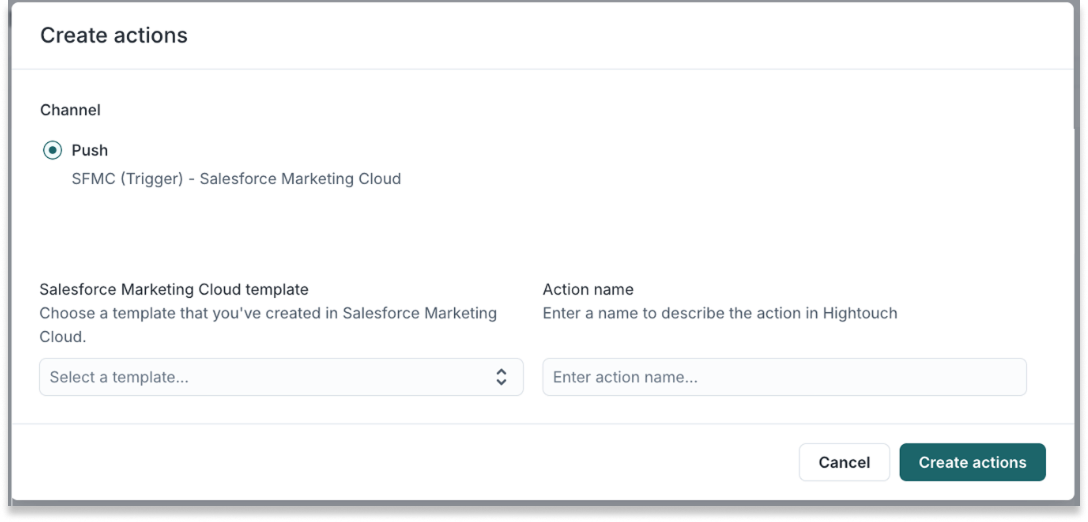
- Follow the steps to add an action.
Send push notifications via Journey
- Follow the steps to add channels. Make sure the selected Sync Type is Journey entry
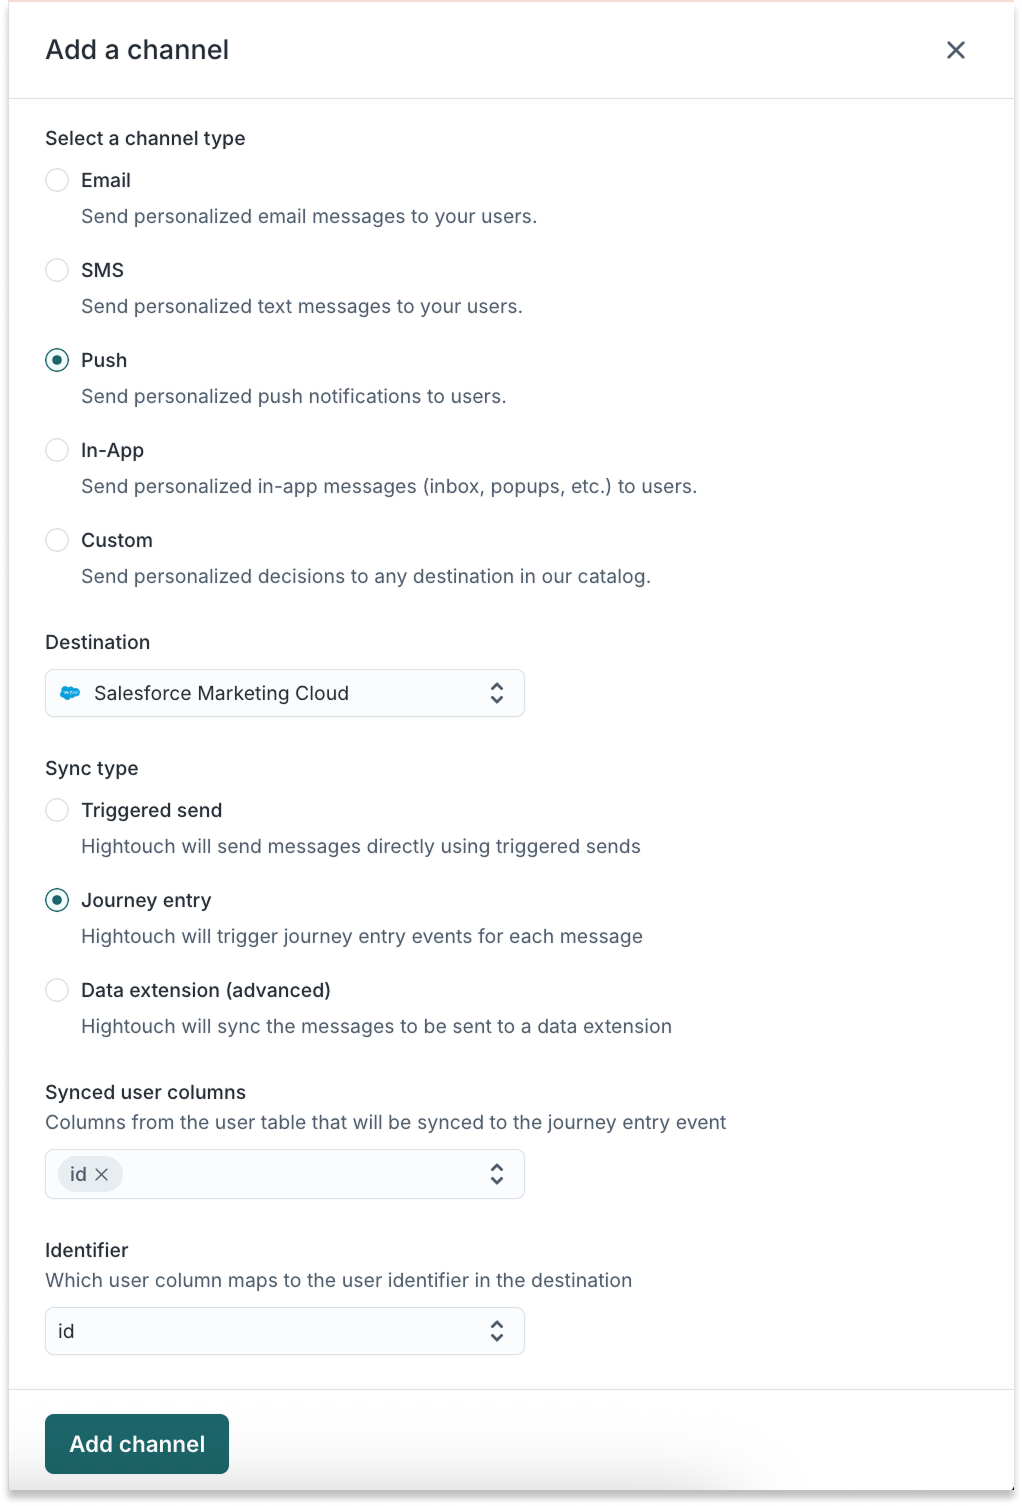
- Follow the steps to add an action.
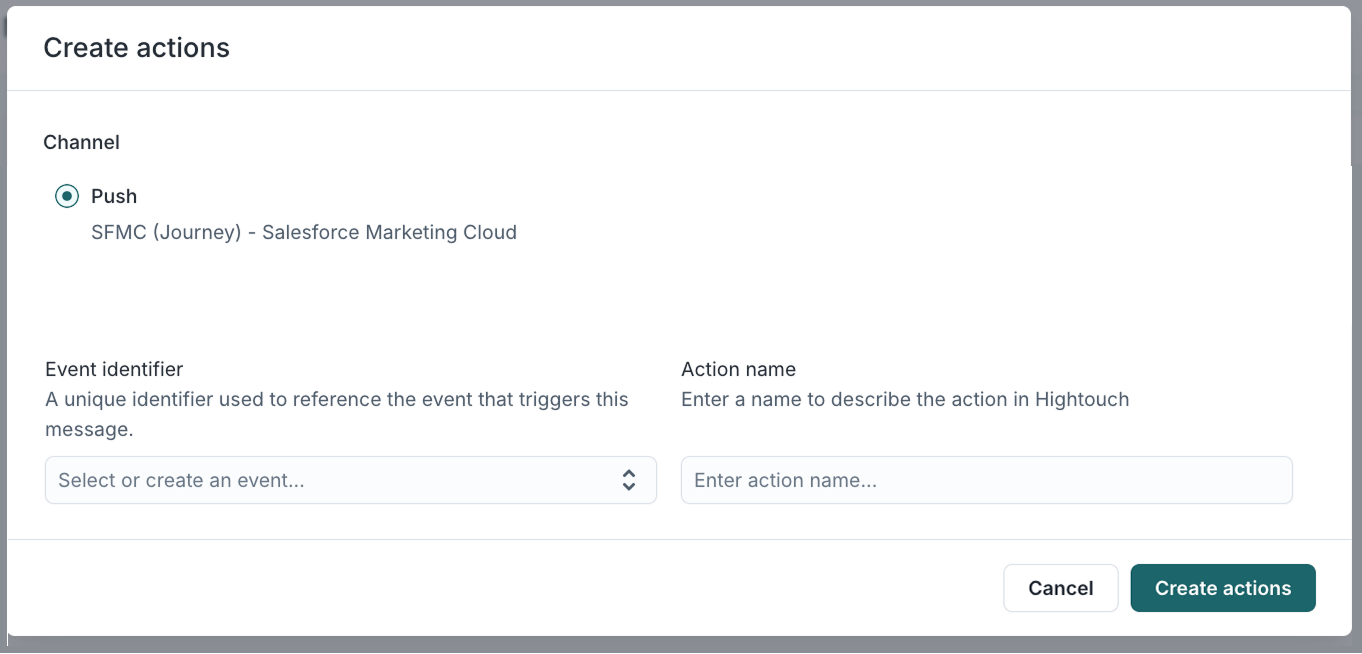
- In the Content tab that opens, set the variables and click Send Test

Send in-app notifications via Journey
Enable the in-app channel and create an action
- Follow the steps to add channels. Make sure the selected Sync Type is Journey entry
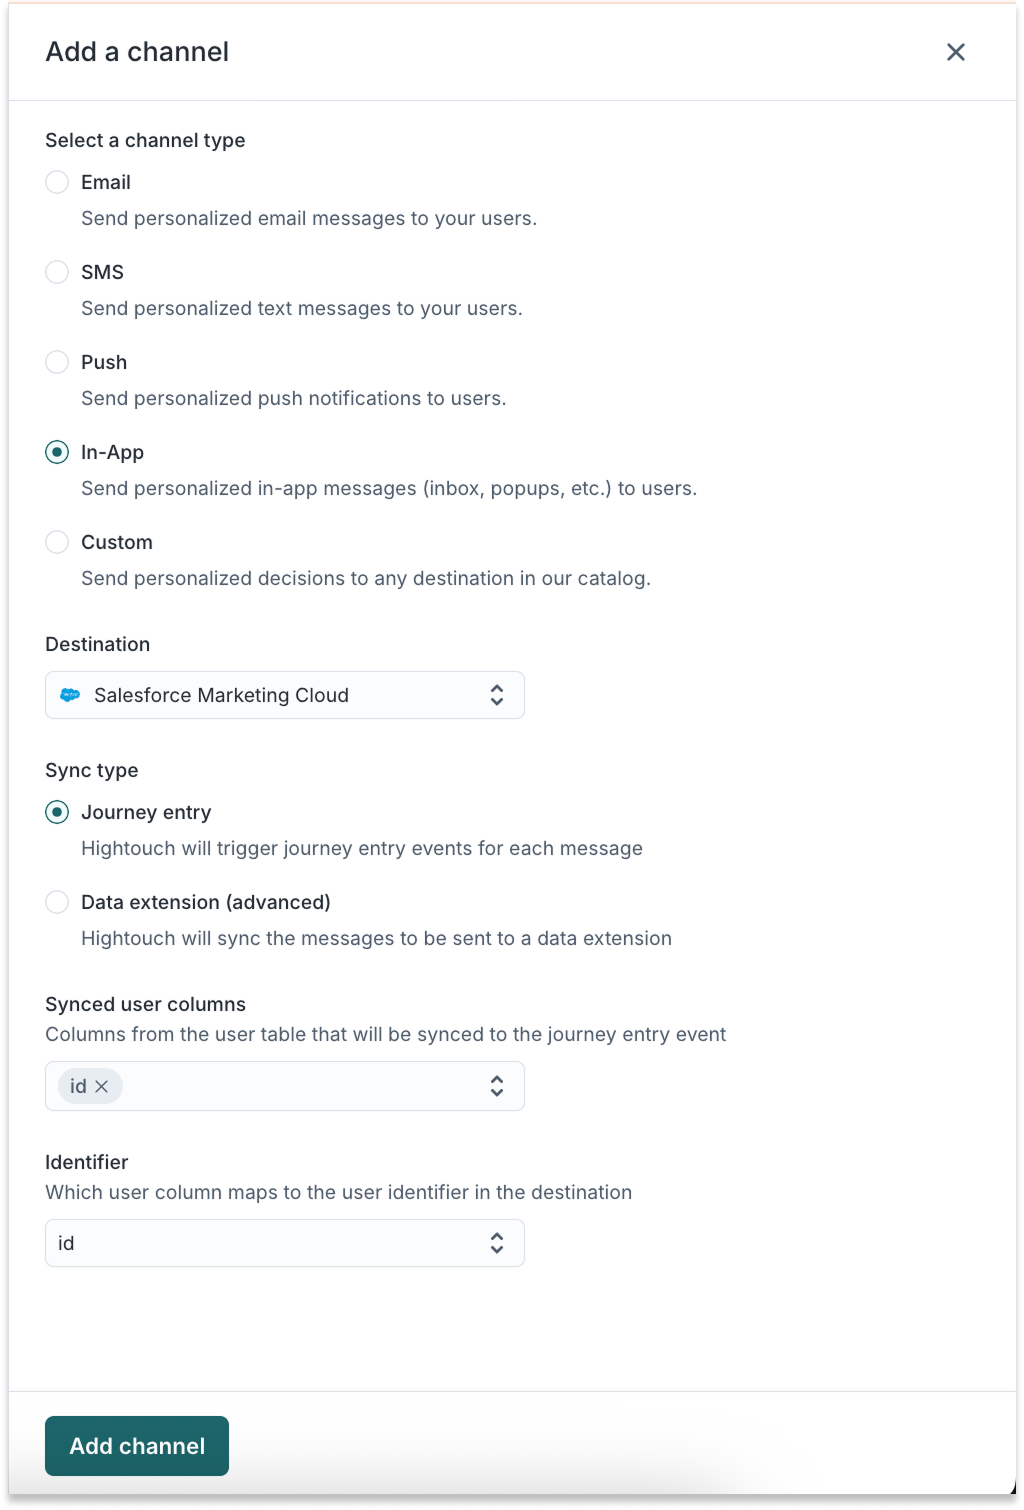
- Follow the steps to add an action.
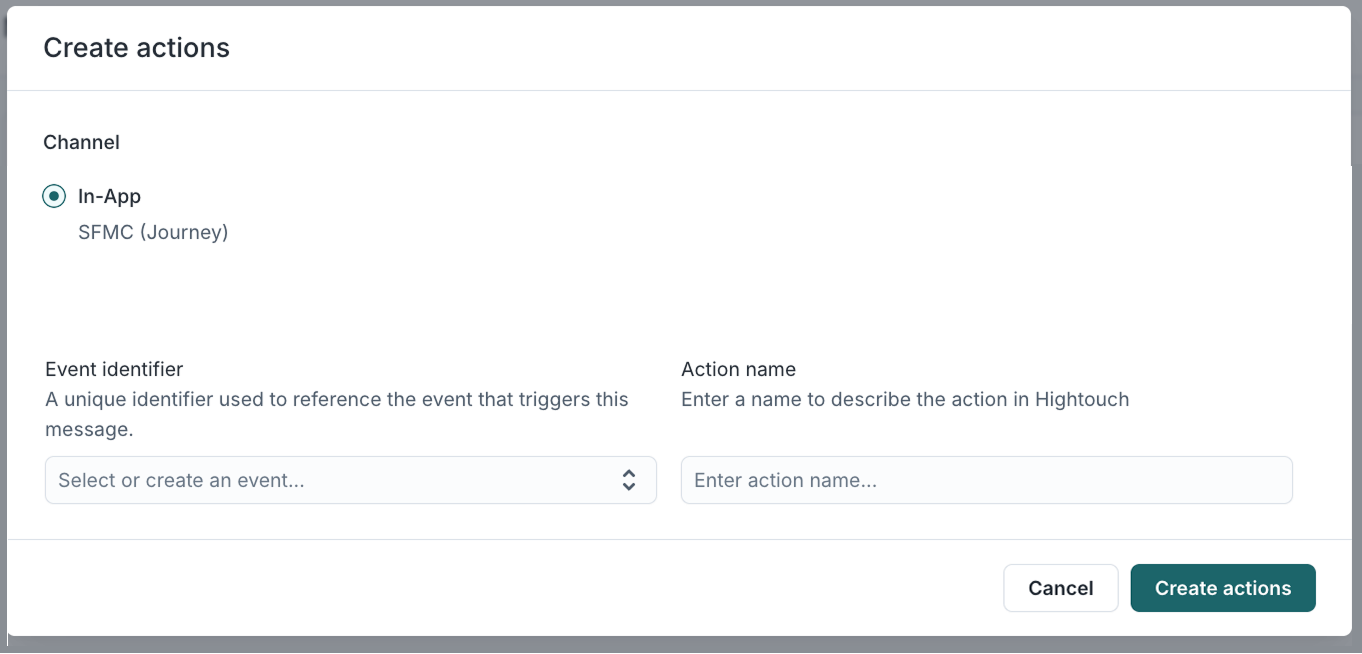
Link your action to an SFMC Journey
In these next steps, you will need to link your newly created action to an associated Journey in SFMC.
In Hightough:
- Go to the Content tab within your AID action to add the variables you would like Hightouch to control
In SFMC:
-
Go to Journey Builder > Journey Builder
-
Click Create New Journey

-
Select Multi-Step Journey
-
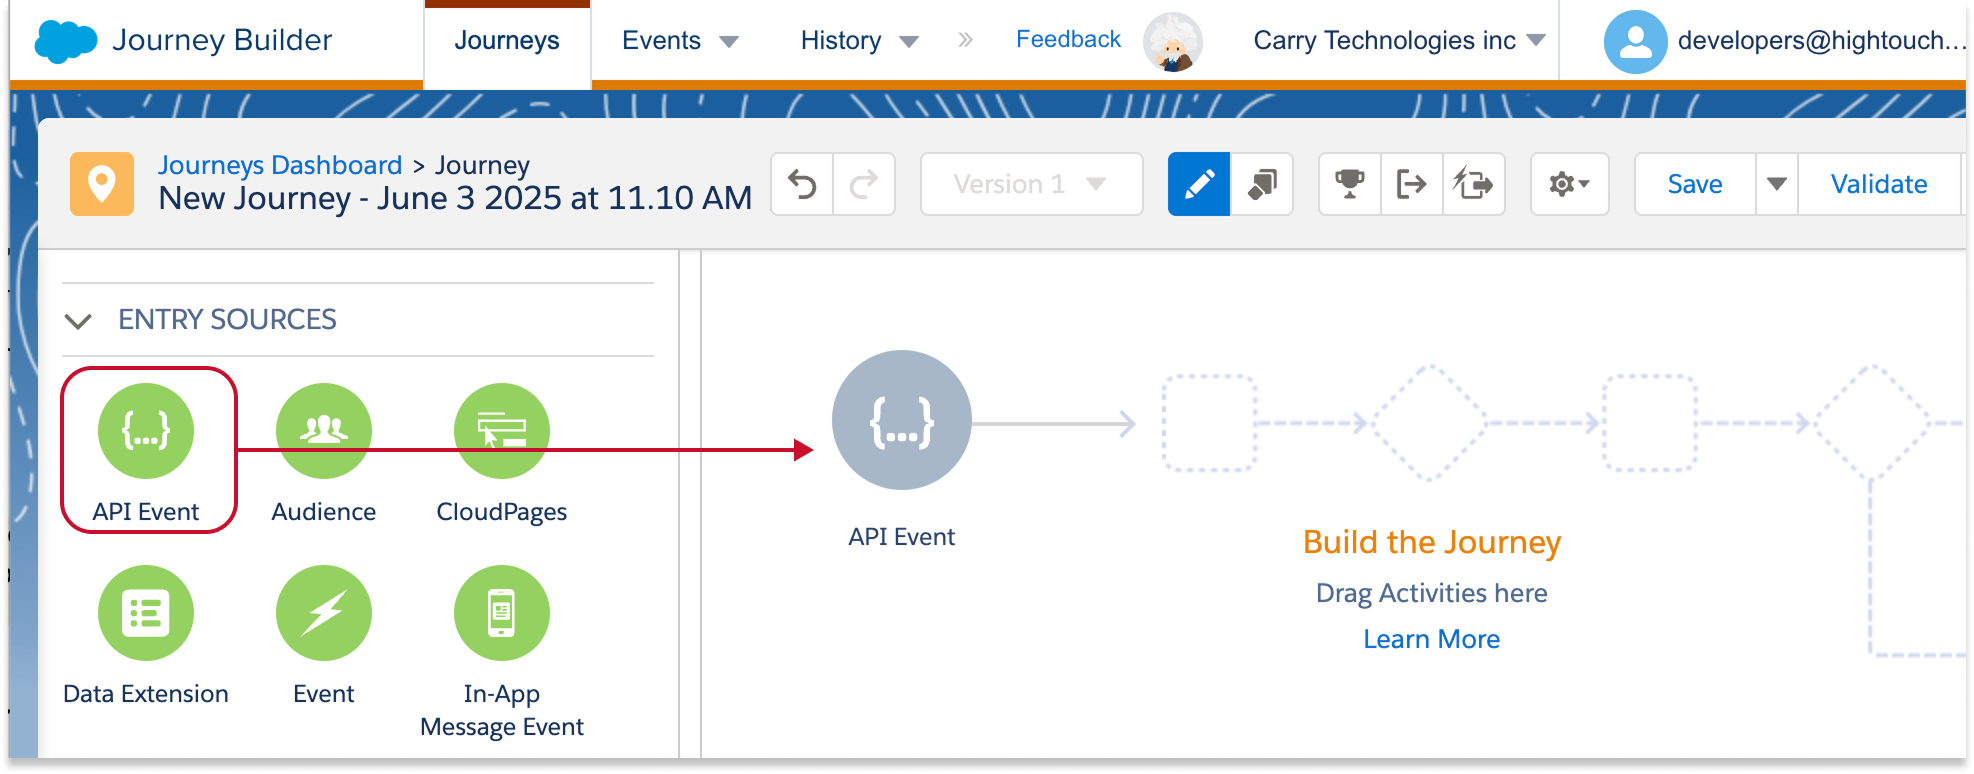
Select API Event as the entry source. Drag it onto the Journey Builder.
-
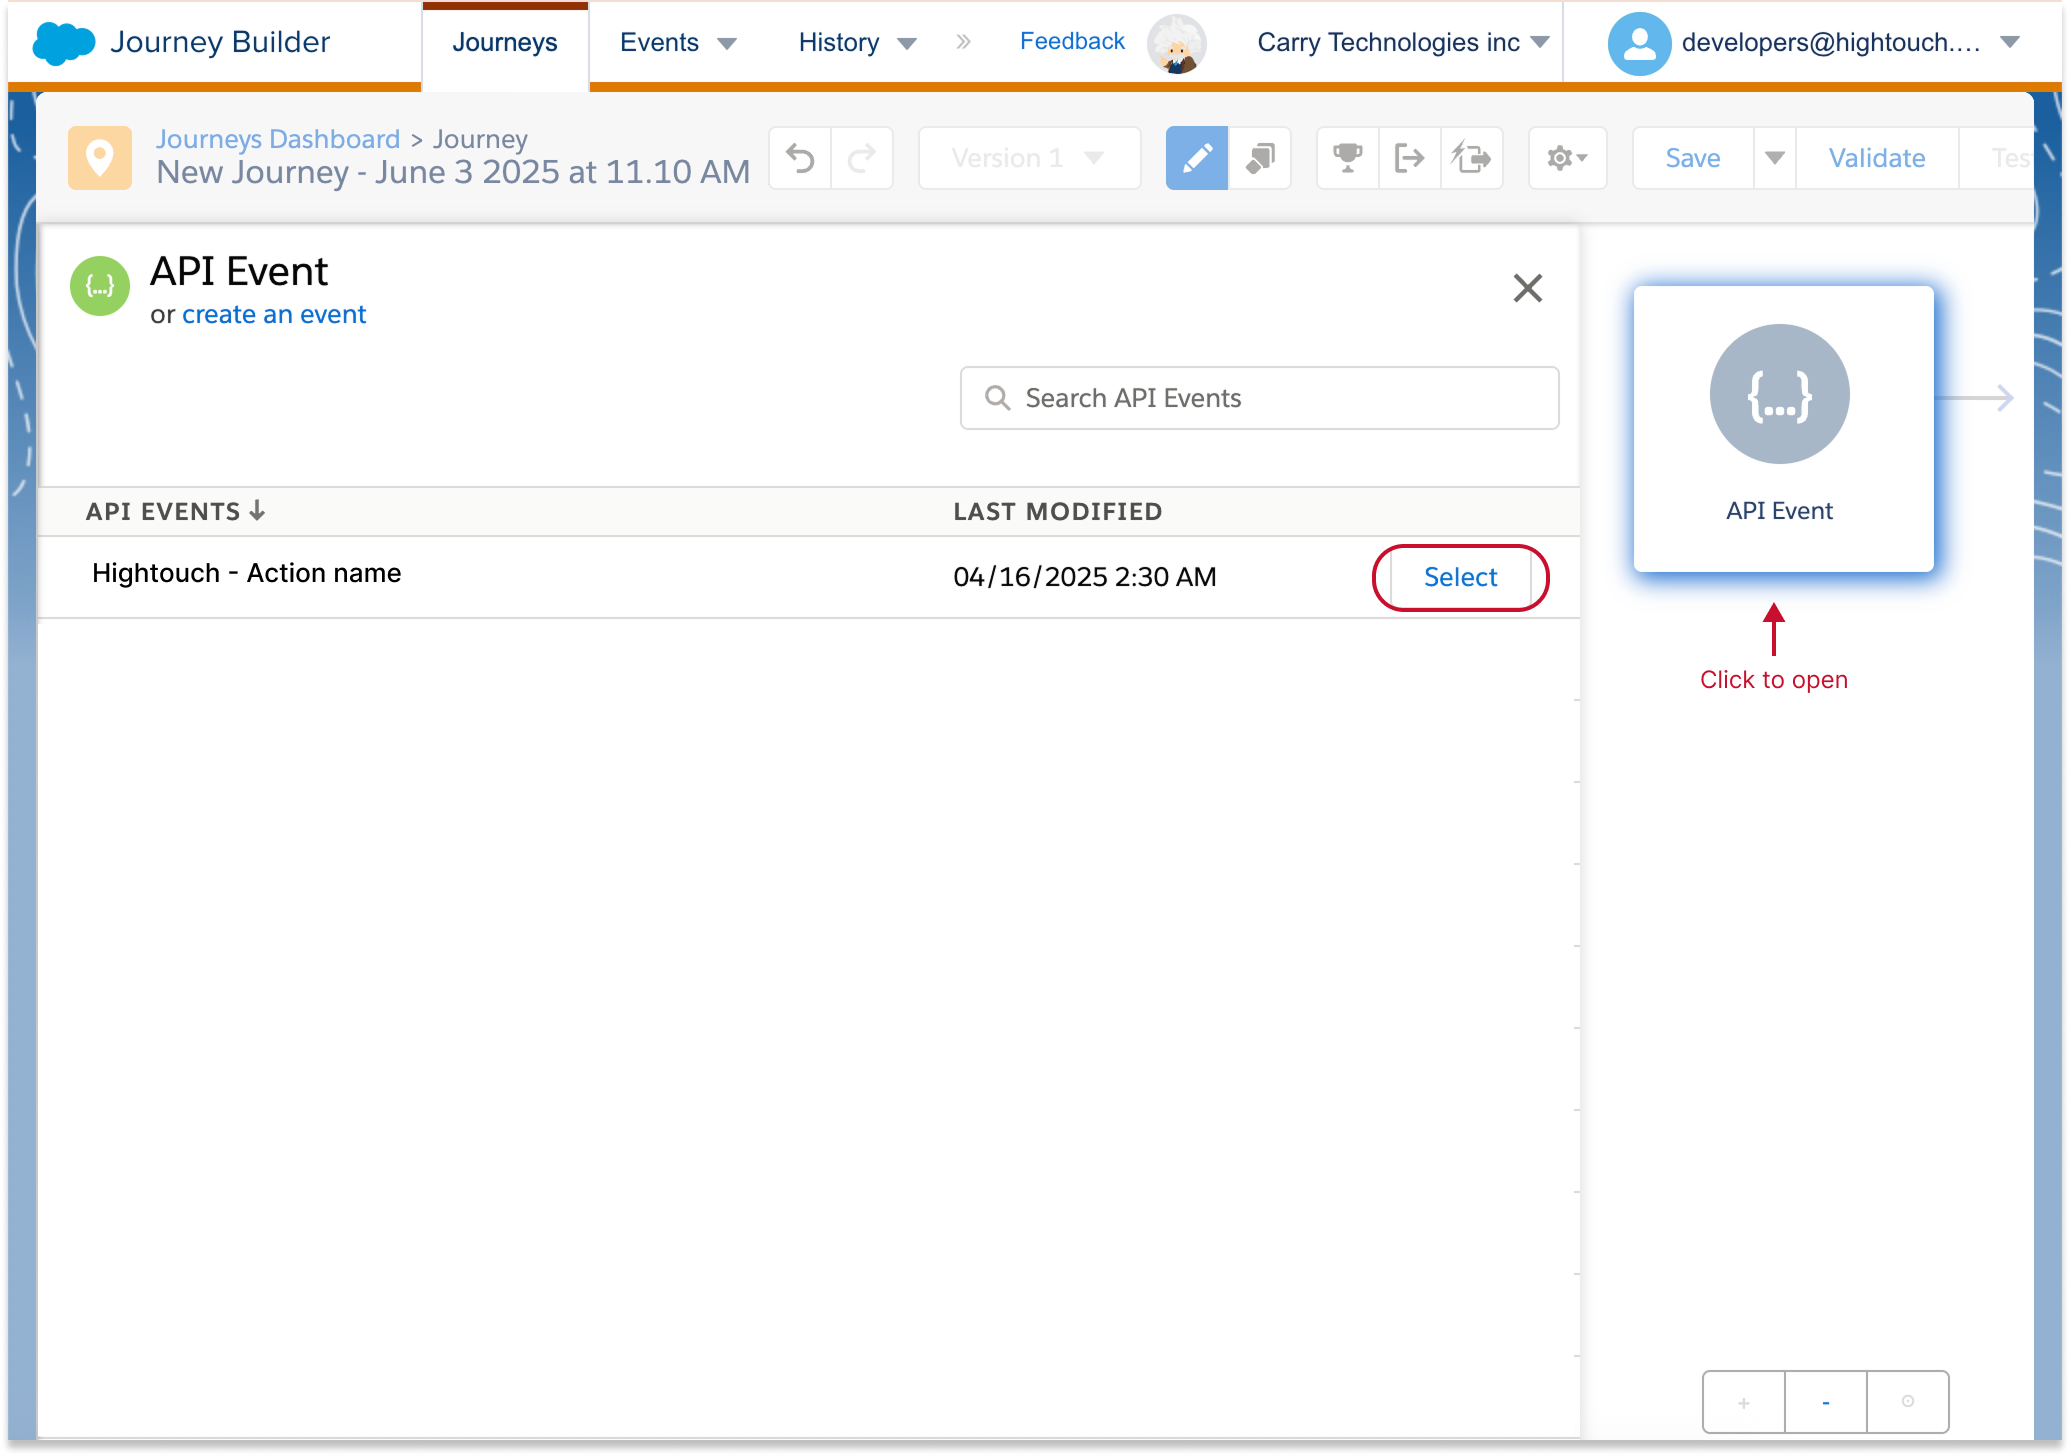
Click the grey API Event icon in the Journey Builder. This will open a list of API Events.
-
Select the action name you chose in step 8 above.
-
Click done
-
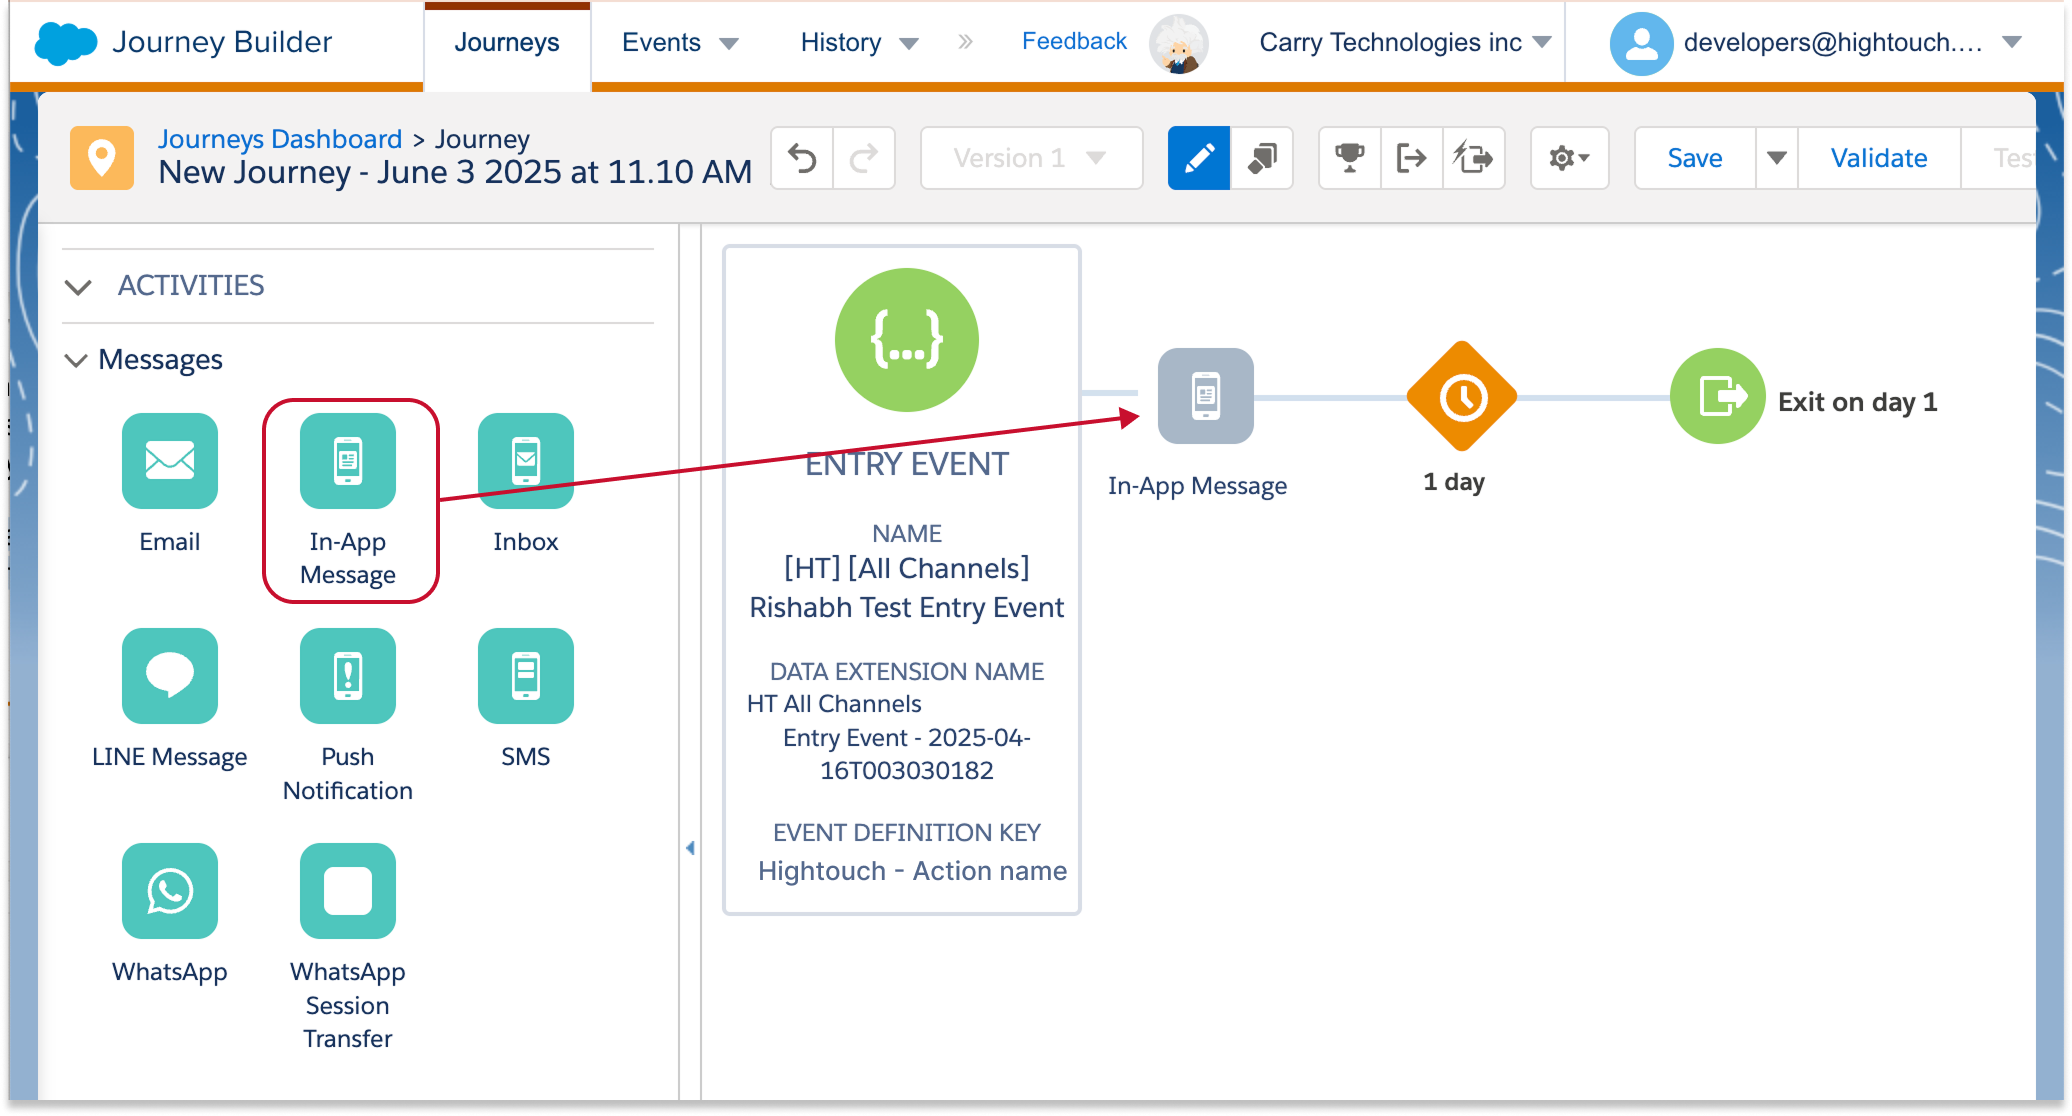
Next, drag In-App Message to the Journey Builder
-
Click the grey In-App Message icon in the Journey Builder
-
Select (or create) your desired in-app message template
-
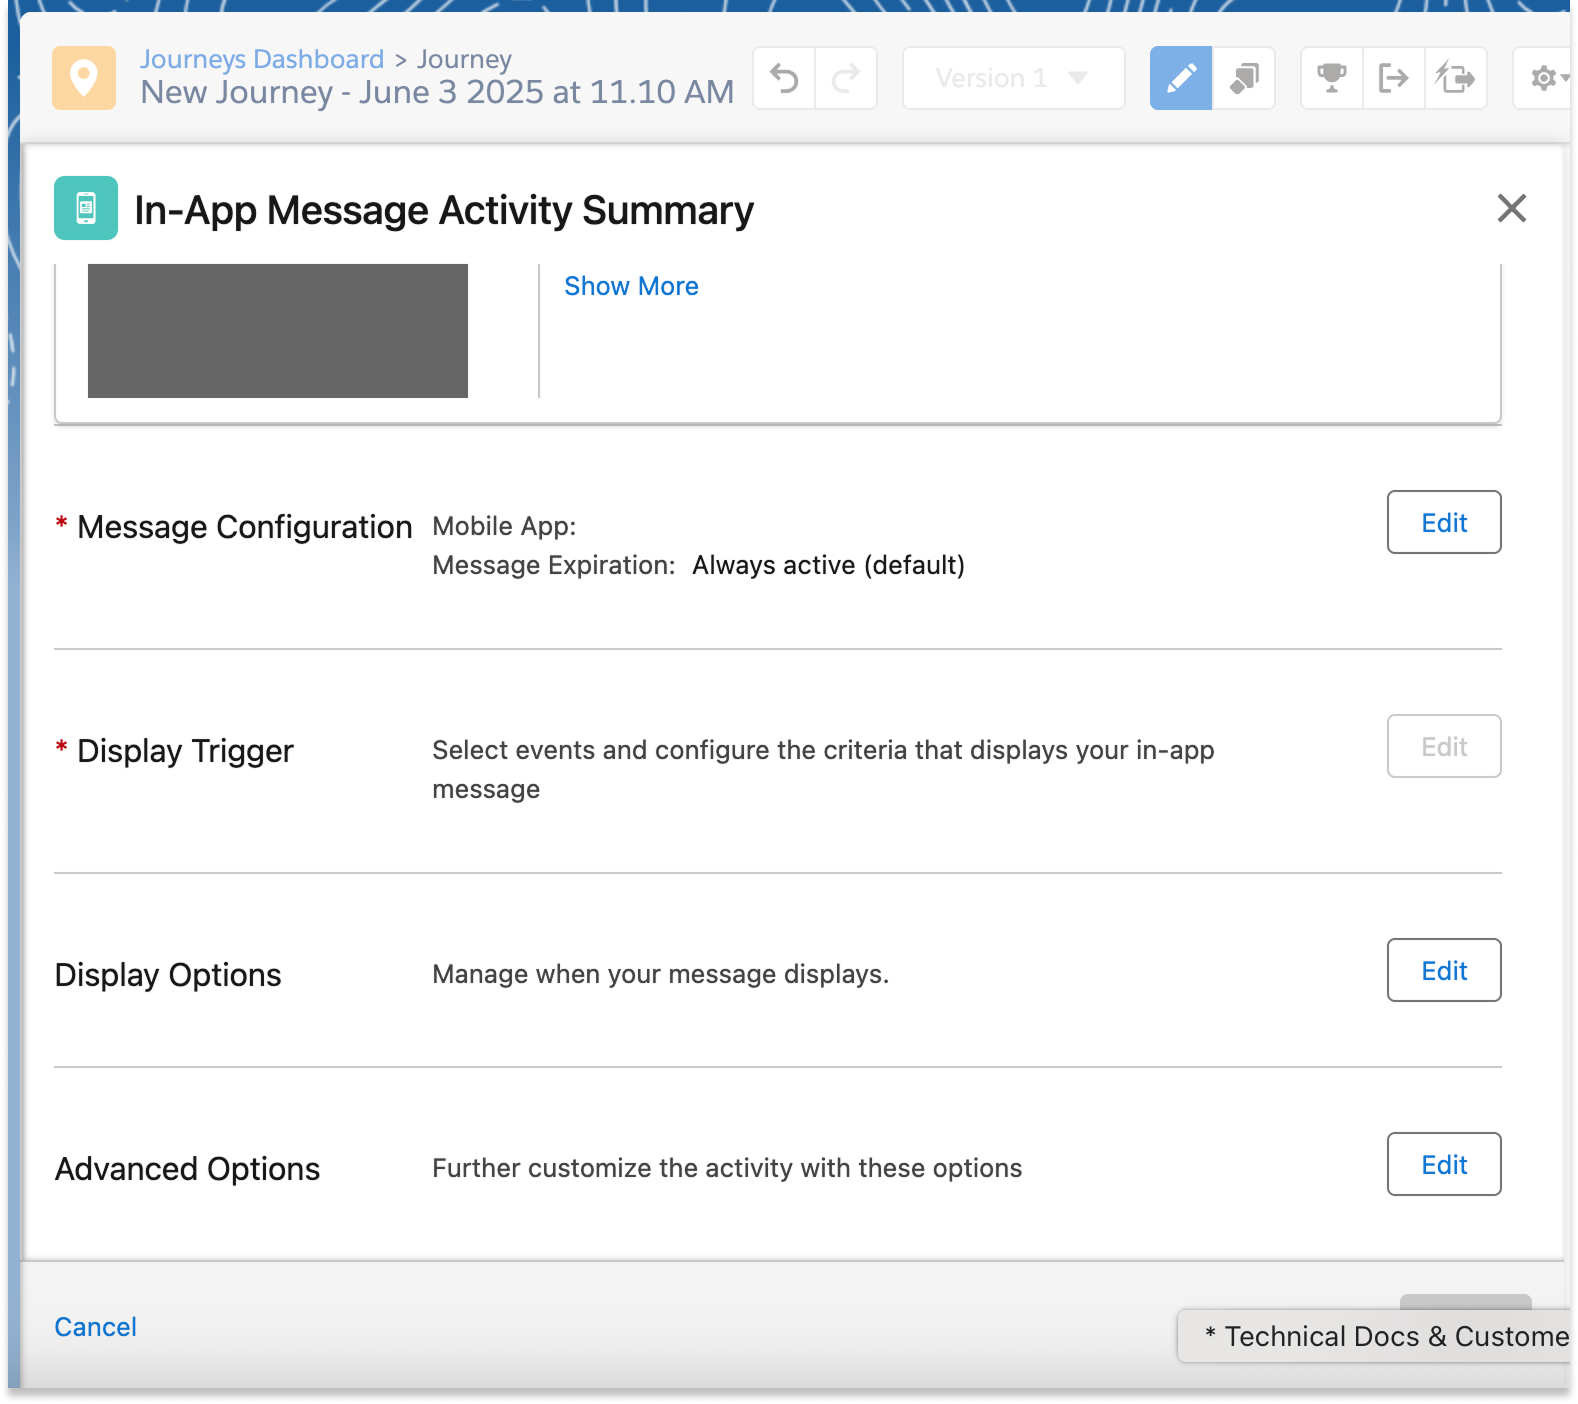
In the In-App Message Activity Summary, edit the required settings for Message Configuration and Display Trigger.
- Optionally, you may configure Display Options, and Advanced Options as desired. See SFMC documentation for more details
- Optional: If you would like Hightouch to control aspects of the In-App Message, follow the instructions for using variables from Hightouch in SFMC templates.
- Paste the variable code snippets from Hightouch into SFMC:
- Select a message in Message Definition
- Click Edit Selected Message
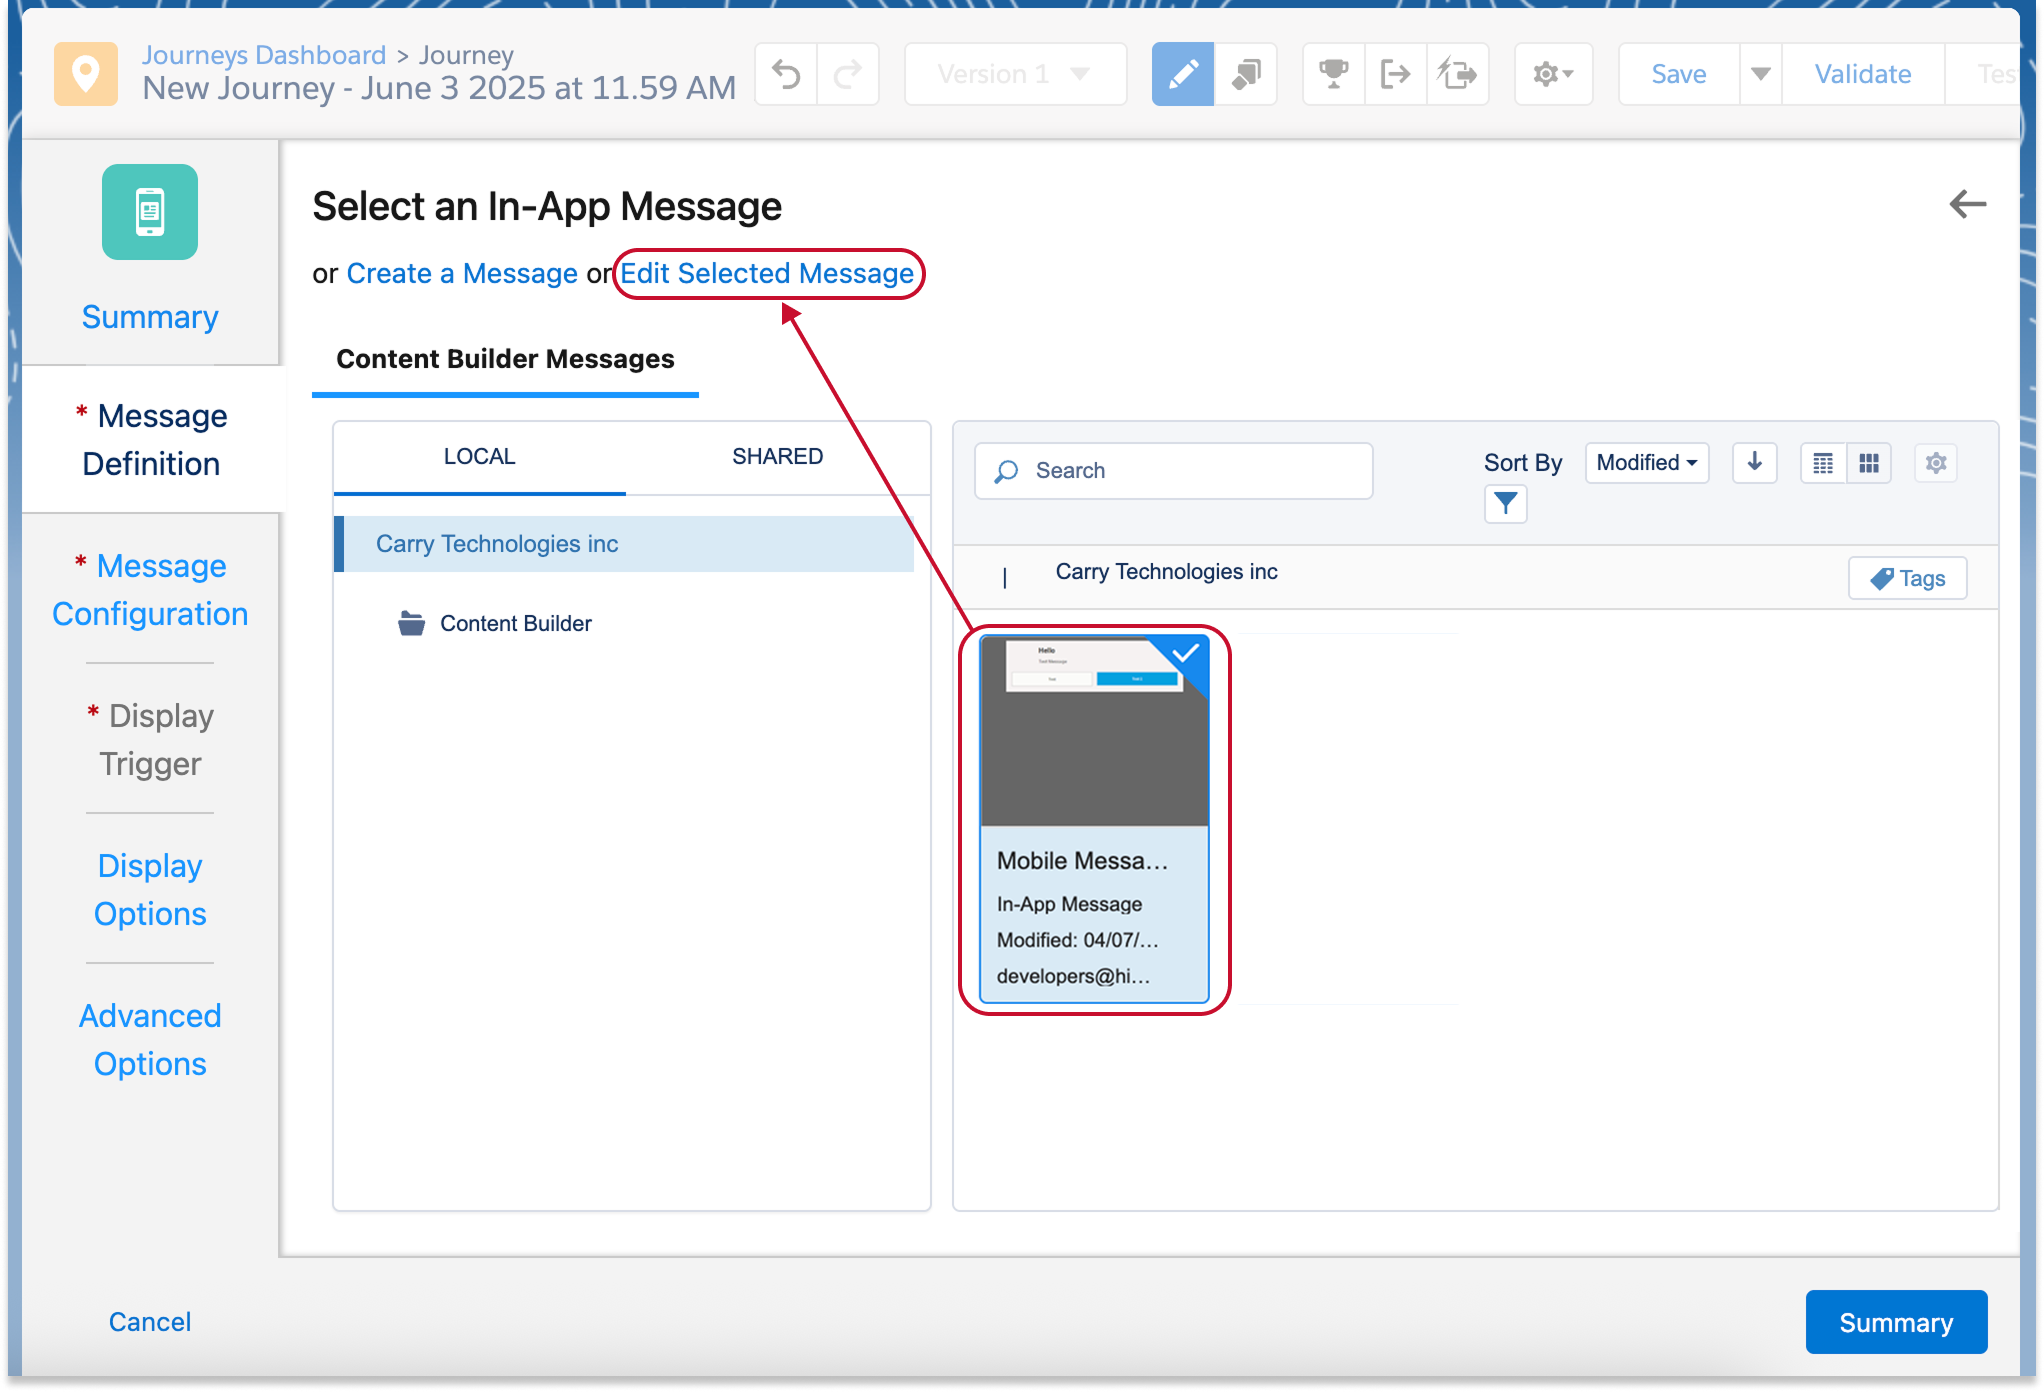
- Paste the copied code snippets from Hightouch into the Content tab that opens
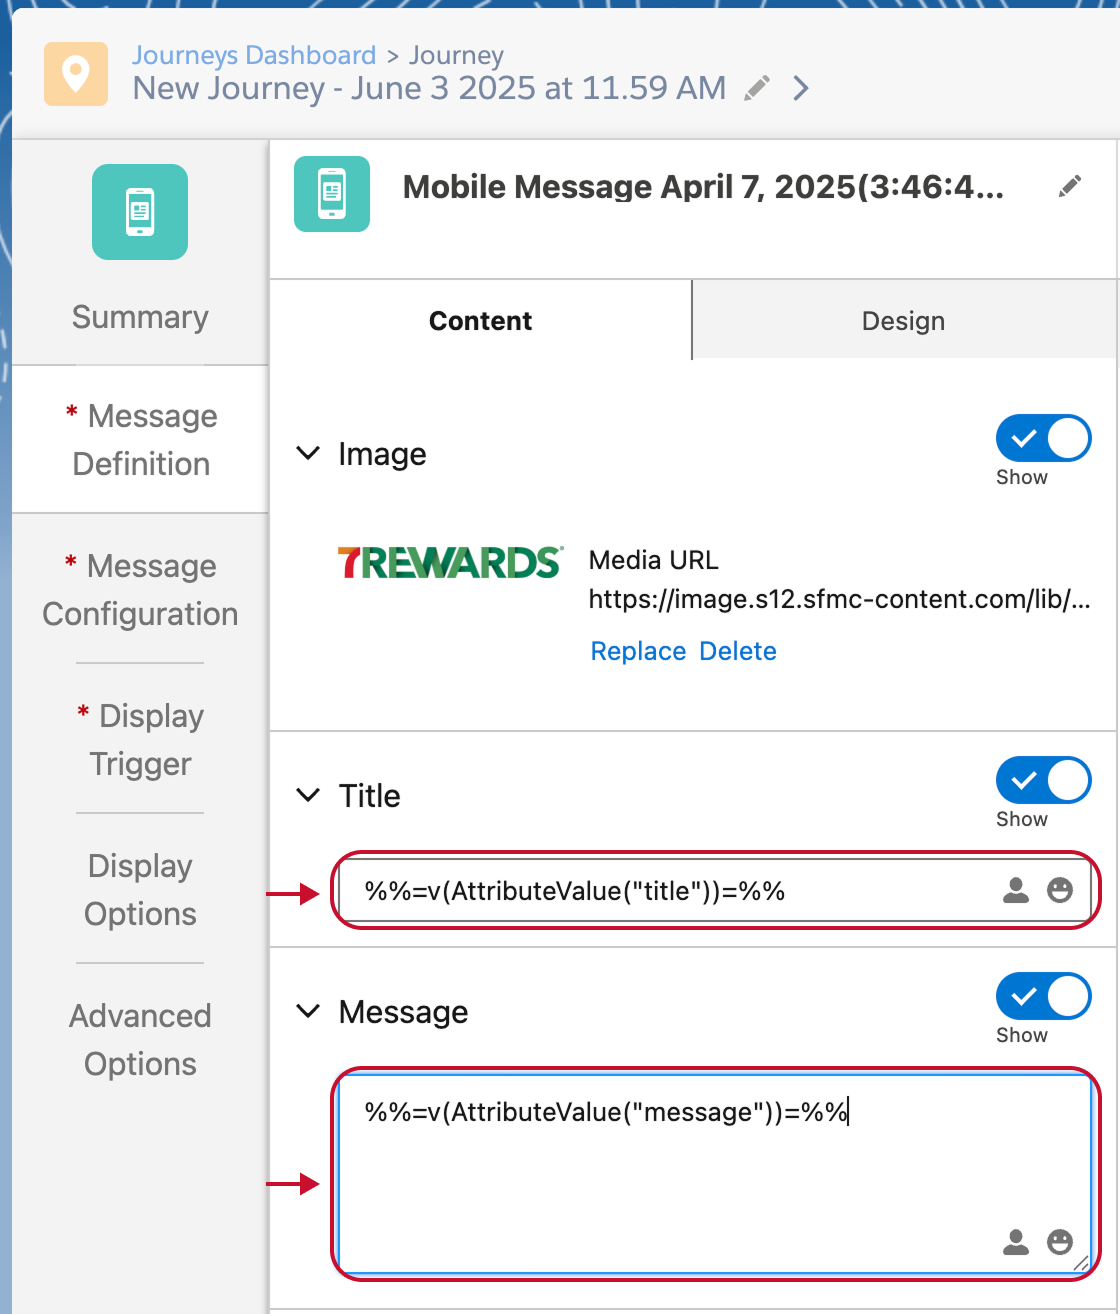
-
Save your changes
-
Optional: If you would like to continuously test the sends, make sure to click the Gear icon>Journey Settings and select re-entry any time
-
Activate your journey

In Hightouch:
-
Return to Hightouch and refresh the Content tab within your AID action.
-
Preview your content to ensure everything is accurate
-
You can now Send tests to subscribers

Use variables in SFMC
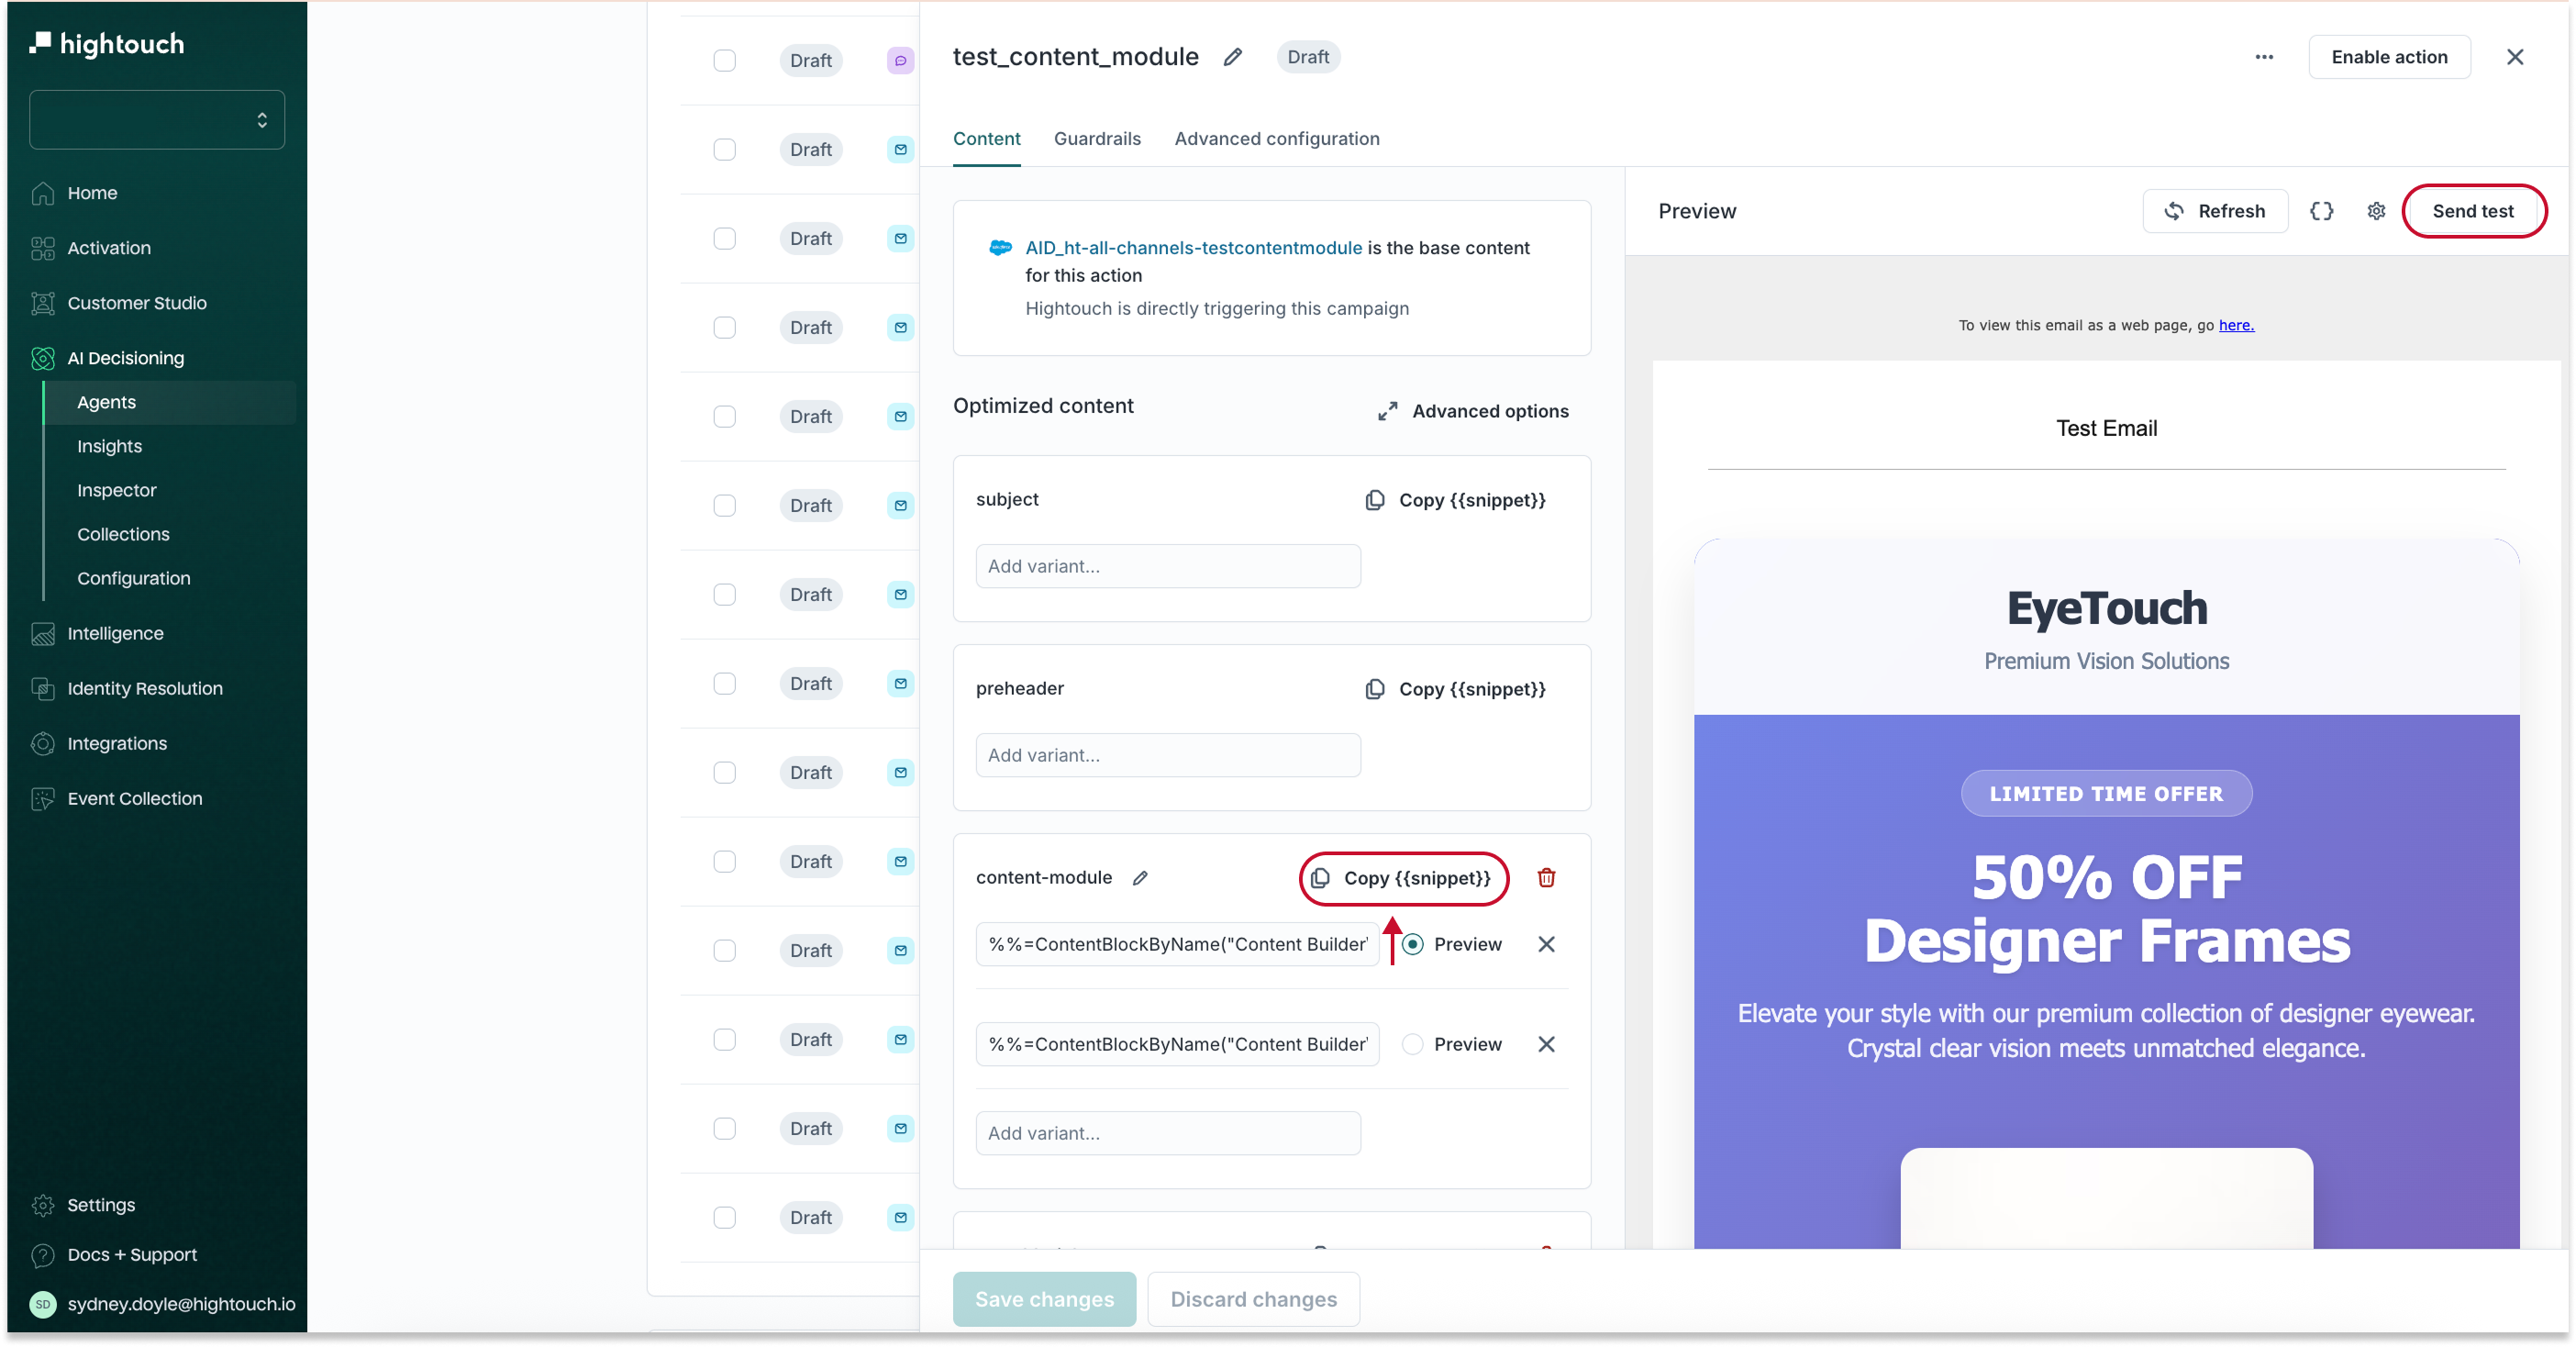
AID actions can output variables (e.g., product name, discount amount) that you use to personalize SFMC content.
Access and use variables
-
Open your action in Hightouch
-
Go to the Content tab
-
Click Copy
{{snippet}}on any variable to grab its code -
Paste the code into your SFMC template
These snippets will render with real values for each user when the message is sent.
