| Audience | Data or analytics engineers, platform admins, technical marketers |
| Prerequisites |
|
Schema setup is a one-time configuration that determines what data marketers can use in the Customer Studio audience builder. It defines models, relationships, and events that power audience filtering.
What you'll learn
After reading this article, you'll know how to:
- Create parent, related, and event models
- Define relationships and join keys across datasets
- Configure optional schema features like merge columns and sampling
- Structure schema so marketers can build audiences more easily
Overview
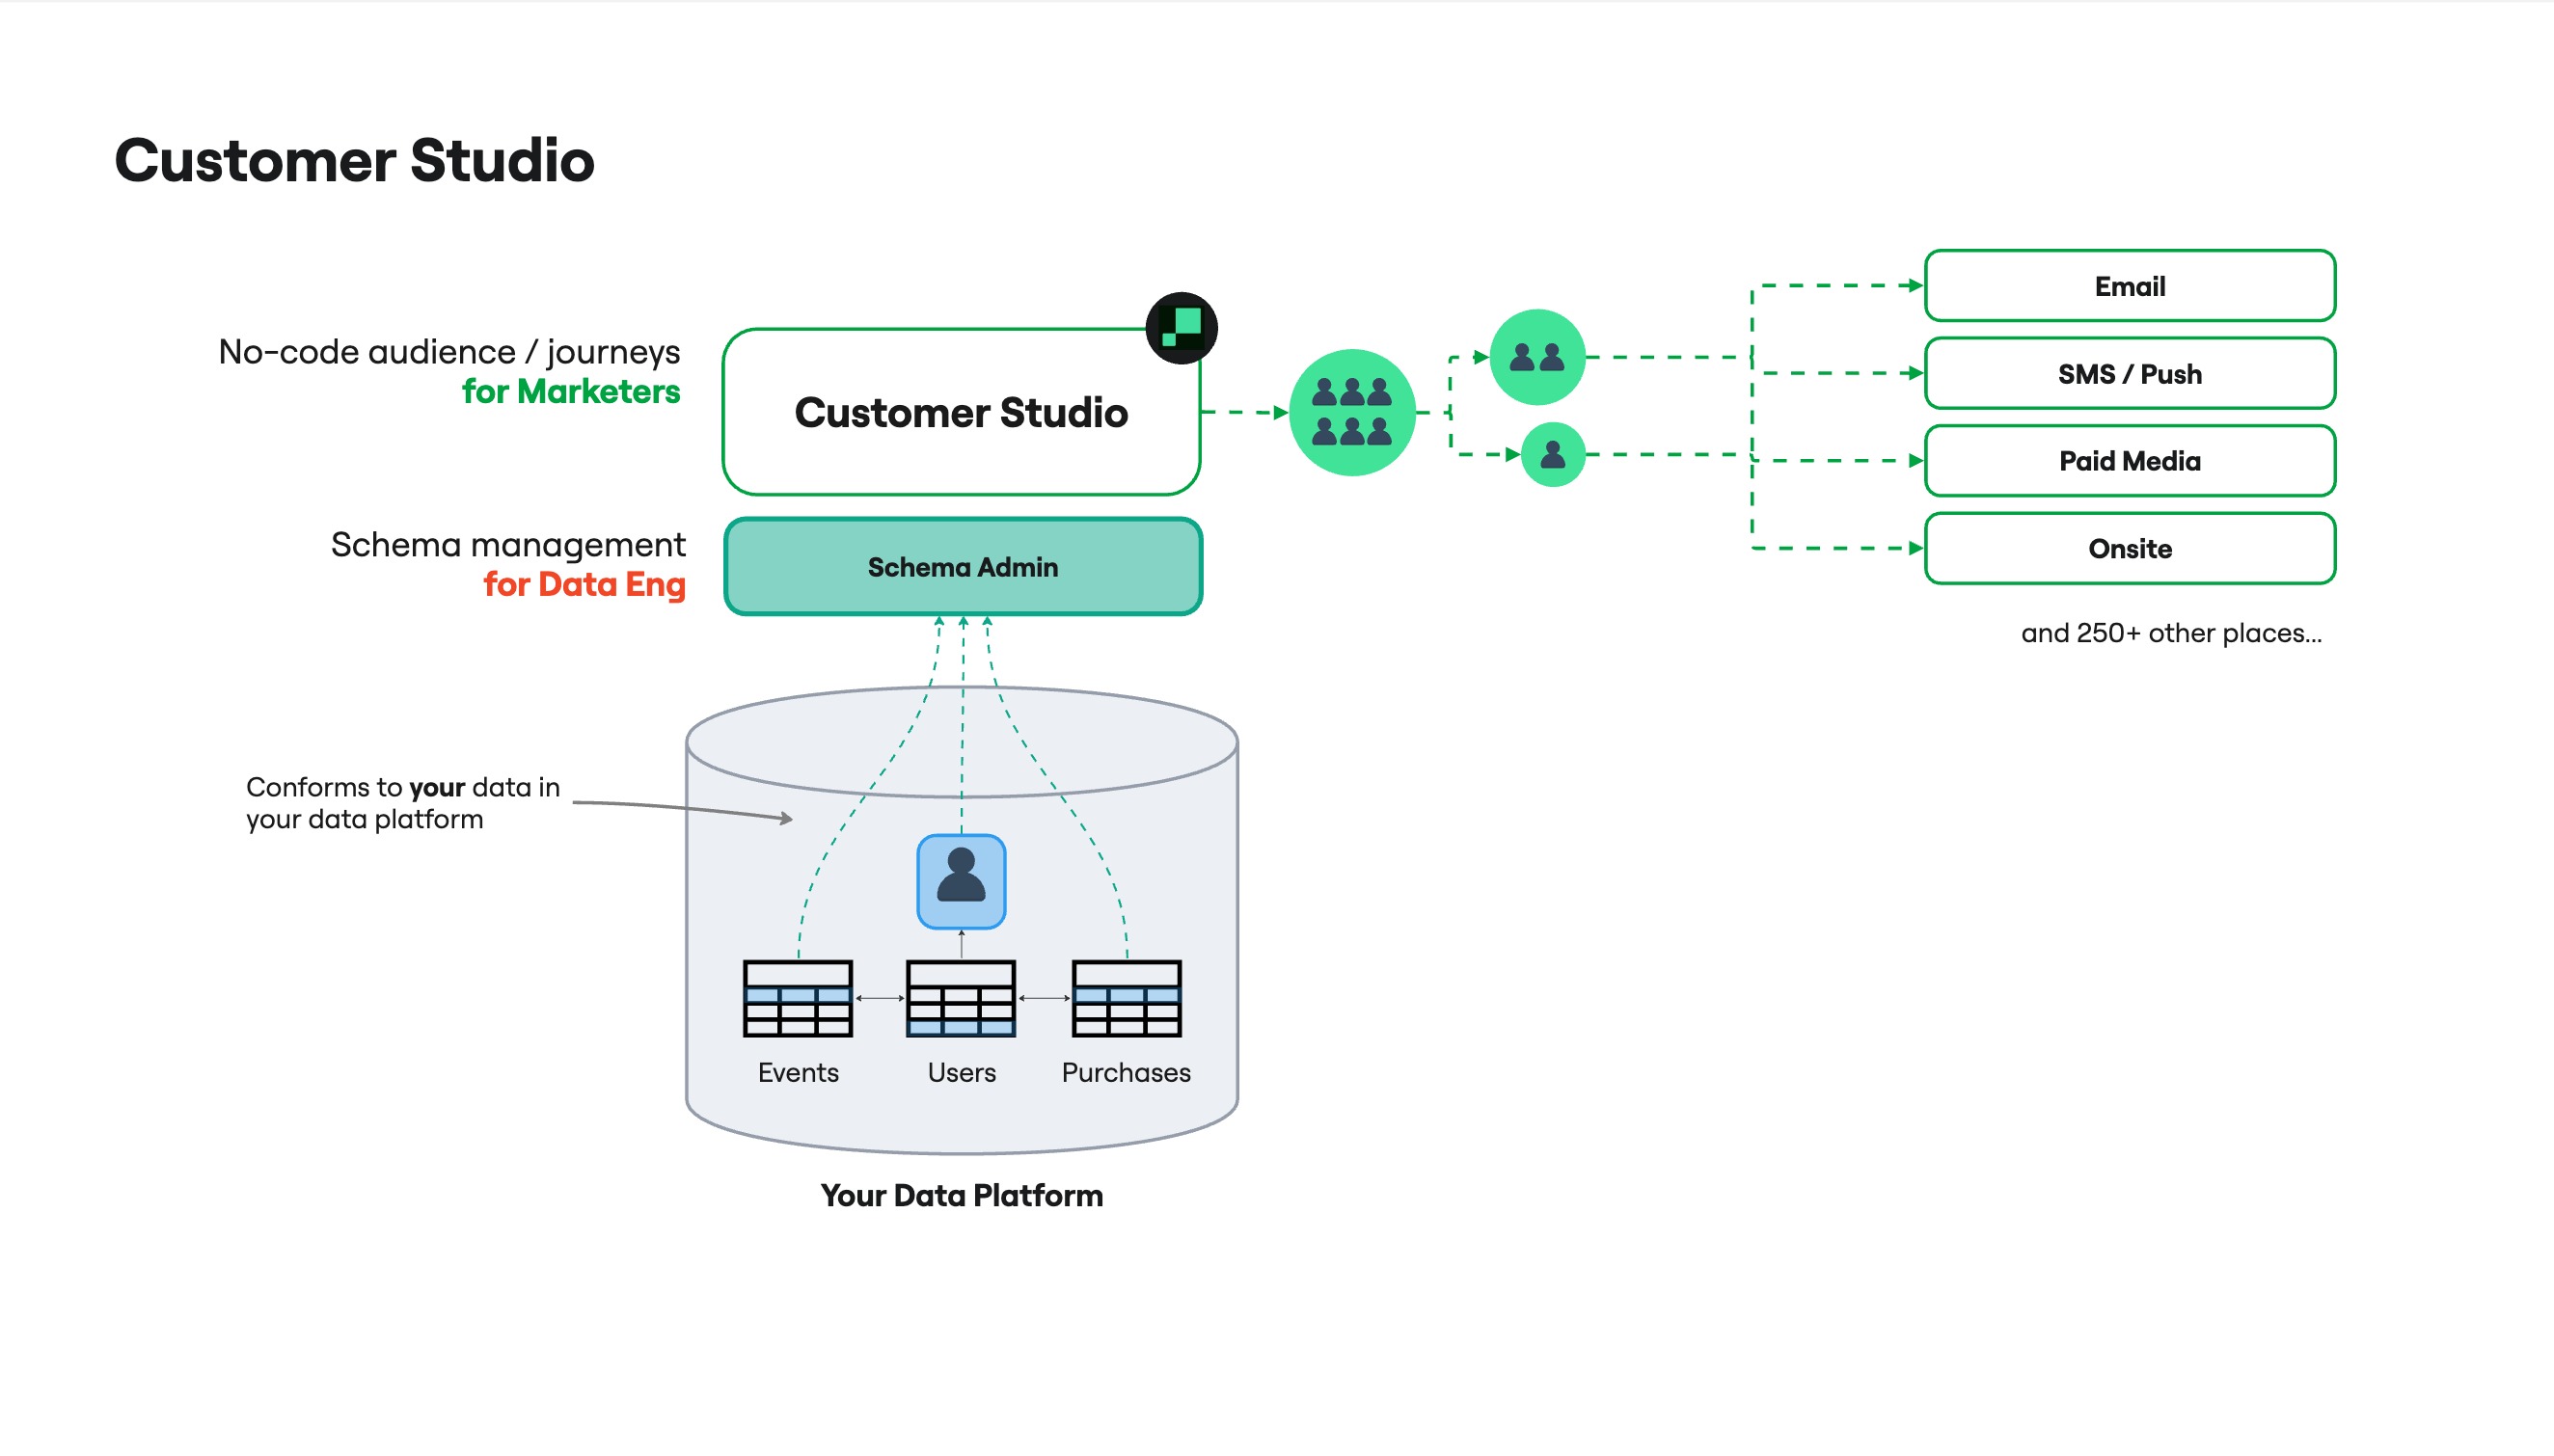
Before marketers can build audiences visually, data teams configure the schema in Customer Studio.
In Customer Studio, you’ll define:
- Parent model: The base entity audiences are built from (for example,
Users) - Related models: Additional context joined to the parent (for example,
Households) - Event models: Timestamped behaviors (for example,
Product Viewed)
Once configured, marketers can build audiences using warehouse data.
What is a data schema?
Imagine you run an online plant store. You want to target customers in the Midwest who recently bought a succulent.
To build this audience, Hightouch needs:
- Who your customers are (a
Userstable) - What they’ve done (a
Purchasestable)
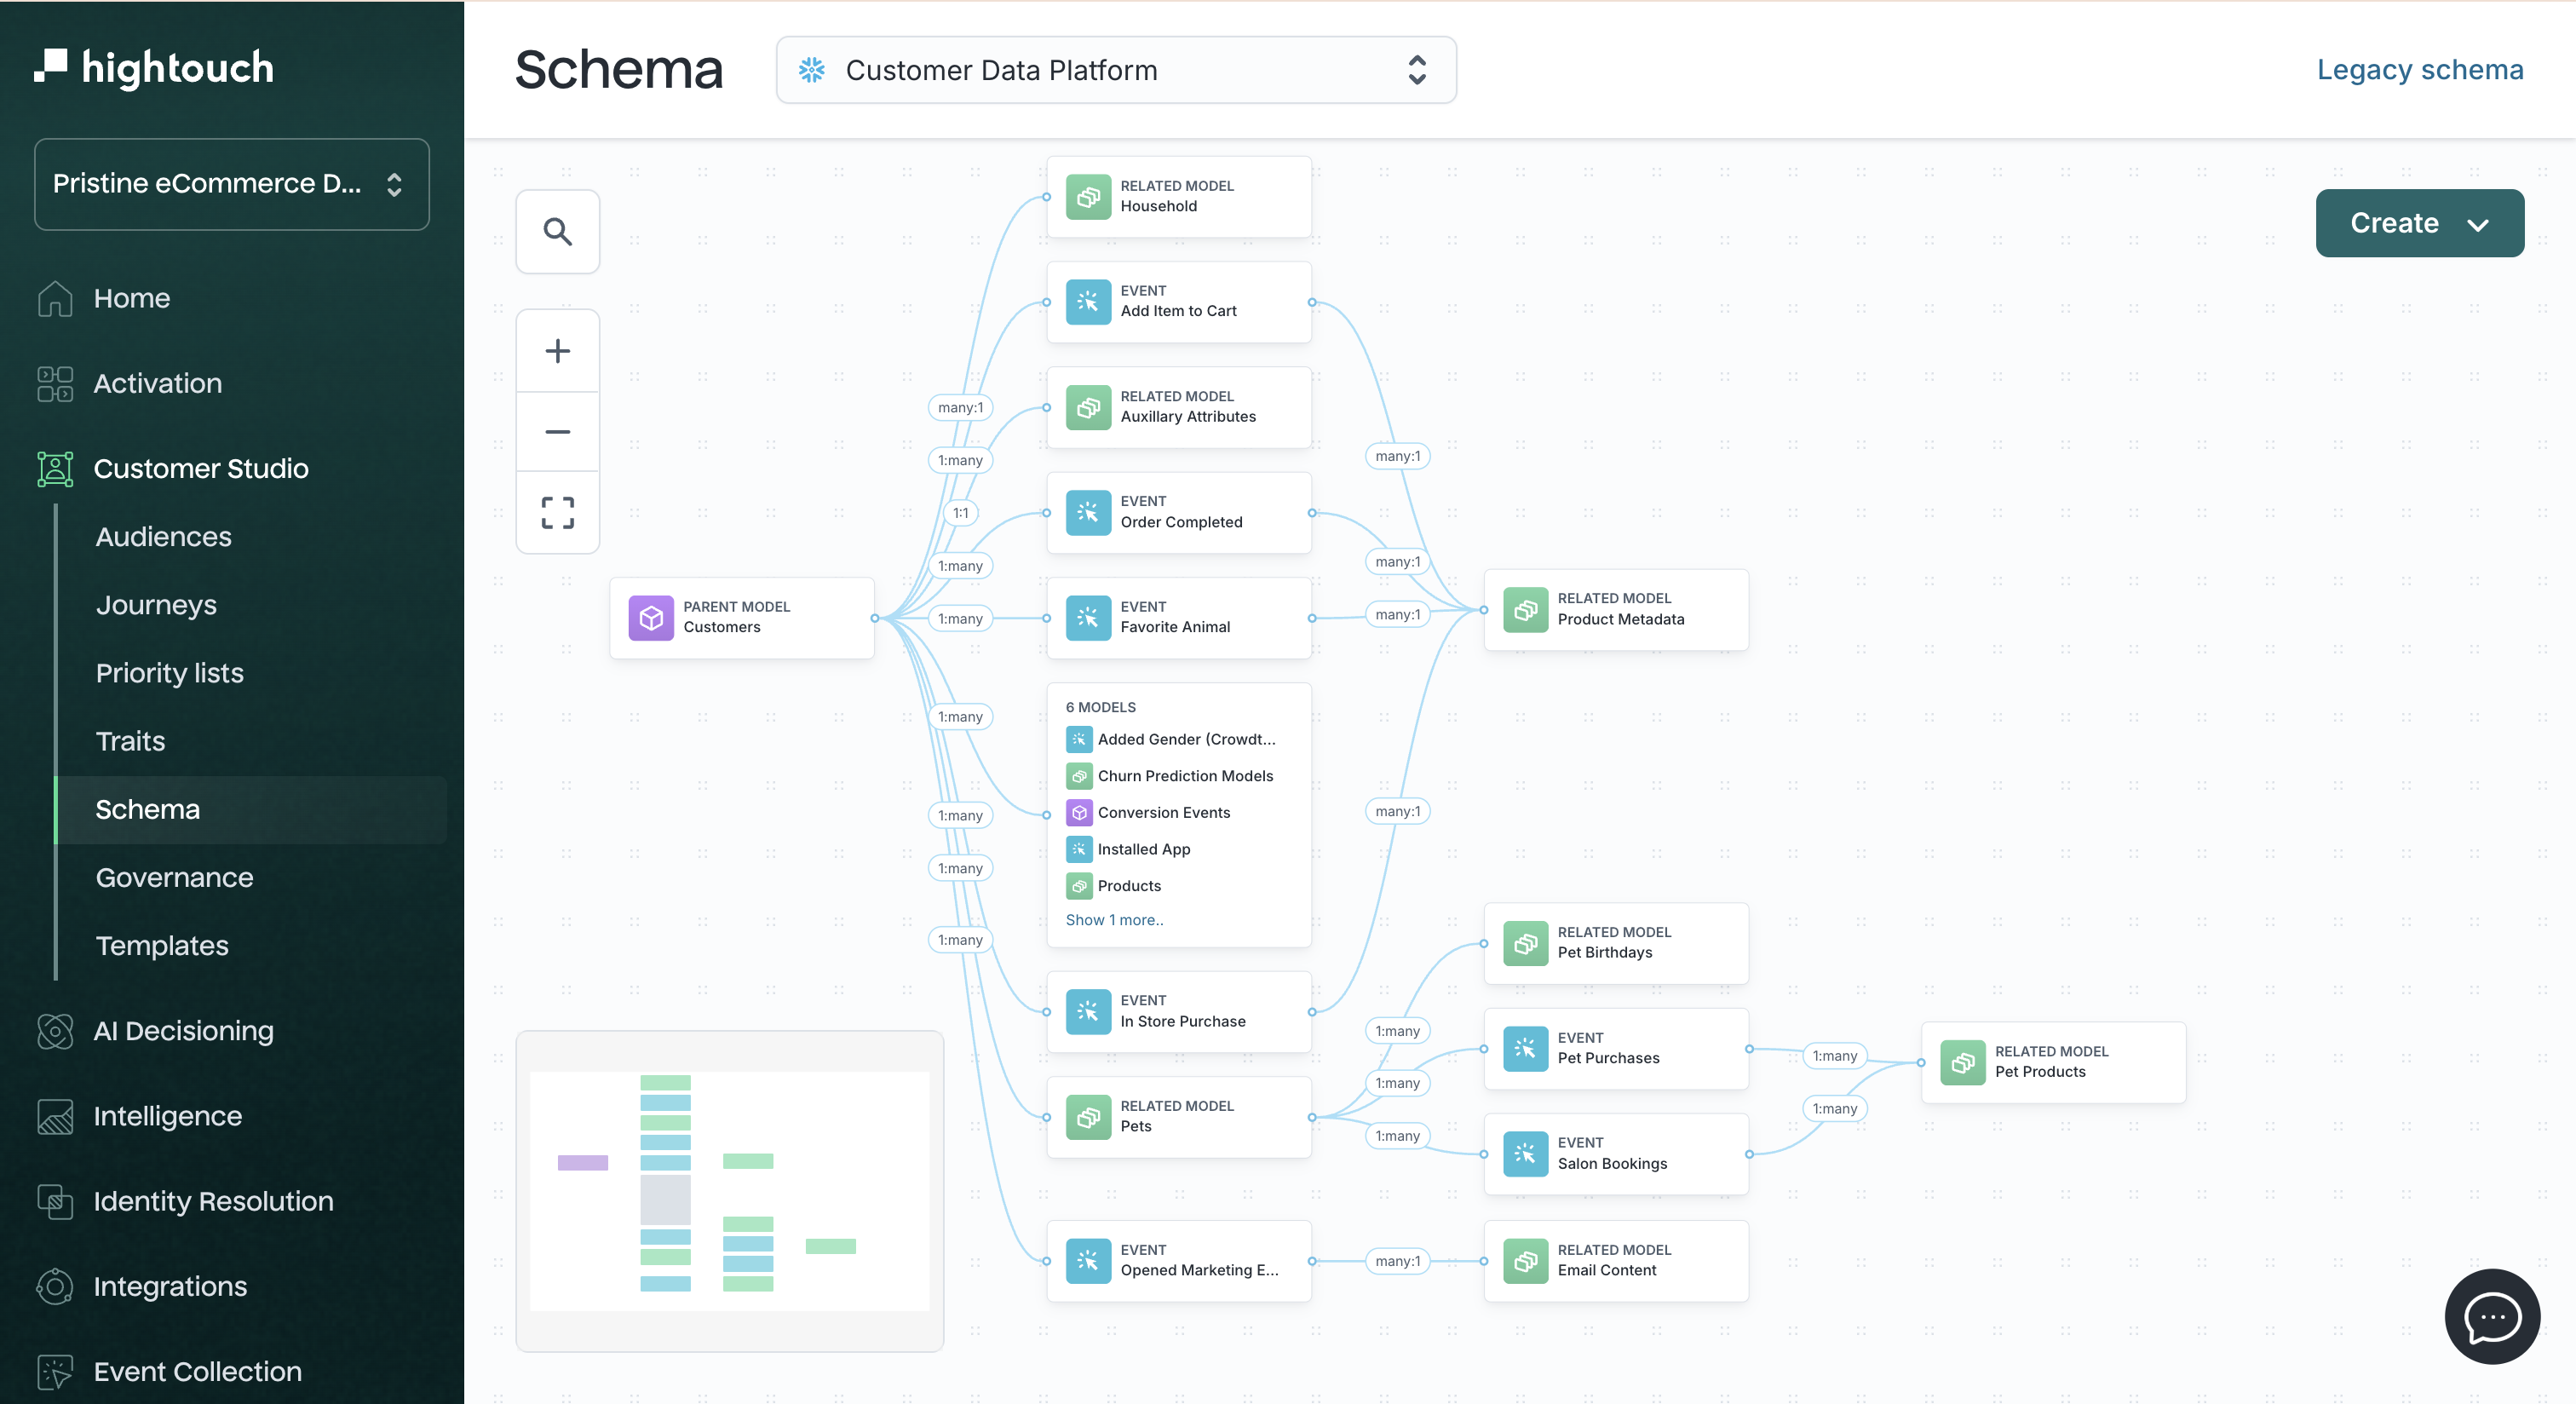
Together, these models and relationships form your data schema—a map of what marketers can filter on (for example, purchased succulents in the last 30 days) when building audiences.
Coordinate with business teams
Before building your schema, align with marketers or campaign owners on:
- Which entities they’ll target (for example, Users, Accounts)
- Which attributes or behaviors they want to filter on
- Whether real-time or batch syncs are part of their workflow
- How frequently audiences need to update
Use this input to decide:
- Which tables or views to expose
- Which relationships to define
- How to name models and columns clearly for business users
Schema design best practices
- Use clear, marketer-friendly names (avoid internal abbreviations)
- Keep the schema focused on fields that support targeting and analysis
- Start small (one parent model + a few related/event models), then expand over time
- Validate join keys early to avoid confusing audience results
Schema setup
1. Define the parent model
The parent model is the core dataset for audience building--most commonly a Users table, but it could also be Accounts, Households, or Devices.
Requirements:
- One row per entity (for example, one row per user)
- A stable, unique primary key (for example,
user_id) - Fields useful for filtering (for example,
email,region,created_at)
Create a parent model
-
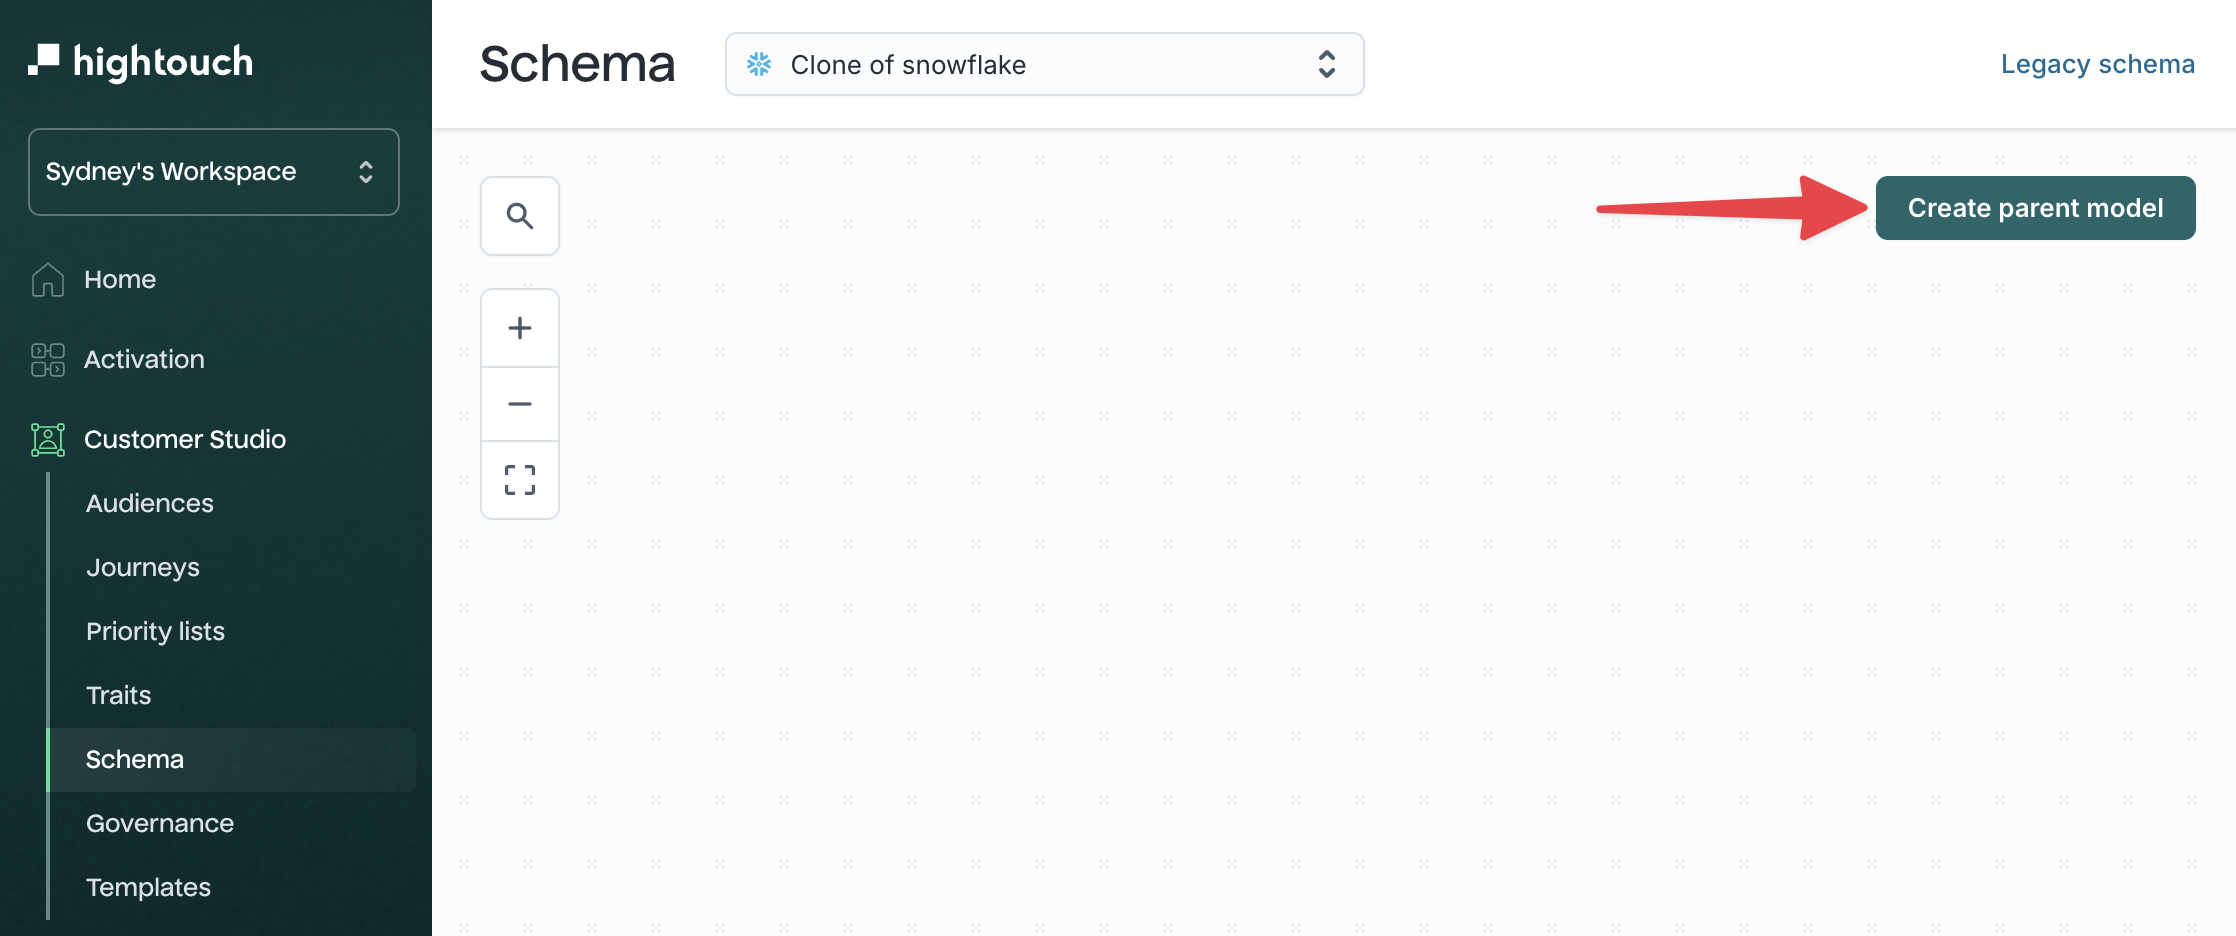
Go to Customer Studio → Schema.
-
Click Create parent model.
-
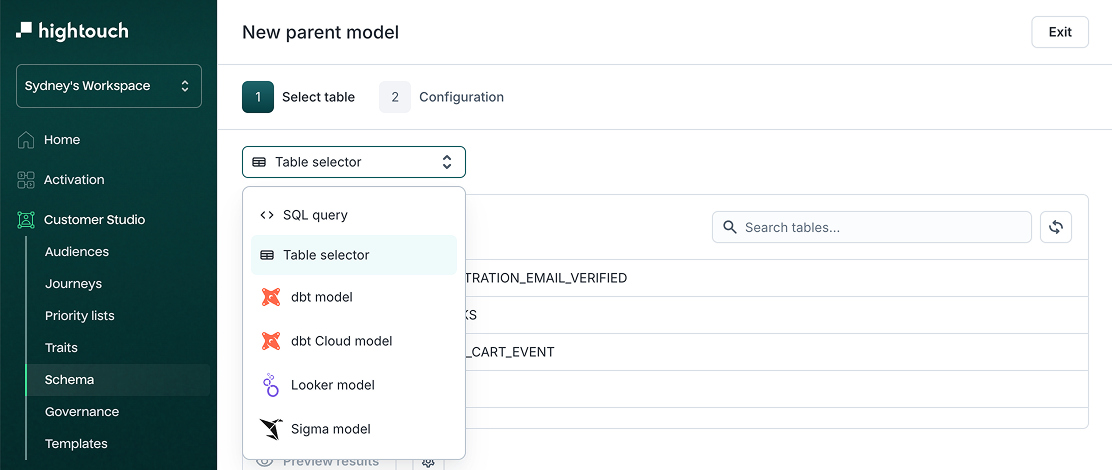
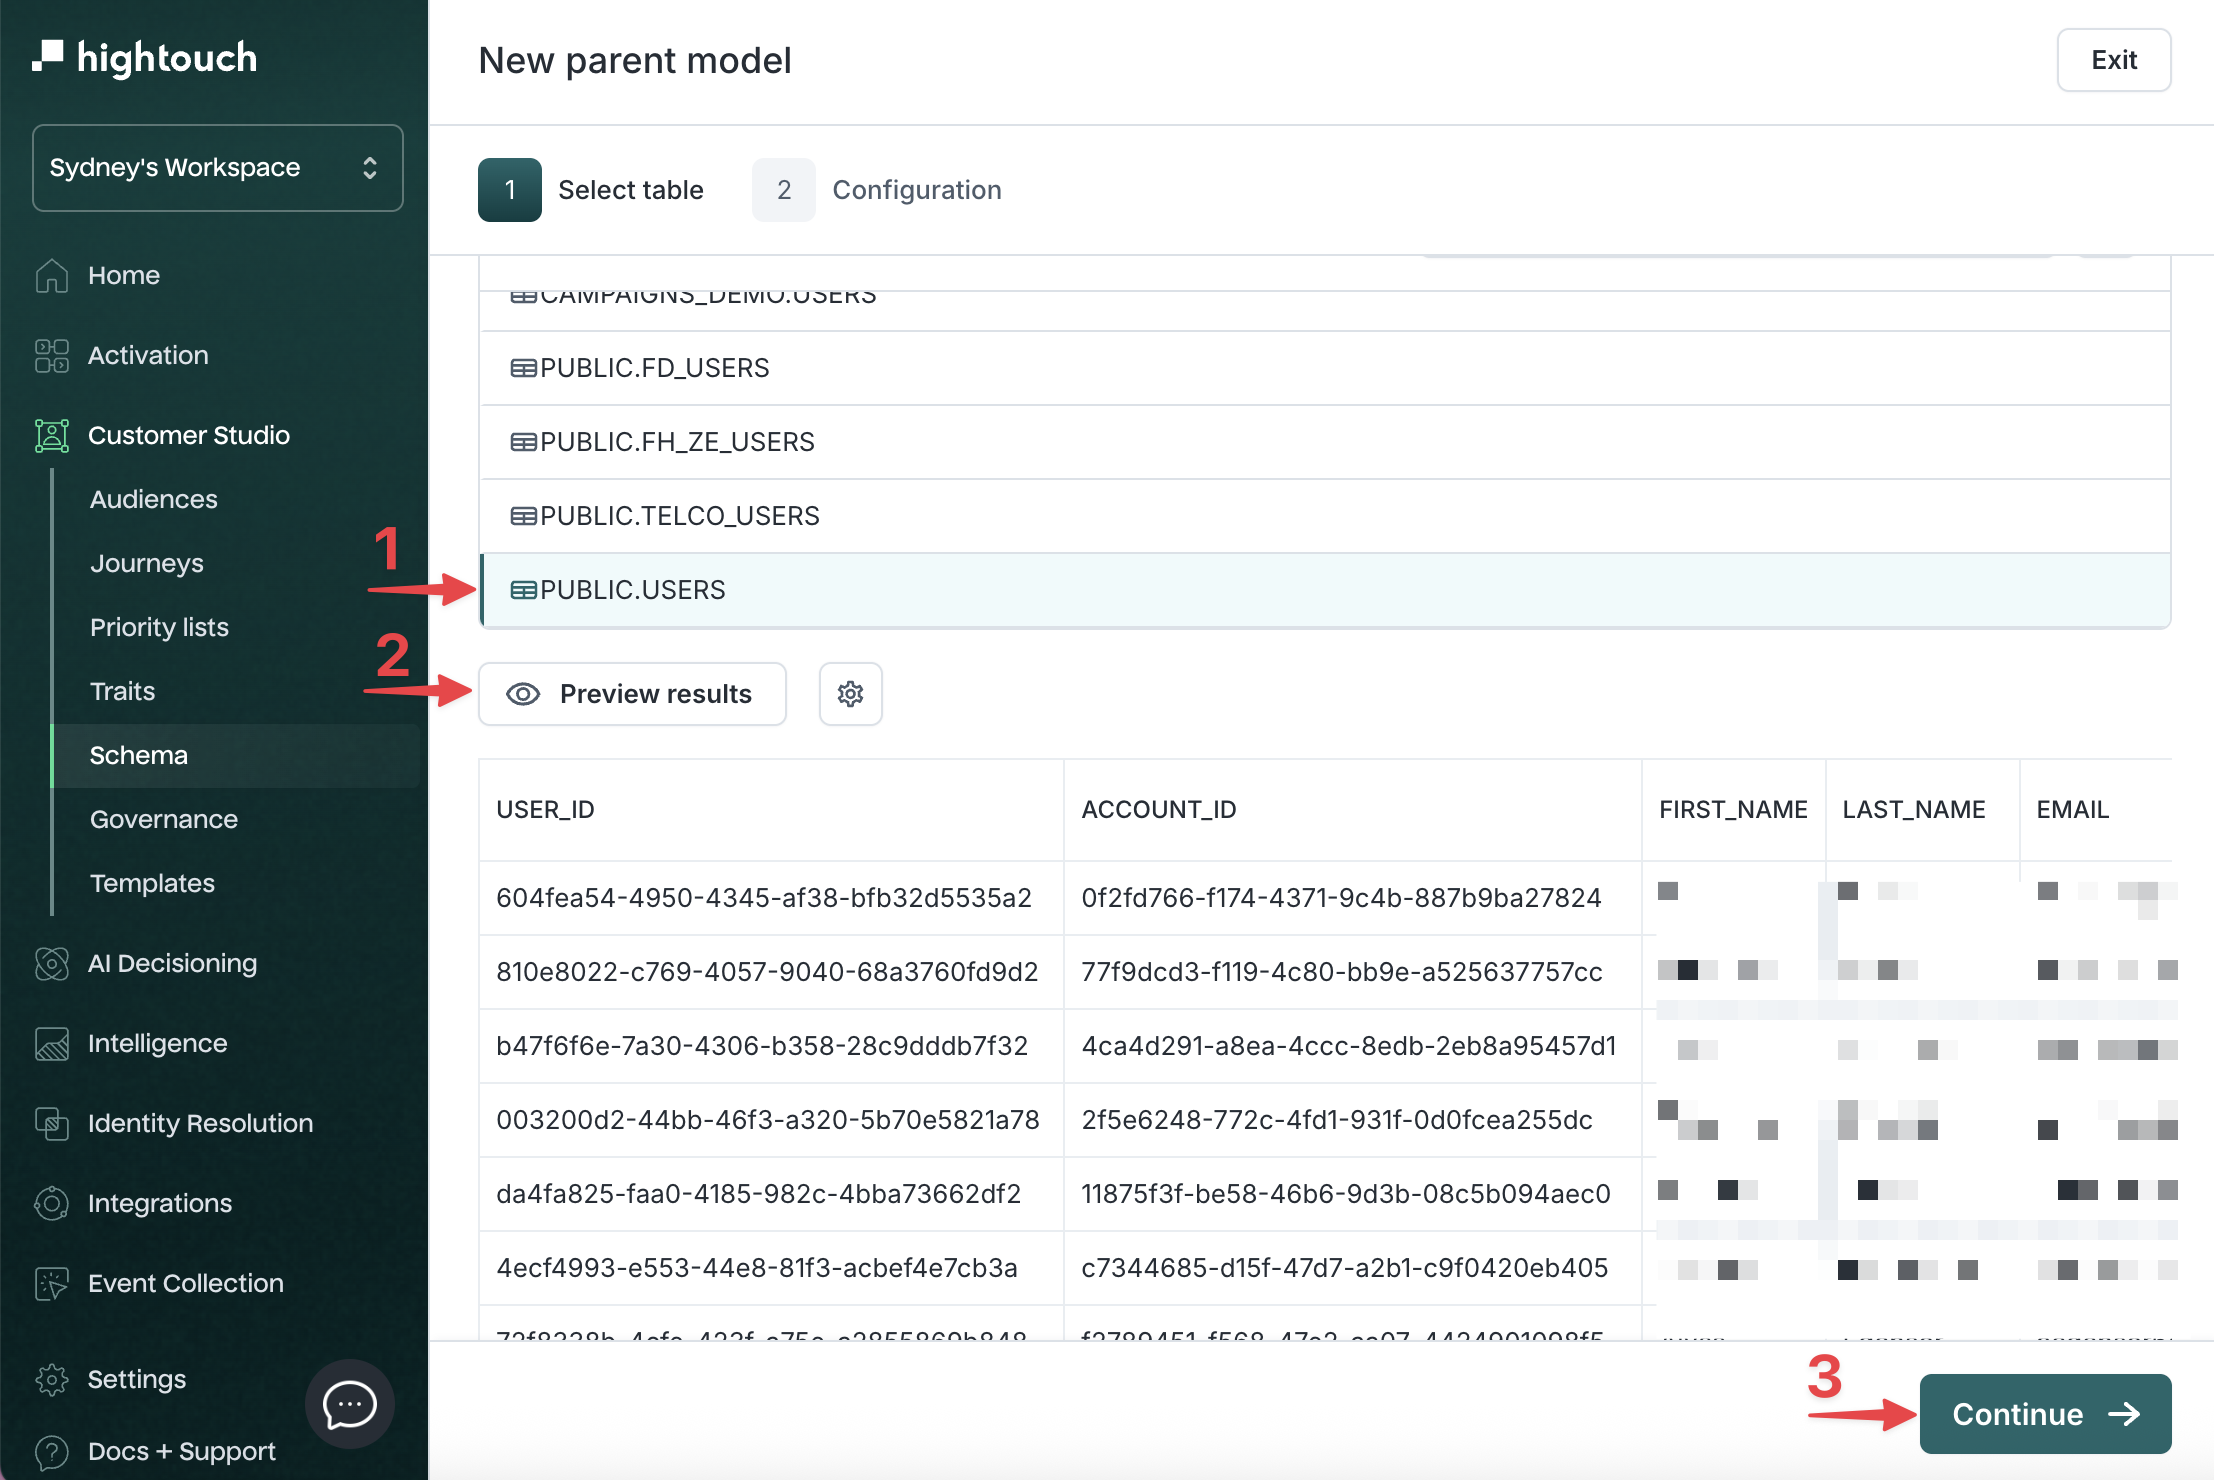
Select a modeling method:
- Table selector (default)
- SQL query
- dbt model
- dbt Cloud model
- Looker model
- Sigma model
-
Preview the results, then click Continue.
-
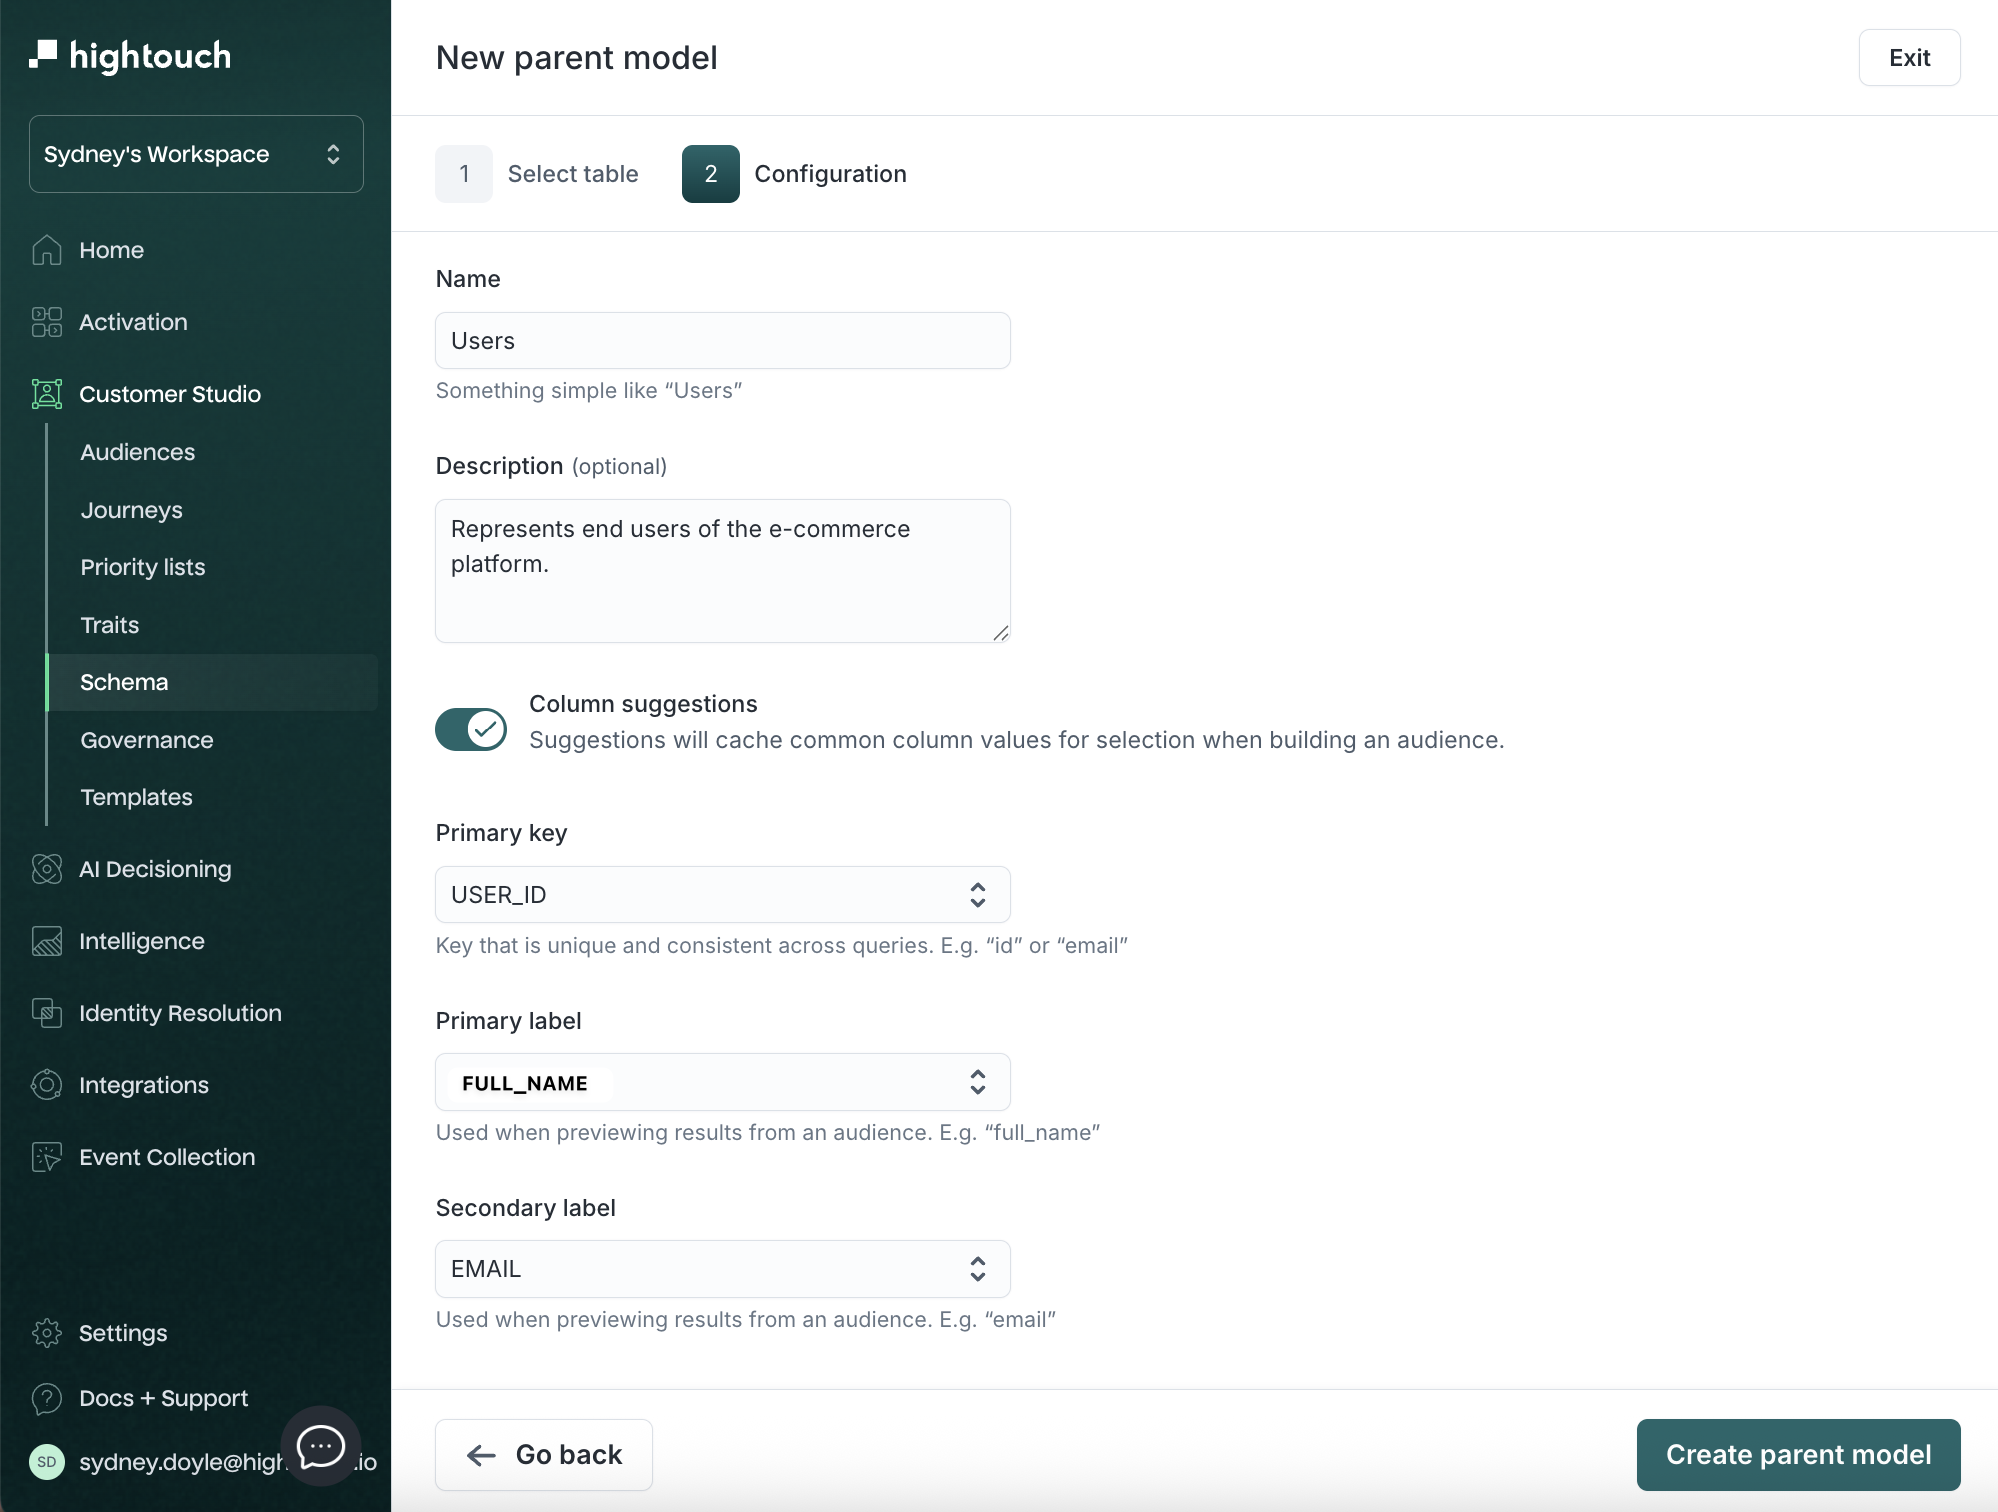
Configure the model:
| Field | Description | Example |
|---|---|---|
| Name | Display name in Customer Studio | Users |
| Description | Context for your team | Represents end users of the platform |
| Primary key | Unique ID column | user_id |
| Primary label | Display name in audience previews | full_name or email |
| Secondary label | Additional preview context | signup_date |
-
Click Create parent model.
2. Add related models
Related models join to the parent via a foreign key and provide additional filtering context—like purchases, subscriptions, or devices.
Examples:
- Households linked to People by
household_id - Subscriptions linked to Companies by
company_id
Create a related model
-
Go to Customer Studio → Schema.
-
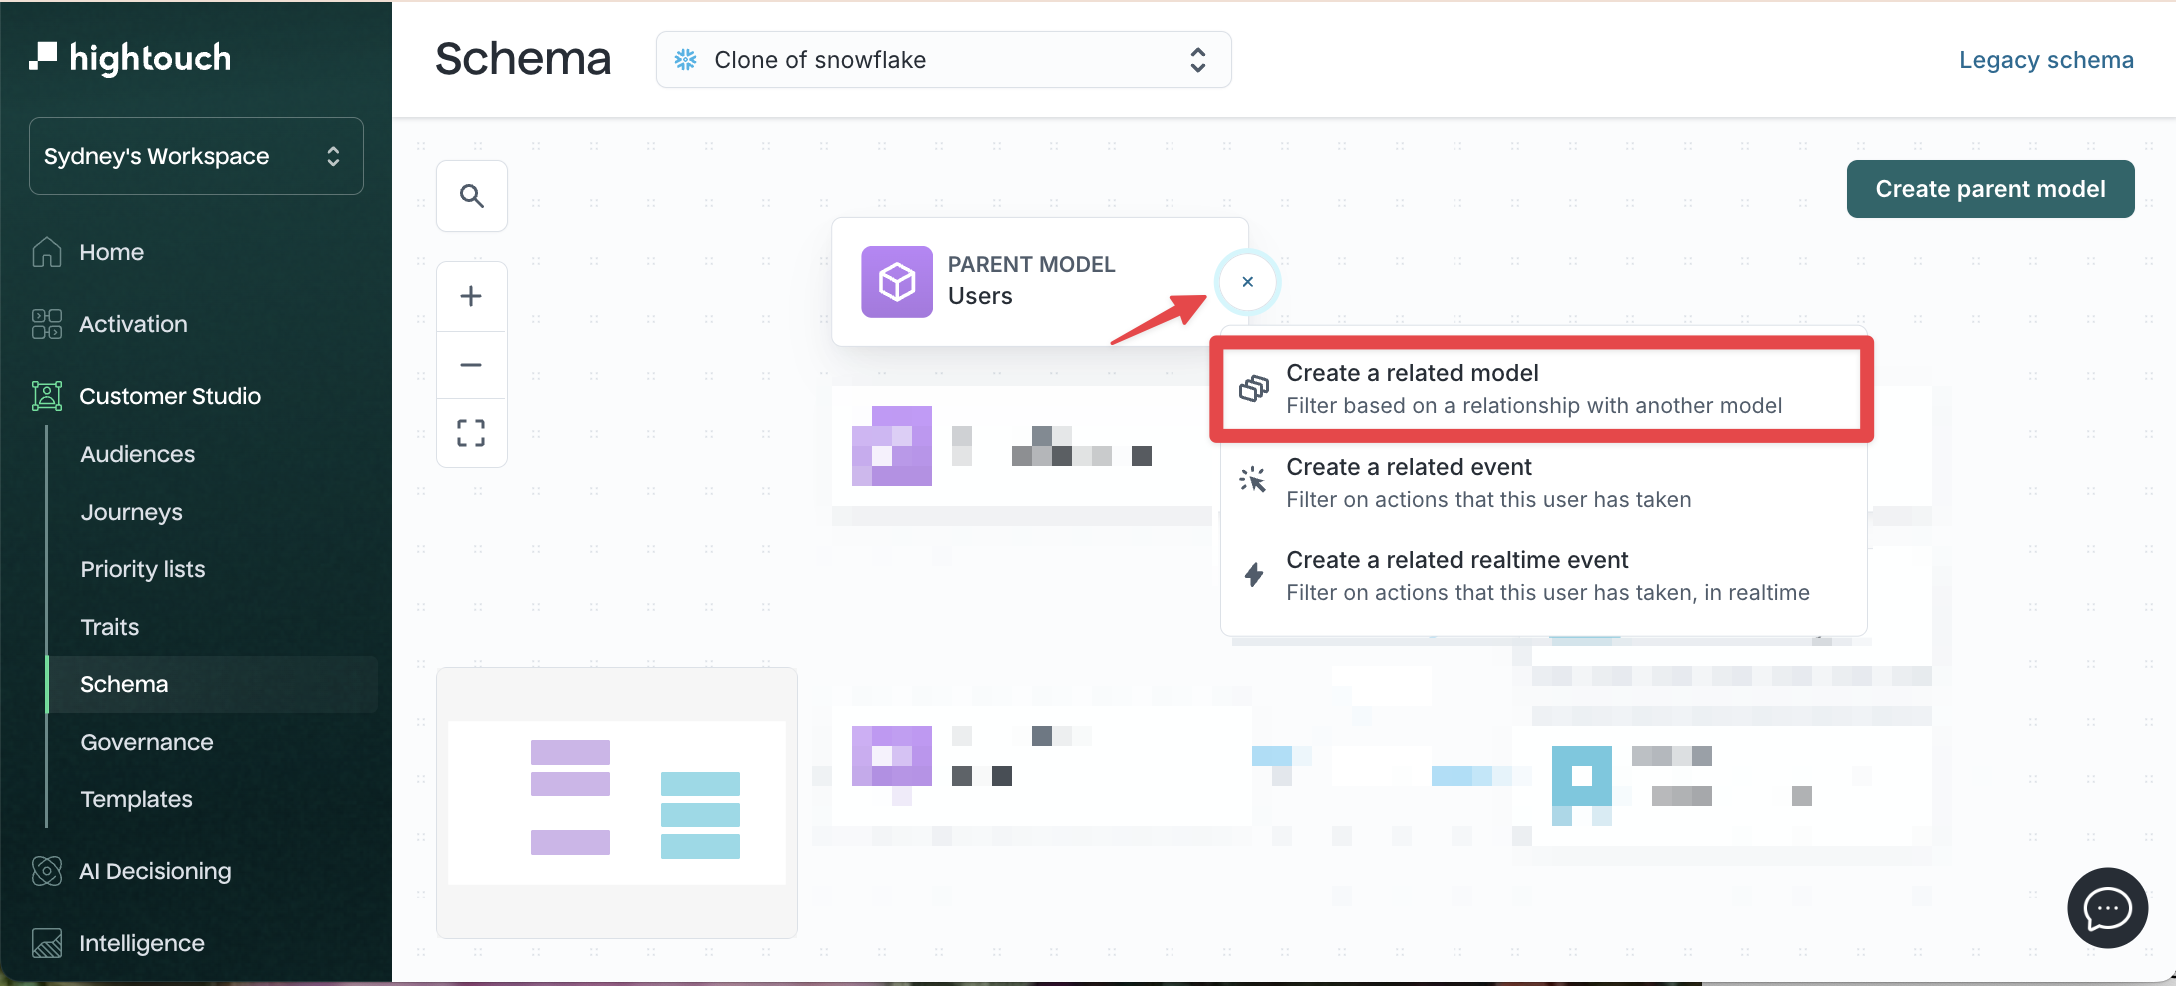
Click the + icon next to your parent model.
-
Select Create related model.
-
Choose your table or modeling method and preview results.
-
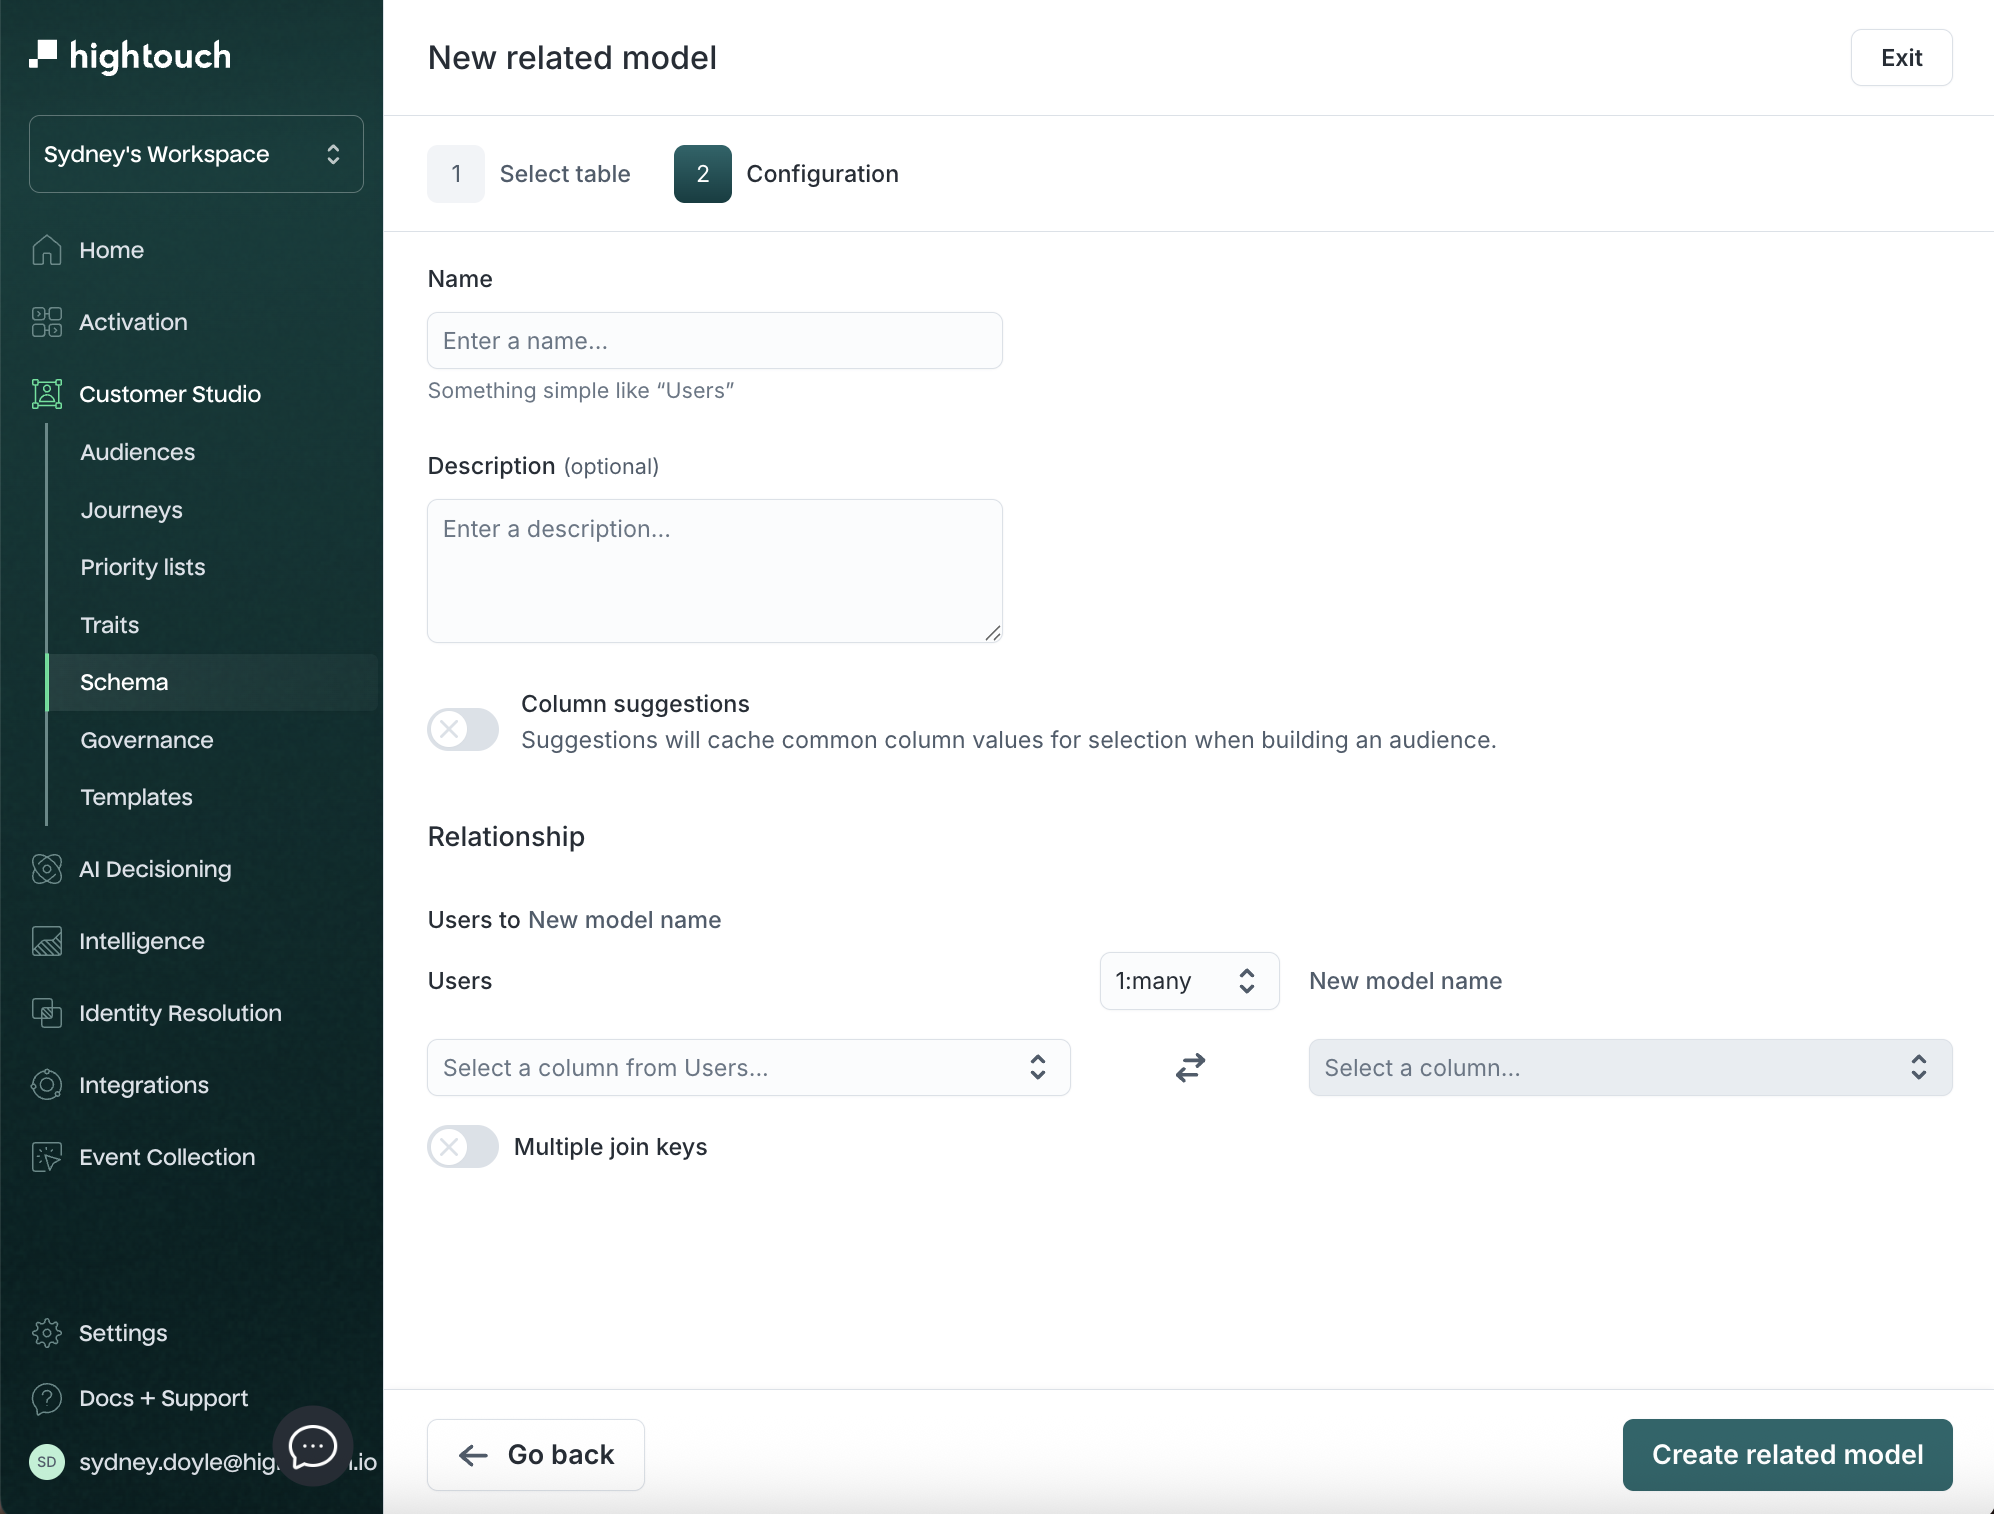
Configure the relationship:
| Field | Description | Example |
|---|---|---|
| Name | Related model name | Households |
| Description | Context for marketers | User purchase records |
| Relationship | Cardinality (1:many, etc.) | 1:many |
| Foreign key (join key) | Column joining models | user_id |
To match on multiple columns (for example, product_id and location_id), enable multiple join keys in the relationship configuration.
-
(Optional) If you want to add columns from the parent model onto the related model, turn on Merge columns.
-
Click Create related model.
3. Add event models
Event models represent timestamped behaviors like page views, logins, or checkouts. These power both real-time and historical audience logic.
Requirements:
- At least one timestamp column (for example,
created_at) - A foreign key linking to the parent model (for example,
user_id)
Create an event model
-
Go to Customer Studio → Schema.
-
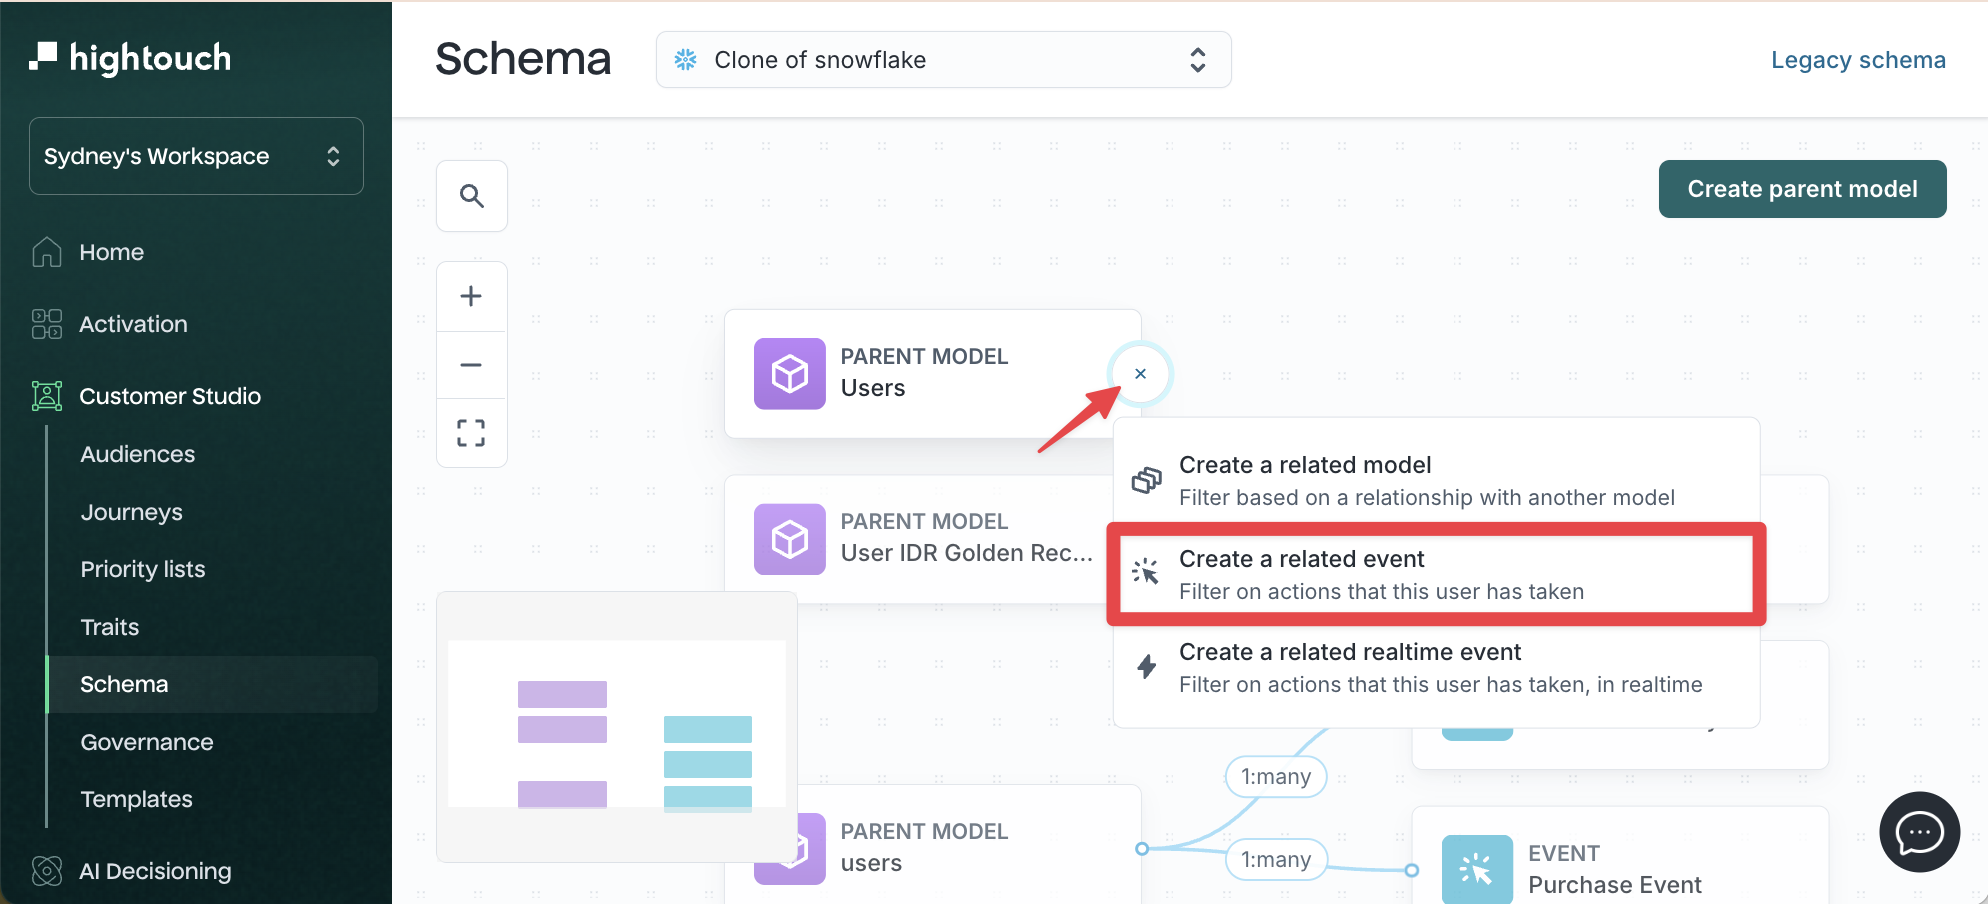
Click the + icon next to your parent model.
-
Select Create related event.
-
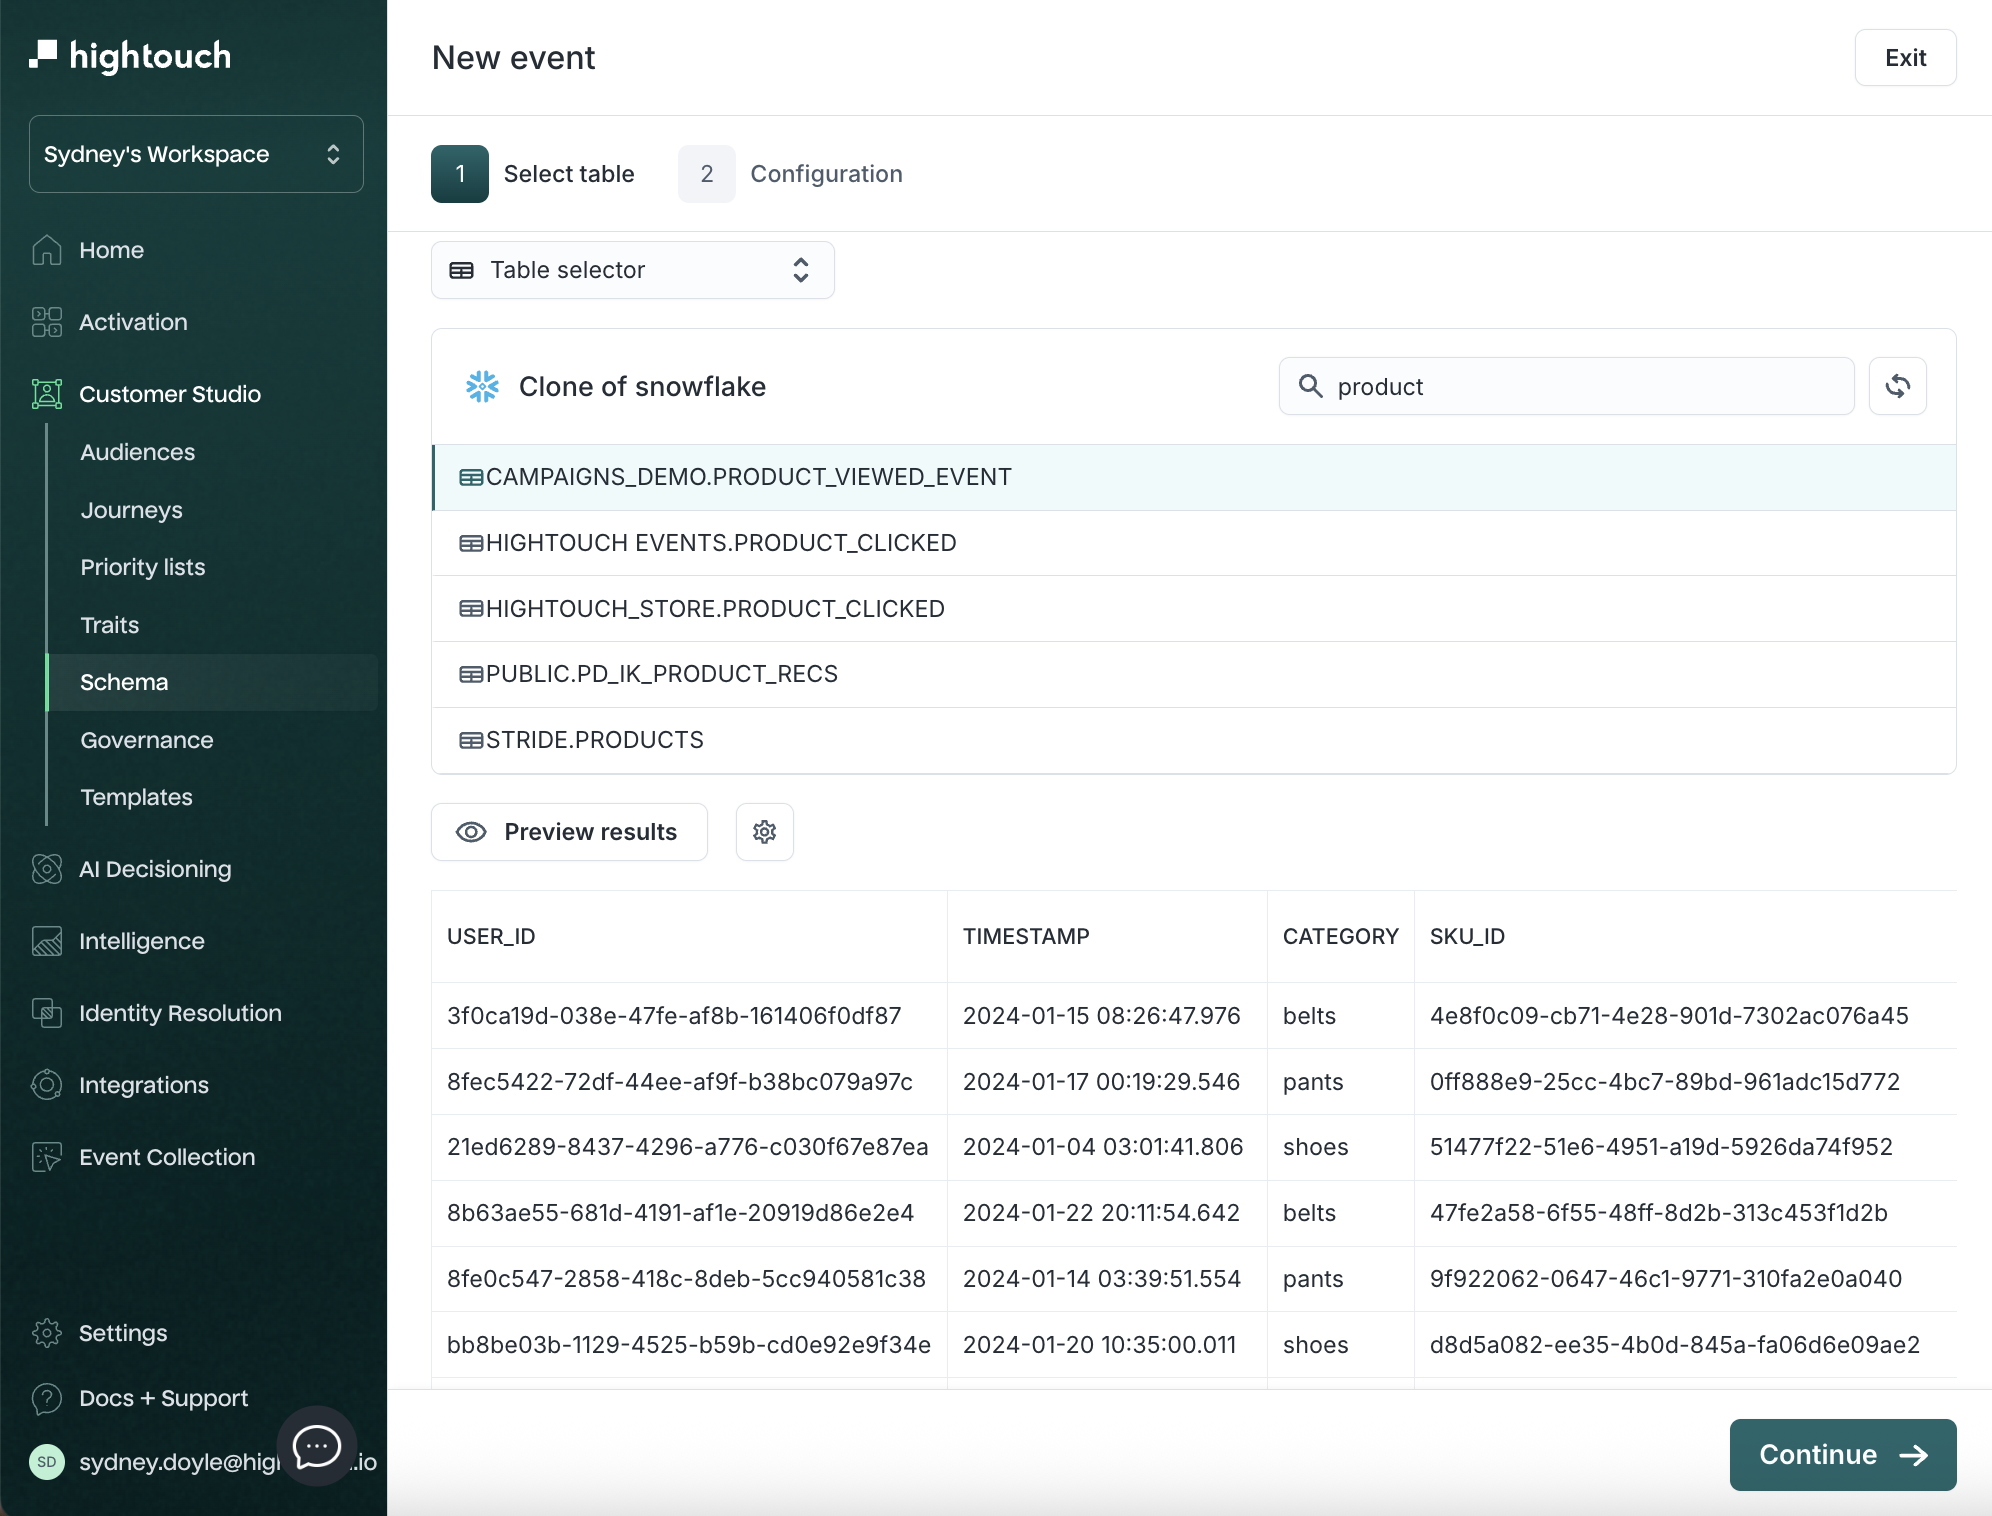
Choose your table or modeling method and preview results.
-
Click Continue.
-
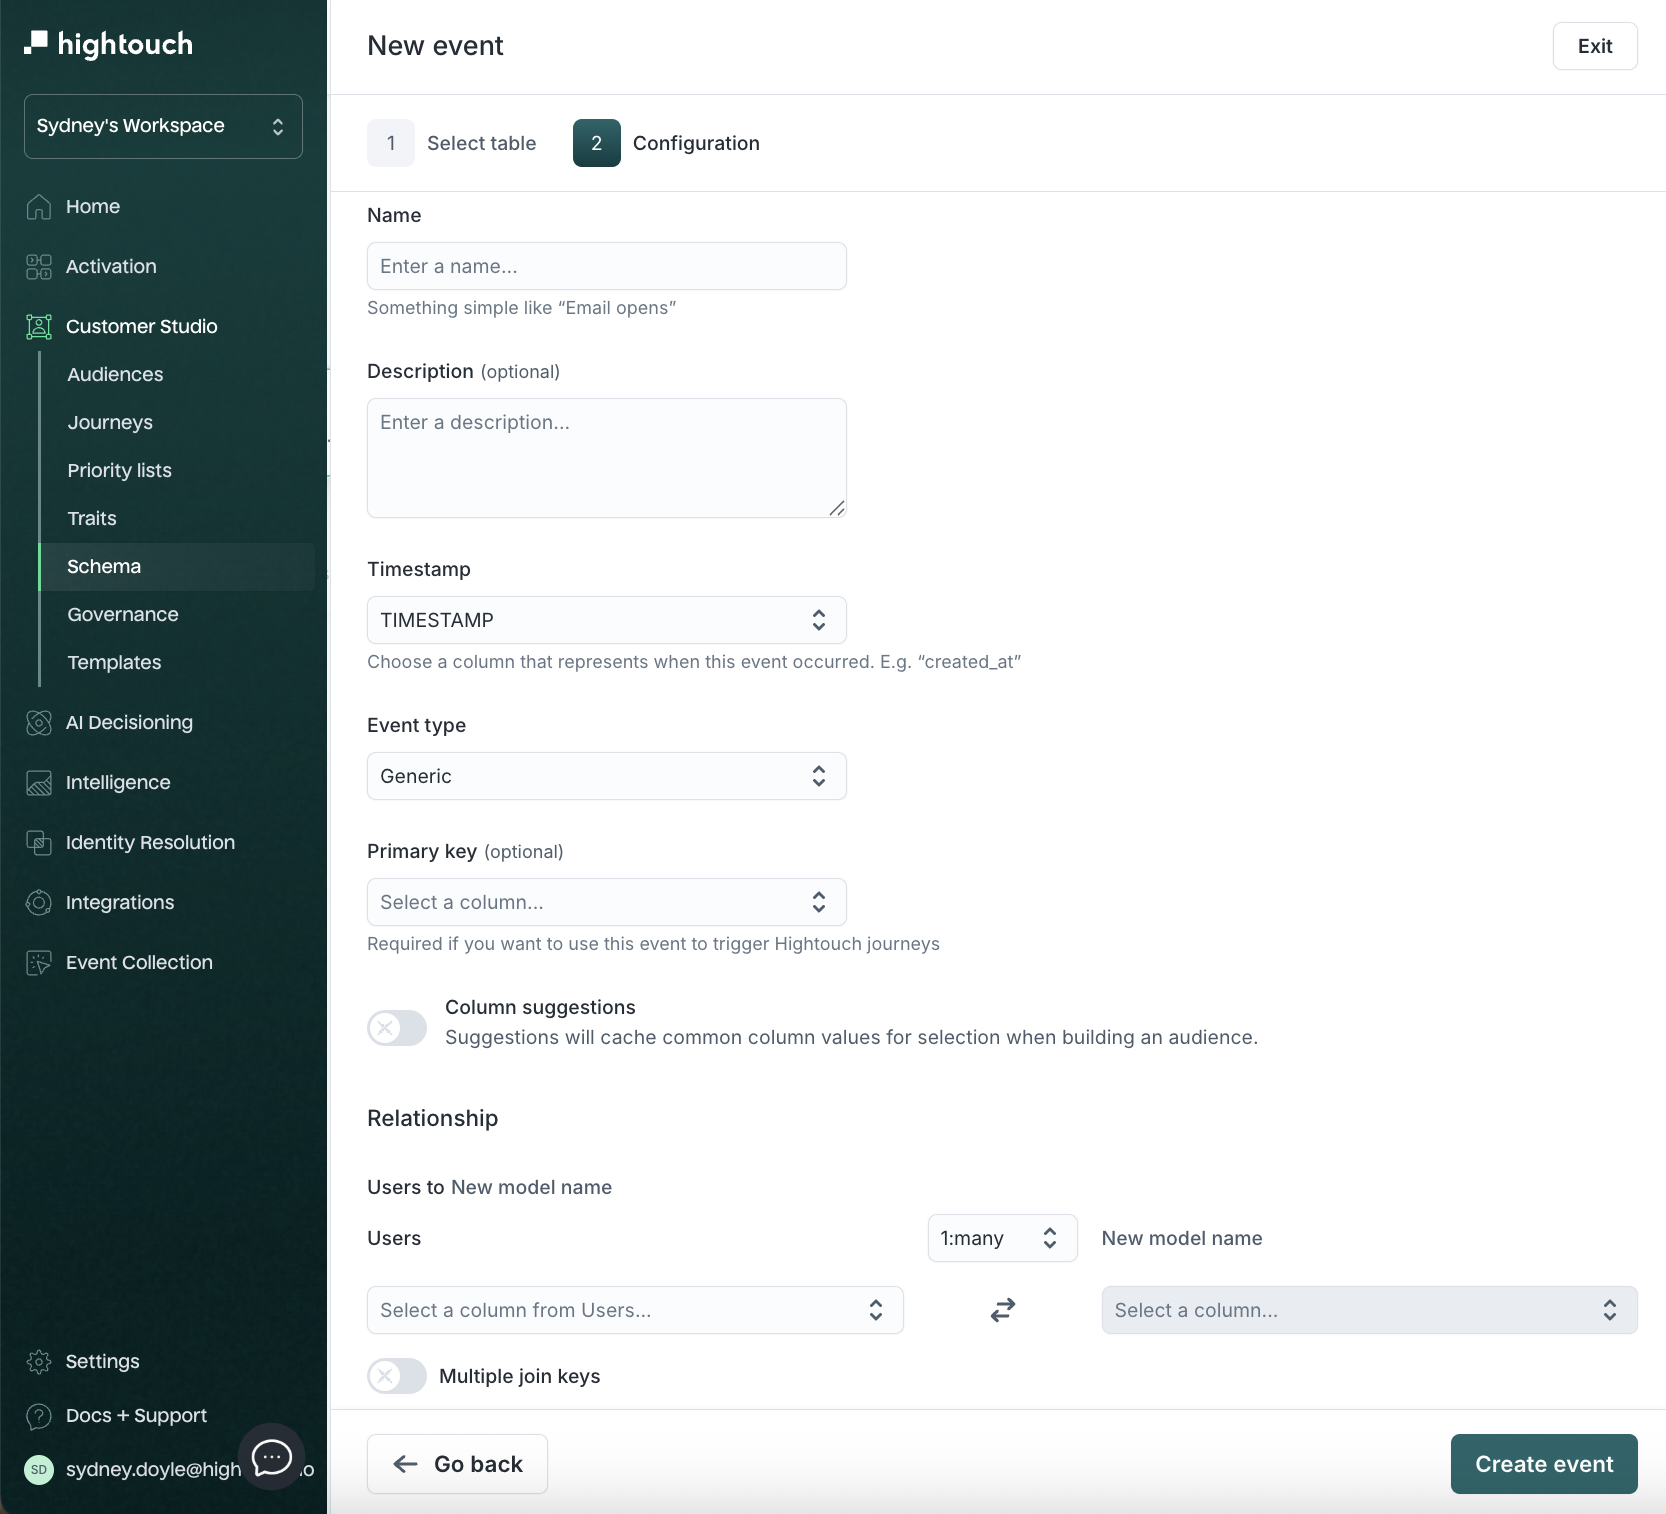
Configure the event:
| Field | Description | Example |
|---|---|---|
| Name | Event name | Product Viewed |
| Description | Context for marketers | Tracks user product views |
| Timestamp column | When the event occurred | created_at |
| Event type | Category (Generic, Checkout) | Generic |
| Primary key | For referencing or triggering Journeys | event_id |
| Relationship | Cardinality to parent | 1:many |
| Foreign key (join key) | Column joining event with parent | user_id |
The primary key uniquely identifies a row. The join key links it to another model. Often, the primary key in the parent model becomes the join key in a related model, but they serve distinct purposes.
-
(Optional) If you want to add columns from the parent model onto the event model, turn on Merge columns.
-
Click Create event.
If all events live in a single table, you can create multiple event models by filtering by event type (for example, Page View and Add to Cart).
Manage schema
View and edit your schema
To manage models in your schema:
- Go to Customer Studio → Schema.
- Select a model to open its details page.
- Use the tabs across the top to configure the model.
Available tabs depend on the model type:
Columns: enable fields, set aliases, redact values, and manage suggestionsRelationships: create and edit relationships to other modelsMatch Booster: enhance match rates using additional identifiers (if enabled)Sampling: configure sampling to speed up previewsActivity: review changes and see what depends on the modelConfiguration: manage core model settings like primary key, labels, and suggestion refresh interval
Delete a model
- Open the model you want to remove.
- Click the three-dot menu, then select Delete.
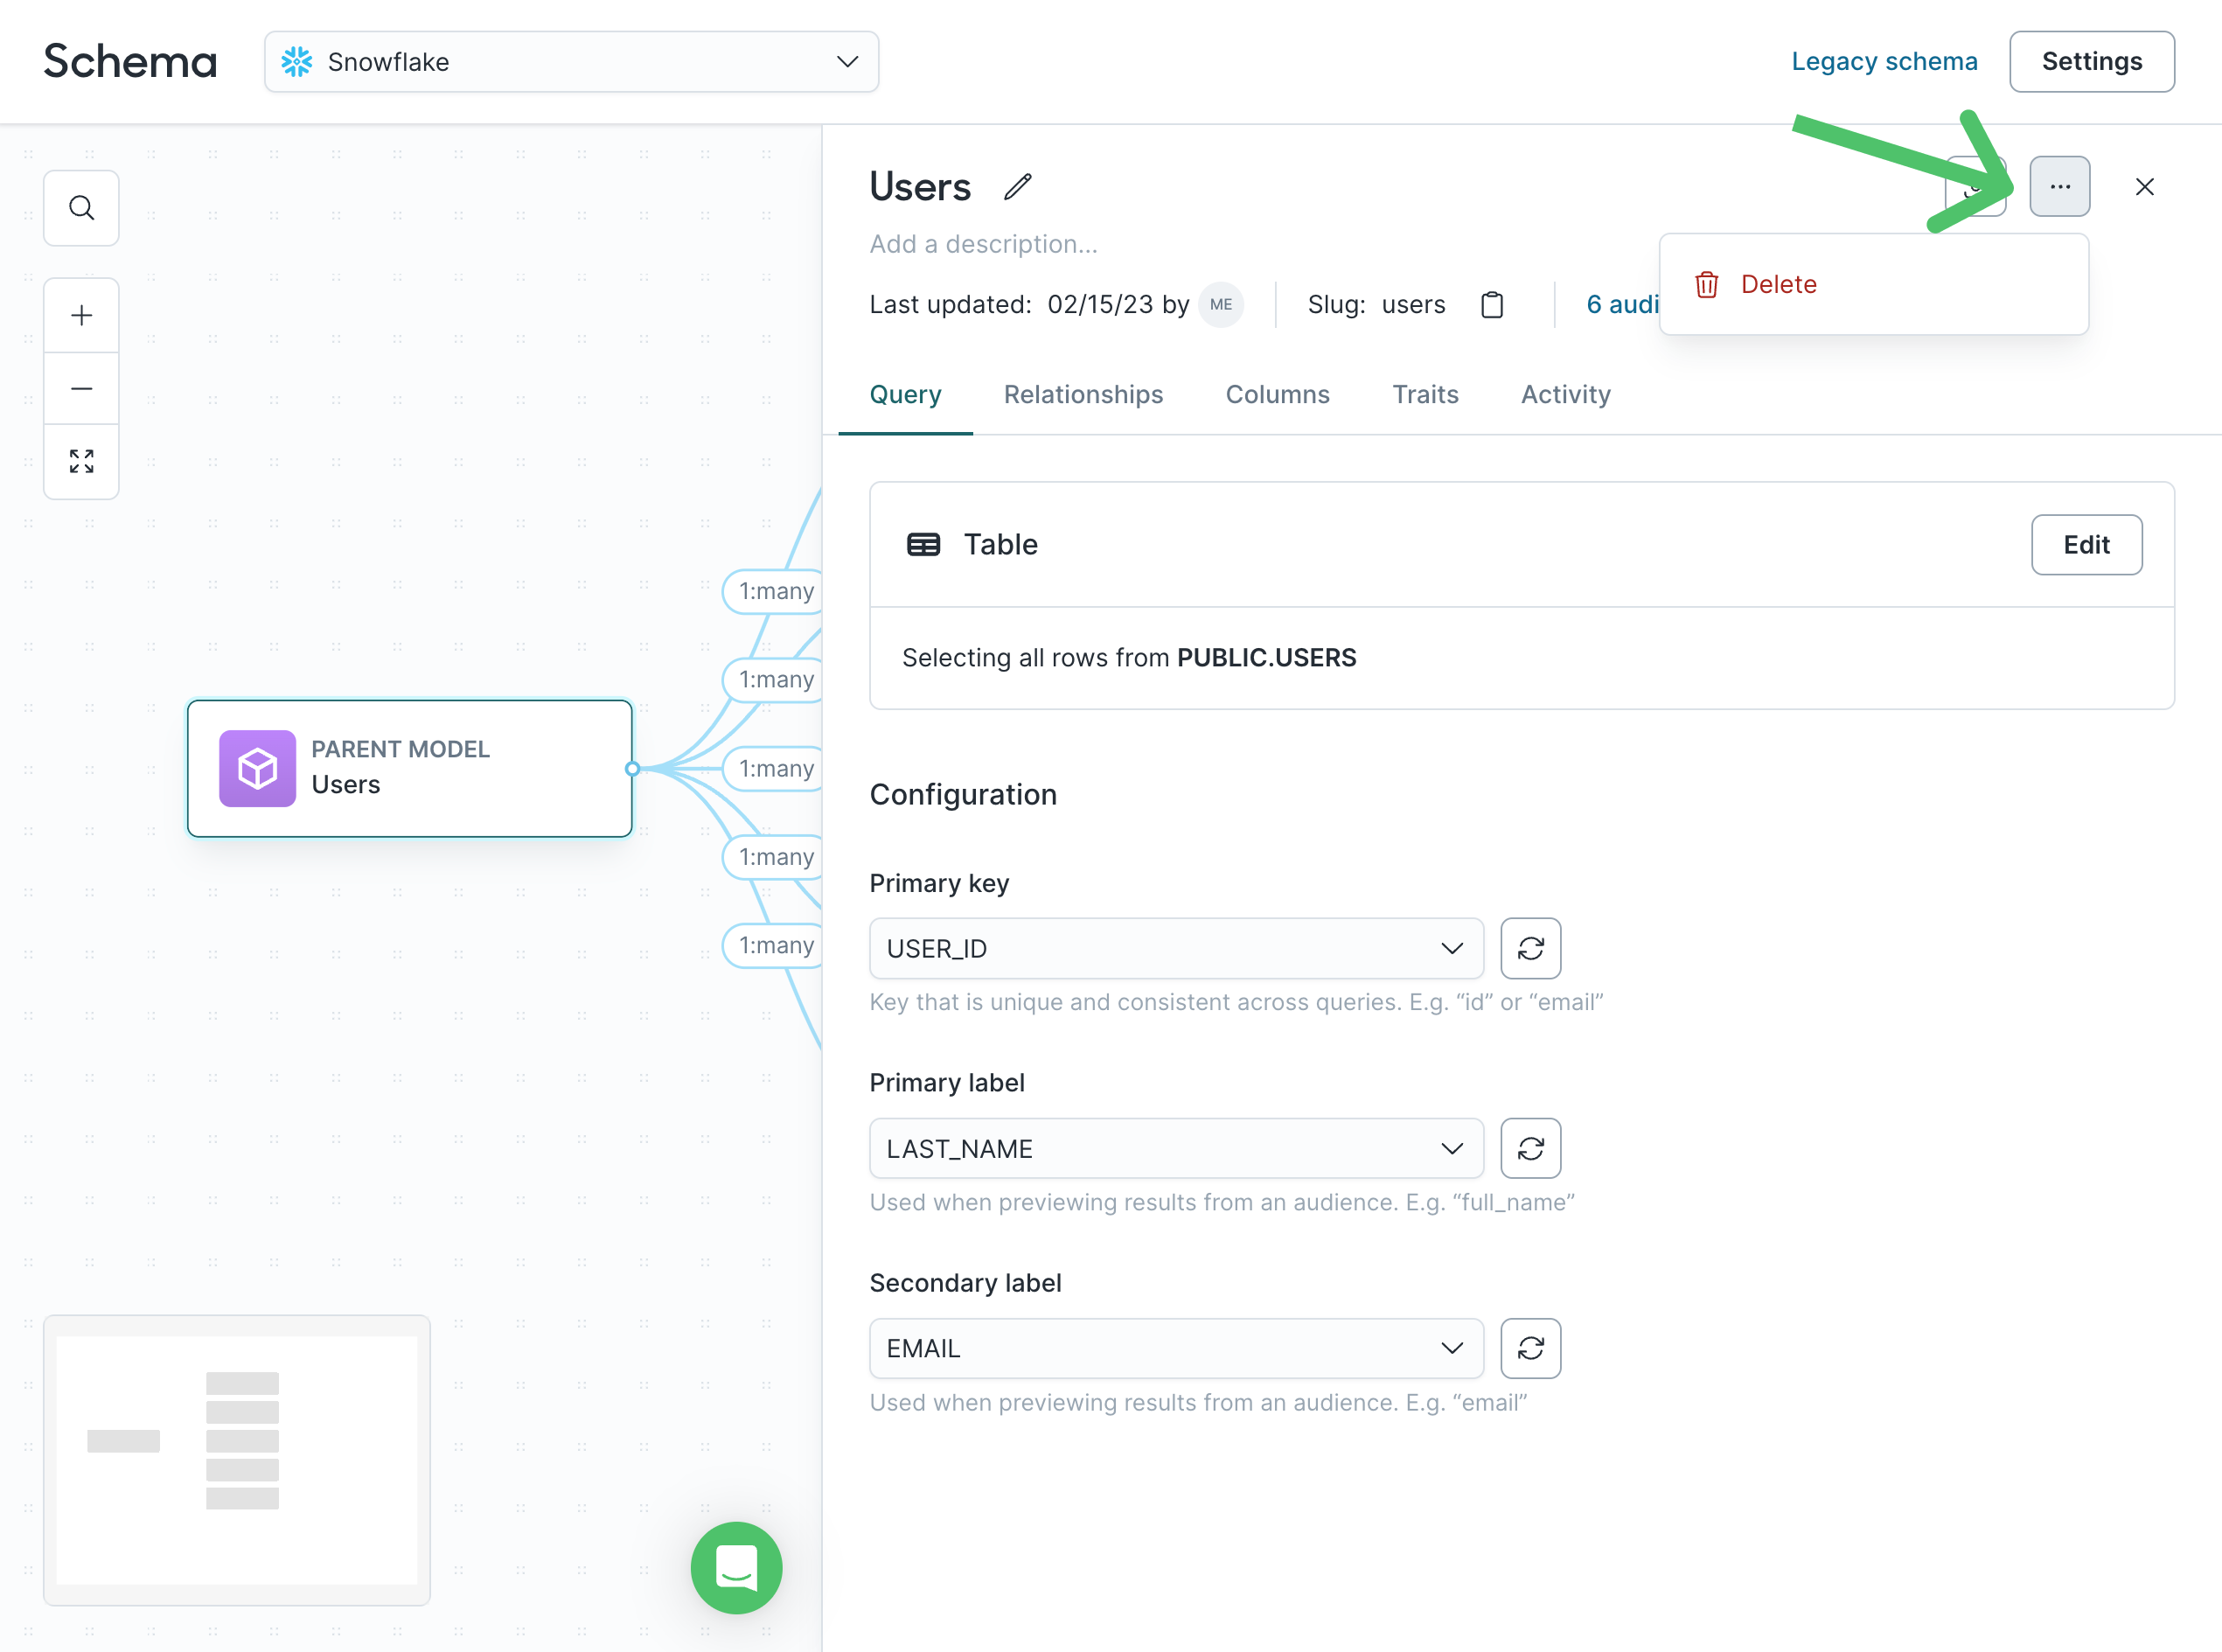
Deleting a model removes it from the audience builder. Any audiences using it will break and must be updated.
Columns
Use the Columns tab to control which fields appear in Customer Studio and how marketers interact with them.
- Open the model you want to update.
- Go to the
Columnstab.
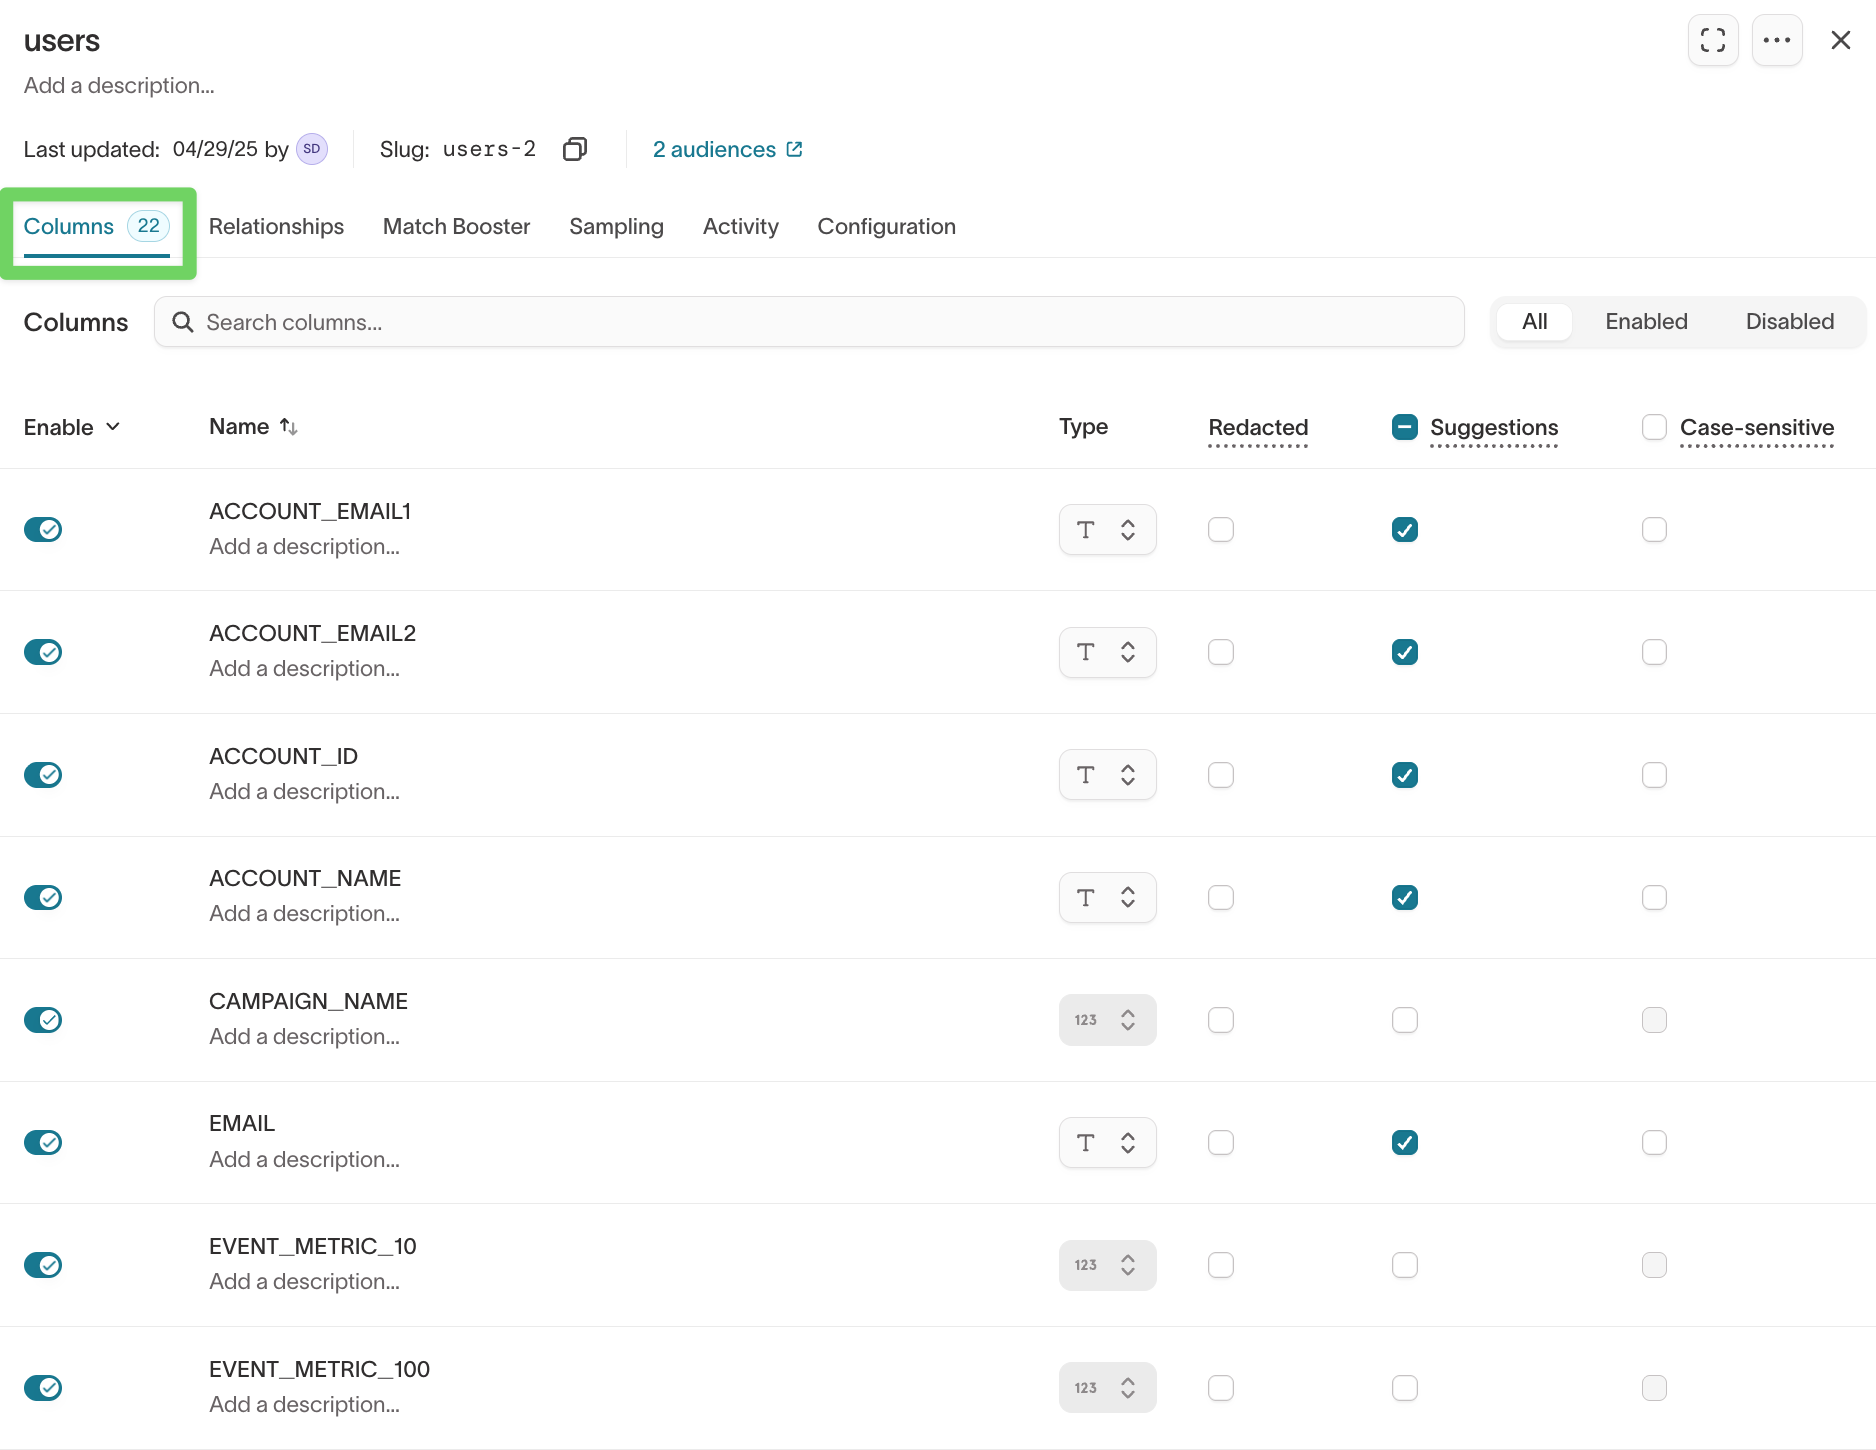
Enable or exclude columns
Use the toggle next to each column to control whether it appears in Customer Studio.
Disable columns when:
- the field isn’t useful for filtering (for example, internal IDs)
- the field adds noise for marketers
- you don’t want it available in audience filters
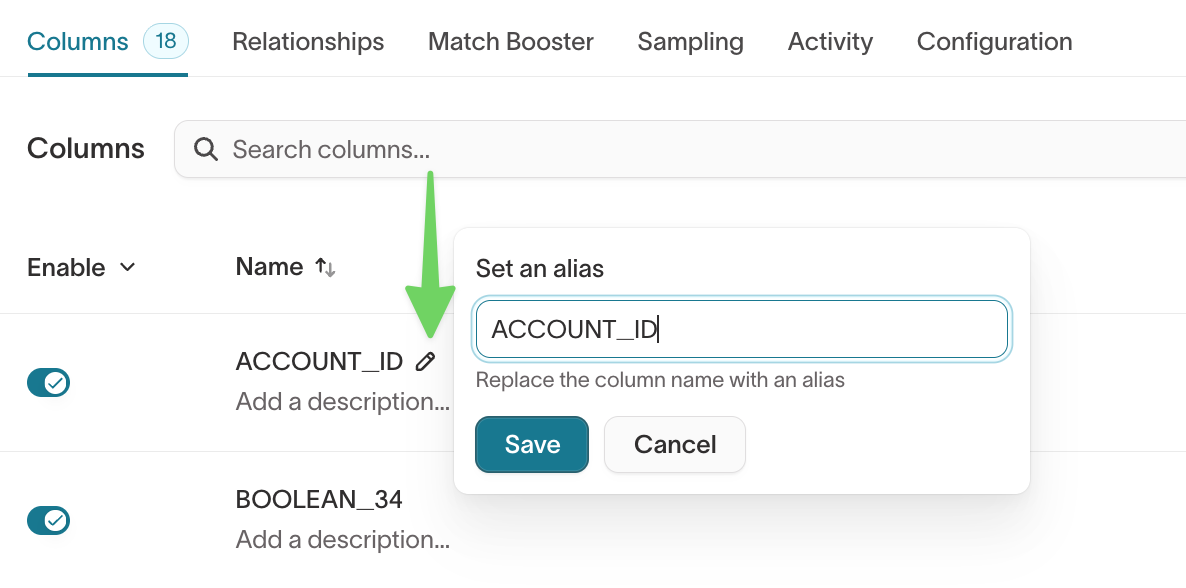
Rename columns using aliases
Aliases control how columns appear in the audience builder.
For example:
geo_region→Regioncreated_at→Signup date
To set an alias, hover over the column and click the pencil icon.
Redact column values in previews
Redaction hides values in places like audience previews and profile exploration, while keeping the column available for filtering.
This is useful for sensitive fields like:
- email addresses
- phone numbers
- internal identifiers
Enable filter value suggestions
Suggestions help marketers choose common values from a dropdown when filtering (for example, brands like Nike or Adidas).
You can also control how often suggestions refresh from the model’s Configuration tab.
Refresh columns from your source
If you add or remove columns in your warehouse, you can refresh the columns available in the model.
- Open the model.
- Click the three-dot menu.
- Select Refresh columns available in source.

Relationships
Use the Relationships tab to define how models connect in your schema. These relationships power cross-model filtering in the audience builder.
- Open the model you want to update.
- Go to the
Relationshipstab.
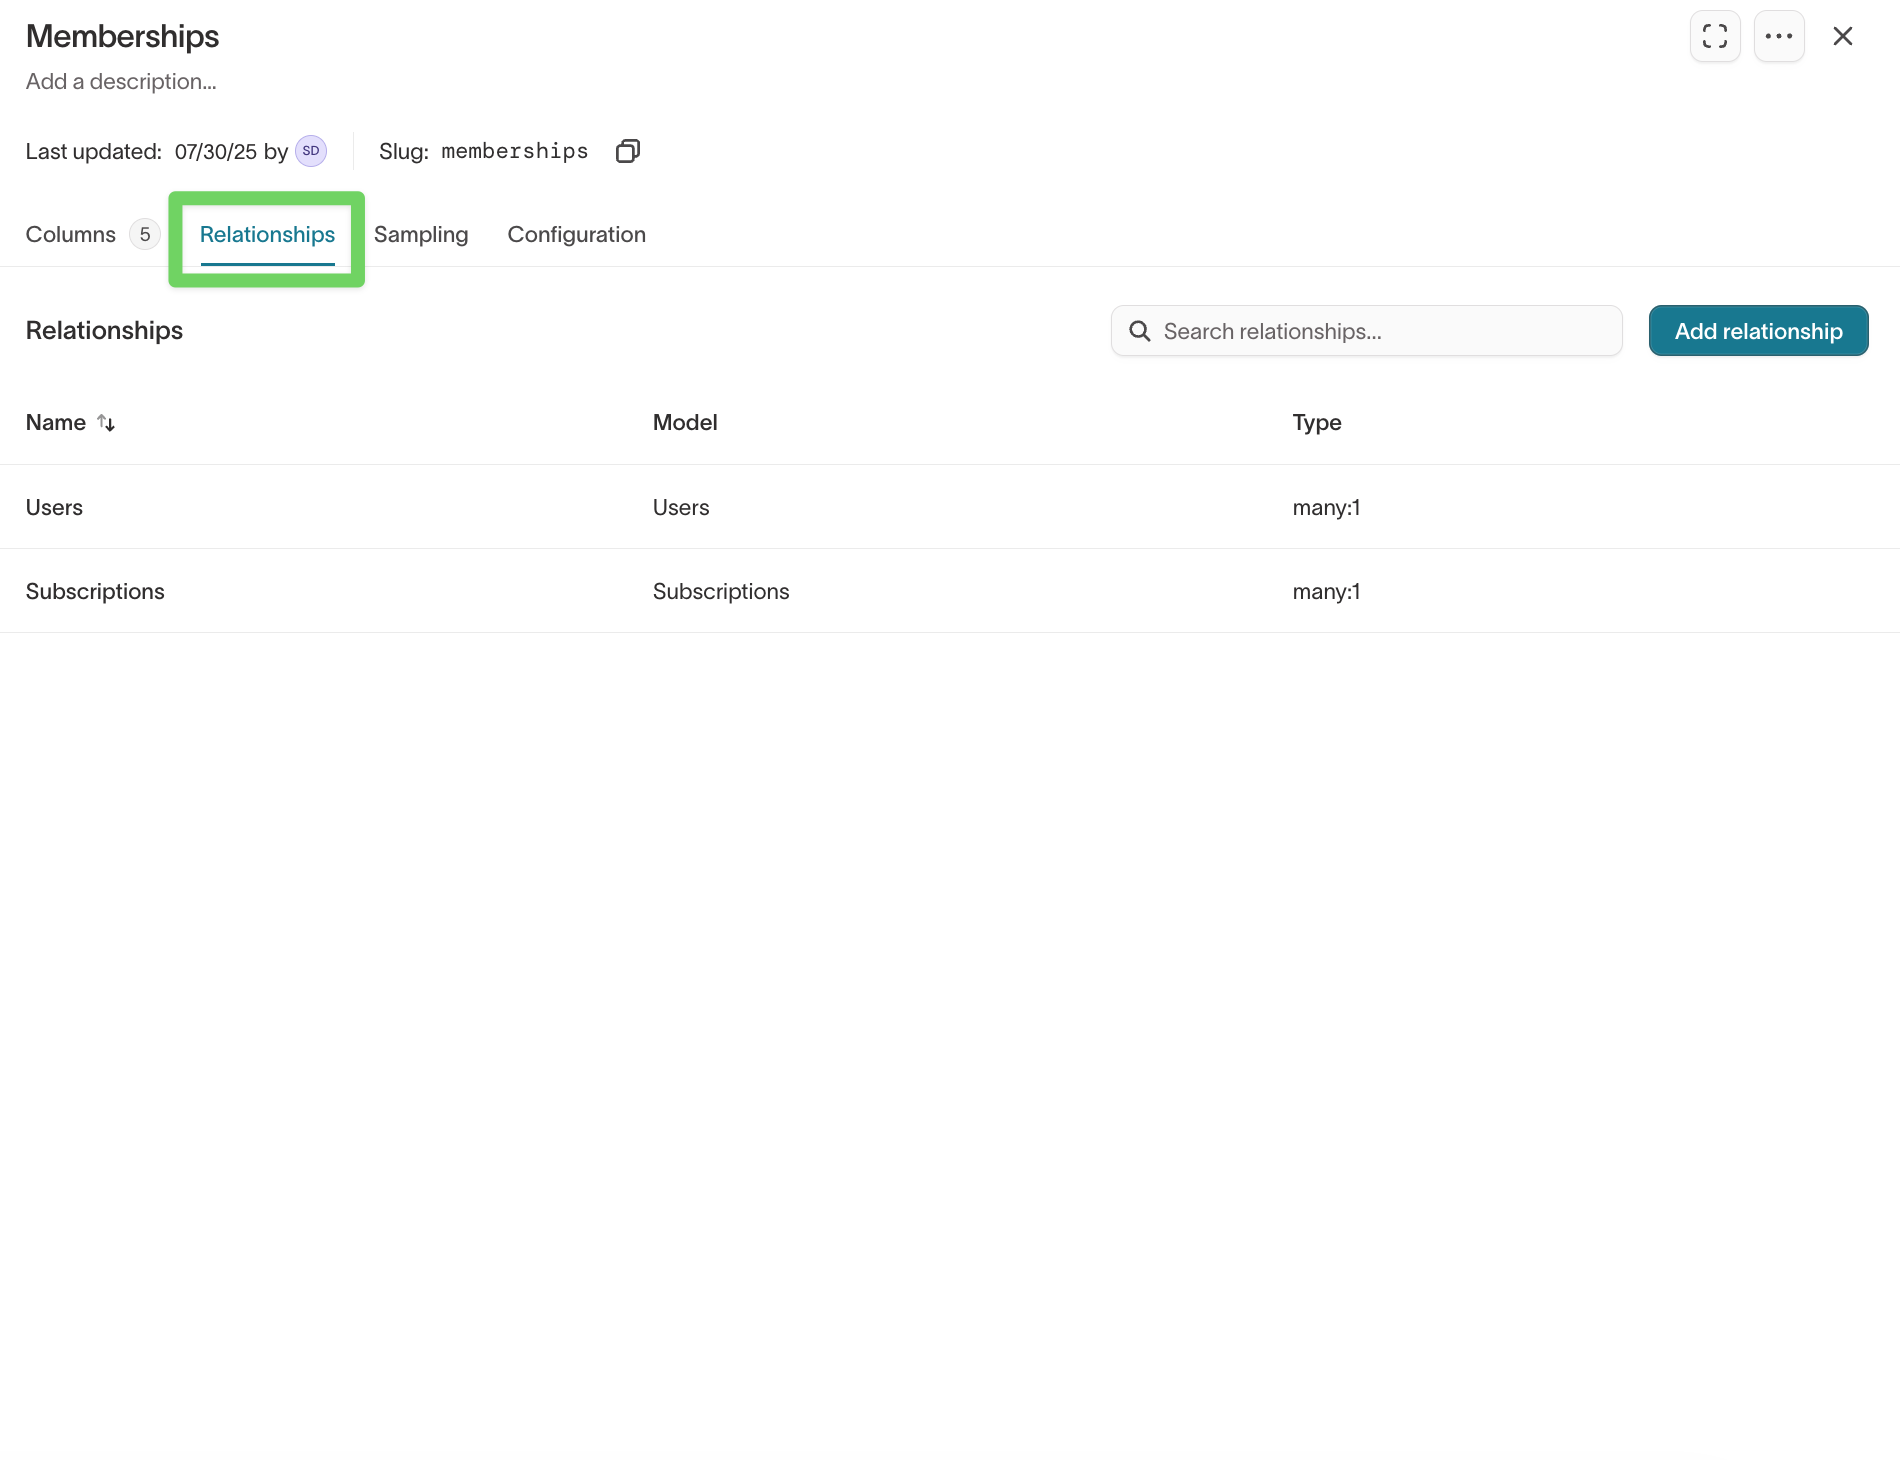
Relationship types
Relationships define how rows connect across models:
| Relationship | Use when... | Example |
|---|---|---|
1:many | One parent maps to many related records | One user has many purchases |
1:1 | One parent maps to one related record | A company has one active subscription |
many:1 | Many records map to one shared record | Many users belong to one household |
Use 1:many for most behavioral data (for example, purchases, page views). Use many:1 when referencing shared entities like plans or organizations.
Add a relationship
- Click Add relationship.
- Choose the relationship type (for example,
1:manyormany:1). - Select the model you want to connect to.
- Choose join keys for each model.
- Click Save.

Edit an existing relationship
To update a relationship:
- Go to the
Relationshipstab. - Select the relationship you want to edit (for example,
Purchase History). - Update join keys, the connected model, or cardinality.
- Click Save changes.
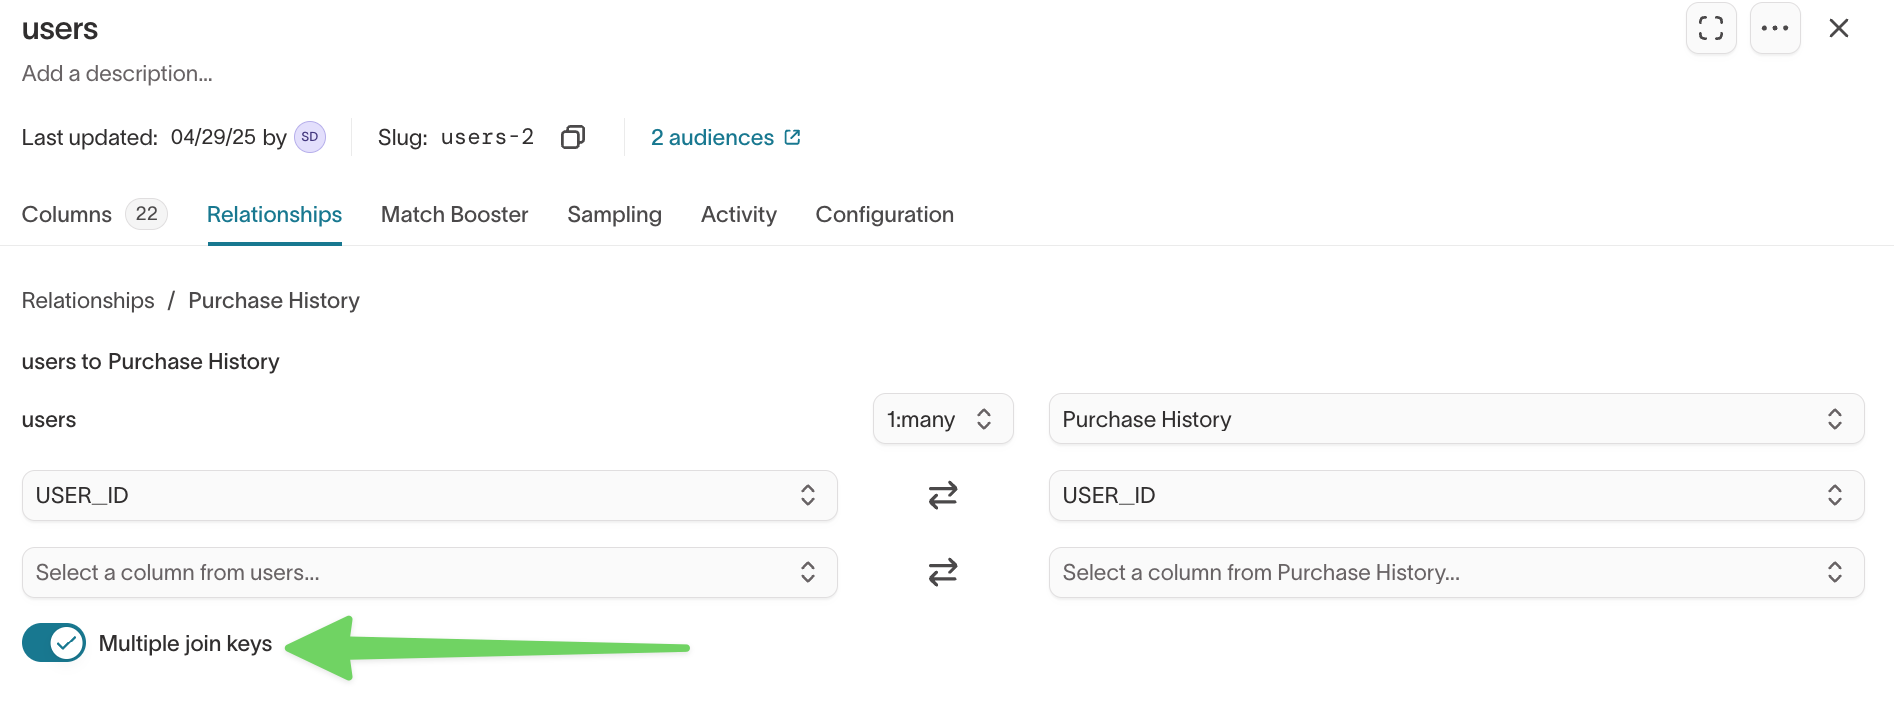
Match on multiple join keys
Multiple join keys let you match models on two or more columns. This is helpful when you need compound keys (for example, product_id and location_id).
Enable multiple join keys
- Open the model and go to the
Relationshipstab. - Select the relationship you want to edit.
- Toggle Multiple join keys ON.
- Select the additional join key columns.
- Click Save changes.
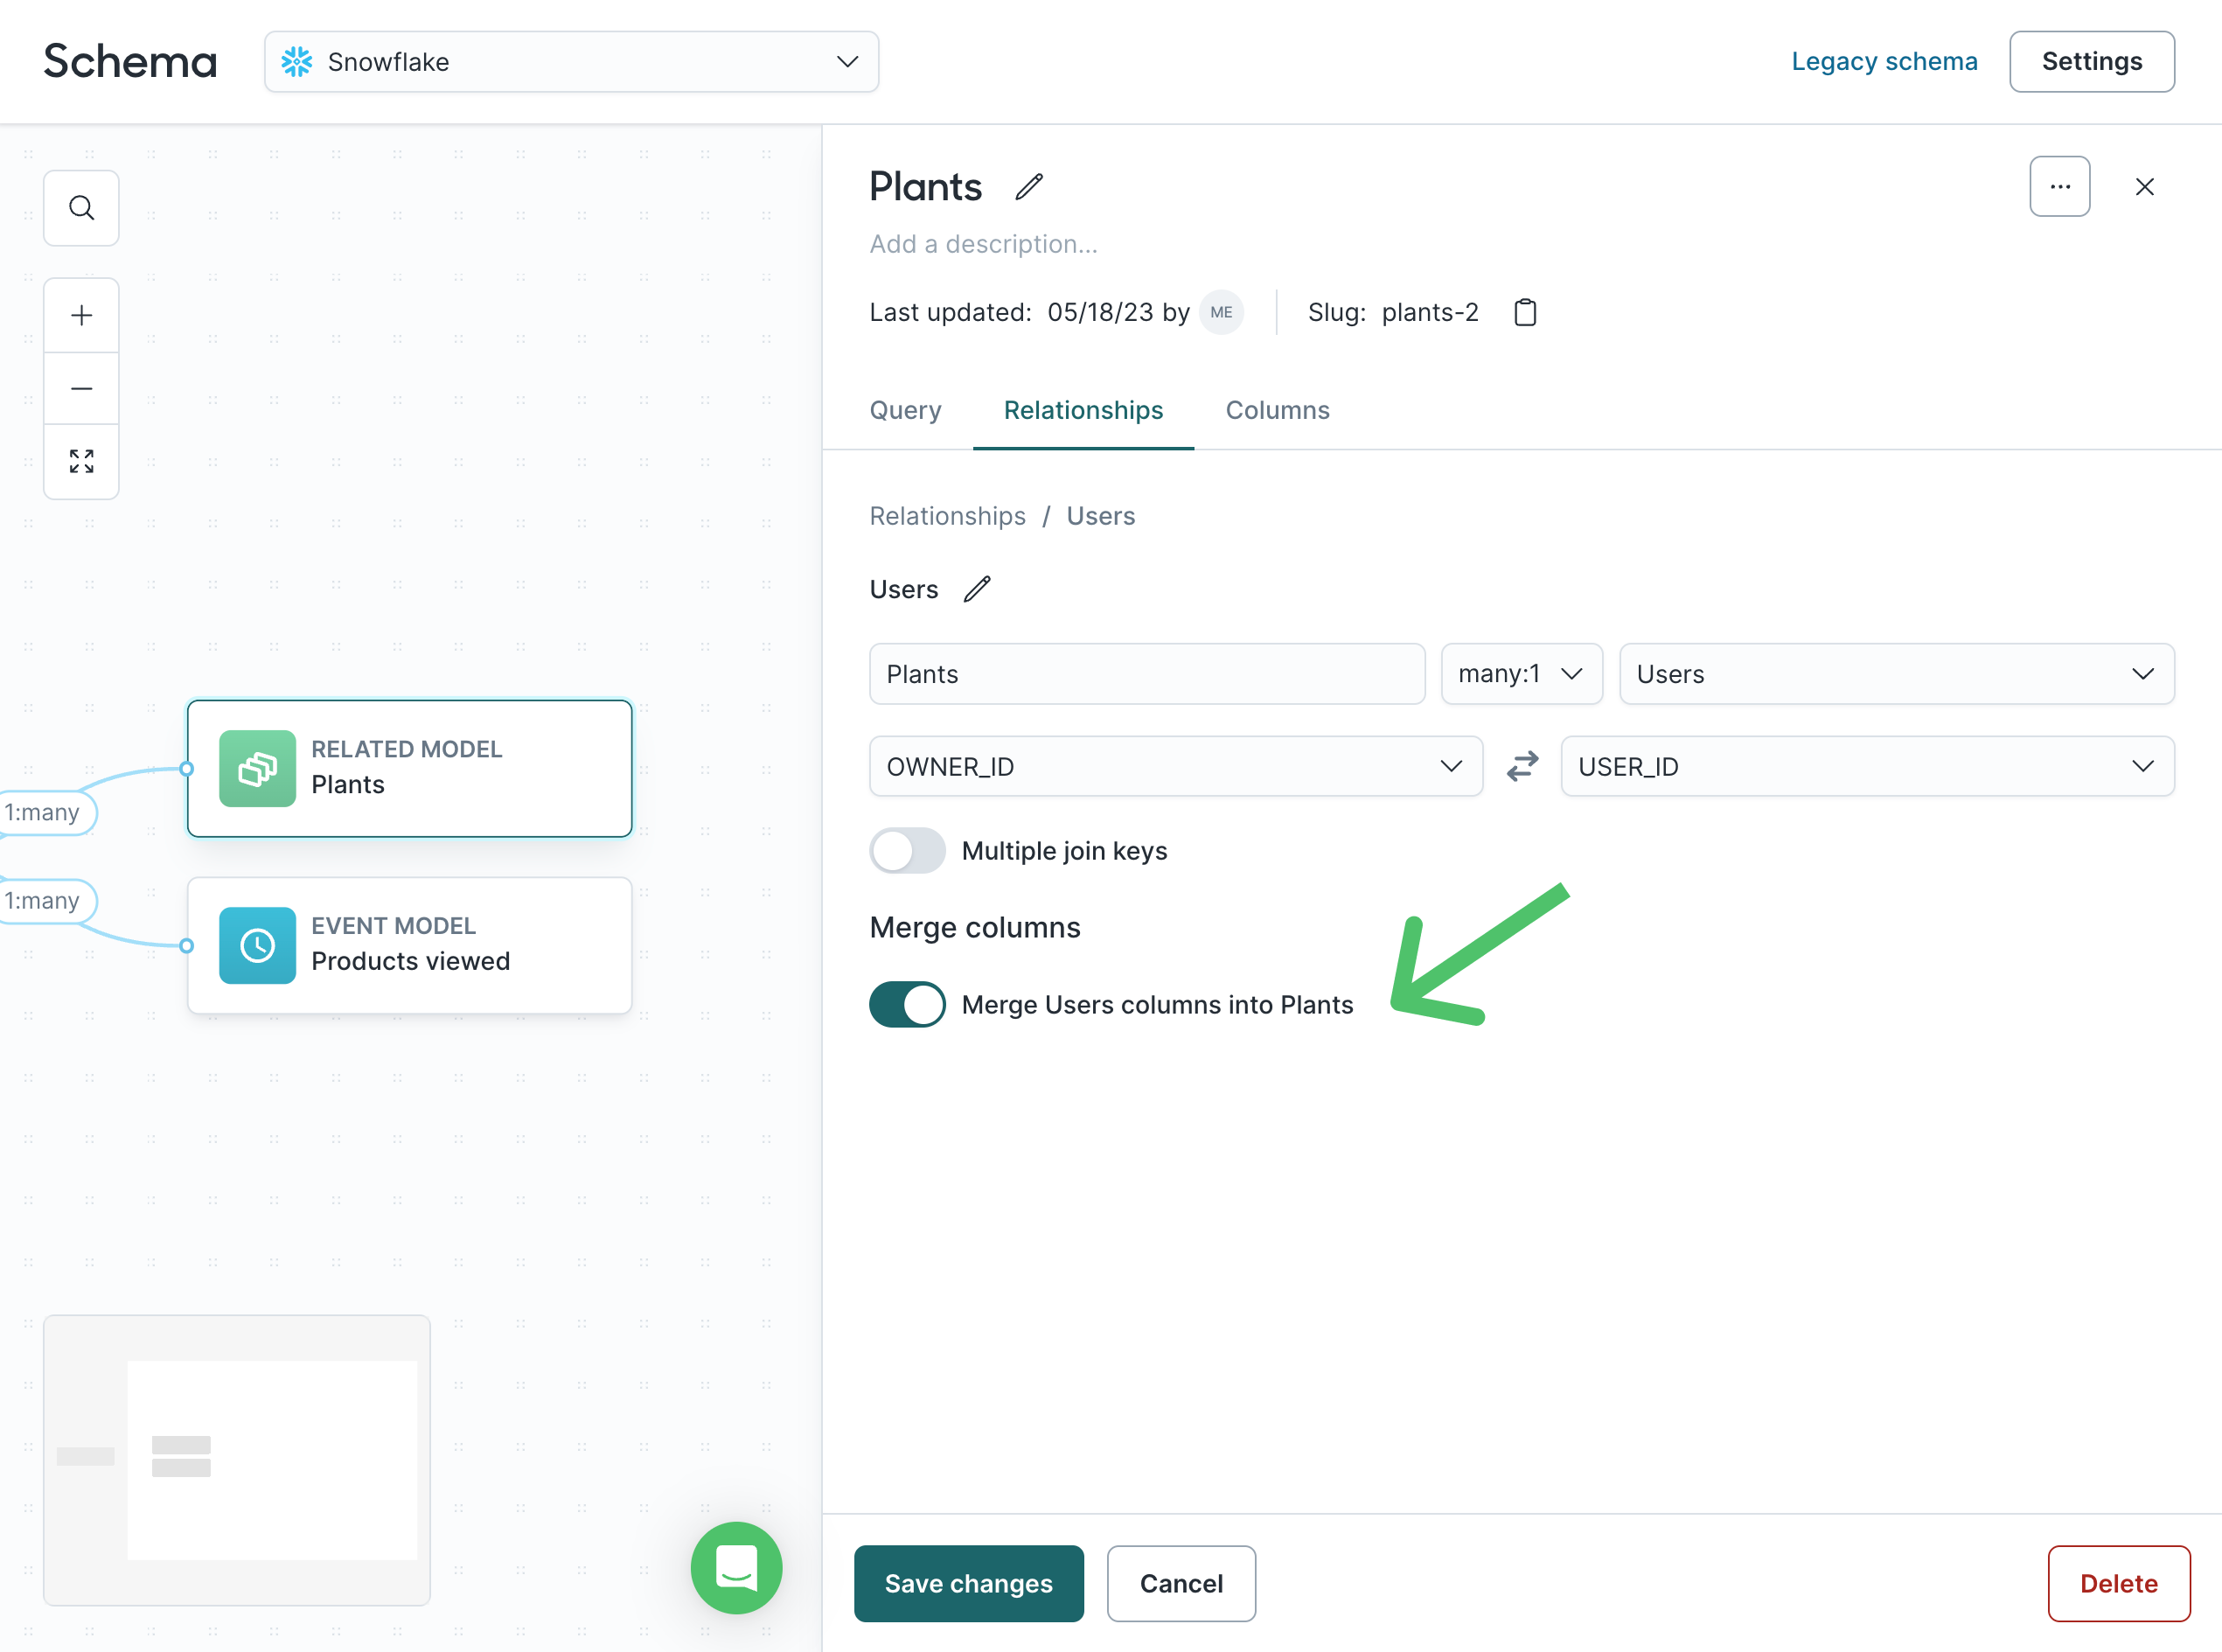
Merge columns
Merge columns let you surface fields from a parent model into a related or event model, so marketers can filter on those fields without switching models.
This is useful when:
- the related/event model doesn’t include marketer-friendly fields like region or plan name
- you want to reduce duplication across traits or audiences
- marketers need both behavior (events) and customer attributes in the same workflow
Merged columns appear as read-only copies in the target model and are filterable like native fields.
Merge column eligibility
Whether you can merge columns depends on the relationship’s cardinality:
| Relationship type | Merge allowed? | Merge direction | UI toggle appears? |
|---|---|---|---|
1:1 | ✅ Yes | Either direction | ✅ Yes |
1:many | ❌ No | N/A | ❌ No |
many:1 | ✅ Yes | From parent → related | ✅ Yes (on related) |
Examples:
-
Users → Purchases
-
Merge
geo_regionfrom Users so marketers can filter Purchases by customer location. -
Products → Product Viewed events
-
Merge
brandorcategoryfrom Products so marketers can build audiences based on product attributes.
Enable merge columns
- Open the model and go to the
Relationshipstab. - Select the relationship you want to edit.
- Under Merge columns, toggle Merge columns ON.
- Choose the columns you want to merge, then click Save changes.
Through relationships
Through relationships let you connect two models through an intermediate model (a linking table). This is useful for many-to-many scenarios.
Example: Users → Memberships → Subscriptions
- Users join to Memberships on
user_id - Memberships join to Subscriptions on
subscription_id
This enables filters like “users with an active subscription” without duplicating logic.

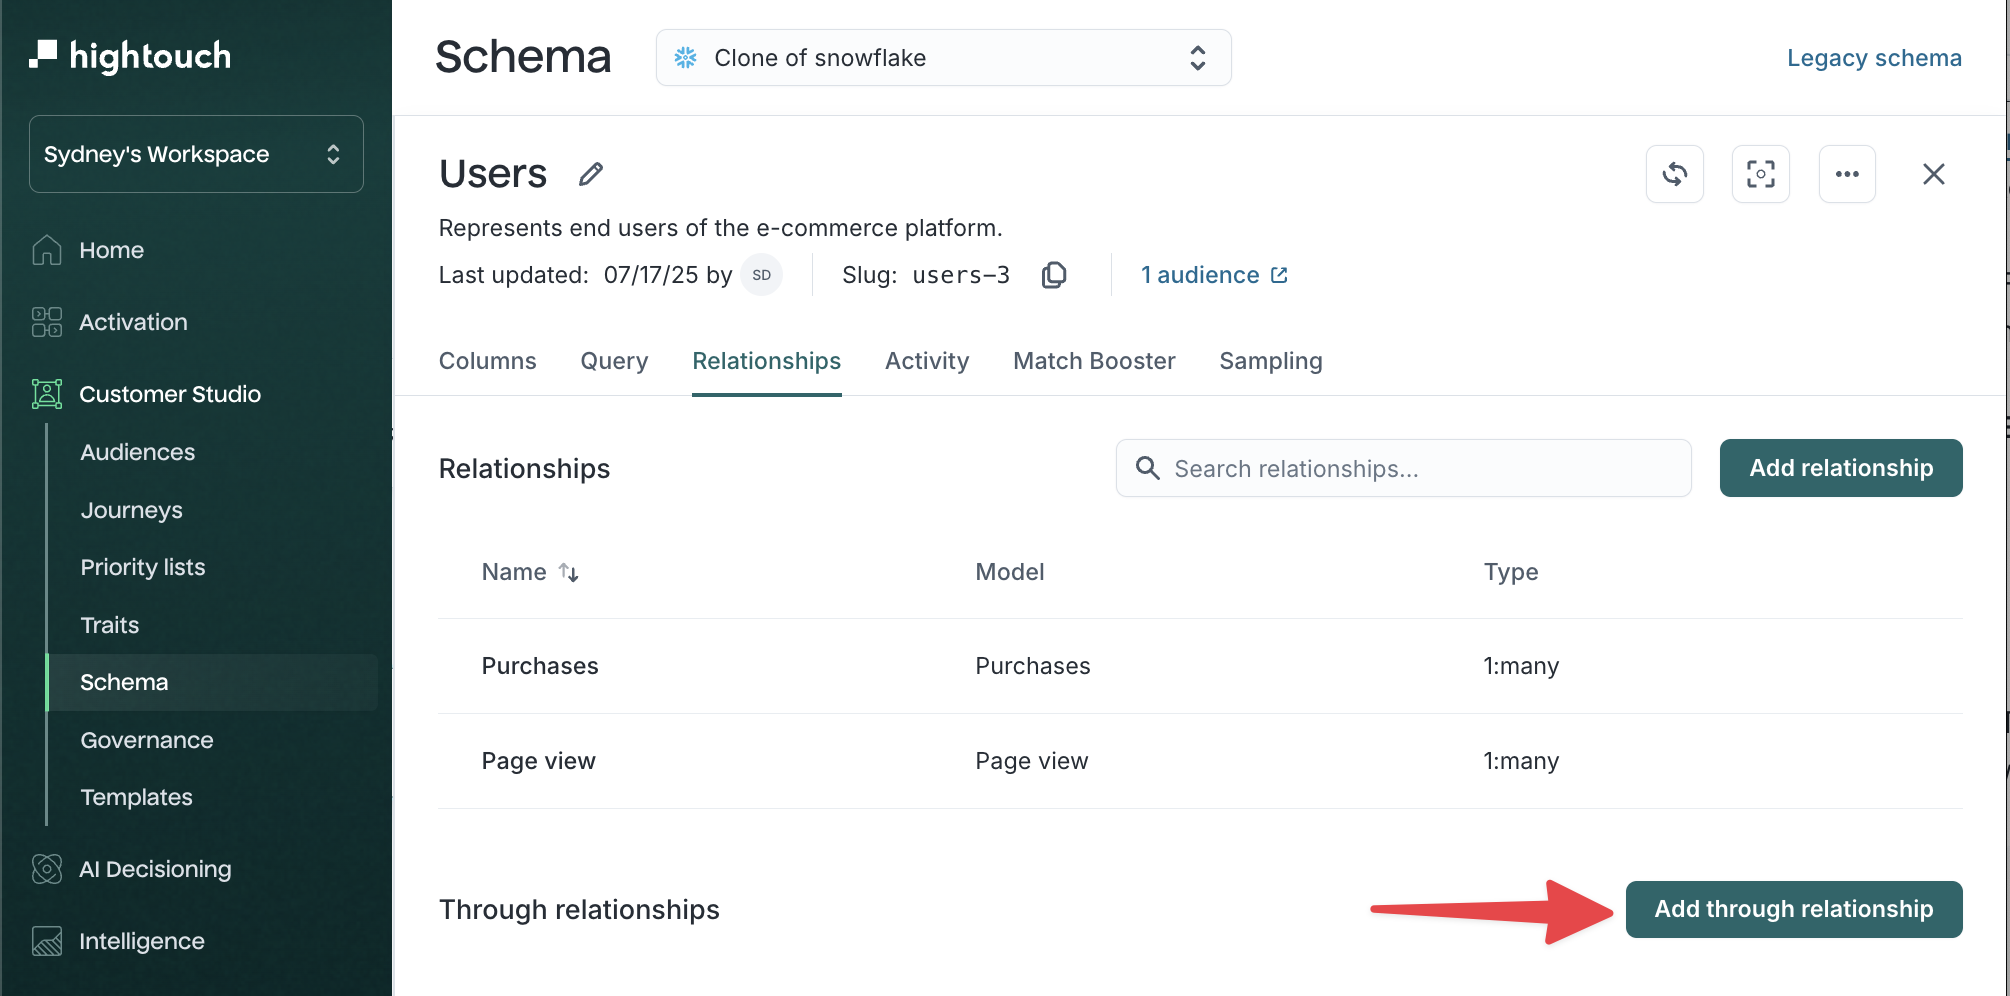
Set up a through relationship
Through relationships are configured in the Relationships tab of your parent model.
-
Create the two direct relationships:
- Users → Memberships (
1:many) - Memberships → Subscriptions (
many:1)

- Users → Memberships (
-
Select your parent model, then open the
Relationshipstab. -
Click Add through relationship.
-
Under Access, select the model you want to access (for example,
Products).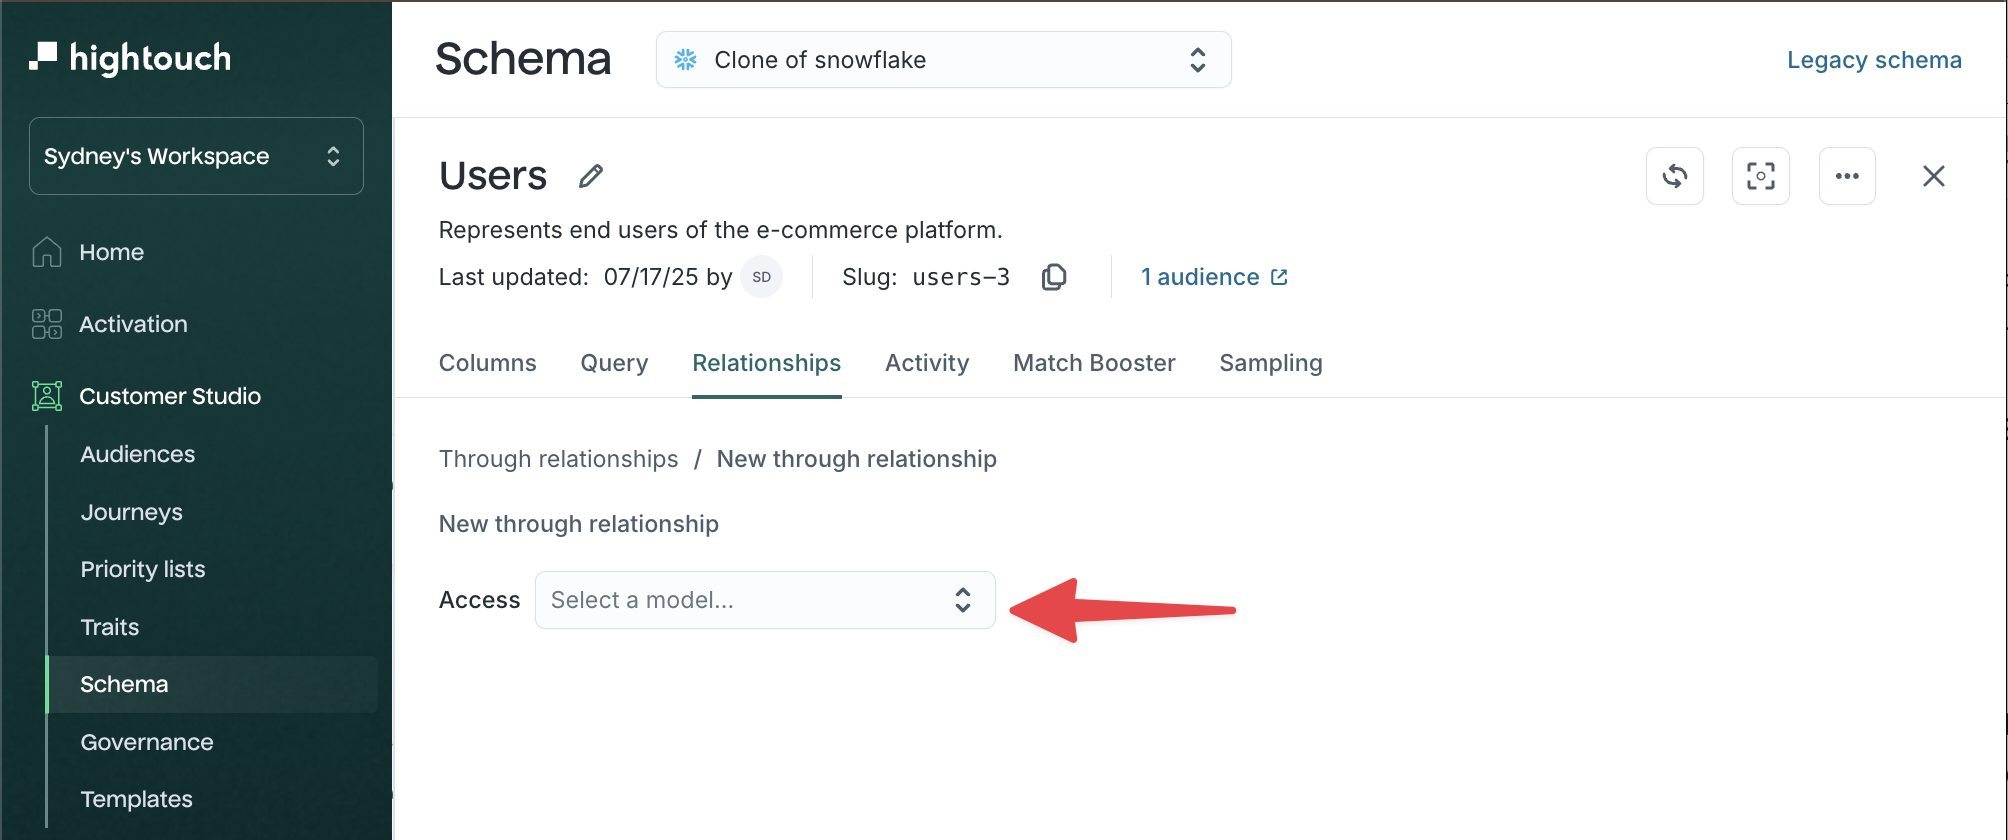
-
In the through dropdown, choose the indirect path that connects your parent model to the target model (for example,
Purchases→Products).
-
Click Save.
Match Booster
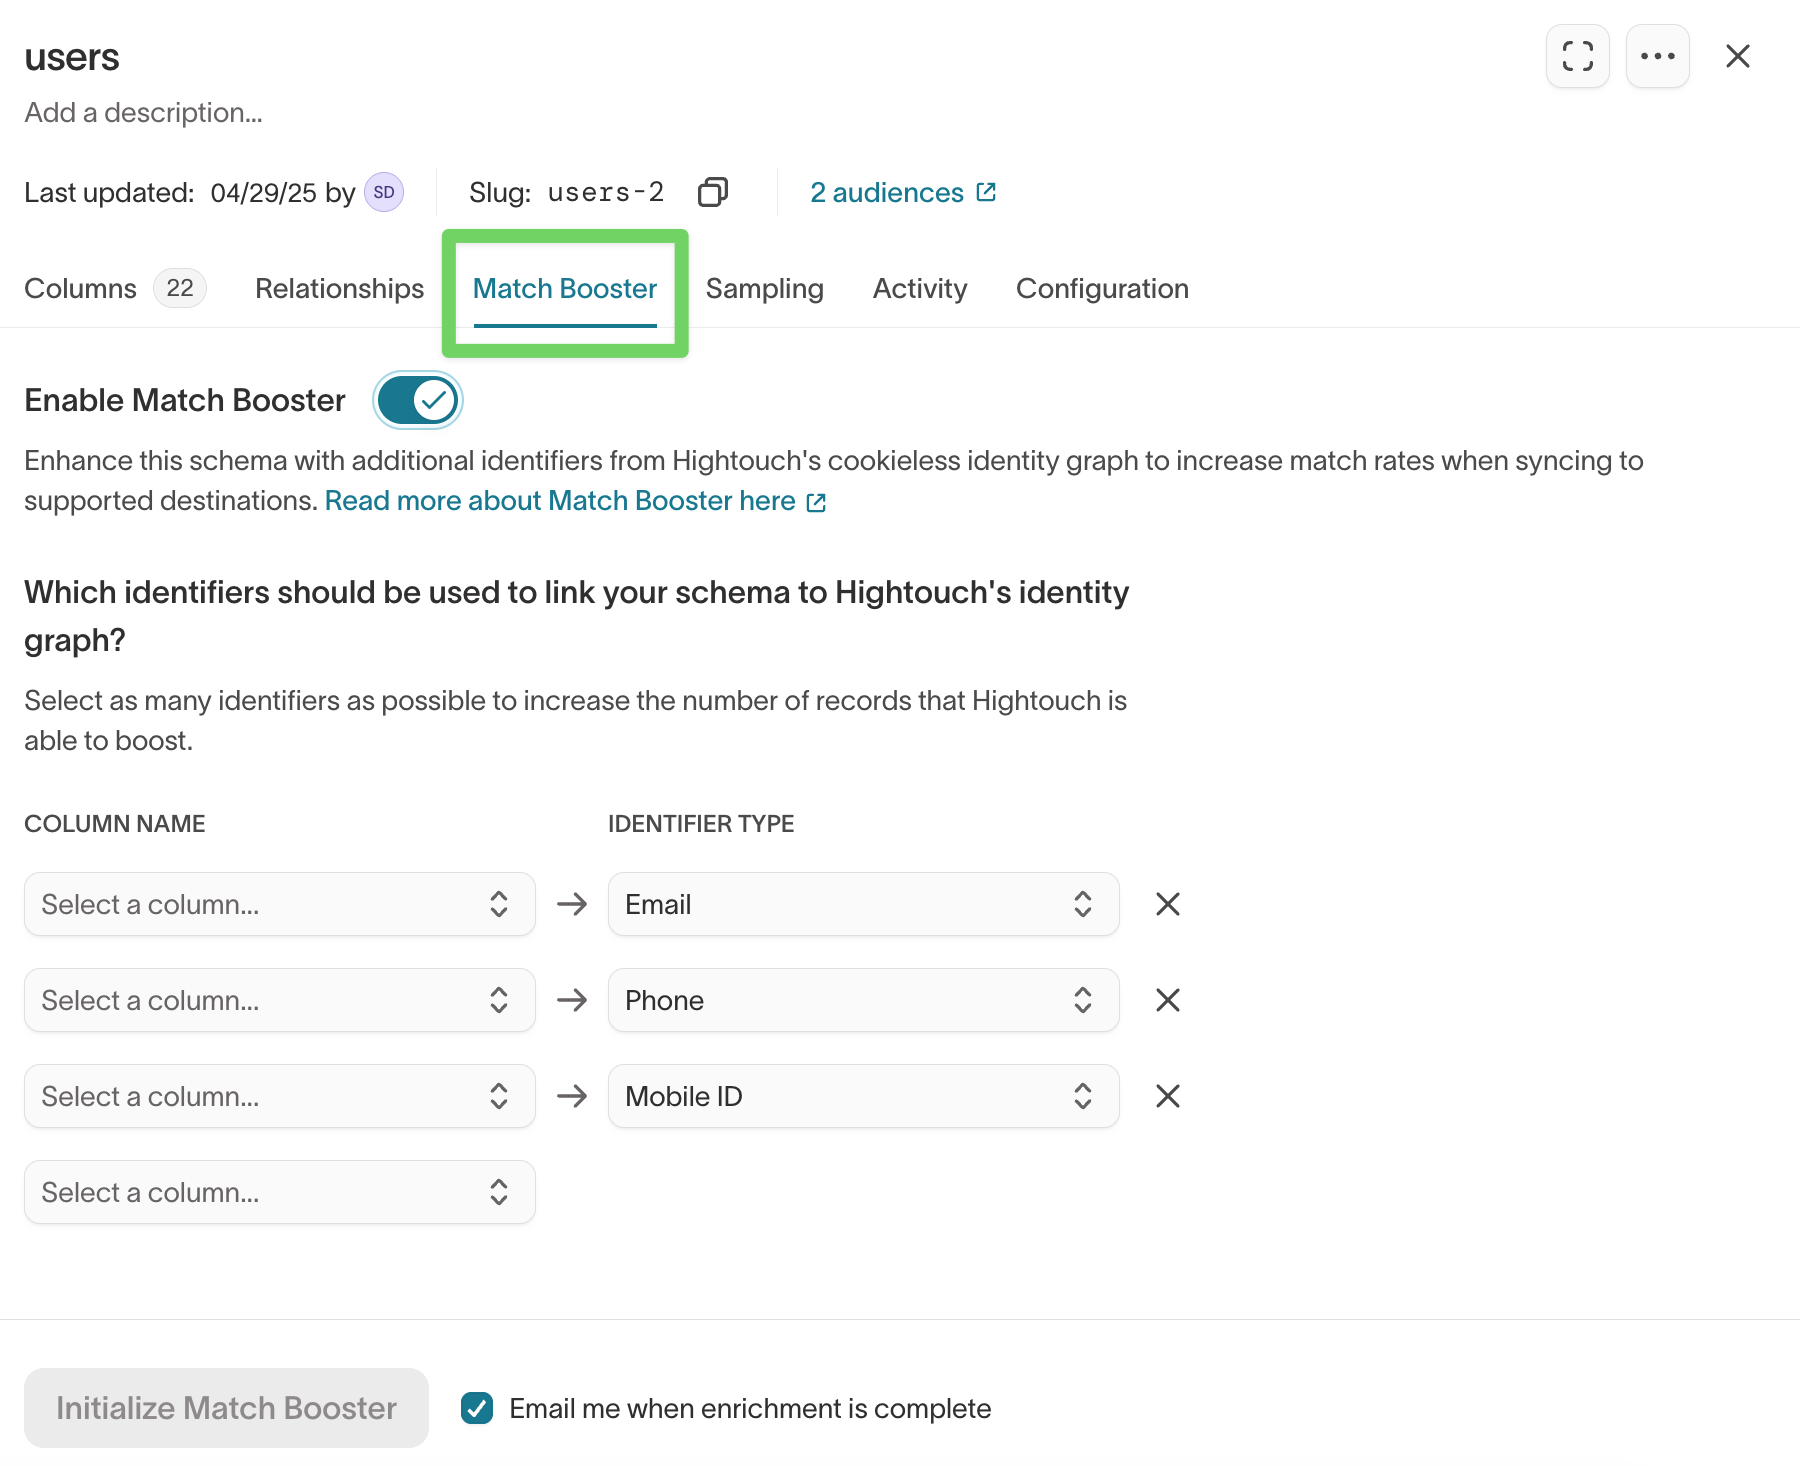
Match Booster enhances match rates by enriching your schema with additional identifiers from Hightouch’s identity graph.
Enable Match Booster
- Open your parent model.
- Go to the
Match Boostertab. - Toggle Enable Match Booster.
- Select one or more identifier columns (for example, email or phone).
- Click Initialize Match Booster to start enrichment.
Learn more: Match Booster overview →
Sampling
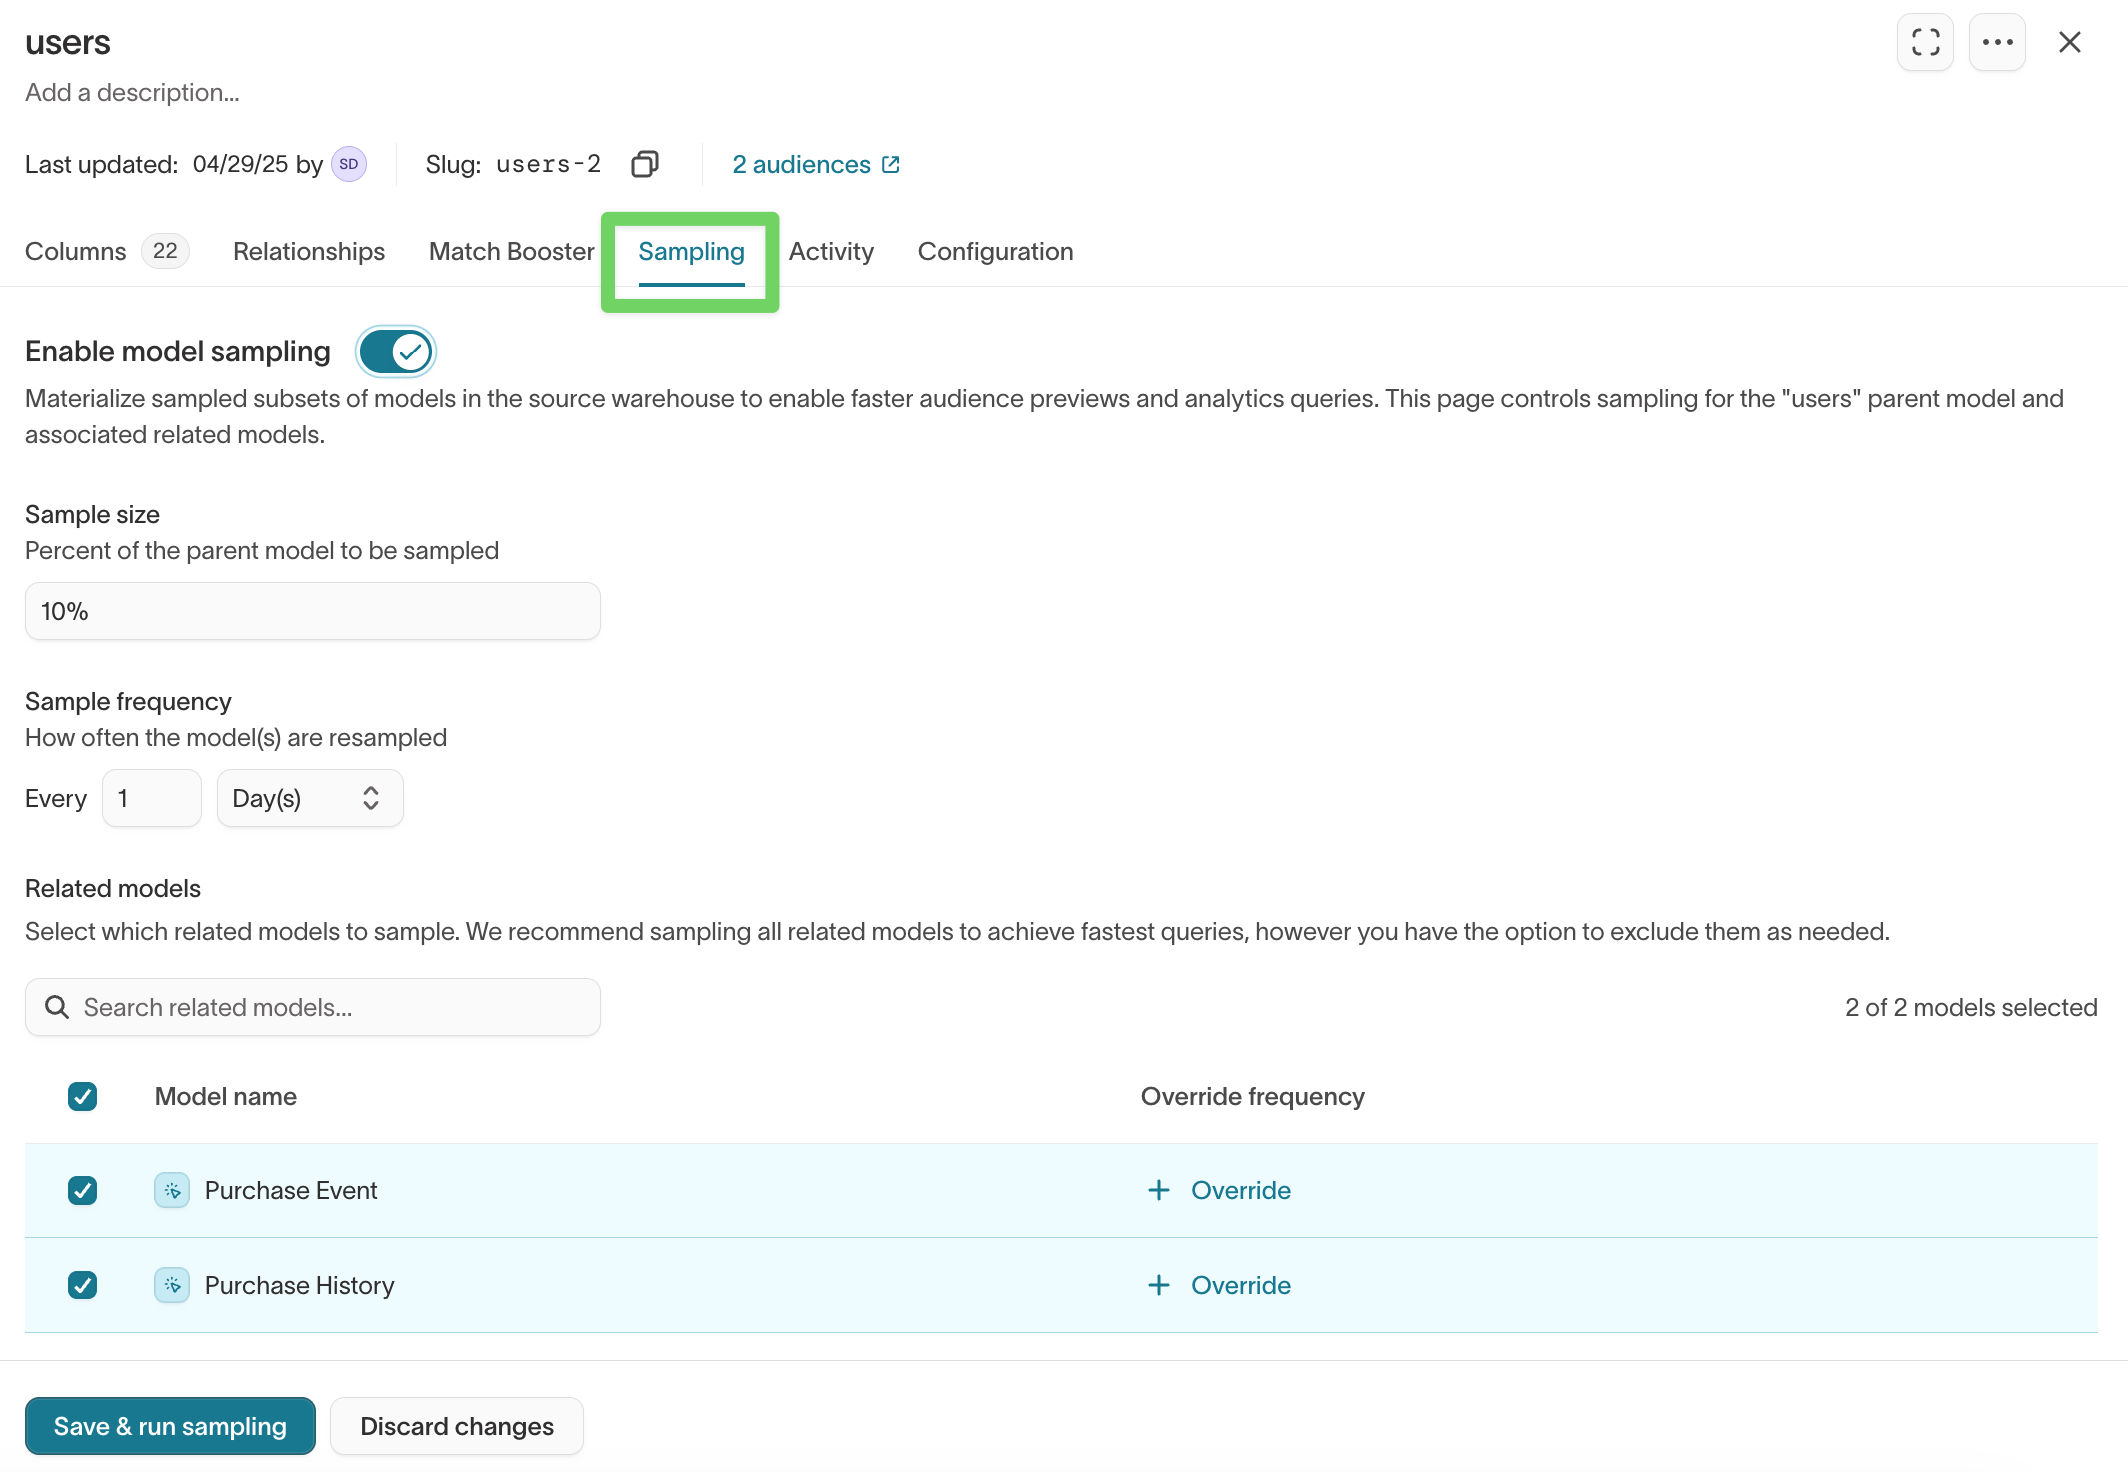
Sampling creates a smaller subset of your model data to improve performance when previewing audiences.
Enable sampling
- Open your model.
- Go to the
Samplingtab. - Turn on sampling and configure the settings.
- Click Save & run sampling.
Learn more: Sampling →
Activity
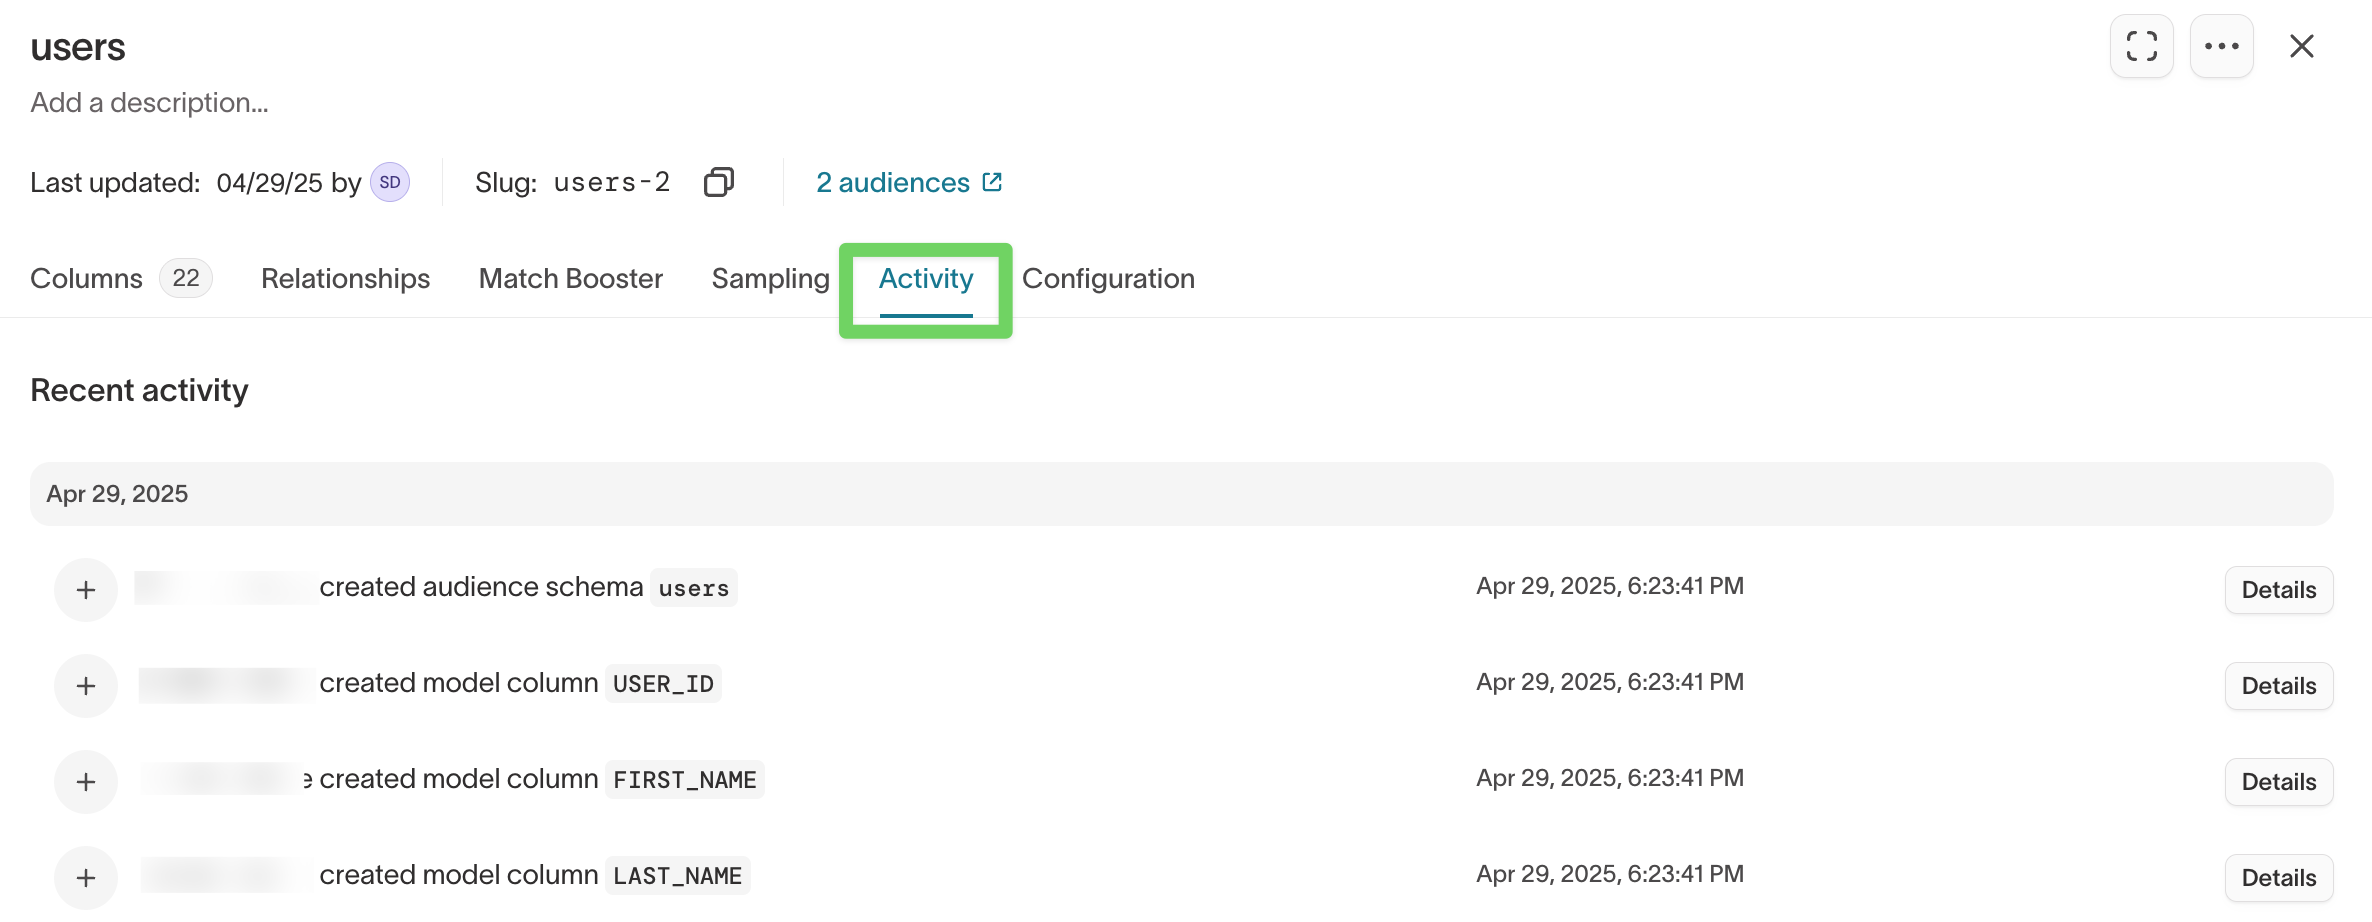
Use the Activity tab to review recent changes and understand how a model is being used.
You can track:
- recent updates to the model definition
- audiences, traits, or syncs that reference the model
- usage history for debugging and cleanup
Configuration
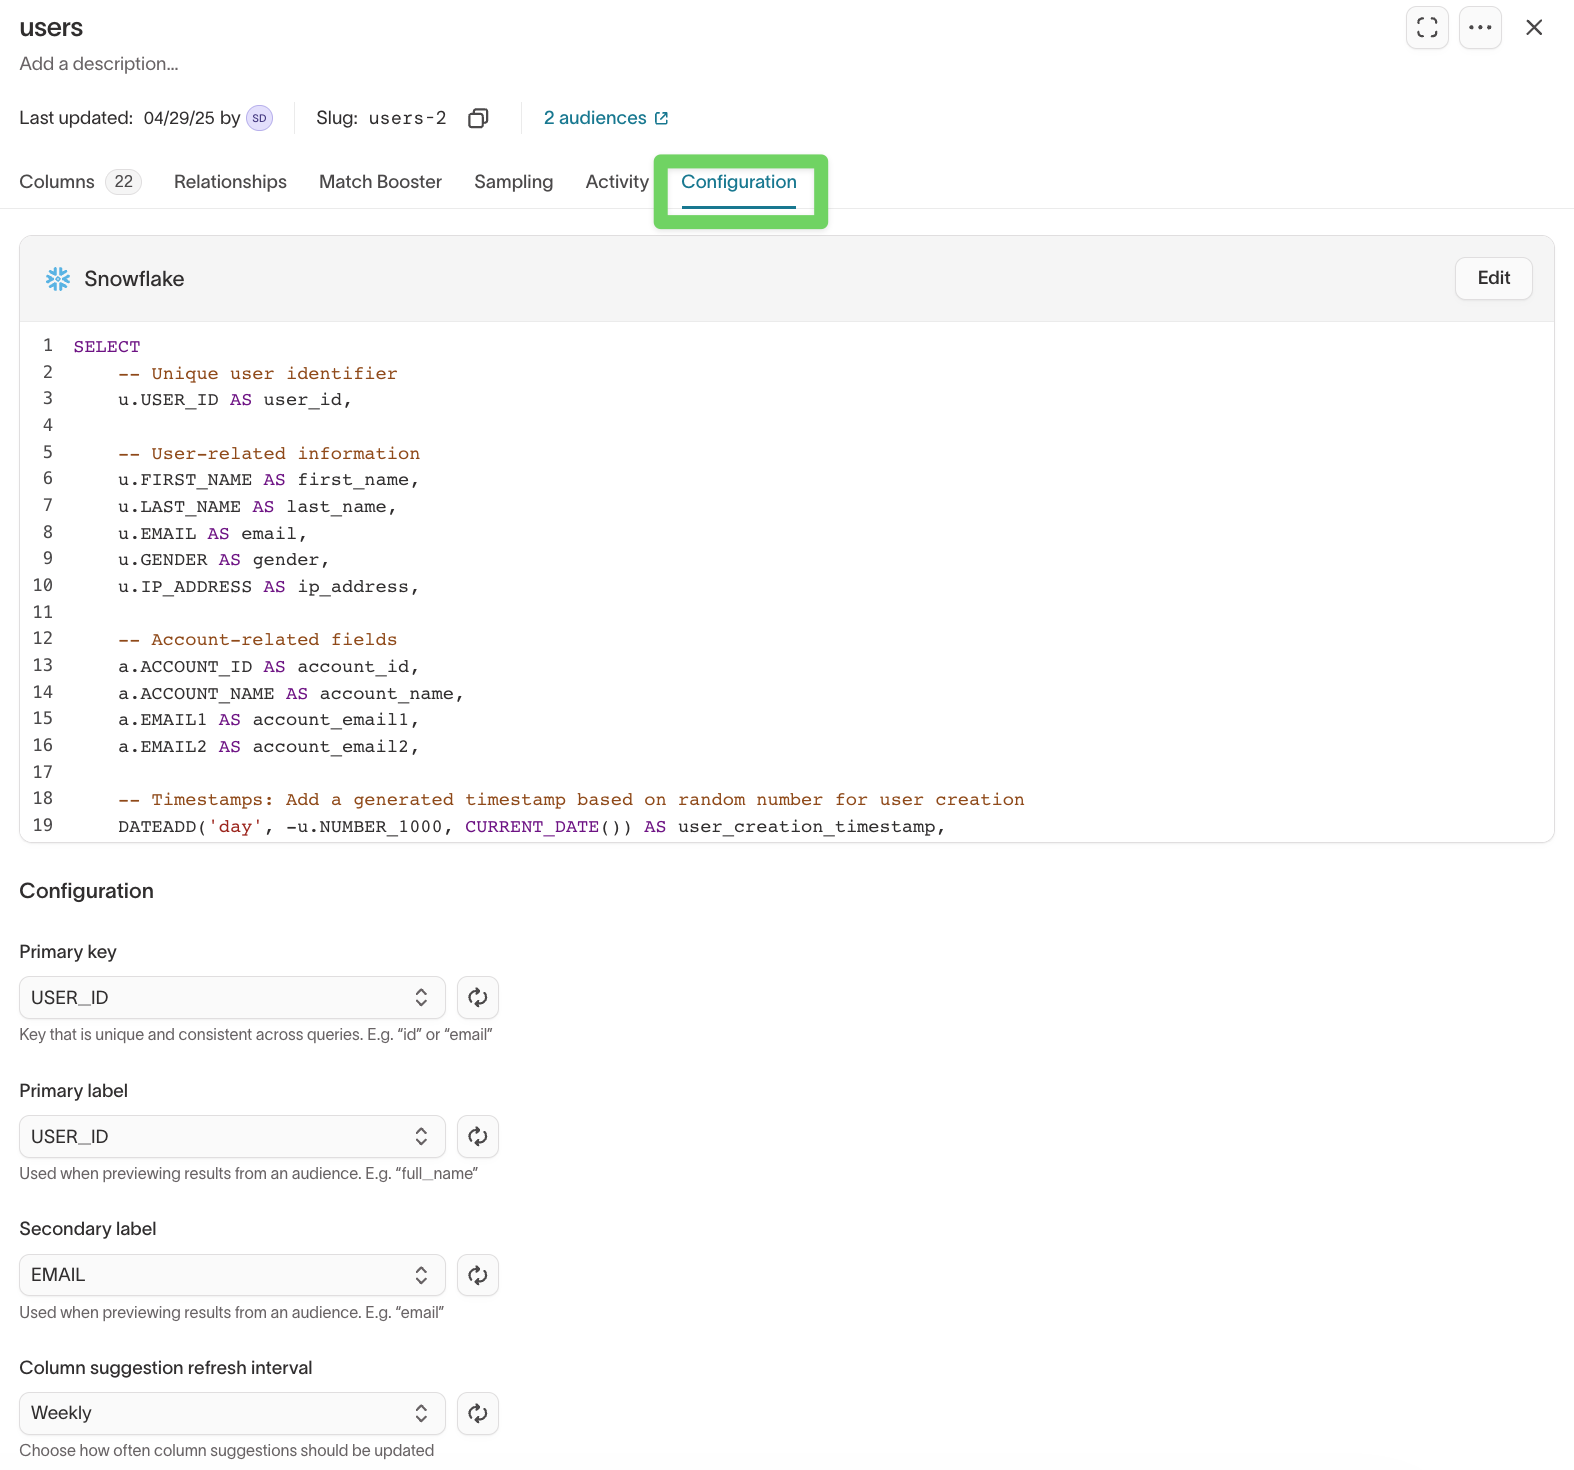
Use the Configuration tab to manage core model settings such as primary key and preview labels.
Common settings include:
- Primary key
- Primary label
- Secondary label
- Column suggestion refresh interval
Column suggestion refresh interval
Hightouch can automatically refresh filter suggestions so dropdown values stay up to date as your warehouse data changes.
- Open your model.
- Go to the
Configurationtab. - Under Column suggestion refresh interval, choose how often suggestions should update.
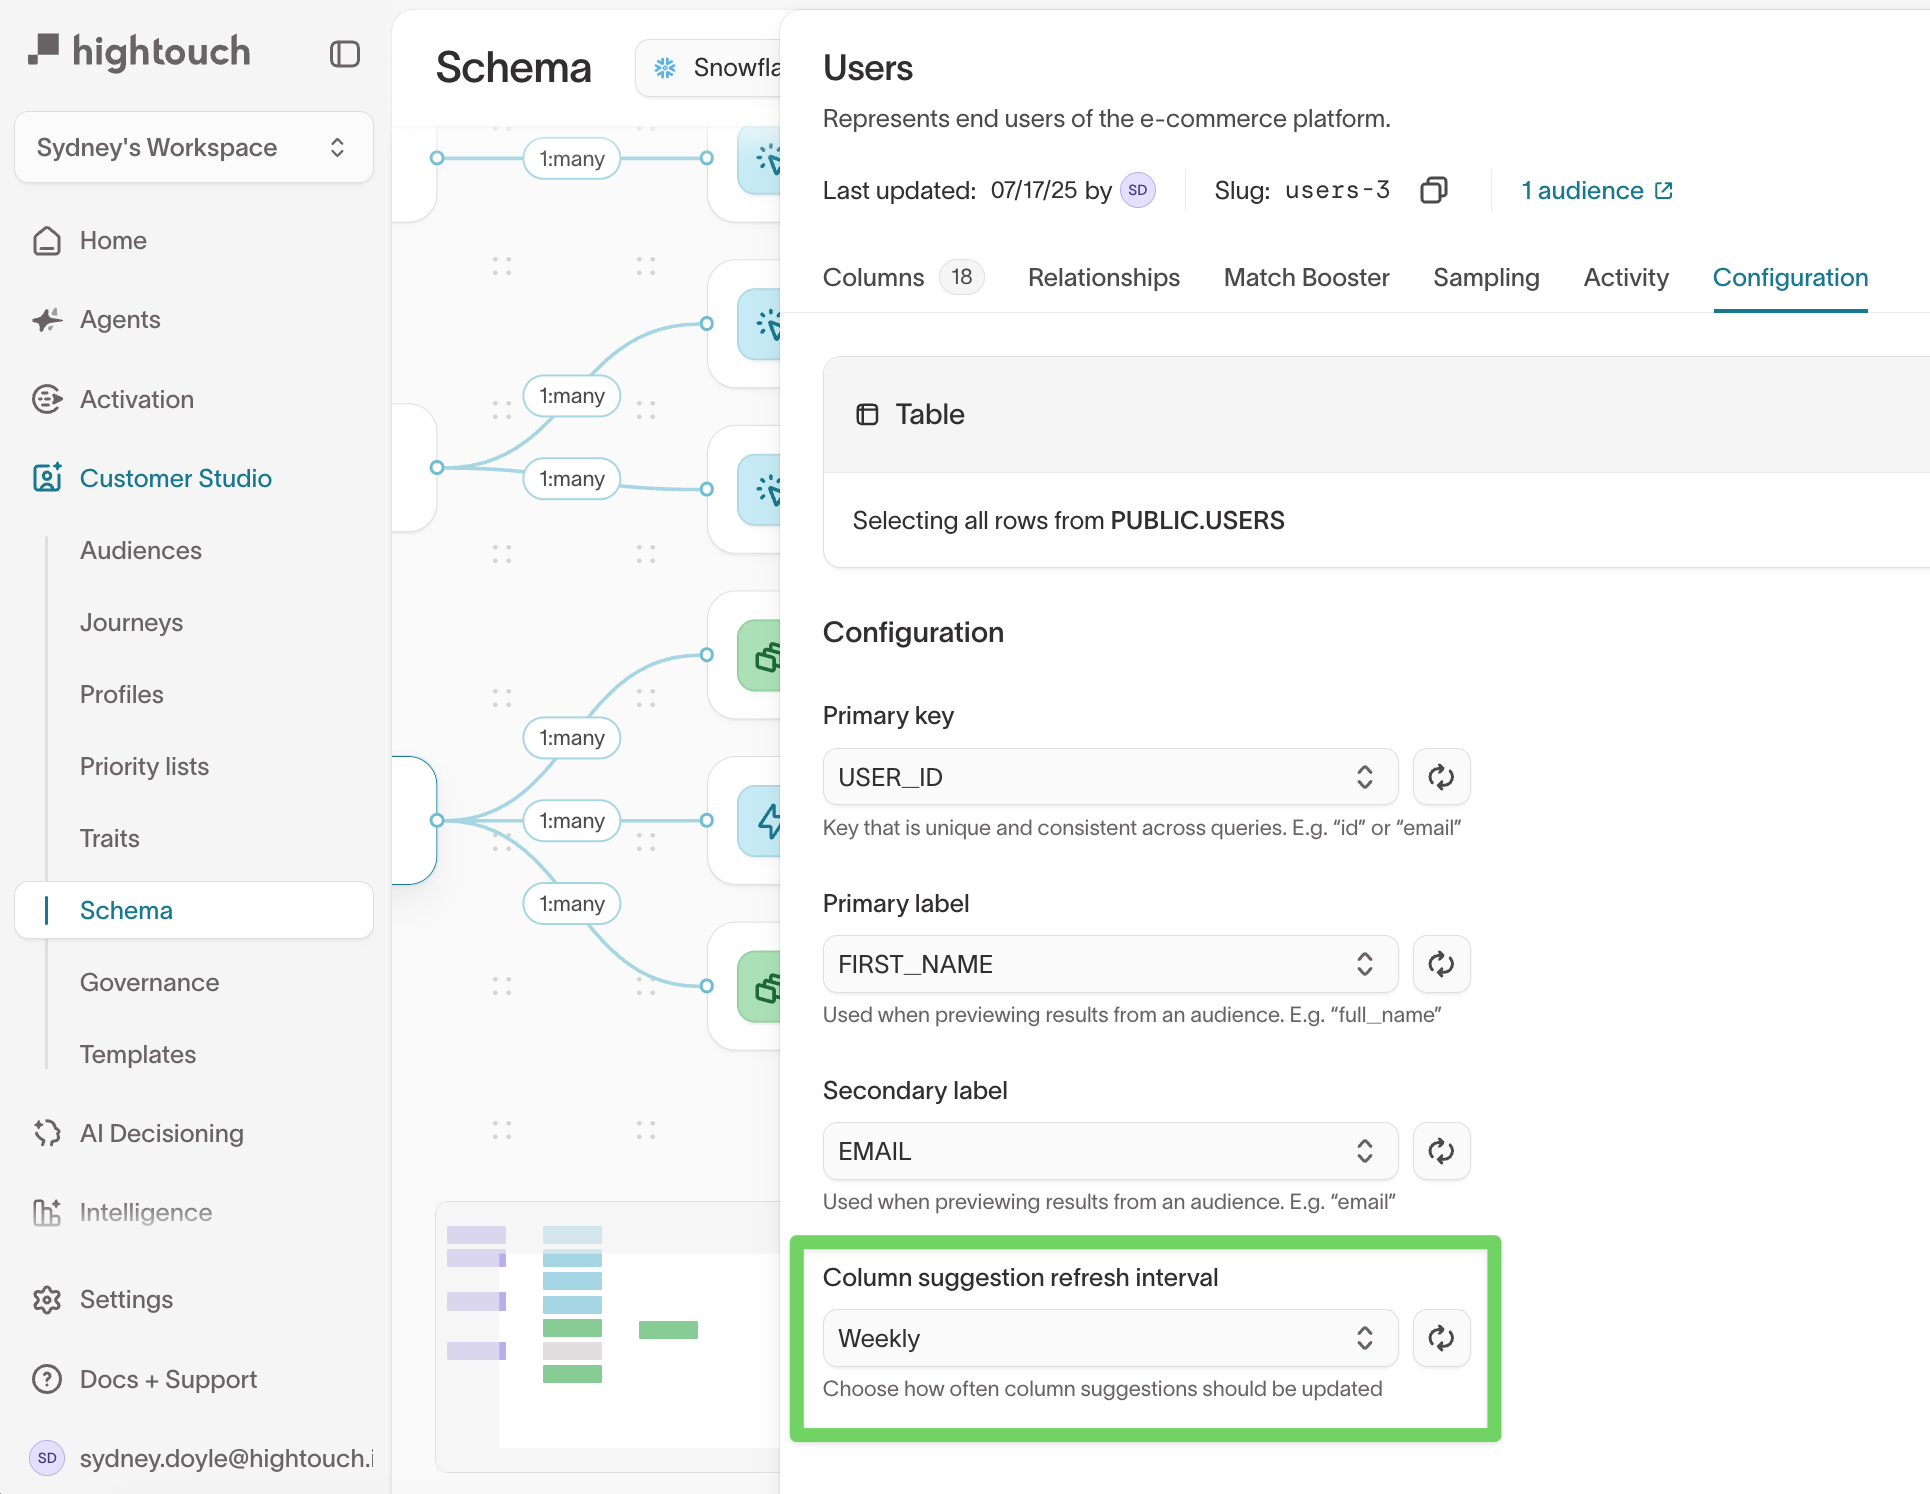
This setting controls how frequently Hightouch updates suggested dropdown values in the audience builder.
It does not affect:
- live audience results
- sync behavior
- warehouse queries (these always use your source-of-truth data)
Refreshing columns updates the fields and dropdown values shown in filters. It does not change your warehouse data or audience results.
What’s next?
After defining your schema, choose the next step based on your role.
If you're managing governance and delivery
Set up rules that control how data flows to destinations and how consent is enforced:
-
Destination rules →
Define sync behavior, redaction policies, and delivery restrictions per destination. -
Subsets →
Apply destination-specific filters (for example, opt-outs) without changing core audience logic. -
OneTrust Snowflake Native App →
Enforce consent policies using Snowflake-native integration with OneTrust.
If you're a marketer
Once the schema is in place, you can begin building audiences:
- Audiences →
Use filters, traits, and events to define dynamic segments directly from your data.