One of the most important questions that any analytics-focused company should strive to answer is “How has my data changed over time?” dbt provides a simple solution to help answer this question called dbt snapshots.
dbt snapshots are tables that allow you to see how your underlying data has changed. Just like everything else in dbt, snapshots are flexible and can be configured for almost any use case.
This exact scenario of changing underlying data is so common that it has a name in the data world — Slowly Changing Dimensions. There are a few different strategies you can use to capture this changing data and as we’ll see, dbt snapshots allow us to employ any of the primary techniques.
Structure of dbt snapshots
The slowly changing dimension tables created in dbt are examples of Type 2 Slowly Changing Dimensions, which means the first time a record is found in the source data, it will get added into the snapshot table. On subsequent dbt runs, it won’t be updated unless there is a change in the underlying data. The original record in the snapshot will look like the following:
| id | status | updated_at | dbt_valid_from | dbt_valid_to |
|---|---|---|---|---|
| 1 | null | 6/1/2020 | 6/1/2020 | null |
Whenever the underlying record changes, the next dbt run will add a new row in the snapshot table. dbt will also update the two existing rows in the snapshot table with the timestamps of when each row was valid. Essentially, the first row will have a “dbt_valid_from” timestamp of when it was first created (June 1 in the example), and a “dbt_valid_to” timestamp of when the record was changed (June 15). The second row will receive a “dbt_valid_from” timestamp of the time of the change (June 15) and will have a null value for the ending valid date.
| id | status | updated_at | dbt_valid_from | dbt_valid_to |
|---|---|---|---|---|
| 1 | lead | 6/1/2020 | 6/1/2020 | 6/15/2020 |
| 1 | customer | 6/15/2020 | 6/15/2020 | null |
As more and more changes occur to this record in the source table, the snapshot table will be updated to reflect the changes. This Slowly Changing Dimension structure allows us to easily understand the value any record had at any given point in time.
Why snapshots matter
Before we get into the technical implementation details, it’s important to understand when snapshots can be applied in real world scenarios. You’re definitely not going to want to set up snapshots on all of your tables but you do need them set up on the appropriate tables as soon as possible to ensure you don’t lose any valuable historical data.
Let’s dive into some examples so you can see it in practice.
Using dbt snapshots to understand where and when a user moved
As evidenced by the name, data tracked by Slowly Changing Dimensions does not change frequently. A primary example of this is a user that has moved addresses.
Of course we want to know the user’s current address, but there are also valid reasons for understanding where the user used to live (and when they lived there). Companies need to keep track of where their users live so they can understand their tax liabilities. It’s not enough to just know where a user currently lives, but you need to know where they lived at the time of any purchase.
Beyond tax purposes, knowing the history of a user’s address is useful for analysts tracking their sales volume by location. Most users in a typical database won’t move that frequently but without tracking history, any report based on a user’s address will already have this inaccuracy built-in from the start.
Using dbt snapshots to track leads
Tracking leads and conversions accurately is critical in any data warehouse. Identifying the actions that cause leads to become customers is a prime example of why it’s so important to have your CRM connected to your data warehouse.
Unfortunately, lead data is not always the easiest to use. The status of a lead can be ever-changing or can remain constant for long stretches of time. For example, some accounts can start in the awareness phase, become a prospect, fall off the radar, and become re-engaged again before finally becoming a customer.
In order to isolate what actions caused leads to change statuses, we need to know the exact range of time when a lead had a specific status. Without understanding the lead’s history, it would be impossible to make data driven decisions to improve the sales and marketing cycle. Luckily, snapshots make it incredibly simple to track leads over time so we can start improving customer conversions.
How dbt snapshots actually work
dbt snapshots actually operate in a fairly straightforward manner. Below is a brief outline of what’s happening under the hood when you create a snapshot.
Step 1: Define your source table
The first thing you need to do is determine what source table you would like to base a snapshot off of. This should be the table that has slowly changing dimensions that you’d like to track. Examples can include user dimension tables, lead status tables, or even purchases tables.
{{ source('hightouch', 'my_first_dbt_model') }}
Step 2: Tell dbt how to identify data changes
To start tracking changes, dbt needs to know when a record has changed. The optimal way to configure this is by using an “updated_at” column in your source table which is the timestamp of when the record was last updated. Using this timestamp strategy, dbt will know a record has changed if a given row, based on the unique identifier, has a timestamp that is more recent than the last time you ran the Snapshot.
{{
        config(
          ...
          strategy='timestamp',
          updated_at='updated_at',
        )
}}
The alternate method to alert dbt that a row has changed is referred to as “check strategy”, though it is not the preferred strategy. Using the “check strategy” method, you define specific column(s) for dbt to check if they’ve had value changes. For example, you may only care if the column “status” has changed in the leads table. Similar to the timestamp strategy, dbt will know if the row has changed if, based on the unique identifier, the row has a different value for the column(s) you defined.
{{
        config(
          ...
          strategy=check,
          check_cols=[‘status’],
        )
}}
Step 3: Determine how to deal with hard deletes
Beyond having simple updates to our source table, we do have to be aware of potential hard deletes and how we’d like to handle them. Hard deletes can happen for a variety of reasons in your source table, and you need to have a strategy for how to deal with them.
The default method dbt provides is to ignore hard deletes all together. In this situation, if a record is deleted in your underlying source table, the dbt snapshot will not know that any change has taken place to that record. As a result, your dbt snapshot won’t change at all after the hard delete.
{{
        config(
          ...
          invalidate_hard_deletes = False
        )
}}
The alternative option is to invalidate hard deletes. This means that dbt can track the records in your source table that have been deleted. In such instances, dbt will create a row in your Snapshot for each deleted record. The rows will also have a column called “dbt_valid_to” set to the timestamp of when the snapshot was run.
{{
        config(
          ...
          invalidate_hard_deletes = True
        )
}}
Invalidating hard deletes is a new configuration that dbt released in v0.19.0. It provides much more flexibility than the default option, and is generally preferred when configuring snapshots. The primary reason it’s not the default option is because it is a newer feature. However, it’s definitely ideal to enable it in your snapshots.
Implementing dbt snapshots
The full code to actually create a dbt snapshot is simple, and can also be found in their documentation. In the snapshots directory, or wherever your project has snapshots, create an SQL file with the following template of code.
Starting Snapshot Template
{% snapshot table_name %}
[INSERT SQL HERE]
{% endsnapshot %}
As mentioned previously, your SQL should be as simple as “select *” from your source table.
Then, in the same SQL file above your select statement, or in your dbt_project.yml file, set up the configurations for your Snapshot. Again, these configurations include important fields like your unique key, strategy, and the field for the updated_at timestamp or the columns to use for the check strategy.
Snapshot Configuration Examples
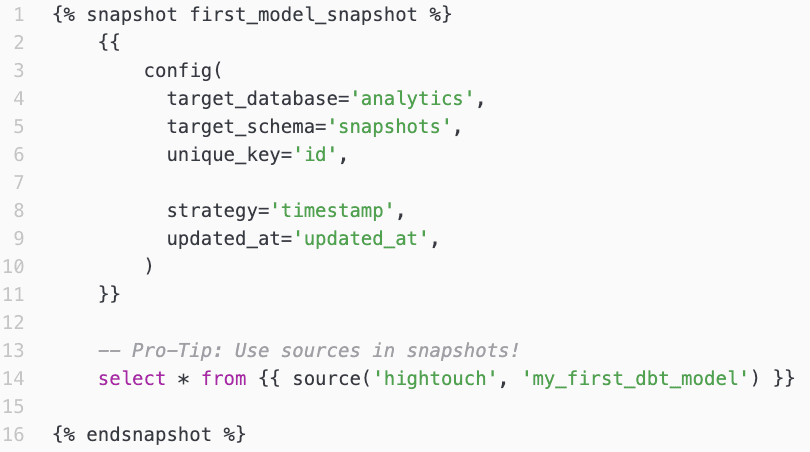
Example Snapshot using the timestamp strategy
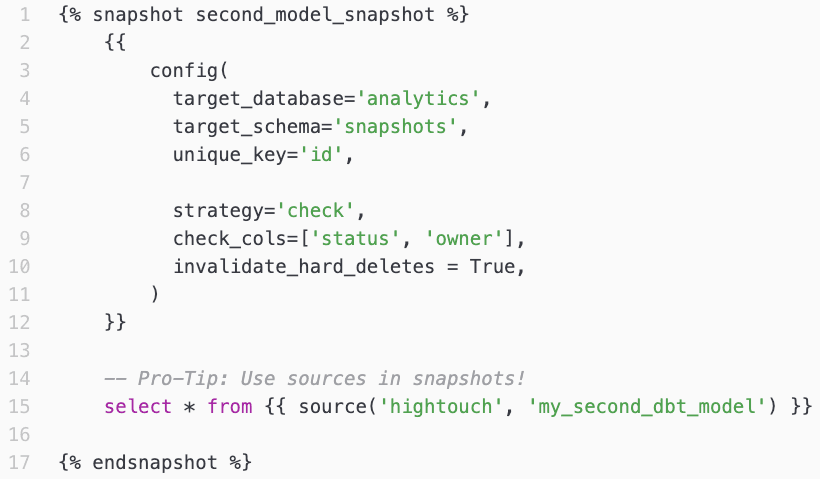
Example Snapshot using the check strategy
dbt snapshot guidelines
Like almost everything else in dbt, dbt provides documentation for some Snapshot best practices. Some of them are common sense — using the timestamp strategy, and making sure your unique key is indeed unique. They also recommend that you place snapshot tables in a different schema than standard models to clearly identify them.
Based on my experience, the most important recommendation is to keep your snapshots simple. You don’t want to be adding logic or joins to your snapshots. Any logic you add is going to complicate the query as well as the results.
You can always apply the logic downstream after the Snapshot is created, and you want to isolate the changes of the underlying data from the change in any logic. The reason for keeping joins separate is the same — it can complicate which records are included or excluded, and again it will be unclear what the underlying changes in the data actually were.
I’ve also found that the best types of tables for snapshots are source data and data marts. It’s incredibly important to understand how your source data has changed over time because the whole data pipeline is built off of them. These snapshots of source data are often the best place to go when looking for anomalies that exist in the data.
Since data marts often impact so many people in an organization, there are generally many stakeholders interested in understanding when metrics have changed and why. They may even ask for the old metrics so they can perform their own comparisons. By setting up snapshots on data marts, you can easily provide the data they need to have a full understanding of their metrics.
Conclusion
As you can tell, creating snapshots in dbt is as simple as creating any other type of model. The harder part is to ensure you’ve configured everything properly in the Snapshot, and then create the logic downstream to actually take advantage of the data in your slowly changing dimension tables.