Salesforce offers many different products for moving data in and out of the platform and even more dedicated connectors to various databases, applications, and existing Salesforce organizations. However, one of the core use cases for many companies is activating customer data from Snowflake into Salesforce to enable smarter, more personalized marketing.
What is the Snowflake Connector?
The Salesforce Snowflake Connector links Salesforce to Snowflake so you can bi-directionally send data between the systems and activate your customer data directly in Salesforce to power personalized marketing experiences to update objects and fields in Salesforce or Snowflake.
With this integration, you can visually define how your data should be mapped to the appropriate objects/fields in either destination through Salesforce Data Pipelines, which you can configure using various nodes to filter, join, transform, update, or even append your data.
How Does the Snowflake Connector Work?
The Snowflake Connector feature is only available to CRM Analytics (formerly Tableau CRM) users. There are three native connector types that fall underneath this product:
- Input connectors sync data directly into Salesforce.
- Output connectors export enriched customer data from Salesforce to support downstream marketing and analytics use cases.
- Live connectors create a direct connection to your source (e.g., Snowflake) and query data directly in Salesforce. This is mainly useful if you’re trying to take advantage of Salesforce’s analytics and reporting capabilities.
Using the Snowflake Connector, you can visually define your data using the Data Manager and Data Prep features to manage and automate your customer data activation workflows in Salesforce. The Data Manager feature lets you schedule, automate, and monitor your pipelines to and from Snowflake, and the Data Prep feature enables you to visually build recipes and workflows to activate and sync customer data across platforms to drive marketing outcomes. Within these visual workflows, you can easily map your customer data to the right Salesforce objects and fields. No engineering resources required.
Pricing
Unlike many of Salesforce’s other data ingestion tools, like Data Loader and Data Import Wizard, Snowflake Connector is not a free tool. The feature is locked behind CRM Analytics, which starts at approximately $125 per monthly user. The Snowflake connector can sync up to 100 million rows or 50 GB of data per object.
Getting Started with the Snowflake Connector
If you already have a license to CRM Analytics, setting up the Snowflake Connector is relatively straightforward, and you can start ingesting your Snowflake data in a few simple steps:
-
Configure your Snowflake instance. Before you can connect your Salesforce instance to Snowflake, you'll need to set up a database and schema that aligns with your Salesforce instance and create the proper Snowflake objects. You'll also need to provision an X-small or small warehouse to load your data. Lastly, you'll need to create a role with the proper privileges to manage your database, schema, and warehouse.
-
Navigate to analytics settings in the search setup menu. After you've opened the settings, you must enable the following: "data sync and connections," "Snowflake output connection," and "direct data for external sources."
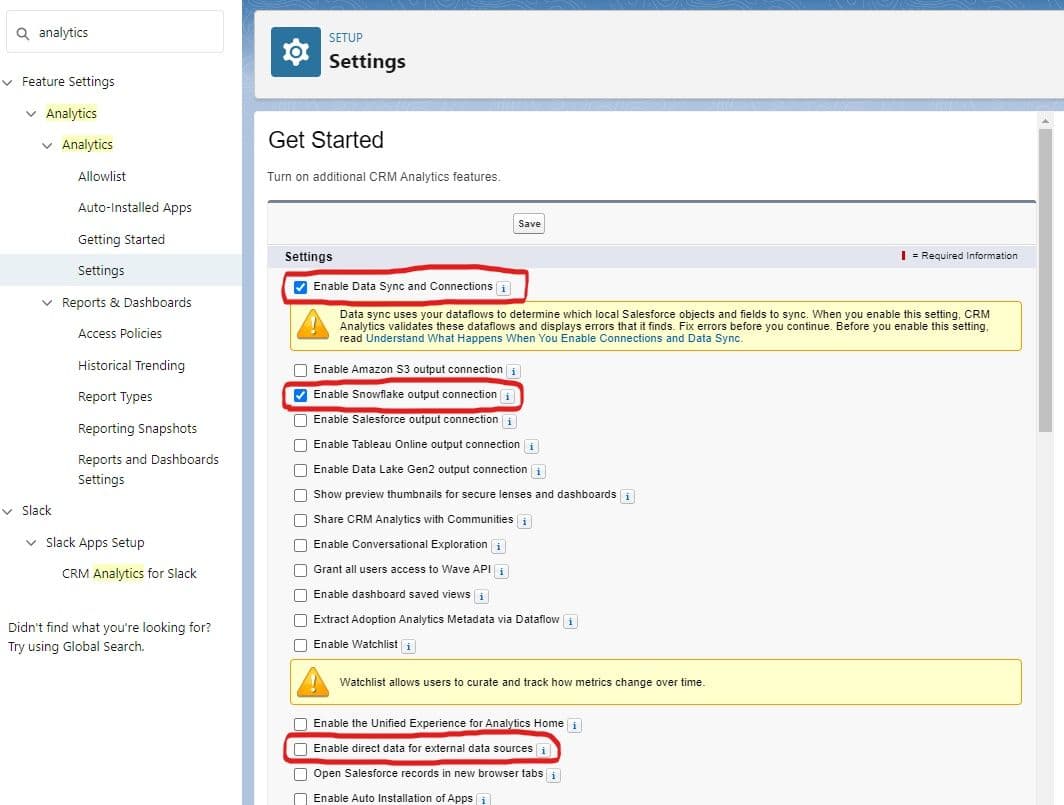
CRM Analytics Settings
- Connect to Snowflake. Once you've configured your settings, you can open up the Data Manager. From here, you can connect to your Snowflake database after creating an input connection and filling out standard information (e.g., username, password, authentication type, etc.)
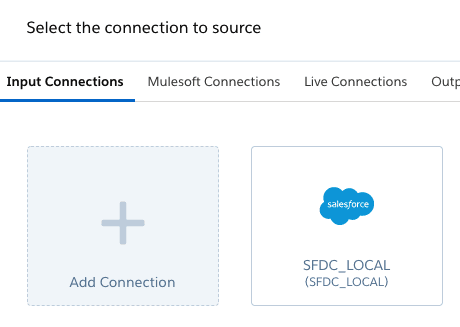
CRM Analytics Snowflake Connection
- Build a recipe to sync your data. After you've set up your connection to Snowflake, the final step is building a recipe to map your data to the appropriate fields in Salesforce. You can run your recipe manually or have it run on a predefined sync schedule.
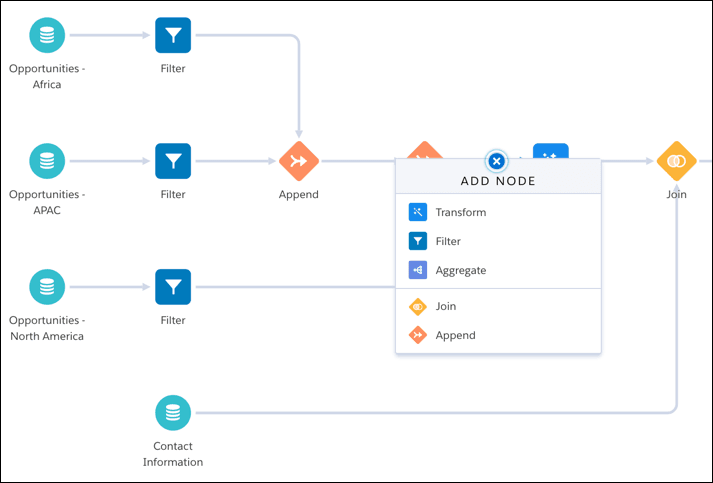
CRM Analytics Recipe
Pros and Cons
Using the Snowflake Connector to ingest data into Salesforce can be very challenging because the recipe-building process is very complicated and difficult to maintain at scale. There's no simple way to update, insert, or upsert fields in Salesforce without building a complex Recipe to transform, filter, aggregate, join or append your data.
Inevitably this means your data team is forced to build and maintain business logic in Salesforce rather than Snowflake, which creates several problems–the first being that Salesforce is not a data platform, and the second being that your data teams don’t want to have two definitions of business logic. Your data transformation should take place directly on top your warehouse (e.g., Snowflake.)
There is a live connection option to Snowflake, but this only allows you to query data from Snowflake in a live dataset in Salesforce, which means this use case is only applicable for reporting. Anytime you want to ingest data into Salesforce, you’ll need to build an entirely new recipe. The one upside to this approach is that you can schedule when your recipes run.
Final Thoughts
Salesforce’s Snowflake Connector can be a good option if you just need to ingest a small amount of data into Salesforce. However, if you’re trying to sync data from Snowflake to Salesforce at scale, maintaining these workflows is impossible because you have to handle all of the underlying intricacies and dependencies in your workflows.
The Snowflake Connector is also extremely expensive, so you’ll likely want to find another alternative. Data Activation platforms like Hightouch, which run on top of your warehouse (e.g., Snowflake), allow you to sync data declaratively and automatically. You don’t have to build and maintain any workflows–all you have to do is map your data in Snowflake to the proper objects and fields in Salesforce and run your sync. Hightouch integrates with over 150 different destinations (including Salesforce), and the first integration is completely free when you create a new workspace.